24 Sample Web Application for .NET Clients
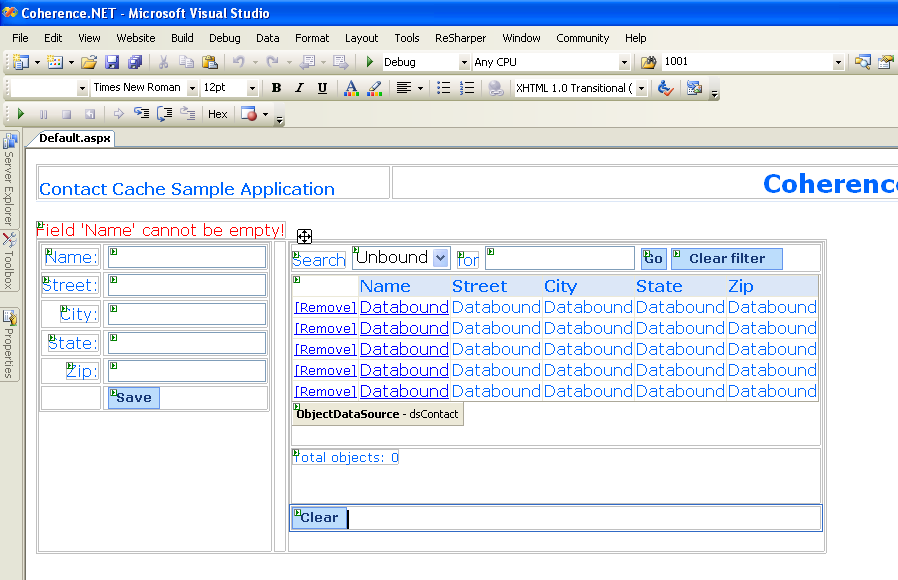
This chapter provides step-by-step instructions to create a simple Windows ASP.NET Web application that uses the Coherence for .NET library.
24.1 General Instructions
Developing and configuring a Windows ASP.NET web application that uses Coherence for .NET requires six basic steps:
The following sections describe each of these steps in detail.
24.2 Create an ASP.NET Project
To create a new ASP.NET web application, follow these steps:
-
Choose File->New->Web site in Visual Studio 2005.
-
Under the "Templates", select "ASP.NET Web Site".
-
Select the language that you are most familiar with.
-
Select the location (type and full path) where you want to store your application.
Click the OK button to generate a new solution and empty ASP.NET application.
24.3 Add a Reference to the Coherence for .NET Library
To use the Coherence for .NET library in your .NET application, you first need to add a reference to the Coherence.dll library:
-
In your project go to Project->Add Reference... or right click References in the Solution Explorer and choose Add Reference....
-
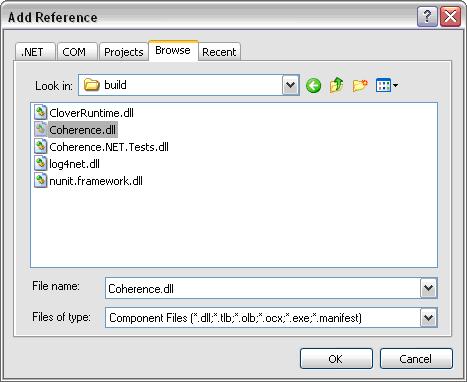
In the Add Reference window that appears, choose the Browse tab and find the
Coherence.dlllibrary on your file system.Figure 24-1 Coherence.dll File in the Add Reference Window
Description of "Figure 24-1 Coherence.dll File in the Add Reference Window"
-
Click OK.
24.4 Configure the Web.config File
To correctly configure the Coherence for .NET library, you must configure the Web.config XML file with the appropriate file names for each configuration file used by the Coherence for .NET library. Example 24-2 illustrates a valid Web.config configuration file:
Example 24-1 Sample Web.config Configuration File
<?xml version="1.0"?>

<configuration>
  <configSections>
    <section name="coherence" type="Tangosol.Util.CoherenceConfigHandler, Coherence"/>
  </configSections>

  <coherence>
    <cache-factory-config>coherence.xml</cache-factory-config>
    <cache-config>cache-config.xml</cache-config>
    <pof-config>pof-config.xml</pof-config>
  </coherence>

  <system.web>
    <httpModules>
      <add name="CoherenceShutdown" type="Tangosol.Web.CoherenceShutdownModule, Coherence"/>
    </httpModules>
    <compilation debug="true"/>
    <authentication mode="Windows"/>
  </system.web>
</configuration>
In the <configSections> you must specify a class that handles access to the Coherence for .NET configuration section.
Elements within the Coherence for .NET configuration section are:
-
cache-factory-config—contains the path to a configuration descriptor used by theCacheFactoryto configure the (IConfigurableCacheFactory and Logger) used by theCacheFactory. -
cache-config—contains the path to a cache configuration descriptor which contains the cache configuration described earlier (see "Configuring Coherence*Extend on the Client"). This cache configuration descriptor is used by the DefaultConfigurableCacheFactory. -
pof-config—contains the path to a configuration descriptor used by theConfigurablePofContextto register custom types used by the application.
24.5 Create Coherence for .NET Configuration Files
Example 24-2 illustrates a sample coherence.xml configuration file:
Example 24-2 Sample coherence.xml Configuration File
<?xml version="1.0"?>
<coherence xmlns="http://schemas.tangosol.com/coherence">
<logging-config>
<destination>stderr</destination>
<severity-level>5</severity-level>
<message-format>{date} <{level}> (thread={thread}): {text}</message-format>
<character-limit>8192</character-limit>
</logging-config>
</coherence>
Example 24-3 illustrates a sample cache-config.xml configuration file:
Example 24-3 Sample cache-config.xml Configuration File
<?xml version="1.0"?>

<cache-config xmlns="http://schemas.tangosol.com/cache">
  <caching-scheme-mapping>
    <cache-mapping>
      <cache-name>dist-contact-cache</cache-name>
      <scheme-name>extend-direct</scheme-name>
    </cache-mapping>
  </caching-scheme-mapping>

  <caching-schemes>
    <remote-cache-scheme>
      <scheme-name>extend-direct</scheme-name>
      <service-name>ExtendTcpCacheService</service-name>
      <initiator-config>
        <tcp-initiator>
          <remote-addresses>
            <socket-address>
              <address>localhost</address>
              <port>9099</port>
            </socket-address>
          </remote-addresses>
          <connect-timeout>5s</connect-timeout>
        </tcp-initiator>

        <outgoing-message-handler>
          <request-timeout>30s</request-timeout>
        </outgoing-message-handler>

      </initiator-config>
    </remote-cache-scheme>
  </caching-schemes>
</cache-config>
Example 24-4illustrates a sample pof-config.xml configuration file:
Example 24-4 Sample pof-config.xml Configuration File
<?xml version="1.0"?>

<pof-config xmlns="http://schemas.tangosol.com/pof">
  <user-type-list>
    <!-- include all "standard" Coherence POF user types -->
    <include>assembly://Coherence/Tangosol.Config/coherence-pof-config.xml</include>

    <!-- include all application POF user types -->
    <user-type>
      <type-id>1001</type-id>
      <class-name>ContactCache.Web.ContactInfo</class-name>
    </user-type>
  </user-type-list>
</pof-config>
Having creating these configuration files, everything is now in place to connect to a Coherence cluster and perform all operations supported by Coherence for .NET.
24.6 Create the Web Form
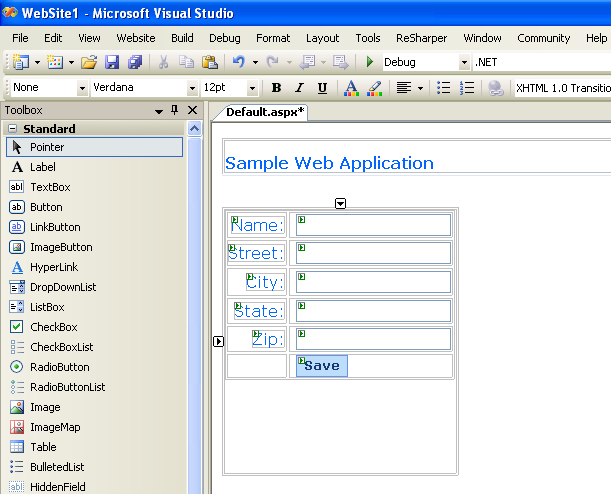
Switch to the Design tab for the Default.aspx page and from the Toolbox pane add the appropriate controls by dragging and dropping them on the page. You will need TextBox controls for the Name, Street, City, State, and Zip fields and corresponding label controls for each. This is illustrated in Figure 24-2.
Figure 24-2 Adding Controls for the .aspx Page
Description of "Figure 24-2 Adding Controls for the .aspx Page"
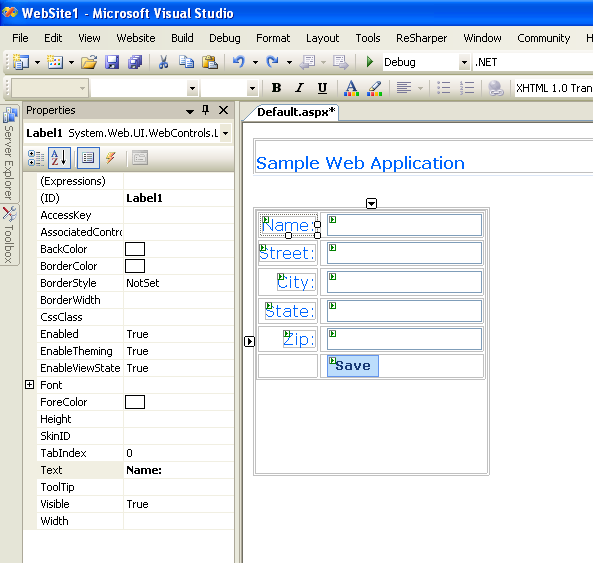
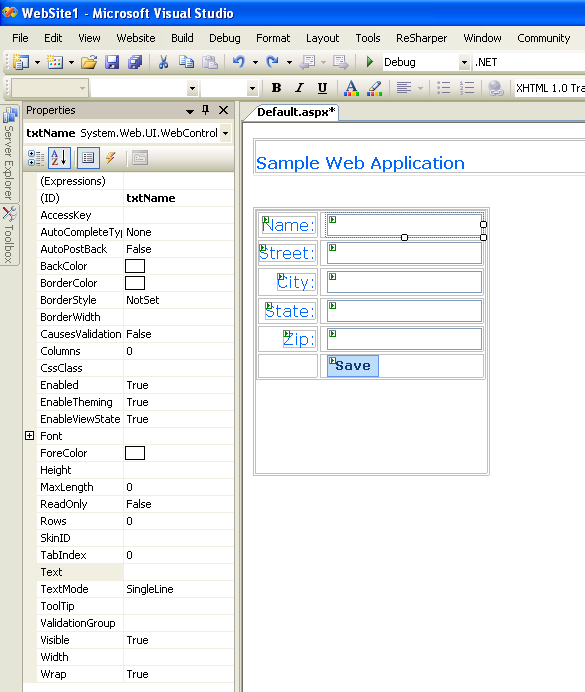
After placing them on the page, you should change the ID and Text property for each control. As we won't be using labels in the code, you can leave their ID property values as generated, and just put appropriate labels in the Text property. You should name the ID and TextBox controls txtName, txtStreet, and so on. Add one button and rename its ID to btnSave and Text property to Save. This is illustrated in Figure 24-3.
Figure 24-3 Changing IDs and Properties for Data Controls
Description of "Figure 24-3 Changing IDs and Properties for Data Controls"
Add one button and rename its ID to btnClear and Text property to Clear. This is illustrated in Figure 24-4
Figure 24-4 Adding a "Clear" Button to the Application
Description of "Figure 24-4 Adding a "Clear" Button to the Application"
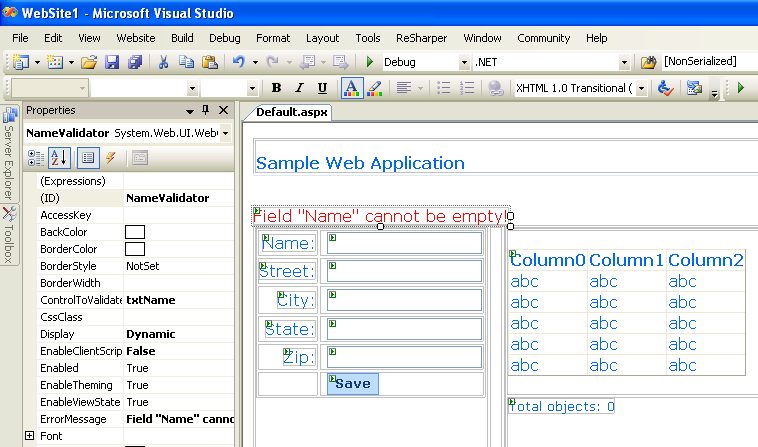
Add label and rename its ID to lblTotal. This label will be used to display the cache size. We have to add a RequiredFieldValidator from the Validation list of controls on the Toolbox pane and set its properties. This is illustrated in Figure 24-5:
Figure 24-5 Adding a Field Validator and Setting its Properties
Description of "Figure 24-5 Adding a Field Validator and Setting its Properties"
Please note that ControlToValidate property is set to the txtName control.
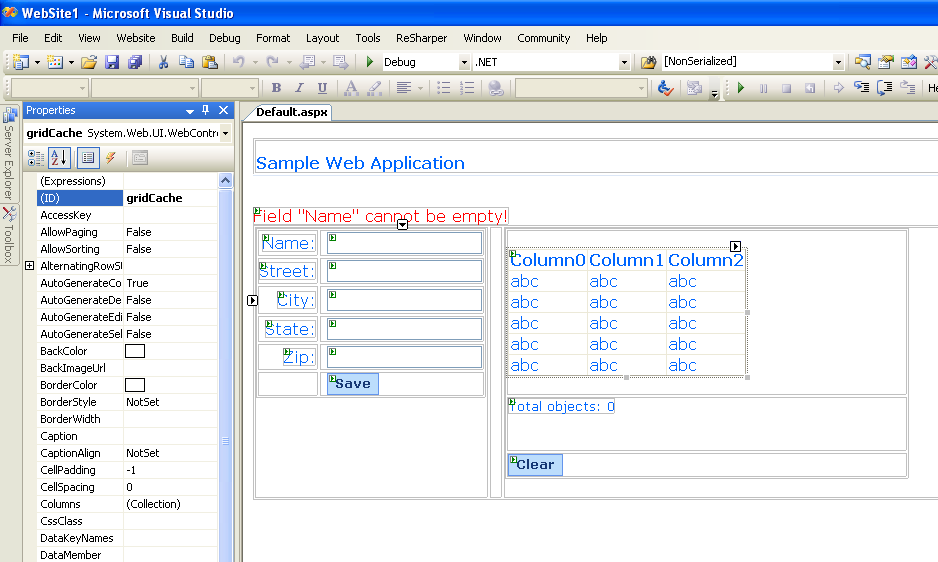
From the Data list of controls on the Toolbox pane, add a GridView control and an ObjectDataSource (named dsContact). This is illustrated in Figure 24-6.
Figure 24-6 Adding a GridView Control and an ObjectDataSource
Description of "Figure 24-6 Adding a GridView Control and an ObjectDataSource "
Example 24-5 illustrates code for the GridView control source:
Example 24-5 Code for the GridView Data Control
<asp:GridView ID="gridCache" runat="server" DataSourceID="dsContact" AutoGenerateColumns="False" Font-Names="Verdana">
  <Columns>
    <asp:TemplateField>
      <ItemStyle Font-Size="Small"/>
      <ItemTemplate>
        <asp:HyperLink Text="[Remove]" ID="HyperLink1" runat="server" NavigateUrl='<%# "?removeKey=" +
                DataBinder.Eval(Container.DataItem, "Name").ToString() %>'/>
      </ItemTemplate>
    </asp:TemplateField>
    <asp:TemplateField HeaderText="Name">
      <HeaderStyle BackColor="#DCE7F7"/>
      <ItemTemplate>
        <asp:HyperLink runat="server" NavigateUrl='<%# "?getKey=" + DataBinder.Eval(Container.DataItem, "Name").ToString() %>'>
          <%# DataBinder.Eval(Container.DataItem, "Name") %>
        </asp:HyperLink>
      </ItemTemplate>
    </asp:TemplateField>
    <asp:BoundField DataField="Street" HeaderText="Street">
      <HeaderStyle BackColor="#DCE7F7"/>
    </asp:BoundField>
    <asp:BoundField DataField="City" HeaderText="City">
      <HeaderStyle BackColor="#DCE7F7"/>
    </asp:BoundField>
    <asp:BoundField DataField="State" HeaderText="State">
      <HeaderStyle BackColor="#DCE7F7"/>
    </asp:BoundField>
    <asp:BoundField DataField="Zip" HeaderText="Zip">
      <HeaderStyle BackColor="#DCE7F7"/>
    </asp:BoundField>
  </Columns>
</asp:GridView>
Example 24-6 illustrates the ObjectDataSource code.
Example 24-6 ObjectDataSource Code
<asp:ObjectDataSource ID="dsContact" runat="server" SelectMethod="GetData"
    TypeName="ContactCache.Web.ContactInfoDataSource"
</asp:ObjectDataSource>
Now, let's add a Search pane by dragging and dropping a few labels, one DropDownList for a filter column, and a TextBox for filter criteria. This is illustrated in Figure 24-7.
24.7 Implement the Web Application
24.7.1 Global.asax File
Example 24-7 illustrates the Global.asax file which redirects the user to an error page if an exception occurs. A Coherence for .NET INamedCache instance is retrieved by using the CacheFactory.GetCache(...) API call. Once it is obtained, it is stored in the Application state.
Example 24-7 Redirecting a User to an Error Page
<%@ Application Language="C#" %>

<script runat="server">
    void Application_Start(object sender, EventArgs e)
    {
    try
        {
        Application["contactCache"] = CacheFactory.GetCache("dist-contact-cache");
        }
    catch
        {
        }
    }

    void Application_End(object sender, EventArgs e)
    {
        CacheFactory.Log("Application terminated.", CacheFactory.LogLevel.Info);
        INamedCache contactCache = Application["contactCache"] as INamedCache;
        if (contactCache != null)
        {
           contactCache.Release();
        }
    }

    void Application_Error(object sender, EventArgs e)
    {
        Server.Transfer("ConnectionError.html");
    }
</script>
24.7.2 Business Object Definition
Example 24-8 illustrates the definition of the ContactInfo business object.
Example 24-8 Sample Business Object Definition File
public class ContactInfo : IPortableObject
{
    private string name;
    private string street;
    private string city;
    private string state;
    private string zip;

    public ContactInfo()
    { }

    public ContactInfo(string name, string street, string city, string state, string zip)
    {
        this.name   = name;
        this.street = street;
        this.city   = city;
        this.state  = state;
        this.zip    = zip;
    }

    public void ReadExternal(IPofReader reader)
    {
        name   = reader.ReadString(0);
        street = reader.ReadString(1);
        city   = reader.ReadString(2);
        state  = reader.ReadString(3);
        zip    = reader.ReadString(4);
    }

    public void WriteExternal(IPofWriter writer)
    {
        writer.WriteString(0, name);
        writer.WriteString(1, street);
        writer.WriteString(2, city);
        writer.WriteString(3, state);
        writer.WriteString(4, zip);
    }
}
24.7.3 Service Layer Implementation
Example 24-9 illustrates a class that will provide data to the data bind control. It must have a public GetData() method that will return an ICollection of data to the data bind control:
Example 24-9 Providing Data to the Data Bind Control
public class ContactInfoDataSource
{
    public ICollection Data
    {
        set { m_col = value; }
    }

    public ICollection GetData()
    {
        return m_col;
    }

    public ContactInfoDataSource()
    {}

    public ContactInfoDataSource(ICollection col)
    {
        ArrayList results = new ArrayList();
        if (col is INamedCache)
        {
            INamedCache cache = col as INamedCache;

            foreach (ContactInfo contactInfo in cache.Values)
            {
                results.Add(contactInfo);
            }
        }
        else if (col is ArrayList)
        {
            foreach (DictionaryEntry entry in col)
            {
                results.Add(entry.Value);
            }
        }
        Data = results;
    }

    private ICollection m_col = null;
}
24.7.4 Code-behind the ASP.NET Page
Add an event handler that creates an inner object that provide data to the data bind control. This is illustrated in Example 24-10.
Example 24-10 Event Handler to Provide Data to the Data Bind Control
protected void dsContact_ObjectCreating(object sender, ObjectDataSourceEventArgs e)
{
    ContactInfoDataSource cds = new ContactInfoDataSource(Contacts == null ? ContactCache : Contacts);
    e.ObjectInstance = cds;
}
The method illustrated in Example 24-11 refreshes the GridView displayed on the page, refreshes the total label lblTotal, and makes the btnClear and all buttons visible if there are objects in the cache:
Example 24-11 Method to Refresh the Grid View
private void RefreshDataGridAndRenderPage()
{
    gridCache.DataBind();

    int totalObjects = (Contacts == null ? ContactCache.Count : Contacts.Count);
    lblTotal.Text = "Total objects: " + totalObjects;

    if (ContactCache.Count > 0)
    {
        lblTotal.Visible = btnClear.Visible = true;
        lblSearch.Visible = listColumnNames.Visible = lblFor.Visible = txtFilterCriteria.Visible = btnSearch.Visible = true;
    }
    else
    {
        lblTotal.Visible = btnClear.Visible = false;
        lblSearch.Visible = listColumnNames.Visible = lblFor.Visible = txtFilterCriteria.Visible = btnSearch.Visible = false;
    }

    btnClearFilter.Visible = (Contacts != null);
}
The method illustrated in Example 24-12 handles page load events. If there is a getKey value in the Request, then the value mapped to the specified key in the cache is retrieved and the appropriate fields populated with its properties. If there is a removeKey value in the Request, the value mapped to the specified key is removed from the cache.
Example 24-12 Method to Handle Page Load Events
protected void Page_Load(object sender, EventArgs e)
{
    if (Request["getKey"] != null)
    {
        FindObjectInCache(Request["getKey"]);
    }
    else if (Request["removeKey"] != null)
    {
        CacheFactory.Log("Object with key [" + Request["removeKey"] + "] has been removed from cache.", CacheFactory.LogLevel.Info);
        ContactCache.Remove(Request["removeKey"]);
    }

    RefreshDataGridAndRenderPage();
    PopulateFilterColumns();
}
The helper method illustrated in Example 24-13 retrieves an ContactInfo object from the cache by a specified key:
Example 24-13 Retrieving a Business Object from the Cache through a Specified Key
private void FindObjectInCache(object key)
{
    ContactInfo contactInfo = (ContactInfo)ContactCache[key];

    if (contactInfo == null)
    {
        contactInfo = new ContactInfo();
    }

    txtName.Text = key as String;
    txtStreet.Text = contactInfo.Street;
    txtCity.Text = contactInfo.City;
    txtState.Text = contactInfo.State;
    txtZip.Text = contactInfo.Zip;
}
Example 24-14 illustrates an the event handler for the btnSave button:
Example 24-14 Event Handler for a "Save" Button
protected void btnSave_Click(object sender, EventArgs e)
{
    String name = txtName.Text;

    if (name != null && name != "")
    {
        ContactInfo contactInfo = new ContactInfo(name,
                                      txtStreet.Text,
                                      txtCity.Text,
                                      txtState.Text,
                                      txtZip.Text);
        ContactCache.Insert(name, contactInfo);

        CacheFactory.Log("Object with key [" + name + "] has been inserted into cache.", CacheFactory.LogLevel.Info);
        RefreshDataGridAndRenderPage();
    }
}
Example 24-15 illustrates the event handler for the btnClear button:
Example 24-15 Event Handler for a :Clear" Button
protected void btnClear_Click(object sender, EventArgs e)
{
    NameValidator.Enabled = false;

    ContactCache.Clear();
    RefreshDataGridAndRenderPage();

    NameValidator.Enabled = true;
}
Example 24-16 illustrates the event handler for the btnSearch button:
Example 24-16 Event Handler for a "Search" Button
protected void btnSearch_Click(object sender, EventArgs e)
{
    NameValidator.Enabled = false;

    String filterBy = listColumnNames.Items[listColumnNames.SelectedIndex].Text;
    String filterCriteria = txtFilterCriteria.Text.Trim();

    if (filterCriteria != "")
    {
        IValueExtractor extractor = new ReflectionExtractor("get" + filterBy);
        IFilter filter = new LikeFilter(extractor, filterCriteria, '\\', true);

        ICollection results = ContactCache.GetEntries(filter);

        Contacts = results;
        dsContact = new ObjectDataSource();

        RefreshDataGridAndRenderPage();
    }

    NameValidator.Enabled = true;
}
Example 24-17 illustrates the event handler for the btnClearFilter button:
Example 24-17 Event Handler for a "Clear Filter" Button
protected void btnClearFilter_Click(object sender, EventArgs e)
{
    NameValidator.Enabled = false;

    Contacts = null;
    dsContact = new ObjectDataSource();

    RefreshDataGridAndRenderPage();
    NameValidator.Enabled = true;
}
Finally, you should add an ConnectionError.html page to the project with an appropriate error message in it.
