1 Create and Use Coherence Caches
The simplest and most flexible way to create caches in Coherence is to use the cache configuration descriptor to define attributes and names for your application's or cluster's caches, and to instantiate the caches in your application code referring to them by name that matches the names or patterns as defined in the descriptor.
This approach to configuring and using Coherence caches has several very important benefits. It separates the cache initialization and access logic for the cache in your application from its attributes and characteristics. This way your code is written in a way that is independent of the cache type that will be used in your application deployment and changing the characteristics of each cache (such as Rich Text cache type, cache eviction policy, and cache type-specific attributes, and so on) can be done without making any changes to the code whatsoever. It enables you to create multiple configurations for the same set of named caches and to instruct your application to use the appropriate configuration at deployment time by specifying the descriptor to use in the java command line when the node JVM is started.
1.1 Creating a Cache in Your Application
To instantiate a cache in your application code, you need to:
-
Make sure that
coherence.jaris in your classpath. -
Use
CacheFactory.getCache()to access the cache in your code.
Your code will look similar to the following:
import com.tangosol.net.CacheFactory;
import com.tangosol.net.NamedCache;

...

NamedCache cache = CacheFactory.getCache("VirtualCache");
Now you can retrieve and store objects in the cache, using the NamedCache API, which extends the standard java.util.Map interface, adding several additional capabilities that provide concurrency control (ConcurrentMap interface), ability to listen for cache changes (ObservableMap interface) and ability to query the cache (QueryMap interface).
Example 1-1 illustrates typical cache operations in a Java program.
1.2 Configuring the Caches
The cache attributes and settings are defined in the cache configuration descriptor. Cache attributes determine the cache type (what means and resources the cache will use for storing, distributing and synchronizing the cached data) and cache policies (what happens to the objects in the cache based on cache size, object longevity and other parameters).
The structure of the cache configuration descriptor (described in detail by the cache-config.dtd included in the coherence.jar) consists of two primary sections: caching-schemes section and caching-scheme-mapping section.
The caching-schemes section is where the attributes of a cache or a set of caches get defined. The caching schemes can be of several types, each with its own set of attributes. The caching schemes can be defined completely from scratch, or can incorporate attributes of other existing caching schemes, referring to them by their scheme-names (using a scheme-ref element) and optionally overriding some of their attributes to create new caching schemes. This flexibility enables you to create caching scheme structures that are easy to maintain, foster reuse and are very flexible.
The caching-scheme-mapping section is where the specific cache name or a naming pattern is attached to the cache scheme that defines the cache configuration to use for the cache that matches the name or the naming pattern. So if we would like to define the cache descriptor for the cache we mentioned in the previous section (VirtualCache), it may look something like the following:
Example 1-2 Sample Cache Configuration File
<?xml version="1.0"?>
<!DOCTYPE cache-config SYSTEM "cache-config.dtd">

<cache-config>
    <caching-scheme-mapping>
    <!--
    Caches with any name will be created as default replicated.
    -->
    <cache-mapping>
        <cache-name>*</cache-name>
        <scheme-name>default-replicated</scheme-name>
    </cache-mapping>
    </caching-scheme-mapping>

    <caching-schemes>
        <!--
        Default Replicated caching scheme.
        -->
        <replicated-scheme>
            <scheme-name>default-replicated</scheme-name>
            <service-name>ReplicatedCache</service-name>
            <backing-map-scheme>
                <class-scheme>
                    <scheme-ref>default-backing-map</scheme-ref>
                </class-scheme>
            </backing-map-scheme>
        </replicated-scheme>

        <!--
        Default backing map scheme definition used by all
        The caches that do not require any eviction policies
        -->
        <class-scheme>
            <scheme-name>default-backing-map</scheme-name>
            <class-name>com.tangosol.util.SafeHashMap</class-name>
        </class-scheme>

    </caching-schemes>
</cache-config>
The above cache configuration descriptor specifies that all caches will be created (including our VirtualCache cache) using the default-replicated caching scheme. It defines the default-replicated caching scheme as a replicated-scheme, using a service named ReplicatedCache and using the backing map named default-backing-map, which is defined as a class com.tangosol.util.SafeHashMap (the default backing map storage that Coherence uses when no eviction policies are required).
Then, at a later point, let's say we decide that, since the number of entries that our cache is holding is too large and updates to the objects too frequent to use a replicated cache, we want our VirtualCache cache to become a distributed cache instead (while keeping all other caches replicated). To accommodate these new circumstances, we can change the cache configuration by adding the following cache-scheme definition for the distributed cache to the caching-schemes section:
Example 1-3 cache-scheme Definition for a Distributed Cache
<!--
Default Distributed caching scheme.
-->
<distributed-scheme>
    <scheme-name>default-distributed</scheme-name>
    <service-name>DistributedCache</service-name>
    <backing-map-scheme>
        <class-scheme>
            <scheme-ref>default-backing-map</scheme-ref>
        </class-scheme>
    </backing-map-scheme>
</distributed-scheme>
Then mapping the VirtualCache cache to it in the caching-schemes-mapping section:
Example 1-4 Mapping to a Distributed Cache
<cache-mapping>
    <cache-name>VirtualCache</cache-name>
    <scheme-name>default-distributed</scheme-name>
</cache-mapping>
The resulting cache definition descriptor will look similar to Example 1-5:
Example 1-5 Configuration for a Distributed Cache
<?xml version="1.0"?>
<!DOCTYPE cache-config SYSTEM "cache-config.dtd">

<cache-config>
    <caching-scheme-mapping>
        <!--
        Caches with any name will be created as default replicated.
        -->
        <cache-mapping>
            <cache-name>*</cache-name>
            <scheme-name>default-replicated</scheme-name>
        </cache-mapping>
        <cache-mapping>
            <cache-name>VirtualCache</cache-name>
            <scheme-name>default-distributed</scheme-name>
        </cache-mapping>
    </caching-scheme-mapping>

    <caching-schemes>
        <!--
        Default Replicated caching scheme.
        -->
        <replicated-scheme>
            <scheme-name>default-replicated</scheme-name>
            <service-name>ReplicatedCache</service-name>

            <backing-map-scheme>
                <class-scheme>
                    <scheme-ref>default-backing-map</scheme-ref>
                </class-scheme>
            </backing-map-scheme>
        </replicated-scheme>

        <!--
        Default Distributed caching scheme.
        -->
        <distributed-scheme>
            <scheme-name>default-distributed</scheme-name>
            <service-name>DistributedCache</service-name>

            <backing-map-scheme>
                <class-scheme>
                    <scheme-ref>default-backing-map</scheme-ref>
                </class-scheme>
            </backing-map-scheme>
        </distributed-scheme>

        <!--
        Default backing map scheme definition used by all
        The caches that do not require any eviction policies
        -->
        <class-scheme>
            <scheme-name>default-backing-map</scheme-name>

            <class-name>com.tangosol.util.SafeHashMap</class-name>
        </class-scheme>

    </caching-schemes>
</cache-config>
When we revise and deploy the descriptor and restart the cluster, the VirtualCache cache will be a distributed cache instead of replicated, all without any changes to the code we wrote.
1.3 Cache Configuration Descriptor Location
A few words about how to instruct Coherence where to find the cache configuration descriptor. Without specifying anything in the Java command line, Coherence will attempt to use the cache configuration descriptor named coherence-cache-config.xml that it finds in the classpath. Since Coherence ships with this file packaged into the coherence.jar, unless you place another file with the same name in the classpath location preceding coherence.jar, that is the one that Coherence will use. You can tell Coherence to use a different default descriptor by using the -Dtangosol.coherence.cacheconfig java command line property as follows:
java -Dtangosol.coherence.cacheconfig=/cfg/my-config.xml AppServer
The above command instructs Coherence to use my-config.xml file in /cfg directory as the default cache configuration descriptor. As you can see, this capability can give you the flexibility to modify the cache configurations of your applications without making any changes to the application code and by simply specifying different cache configuration descriptors at application deployment or start-up.
1.4 Putting It all Together: Your First Coherence Cache Example
Let's try walking through creating a working example cache using the caches and the cache configuration descriptor we described in the previous section. The easiest way to initially do that is to use the Coherence command line application. A couple of general comments regarding this example before we get started:
-
In the examples we refer to the 'nodes' or 'JVMs'. We make no assumption regarding where they will run - you can run all of them on the same machine multiple machines or a combination of multiple nodes per machine and multiple machines. To see the clustered cache in action you will need at least 2 nodes to see the JVMs sharing data (all the following examples were captured with 2 JVMs on a single machine).
-
This example uses Windows conventions and commands but it will work equally well in any of the UNIX environments (with the appropriate adjustments for the UNIX commands and conventions) and we encourage you to try it on multiple machines with different operating systems, as this is the way Coherence is designed to function: on multiple platforms simultaneously.
1.5 Setting Up Your Test Environment
To set up the test environment, you will need install Coherence by unzipping the software distribution in the desired location on one or more machines.
The coherence/examples directory contains the following examples that will be used in this exercise:
-
examples/config/explore-config.xmlis the configuration descriptor used by the test environment example.
-
examples/java/com/tangosol/examples/explore/SimpleCacheExplorer.javais the Java class that demonstrates how you can access the cache from a command line.
To deploy and run it, you need to execute the following Java command line (from the coherence directory):
-
In Windows:
java -cp ./lib/coherence.jar;./examples/java -Dtangosol.coherence.cacheconfig=./examples/config/explore-config.xml com.tangosol.examples.explore.SimpleCacheExplorer -
In UNIX:
java -cp ./lib/coherence.jar:./examples/java
     -Dtangosol.coherence.cacheconfig=./examples/config/explore-config.xml
     com.tangosol.examples.explore.SimpleCacheExplorer
You should see something like the following when you bring it up:
Example 1-6 Output from Starting a Coherence Server
D:\coherence>java -cp ./lib/coherence.jar;./examples/java -Dtangosol.coherence.cacheconfig=./examples/config/explore-config.xml
com.tangosol.examples.explore.SimpleCacheExplorer
2008-09-15 16:54:18.745 Oracle Coherence 3.4/405(thread=main, member=n/a): Loaded operational configuration from
resource "jar:file:/D:/coherence/lib/coherence.jar!/tangosol-coherence.xml"
2008-09-15 16:54:18.745 Oracle Coherence 3.4/405 (thread=main, member=n/a): Loaded operational overrides from
resource "jar:file:/D:/coherence/lib/coherence.jar!/tangosol-coherence-override-dev.xml"
2008-09-15 16:54:18.745 Oracle Coherence 3.4/405 (thread=main, member=n/a): Optional configuration override
"/tangosol-coherence-override.xml" is not specified
2008-09-15 16:54:18.755 Oracle Coherence 3.4/405 (thread=main, member=n/a): Optional configuration override
"/custom-mbeans.xml" is not specified

Oracle Coherence Version 3.4/405
Grid Edition: Development mode
Copyright (c) 2000-2008 Oracle. All rights reserved.

2008-09-15 16:54:18.945 Oracle Coherence GE 3.4/405(thread=main, member=n/a): Loaded cache configuration from
file "D:\coherence\examples\config\explore-config.xml"
2008-09-15 16:54:19.716 Oracle Coherence GE 3.4/405(thread=Cluster, member=n/a): Service Cluster joined the
cluster with senior service member n/a
2008-09-15 16:54:22.921 Oracle Coherence GE 3.4/405(thread=Cluster, member=n/a): Created a new cluster
"cluster:0x19DB" with Member(Id=1, Timestamp=2008-09-15 16:54:19.396, Address=xxx.xxx.xxx.xxx:8088, MachineId=6522,
Location=site:mydomain.com,machine:mycomputer,process:3500, Role=TangosolSimpleCacheExplorer, Edition=Grid Edition, Mode=Development,
CpuCount=1, SocketCount=1) UID=0x0A8F9C7A0000011BE70BDE04197A1F98
2008-09-15 16:54:23.001 Oracle Coherence GE 3.4/405(thread=ReplicatedCache, member=1): Service ReplicatedCache
joined the cluster with senior service member 1

Command:
Type Help to view the SimpleCacheExplorer command line options. You may need to press Enter to display the Command: prompt.
Type info to display configuration and member information (please note that in the following example there are 2 cluster members active):
Example 1-8 Output from the info Command
Command: info

>> VirtualCache cache is using a cache-scheme named 'default-replicated' defined as:
<replicated-scheme>
  <scheme-name>default-replicated</scheme-name>
  <service-name>ReplicatedCache</service-name>
  <backing-map-scheme>
    <class-scheme>
      <scheme-ref>default-backing-map</scheme-ref>
    </class-scheme>
  </backing-map-scheme>
</replicated-scheme>

>> The following member nodes are currently active:
Member(Id=1, Timestamp=2008-09-15 16:54:19.396, Address=xxx.xxx.xxx.xxx:8088, MachineId=6522, Location=site:mydomain.com,machine:
mycomputer,process:3500, Role=TangosolSimpleCacheExplorer) <-- this node
Member(Id=2, Timestamp=2008-09-15 17:19:56.096, Address=xxx.xxx.xxx.xxx:8089, MachineId=6522, Location=site:mydomain.com,machine:
mycomputer,process:3892, Role=TangosolSimpleCacheExplorer)

Command:
You can also put a value into the cache:
And retrieve a value from the cache:
Try these commands from multiple sessions and see the results. The examples/jsp/explore/SimpleCacheExplorer.jsp is the JSP file that can be used with your favorite application server:
-
To deploy and run it, you will need to deploy the JSP to the default web applications directory of your application server (along with the contents of the
examples/jsp/imagesdirectory), modify the server start-up script to make sure that the classpath includescoherence.jar, and specify the location of the cache configuration file on the Java command line using the-Dtangosol.coherence.cacheconfigoption (for example,-Dtangosol.coherence.cacheconfig=$COHERENCE_HOME/examples/config/explore-config.xml). -
You can then start one or more instances of the application server (on different machines or different ports) and access the
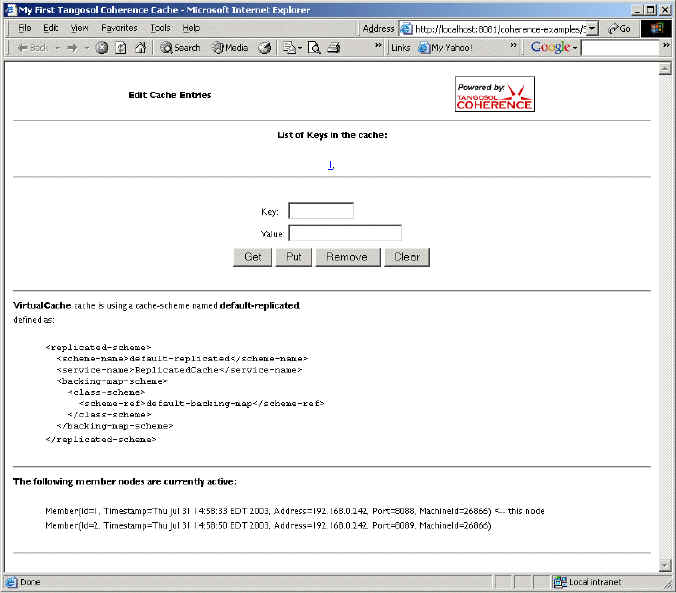
SimpleCacheExplorer.jspfrom the browser. You should see something like the following when you bring it up:Figure 1-1 Interacting with the Cache through a Browser

Description of "Figure 1-1 Interacting with the Cache through a Browser"
As with the command line application try adding, updating, and removing entries from multiple instances of the application server. Also please notice the information about the cache configuration and cluster membership at the bottom of the page. As cluster members are added and removed, this information will change.
1.6 Modifying the Cache Configuration
When you are comfortable with the test setup, let's change the cache configuration and test our changes, using this simple test harness. Please remember that after each cache configuration change all the cluster members need to be shut down and then restarted (whether you are using application server instances or just plain java JVMs). All our tests are configured to use coherence/examples/config/explore-config.xml, so this is the file that must be edited to make cache configuration changes. Let's make the first change we described previously, changing the VirtualCache to be a distributed cache by adding the following (bolded) sections:
Example 1-11 Specifying a Distributed Cache in the cache-config File
<?xml version="1.0"?> <!DOCTYPE cache-config SYSTEM "cache-config.dtd">
<cache-config> <caching-scheme-mapping> <!-- Caches with any name will be created as default replicated. --> <cache-mapping> <cache-name>*</cache-name> <scheme-name>default-replicated</scheme-name>
 </cache-mapping>
<cache-mapping><cache-name>VirtualCache</cache-name><scheme-name>default-distributed</scheme-name></cache-mapping></caching-scheme-mapping>

<caching-schemes> <!-- Default Replicated caching scheme. --> <replicated-scheme> <scheme-name>default-replicated</scheme-name> <service-name>ReplicatedCache</service-name>

<backing-map-scheme> <class-scheme> <scheme-ref>default-backing-map</scheme-ref> </class-scheme> </backing-map-scheme> </replicated-scheme>

<!--Default Distributed caching scheme.-->
<distributed-scheme>      <scheme-name>default-distributed</scheme-name> <service-name>DistributedCache</service-name>

<backing-map-scheme><class-scheme><scheme-ref>default-backing-map</scheme-ref></class-scheme></backing-map-scheme></distributed-scheme>
<!-- Default backing map scheme definition used by all The caches that do not require any eviction policies --> <class-scheme> <scheme-name>default-backing-map</scheme-name>
<class-name>com.tangosol.util.SafeHashMap</class-name> </class-scheme>
</caching-schemes> </cache-config>
After the changes are saved, the test instances are restarted and you have had a chance to do some test data entry to see how the cache behaves, you should see the following in the cache configuration section of the tests:
-
SimpleCacheExplorer.java:Example 1-12 Running SimpleCacheExplorer.java with a Distributed Cache
Command: info >> VirtualCache cache is using a cache-scheme named 'default-distributed' defined as: <distributed-scheme> <scheme-name>default-distributed</scheme-name> <service-name>DistributedCache</service-name> <backing-map-scheme> <class-scheme> <scheme-ref>default-backing-map</scheme-ref> </class-scheme> </backing-map-scheme> </distributed-scheme> >> The following member nodes are currently active: Member(Id=1, Timestamp=2008-09-15 17:53:22.701, Address=xxx.xxx.xxx.xxx:8088, MachineId=6522, Location=site:mydomain.com, machine:mycomputer,process:3156, Role=TangosolSimpleCacheExplorer) <-- this node Member(Id=2, Timestamp=2008-09-15 17:54:37.619, Address=xxx.xxx.xxx.xxx:8089, MachineId=6522, Location=site:mydomain.com, machine:mycomputer,process:916, Role=TangosolSimpleCacheExplorer) Command: -
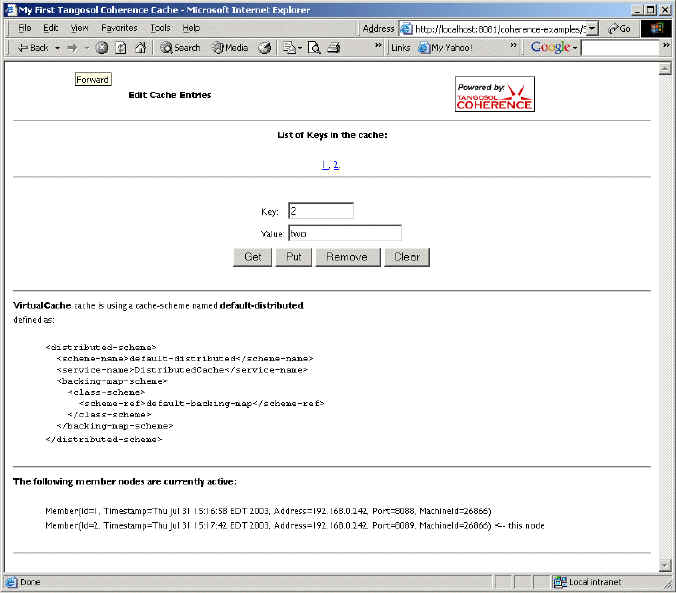
SimpleCacheExplorer.jsp:Figure 1-2 Running SimpleCacheExplorer.jsp with a Distributed Cache

Description of "Figure 1-2 Running SimpleCacheExplorer.jsp with a Distributed Cache"
As you can see, our VirtualCache cache is now distributed according to the cache configuration descriptor.
Now let's add an eviction policy for our default distributed cache, limiting its size to 5 entries (per node) and setting the entry expiry to 60 seconds with an LRU eviction policy. To do that we need to make the following (bolded) changes to our descriptor:
Example 1-13 Adding an Eviction Policy to a cache-config File
<?xml version="1.0"?> <!DOCTYPE cache-config SYSTEM "cache-config.dtd"> <cache-config> <caching-scheme-mapping> <!-- Caches with any name will be created as default replicated. --> <cache-mapping> <cache-name>*</cache-name> <scheme-name>default-replicated</scheme-name> </cache-mapping> <cache-mapping> <cache-name>VirtualCache</cache-name> <scheme-name>default-distributed</scheme-name> </cache-mapping> </caching-scheme-mapping> <caching-schemes> <!-- Default Replicated caching scheme. --> <replicated-scheme> <scheme-name>default-replicated</scheme-name> <service-name>ReplicatedCache</service-name> <backing-map-scheme> <class-scheme> <scheme-ref>default-backing-map</scheme-ref> </class-scheme> </backing-map-scheme> </replicated-scheme> <!-- Default Distributed caching scheme. --> <distributed-scheme> <scheme-name>default-distributed</scheme-name> <service-name>DistributedCache</service-name> <backing-map-scheme><local-scheme><scheme-ref>default-eviction</scheme-ref><eviction-policy>LRU</eviction-policy><high-units>5</high-units><expiry-delay>60</expiry-delay></local-scheme></backing-map-scheme> </distributed-scheme> <!-- Default backing map scheme definition used by all The caches that do not require any eviction policies --> <class-scheme> <scheme-name>default-backing-map</scheme-name> <class-name>com.tangosol.util.SafeHashMap</class-name> </class-scheme><!--Default eviction policy scheme.--><local-scheme><scheme-name>default-eviction</scheme-name><eviction-policy>HYBRID</eviction-policy><high-units>0</high-units><expiry-delay>3600</expiry-delay></local-scheme></caching-schemes> </cache-config>
Note that we defined a general purpose local-scheme 'default-eviction' (with no size limit, 5 minute expiry and a HYBRID eviction policy) and then used it by reference (using scheme-ref) for our default-distributed scheme definition, overriding it's configuration settings to match our requirements.
After the changes are saved, the test instances are restarted and you have had a chance to do some test data entry to see how the cache behaves, you should see the following in the cache configuration section of the tests:
-
SimpleCacheExplorer.java:Example 1-14 Running SimpleCacheExplorer.java with an Eviction Policy
Command: info

>> VirtualCache cache is using a cache-scheme named 'default-distributed' defined as:
<distributed-scheme>
  <scheme-name>default-distributed</scheme-name>
  <service-name>DistributedCache</service-name>
  <backing-map-scheme>
    <local-scheme>
      <scheme-ref>default-eviction</scheme-ref>
      <eviction-policy>LRU</eviction-policy>
      <high-units>5</high-units>
      <expiry-delay>60</expiry-delay>
    </local-scheme>
  </backing-map-scheme>
</distributed-scheme>

>> The following member nodes are currently active:
Member(Id=1, Timestamp=2008-09-15 18:10:23.148, Address=xxx.xxx.xxx.xxx:8088, MachineId=6522, Location=site:mydomain.com,
machine:mycomputer,process:2960, Role=TangosolSimpleCacheExplorer) <-- this node
Member(Id=2, Timestamp=2008-09-15 18:10:35.957, Address=xxx.xxx.xxx.xxx:8089, MachineId=6522, Location=site:mydomain.com,
machine:mycomputer,process:3348, Role=TangosolSimpleCacheExplorer)

Command:
-
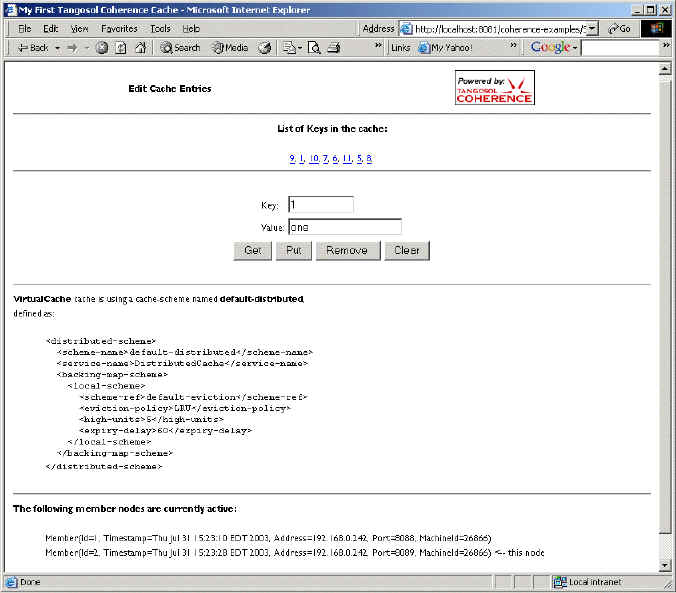
SimpleCacheExplorer.jsp:Figure 1-3 Running SimpleCacheExplorer.jsp with an Eviction Policy

Description of "Figure 1-3 Running SimpleCacheExplorer.jsp with an Eviction Policy"
Try doing some puts and gets, carefully noting the time you last updated the specific entries. You should see that the number of entries does not exceed 5 entries per node (so if you have 2 nodes running the number of entries should not exceed 10, for 3 nodes - 15, and so on) and entries either expire after they have not been updated for 60 seconds, or when you add the 6th entry (with the least recently touched entries being 'evicted' from the cache first. (Hint: use the keys command in the SimpleCacheExplorer.java to see the list of keys in the cache.)
These examples show you the general approach to modifying the cache configurations without making any code changes (as you no doubt noticed we did not touch our test application's code). Please refer to the cache-config.dtd, which can be found in the coherence.jar for full details on the available cache configuration descriptor settings and the explanation of their meaning and possible settings.