2 Documentation Errata
This chapter describes changes, enhancements, and corrections made to the existing Oracle Coherence library (Getting Started, Developer's Guide, and User's Guide). The current Oracle Coherence documentation library can be found at the following URL:
https://download.oracle.com/docs/cd/E13924_01/index.htm
This chapter contains the following information:
2.1 Installing Coherence Web Session Management Module (3.4.1)
-
Coherence*Web Session Management Module: Supported Web Containers
-
General Instructions for Installing Coherence*Web Session Management Module
-
Installing Coherence*Web Session Management Module on Caucho Resin 3.0.x
-
Installing Coherence*Web Session Management Module on Caucho Resin 3.1.x
-
Installing Coherence*Web Session Management Module on Oracle OC4J 10.1.2.x
-
Installing Coherence*Web Session Management Module on Oracle WebLogic 10.x
-
How the Coherence*Web Installer instruments a Java EE application
-
Testing HTTP session management (without a dedicated loadbalancer)
2.1.1 Coherence*Web Session Management Module: Supported Web Containers
Table 2-1 summarizes the Web containers supported by the Coherence*Web Session Management Module and the installation information specific to each supported web container.
Table 2-1 Web Containers Supported by Coherence*Web
Notes:
* The server type alias passed to the Coherence*Web installer though the -server command line option.
2.1.2 General Instructions for Installing Coherence*Web Session Management Module
To enable Coherence*Web in your Java EE application, you must run a ready-to-deploy application (recommended) through the automated installer before deploying it. The automated installer prepares the application for deployment.
To install Coherence*Web for the Java EE application you are deploying:
-
Make sure that the application directory and the
.earfile or.warfile are not being used or accessed by another process. -
Change the current directory to the Coherence library directory (%COHERENCE_HOME%
\libon Windows and $COHERENCE_HOME/libon UNIX). -
Make sure that the paths are configured so that the Java command will run.
-
Complete the application inspection step by running the following command and specifying the full path to your application and the name of your server found in the chart above (replacing the
<app-path>and<server-type>with them in the command line below):java -jar webInstaller.jar <app-path> -inspect -server:<server-type>
The system will create (or update, if it already exists), the coherence-web.xml configuration descriptor file for your Java EE application in the directory where the application is located. This configuration descriptor contains the default Coherence*Web settings for your application recommended by the installer. You may proceed to the install step or review and modify the settings, based on your requirements, before running the install step. For example, you can enable certain features by setting the
context-paramoptions in thecoherence-web.xmlconfiguration descriptor:-
The setting in Table 2-2 will cluster all
ServletContext("global") attributes so that servers in a cluster will share the same values for those attributes, and will also receive the events specified by the Servlet Specification when those attributes change: -
The setting in Table 2-3 allows an application to enumerate all of the sessions that exist within the application, or to obtain any one of those sessions to examine or manipulate:
-
The setting in Table 2-4 enables you to increase the length of the
HttpSessionID, which is generated using aSecureRandomalgorithm; the length can be any value, although in practice it should be small enough to fit into a cookie or a URL (depending on how session IDs are maintained.) Increasing the length can decrease the chance of a session being purposefully hijacked: -
By default, the
HttpSessionID is managed in a cookie. If the application supports URL encoding, set the option described in Table 2-5 to enable it:Table 2-5 Settings to Support URI Encoding
Parameter Value param-name
coherence-session-urlencode-enabled
param-value
true
After double-checking that these changes have been made, save the file and exit the editor; remember to return back to the Coherence library directory if you are working from a shell or command line.
-
-
Go through the Coherence*Web application installation step by running the following command and specifying the full path to your application (replacing the
<app-path>with it in the command line below):java -jar webInstaller.jar <app-path> -install
The installer requires a valid
coherence-web.xmlconfiguration descriptor for its use in the same directory in which the application is located. -
Deploy the updated application and verify that everything functions as expected, using the load balancer if necessary. Please remember that the load balancer is only intended for testing and should not be used in a production environment.
2.1.3 Installing Coherence*Web Session Management Module on Caucho Resin 3.0.x
Follow these additional steps when installing the Coherence*Web Session Management Module into a Caucho Resin 3.0.x server:
-
From within the Coherence library directory, extract the
coherence-web.jarfrom thewebInstaller.jar:jar -xvf webInstaller.jar web-install/coherence-web.jar
This will extract the
coherence-web.jarfile into a subdirectory namedweb-install. Use the following commands to move thecoherence-web.jarfile up one level into thelibrarydirectory:On Windows:
move web-install\coherence-web.jar .
rmdir web-install
On UNIX:
mv web-install/coherence-web.jar .
rmdir web-install
-
For each Resin install that will be running in the server cluster, update the libraries using the following command (note that it is broken up into multiple lines only for formatting purposes; this is a single command entered on one line):
java -cp coherence.jar;coherence-web.jar
com.tangosol.coherence.servlet.WebPluginInstaller <resin-home-path> -install
For example, on Windows:
java -cp coherence.jar;coherence-web.jar
com.tangosol.coherence.servlet.WebPluginInstaller C:\opt\resin30 -install
-
Follow the general installation steps for the Coherence*Web Session Management Module, specifying Resin/3.0.x for the server type.
2.1.4 Installing Coherence*Web Session Management Module on Caucho Resin 3.1.x
Follow these additional steps when installing the Coherence*Web Session Management Module into a Caucho Resin 3.1.x server:
-
From within the Coherence library directory, extract the
coherence-web.jarfrom thewebInstaller.jar:jar -xvf webInstaller.jar web-install/coherence-web.jar
This will extract the
coherence-web.jarfile into a subdirectory namedweb-install. Use the following commands to move thecoherence-web.jarfile up one level into thelibrarydirectory:On Windows:
move web-install\coherence-web.jar .
rmdir web-install
On UNIX:
mv web-install/coherence-web.jar .
rmdir web-install
-
For each Resin install that will be running in the server cluster, update the libraries using the following command (note that it is broken up into multiple lines only for formatting purposes; this is a single command entered on one line):
java -cp coherence.jar;coherence-web.jar
com.tangosol.coherence.servlet.WebPluginInstaller <resin-home-path> -install
For example, on Windows:
java -cp coherence.jar;coherence-web.jar
com.tangosol.coherence.servlet.WebPluginInstaller C:\opt\resin31 -install
-
Follow the general installation steps for the Coherence*Web Session Management Module, specifying Resin/3.1.x for the server type.
2.1.5 Installing Coherence*Web Session Management Module on Oracle OC4J 10.1.2.x
Follow these additional steps when installing the Coherence*Web Session Management Module into a Oracle OC4J 10.1.2.x server:
-
From within the Coherence
librarydirectory, extract thecoherence-web.jarfrom thewebInstaller.jar:jar -xvf webInstaller.jar web-install/coherence-web.jar
This will extract the
coherence-web.jarfile into a subdirectory namedweb-install. Use the following commands to move thecoherence-web.jarfile up one level into thelibrarydirectory:On Windows:
move web-install\coherence-web.jar .
rmdir web-install
On UNIX:
mv web-install/coherence-web.jar .
rmdir web-install
-
For each OC4J install that will be running in the server cluster, update the libraries using the following command (note that it is broken up into multiple lines only for formatting purposes; this is a single command entered on one line):
java -cp coherence.jar;coherence-web.jar
com.tangosol.coherence.servlet.WebPluginInstaller <oc4j-home-path> -install
For example, on Windows:
java -cp coherence.jar;coherence-web.jar
com.tangosol.coherence.servlet.WebPluginInstaller C:\opt\oracle1012\j2ee\home
-
Follow the general installation steps for the Coherence*Web Session Management Module, specifying Oracle/10.1.2.x for the server type.
2.1.6 Installing Coherence*Web Session Management Module on Oracle WebLogic 10.x
Follow these additional steps when installing the Coherence*Web Session Management Module into an Oracle WebLogic 10.x server:
-
From within the Coherence library directory, extract the
coherence-web.jarfrom thewebInstaller.jar:jar -xvf webInstaller.jar web-install/coherence-web.jar
This will extract the
coherence-web.jarfile into a subdirectory namedweb-install. Use the following commands to move thecoherence-web.jarfile up one level into thelibrarydirectory:On Windows:
move web-install\coherence-web.jar .
rmdir web-install
On UNIX:
mv web-install/coherence-web.jar .
rmdir web-install
-
For each WebLogic 10.x install that will be running in the server cluster, update the libraries using the following command (note that it is broken up into multiple lines only for formatting purposes; this is a single command entered on one line):
java -cp coherence.jar;coherence-web.jar
com.tangosol.coherence.servlet.WebPluginInstaller <wls-home-path> -install
For example, on Windows:
java -cp coherence.jar;coherence-web.jar
com.tangosol.coherence.servlet.WebPluginInstaller C:\bea\weblogic\wlserver_10 -install
-
Follow the general installation steps for the Coherence*Web Session Management Module, specifying WebLogic/10.x for the server type.
2.1.7 How the Coherence*Web Installer instruments a Java EE application
During the inspect step, the Coherence*Web Installer performs the following tasks:
-
Generates a template
coherence-web.xmlconfiguration file that contains basic information about the application and target web container along with a set of default Coherence*Web configuration context parameters appropriate for the target web container. If an existingcoherence-web.xmlconfiguration file exists (for example, from a previous run of the Coherence*Web Installer), the context parameters in the existing file are merged with those in the generated template. -
Enumerates the JSPs from each web application in the target Java EE application and add information about each JSP to the
coherence-web.xmlconfiguration file. -
Enumerates the TLDs from each web application in the target Java EE application and add information about each TLD to the
coherence-web.xmlconfiguration file.
During the install step, the Coherence*Web Installer performs the following tasks:
-
Creates a backup of the original Java EE application so that it can be restored during the uninstall step.
-
Add the Coherence*Web configuration context parameters generated in Step (1) of the inspect step to the
web.xmldescriptor of each web application contained in the target Java EE application. -
Unregisters any application-specific
ServletContextListener,ServletContextAttributeListener,ServletRequestListener,ServletRequestAttributeListener,HttpSessionListener, andHttpSessionAttributeListenerclasses (including those registered by TLDs) from each Web application. -
Registers a Coherence*Web
ServletContextListenerin eachweb.xmldescriptor. At runtime, the Coherence*WebServletContextListenerwill propagate eachServletContextEventto each application-specificServletContextListener. -
Registers a Coherence*Web
ServletContextAttributeListenerin eachweb.xmldescriptor. At runtime, the Coherence*WebServletContextAttributeListenerwill propagate eachServletContextAttributeEventto each application-specificServletContextAttributeListener. -
Wraps each application-specific Servlet declared in each
web.xmldescriptor with a Coherence*WebSessionServlet. At runtime, each Coherence*WebSessionServletwill delegate to the wrapped Servlet. -
Adds the following directive to each JSP enumerated in Step (2) of the inspect step:
<%@ page extends="com.tangosol.coherence.servlet.api22.JspServlet" %>
During the uninstall step, the Coherence*Web Installer replaces the instrumented Java EE application with the backup of the original version created in Step (1) of the install process.
2.1.8 Testing HTTP session management (without a dedicated loadbalancer)
Coherence comes with a light-weight software load balancer; it is only intended for testing purposes. The load balancer is very useful when testing functionality such as Session Management and is very easy to use.
-
Start multiple application server processes, on one or more server machines, each running your application on a unique IP address and port combination.
-
Open a command (or shell) window.
-
Change the current directory to the Coherence library directory (%COHERENCE_HOME%
\libon Windows and $COHERENCE_HOME/libon UNIX). -
Make sure that the paths are configured so that the Java command will run.
-
Start the software load balancer with the following command lines (each of these command lines makes the application available on the default HTTP port, which is port 80).
To test load-balancing locally on one machine with two application server instances on ports
7001and7002:java -jar coherence-loadbalancer.jar localhost:80 localhost:7001 localhost:7002
To run the load-balancer locally on a machine named server1 that load balances to port
7001onserver1,server2andserver3:java -jar coherence-loadbalancer.jar server1:80 server1:7001 server2:7001 server3:7001
Assuming the above command line, an application that previously was accessed with the URL
http://server1:7001/my.jspwould now be accessed with the URLhttp://server1:80/my.jspor justhttp://server1/my.jsp.Table 2-6 describes the supported command line options:
Table 2-6 Command Line Options to Test HTTP Session Management
Option Description -backlog
Sets the TCP/ IP accept backlog option to the specified value, for example:
-backlog=64-random
Specifies the use of a random load-balancing algorithm (default).
-roundrobin
Specifies the use of a round-robin load-balancing algorithm
-threads
Uses the specified number of request/ response thread pairs (so the total number of additional daemon threads will be two times the specified value), for example:
-threads=64Make sure that your application uses only relative re-directs or the address of the load-balancer.
2.2 Using Coherence and WebLogic Portal (3.4.1)
Coherence integrates closely with Oracle WebLogic Portal to provide WAN-capable clustered caching for portal applications. Specifically, Coherence includes the following integration points:
-
Sharing Data Between WSRP-Federated Portals Using Coherence—This section provides a blueprint for efficiently sharing data between WSRP-federated portals that leverages Coherence and the WebLogic Portal Custom Data Transfer mechanism
2.2.1 P13N CacheProvider SPI Implementation
Internally, WebLogic Portal uses its own caching service to cache portal, personalization, and commerce data as described here:
WebLogic Portal 8.1.6 and later includes an SPI for the P13N caching service that can be implemented by third party cache vendors. Coherence includes a P13N CacheProvider SPI implementation that—when installed into a WebLogic Portal application—will transparently manage cached P13N data without requiring code changes. Additionally, combining Coherence and WebLogic Portal gives you extreme flexibility in your choice of cache topologies.
For example, if you find that your Portal servers are bumping into the 4GB heap limit (on 32-bit JVMs) or are experiencing slow GC times, you can reduce your Portal JVM heap size and GC times by leveraging a cache client/server topology to move serializable P13N state out of your Portal JVMs and into one or more dedicated Coherence cache servers. You can also leverage the Coherence Management Framework to closely monitor statistics to better tune your P13N cache settings. Finally, the Coherence CacheProvider also allows your portlets to leverage Coherence caching service by using the standard P13N Cache API.
To install the Coherence P13N CacheProvider, copy the coherence-wlp.jar and coherence.jar libraries included in the lib directory of the Coherence installation to the APP-INF/lib directory of your WebLogic Portal application. Additionally, you must configure the Coherence P13N CacheProvider as the default provider in the p13n-cache-config.xml file found in each of your WLP application's META-INF directory. Specifically, add the following line immediately before the first <cache> element:
<default-provider-id>com.tangosol.coherence.weblogic</default-provider-id>
See the Javadoc for the PortalCacheProvider class for details on configuring the Coherence CacheProvider and Coherence caches used by the provider. See also the following document for a list of some of the caches used by WebLogic Portal:
https://download.oracle.com/docs/cd/E13155_01/wlp/docs103/caches/caches.html
2.2.2 Sharing Data Between WSRP-Federated Portals Using Coherence
The Web Services for Remote Portlets (WSRP) protocol was designed to support the federation of portals hosted by arbitrary portal servers and server clusters. Developers use WSRP to aggregate content and the user interface (UI) from various portlets hosted by other remote portals. By itself, WSRP does not address the challenge of implementing scalable, reliable, and high-performance federated portals that create, access, and manage the lifecycle of data shared by distributed portlets. Fortunately, WebLogic Portal provides an extension to the WSRP specification that—when coupled with Oracle Coherence—allows WSRP Consumers and Producers to create, view, modify, and control concurrent access to shared, scoped data in a scalable, reliable, and highly performant manner.
See the following document for complete details:
http://www.oracle.com/technology/pub/articles/dev2arch/2005/11/federated-portal-cache.html
2.3 Using JDeveloper for Coherence Development
This section provides basic instructions on how to setup JDeveloper when developing Coherence solutions.
2.3.1 Running Coherence in JDeveloper
JDeveloper can be used to run cache server (DefaultCacheServer) and cache (CacheFactory) instances. Each instance is started as a separate Java process and emits standard output to the process' log. Input (such as cache commands) can be entered directly in the process as if it were started from the command line. This configuration facilitates development and testing Coherence solutions.
To run Coherence in JDeveloper:
-
In JDeveloper, create a new Generic Application, which includes a single project. If you are new to JDeveloper, consult the Online Help for detailed instructions.
-
In the Application Navigator, double-click the new project. The Project Properties dialog box displays.
-
Select the Libraries and Classpath node. The Libraries and Classpath page displays
-
On the Libraries and Classpath page, click Add JAR/Directory. The Add Archive or Directory dialog box displays.
-
From the directory tree, select
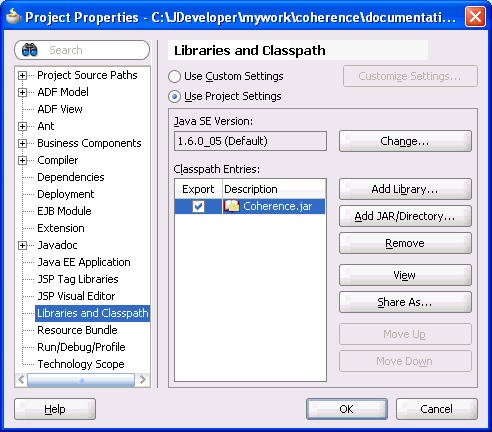
COHERENCE_HOME\lib\coherence.jarand click Select. Thecoherence.jarlibrary displays in the Classpath Entries list as shown in Figure 2-1:Note:
Thetangosol.jarlibrary is also required in the classpath when using a Coherence 3.3.x release.Figure 2-1 Setting the Coherence Library on the Classpath
Description of "Figure 2-1 Setting the Coherence Library on the Classpath"
-
From the Project Properties dialog box, select the Run/Debug/Profile node. The Run/Debug/Profile page displays.
-
From the Run/Debug/Profile page, click New. The Create Run Configuration dialog box displays.In the Name text box, enter a name for the new run configuration. In the Copy Settings From drop-down box, choose default. Click OK. The new run configuration displays in the Run Configuration list.
-
From the Run Configuration list, select the new Run Configuration and click Edit. The Edit Run Configuration dialog box displays and the Launch Settings node is selected.
-
From the Launch Settings page, click Browse to select a Default Run Target. The Choose Default Run Target dialog box displays.
-
From the directory tree, select
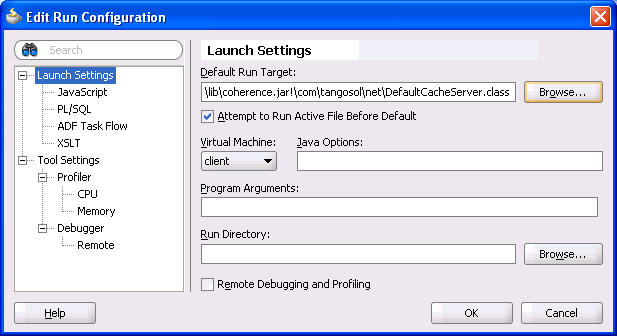
COHERENCE_HOME\lib\coherence.jar\com\tangosol\net\DefaultCacheServer.classand click Open. TheDefaultCacheServerclass is entered as the default run target as shown in Figure 2-2:Figure 2-2 Setting DefaultCacheServer as a Default Run Target
Description of "Figure 2-2 Setting DefaultCacheServer as a Default Run Target"
Tip:
Use the Java Options text box to set Coherence system properties. -
Select the Tool Settings Node. The Tool Settings page displays.
-
From the Additional Runner Options section, click the Allow Program Input check box. A check mark in the box indicates that the option is selected.
-
Click OK.
-
Repeat Steps 6 through 14 and select
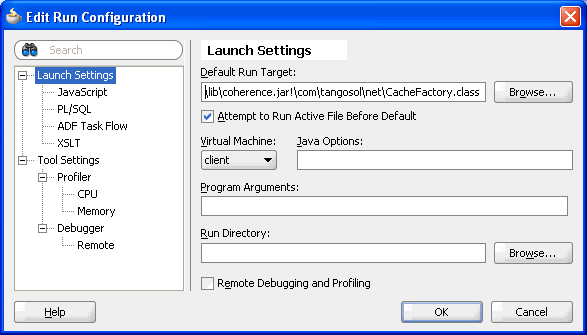
COHERENCE_HOME\lib\coherence.jar\com\tangosol\net\CacheFactory.classas the default run target as shown in Figure 2-3:Figure 2-3 Setting CacheFactory as a Default Run Target
Description of "Figure 2-3 Setting CacheFactory as a Default Run Target"
-
Click OK to close the Project Properties dialog box.
-
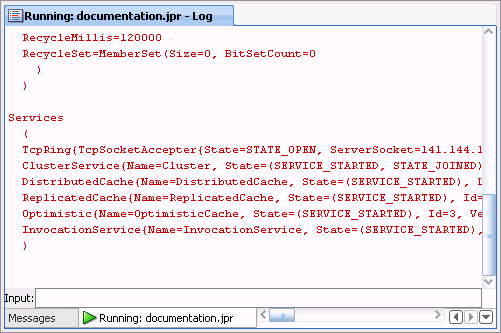
Use the Run button drop-down list to select and start the run configuration for the cache server. A cache server instance is started and output is shown in the process's log tab as shown in Figure 2-4:
Figure 2-4 Log Output for a Cache Server Instance
Description of "Figure 2-4 Log Output for a Cache Server Instance"
-
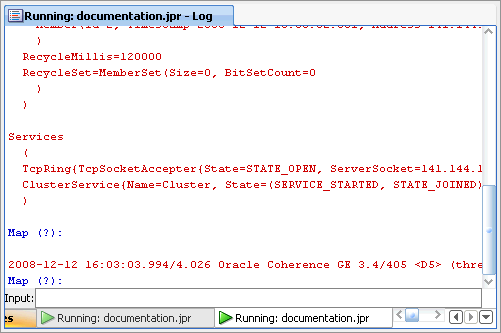
Use the Run button drop-down list to select and start the run configuration for the cache. A cache instance is started and output is shown in the process's log tab as shown in Figure 2-5.
Figure 2-5 Log Output for a Cache Client Instance
Description of "Figure 2-5 Log Output for a Cache Client Instance"
-
From the Cache Factory's Running Log tab, use the Input text box located at the bottom of the tab to interact with the cache instance. For example, type
helpand press Enter to see a list of valid commands.
2.3.2 Viewing Thread Dumps in JDeveloper
Java allows you to dump a list of threads and all their held locks to standard output. This is achieved in Linux environments using the kill command and in Windows environments using ctrl+break. Thread dumps are very useful for troubleshooting during development (for example, finding deadlocks).
When developing Coherence solutions in JDeveloper, you can view thread dumps directly in a process's log tab. This is achieved by sending the above signals to the Java process running in JDeveloper.
To view thread dumps in JDeveloper:
-
From a shell or command prompt, use
JDK_HOME/bin/jpsto get the Process ID (PID) of the Java process for which you want to view a thread dump. If you are using JDK 1.4 or below, useps -efon Linux ortliston Windows to get the PID. -
On Linux, use
kill -3PIDto send aQUITsignal to the process. On Windows, you must use a third-party tool (such as SendSignal) in order to send actrl+breaksignal to a remote Java process.The thread dump is viewable in the process's log in JDeveloper.
2.3.3 Creating a Cache Configuration in JDeveloper
JDeveloper can be used to create a Coherence cache configuration file. JDeveloper loads the cache-config.dtd and lists all the DTD's elements in the Component Palette. In addition, JDeveloper validates the cache configuration file against the DTD and provides XML code completion.
To create a cache configuration in JDeveloper:
-
Extract
cache-config.dtdfrom theCOHERENCE_HOME\lib\coherence.jarlibrary to a directory on your computer. -
In the JDeveloper Application Navigator, double-click your coherence project. The Project Properties dialog box displays.
-
Expand the Project Source Paths node and click Resources. The Resources page displays.
-
In the Resources section, click Add to find and select the directory where you extracted the DTD file.
-
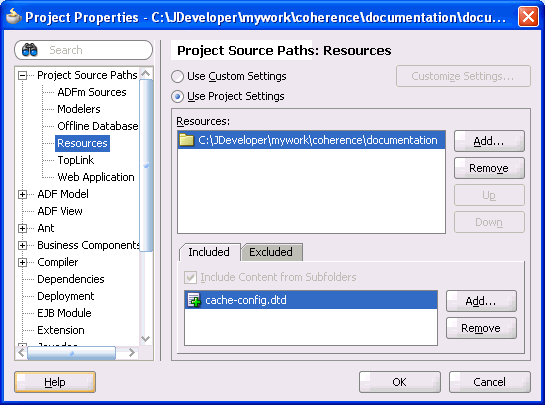
In the Included tab, click Add and select the
cache-config.dtdfile. -
Click OK. The DTD is listed in the Included tab as shown in Figure 2-6.
Figure 2-6 Project DTD Listed Under Resources in the Project Properties Dialog Box
Description of "Figure 2-6 Project DTD Listed Under Resources in the Project Properties Dialog Box"
-
Click OK to close the Project Properties dialog box. The DTD is listed in the Application Navigator under the Resources folder for your project.
-
From the File menu, click New. The New Gallery dialog box displays.
-
From the Categories section, expand the General node and click XML.
-
Select XML Document and click OK. The Create XML File dialog box displays.
-
Enter
coherence-cache-config.xmlas the file name and save it to the same directory where the DTD is located. -
Click OK. The cache configuration file is created, opened for editing, and listed in the Application Navigator under the resources folder for your project.
-
Add the following
DOCTYPEat the beginning of the file:<?xml version="1.0" encoding="windows-1252" ?> <!DOCTYPE cache-config SYSTEM "cache-config.dtd">
The Component Palette refreshes and lists all the elements available from the
cache-config.dtdfile. -
Save the
coherence-cache-config.xmlfile.
2.4 Corrections to the C++ Object Model
This section describes corrections to the Understanding the C++ Object Model topic that can be found in the Users Guide for Oracle Coherence.
In the Threading section, there is a reference to a coherence::lang::ThreadLocal class. This is an error. The correct name of the class is coherence::lang::ThreadLocalReference.
In the Object Immutability section, there is a sentence where the words Handle and View were transposed. The incorrect text reads:
-
Note that once immutable, an object cannot revert to being mutable. You cannot cast away const-ness to turn a
Handleinto aViewas this would violate the proved immutability.
The corrected text (in italics) should read:
-
Note that once immutable, an object cannot revert to being mutable. You cannot cast away const-ness to turn a View into a Handle as this would violate the proved immutability.
In the Thread Safe Handles section, the paragraph that reads:
-
These handle types may be read and written from multiple thread without the need for additional synchronization. They are primarily intended for use as the data-members of other managed classes, and they make use of their parent's internal atomic state to provide thread-safety. When using these handle types it is recommended that they be read into a normal stack based handle if they will be accessed more than once within a code block. This assignment to a normal stack based handle is thread-safe, and once completed allows for essentially free dereferencing of the stack based handle. Note that when initializing thread-safe handles a reference to the parent class must be supplied as the first parameter, this reference can be obtained by calling
self()on the parent object.
Should be corrected to the following (corrected text in italics):
-
These handle types may be read and written from multiple thread without the need for additional synchronization. They are primarily intended for use as the data-members of other managed classes, and they make use of their parent's internal atomic state to provide thread-safety. When using these handle types it is recommended that they be read into a normal stack based handle if they will be accessed more than once within a code block. This assignment to a normal stack based handle is thread-safe, and after it completes, allows for essentially free dereferencing of the stack based handle. Note that when initializing thread-safe handles a reference to a guardian Object must be supplied as the first parameter, this reference can be obtained by calling
self()on the enclosing object.
The paragraph that reads:
-
The same basic technique can be applied to non-managed classes as well. This is made possible, by using the defined synchronization point as the "parent" for the thread-safe handles. With this approach you must ensure that the "parent"
m_hMutexObject outlives the thread-safe handlem_vsName. This is easily accomplished by declaring them as data-members of the same class, and declaring the "parent" before the handle.
Should be replaced by the following (corrected text in italics):
-
The same basic technique can be applied to non-managed classes as well. Since non-managed classes do not extend
coherence::lang::Objectthey cannot be used as the guardian of thread-safe handles. It is possible however to use another Object as the guardian. When taking this approach it is crucial to ensure that the guardian Object outlives the guarded thread-safe handle. To facilitate this Coherence starting with Coherence 3.4.1 you can obtain an immortal guardian fromcoherence::lang::Systemby calling theSystem::common().
The code in Example 2-18: Thread-safe Handle as a Non-Managed Class should be replaced with the following:
class Employee
    {
    public:
        Employee(String::View vsName, int32_t nId)
            : m_vsName(System::common(), vsName), m_nId(nId)
            {
            }

    public:
        String::View getName() const
            {
            return m_vsName;
            }

        void setName(String::View vsName)
            {
            m_vsName = vsName;
            }

        int32_t getId() const
            {
            return m_nId;
            }

    private:
        MemberView<String>   m_vsName;
        const int32_t        m_nId;
    };
2.5 Corrections to Date Formats in Reporter Output
The date formats described in the Analyzing Reporter Content chapter have changed. The previous date formats recorded only the year, month, and day when the report was run (YYYYMMDD). The new formats have been updated to also record the hour (YYYYMMDDHH). Table 2-7 summarizes the changes from the old format to the new format.
2.6 Corrections to Coherence Features by Edition
The table in the Coherence Client Editions section of the Coherence Features by Edition appendix is missing a row for the C++ client under API Language. The corrected row should read as follows:
Table 2-8 Coherence Client Editions
| Data Client (see note 9) | Real Time Client (see note 10) (configured as Extend/TCP Client; see note 11) | Real Time Client (see note 10) (configured as Compute Client) | ||
|---|---|---|---|---|
|
API Language |
Java |
Yes |
Yes |
Yes |
|
.NET |
Yes |
Yes |
No |
|
|
C++ |
Yes |
Yes |
No |
Moreover, Notes 9, 10, and 11 are missing from the text. They are reproduced below.
9. Data Client may be used with all Coherence Server Editions.
10. Real Time Client may only be used with Grid Edition.
11. Extend/TCP is an abbreviation for Coherence*Extend configured for transport over TCP/IP.
2.7 Corrections to How to Manage Coherence using JMX
In How to Manage Coherence Using JMX, Table 22-4: Values for the tangosol.coherence.management.refresh.policy Property incorrectly identifies refresh-expired as being the default value. The correct default value for the property is refresh-ahead.
2.8 Corrections to distributed-scheme Element Description
The description of the backup-count attribute of the distributed-scheme element incorrectly lists 0, 1, or 2 as the recommended values. The correct recommended values should be 0 or 1.
2.9 Corrections to Production Checklist
This section describes changes and enhancements made to the Production Checklist appendix:
In the JVM section, the bullet points that read:
-
Using identical heap size values for both
-Xmsand-Xmxwill yield substantially better performance, as well as "fail fast" memory allocation.
Should be corrected to the following (corrected text in italics)
-
Using identical heap size values for both
-Xmsand-Xmxwill yield substantially better performance on Sun and JRockit JVMs, as well as "fail fast" memory allocation. See the specific Deployment Considerations for various JVMs below.
The following bullet point should be added to the list:
-
JVMs that experience an
OutOfMemoryErrorcan be left in an indeterministic state which can have adverse effects on a cluster. We recommend configuring JVMs to exit upon encountering an OutOfMemoryError instead of allowing the JVM to attempt recovery. See the specific Deployment Considerations below for instructions on configuring this on common JVMs.
2.10 Corrections to Platform-Specific Deployment Considerations
This section describes the changes and enhancements made to the Platform-Specific Deployment Considerations appendix.
2.10.1 Sun JVMs
In the Deploying to Sun JVMs section, add the following section:
JVMs that experience an OutOfMemoryError can be left in an indeterministic state which can have adverse effects on a cluster. We recommend configuring JVMs to exit upon encountering an OutOfMemoryError instead of allowing the JVM to attempt recovery. Here are the parameters to configure this setting on Sun JVMs:
Unix:
-XX:OnOutOfMemoryError="kill -9 %p"
Windows:
-XX:OnOutOfMemoryError="taskkill /F /PID %p"
Note:
Note: as of December 2008, this flag is available on newer versions of 1.4.2 and 1.6, but not on 1.5.2.10.2 IBM JVMs
In the Deploying to IBM JVMs section, add the following two sections:
JVMs that experience an OutOfMemoryError can be left in an indeterministic state which can have adverse effects on a cluster. We recommend configuring JVMs to exit upon encountering an OutOfMemoryError instead of allowing the JVM to attempt recovery. Here are the parameters to configure this setting on IBM JVMs (1.5 and above):
Unix:
-Xdump:tool:events=throw,filter=java/lang/OutOfMemoryError,exec="kill -9 %pid"
Windows:
-Xdump:tool:events=throw,filter=java/lang/OutOfMemoryError,exec="taskkill /F /PID %pid"
IBM does not recommend fixed size heaps for JVMs. In many cases, it is recommended to use the default for -Xms (in other words, omit this setting and only set -Xmx). See this link for more details:
2.10.3 Oracle JRocket JVMs
In the Deploying to Oracle JRocket JVMs section add the following section:
JVMs that experience an OutOfMemoryError can be left in an indeterministic state which can have adverse effects on a cluster. We recommend configuring JVMs to exit upon encountering an OutOfMemoryError instead of allowing the JVM to attempt recovery. Here are the parameters to configure this setting on JRockit JVMs:
-XXexitOnOutOfMemory