|
Configuring Siebel Open UI > Customizing Siebel Open UI for Siebel Mobile > Customizing How Siebel Open UI Interacts with Siebel Mobile Applications >
Adding Maps That Include Location Data in Siebel Mobile
This topic describes how to configure Siebel Open UI to add maps that include location data in Siebel Mobile. Siebel Open UI uses the location of the mobile device service to map contacts. It can access these services through methods. The location service allows you to use the zip code or postal code to map contacts, accounts, or activities. For more information, Method That Integrates Google Maps. To add maps that include location data in Siebel Mobile
- Make sure you prepare the data that this example requires.
For more information, see Setting Up Configuration for Siebel Mobile Examples.
- Add a map button to the Contact List Applet:
- Open Siebel Tools. Choose the Siebel Mobile tag in the log in dialog box.
For more information, see Using Siebel Tools.
- In the Object Explorer, click Applet.
- In the Applets list, query the Name property for Contact List Applet.
- In the Object Explorer, expand the Applet tree, expand the List tree, and then click List Column.
- In the List Columns list, add the following list column.
|
|
Name |
Personal Full Address |
Field |
Personal Full Address |
Display Name - String Reference |
SBL_ADDRESS-1004224839-0NU |
- In the Object Explorer, click Control.
- In the Controls list, add the following control.
|
|
Name |
ShowAccounts |
Caption - String Reference |
SBL_MAP-1009093849-828 |
HTML Type |
MiniButton |
Method Invoked |
ShowMapLocations |
- Configure Siebel Open UI to display the Address field:
- In the Object Explorer, click Applet Web Template.
- In the Applet Web Templates list, query the Name property for Edit List.
- In the Object Explorer, expand the Applet Web Template tree, and then click Applet Web Template Item.
- In the Applet Web Template Items list, query the Name property for Account, and then set the Inactive property to TRUE.
- In the Applet Web Templates list, right-click the Edit List record, and then click Edit Web Layout.
- In the Web Layout Editor, drag and drop the following list column from the Controls/Columns Palette to an appropriate location in the canvas:
'Personal Full Address' (Display Name: Address)
- Drag and drop the following control from the Controls/Columns Palette to an appropriate location in the canvas:
'ShowAccounts' (Display Name: Map)
- Save your modifications, and then close the Web Layout Editor.
- In the Object Explorer, click Applet.
- In the Applets list, right-click the Contact List Applet, and then click Compile Selected Objects. Compile this applet into the SRF that the client uses.
- Modify the mobile contact list view to use the correct web template:
- In the Object Explorer, click Web Template.
- In the Web Templates list, add the following web template.
|
|
Name |
View Detail Map Mobile |
Project |
Mobile LS |
Type |
View Template |
- In the Object Explorer, expand the Web Template tree, and then click Web Template File.
- In the Web Template Files list, add the following web template file.
|
|
Name |
View Detail Map Mobile Template |
File Name |
CCViewDetailMap_Mobile.swt |
Bitmap |
CCViewDetailMap_Mobile.swt |
- Right-click the View Detail Map Mobile Template record, and then click Compile Selected Objects. Compile this file into the SRF that the client uses.
- In the Object Explorer, click View.
- In the View list, query the Name property for Pharma Contact List View - Mobile.
- In the Object Explorer, expand the View tree, and then click View Web Template.
- In the View Web Templates list, query the Name property for Base, and then set the following property.
|
|
Web Template |
View Detail Map Mobile |
- In the Views list, right-click the Pharma Contact List View - Mobile record, and then click Compile Selected Objects. Compile this file into the SRF that the client uses.
- Test your modifications:
- Use Safari to open the ePharmacy application.
- Reset Safari for mobile mode.
- Navigate to the Contacts screen.
- Make sure Siebel Open UI displays a Map button on the contact list applet.
If Safari does not display the map, then make sure you set the Safari browser proxy correctly.
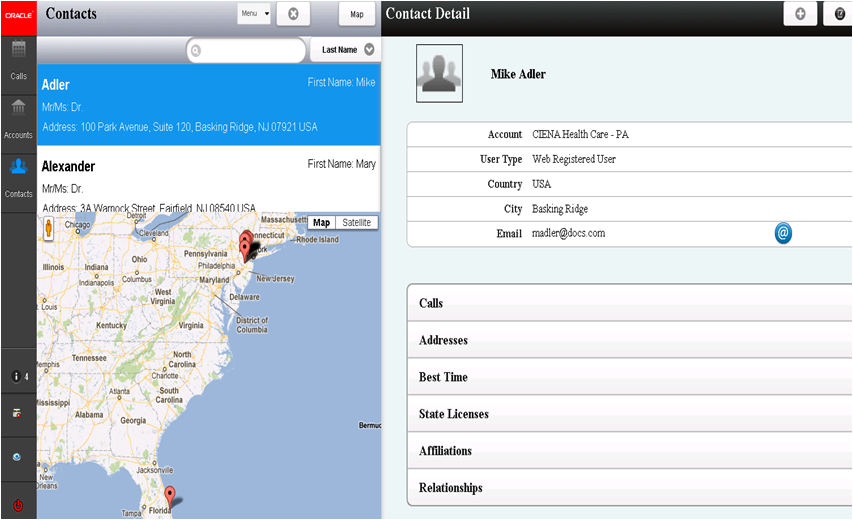
- Click the Map button and make sure Siebel Open UI displays a Google map at the bottom of the list applet.
- Make sure the map includes markers that identify the physical location of the contacts. For example:
|