| Oracle® Business Intelligence Applications Installation and Configuration Guide for Oracle Data Integrator Users Version 7.9.5.2 Part Number E13669-01 |
|
|
View PDF |
| Oracle® Business Intelligence Applications Installation and Configuration Guide for Oracle Data Integrator Users Version 7.9.5.2 Part Number E13669-01 |
|
|
View PDF |
This chapter explains how to install and set up the Oracle Business Intelligence Applications components to create a working Extract-Load Transform (E-LT) environment. It contains the following main topics:
Section 4.1, "About Oracle Business Intelligence Applications Topologies"
Section 4.3, "Mandatory Requirements and Pre-installation Tasks"
Section 4.5, "Setting Up the Oracle Business Intelligence Applications and ODI Components"
For information about supported platform versions, see System Requirements and Supported Platforms for Oracle Business Intelligence Applications.
To find out about other possible tasks required to deploy Oracle Business Intelligence Applications, see Section 2.4, "Roadmap To Installing, Configuring, and Customizing Oracle Business Intelligence Applications With ODI".
Oracle Business Intelligence Applications and Oracle Data Integrator (ODI) can be deployed flexibly across a wide range of topologies on different platforms and combinations of platform.
This section uses an example to explain a typical topology for an Oracle Business Intelligence Applications deployment. The figure below describes a typical deployment topology, which includes an installation tier, an E-LT tier, and an Oracle BI deployment tier.
Note: The Oracle Business Intelligence Applications installer only installs onto a Windows machine. To install Oracle Business Intelligence Applications components on Unix platforms, you must first install the components on a Windows machine, then manually copy over the components to a Unix machine.
In the figure above, note the following:
Installation Tier
MACHINE A (Windows-only)
MACHINE A is a machine that has installed Oracle Business Intelligence Administration Tool, on which you run the Oracle Business Intelligence Applications installer to install the Oracle Business Intelligence Applications files. You can also install Oracle Business Intelligence Applications on a machine that has Oracle Business Intelligence Enterprise Edition installed.
When the Oracle Business Intelligence Applications installation is complete, you manually copy the following files from the installation machine (MACHINE A) to the Business Intelligence Deployment Tier (MACHINE GROUP E), as follows:
- You manually copy the OracleBI\Server\Repository\OracleBIAnalyticsApps.rpd file from MACHINE A to the machine that runs the BI Server in MACHINE GROUP E.
- You manually copy the OracleBIData\Web\Catalog\EnterpriseBusinessAnalytics\*.* files from MACHINE A to the machine that runs the BI Presentation Services Catalog in MACHINE GROUP E.
You typically develop the RPD and Presentation Catalog and perform customization changes to fit your business requirements.
- You manually copy the biapps_odi.zip file from MACHINE A to the Oracle Data Integrator machine (that is, MACHINE B) and unzip the file into the \oracledi\ directory.
- You manually copy the Oracle BI Applications Configuration Manager files in the \OracleBI\dwrep\biapps_configmgr\ directory from MACHINE A to the Oracle Data Integrator machine (that is, MACHINE B).
E-LT Tier (Functional)
MACHINE B (Windows, Unix, Linux)
MACHINE B is a machine on which ODI is installed, and which runs the ODI production environment (for example, ODI tools, ODI Agents). You manually copy the biapps_odi.zip to this machine, and unzip the file into the \oracledi\ directory. In addition, you manually copy the Oracle BI Applications Configuration Manager files in the \OracleBI\dwrep\biapps_configmgr\ directory from MACHINE A to this machine.
MACHINE C (Windows, Unix, Linux)
MACHINE C is a machine that hosts the transactional (OLTP) database.
MACHINE D (Windows, Unix, Linux)
MACHINE D is a machine that hosts the Oracle Business Analytics Warehouse database.
BI Deployment Tier (Functional)
The BI Deployment Tier (Functional) tier is used to deploy the business intelligence dashboards, can have either of the following:
MACHINE GROUP E (Windows, Unix, Linux)
MACHINE GROUP E is a group of machines that runs the Oracle Business Intelligence Enterprise Edition components. For example, one machine might run the BI Server and BI Applications RPD, and another machine might run the BI Presentation Services and the Oracle Business Analytics Warehouse.
Notes
In an ODI environment, you typically maintain different environments (known as Contexts) for QA, Development, and Production. For information about Contexts, and about moving from a test to a production environment in ODI, see Section 4.6.10, "About deploying ODI across multiple environments".
To maintain a back-up of the ODI project for recovery purposes, use the Import and Export option in ODI Designer. For example, you can select File, then Export to export the Work Repository to a directory or ZIP file. You can select File, then Import to import the Work Repository from a directory or ZIP file. For information about how to import a Work Repository, see Section 4.5.5.5, "How to import the Oracle BI Applications Work Repository".
The Oracle Business Intelligence Applications installation and set up process consists of the following tasks. Complete each of these tasks in the order listed below.
Before you install Oracle Business Intelligence Applications and Oracle Data Integrator, make sure that you have satisfied the following requirements:
Make sure that you satisfy the Oracle Business Intelligence Infrastructure requirements that are specified in Section 4.3.1, "Oracle Business Intelligence Infrastructure Requirements".
Make sure that you satisfy the Oracle Data Integrator requirements that are specified in the Oracle Data Integrator Installation Guide. In addition, before you install ODI, Oracle recommends that you read the ODI documentation in detail to enable you to plan your ODI topology. ODI documentation is available on the BI media pack.
Make sure that you satisfy the Code Page requirements that are specified in Section 4.3.2, "Code Page and Data Movement Requirements").
Make sure that you perform that mandatory pre-installation tasks that are specified in Section 4.3.3, "Pre-installation Tasks").
Install the Oracle Business Intelligence Applications Version 7.9.5.2 software (for more information, see Section 4.4, "Installing Oracle Business Intelligence Applications and Oracle Data Integrator Software"), as follows:
Run the Oracle installer to install the Oracle Business Intelligence Applications software. For more information, see Section 4.4.1, "How to Run the Oracle Business Intelligence Applications Installer (Windows)".
Run the Oracle Data Integrator installer to install the Oracle Data Integrator software. For more information, see Section 4.4.2, "Installing Oracle Data Integrator Version 10.1.3.5".
(Optional) Copy the BI server components to appropriate Unix or Windows machines Section 4.5.1, "(Optional) How to Copy Over Installation Files".
Set up the Oracle Business Intelligence Applications and Oracle Data Integrator components (for more information, see Section 4.5, "Setting Up the Oracle Business Intelligence Applications and ODI Components"), as follows:
Edit the ODI parameter file to set your deployment-specific settings (for more information, see Section 4.5.2, "How to configure the ODI parameter file").
Create and start the ODI Agents (for more information, see Section 4.5.3, "How to start the ODI Agents").
Set up the ODI Repository (for more information, see Section 4.5.4, "How to configure the ODI Repository").
Set up the ODI Topology (for more information, see Section 4.5.5, "How to set up the ODI Topology").
Create the ODI Scenarios (for more information, see Section 4.5.6, "How to generate the required ODI Scenarios").
Set up the Data Warehouse Target Schema Objects (for more information, see Section 4.5.7, "How to install the Schema Objects for the Oracle Business Analytics Warehouse").
Setup Oracle BI Applications Configuration Manager. For more information, see Section 4.5.8, "Setting Up Oracle BI Applications Configuration Manager".
Set up the Master Packages in ODI to run Execution Plans (for more information, see Section 4.7.1, "How to set up Master Packages to run an Execution Plan").
Review and perform any post-installation tasks that are applicable to your deployment. For more information, see Section 4.6, "Miscellaneous and Supporting Tasks".
Perform a test full load E-LT (for more information, see Section 4.7, "Loading Source Data Using an Execution Plan").
Note: Before you load your OLTP data, you typically configure your applications (for more information, see Section 4, "Configuring Your Analytical Applications") and make customizations if required (for more information, see Section 10, "Customizing Oracle Business Intelligence Applications").
For an example of performing a full load of OLTP data, see Section 4.7.4, "Example of Running A Full Load E-LT in Oracle BI Applications Configuration Manager".
This section includes mandatory requirements that you must satisfy and pre-installation tasks that you must perform before you can deploy Oracle Business Intelligence Applications, and contains the following topics:
Oracle Business Intelligence Applications has the following infrastructure requirements:
To install Oracle Business Intelligence Applications files, at a minimum you must have installed on the installation machine Oracle Business Intelligence Administration Tool.
Alternatively, you can run the Oracle Business Intelligence Applications installer on a machine that has installed Oracle Business Intelligence Enterprise Edition. If so, Oracle Business Intelligence Enterprise Edition must have been installed using the Complete setup type option. This infrastructure does not need to be the functional version of Oracle Business Intelligence Enterprise Edition that you will use to deploy reports and dashboards in your live system. This infrastructure is only required to enable the Oracle Business Intelligence Applications installer to install the Oracle Business Intelligence Applications files onto a machine. For more information about topologies, see Section 4.1, "About Oracle Business Intelligence Applications Topologies".
To run Oracle Business Intelligence Applications, you must have installed Oracle Business Intelligence Enterprise Edition as the infrastructure. In an Oracle Business Intelligence Applications deployment, Oracle Business Intelligence Enterprise Edition uses the Oracle Business Analytics Warehouse as a data source, uses the prebuilt OracleBIAnalyticsApps.rpd as the repository for the Oracle BI Server, and provides users with the Oracle BI Applications reports and dashboards.
To determine the minimum version of Oracle Business Intelligence infrastructure that is supported for this release of Oracle Business Intelligence Applications, refer to System Requirements and Supported Platforms for Oracle Business Intelligence Applications.
The Oracle Business Analytics Warehouse can be deployed in various code page environments and supports global deployments. Oracle EBS data sources typically use UTF8 encoding.
Data movement in the following source database and data warehouse configuration modes are supported:
Unicode to Unicode
Code page (multi- or single-byte) to Unicode
Code page to Code page (where the code pages are the same)
Oracle Business Intelligence Applications uses ODI to perform E-LT routines to move data from source database(s) to the Oracle Business Analytics Warehouse.
During the installation and Set up procedures described in this chapter, you will make various settings to enable accurate data movement. Use the guidelines and references noted below to determine values for these settings that are appropriate for your environment:
Consult your database administrator to determine the code page your source OLTP database uses. Based on the type of data that will be moved from one or more source databases to the Oracle Business Analytics Warehouse, determine what code page you will need to use for the Oracle Business Analytics Warehouse database. Consider future requirements for storing data when determining what code page to use for the Oracle Business Analytics Warehouse.
If your environment uses Oracle or DB2 database, you need to set environment variables NLS_LANG or DB2CODEPAGE. For information on how to set these environment variables see Section 4.3.3.3.1, "Setting the NLS_LANG Environment Variable for Oracle Databases".
This section explains the mandatory tasks that you must perform for an Oracle Business Intelligence Applications deployment, and contains the following topics:
This section provides information on creating database accounts that are required by Oracle Business Intelligence Applications components. You must create the database accounts listed in this section in a single Oracle 10gR2 database instance.
For example SQL commands that you can use to create database accounts, see "Example SQL Commands For Creating Database Users and Tablespaces".
Note: Make sure that you set up the database correctly, using the init<Version>.ora initialization file provided (for more information, see Section 3.1, "Oracle-Specific Database Guidelines for Oracle Business Analytics Warehouse").
Note: For information about changing the default database passwords or changing the schema names, see Section 4.6.4, "About Resetting the Default Passwords, Schema Names, and ODI Connection Details".
Before you install Oracle Business Intelligence Applications, use your target database tool to create the following database users and tablespaces with the specified privileges:
Table 4-1 Required Database Users and Tablespaces
| Database User ID | Description | Default Password | Tablespace | Privileges |
|---|---|---|---|---|
|
ODI_REP_7952 |
ODI Master and Work Repositories database schema. |
ODI_REP_7952 |
BIAPPS_REP |
CONNECT, RESOURCE |
|
TEMP_BIAPPS |
ODI staging database schema. TEMP_BIAPPS is used by ODI to create and drop segments during ELT processes. This schema must have a dedicated and locally managed tablespace with a uniform extent size. |
TEMP_BIAPPS |
BIAPPS_TEMP |
CONNECT RESOURCE |
|
DATA_BIAPPS |
Data Warehouse database schema. |
DATA_BIAPPS |
BIAPPS_DATA |
CONNECT RESOURCE CREATE DATABASE LINK CREATE ANY DIRECTORY CREATE ANY INDEX CREATE ANY PROCEDURE CREATE ANY SEQUENCE CREATE ANY SYNONYM CREATE ANY TABLE CREATE ANY TRIGGER CREATE ANY VIEW DELETE ANY TABLE DROP ANY DIRECTORY DROP ANY INDEX DROP ANY PROCEDURE DROP ANY SEQUENCE DROP ANY SYNONYM DROP ANY TABLE DROP ANY TRIGGER DROP ANY VIEW INSERT ANY TABLE SELECT ANY SEQUENCE SELECT ANY TABLE UPDATE ANY TABLE ANALYZE ANY |
|
Index Tablespace |
Index Tablespace. This is a mandatory Tablespace that is used as the INDEX_TABLESPACE FlexField value in ODI (for more information, see Section 4.5.7.5, "Verifying the INDEX_TABLESPACE Setting"). |
Not applicable. |
BIAPPS_INDEX |
Not applicable. |
|
DATA_BIAPPSTX |
Oracle BI Applications Configuration Manager database schema. Additional privileges are created as part of the setup (for more information, see Section 4.5.8.3, "How to Set Up Oracle BI Applications Configuration Manager on Windows"). |
DATA_BIAPPSTX |
BIAPPS_DATA |
CONNECT RESOURCE |
Example SQL Commands For Creating Database Users and Tablespaces
To create a database user named ODI_REP_7952:
GRANT CONNECT, RESOURCE TO ODI_REP_7952 IDENTIFIED BY ODI_REP_7952;
To make sure that the database object is created in the correct tablespace, use the following command:
ALTER USER ODI_REP_7952 DEFAULT TABLESPACE BIAPPS_REP;
To create a database user named TEMP_BIAPPS:
GRANT CONNECT, RESOURCE TO TEMP_BIAPPS IDENTIFIED BY TEMP_BIAPPS;
To create a database user named DATA_BIAPPS:
GRANT CONNECT,RESOURCE,CREATE DATABASE LINK,CREATE ANY DIRECTORY,CREATE ANY INDEX,CREATE ANY PROCEDURE,CREATE ANY SEQUENCE,CREATE ANY SYNONYM,CREATE ANY TABLE,CREATE ANY TRIGGER,CREATE ANY VIEW,DELETE ANY TABLE,DROP ANY DIRECTORY, DROP ANY INDEX,DROP ANY PROCEDURE,DROP ANY SEQUENCE,DROP ANY SYNONYM,DROP ANY TABLE,DROP ANY TRIGGER,DROP ANY VIEW,INSERT ANY TABLE,SELECT ANY SEQUENCE, SELECT ANY TABLE,UPDATE ANY TABLE,ANALYZE ANY TO DATA_BIAPPS IDENTIFIED BY DATA_BIAPPS;
To create a tablespace named BIAPPS_INDEX:
CREATE TABLESPACE BIAPPS_INDEX DATAFILE 'tmp_tablespace.dat' SIZE 10M REUSE;
To create a database user named DATA_BIAPPSTX:
GRANT CONNECT, RESOURCE TO DATA_BIAPPSTX IDENTIFIED BY DATA_BIAPPSTX;
Oracle EBS 11.5.10 source data is accessed through a Database Link (DBLINK) drawn from the ODI_REP_7952 schema on the Oracle Business Analytics Warehouse database instance to the schema on the EBS 11.5.10 database instance. You need to enable this connection by creating an entry in the tnsnames.ora file in your Oracle Business Analytics Warehouse database instance.
The file tnsnames.ora is located in <ORACLE_HOME>\NETWORK\ADMIN directory on the machine hosting your Oracle Business Analytics Warehouse database instance.
Example TNS entries:
ipc-ora=(DESCRIPTION=
             (ADDRESS=
                 (PROTOCOL=IPC)
                 (KEY=ORCL)
             )
             (CONNECT_DATA=(SID=ORA102))
            (HS=)
             )
ipc-gw=(DESCRIPTION=
           (ADDRESS=
               (PROTOCOL=IPC)
               (KEY=ORCL)
           )
           (CONNECT_DATA=(SID=drdahoa1))
                                     (HS=)
           )
You can update the TNS file manually using a text editor, or use the configuration tool, Oracle Net Configuration Assistant. For more information about the configuration tool, refer to Oracle Net Services Administrator's Guide in the Oracle database documentation library.
On the machines that will host the databases, you need to configure the language environment using the NLS_LANG variable.
Follow this procedure to set the NLS_LANG environment variable for Oracle databases.
Note:
You need to set the NLS_LANG environment variable on each machine that has the Oracle client installed.To set the NLS_LANG environment variable for Oracle databases:
Determine the NLS_LANG value.
In the data warehouse database, run the command
SELECT * FROM V$NLS_PARAMETERS
Make a note of the NLS_LANG value, which is in the format [NLS_LANGUAGE]_[NLS_TERRITORY].[NLS_CHARACTERSET].
For example: American_America.UTF8
For Windows:
Navigate to Control Panel > System and click the Advanced tab. Click Environment Variables.
In System variables section, click New.
In the Variable Name field, enter NLS_LANG.
In the Variable Value field, enter the NLS_LANG value that was returned in Step 0.
The format for the NLS_LANG value should be [NLS_LANGUAGE]_[NLS_TERRITORY].[NLS_CHARACTERSET].
For example: American_America.UTF8.
Note:
The NLS_LANG character set should reflect the setting of the operating system character set of the client. For example, if the database character set is AL32UTF8 and the client is running on a Windows operating system, then you should not set AL32UTF8 as the client character set in the NLS_LANG parameter because there are no UTF-8 WIN32 clients. Instead, the NLS_LANG setting should reflect the code page of the client. For example, on an English Windows client, the code page is 1252. An appropriate setting for NLS_LANG is AMERICAN_AMERICA.WE8MSWIN1252.Setting NLS_LANG correctly allows proper conversion from the client operating system character set to the database character set. When these settings are the same, Oracle assumes that the data being sent or received is encoded in the same character set as the database character set, so character set validation or conversion may not be performed. This can lead to corrupt data if the client code page and the database character set are different and conversions are necessary
For UNIX and Linux, set the variable as shown below:
setenv NLS_LANG <NLS_LANG>
echo $NLS_LANG
For example: setenv NLS_LANG American_America.UTF8. Use the echo $NLS_LANG command to verify that you have set the environment correctly.
If your data is 7-bit or 8-bit ASCII and ODI is running on UNIX or Linux, then set NLS_LANG <NLS_LANGUAGE>_<NLS_TERRITORY>.WE8ISO8859P1
Depending on your network setup, you might have to open ports on your firewall. For example, you might open a port in your firewall for the connection from ODI to the source system database or data warehouse database.
This section explains how to install Oracle Business Intelligence Applications software and Oracle Data Integrator software, and contains the following topics:
Section 4.4.1, "How to Run the Oracle Business Intelligence Applications Installer (Windows)"
Section 4.4.2, "Installing Oracle Data Integrator Version 10.1.3.5"
Note: After installation, you must follow the set up instructions specified in Section 4.5, "Setting Up the Oracle Business Intelligence Applications and ODI Components".
The Oracle Business Intelligence Applications installer runs on Windows, and requires an Oracle Business Intelligence infrastructure to be installed. For more information on Oracle Business Intelligence infrastructure requirements, including versions supported for this release of Oracle BI Applications, see Section 4.3.1, "Oracle Business Intelligence Infrastructure Requirements".
This section explains how to install the Oracle Business Intelligence Applications files using the Oracle Business Intelligence Applications Installation Wizard.
Note: The Oracle Business Intelligence Applications installer only installs onto a Windows machine. To install Oracle Business Intelligence Applications components on Unix platforms, you must first install the components on a Windows machine, then manually copy over the components to one or more Unix machines.
When you run the Oracle Business Intelligence Applications Installation Wizard, the Oracle Business Intelligence Applications files are installed into the existing Oracle Business Intelligence infrastructure directory (for example, <DRIVE>:\OracleBI\).
Note:
If you have a previous version of Oracle Business Intelligence Applications installed, you must uninstall this version before you run the installer for Oracle Business Intelligence Applications Version 7.9.5.2. Oracle recommends that before you uninstall the old version you make a back-up of the RPD and Presentation Services Catalog.To install Oracle Business Intelligence Applications on Windows:
Access the installation files on the installation CD-ROM, and then run the program setup.exe to display the Welcome page.
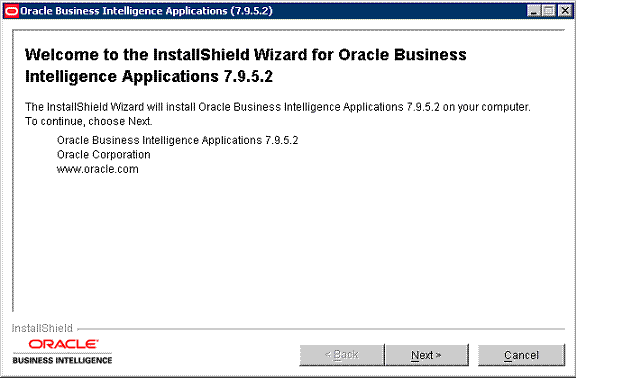
Note:
To run the installer in console (or text) mode, run the command setup.exe -console. You do not see following dialogue screens in console installation mode. Instead, you enter input as plain text in the terminal window when prompted.Click Next to display the Oracle Business Intelligence infrastructure selection page.
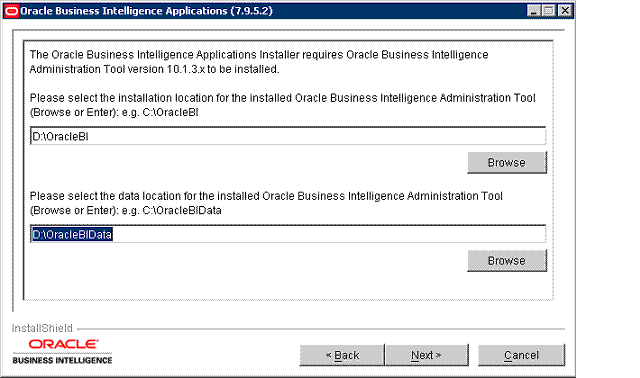
Enter or browse for the location for the Oracle Business Intelligence infrastructure (for example, <DRIVE>:\OracleBI\), the Oracle Business Intelligence infrastructure data (for example, <DRIVE>:\OracleBIData\).
Click Next to display the Select Oracle Business Intelligence Applications page.
At the Select Oracle Business Intelligence Applications page, select the applications that you want to install, then click Next.
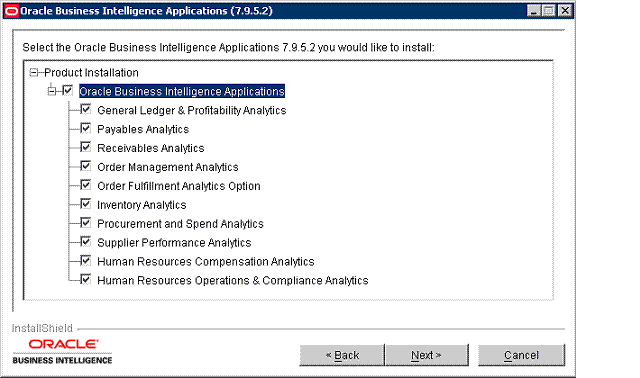
To determine the applications you should install for the Oracle Business Intelligence Applications licenses that you have purchased, see the spreadsheet entitled '2-Installer Options' in Oracle Business Intelligence Applications Licensing and Packaging Guide. This guide is part of the Oracle Business Intelligence Media Pack.
If you selected more than one application on the Select Oracle Business Intelligence Applications page, an information page is displayed. Click Next.
At the summary page, review the summary information and click Next to start the installation.
The installer installs the Oracle Business Intelligence Applications directories and files into the Oracle Business Intelligence infrastructure installation (for example, <DRIVE>:\OracleBI\), and installs the Oracle BI Repository file and Presentation Catalog.
Note: Even when the progress bar on the installer reports 100% complete, you must wait until the Finish button is displayed.
Click Finish.
Tip:
To check that you have installed the correct version of Oracle Business Intelligence Applications, look in the <DRIVE>:\OracleBI\Document\version_apps.txt file in the Oracle Business Intelligence infrastructure directory, which contains the installed version number.When the installation is complete, unzip the \OracleBIData\web\catalog\EnterpriseBusinessAnalytics.zip file into the \OracleBIData\web\catalog\ directory, which creates a new directory called EnterpriseBusinessAnalytics.
You typically copy the \OracleBIData\web\catalog\EnterpriseBusinessAnalytics directory from the installation machine to the machine on which the Oracle Presentation Services is running. For more information, see Section 4.1, "About Oracle Business Intelligence Applications Topologies".
When the installation is complete, verify that the following directories or files are installed in the \OracleBI\ directory of the Oracle Business Intelligence Applications installation machine:
The \OracleBI\dwrep\biapps_odi\ directory.
The Oracle Business Intelligence Applications repository file named OracleBIAnalyticsApps.rpd in the \OracleBI\server\Repository directory. You typically copy the OracleBIAnalyticsApps.rpd file to the machine on which Oracle BI Server is running (for more information, see Section 4.1, "About Oracle Business Intelligence Applications Topologies").
Notes
To log into the OracleBIAnalyticsApps.rpd file using the Oracle Business Intelligence Administration Tool, use the following login details:
Username: Administrator
Password: SADMIN
Refer to the Oracle Business Intelligence Enterprise Edition documentation for more information on working with the repository and Presentation Services Catalog.
This section explains how to install Oracle Data Integrator for an Oracle Business Intelligence Applications deployment. Before you install Oracle Data Integrator, make sure that you have satisfied the requirements specified in Oracle Data Integrator Installation Guide.
To install Oracle Data Integrator Version 10.1.3.5 for Oracle Business Intelligence Applications, do the following:
Install the ODI software (for more information, see Section 4.4.2.1, "How to Run the Oracle Data Integrator Installer").
Manually copy the Oracle BI Applications ZIP file biapps_odi_zip into the ODI installation directory and unzip the file (for more information, see Section 4.4.2.2, "How to set up the Oracle BI Applications files for ODI").
When you run the Oracle Data Integrator installer, you will install the following ODI components:
Agent
Designer
Operator
Repository Management
Security Manager
Topology Manager
You can add other ODI components later if required (for example, Oracle Data Profiling, Metadata Navigator) by running the ODI installer again on a machine. For more information, refer to the Oracle Data Integrator Documentation Library.
To start the Oracle Data Integrator installer:
Access the ODI installation files on the installation CD-ROM, then:
on Windows, double-click setup.bat to start the installer.
on UNIX, enter the ./runInstaller command to start the installer.
Note:
To run the installer in console (or text) mode, run the command setup.exe -console. You do not see following dialogue screens in console installation mode. Instead, you enter input as plain text in the terminal window when prompted.At the Select a Product to Install screen, select the Oracle Data Integrator 10.1.3.5.0 radio button.
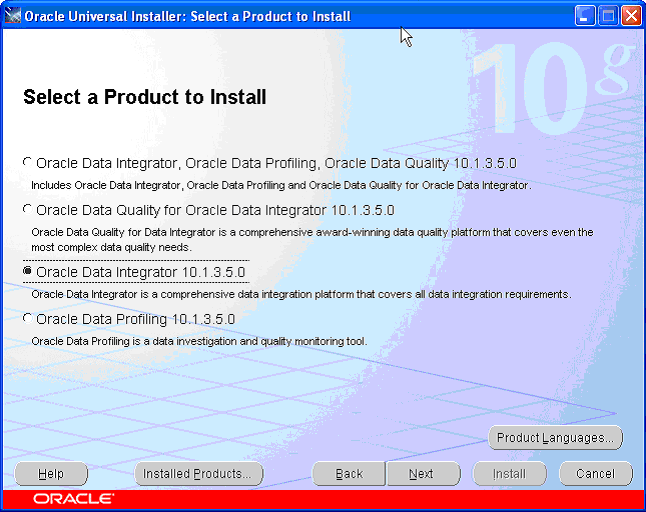
Click Next and follow the remaining on-screen instructions to start the ODI installation.
The Oracle Data Integrator installer creates an Oracle Home directory that contains a \oracledi\ directory. For example, you might have an ODI installation directory called D:\OraHome_1\. The ODI installation directory is referred to as $ODI_HOME.
Note: On UNIX platforms, add the following environment variable for the user who has installed Oracle Data Integrator: ODI_JAVA_HOME=$ODI_HOME/jre/1.4.2. Refer to Oracle Data Integrator Installation Guide for a full list of environment variables required for other components.
After you have installed Oracle Data Integrator Version 10.1.3.5, you need to manually add some Oracle Business Intelligence Applications files to the ODI installation machine, as follows:
To set up the required Oracle BI Applications files for ODI:
On the Oracle Business Intelligence Applications installation machine, locate the biapps_odi.zip file in the \OracleBI\dwrep\biapps_odi\ directory.
For example, D:\OracleBI\dwrep\biapps_odi\biapps_odi.zip.
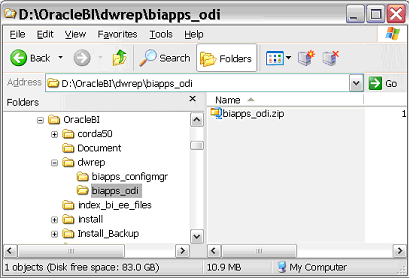
On the Oracle Data Integrator machine, locate the \oracledi\ directory in the Oracle Home directory in which ODI is installed.
For example, D:\OraHome_1\oracledi\.
On the Oracle Data Integrator machine, copy the \OracleBI\dwrep\biapps_odi\biapps_odi.zip file from the Oracle Business Intelligence Applications installation machine to the \oracledi\ directory on the Oracle Data Integrator installation machine.
On the Oracle Data Integrator installation machine, unzip the $ODI_HOME\oracledi\biapps_odi.zip file into the $ODI_HOME\oracledi\ directory.
When you unzip the biapps_odi.zip file, the following new directories are created in the $ODI_HOME\oracledi\ directory:
\biapps_odi\odifiles\binfiles\
\biapps_odi\odifiles\libfiles\
\biapps_odi\odifiles\importfiles\
\biapps_odi\odifiles\dbfiles\
\biapps_odi\odifiles\odidatafiles\
Note: The \odidatafiles\ directory contains a 'lkpfiles' directory (that contains the domain value look-up files) and a 'srcfiles' directory (that contains metadata definitions for the source flat-file data stores).
On the Oracle Data Integrator machine, copy the files in the $ODI_HOME\oracledi\biapps_odi\odifiles\binfiles\ directory to the $ODI_HOME\oracledi\bin\ directory.
On the Oracle Data Integrator machine, copy the files in the $ODI_HOME\oracledi\biapps_odi\odifiles\libfiles\ directory to the $ODI_HOME\oracledi\lib\ directory.
On the Oracle Data Integrator machine, copy the init10gR2.ora file in the $ODI_HOME\oracledi\biapps_odi\dbfiles\ directory to the machine that hosts the data warehouse (for example, in the $ORACLE_HOME/dbs directory).
Rename the init10gR2.ora file, as follows:
On Windows, rename the file as:
%ORACLE_HOME%\database\init<SID>.ora
On UNIX or Linux, rename the file as:
$ORACLE_HOME/dbs/init<SID>.ora
For more information about setting the parameters in the *.ora file, see Section 3.1, "Oracle-Specific Database Guidelines for Oracle Business Analytics Warehouse".
If required (for example, to conserve disk space), you can delete the biapps_odi.zip file from the Oracle Data Integrator machine.
This sections explains how to set up the Oracle Business Intelligence Applications and Oracle Data Integrator components to create an operational E-LT environment. Perform the tasks in this section in the sequence specified. This section contains the following topics:
Section 4.5.1, "(Optional) How to Copy Over Installation Files"
Section 4.5.7, "How to install the Schema Objects for the Oracle Business Analytics Warehouse"
Section 4.5.8, "Setting Up Oracle BI Applications Configuration Manager"
Notes
Before following the steps in this section, you must have installed the Oracle Business Intelligence Applications software and the Oracle Data Integrator software as specified in Section 4.4, "Installing Oracle Business Intelligence Applications and Oracle Data Integrator Software".
The installation and set up steps in this chapter assume the following recommended ODI configuration:
The ODI Master and Work Repositories are installed in a single database schema.
The Data Warehouse database schema is hosted on the same database instance as the ODI Repository.
The ODI Work (temporary) database schema is hosted on the same database instance as ODI Repository.
There is only one Oracle Applications 11.5.10 data source for each environment (for example, the Production context, for more information about Contexts, refer to the ODI documentation).
A typical deployment environment for Oracle Business Intelligence Applications is to have client tools running on Windows, and have servers running on Unix. After installing Oracle Business Intelligence Applications files onto a Windows machine, you might copy the BI server components to appropriate Unix machines, as described in this section.
To copy over installation files:
Copy the OracleBI\Server\Repository\OracleBIAnalyticsApps.rpd file from the Oracle Business Intelligence Applications installation machine to the machine that runs the BI Server.
Copy the OracleBIData\Web\Catalog\EnterpriseBusinessAnalytics\*.* files from the Oracle Business Intelligence Applications installation machine to the machine that runs the BI Presentation Services Catalog.
The Presentation Services Catalog is installed as a ZIP file named EnterpriseBusinessAnalytics.zip. Make sure that you un-zip the EnterpriseBusinessAnalytics.zip file into the OracleBIData\Web\Catalog\ directory.
For more information about deploying Oracle Business Intelligence Applications on multiple machines, see Section 4.1, "About Oracle Business Intelligence Applications Topologies".
You configure the ODI parameter file to specify configuration values that are specific to your Oracle Business Intelligence Applications deployment. For example, you need to specify the ODBC URL.
To configure the odiparams.bat file:
On the ODI machine, open the odiparams.bat or odiparams.sh file in a text editor.
The odiparams.bat and odiparams.sh files are located in the $ODI_HOME\oracledi\bin\ directory. For example, D:\OraHome_1\oracledi\bin\.
Set the value of the following parameter:
set ODI_SECU_URL=jdbc:oracle:thin:@<host>:<port>:<sid>
Replace <host>, <port>, and <sid> with your database specific parameters.
For example, 'jdbc:oracle:thin:@US12345.us.company.com:1521:US12345'.
Save the odiparams file.
To deploy ODI, you must start the ODI Agents named 'WORKFLOW' and 'INTERFACE' as background processes. You must start the ODI Agents each time the machine on which you are running the ODI Agents is started. This task explains how to start the ODI Agents using the default port numbers 20910 (for the WORKFLOW Agent) and 20911 (for the INTERFACE Agent).
Note: If you encounter a port conflict when you run the ODI Agents, you might need to use different port numbers (for more information, see (Section 4.6.13, "How to Resolve Conflicts in ODI Agent Port Numbers").
When you use ODI Designer to execute Packages and Interfaces, you specify the INTERFACE Agent.
To start the ODI Agents on Windows:
On the ODI machine, open a command window and change directory to the $ODI_HOME\oracledi\bin directory.
Execute the following commands one at a time:
agentservice –i –s WORKFLOW 20910
agentservice –i –a INTERFACE 20911

The above commands create the following agents:
Table 4-2 ODI Agents for Oracle Business Intelligence Applications
Display the Windows Services dialog.
For example, run 'services.msc' from the Windows > Run dialog.
Start the 'OracleDI BI Agent WORKFLOW' service and the 'OracleDI BI Agent INTERFACE' service.
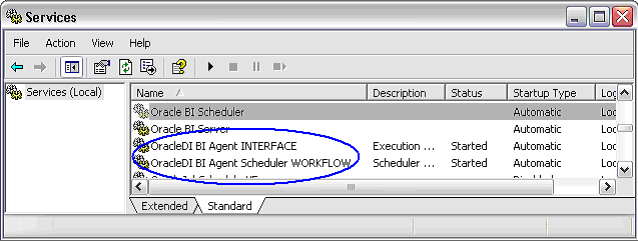
Note: Command log information about Agents is stored in the file $ODI_HOME\oracledi\bin\agentservice.log. For a full list of log files, see Section 4.6.15, "List of Log Files".
To install and start the ODI Agents on Unix:
On the ODI machine, open a command window and change directory to the $ODI_HOME/oracledi/bin directory.
Execute the following commands one at a time:
./agentscheduler.sh –NAME=WORKFLOW –PORT=20910 &
./agent.sh –NAME=INTERFACE –PORT=20911 &
Notes
For the agentscheduler and agent commands, you can set the trace level using -v <trace level>, and use '> trace.txt' to output to a log file. For example:
agent.bat "-v=5" > trace.txt
agent.sh -v=5 . trace.txt
If you restart the machine on which you are running the ODI Agents, you must re-start the ODI Agents.
To configure the ODI Repository, do the following:
Import the ODI Master Repository (for more information, see Section 4.5.4.1, "How to import the ODI Master Repository").
Configure the Topology Manager connection to the ODI Master Repository (for more information, see Section 4.5.4.2, "How to configure the Topology Manager connection to the ODI Master Repository").
Create the ODI Work Repository (for more information, see Section 4.5.4.3, "How to create the blank ODI Work Repository").
To import the ODI Master Repository:
On the ODI machine, choose Start, then All Programs, then Oracle Data Integrator, then Repository Management, then Master Repository Import to display the Master Repository Import Wizard dialog.

On a UNIX or Linux machine, you can display the Master Repository Import Wizard by running the $ODI_HOME/oracledi/bin/mimport.sh command.
In the Master Repository Import Wizard dialog, enter the appropriate information, as described in the table below.
Table 4-3 Master Repository Import Wizard dialog fields
| Field | Description |
|---|---|
|
Login |
Do not change the default option (OracleDI Local Repository). |
|
Driver |
Specify 'oracle.jdbc.driver.OracleDriver'. |
|
URL |
Specify the JDBC URL to the Oracle Business Analytics Warehouse in the format jdbc:oracle:thin:@<host>:<port>:<sid>. Replace <host>, <port> and <sid> with your database installation specific values. For example, 'jdbc:oracle:thin:@US12345.us.company.com:1521:US12345'. |
|
User |
Specify ODI_REP_7952. This is the ODI Repository database user. |
|
Password |
Specify ODI_REP_7952. This is the default password for the ODI Repository database user. |
|
Id |
Specify a non-zero integer (the recommended value is 10). |
|
Use a zip file |
Select this check box. |
|
Zip |
Specify $ODI_HOME\oracledi\biapps_odi\odifiles\importfiles\odi_rep_7952_master.zip |
|
Technology |
Select Oracle from the list. |
Click Test Connection to verify the details, then click OK to close the Information dialog.
Click OK to save the details and start the import.
To configure the Topology Manager connection to the ODI Master Repository:
On the ODI machine, choose Start, then All Programs, then Oracle Data Integrator, then Topology Manager to display the Topology Manager login dialog.

On a UNIX or Linux machine, you can display the Topology Manager by running the /oracledi/bin/topology.sh command.
Click New to display the Repository Connections dialog.
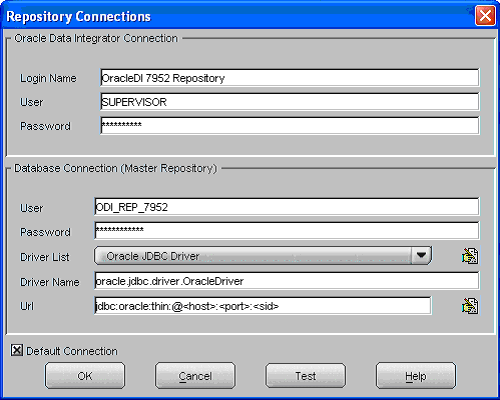
In the Repository Connections dialog, enter the appropriate information, as described in the table below.
Table 4-4 Repository Connections dialog fields
| Field | Description |
|---|---|
|
Login Name |
Specify an identifier for the repository connection. |
|
User |
Specify SUPERVISOR. This is the ODI Administrator database user. |
|
Password |
Specify SUPERVISOR. This is the default password for the ODI Administrator database user. |
|
User |
Specify ODI_REP_7952. This is the ODI Repository database user name. |
|
Password |
Specify ODI_REP_7952. This is the default password for the ODI Repository database user name. |
|
Driver List |
Select 'Oracle JDBC Driver'. |
|
Driver Name |
Specify 'oracle.jdbc.driver.OracleDriver'. |
|
URL |
Specify the JDBC URL to the Oracle Business Analytics Warehouse in the format jdbc:oracle:thin:@<host>:<port>:<sid>. Replace <host>, <port> and <sid> with your database installation specific values. For example, 'jdbc:oracle:thin:@US12345.us.company.com:1521:US12345'. |
|
Default Connection |
Select this check box. |
Click Test to verify the details.
Click OK on the Information dialog.
Click OK on the Security Repository Connections dialog to log in to Topology Manager.
You create a blank ODI Work Repository to enable you to import the Oracle Business Intelligence Applications Work Repository in a later setup task (for more information, see Section 4.5.5.5, "How to import the Oracle BI Applications Work Repository").
To create the blank ODI Work Repository:
Log into Topology Manager as user SUPERVISOR as described in Section 4.5.4.2, "How to configure the Topology Manager connection to the ODI Master Repository".
In the Topology Manager, display the Repositories tab.
In the Repositories pane, right click on Work Repositories node.
Select the Insert Work Repository menu option to display the Data Server: New dialog.
Display the Definition tab, and enter the appropriate information, as described in the table below.
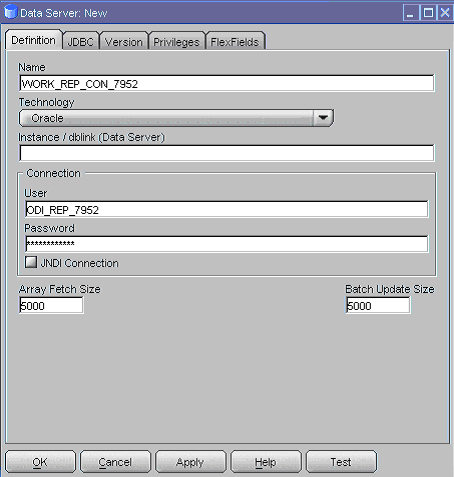
Table 4-5 Data Server: New dialog, Definition tab fields
| Field | Description |
|---|---|
|
Name |
Specify WORK_REP_CON_7952. This is the identifier for the repository connection. |
|
Technology |
Select Oracle from the drop down list |
|
Instance/dblink (Data Server) |
Leave this field blank. |
|
User |
Specify 'ODI_REP_7952'. This is the repository database user name. |
|
Password |
Specify 'ODI_REP_7952'. This is default password for the repository database user name. |
|
JNDI Connection |
Clear this check box. |
|
Array Fetch Size |
Specify a value suitable to your environment (a typical value is 5000). |
|
Batch Update Size |
Specify a value suitable to your environment (a typical value is 5000). |
Display the JDBC tab, and enter the appropriate information, as described in the table below.
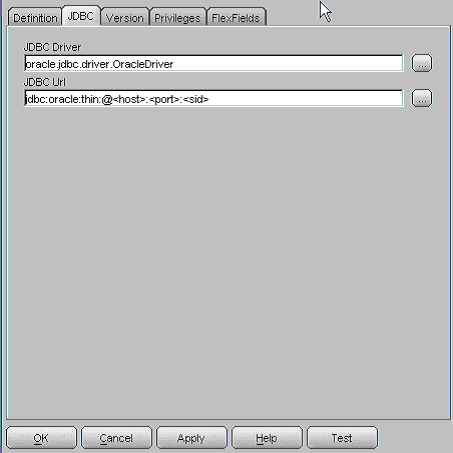
Table 4-6 Data Server: New dialog, JDBC tab fields
| Field | Description |
|---|---|
|
JDBC Driver |
Specify oracle.jdbc.driver.OracleDriver. |
|
JDBC Url |
Specify the JDBC URL to the Oracle Business Analytics Warehouse in the format jdbc:oracle:thin:@<host>:<port>:<sid>. Replace <host>, <port> and <sid> with the values for the database hosting the ODI Repositories. For example, 'jdbc:oracle:thin:@US12345.us.company.com:1521:US12345'. |
Click Test to display the Test Connection for: <connection> dialog.
From the Agent drop down list, select Local (No Agent).
Click Test to verify the details.
Click OK on the Information dialog.
Click OK on the Data Server: New dialog to display the Work Repository: New dialog.
On the Work Repository: New dialog, enter the appropriate information, as described in the table below.
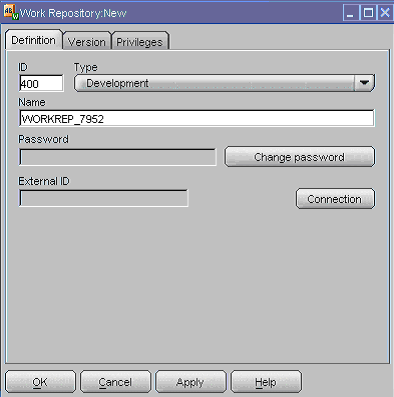
Click Apply, then click OK to save the details.
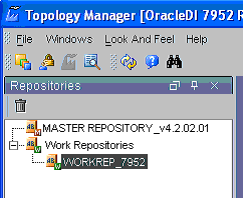
Topology Manager displays the WORKREP_7952 repository in the Work Repositories list in the Repositories pane.
To set up the ODI Topology, you need to do the following:
Set up the Oracle Data Servers (for more information, see Section 4.5.5.1, "Setting up the Oracle Data Servers").
Set up the Agents (for more information, see Section 4.5.5.2, "How to set up the Agents").
Set up the Data Source Number (for more information, see Section 4.5.5.3, "How to set up the Data Source Number").
Set up the ODI Designer connection to the ODI Master Repository (for more information, see Section 4.5.5.4, "How to set up the ODI Designer connection to the ODI Master Repository").
Create the ODI Work Repository (for more information, see Section 4.5.5.5, "How to import the Oracle BI Applications Work Repository").
To set up the Oracle Data Servers for Oracle Business Intelligence Applications, do the following:
Locate the Physical Architecture tab in ODI Topology Manager (for more information, see Section 4.5.5.1.1, "How to display the Physical Architecture tab in Topology Manager").
Set up the ORACLE_BI_APPLICATIONS Data Server (for more information, see Section 4.5.5.1.2, "How to set up the ORACLE_BI_APPLICATIONS Data Server").
Set up the Physical Schema for the ORACLE_BI_APPLICATIONS Data Server (for more information, see Section 4.5.5.1.3, "How to set up the Physical Schema for the ORACLE_BI_APPLICATIONS Data Server").
Set up the ORACLE_EBS_1510 Data Server (for more information, see Section 4.5.5.1.4, "How to set up the ORACLE_EBS_11510 Data Server").
Set up the Physical Schema for the ORACLE_EBS_11510 Data Server (for more information, see Section 4.5.5.1.5, "How to set up the Physical Schema for the ORACLE_EBS_11510 Data Server").
Set up the ORACLE_WORK_REP Data Server (for more information, see Section 4.5.5.1.6, "How to set up the ORACLE_WORK_REP Data Server").
Set up the Physical Schema for the ORACLE_WORK_REP Data Server (for more information, see Section 4.5.5.1.7, "How to set up the Physical Schema for the ORACLE_WORK_REP Data Server").
Set up the Logical Data Servers (for more information, see Section 4.5.5.1.8, "How to set up the Logical Data Servers").
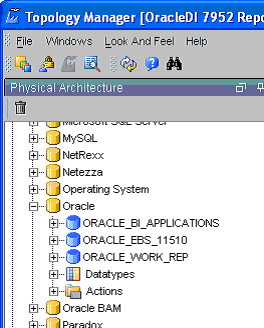
To display the Physical Architecture tab in Topology Manager:
Start ODI Topology Manager.
Display the Physical Architecture tab.
Expand the Technologies node.
Expand the Oracle node to display the Physical Data Servers.
To set up the ORACLE_BI_APPLICATIONS Data Server:
Start Topology Manager and display the Oracle node in the Physical Architecture tab (for more information, see Section 4.5.5.1.1, "How to display the Physical Architecture tab in Topology Manager").
Double click the ORACLE_BI_APPLICATIONS node to display the Data Server: <Name> dialog.
Display the Definition tab, and enter the appropriate information, as described in the table below.
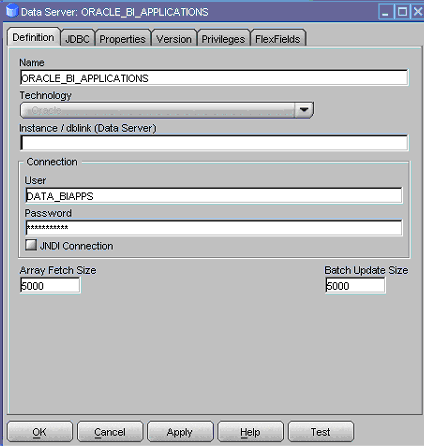
Table 4-8 Data Server: ORACLE_BI_APPLICATIONS dialog, Definition tab fields
| Field | Description |
|---|---|
|
Name |
Do not change the default value ORACLE_BI_APPLICATIONS. |
|
Technology |
Do not change the default value Oracle. |
|
Instance/dblink (Data Server) |
Specify a database instance name. Use the Oracle SID name. |
|
User |
Specify 'DATA_BIAPPS'. This is the warehouse database user name. |
|
Password |
Specify 'DATA_BIAPPS'. This is default password for the warehouse database user name. |
|
Array Fetch Size |
Specify a value suitable to your environment (a typical value is 5000). |
|
Batch Update Size |
Specify a value suitable to your environment (a typical value is 5000). |
Display the JDBC tab, and enter the appropriate information, as described in the table below.

Table 4-9 Data Server: New dialog, JDBC tab fields
| Field | Description |
|---|---|
|
JDBC Driver |
Specify oracle.jdbc.driver.OracleDriver. |
|
JDBC Url |
Specify in the format jdbc:oracle:thin:@<host>:<port>:<sid>. Replace <host>, <port> and <sid> with the values for the database hosting the ODI Repositories. For example, 'jdbc:oracle:thin:@US12345.us.company.com:1521:US12345'. |
Click Test to display the Test Connection for: <Connection> dialog.
From the Agent drop down list, select Local (No Agent).
Click Test to verify the details.
Click OK on the Information dialog.
Click Apply, then click OK.
To set up the Physical Schema for the ORACLE_BI_APPLICATIONS Data Server:
Start Topology Manager and display the Oracle node in the Physical Architecture tab (for more information, see Section 4.5.5.1.1, "How to display the Physical Architecture tab in Topology Manager").
Expand the ORACLE_BI_APPLICATIONS node.
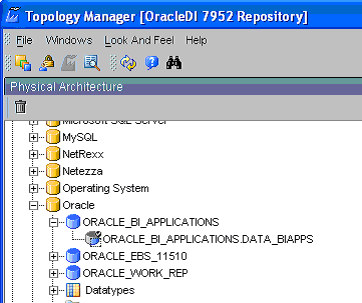
Double click on ORACLE_BI_APPLICATIONS.DATA_BIAPPS to display the Physical Schema: <Name> dialog.
Display the Definition tab, and enter the appropriate information, as described in the table below.
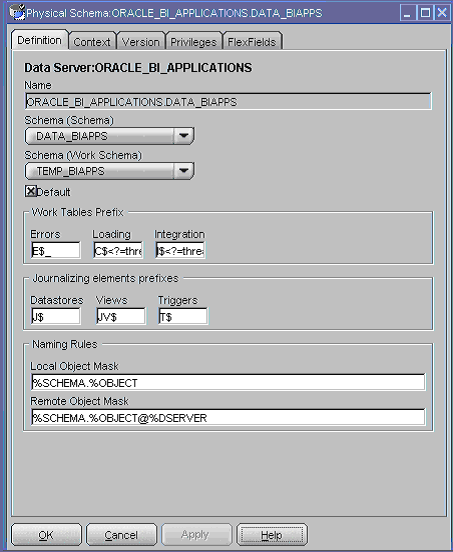
Table 4-10 Physical Schema: <Name> dialog, Definition tab fields
| Field | Description |
|---|---|
|
Schema (Schema) |
Make sure that DATA_BIAPPS is selected from the drop down list. |
|
Schema (Work Schema) |
Make sure that TEMP_BIAPPS is selected from the drop down list. |
Note: Do not change the other field values.
Click OK to save the details.
To set up the ORACLE_EBS_11510 Data Server:
Start Topology Manager and display the Oracle node in the Physical Architecture tab (for more information, see Section 4.5.5.1.1, "How to display the Physical Architecture tab in Topology Manager").
Double click the ORACLE_EBS_11510 node to display the Data Server: <Name> dialog.
Display the Definition tab, and enter the appropriate information, as described in the table below.
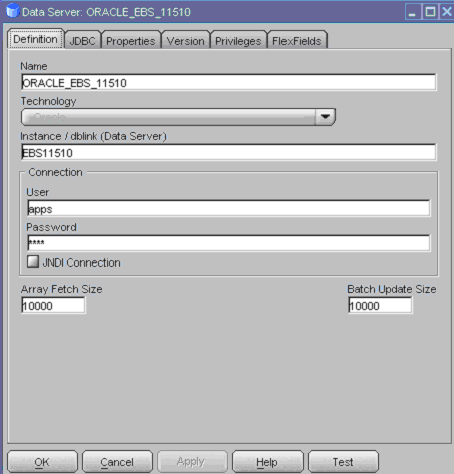
Table 4-11 Data Server: ORACLE_EBS_11510 dialog, Definition tab fields
| Field | Description |
|---|---|
|
Name |
Do not change the default value ORACLE_EBS_11510. |
|
Technology |
Do not change the default value Oracle. |
|
Instance/dblink (Data Server) |
Specify a database instance name. Use the EBS 11.5.10 Oracle SID name. For example, EBS11510. |
|
User |
Specify 'APPS'. This is the EBS 11.5.10 APPS user name. |
|
Password |
Specify the APPS schema password (for example, APPS, or appropriate password). |
|
Array Fetch Size |
Specify a value suitable to your environment (a typical value is 5000). |
|
Batch Update Size |
Specify a value suitable to your environment (a typical value is 5000). |
Display the JDBC tab, and enter the appropriate information, as described in the table below.

Table 4-12 Data Server: ORACLE_EBS_11510 dialog, JDBC tab fields
| Field | Description |
|---|---|
|
JDBC Driver |
Specify oracle.jdbc.driver.OracleDriver. |
|
JDBC Url |
Specify in the format jdbc:oracle:thin:@<host>:<port>:<sid>. Replace <host>, <port> and <sid> with the values for the database hosting the EBS instance. For example, 'jdbc:oracle:thin:@US12345.us.company.com:1521:US11510'. |
Click Test to display the Test Connection for: <connection> dialog.
From the Agent drop down list, select Local (No Agent).
Click Test to verify the details.
Click OK on the Information dialog.
Click Apply, then click OK.
To set up the Physical Schema for the ORACLE_EBS_11510 Data Server:
Start Topology Manager and display the Oracle node in the Physical Architecture tab (for more information, see Section 4.5.5.1.1, "How to display the Physical Architecture tab in Topology Manager").
Expand the ORACLE_EBS_11510 node.
Double click on ORACLE_EBS_11510.APPS to display the Physical Schema: <Name> dialog.
Display the Definition tab, and enter the appropriate information, as described in the table below.

Table 4-13 Physical Schema: <Name> dialog, Definition tab fields
| Field | Description |
|---|---|
|
Schema (Schema) |
Make sure that APPS is selected from the drop down list. |
|
Schema (Work Schema) |
Make sure that APPS is selected from the drop down list. |
Note: Do not change the other field values.
Click OK to save the details.
To set up the ORACLE_WORK_REP Data Server:
Start Topology Manager and display the Oracle node in the Physical Architecture tab (for more information, see Section 4.5.5.1.1, "How to display the Physical Architecture tab in Topology Manager").
Double click the ORACLE_WORK_REP node to display the Data Server: <Name> dialog.
Display the Definition tab, and enter the appropriate information, as described in the table below.

Table 4-14 Data Server: ORACLE_WORK_REP dialog, Definition tab fields
| Field | Description |
|---|---|
|
Name |
Do not change the default value ORACLE_WORK_REP. |
|
Technology |
Do not change the default value Oracle. |
|
Instance/dblink (Data Server) |
Specify the name of the machine that hosts the ODI Master Repository. Use the Oracle SID name. |
|
User |
Specify 'ODI_REP_7952'. This is the ODI Repository user name. |
|
Password |
Specify 'ODI_REP_7952'. This is default password for the ODI Repository user name. |
|
Array Fetch Size |
Specify a value suitable to your environment (a typical value is 5000). |
|
Batch Update Size |
Specify a value suitable to your environment (a typical value is 5000). |
Display the JDBC tab, and enter the appropriate information, as described in the table below.

Table 4-15 Data Server: ORACLE_WORK_REP dialog, JDBC tab fields
| Field | Description |
|---|---|
|
JDBC Driver |
Specify oracle.jdbc.driver.OracleDriver. |
|
JDBC Url |
Specify in the format jdbc:oracle:thin:@<host>:<port>:<sid>. Replace <host>, <port> and <sid> with the values for your database installation specific values. For example, 'jdbc:oracle:thin:@US12345.us.company.com:1521:US12345'. |
Click Test to display the Test Connection for: <connection> dialog.
From the Agent drop down list, select Local (No Agent).
Click Test to verify the details.
Click OK on the Information dialog.
Click Apply, then click OK.
To set up the Physical Schema for the ORACLE_WORK_REP Data Server:
Start Topology Manager and display the Oracle node in the Physical Architecture tab (for more information, see Section 4.5.5.1.1, "How to display the Physical Architecture tab in Topology Manager").
Expand the ORACLE_WORK_REP node.
Double click on ORACLE_WORK_REP.ODI_REP_7952 to display the Physical Schema: <Name> dialog.
Display the Definition tab, and enter the appropriate information, as described in the table below.
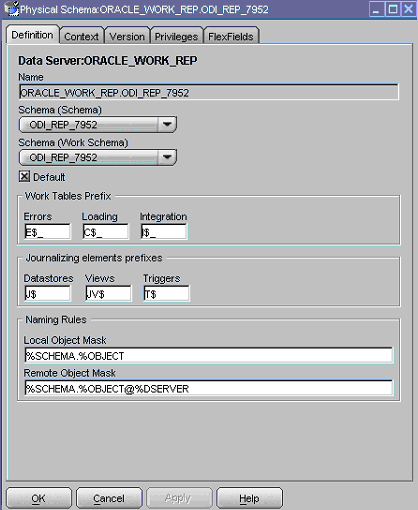
Table 4-16 Physical Schema: <Name> dialog, Definition tab fields
| Field | Description |
|---|---|
|
Schema (Schema) |
Make sure that ODI_REP_7952 is selected from the drop down list. |
|
Schema (Work Schema) |
Make sure that ODI_REP_7952 is selected from the drop down list. |
Note: Do not change the other field values.
Click OK to save the details.
To set up the Logical Data Servers:
Start ODI Topology Manager.
Display the Logical Architecture tab.
Expand the Technologies node.
Expand the Oracle node to display the Logical Data Servers.
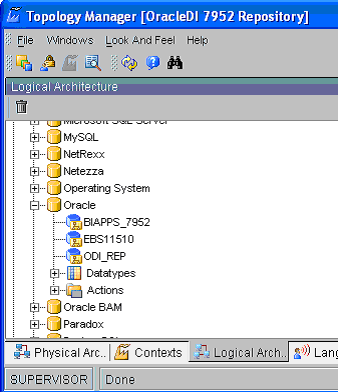
The Oracle node should contain the following Logical Data Servers:
BIAPPS_7952
EBS11510
ODI_REP
Edit the BIAPPS_7952 Logical Data Server and make sure that for the appropriate Context (for example, Development), the value in the Physical Schemas column is set to 'ORACLE_BI_APPLICATIONS.DATA_BIAPPS'.
Edit the EBS11510 Logical Data Server and make sure that for the appropriate Context (for example, Development), the value in the Physical Schemas column is set to 'ORACLE_EBS_11510.APPS'.
Edit the ODI_REP Logical Data Server and make sure that for the appropriate Context (for example, Development), the value in the Physical Schemas column is set to 'ORACLE_WORK_REP.ODI_REP_7952'.
This section explains how to set up the INTERFACE agent and the WORKFLOW agent in Topology Manager. To set up the Agents, do the following:
Set up the INTERFACE Agent (for more information, see Section 4.5.5.2.1, "How to set up the INTERFACE Agent").
Set up the WORKFLOW Agent (for more information, see Section 4.5.5.2.2, "How to set up the WORKFLOW Agent").
Start Topology Manager, display the Physical Architecture tab, and expand the Agents node.
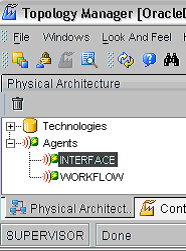
Double-click the INTERFACE node to display the Agent: <Name> dialog.
Display the Definition tab, and enter the appropriate information, as described in the table below.
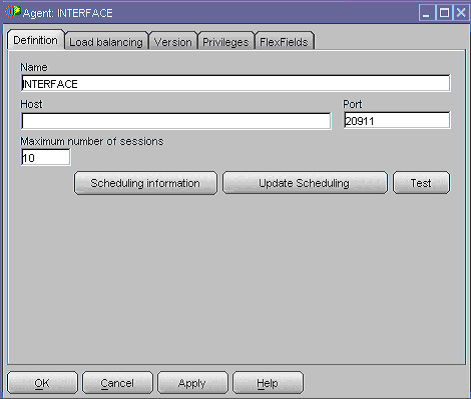
Table 4-17 Agent: <Name> dialog, Definition tab fields
| Field | Description |
|---|---|
|
Name |
Do not change the default value INTERFACE. |
|
Host |
The host name of the machine that is running the Agent, typically the ODI installation machine. For example, localhost, or US12345.us.company.com. |
|
Port |
Do not change the default value. If you encounter a port conflict when you run the ODI Agents, you might need to use a different port number (for more information, see (Section 4.6.13, "How to Resolve Conflicts in ODI Agent Port Numbers"). |
|
Maximum number of sessions |
The maximum number of interfaces that can run in parallel (default is 10). This value is used when load balancing. |
Click Test to verify the details.
Click OK to close the Test window.
Click Apply, then click OK to save the details.
How to set up the WORKFLOW Agent
Start Topology Manager, display the Physical Architecture tab, and expand the Agents node.
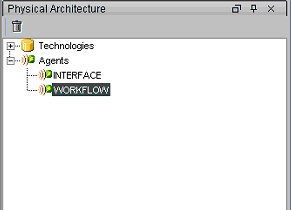
Double-click the WORKFLOW node to display the Agent: <Name> dialog.
Display the Definition tab, and enter the appropriate information, as described in the table below.
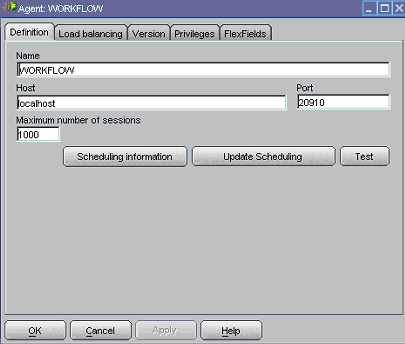
Table 4-18 Agent: <Name> dialog, Definition tab fields
| Field | Description |
|---|---|
|
Name |
Do not change the default value WORKFLOW. |
|
Host |
The host name of the machine that is running the Agent, typically the ODI installation machine. For example, localhost, or US12345.us.company.com. |
|
Port |
Do not change the default value. If you encounter a port conflict when you run the ODI Agents, you might need to use a different port number (for more information, see (Section 4.6.13, "How to Resolve Conflicts in ODI Agent Port Numbers"). |
|
Maximum number of sessions |
The maximum number of interfaces that can run in parallel (default is 1000). This value is used when load balancing. |
Click Test to verify the details.
Click OK to close the Test window.
Click Apply, then click OK to save the details.
The section describes how to uniquely identify the data source for each context using a Data Source Number.
Start Topology Manager, and display the Contexts tab.
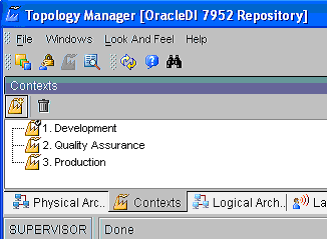
The Contexts tab displays three contexts: Development, Quality Assurance, and Production.
Edit each Context, and do the following:
Display the Flexfields tab, and enter the appropriate information, as described in the table below.
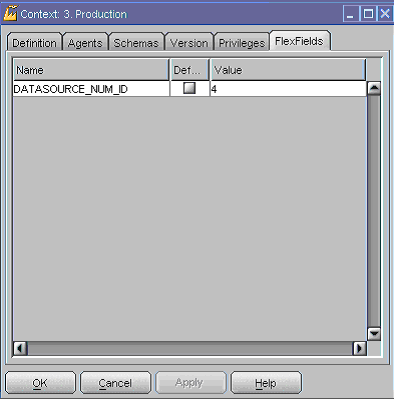
To set up the ODI Designer connection to the ODI Master Repository:
On the ODI machine, choose Start, then All Programs, then Oracle Data Integrator, then Designer to display the Designer login dialog.

Click New to display the Work Repository Connection dialog.
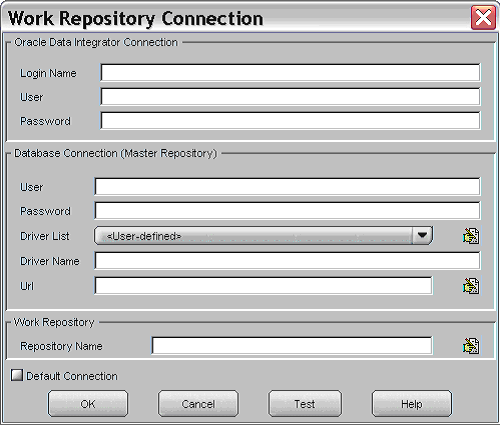
In the Work Repository Connection dialog, enter the appropriate information, as described in the table below.
Table 4-20 Work Repository Connection dialog fields
| Field | Description |
|---|---|
|
Login Name |
Specify 'OracleDI 7952 Repository'. |
|
User |
Specify SUPERVISOR. This is the ODI Administrator database user. |
|
Password |
Specify SUPERVISOR. This is the default password for the ODI Administrator database user. |
|
User |
Specify ODI_REP_7952. This is the ODI Repository database user name. |
|
Password |
Specify SUPERVISOR. This is the default password for the ODI Repository database user name. |
|
Driver List |
Select 'Oracle JDBC Driver'. |
|
Driver Name |
Specify 'oracle.jdbc.driver.OracleDriver'. |
|
URL |
Specify the JDBC URL to the Oracle Business Analytics Warehouse in the format jdbc:oracle:thin:@<host>:<port>:<sid>. Replace <host>, <port> and <sid> with your database installation specific values. For example, 'jdbc:oracle:thin:@US12345.us.company.com:1521:US12345'. |
|
Repository Name |
Specify WORKREP_7952. |
|
Default Connection |
Select this check box. |
Click Test to verify the details.
Click OK on the Information dialog.
Click OK on Repository Connections dialog.
Click OK on the Oracle Data Integrator Login dialog to log in to ODI Designer.
This section explains how to create the Oracle Business Intelligence Applications Work Repository by importing a zipped repository file into ODI. Importing this repository creates a project in 'ODI Designer called Oracle BI Applications 7.9.5.2'.
To import the Oracle BI Applications Work Repository:
In ODI Designer, select an appropriate Context from the Context drop down list.
For example, if you are in a production environment, select Production.
Choose File, then Import, then Work Repository to display the Import work repository dialog.
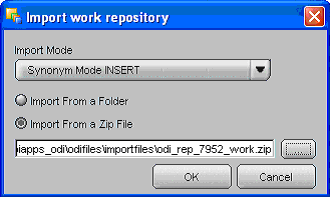
In the 'Import work repository' dialog, enter the appropriate information, as described in the table below.
Table 4-21 Import work repository dialog fields
| Field | Description |
|---|---|
|
Import Mode |
Select Synonym Mode INSERT from the drop down list. |
|
Import From a Zip File |
Select the Import from a Zip File radio button. |
|
<Zip file path> |
Use this field to specify the following path and ZIP file name:
|
Click OK to import the Work Repository.
Tip: Depending on the speed of your ODI machine, ODI Designer can take up to between one and three hours to import the repository. Do not interrupt the import process during this time, even though ODI Designer does not provide a progress report during the import process.
Display the Projects view to display the Oracle BI Applications 7.9.5.2 project that contains the work repository objects.
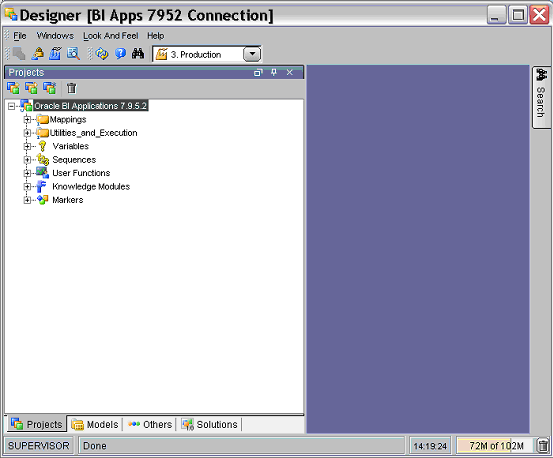
This section explains how to generate the required scenarios in ODI, which are used to control E-LT processes.
In ODI Designer, log in as SUPERVISOR, and display the Projects view.
Expand the Oracle BI Applications 7.9.5.2 project.
Select Utilities_and_Execution, then Utilities, then Initial_Setup, then Procedures.
Right click on Gen Scenarios and select Execute to start creating the scenarios required for Oracle Business Intelligence Applications.
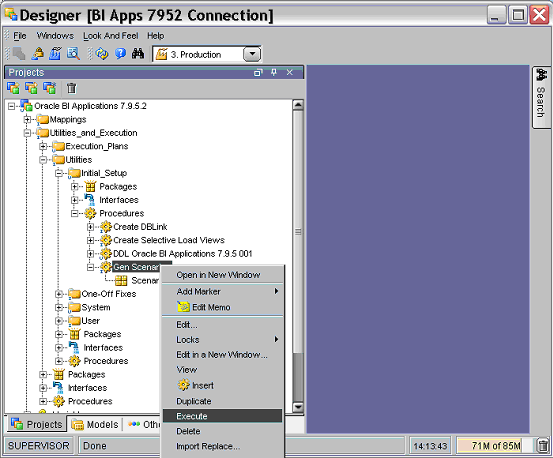
ODI Designer displays the Execution dialog.
Use the Execution dialog to specify the appropriate context in the Context field, and specify Local (No Agent) as the Agent value.
You use ODI Operator to monitor executed processes.
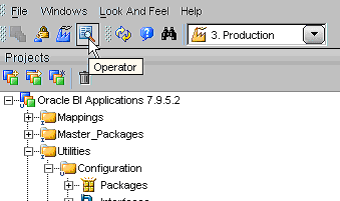
To display ODI Operator, click on the Operator icon on the ODI Designer tool bar.
In ODI Operator, display the Session List tab, expand the Sessions node, and verify the session running the Gen Scenario procedure.
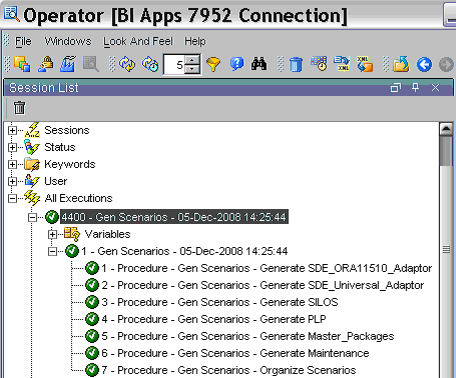
Make sure that all of the procedures on the Gen Scenarios node execute successfully.
This section explains how to install the Schema Objects required by the Oracle Business Analytics Warehouse.
To install the Schema Objects, do the following:
Generate the required procedures (for more information, see Section 4.5.7.1, "How to Generate the Data Warehouse DDL Procedure").
Execute the required procedures (for more information, see Section 4.5.7.2, "Execute the Data Warehouse DDL Procedure").
Execute the Load Control Seed Data Package (for more information, see Section 4.5.7.3, "Running Load Control Seed Data Package").
Execute the Create DBLink procedure (for more information, see Section 4.5.7.4, "Running Create DBLink Procedure").
Verify the INDEX_TABLESPACE setting in ODI (for more information, see Section 4.5.7.5, "Verifying the INDEX_TABLESPACE Setting").
Notes
Before performing the following tasks, make sure that the Oracle Business Analytics Warehouse schema is empty.
To maximize performance, Oracle recommends that you implement range partitioning for fact tables before you create the Oracle Business Analytics Warehouse Target Schema Objects. For more information about implementing partitions, see Section 4.6.9, "How to add partitions to Data Warehouse tables".
To generate the required DDL Procedure:
In ODI Designer, log in as SUPERVISOR, and display the Models view.
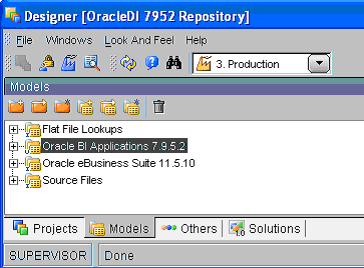
Right-click on the Oracle BI Applications 7.9.5.2 node, then select Generate DDL from the right-click menu to display the Generate DDL for Oracle Data Integrator Model Tables dialog.
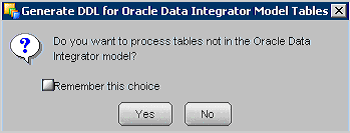
Click No to display the Generate DDL dialog.
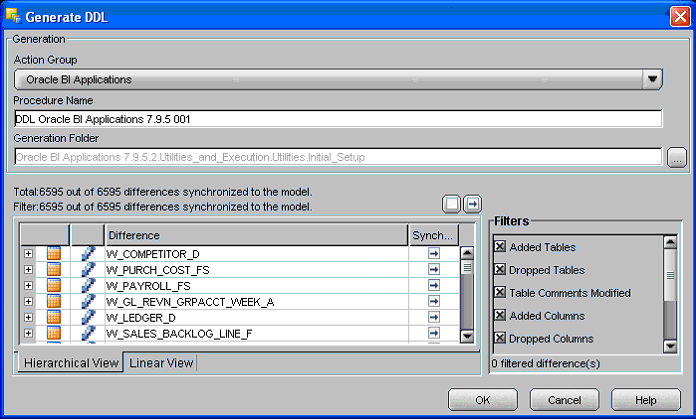
To select all objects for generation, click the right arrow (-->) in the top right hand corner of the list of objects.
A right arrow (-->) is displayed in the Synchronization column for each row in the objects table, to indicate that all objects are selected.
Click the (...) button to the right of the Generation Folder field to display the Select a folder dialog, and select the \Initial_Setup folder.
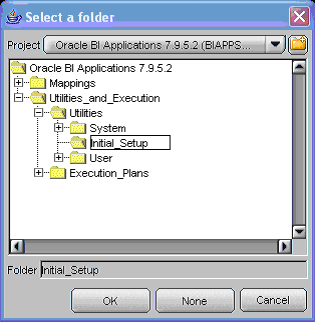
Click OK to start the generation of DDL procedures.
To execute the required procedures:
In ODI Designer, log in as SUPERVISOR, and display the Projects view.
Expand the Oracle BI Applications 7.9.5.2 project.
Select Utilities_and_Execution, then Utilities, then Initial_Setup, then Procedures.
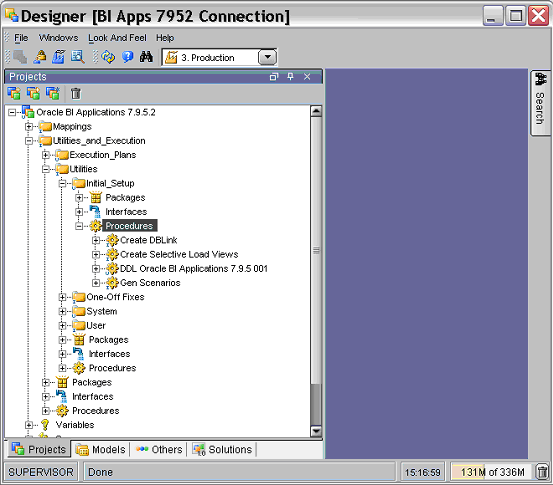
Right click on 'DDL Oracle BI Applications 7.9.5 001' and select Execute.
Right click on 'Create Selective Load Views' and select Execute to display the Execute dialog.
Use the Execution dialog to specify the appropriate context in the Context field, and specify INTERFACE as the Agent value.
You use ODI Operator to monitor executed processes.
To display ODI Operator, click on the Operator icon on the ODI Designer tool bar.

To run the Load Control Seed Data Package:
In ODI Designer, log in as SUPERVISOR, and display the Projects view.
Expand the Oracle BI Applications 7.9.5.2 project.
Select Utilities_and_Execution, then Utilities, then Initial_Setup, then Packages.
Right click on 'Load Control Seed Data' and select Execute.
You use ODI Operator to monitor executed processes.
To run the Create DBLink Procedure:
In ODI Designer, log in as SUPERVISOR, and display the Projects view.
Expand the Oracle BI Applications 7.9.5.2 project.
Select Utilities_and_Execution, then Utilities, then Initial_Setup, then Procedures.

Right click on Create DBLink and select Execute.
You use ODI Operator to monitor executed processes.
You need to make sure that the INDEX_TABLESPACE setting in ODI is configured to use the BIAPPS_INDEX index that you created in Section 4.3.3.1, "Creating the Required Databases and Tablespaces".
To verify the INDEX_TABLESPACE setting:
In ODI Designer, log in as SUPERVISOR, and display the Models view.
Edit the Oracle BI Applications 7.9.5.2 project, to display the Model:<Name> dialog.
Display the FlexFields tab.
Make sure that the INDEX_TABLESPACE FlexField is set with a value BIAPPS_INDEX.
This FlexField is used by Index Management procedures in related Knowledge Modules (KM).
Oracle BI Applications Configuration Manager is a web-application that enables you to:
Create and manage Execution Plans for E-LT executions.
Set E-LT parameters.
View Master Package structures.
Run and monitor Execution Plans.
You can also set up connections to different environments, and use a single deployment of Oracle BI Applications Configuration Manager to manage them.
The source files for Oracle BI Applications Configuration Manager are installed when you install Oracle Business Intelligence Applications on a machine. This section explains how to use those files to set up and run Oracle BI Applications Configuration Manager, and contains the following topics:
Section 4.5.8.1, "Overview to Setting Up Oracle BI Applications Configuration Manager"
Section 4.5.8.2, "How to Execute the Oracle BI Applications Configuration Manager Setup Script"
Section 4.5.8.3, "How to Set Up Oracle BI Applications Configuration Manager on Windows"
Section 4.5.8.4, "How to Set Up Oracle BI Applications Configuration Manager on UNIX/Linux"
Section 4.5.8.5, "About accessing the WebLogic Administration Console"
Section 4.5.8.6, "How to Launch Oracle BI Applications Configuration Manager"
Section 4.5.8.7, "How to Launch Oracle BI Applications Configuration Manager in Debug Mode"
Section 4.5.8.8, "How to create a Connection For Your Development Environment"
Section 4.5.8.9, "How to Login to Oracle BI Applications Configuration Manager Using A Connection"
For information about using Oracle BI Applications Configuration Manager, see Section 4.6.3, "Using Oracle BI Applications Configuration Manager".
Oracle BI Applications Configuration Manager uses a Web Logic application server with Oracle Application Development Framework (ADF) runtime that you must set up after you have installed Oracle Business Intelligence Applications on a machine.
After you have run the Oracle Business Intelligence Applications installer on a machine, the Oracle BI Applications Configuration Manager files are installed in the \OracleBI\dwrep\biapps_configmgr\ directory. To install Oracle BI Applications Configuration Manager on a different machine (for example, a UNIX or Linux machine), you copy the appropriate files from the \OracleBI\dwrep\biapps_configmgr\ directory to the target machine. On the target machine, you then set up Oracle BI Applications Configuration Manager as described in this section.
When deciding where to install WebLogic Server and deploy Oracle BI Applications Configuration Manager, note the following:
You can install WebLogic Server and deploy Oracle BI Applications Configuration Manager on any Windows, UNIX, or Linux machine. For example, you can install WebLogic Server and deploy Oracle BI Applications Configuration Manager on the machine that hosts the ODI Agents and Tools.
For performance reasons, the machine on which you install Oracle WebLogic Server and deploy Oracle BI Applications Configuration Manager must be the same Local Area Network as the Oracle Business Analytics Warehouse machine.
The machine on which you run the WebLogic server for Oracle BI Applications Configuration Manager must have JDK 1.6.0.05 or a higher 1.6.x version.
To set up Oracle BI Applications Configuration Manager:
Execute the setup script for Oracle BI Applications Configuration Manager, as described in Section 4.5.8.2, "How to Execute the Oracle BI Applications Configuration Manager Setup Script".
If you are deploying Oracle BI Applications Configuration Manager from a Windows machine, follow the steps in Section 4.5.8.3, "How to Set Up Oracle BI Applications Configuration Manager on Windows"
If you are deploying Oracle BI Applications Configuration Manager from a UNIX or Linux machine, follow the steps in Section 4.5.8.4, "How to Set Up Oracle BI Applications Configuration Manager on UNIX/Linux"
The biappstx_setup.sql file sets up the required GRANTs on the repositories used by Oracle BI Applications Configuration Manager.
To execute the Oracle BI Applications Configuration Manager setup script:
On the ODI machine, open the biappstx_setup.sql in a text editor or SQL tool, and make sure that the schema names that are defined by the DEFINE statements at the top of the file match the schema names that you have used in your deployment.
The biappstx_setup.sql file is located in the $ODI_HOME\oracledi\biapps_odi\dbfiles\ directory. For example, D:\OraHome_1\oracledi\biapps_odi\dbfiles\.
The default values are defined as follows:
/*  DEFINEs for default schema names  */
--ODI Repository default schema
DEFINE L_ODI_SCHEMA   = ODI_REP_7952
--OBIA Data warehouse default schema
DEFINE L_OBIA_SCHEMA  = DATA_BIAPPS
--Configuration Manager default schema
DEFINE L_TX_SCHEMA    = DATA_BIAPPSTX
Using Oracle SQL Developer or Oracle SQL*Plus, connect to your database machine as a user with DBA privileges (for example, SYS or SYSTEM), and execute the biappstx_setup.sql file.
Alternatively, you can execute the individual SQL commands in the biappstx_setup.sql file.
This section provides instructions on how to install Oracle WebLogic Server 10.3 + Application Development Framework (ADF) 11g Runtime on Windows, create a WebLogic domain, and deploy the Oracle Business Intelligence Applications Configuration Manager to the created domain in the installed Oracle WebLogic Server instance.
To set up Oracle BI Applications Configuration Manager on Windows:
On the target machine, install JDK 1.6.0_05 or a higher 1.6.x version on the machine where Oracle WebLogic Server will be installed.
Do not use spaces in the directory path name.
If you are installing Oracle BI Applications Configuration Manager on the machine on which the Oracle BI Applications installer was run, skip Step 2 and go straight to Step 3.
If you are installing Oracle BI Applications Configuration Manager on a machine different from the one on which the Oracle BI Applications installer was run, copy the following files from the \OracleBI\dwrep\biapps_configmgr\ directory on the Oracle Business Intelligence Applications installation machine to a directory on the target machine, as follows:
On the Oracle Business Intelligence Applications installation machine, navigate to the OracleBI\dwrep\biapps_configmgr\ directory.
Copy the following files from the \OracleBI\dwrep\biapps_configmgr\ directory to an equivalent directory on the target machine:
biapps_configmgr.ear
jdevstudio11110install.jar
silent.xml
WIN_1_HowToInstallBIAppsConfigMgr.txt
WIN_2_RunJDevInstallerSilent.cmd
WIN_3_CreateDomain.txt
WIN_4_DeployBIAppsConfigMgr.cmd
Install WebLogic Server10.3 and ADF 11g Runtime, as follows:
Edit silent.xml and specify the full path name to the WebLogic (BEA) Home directory by setting the value for the data-value name 'BEAHOME'.
This is the location where Oracle WebLogic Server will be installed. For example, D:\Weblogic\.
Edit WIN_2_RunJDevInstallerSilent.cmd, and set the JAVA_LOCATION variable to the path to the java.exe (JDK 1.6.0_05 or higher 1.6 version) on your machine, then save the changes to the file.
For example, D:\jre1.6.0_02\bin.
Execute the WIN_2_RunJDevInstallerSilent.cmd file.
This script installs WebLogic Server + Application Developer Framework and ADF Runtime Libraries. WebLogic is installed in the directory specified by 'BEAHOME' in silent.xml.
Set up the required WebLogic domain, as follows:
Launch the Oracle WebLogic Configuration Wizard by selecting Start > Programs > Oracle Fusion Middleware BEAHOME > Weblogic 10.3 > Tools > Configuration Wizard.
In the Welcome screen, select the Create a New WebLogic domain radio button, then click Next.
In the Select Domain Source screen, select the Generate a domain configured automatically to support the following products: radio button.
Select the Application Development Framework check box, then click Next.
Note: This option is mandatory for Oracle BI Applications Configuration Manager deployment.
In the Configure Administrator Username and Password screen, enter User name and User Password, confirm the password, then click Next.
In the Configure Server Start Mode and JDK screen, retain the default selection of Development Mode for the WebLogic Domain Startup Mode.
In the JDK Selection box, select the location of the JDK 1.6 installation on the machine, then click Next.
In the Customize Environment and Services settings screen, select the No radio button, then click Next.
In the Create WebLogic Domain screen, specify the Domain name.
Note: Do not use spaces. Do not change the values for Domain location or Application location.
At the summary screen, do not select the Start Admin Server check box.
Note: Oracle WebLogic Server should not be running for the next step.
Deploy the Oracle BI Applications Configuration Manager application, as follows:
Note: Before executing this step, make sure the Oracle WebLogic Server is not running.
Edit the WIN_4_DeployBIAppsConfigMgr.cmd file.
Set BEAHOME to the install location of Oracle WebLogic Server as specified in the silent.xml file in Step 3.
Set USER_DOMAIN to the name of the WebLogic domain that you created in step 4.
Set EAR_FILE_PATH to the location of the biapps_configmgr.ear file.
Save changes to the file.
Execute the WIN_4_DeployBIAppsConfigMgr.cmd file by double-clicking the file or by executing from a command prompt window.
This cmd file will deploy the Oracle BI Applications Configuration Manager application using the biapps_configmgr.ear file to the Oracle WebLogic Server installed in Step 3 and in the domain you have created in Step 4.
The script starts the Oracle WebLogic Server after the BI Applications Configuration Manager is deployed. A notice similar to "<Notice> <WebLogicServer> <BEA-000360> <Server started in RUNNING mode>" is displayed in the command line window to indicate that the WebLogic Server is running and listening at the default port 7001.
Launch a supported browser with the URL for Oracle BI Applications Configuration Manager - http://<WebLogic Server Host>:7001/biapps.
For information on how to log in and use Oracle BI Applications Configuration Manager, refer to Section 4.5.8.6, "How to Launch Oracle BI Applications Configuration Manager".
The URL for the WebLogic Console is:
http://<Weblogic Server Host>:7001/console
The credentials required to log in to the WebLogic Console are the username and password you entered in Step 4.
This section provides instructions on how to install Oracle WebLogic Server 10.3 + Application Development Framework (ADF) 11g Runtime on UNIX or Linux, create a WebLogic domain, and deploy the Oracle Business Intelligence Applications Configuration Manager to the created domain in the installed Oracle WebLogic Server instance.
To deploy Oracle Business Intelligence Applications Configuration Manager, you must copy the setup files from the Oracle Business Intelligence Applications installation machine to a UNIX or Linux machine, as described in this section.
To set up Oracle BI Applications Configuration Manager on UNIX or Linux:
On the target machine, install JDK 1.6.0_05 or a higher 1.6.x version on the machine where Oracle WebLogic Server will be installed.
Copy the following files from the \OracleBI\dwrep\biapps_configmgr\ directory on the Oracle Business Intelligence Applications installation machine to a directory on the target machine, as follows:
On the Oracle Business Intelligence Applications installation machine, navigate to the OracleBI\dwrep\biapps_configmgr\ directory.
Copy the following files from the \OracleBI\dwrep\biapps_configmgr\ directory to an equivalent directory on the target machine:
biapps_configmgr.ear
jdevstudio11110install.jar
silent.xml
UNIX_1_HowToInstallBIAppsConfigMgr.txt
UNIX_2_RunJDevInstallerSilent.sh
UNIX_3_CreateDomain.txt
UNIX_4_DeployBIAppsConfigMgr.sh
Note: The UNIX_2_RunJDevInstallerSilent.sh and UNIX_4_DeployBIAppsConfigMgr.sh scripts must have read, write, and execute permissions. If the files do not have these permissions, modify them using the chmod command.
When you copy across these files, use a MS-DOS to UNIX conversion tool, convert the script files to UNIX format (that is, remove the carriage return and line feed characters). There are many MS-DOS to UNIX conversion tools that are freely available for download on the Internet. Alternatively, you can manually remove the carriage return and line feed character (/r) from the script files by running the following commands:
tr -d '\r'<UNIX_2_RunJDevInstallerSilent.sh>tmp.sh
mv tmp.sh UNIX_2_RunJDevInstallerSilent.sh
Repeat for the UNIX_4_DeployBIAppsConfigMgr.sh file.
Install WebLogic Server10.3 and ADF 11g Runtime, as follows:
Edit silent.xml and specify the full path name to the WebLogic (BEA) Home directory by setting the value for the data-value name 'BEAHOME'.
This is the location where Oracle WebLogic Server will be installed.
Edit UNIX_2_RunJDevInstallerSilent.sh, and set the JAVA_LOCATION variable to the path to the java binary (JDK 1.6.0_05 or higher 1.6 version) on your machine, then save the changes to the file.
For example, /jre1.6.0_02/bin.
Execute the command using:
./UNIX_2_RunJDevInstallerSilent.sh
Note: The script should be run under the bash shell
This script installs WebLogic Server + Application Developer Framework and ADF Runtime Libraries. WebLogic is installed in the directory specified by 'BEAHOME' in silent.xml.
Set up the required WebLogic domain, as follows:
Launch the Oracle WebLogic Configuration Wizard by opening a command shell. Go to the \common\bin subdirectory of the WebLogic product installation directory, and execute the following command:
sh config.sh -mode=console
Note: The command and arguments must be entered in lower case.
At the Welcome prompt, choose "1 Create a new WebLogic domain" by typing 1, then press Enter.
At the Select Domain Source prompt, select "1 Choose Weblogic Platform components" by typing 1, then press Enter.
At the Application Template Selection prompt, select "Application Development Framework" by typing 1, then press Enter.
Note: This option is mandatory for Oracle BI Applications Configuration Manager deployment.
At the Application Template Selection prompt, type next and press Enter.
At the Configure Administrator Username and Password prompt, create a user to be assigned to the Administrator role. This user is the default administrator used to start development mode servers.
Follow the on screen instructions to set the user password and confirm user password.
Optionally, change the default user name.
At the Domain Mode Configuration prompt, select "1 Development Mode" by typing 1, then press Enter.
At the Java SDK Selection prompt: specify Java SDK 1.6.0_05 or higher JDK 1.6 location.
At the Choose Configuration Option prompt: do not change the default settings by typing 1, then press Enter.
At the Select the target domain directory for this domain prompt, accept the default target location for the domain directory.
Note: Do not change the default value.
At the Select the applications directory for this domain prompt, accept the default target location for the application directory.
Note: Do not change the default value.
At the Edit Domain Information prompt, select the default name 'base_domain'.
Alternatively, specify a different name if required.
Complete the domain creation.
Deploy the Oracle BI Applications Configuration Manager application, as follows:
Note: Before executing this step, make sure the Oracle WebLogic Server is not running.
Edit the UNIX_4_DeployBIAppsConfigMgr.sh file.
Set BEAHOME to the install location of Oracle WebLogic Server as specified in the silent.xml file in Step 3.
Set USER_DOMAIN to the name of the WebLogic domain that you created in step 4.
Set EAR_FILE_PATH to the location of the biapps_configmgr.ear file.
Save changes to the file.
Execute the UNIX_4_DeployBIAppsConfigMgr.sh file using:
./UNIX_4_DeployBIAppsConfigMgr.sh
Note: The script should be run under the bash shell
This cmd file will deploy the Oracle BI Applications Configuration Manager application using the biapps_configmgr.ear file to the Oracle WebLogic Server installed in Step 3 and in the domain you have created in Step 4.
The script starts the Oracle WebLogic Server after the BI Applications Configuration Manager is deployed. A notice similar to "<Notice> <WebLogicServer> <BEA-000360> <Server started in RUNNING mode>" is displayed in the command line window to indicate that the WebLogic Server is running and listening at the default port 7001.
For information on how to log in and use Oracle BI Applications Configuration Manager, refer to Section 4.5.8.6, "How to Launch Oracle BI Applications Configuration Manager".
The URL for the WebLogic Console is:
http://<Weblogic Server Host>:7001/console
The credentials required to log in to the WebLogic Console are the username and password you entered in Step 4.
The WebLogic Admin Console is accessed from the URL:
http://<IP or Name of machine where WebLogic is installed>:7001/biapps. For example,
The default user name and password is weblogic/weblogic.
Log into the BI Applications Configuration Manager by accessing the URL:
http://<IP or Name of machine where WebLogic is installed>:7001/biapps
The default username and password is data_biappstx/ data_biappstx.
You launch Oracle BI Applications Configuration Manager to enable you to create and manage E-LT execution plans, set E-LT parameters, and monitor E-LT processes.
For a list of supported browsers and requirements, see System Requirements and Supported Platforms for Oracle Business Intelligence Applications.
To start Oracle BI Applications Configuration Manager for the first time:
Open a supported Web browser.
Enter or select the Oracle BI Applications Configuration Manager URL using the fully qualified host name used by your installation to display the Login page.
Use the URL format: http://<hostname>:7001/biapps. For example:
http://mymachine.us.company.com:7001/biapps
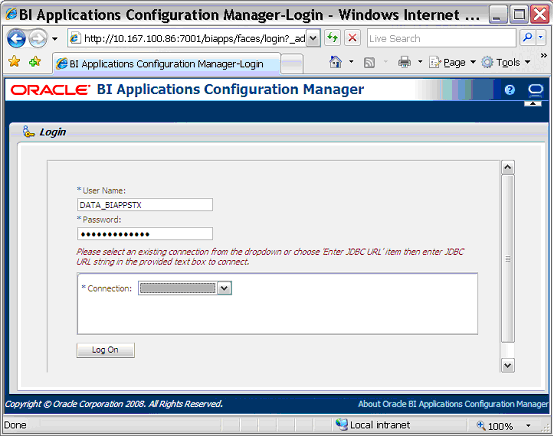
Enter appropriate login information, as described in the table below, then click Log On.
Table 4-22 Oracle BI Applications Configuration Manager Login page fields
| Field Name | Description |
|---|---|
|
User Name |
Enter 'DATA_BIAPPSTX'. |
|
Password |
Enter 'DATA_BIAPPSTX' (default password) or a different password if you have changed it. |
|
Connection |
Select 'Enter JDBC URL'. |
|
JDBC URL |
Specify the JDBC URL to the Oracle Business Analytics Warehouse in the format jdbc:oracle:thin:@<host>:<port>:<sid>. Replace <host>, <port> and <sid> with the values for the database hosting the ODI Repositories. For example, 'jdbc:oracle:thin:@US12345.us.company.com:1521:US12345'. |
The main Oracle BI Applications Configuration Manager page is displayed.
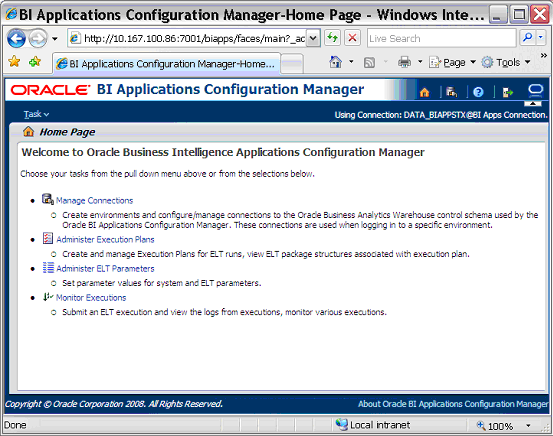
Use the navigation links at the left-hand side (or use the Task menu) to select the area that you want to manage.
You launch Oracle BI Applications Configuration Manager when you want to debug an Execution Plan by creating additional debug information that you analyze or send to Oracle Support if required.
To run Oracle BI Applications Configuration Manager in debug mode:
Log out of any Oracle BI Applications Configuration Manager sessions.
Launch Oracle BI Applications Configuration Manager by appending the loglevel parameter to the URL. For example:
<HOST-NAME>:7001/biapps/faces/login.jspx?loglevel=debug
Log in, and run the execution plan.
Log out of Oracle BI Applications Configuration Manager.
Access the log file in the following location:
<Stand-alone WebLogic installation folder>/user_projects/domains/base_domain
Note: The default domain name is 'base_domain'. Specify the appropriate domain name. The format of the file name is <WebLogic Session-Id>_<date string>_<time string>_debug.log. The WebLogic session Id is stripped of any special characters to ensure a valid Unix/Windows file name.
This section explains how to create a connection for your development environment in Oracle BI Applications Configuration Manager.
A connection is a stored set of environment details that includes a JDBC connect string to the Oracle Business Analytics Warehouse, an ODI agent name and port, and an ODI context. For example, you might create separate connections for Development, Test, and Production environments.
After you have created a connection, you can log into Oracle BI Applications Configuration Manager by selecting the connection from a drop down list and entering a user name and password, instead of specifying environment details every time they log in.
To create a connection in Oracle BI Applications Configuration Manager:
Start Oracle BI Applications Configuration Manager (for more information, see Section 4.5.8.6, "How to Launch Oracle BI Applications Configuration Manager").
Select the Manage Connections link to display the Configuration Manager Connections page.
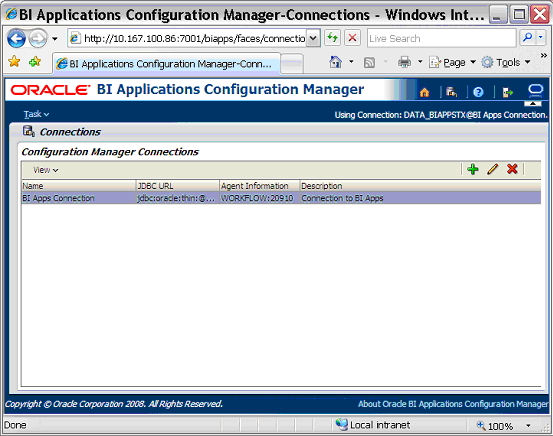
Click the New button (+) to display the Create New Connection page.
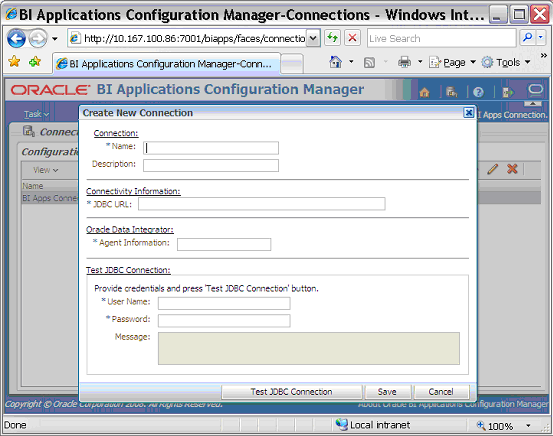
Enter the appropriate connection information, as described in the table below.
Table 4-23 Create New Execution Plan page fields
| Field | Description |
|---|---|
|
Name |
A user-specified short descriptive name to identify the connection. For example, 'DEV Connection APAC'. |
|
Description |
A user-specified short description that is displayed on the Connections page to assist users in selecting the correction connection. For example, 'Connects to Development environment for APAC region'. |
|
JDBC URL |
The JDBC URL connection string to the database that hosts the DATA_BIAPPSTX account. Specify in the format jdbc:oracle:thin:@<host>:<port>:<sid>. Replace <host>, <port> and <sid> with the values for the database hosting the ODI Repositories. For example, 'jdbc:oracle:thin:@US12345.us.company.com:1521:US12345'. |
|
Agent Information |
Specify the Agent name and port number of the ODI WORKFLOW Agent in the format <Agent name>:<port number>. For example, 'WORKFLOW:20910'. |
|
User Name |
Specify DATA_BIAPPSTX. |
|
Password |
Specify DATA_BIAPPSTX. |
|
Message |
A read-only field that shows the status of the JDBC Connection test. |
Click Test JDBC Connection to test the connection details.
When a valid set of connection details are specified, a 'Successful!' message is displayed.
Click Save.
Now that you have created a Connection, you can use it to log into Oracle BI Applications Configuration Manager using the stored environment details.
Note: To use the connection that you just created, click Logoff to log out of Oracle BI Applications Configuration Manager, and re-login using the new connection.
You start Oracle BI Applications Configuration Manager to enable you to create and manage E-LT execution plans, set E-LT parameters, and run and monitor E-LT processes.
To start Oracle BI Applications Configuration Manager using a connection:
Open a supported Web browser.
Enter or select the Oracle BI Applications Configuration Manager URL using the fully qualified host name and domain used by your installation to display the Login page.
Use the URL format: http://<host.domain>:7001/biapps. For example:
http://mymachine.us.company.com:7001/biapps

Enter login details as described in the table below, then click Log On.
Table 4-24 Oracle BI Applications Configuration Manager Login page fields
| Field Name | Description |
|---|---|
|
User Name |
Enter 'DATA_BIAPPSTX'. |
|
Password |
Enter 'DATA_BIAPPSTX'. |
|
Connection |
Select a connection name from the drop down list. For example, you might select 'PROD Connection APAC' for the Production environment for the APAC region. |
Use the navigation links at the left-hand side (or use the Task menu) to select the area that you want to manage.
This section contains the following topics:
Section 4.6.2, "Using ODI Designer to Manage Your Environment"
Section 4.6.3, "Using Oracle BI Applications Configuration Manager"
Section 4.6.4, "About Resetting the Default Passwords, Schema Names, and ODI Connection Details"
Section 4.6.5, "How to configure and activate Automated Database Statistics Collection"
Section 4.6.6, "How to configure and activate Automated Delete Handling"
Section 4.6.8, "How to reset the Oracle Business Analytics Warehouse for Full Load"
Section 4.6.9, "How to add partitions to Data Warehouse tables"
Section 4.6.10, "About deploying ODI across multiple environments"
Section 4.6.11, "How to run an ODI Agent as a Unix background process"
Section 4.6.12, "How to uninstall ODI Agent Windows Services"
Section 4.6.13, "How to Resolve Conflicts in ODI Agent Port Numbers"
Section 4.6.14, "How to activate or deactivate Flow Control in ODI"
To verify and Oracle Business Intelligence Applications environment, do the following: (need to add cross-refs to appropriate tasks).
Log into ODI Designer or ODI Topology Manager as user SUPERVISOR.
Use ODI Designer to connect to the Work Repository.
Use ODI Topology Manager to check the Oracle Data Server Connections.
Use ODI Topology Manager to check the Agents.
Use ODI Topology Designer to check that the Model objects are available.
This section explains how to use ODI Designer to manage the Oracle Business Intelligence Applications environment.
Note: To manage Oracle Business Intelligence Applications environment in ODI, you must log in as user 'SUPERVISOR'.
This section explains how to use the Projects view in ODI Designer to manage Oracle Business Intelligence Applications.
The figure below shows the main ODI Designer screen for projects:
Key
The project contains all of the ODI project components required by Oracle Business Intelligence Applications.
The Mappings folder contains the Packages and Interfaces used by Oracle Business Intelligence Applications to perform E-LT. For example, the \SDE_ORA11510_Adaptor folder contains a sub-folder for every Application and Subject Area combination containing Packages and Interfaces for that Subject Area.
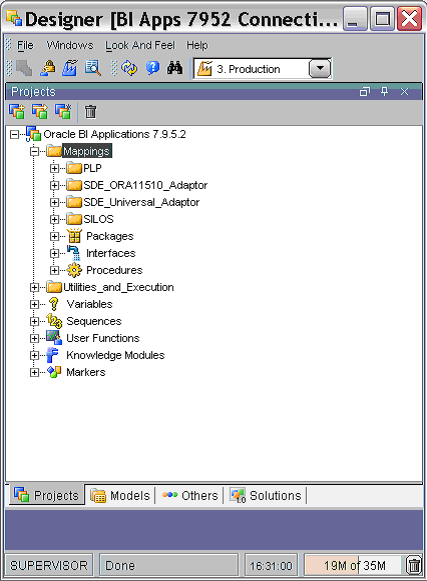
The Mappings folder contains the following main sub-folders:
PLP - Contains the Post Load Processing (PLP) Mappings.
SDE_ORA11510_Adaptor - Contains the Source-Dependent Extract (SDE) mappings for Oracle EBS 11.5.10.
SDE_Universal_Adaptor - Contains the Source-Dependent Extract (SDE) mappings for Universal Adaptor.
SILOS - Contains the Source Independent Load (SIL) mappings.
The Execution_Plans folder contains the Master Packages used by Oracle Business Intelligence Applications to run Execution Plans.
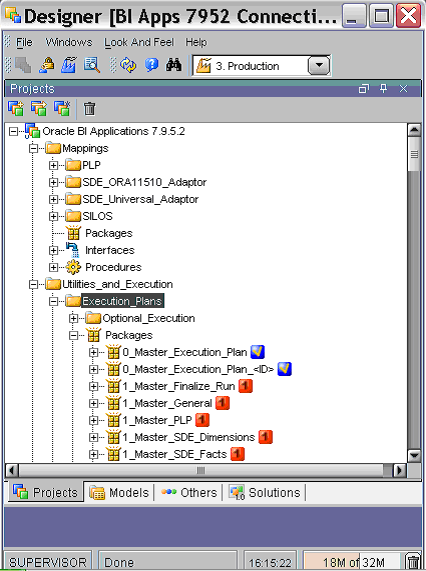
The Utilities folder contains procedures and packages. that you can use to maintain your Oracle Business Intelligence Applications environment. For example, to collect database statistics, manage indexes, and truncate tables.
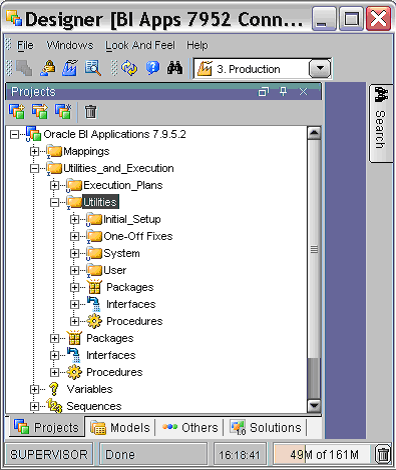
This section explains how to use the Models view in ODI Designer to manage Oracle Business Intelligence Applications.
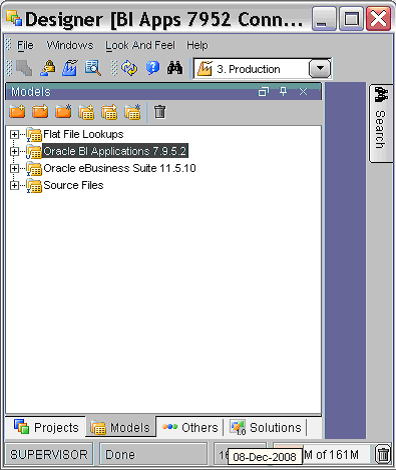
Oracle Business Intelligence Applications installs with the following models:
Flat File Lookups - Contains definitions (metadata) pertaining to the lookup flat file data stores. These objects are mapped to the files in the location $ODI_HOME/oracledi/biapps_odi/odifiles/odidatafiles/lkpfiles.
Oracle BI Applications 7.9.5.2 - Contains definitions (metadata) of all the Oracle Business Analytics Warehouse objects.
Oracle eBusiness Suite 11.5.10 - Contains definitions (metadata) of all the EBS 11.5.10 data source objects.
Source Files - Contains definitions (metadata) of all the source flat-file data stores. These objects are mapped to the files in the location $ODI_HOME/oracledi/biapps_odi/odifiles/odidatafiles/srcfiles.
This section explains how to use Oracle BI Applications Configuration Manager to manage your Oracle Business Intelligence Applications environment, and contains the following topics:
Note: For a list of log files produced by Oracle BI Applications Configuration Manager, see Section 4.6.15, "List of Log Files".
The Oracle BI Applications Configuration Manager is a web-application that enables you to:
Create and manage execution plans for E-LT executions.
Set system and E-LT parameters.
View Master Package structures.
Run and monitor E-LT executions.

You can also setup connections to different environments, and use a single deployment of Oracle BI Applications Configuration Manager to manage them.
This section explains how to manage connections in Oracle BI Applications Configuration Manager.
A connection is a stored set of environment details that includes a JDBC connect string to the Oracle Business Analytics Warehouse, an ODI agent name and port. For example, you might create separate Production connections for APAC, EMEA, and US regions.
After you have created a connection, you can log into Oracle BI Applications Configuration Manager by selecting the connection from a drop down list and entering a user name and password, instead of specifying JDBC URL details every time you log in.
For more information about creating connections, see Section 4.5.8.8, "How to create a Connection For Your Development Environment".
Use the Configuration Manager Connections page to edit and delete connections. To display the Configuration Manager Connections page, select the Manage Connections link on the main page. Select a connection in the Connections list, then click either Edit or Delete the connection details.
This section explains how to manage E-LT Parameters in Oracle BI Applications Configuration Manager.
The Parameters Administration page contains a tab for each category of parameters, as follows:
Global - these parameters are independent of ELT tasks or apply to all ELT tasks.
Common - these parameters are for ELT tasks that are common to more than one BI Application module (for example, Human Resources Analytics).
Application Specific - these parameters are specific to a given BI Application module (for example, Human Resources Analytics).
To navigate to the Parameters Administration page, either click on the Administer Parameters link from the left Navigation pane or click on the link from the Home page or choose the Administer Parameters menu item from the application menu. The Parameters Administration page consists of three tabs that display Global, Common and Application Specific parameters. To set a parameter value, double-click on the parameter record to make the record editable, then enter a value in the Parameter Value field.
Note: Part III Configuring Your Analytical Applications describes how to use Oracle BI Applications Configuration Manager to configure specific applications. For more information, refer to the appropriate chapters below for the applications that you have installed:
Chapter 6, "Configuring Oracle Procurement and Spend Analytics"
Chapter 8, "Configuring Oracle Supply Chain and Order Management Analytics"
This section provides generic instructions for modifying E-LT parameters. Part III Configuring Your Analytical Applications describes how to use Oracle BI Applications Configuration Manager to configure specific applications.
Note: Oracle BI Applications Configuration Manager does not perform validation on the parameter values that are entered. For parameters that must be entered in a specific format, follow the formatting instructions noted in the Description column for the parameter. For example, date parameter values must be entered in either YYYYMMDD or MM/DD/YYYY format. Refer to the parameter Description information for the parameter to find out the format to use.
You use Oracle BI Applications Configuration Manager to specify E-LT parameter values that are used to control the E-LT processes for your Applications and Subject Areas.
Start Oracle BI Applications Configuration Manager (for more information, see Section 4.5.8.9, "How to Login to Oracle BI Applications Configuration Manager Using A Connection").
Select the Administer ELT Parameters link to display the Parameters Administration page.
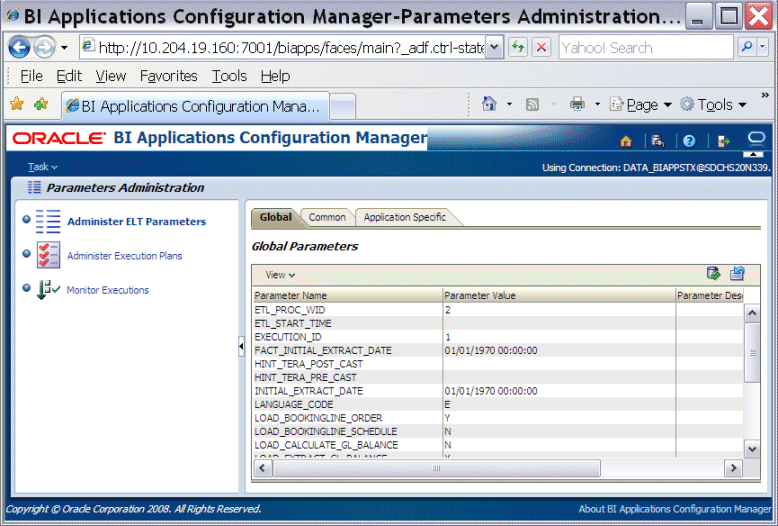
Use the Global, Common, and Application Specific tabs to change the default values of the parameters.
At the Application Specific tab, the parameters are grouped into Subject Area within Application, to help you locate the parameters that are specific to your Application.
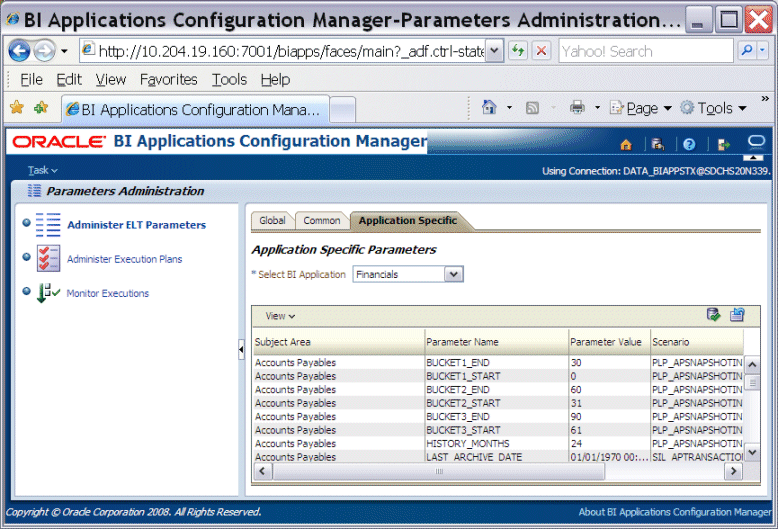
The Execution Plans Administration page enables you to create and maintain your Execution Plans for E-LT runs.
To navigate to the Execution Plans Administration page, either click on the Administer Execution Plans link from the left Navigation pane or click on the link from the Home page or choose the Administer Execution Plans menu item from the application menu.
An execution plan consists of a name, description, an Execution Plan ID, and associated Subject Areas. The Execution Plans Administration page displays a top pane with the list of execution plans. The bottom pane contains two tabs. For the selected execution plan record in the top pane, the Subject Areas tab displays the Subject Areas which are included in the execution plan.
For information about how to create an Execution Plan, see Section 4.7.2.2, "How to Create an Execution Plan In Oracle BI Applications Configuration Manager".
For information about how to run an Execution Plan, see Section 4.7.2.3, "How to Run an Execution Plan in Oracle BI Applications Configuration Manager".
For an example of creating and running an Execution Plan, see Section 4.7.4, "Example of Running A Full Load E-LT in Oracle BI Applications Configuration Manager".
For more information about re-starting an Execution Plan (for example, after diagnosing and fixing an E-LT error), see Section 4.6.3.5.2, "How to Restart Execution Plans After Error Correction".
This section explains how to monitor E-LT processes in Oracle BI Applications Configuration Manager, and contains the following topics:
You can use Oracle BI Applications Configuration Manager to monitor E-LT processes. You can generate logs that you can use to diagnose issues that you might have. You monitor E-LT processes using the Sessions page, which you display by selecting the Monitor Executions link on the main page.
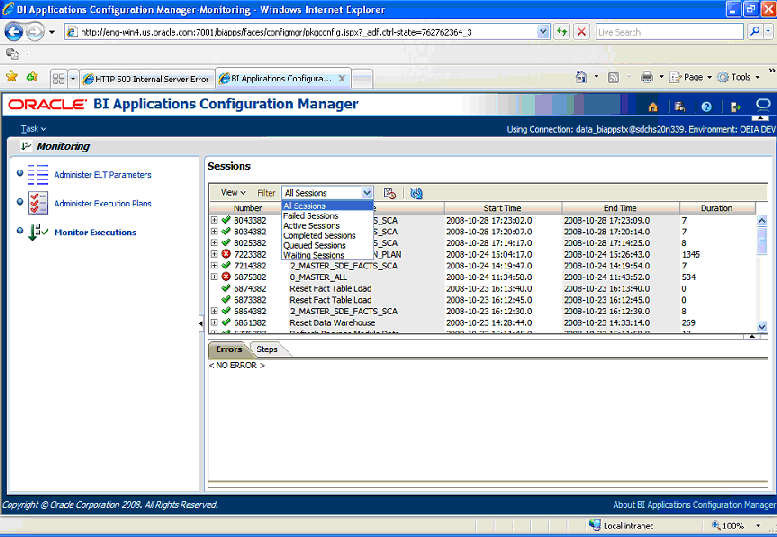
The Sessions displayed are identified by Execution Plan ID, and relate to the 0_Master_Execution_Plan package (or copy of) that you set up as the Master Package (for more information, see Section 4.7.1, "How to set up Master Packages to run an Execution Plan"). The Sessions page lists sessions initiated in both ODI Designer and BI Applications.
The Errors tab in the bottom pane displays errors for the session that is highlighted in the top pane. The figure below shows the Errors tab for a failed session.
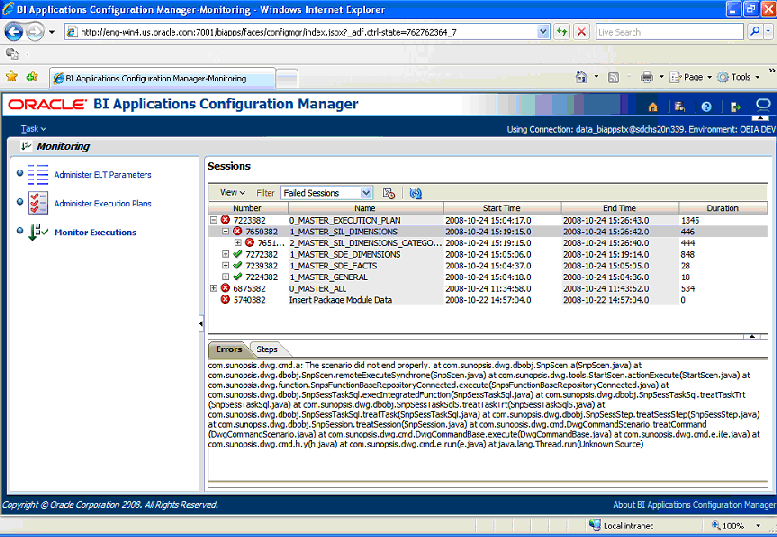
The Steps tab in the bottom pane displays more information about the session and task that is highlighted in the top pane.
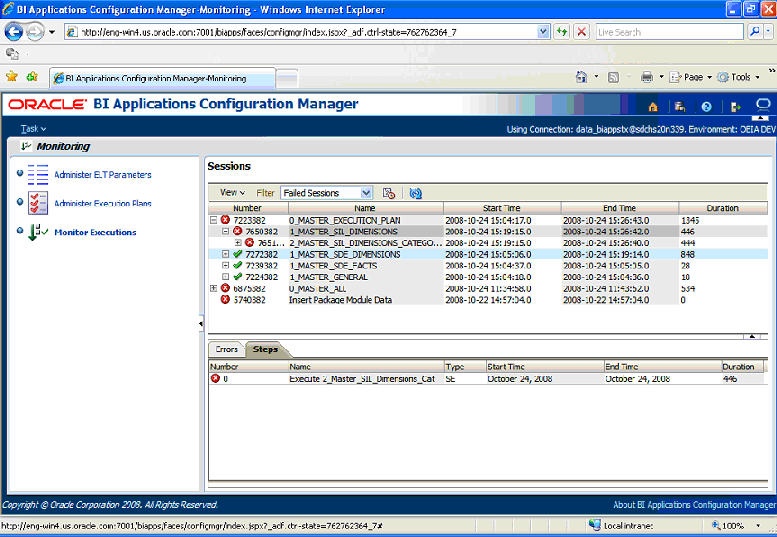
If an Execution Plan fails, after you diagnose and fix the underlying error you need to restart the Execution Plan, as described in this section.
To restart an Execution Plan after error correction:
Start Oracle BI Applications Configuration Manager and connect to the required environment (for more information, see Section 4.5.8.9, "How to Login to Oracle BI Applications Configuration Manager Using A Connection").
Select the Administer Execution Plans link.
In the upper pane, select the Execution Plan that you want to restart.
Display the 'Package Structure' tab in the lower pane.
Set the Filter to 'Execution Structure'.
Click the Execute button on the right hand side of the Filter drop down list.
Oracle recommends that you use the out-of-the-box schema names, tablespace names, object names, and passwords. If you do use different names, follow the procedures in this section to keep the Oracle Business Intelligence Applications components synchronized.
This section explains how to reset database passwords, schema names, and connection details for the components in Oracle Business Intelligence Applications, and what related components you need to change to keep your components synchronized. For example, if you want to use a different database schema name to the recommended 'ODI_REP_7952', you also need to modify ORACLE_WORK_REP schema in ODI Topology Manager.
This section contains the following topics:
Section 4.6.4.1, "How to Change the Default Database Passwords"
Section 4.6.4.2, "How to Change the ODI Topology Connection Details"
Section 4.6.4.3, "How to Change the Encoded Passwords in odiparams.bat"
Section 4.6.4.4, "How to Change the Password for the ODI SUPERVISOR User"
Section 4.6.4.5, "Using Different Schema and Tablespace Names"
Section 4.6.4.6, "Using A Different ODI Work Repository Name"
This section explains how to change the default database passwords for the databases that you set up in Section 4.3.3.1, "Creating the Required Databases and Tablespaces".
Use an appropriate SQL client to change the database password.
For example, you might connect to Oracle SQL Developer or SQL*Plus and execute the following command:
ALTER USER ODI_REP_7952 IDENTIFIED BY <New Password> REPLACE <Old Password>
Notes
If you change the ODI_REP_7952 database password, you also need to modify the connection details for ORACLE_WORK_REP work repository as described in Section 4.6.4.2, "How to Change the ODI Topology Connection Details".
If you change the DATA_BIAPPS database password, you also need to modify the connection details for ORACLE_BI_APPLICATIONS as described in Section 4.6.4.3, "How to Change the Encoded Passwords in odiparams.bat".
This section explains how to change the default ODI Topology Connection details. The table below shows the default schemas and what you need to do if you change the connection details.
Table 4-25 Database Schemas and Related Physical Data Servers
| Database Schema Name | Related Physical Data Server | Action Required to Synchronize |
|---|---|---|
|
ODI_REP_7952 |
ORACLE_WORK_REP |
If you change the ODI_REP_7952 schema password, you need to modify the Oracle BI Applications Configuration Manager setup. |
|
TEMP_BIAPPS |
Not applicable. |
Not applicable. |
|
DATA_BIAPPS |
ORACLE_BI_APPLICATIONS |
If you change the DATA_BIAPPS schema password, you need to modify the Oracle BI Applications Configuration Manager setup. |
|
DATA_BICONSOLE |
Not applicable. |
If you change the DATA_BICONSOLE schema password, you need to modify the Oracle BI Applications Configuration Manager setup. |
To change the Work Repository connection details:
In ODI Topology Manager, display the Repositories tab.
Expand the Work Repositories node.
Edit the repository WORKREP_7952, to display the Work Repository: <Repository Name> dialog.
Click Connection to display the Data Server: <Repository Name> dialog.
Use the Password field to modify the password, then click Test to verify the new password.
Save the details.
This section explains how to change the encoded passwords that are set in the ODI configuration file odiparams.bat. For example, the odiparams.bat file located in the $ODI_HOME\oracledi\bin directory might contain the following parameters:
set ODI_SECU_USER=ODI_REP_7952
set ODI_SECU_ENCODED_PASS=dpfHHIqHwW.v9VGofVVd6eG0x
set ODI_USER=SUPERVISOR
set ODI_ENCODED_PASS=d,ypFC5Tzt5plXN82JwXASAUp
You might want to change the password for ODI_REP_7952 user or the SUPERVISOR user.
To encode a password:
On the ODI machine, open a command prompt, and use the CD command to change to the $ODI_HOME\oracledi\bin directory.
Enter the following command:
agent ENCODE <password>
Where <password> is either ODI_REP_7952 or SUPERVISOR.
The 'agent ENCODE' command returns an encoded password for ODI_REP_7952 or SUPERVISOR and displays it on screen.
Note down or copy into memory the encoded password returned by the 'agent ENCODE' command.
Open the file $ODI_HOME\oracledi\bin\odiparams.bat in a text editor.
If you obtained a new encoded password for the ODI_REP_7952 user, type in or paste in the encoded password that you obtained in step 3 as the value of the set 'ODI_SECU_ENCODED_PASS=' parameter.
If you obtained a new encoded password for the SUPERVISOR user, type in or paste in the encoded password that you obtained in step 3 as the value of the set 'set ODI_ENCODED_PASS=' parameter.
Save the odiparams.bat file.
This section explains how to change the ODI SUPERVISOR password.
To change the passwords for the ODI SUPERVISOR user:
Log into ODI Designer or ODI Topology Manager.
Choose File, then Change Password to display the 'Password change' dialog.
Use the 'Password change' dialog to specify the current password, and the new password.
Save the details.
You now need to modify the ODI Connections to use the new SUPERVISOR password.
This section explains what you have to change if you use different schema and tablespace names to the default names.
To use different Oracle Business Analytics Warehouse Schema names for DATA_BIAPPS or TEMP_BIAPPS, do the following:
Create new database account names for DATA_BIAPPS or TEMP_BIAPPS.
For more information about creating database accounts, see Section 4.3.3.1, "Creating the Required Databases and Tablespaces".
In ODI Topology, replace the database account names for DATA_BIAPPS or TEMP_BIAPPS to the new database account names that you created in step 1.
Modify the biappstx_setup.sql file as follows:
On the ODI machine, open the biappstx_setup.sql in a text editor or SQL tool.
The biappstx_setup.sql file is located in the $ODI_HOME\oracledi\biapps_odi\dbfiles\ directory. For example, D:\OraHome_1\oracledi\biapps_odi\dbfiles\.
Modify the value of the 'DEFINE L_OBIA_SCHEMA = 'statement.
For example, you might change this statement to DEFINE L_OBIA_SCHEMA = DATA_TESTSCHEMA.
Save the file.
To use a different ODI Repository schema name, do the following:
Create new database account names for ODI_REP_7952.
For more information about creating database accounts, see Section 4.3.3.1, "Creating the Required Databases and Tablespaces".
Modify the odiparams.bat or odiparams.sh file and change the following parameters:
ODI_SECU_USER
ODI_SECU_ENCODED_PASS
For information about obtaining encoded passwords, see Section 4.6.4.3, "How to Change the Encoded Passwords in odiparams.bat".
Edit the ODI Master Repository to use the new database account name that you created in step 1.
In ODI Topology, replace the database account name for ODI_REP_7952 to the new database account name that you created in step 1.
Modify the biappstx_setup.sql file as follows:
On the ODI machine, open the biappstx_setup.sql in a text editor or SQL tool.
The biappstx_setup.sql file is located in the $ODI_HOME\oracledi\biapps_odi\dbfiles\ directory. For example, D:\OraHome_1\oracledi\biapps_odi\dbfiles\.
Modify the value of the 'DEFINE L_ODI_SCHEMA = 'statement'.
For example, you might change this statement to DEFINE L_ODI_SCHEMA = ODI_REP_1.
Save the file.
To use a different Schema name, do the following:
Create a new database account name for DATA_BIAPPSTX.
For example, you might create a new database account name DATA_CONFTX that has the same privileges as DATA_BIAPPSTX.
For more information about creating database accounts, see Section 4.3.3.1, "Creating the Required Databases and Tablespaces".
In Oracle BI Applications Configuration Manager, replace the database account name for DATA_BIAPPSTX to the new database account name that you created in step 1.
Modify the biappstx_setup.sql file as follows:
On the ODI machine, open the biappstx_setup.sql in a text editor or SQL tool.
The biappstx_setup.sql file is located in the $ODI_HOME\oracledi\biapps_odi\dbfiles\ directory. For example, D:\OraHome_1\oracledi\biapps_odi\dbfiles\.
Modify the value of the 'DEFINE L_TX_SCHEMA = 'statement.
For example, you might change this statement to DEFINE L_TX_SCHEMA = DATA_CONFTX.
Save the file.
To use a different index tablespace schema name, do the following:
Create a new database account name for BIAPPS_INDEX.
For example, you might create a new database account name BIAPPS_INDEX_1 that has the same privileges as BIAPPS_INDEX.
For more information about creating database accounts, see Section 4.3.3.1, "Creating the Required Databases and Tablespaces".
In ODI Designer, modify the Oracle BI Applications 7.9.5.2 model as follows:
Log into ODI Designer and display the Models view.
Double click on the Oracle BI Applications 7.9.5.2 model to display the Model: <Name> dialog.
Display the FlexFields tab.
Replace the value of the INDEX_TABLESPACE field with the new database account name that you created in step 1.
Save the details, and re-start the ODI Agents if necessary.
Note: Before you modify the ODI Work Repository Name, make sure that all ODI processes have stopped.
To use a different ODI Work Repository name, do the following:
Stop the ODI Agents INTERFACE and WORKFLOW.
In ODI Topology Manager, display the Repositories tab.
Expand the Work Repositories node and double-click on WORKREP_7952 to display the Work Repository: <Name> dialog.
Use the Name field to change the name of the ODI Work Repository, and save the details.
Log out of ODI Topology Manager.
Start ODI Designer to display the Oracle Data Integrator Login dialog.
Use the Login Name list to select the connection details for the environment that you are working in.
Click the Edit button to display the Work Repository Connection dialog.
Use the Repository Name field to change the name of the ODI Work Repository, and save the details.
In a text editor, edit the odiparams.bat or odiparams.sh file and modify the value of the 'set ODI_SECU_WORK_REP=' command.
For example, you might change the command to set ODI_SECU_WORK_REP=WORKREP_EMEA.
Re-start the ODI Agents WORKFLOW and INTERFACE.
Oracle Business Intelligence Applications is installed with a schedule that you can use in ODI Designer to automatically collect database statistics for analysis. This section explains how to activate this package (named 'Collect Statistics') and optionally change its schedule (by default, it is executed once per week at 12.00 AM on Saturday).
To activate and configure the 'Collect Statistics' Package:
In ODI Designer, display the Projects view.
Open the project Oracle BI Applications 7.9.5.2.
Navigate to \Utilities_and_Execution\Utilities\System\Packages\Collect Statistics\Scenarios\COLLECT_STATISTICS Version 001\Scheduling.
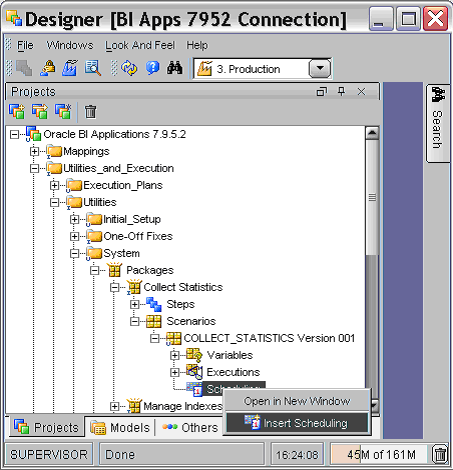
Right-click on Scheduling and select Insert Scheduling to display the Scenario Scheduling: <Name> dialog.
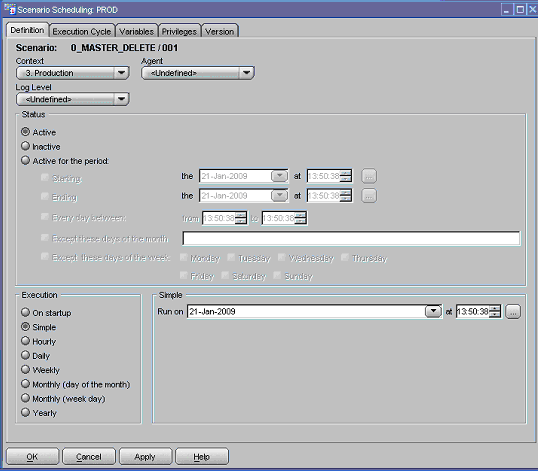
Use the fields on the Scenario Scheduling: <Name> dialog to modify the schedule, as follows:
Use the Status area to activate or deactivate the package.
For example, select the Active radio button to activate the package.
Use the Context field to select the 'Production' context.
Use the Agent field to select the 'INTERFACE' agent.
Use the other fields to specify the time and frequency of the refresh.
Save the details.
Oracle Business Intelligence Applications is installed with a schedule that you can use in ODI Designer to automatically handle deletes made in your source system and propagate them to the Oracle Business Analytics Warehouse. This section explains how to activate this scenario and specify its schedule.
To activate and configure the 'Collect Statistics' Package:
In ODI Designer, display the Projects view.
Open the project Oracle BI Applications 7.9.5.2.
Navigate to \Utilities_and_Execution\Execution_Plans\Optional_Execution\Delete_Master_Packages\Packages\0_Master_Delete\Scenarios\0_MASTER_DELETE Version 001\Scheduling.
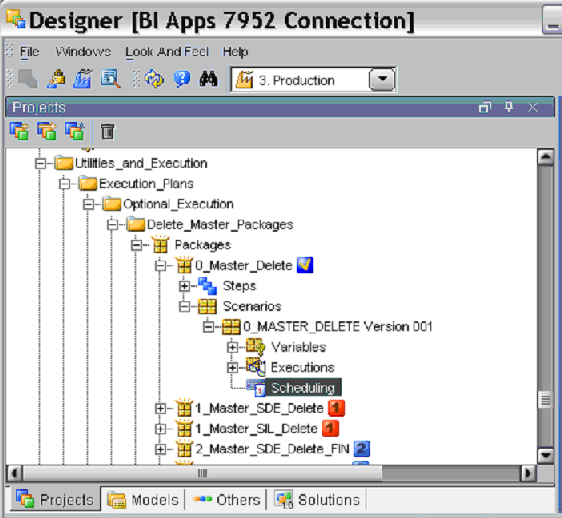
Right click on the Scheduling node and choose Insert Scheduling to display the Scenario Scheduling: <Name> dialog.

Use the fields on the Scenario Scheduling: <Name> dialog to modify the schedule, as follows:
Use the Status area to activate or deactivate the package.
For example, select the Active radio button to activate the package.
Use the Context field to select the 'Production' context.
Use the Agent field to select the 'INTERFACE' agent.
Use the other fields to specify the time and frequency of the refresh.
Save the details.
This section explains how to use loads in ODI to manage your Oracle Business Intelligence Applications environment.
The Master Packages are pre-programmed to handle incremental load logic implicitly. All the runs initiated after the initial full load is successfully done are incremental by default.
To reset the Oracle Business Analytics Warehouse for full load:
In ODI Designer, display the Projects view.
Open the project Oracle BI Applications 7.9.5.2.
Navigate to Utilities_and_Execution\Utilities\User\Packages\.
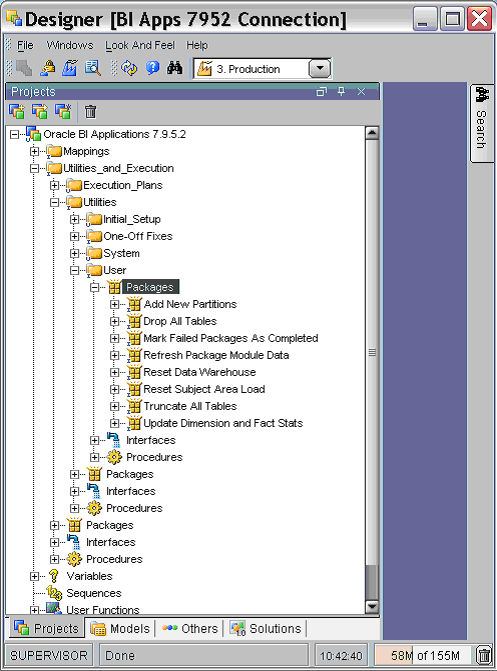
Execute the 'Reset Data Warehouse' package.
This section explains how to use Oracle Data Integrator to manage partitioning and indexing on data warehouse tables, and contains the following topics:
Section 4.6.9.1, "About supported partitioning in this release"
Section 4.6.9.3, "How to generate a DDL for a modified table"
Section 4.6.9.6, "How to add a partition to a table that is already partitioned"
Note: For more information about partitioning in Oracle Business Intelligence Applications, see Oracle Database Data Warehousing Guide.
When you set up partitioning, note the following:
This release supports only partitions based on DATE based key columns.
This release supports only range partitioning.
Each partitions must represent a month of data.
Partition Index management and Statistics collection can be fine-tuned to optimally handle incremental date range windows.
The FlexField NUM_PARTITIONS_INCR is relevant only for the tables with partitioning enabled. This FlexField carries a numeric value representing the number of months affected by the Index Management and Statistics Collection routines.
The following actions are automatically performed on most current partitions determined by NUM_PARTITIONS_INCR:
Disable Partition Index before Incremental loads.
Statistics Collection after Incremental Loads
Enable Partition Indexes after Incremental Loads.
The default value for the NUM_PARTITIONS_INCR FlexField is 3.
This section uses an example to show how to partition a data warehouse table.
Before starting this procedure, the following information is required:
The name of the Data Warehouse Table being partitioned.
The Partitioning Key Column (only date key columns are supported).
The Start Key Value.
The Maximum Key Value.
The number of Partitions optimally affected by Index Management/Statistics Collection routines.
Example of partitioning the W_REV_F fact table:
Use a SQL editor such as SQL*PLUS or SQL Developer to make a back-up of the fact W_REV_F fact table.
This back-up version will enable you to repopulate the table in the later step Section 4.6.9.4, "About Repopulating A Partitioned Table").
In ODI Designer, display the Models view.
Note: You must be logged in as the SUPERVISOR user.
Open the model Oracle BI Applications 7.9.5.2.
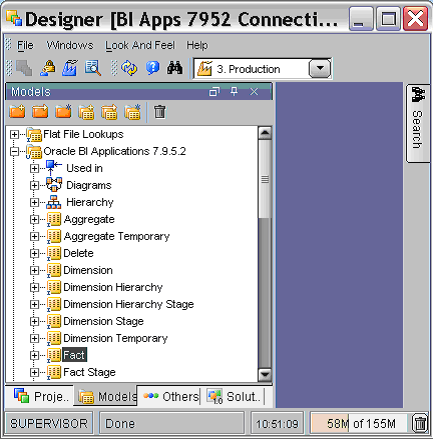
Expand the Fact node and locate the W_REV_F fact table.
Double-click the W_REVN_F table to display the DataStore: <Name> dialog.
Note: If the Object Locking dialog is displayed, click Yes to unlock this object.
Display the FlexFields tab, and enter the appropriate information, as described in the table below.
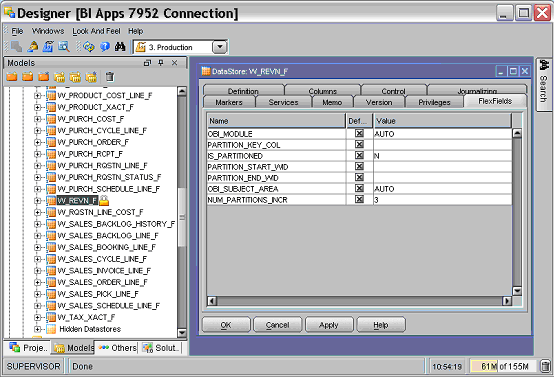
Save the details.
Re-generate a DDL for this table by following the steps in Section 4.6.9.3, "How to generate a DDL for a modified table".
If you have partitioned a table (for example, the W_REVN_F table (as described in Section 4.6.9.2, "An example of partitioning a table")), follow this task to generate a DDL.
To generate a DDL for a modified table:
Using a SQL client tool (for example, Oracle SQL*Plus or Oracle SQL Developer), connect to your data warehouse as user DATA_BIAPPS.
To determine whether the W_REVN_F table is populated, enter the following SQL command:
SELECT COUNT(*) FROM W_REVN_F;
If the table is populated, make a copy of the table by entering the following SQL command:
CREATE TABLE <Temp Table Name> AS SELECT* FROM W_REVN_F;
Delete (or 'drop') the W_REVN_F table by entering the following SQL command:
DROP TABLE W_REVN_F;
In ODI Designer, display the Models view.
Note: You must be logged in as the SUPERVISOR user.
Open the model ORACLE BI APPLICATIONS 7.9.5.2.
Right-click on Oracle BI Applications 7.9.5.2 and select Generate DDL.
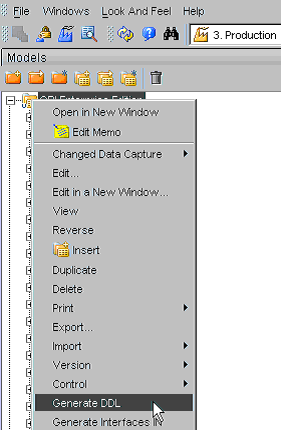
At the Generate DDL for Oracle Data Integrator Model dialog, click No to display the Generate DDL dialog.

Select W_REVN_F in the list, and select the adjacent check box in the Synchronization column to display the Procedure: <Name> dialog.
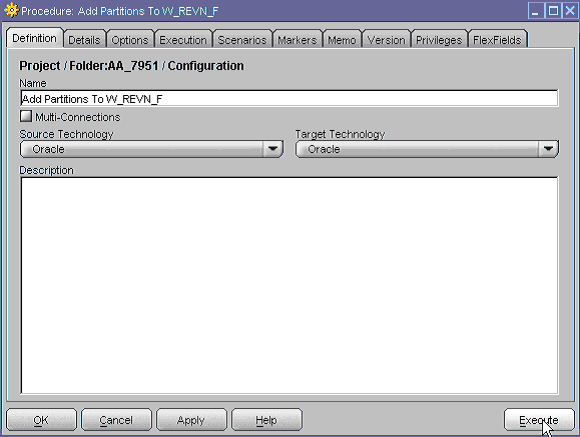
Select Oracle from the Source Technology drop down list.
Select Oracle from the Target Technology drop down list.
Click Execute to display a Confirmation dialog, and click Yes to display the Execution dialog.
Click OK to start the process.
You can now use ODI Operator to monitor the process and make sure that it executes successfully (to start ODI Operator, click the ODI Operator icon on the ODI Designer toolbar).
After you have partitioned a table (for an example using the fact table, see Section 4.6.9.2, "An example of partitioning a table") you need to re-populate the table.
Using a back-up copy of the table that you partitioned, repopulate the partitioned table. Use a SQL editor such as SQL*PLUS or SQL Developer to execute the 'INSERT INTO… SELECT FROM' SQL statement. Make sure that you execute a 'COMMIT' before closing the SQL session.
Oracle recommends that you manually create Partition indexes. Refer to Oracle Database documentation for details on how to create indexes on table partitions.
To add a partition to a table that is already partitioned:
In ODI Designer, display the Projects view.
Open the project Oracle BI Applications 7.9.5.2.
Navigate to Utilities_and_Execution\Utilities\User\Packages\.

Edit the 'Add New Partition' package to display the Package: Add New Partitions dialog.
Display the Diagram tab, and click on the Add New Partition object in the Diagram pane.
Display the Options tab in the Properties panel below.
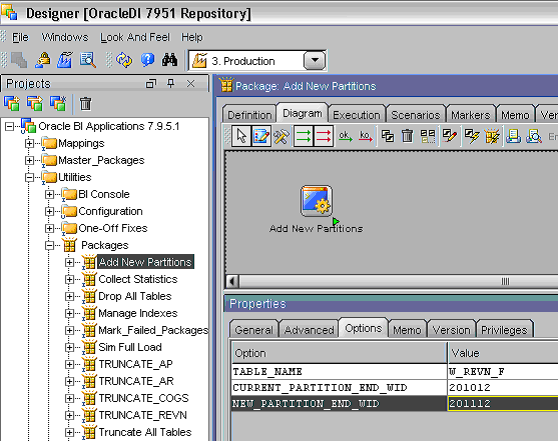
Specify the following values:
TABLE NAME - W_REVN_F
CURRENT_PARTITION_END_WID - 201012
NEW_PARTITION_END_WID - 201112
Click Apply, then Execute to display the Execution dialog.
At the Execution dialog, select INTERFACE from the Agent drop down list, then OK.
You can now use ODI Operator to monitor the process and make sure that it executes successfully (to start ODI Operator, click the ODI Operator icon on the ODI Designer toolbar).
In ODI deployments, you typically maintain different environments (known as Contexts) for Production (PROD), Development (DEV) and Quality Assurance (QA) activities. Oracle recommends that you install multiple ODI Repositories and create Topologies to support multiple environments.
To avoid collision between different environments, it is also recommended that you install ODI separately on different servers for each of the environments.
Alternatively, multiple contexts can be created on a single ODI Repository corresponding to each of the additional environments, as follows:
Create a Context for each of the additional environment i.e. DEV, QA, PROD.
Create a database user for the ODI Staging schema.
Create new data servers corresponding to the data source(s), Staging schema and Data Warehouse target.
For each data server, create corresponding physical schemas.
Create logical schemas and associate them with physical schemas in the contexts.
Associate a DATASOURCE_NUM_ID with the new contexts.
Create the physical agents for each agent running on a machine (as a listener, or in scheduler mode).
Create logical agents and associate them with physical agents in the contexts.
Create Physical and Logical servers corresponding to each of the data sources and data warehouse targets.
Note: For detailed information about ODI Contexts, refer to the Oracle Data Integrator Documentation Library.
To run an ODI Agent as a Unix background process:
Open a command window and change directory to the $ODI_HOME/oracledi/bin directory.
Execute the following commands one at a time:
./agentscheduler.sh –NAME=WORKFLOW –PORT=20910 &
./agent.sh –NAME=INTERFACE –PORT=20911 &
If you have a problem with the ODI Agent processes, you might need to uninstall the services so that you can reinstall them.
To uninstall the ODI Agent services:
Display the Windows Services dialog.
For example, run 'services.msc' from the Windows > Run dialog.
Stop the 'OracleDI BI Agent WORKFLOW' service and the 'OracleDI BI Agent INTERFACE' service.

Open a command window and change directory to the $ODI_HOME\oracledi\bin directory.
Execute the following commands one at a time:
agentservice –r –s WORKFLOW 20910
agentservice –r –a INTERFACE 20911

If required, you can now reinstall the services (for more information about installing these services, see Section 4.5.3, "How to start the ODI Agents").
This section explains how to modify your Oracle Business Intelligence Applications deployment to resolve conflicting port numbers for ODI Agents.
To resolve conflicts in ODI Agent port numbers:
Modify the port number of the INTERFACE and WORKFLOW agents, as described in sections Section 4.5.5.2.1, "How to set up the INTERFACE Agent" and Section 4.5.5.2.2, "How to set up the WORKFLOW Agent".
Uninstall the ODI Agents, as described in Section 4.6.12, "How to uninstall ODI Agent Windows Services".
Re-install the ODI Agents using the new port numbers, as described in Section 4.5.3, "How to start the ODI Agents".
ODI supports dynamic enforcement of data integrity rules using Flow Control, which is implemented at the Interface level. By default, Flow Control in Oracle Business Intelligence Applications is turned off.
To activate or deactivate Flow Control:
In ODI Designer, display the Projects\Mappings tab and locate the Interface for which you want to modify the Flow Control behavior.
Edit the Interface to display the Interface: <Name> dialog, and display the Flow tab.
Use the IKM Selection field to select an appropriate knowledge module, and set the value of the FLOW_CONTROL option and the ANALYZE_FLOW_CONTROL option.
When Flow Control is turned on, ODI starts to filter out error records from the data flow. These error records are saved into error tables internally. You can enable recycling (processing) of error records by setting the RECYCLE_ERRORS property to YES.
Note: For more information about using Flow Control, refer to the ODI documentation.
Oracle BI Configuration Manager produces the following log files in the <ODI_HOME>\biapps_odi\logs directory on the ODI machine:
Table 4-27 Oracle BI Configuration Manager Log Files
| Log File Name | Log File Description |
|---|---|
|
<root session number>_<date string>_<time string>_debug.log |
<root_session_number> corresponds to the root of the session hierarchy as visible in ODI Operator. This log file must be submitted to Oracle Support for resolution of Oracle BI Configuration Manager Execution Plan related issues. Debug information from Oracle BI Applications Configuration Manager, which is stored in: <Stand-alone WebLogic installation folder>/user_projects/domains/base_domain For more information, see Section 4.5.8.7, "How to Launch Oracle BI Applications Configuration Manager in Debug Mode". |
|
Database statistics collection log written by the Database Statistics collection utility. |
|
|
Drop table log written by the Utility Package 'Drop All Tables' and the Procedure 'Drop Table'. |
|
|
Index Management log written by Knowledge Modules during Data Warehouse loads. |
|
|
Truncate table log written by Knowledge Modules during Data Warehouse loads. |
Other log files:
After you have installed and set up Oracle Business Intelligence Applications, configured your applications, (and optionally customized your applications) your Oracle Business Analytics Warehouse is empty. You need to create an Execution Plan to perform a full load E-LT to populate your Oracle Business Analytics Warehouse. You create Execution Plans in Oracle BI Applications Configuration Manager.
When you run an Execution Plan, Oracle Business Intelligence Applications automatically extracts the latest data from your source system, whether it is an initial full load or an incremental load. In other words, the first time you run an Execution Plan, a full load E-LT is performed. If you run the Execution Plan again, an incremental load is automatically performed.
Note: Before you load your OLTP data, you typically configure your applications (for more information, see Section 4, "Configuring Your Analytical Applications") and make customizations if required (for more information, see Section 10, "Customizing Oracle Business Intelligence Applications").
To load data from a source system using an Execution Plan, do the following:
Use Oracle BI Applications Configuration Manager to set E-LT Parameters appropriately for the applications and subjects areas that you want to load. For more information, see Section 4.7.2.1, "How to Set E-LT Parameters In Oracle BI Applications Configuration Manager".
Use Oracle BI Applications Configuration Manager to create an Execution Plan for the applications and subjects areas that you want to load. For more information, see Section 4.7.2.2, "How to Create an Execution Plan In Oracle BI Applications Configuration Manager".
Oracle BI Applications Configuration Manager automatically assigns a unique Execution Plan ID to the Execution Plan. You can see the Execution Plan ID value displayed in the Execution Plan Id column on the Execution Plan list (see screen shot below).
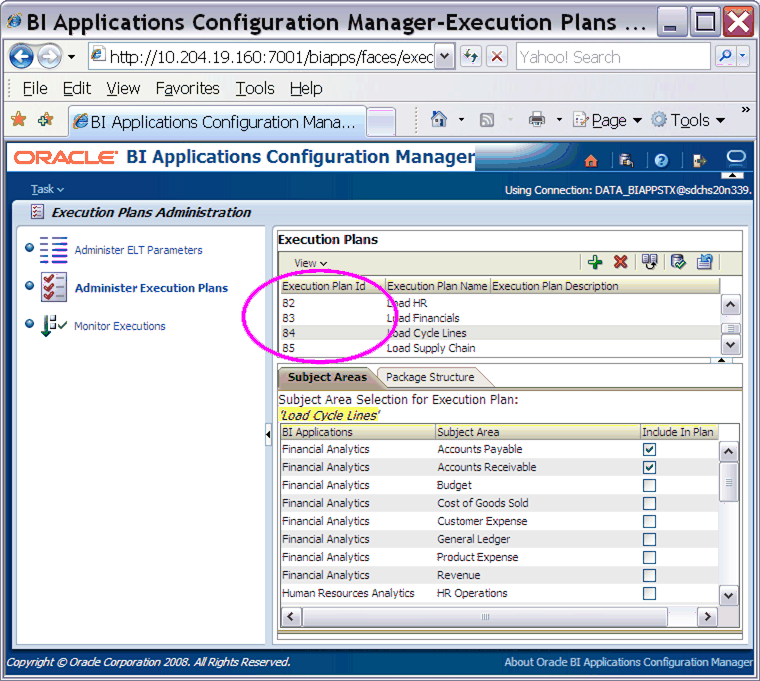
Run the Execution Plan to load the data, in one of the following ways:
Use Oracle BI Applications Configuration Manager to run the Execution Plan. For more information, see Section 4.7.2.3, "How to Run an Execution Plan in Oracle BI Applications Configuration Manager".
Use ODI Designer to run the Execution Plan either once, or scheduled to run more than once.
To use ODI Designer to run an Execution Plan, you must:
a. Create a copy of the ODI master package supplied with Oracle Business Intelligence Applications, and set the value of the OBI_EXECUTION_PLAN setting to match the unique Execution Plan Id value assigned in Oracle BI Applications Configuration Manager. For more information, see Section 4.7.1, "How to set up Master Packages to run an Execution Plan".
b. Execute the Scenario for the copy of the master package that you created. For more information about using ODI Designer to run an Execution Plan, see Section 4.7.2.3, "How to Run an Execution Plan in Oracle BI Applications Configuration Manager".
Note: The advantage of using ODI Designer to run an Execution Plan is that you can use ODI's scheduling tool to schedule the Execution Plan to run automatically.
This section explains how to set up Master Packages in ODI Designer to run an Execution Plan. You set up Master Packages by creating a copy of the ODI master package supplied with Oracle Business Intelligence Applications, and setting the value of the OBI_EXECUTION_PLAN setting to match the unique Execution Plan Id value assigned in Oracle BI Applications Configuration Manager when you create an Execution Plan.
Note: You only need to set up Master Packages in ODI Designer to run Execution Plans if you want to use ODI Designer to execute Execution Plans, or if you want to schedule Execution Plans. If you only want to use Oracle BI Applications Configuration Manager to run Execution Plans, you can skip this task.
Note: Before you start this task, you need to have created an Execution Plan in Oracle BI Applications Configuration Manager and noted down the Execution Plan ID. For more information, see Section 4.7.2.2, "How to Create an Execution Plan In Oracle BI Applications Configuration Manager".
To set up Master Packages to run Execution Plans:
In ODI Designer, log in as SUPERVISOR, and display the Projects view.
Note: When you log in, make sure that you specify the same JDBC URL to the Oracle Business Analytics Warehouse that you specified when you logged into Oracle BI Configuration Manager. If you specify a different JDBC URL, the Execution Plan ID that you specify in step 8 will be incorrect or not recognized.
Expand the Oracle BI Applications 7.9.5.2 project.
Select Utilities_and_Execution, then Execution Plans, then Packages.
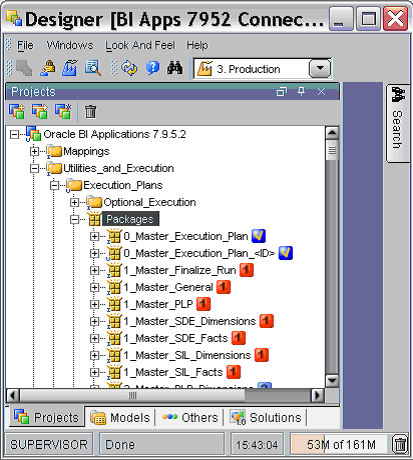
Right-click on 0_Master_All_Exec_Plan_<ID> and choose Duplicate.
ODI Designer creates a copy of the package '0_Master_All_Exec_Plan_<ID>' named 'Copy of 0_Master_All_Exec_Plan_<ID>'. You can optionally rename this copy with a suitable name, for example, 'Execution Plan for HR'.
Double-click on the copy of the package to display the Package: <Name> dialog for this package.
Display the Diagram tab.
Select the 'Update Execution Plan' procedure at the top of the Diagram pane, then display the Options tab on the Properties pane below.
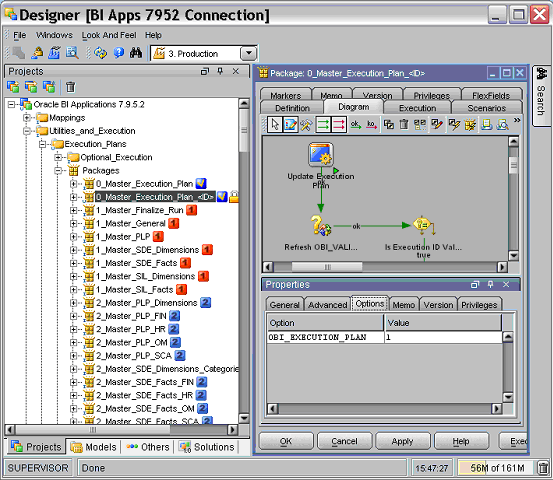
Tip: To display the Properties panel, make sure that you click the 'Show/hide Properties Panel' icon at the top of the Diagram tab.
On the Options tab, use the Value field to set the value of the OBI_EXECUTION_PLAN property.
You set the value of the OBI_EXECUTION_PLAN field to the same as the unique Execution Plan Id value assigned to the Execution Plan in Oracle BI Applications Configuration Manager.
For example, if an Execution Plan that you create in Oracle BI Configuration manager is assigned the ID '470', to run that Execution Plan you set the value of the OBI_EXECUTION_PLAN field to '470'.
For more information about Execution Plan IDs, see Section 4.7.2.2, "How to Create an Execution Plan In Oracle BI Applications Configuration Manager").
Click Apply, then OK to save the details.
Notes
To run multiple execution plans, copy the 0_Master_All_Exec_Plan_1 package, edit the package details, and set the OBI_EXECUTION_PLAN setting to the same as the unique Execution Plan Id value assigned to the Execution Plan in Oracle BI Applications Configuration Manager.
Oracle BI Applications Configuration Manager enables you to create and run Execution Plans, and monitor their progress. To perform E-LT using Oracle BI Applications Configuration Manager, do the following:
Configure E-LT Parameters to enable you to control E-LT processes (for more information, see Section 4.7.2.1, "How to Set E-LT Parameters In Oracle BI Applications Configuration Manager").
Create an Execution Plan (for more information, see Section 4.7.2.2, "How to Create an Execution Plan In Oracle BI Applications Configuration Manager").
Run the Execution Plan (for more information, see Section 4.7.2.3, "How to Run an Execution Plan in Oracle BI Applications Configuration Manager").
You use Oracle BI Applications Configuration Manager to specify E-LT parameter values that are used to control the E-LT processes for your Applications and Subject Areas.
Start Oracle BI Applications Configuration Manager (for more information, see Section 4.5.8.9, "How to Login to Oracle BI Applications Configuration Manager Using A Connection").
Select the Administer ELT Parameters link to display the Parameters Administration page.

Use the Global, Common, and Application Specific tabs to change the default values of the parameters.
At the Application Specific tab, the parameters are grouped into Subject Area within Application, to help you locate the parameters that are specific to your Application.

You use Oracle BI Applications Configuration Manager to create and manage Execution Plans.
Start Oracle BI Applications Configuration Manager (for more information, see Section 4.5.8.9, "How to Login to Oracle BI Applications Configuration Manager Using A Connection").
Select the Administer Execution Plans link.
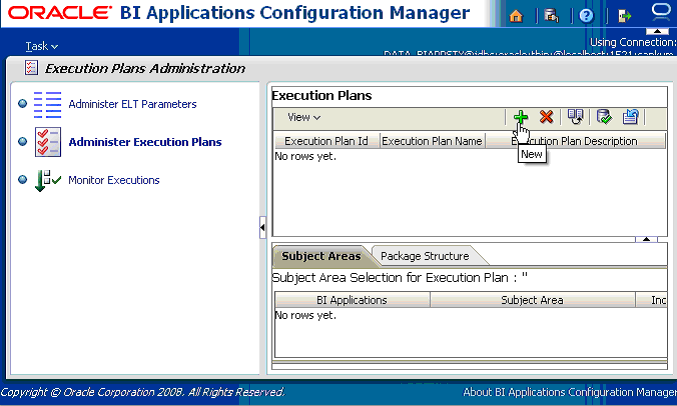
Click the New button (+) to display the Create New Execution Plan page.

Enter the appropriate execution plan information, as described in the table below.
Table 4-29 Create New Connection page fields
| Field | Description |
|---|---|
|
Name |
Enter a short name to identify the Execution Plan. This name will be displayed in Oracle BI Applications Configuration Manager and ODI Designer. For example, 'Load HR All'. |
|
Description |
Enter a short name to description of the Execution Plan. This description will be displayed in Oracle BI Applications Configuration Manager and ODI Designer. |
|
Select Application or Subject Area to be included |
Select the analytic application from which you want to load data (for example, Financials, HR, Supply Chain). To select one item, click the item. To select multiple contiguous items, press Shift and click. To select multiple non-contiguous items, press Ctrl and click. |
|
Synchronize Package Structure. |
Select this check box. In order for the package structures to be displayed correctly on the Package Structure tab, the subject areas associated to an execution plan must be synchronized within internal Oracle BI Applications Configuration Manager tables. If you do not synchronize the package structures when creating the execution plan or when you made changes to the subject areas associated to the execution plan, you must synchronize by clicking the Synchronize package structure button that appears on the Package Structure tab in order to get correct package structure. The synchronization process may take up to several minutes depending on the network traffic between the Oracle Business Analytics Warehouse database and the Oracle BI Applications Configuration Manager installation. |
Save the details.
Note: The OK button is only active if you have included at least one Subject Area in the Execution Plan.
When you save the details, Oracle BI Applications Configuration Manager automatically assigns a unique Execution Plan ID to the Execution Plan. You can see the Execution Plan ID value displayed in the Execution Plan Id column on the Execution Plan list (see screen shot below).

You can use the Execution Plans Administration page to modify the Execution Plan if required (for example, to add or remove Subject Areas), as well as start and monitor it.
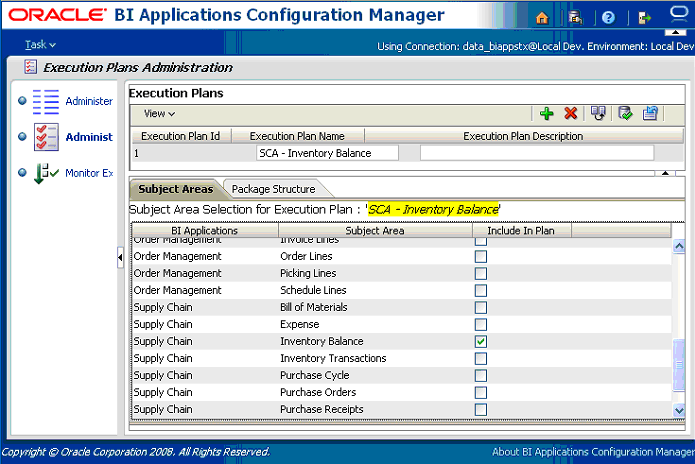
You run an Execution Plan to load data into the Oracle Business Analytics Warehouse for the Applications and Subject Areas specified by the Execution Plan.
To Run an Execution Plan Using Oracle BI Applications Configuration Manager:
Start Oracle BI Applications Configuration Manager (or more information, see Section 4.5.8.9, "How to Login to Oracle BI Applications Configuration Manager Using A Connection").
Select the Administer Execution Plans link.
In the Execution Plans list, select the Execution Plan that you created earlier (or more information, see Section 4.7.2.2, "How to Create an Execution Plan In Oracle BI Applications Configuration Manager").
Display the Package Structure tab.
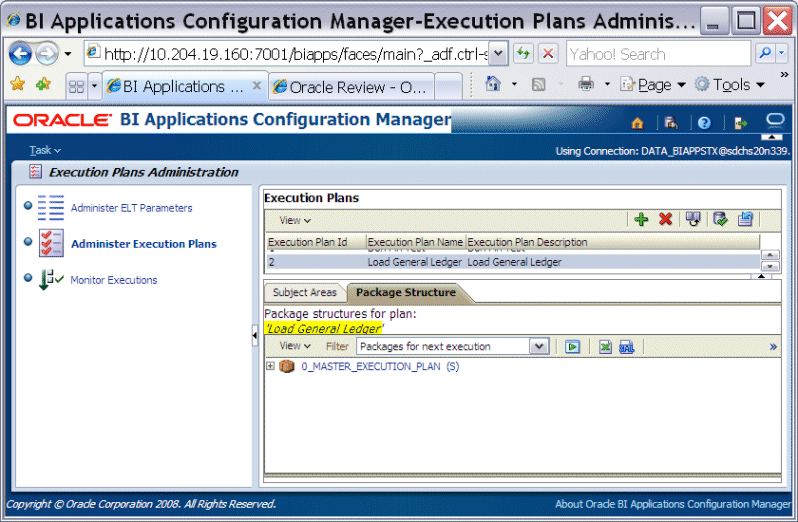
Select the 0_MASTER_EXECUTION_PLAN package.
Click the Execute button to display the Execute Package Structure dialog.
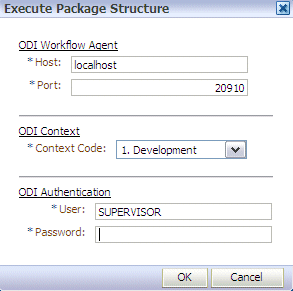
Enter the appropriate execution plan information, as described in the table below, then click OK to save the details.
Table 4-30 Execute Package Structure dialog fields
| Field | Description |
|---|---|
|
Host |
Specify the fully qualified host name of the ODI machine, or 'localhost'. For example, US12345.us.company.com. For more information, see Section 4.5.5.2.2, "How to set up the WORKFLOW Agent". |
|
Port |
Specify the port number that you defined for the WORKFLOW agent. For example, 20910. For more information, see Section 4.5.5.2.2, "How to set up the WORKFLOW Agent". |
|
ODI Context |
Select the appropriate Context in which you are working. |
|
User |
Specify SUPERVISOR. |
|
Password |
Specify SUPERVISOR. |
Use the Sessions page to monitor the process (select the Monitor Execution link).
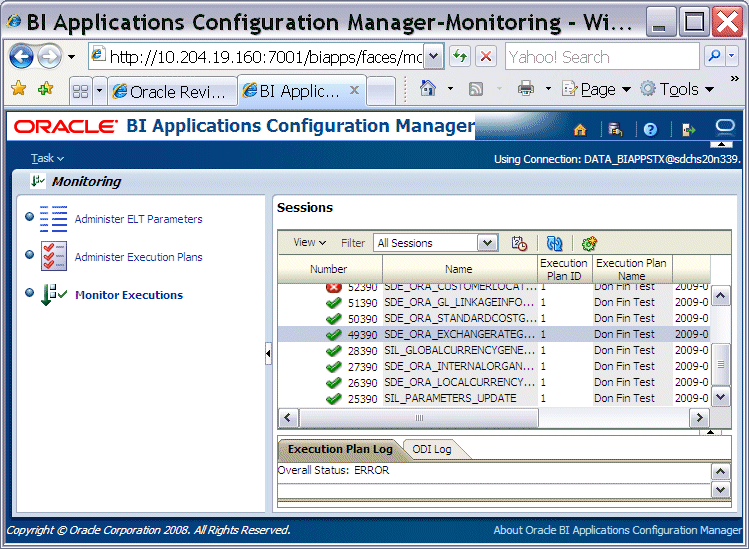
Notes
You can only monitor sessions from Execution Plans that you created in Oracle BI Applications Configuration Manager. You cannot monitor packages that you executed in ODI Designer.
You can also execute an Execution Plan from the Monitor Executions page. Select the Monitor Executions link to display the Sessions page. Then, click the Create New Session icon to display the Execute Package Structure dialog, and select the Execution Plan from the Execution Plan drop down list.
Oracle Business Intelligence Applications truncates tables, drops and creates indexes, and collects statistics for the Knowledge Module.
During a E-LT data load, you can also find information about table truncation, indexes, and statistics collection in the log directory, located in $ODI_HOME\oracledi\biapps_odi\logs. For example, D:\Ora_Home1\oracledi\biapps_odi\logs. For a full list of log files, see Section 4.6.15, "List of Log Files".
You can use ODI Designer to run an Execution Plan once or schedule it to perform more than once.
Note: Before you can perform E-LT using ODI Designer, you must have set up Master Packages in ODI Designer to run an Execution Plans (for more information, see Section 4.7.1, "How to set up Master Packages to run an Execution Plan").
To perform a full-load E-LT process using ODI Designer:
In ODI Designer, display the Projects view.
Expand the Oracle BI Applications 7.9.5.2 project.
Select Utilities_and_Execution, then Execution Plans, then Packages.

Do one of the following:
To perform a single full-load E-LT process:
Right-click on the package that you set up earlier as described in Section 4.7.1, "How to set up Master Packages to run an Execution Plan" (for example, 0_Master_Execution_plam_<ID>) and select Execute.
Use ODI Operator to monitor the processes.
To schedule a full-load E-LT process:
Expand the package that you want to schedule.
Expand the Scenario for that package.
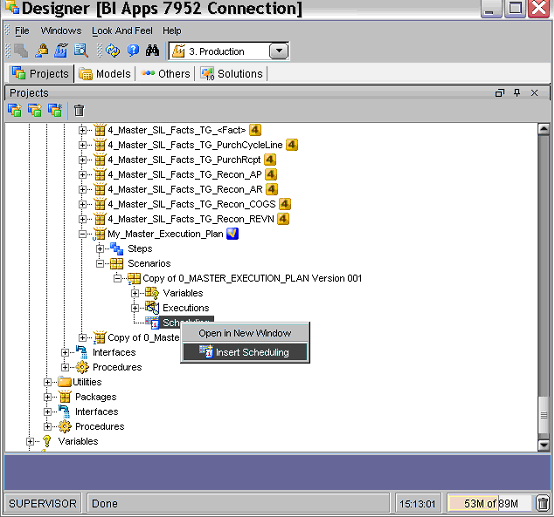
Right-click on the Scheduling node and select Insert Scheduling to display the Scenario Scheduling: <Name> dialog.
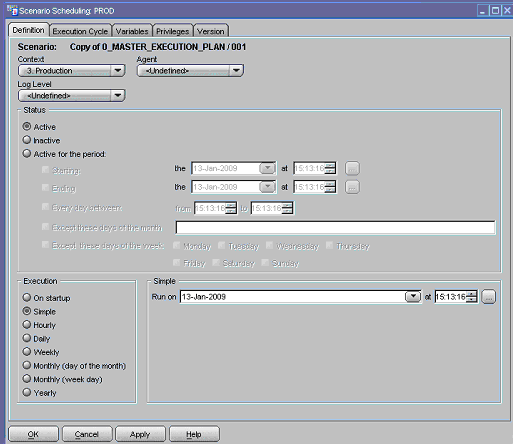
Use the Scenario Scheduling: <Name> dialog to specify the scheduling details.
Save the details.
When the process starts, use ODI Operator to monitor the process.
For more detailed information about using the ODI to perform E-LT, refer to the Oracle Data Integrator documentation.
Note: ODI Designer does not support concurrent package execution for the Master Package. You can only execute Master Packages one-at-a-time.
This example shows you how to use Oracle BI Applications Configuration Manager to load source system data by creating and running an Execution Plan.
In this example, you have installed Oracle Financial Analytics with an Oracle EBS 11.5.10 OLTP data source, and you want to load OLTP data for the subject area General Ledger, as follows:
Start Oracle BI Applications Configuration Manager (or more information, see Section 4.5.8.9, "How to Login to Oracle BI Applications Configuration Manager Using A Connection").
Select the Administer Execution Plans link.

Click the New button (+) to display the Create New Execution Plan page.

Enter 'Financials - General Ledger' in the Name field.
In the Select Application or Subject Area to be included box, select General Ledger.
Click OK.
Select the Administer Execution Plans link.
In the Execution Plans list, select the 'Financials - General Ledger' Execution Plan.
Display the Package Structure tab.

Click the Execute button to display the Execute Package Structure dialog.

Enter the appropriate execution plan information, as described in the table below, then click OK to save the details.
Table 4-31 Execute Package Structure dialog fields
| Field | Description |
|---|---|
|
Host |
Specify the fully qualified host name of the ODI machine, or 'localhost'. For example, US12345.us.company.com. For more information, see Section 4.5.5.2.2, "How to set up the WORKFLOW Agent". |
|
Port |
Specify the port number that you defined for the WORKFLOW agent. For example, 20910. For more information, see Section 4.5.5.2.2, "How to set up the WORKFLOW Agent". |
|
ODI Context |
Select the appropriate Context in which you are working. |
|
User |
Specify SUPERVISOR. |
|
Password |
Specify SUPERVISOR. |
Use the Sessions page to monitor the process (select the Monitor Execution link).
