E SNMP Components
Simple Network Management Protocol (SNMP) is an application-layer protocol that allows the exchange of information on the management of a resource across a network. It enables you to monitor a resource and if required, take some action based on the data obtained from the resource. Both the SNMP version 1 and SNMP version 2 are supported by Oracle Service Bus. SNMP is made up of the following components:
For more information on SNMP, see the Oracle Fusion Middleware SNMP Management Guide for Oracle WebLogic Server.
E.1 Managed Resource
This is the resource that is being monitored. The resource and its attributes are added to the Management Information Base (MIB).
E.2 Management Information Base
The MIB is a data structure that stores all the resources to be monitored in an hierarchical manner. It also stores the attributes of the resources. Each resource is given a unique identifier called the Object Identifier (OID). You can use the SNMP commands to retrieve the information on the management of a resource. The following section gives an illustration of the Oracle WebLogic Server MIB.
The Oracle WebLogic Server installer creates a copy of the MIB in the following location:
MW_HOME/WL_ORACLE_HOME/server/lib/BEA-WEBLOGIC-MIB.asn1
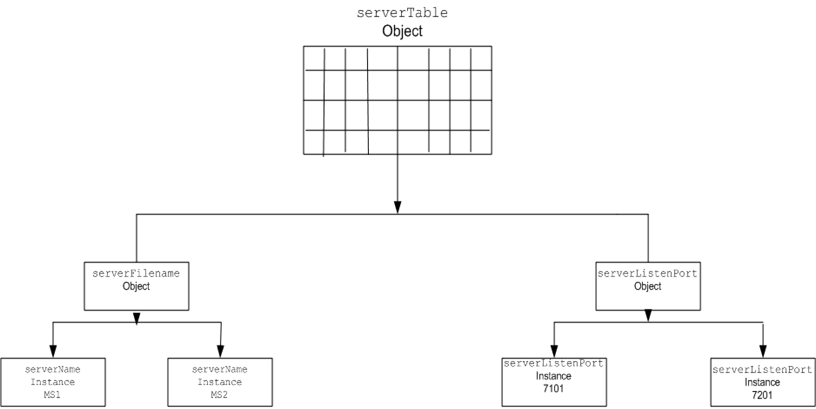
Oracle WebLogic Server exposes thousands of data points in its management system. To organize this data it provides a hierarchical data model that reflects the collection of services and resources that are available in a domain. Figure E-1 illustrates the hierarchy of objects in the MIB.
For example, if you created two managed servers, MS1 and MS2, in a domain, then MIB contains one object serverTable, which in turn contains one serverName object.The serverName object in turn contains two instances containing values MS1 and MS2. The MIB assigns a unique number called an object identifier (OID) to each managed object.
Once assigned you cannot change the OID. Each OID consists of a sequence of integers. This sequence defines the location of the object in the MIB tree. Each node in the path has both a number and a name associated with it.
For more information about Oracle WebLogic Server MIBs, see Oracle Fusion Middleware SNMP Management Guide for Oracle WebLogic Server.
E.2.1 SNMP Agent
Each managed resource uses an SNMP agent to update the relevant information in the MIB. For this you should configure the SNMP agent to detect certain conditions within a managed resource and send trap notifications (reports) to the SNMP manager. You can configure the SNMP agent to generate traps in one of the following ways:
-
Automatically: Configure the SNMP agent to generate traps for events such as server startup or server shut down.
-
Using log messages: Using filters, configure the SNMP agent to detect specific log messages and generate traps.
-
Monitoring traps: Create JMX API clients to monitor the changes in the attributes and notify SNMP agent to generate traps. You can also configure the SNMP agents to monitor the changes in the attribute. For more information about JMX API clients, see Appendix D, "JMX Monitoring API,".
E.2.2 SNMP Manager
The SNMP manager controls the SNMP agents. It is also the primary interface to the Network Management System.
E.2.3 Network Management System (NMS)
The Network Management System forms the interface with the user. It gathers data using the SNMP manager and presents it to the user.
E.3 Creating and Using SNMP Trap Destinations
This section describes how to create and use SNMP trap destinations in an existing Oracle WebLogic Domain to capture SNMP traps generated by Oracle Service Bus.
-
In the Oracle WebLogic Server Console, Lock & Edit the configuration.
-
Choose Diagnostics > SNMP.
-
In the Domain-Scoped SNMP Agent table, click the domain name.
-
On the Domain SNMP Agent page, select Enabled.
-
Make sure the SNMP UDP Port is set to 161 (or another appropriate number if 161 is being used by any other service on that machine).
For Solaris, see the note at the end of this procedure.
-
Click Save.
-
Select the Trap Destinations tab, and click New.
-
Enter the following settings:
-
Name: alsbDestination-0
-
Community: weblogic
-
Host and Port: set the values to point to the host and port where the SNMP manager is listening for these alerts, such as localhost and 163.
-
-
Click OK.
Repeat the steps to create as many trap destinations as you need.
-
Activate Changes in the Oracle WebLogic Server Console.
-
In a command window, change directories to WL_ORACLE_HOME/server/bin, and run the following command:
setWLSEnv.cmd(.sh)
-
Run the following Java command to start the Oracle WebLogic Server SNMP command line utility, which listens for traps and prints them on the console (using 163 as the listen port for traps):
java weblogic.diagnostics.snmp.cmdline.Manager SnmpTrapMonitor -p 163
From then on, the traps generated within Oracle Service Bus should reach the running command line utility listening for traps.
Note:
On Solaris, port numbers 0 to 1023 are reserved for root login. If you want to use ports 161 and 163 (as used in this procedure), you may have to start the server and command line utility using root login. To avoid this problem, and to avoid using the root login, specify port numbers above 1023 for both the SNMP agent and the SNMP manager command.
