23 Working with Guided Business Processes
This chapter describes how to use Guided Business Processes to organize the activities in your process into milestones. You can use milestones to make your process easier to run for inexperienced users. Guided Business Processes hide the complexity of the process and guide the end-user through the tasks that are relevant to them.
-
Section 23.3, "Standards and Guidelines for Working with Guided Business Processes"
-
Section 23.4, "The Typical Flow of Developing a Guided Business Process"
-
Section 23.5, "Introduction to Developing a Guided Business Process"
-
Section 23.8, "Deploying an Guided Business Process to Oracle Weblogic Server"
23.1 Introduction to Guided Business Processes
Guided Business Process enable you to group the interactive activities in your BPM process into a set of milestones that are meaningful to the process process participants. They outline the steps the process participants have to complete, hiding the complexity of the business process.
Guided Business Processes provide a guided visual representation of a process flow, improving the user experience by providing end users with an encapsulated hierarchical view of the business process.
Guided Business Processes enable directing end users to complete a business process through a guided set of steps associated with the process. By following the steps outlined in a Guided Business Process, end users require less training to complete a business process, and the results of the process are more predictable.
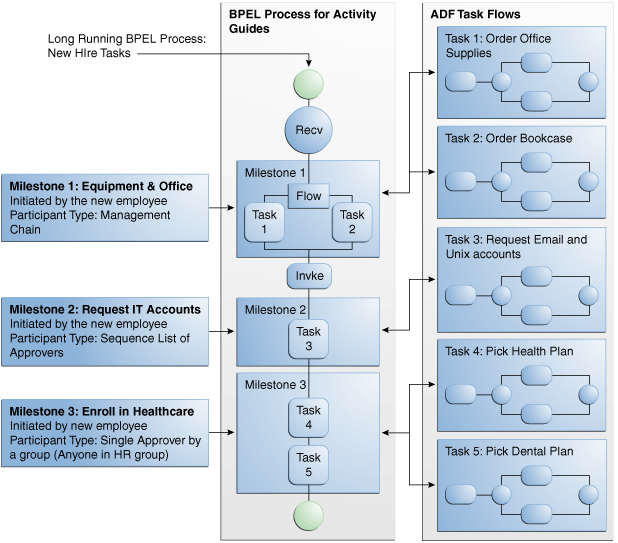
A Guided Business Process is modeled as an activity guide that is based on a business process. The Activity Guide includes a set of Milestones. A milestone is a contained set of tasks that the end user has to complete. A milestone is complete when the user successfully runs a specific set of tasks in the milestone.
Each milestone is a specific set of human workflow tasks. Each human workflow task is itself a task flow that may require the collaboration of multiple participants in various roles. Depending on the nature of the task flows, a participant may save an unfinished task flow and resume it at a later time.
Leveraging Service-Oriented Architecture
Service-Oriented Architecture is the foundation for Guided Business Processes. Guided Business Processes use SOA composite processes, leveraging the following SOA functionality:
-
Reuse of existing investments: Oracle SOA Suite provides a foundation for and access to re-usable services. Composite processes leverage existing investments by running on the SOA platform and accessing existing services provided by the platform. By enabling the use of existing systems, Oracle SOA Infrastructure increases the usefulness and value of these systems.
-
Process-oriented software: Service-Oriented Architecture combined with process orchestration infrastructure act as the controlling agent for the business process across multiple disparate systems.
When to Use Guided Business Processes
Guided Business Processes enable running large-scale, long-running, multiuser processes that consume and reuse taskflows built by other teams. For example, the finance and human resources departments of an organization may access the same human taskflows in different business processes. Using Guided Business Processes enables re-using existing taskflows in a large composite, creating a more meaningful business process for end users.
Oracle SOA infrastructure provides access to re-usable services accessed by the BPEL Designer and BPEL process flow. Guided Business Processes leverage existing services, processes and task flows to create long-running, multiuser processes.
Guided Business Processes provide the following functions and features:
-
Re-using tasks and taskflows within a large composite, to avoid redesigning and re-coding tasks and activities.
-
Using SOA infrastructure to orchestrate tasks, creating a flow of business processes.
-
Using Milestones to modularize tasks into manageable chunks, while presenting to end users a set of related, guided tasks.
For example, a long process with one hundred tasks can be broken down into ten or twenty Milestones. End users need only step through a few Milestones rather than, say, one hundred individual tasks.
Guided Business Processes: Design Time and Run Time
Guided Business Processes consist of both design time components and run time interfaces.
23.1.1 Guided Business Process Design Time Architecture
Guided Business Processes use Oracle BPEL Process Manager, part of Oracle Fusion Middleware, to provide a comprehensive, standards-based, easy-to-use solution for creating, deploying, and managing composite application business processes with both automated and human workflow steps—all in a service-oriented architecture.
Guided Business Processes leverage features of Oracle Fusion Middleware, such as security, scalability and high availability. The following features enable composite processes to be exposed as Guided Business Processes:
-
Technology abstraction. By using metadata, the actual implementation of business logic need not rely on any one technology.
-
Declarative development. Using metadata to define business logic and business processes eliminates the need for coding when creating a Guided Business Process.
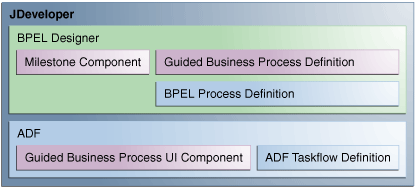
Developing Guided Business Processes involves creating a BPEL composite application which contains an SOA project. The BPEL composite, exposed as a Guided Business Process, consists of an Activity Guide that contains milestone activities. A separate client application must also be developed as an end user interface for the Guided Business Process.
You can develop a user interface for Guided Business Processes using any of the following:
-
Oracle ADF
-
Oracle WebCenter Framework
-
Guided Business Process Run-Time Services.
23.1.2 Components of a Guided Business Process
A Guided Business Process is an asynchronous BPEL process or a BPMN process that orchestrates a set of human tasks and provides a common user interface to complete and track these tasks. To define a Guided Business Process you create an Activity Guide that comprises the following components:
-
Milestone: A milestone is a group of human tasks which must be completed to accomplish a particular goal. A milestone is complete when its human tasks have been completed. Similarly, an Activity Guide is complete when a specific set of Milestones are completed. A milestone can contain Human Task activities and other BPEL activities.
-
Human Tasks: It is possible to invoke an ADF task flow from an Activity Guide. To do so, a BPEL Human Task component is placed in the Activity Guide and bound to an ADF task flow.
-
Other Tasks: Activity Guides can include other tasks such as service calls. However, these automated tasks do not appear in the Activity Guide tree at run time.
-
Invoke: In BPEL you can invoke a second Activity Guide from the current Activity Guide, by using an Invoke component with a Partner Link that references the second Activity Guide BPEL process. This may be useful when you want to compartmentalize and reuse related business processes. For example, an Activity Guide in which an end user applies for a loan might then invoke another Activity Guide in which a loan reviewer reviews the application.
Activity Guides with a simple, sequential process execution must complete all Milestones. Similarly, all Human Task components within a milestone must be completed to complete the milestone.
Activity Guides containing branching and conditional logic may sometimes complete execution without necessarily completing all Milestones. Similarly, some Human Task components within these Milestones may be skipped as well.
23.1.3 Guided Business Process Run-Time Architecture
Guided Business Processes rely on Oracle BPEL Process Manager to orchestrate tasks, combining Oracle BPEL Process Manager, worklist applications, and human task flows to link disparate human tasks to a greater long-running process.
At run time, Guided Business Processes manifest as BPEL or BPMN process instances orchestrating ADF task flows within Milestones. Oracle BPEL Process Manager is the run-time engine for the BPEL Guided Business Processes. The run-time engine for BPMN guided business processes is the BPMN Service Engine. Both engines delegate all human task operations to Human Workflow services.
You can view the process instances organized into an Activity Guide using a custom application developed with Oracle ADF UI, Oracle WebCenter UI or Guided Business Process access APIs. The process instances that you view in an Guided Business Process client also appear in the Worklist application, but they are not organized into milestones.
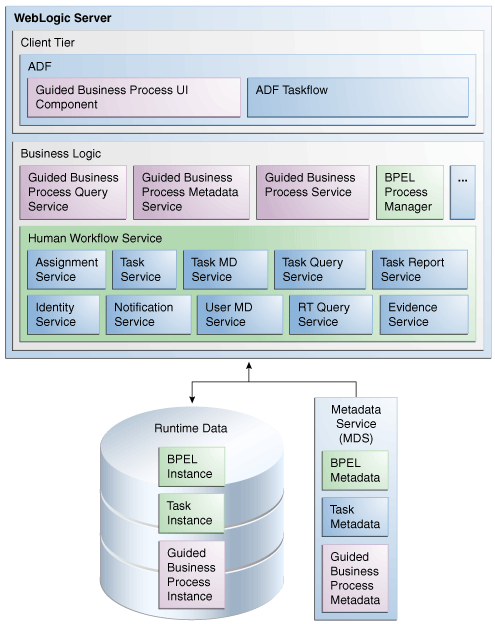
As shown in Figure 23-4, the Guided Business Process run-time architecture is composed of the client, business logic and data tiers.
Run time support includes the Guided Business Process Query, Guided Business Process Metadata and Guided Business Process Instance Management services. The run time components interface with Oracle BPEL Process Manager and the Human Workflow Service.
You can use any of the following as a basis for a Guided Business Process client application:
-
Oracle Worklist application
-
Oracle ADF
-
Oracle WebCenter Framework
-
Guided Business Process Run-Time Services.
For information regarding the Guided Business Process schemas, see Section 24.4, "Guided Business Process Schemas and Software Components."
23.1.3.1 Client Tier
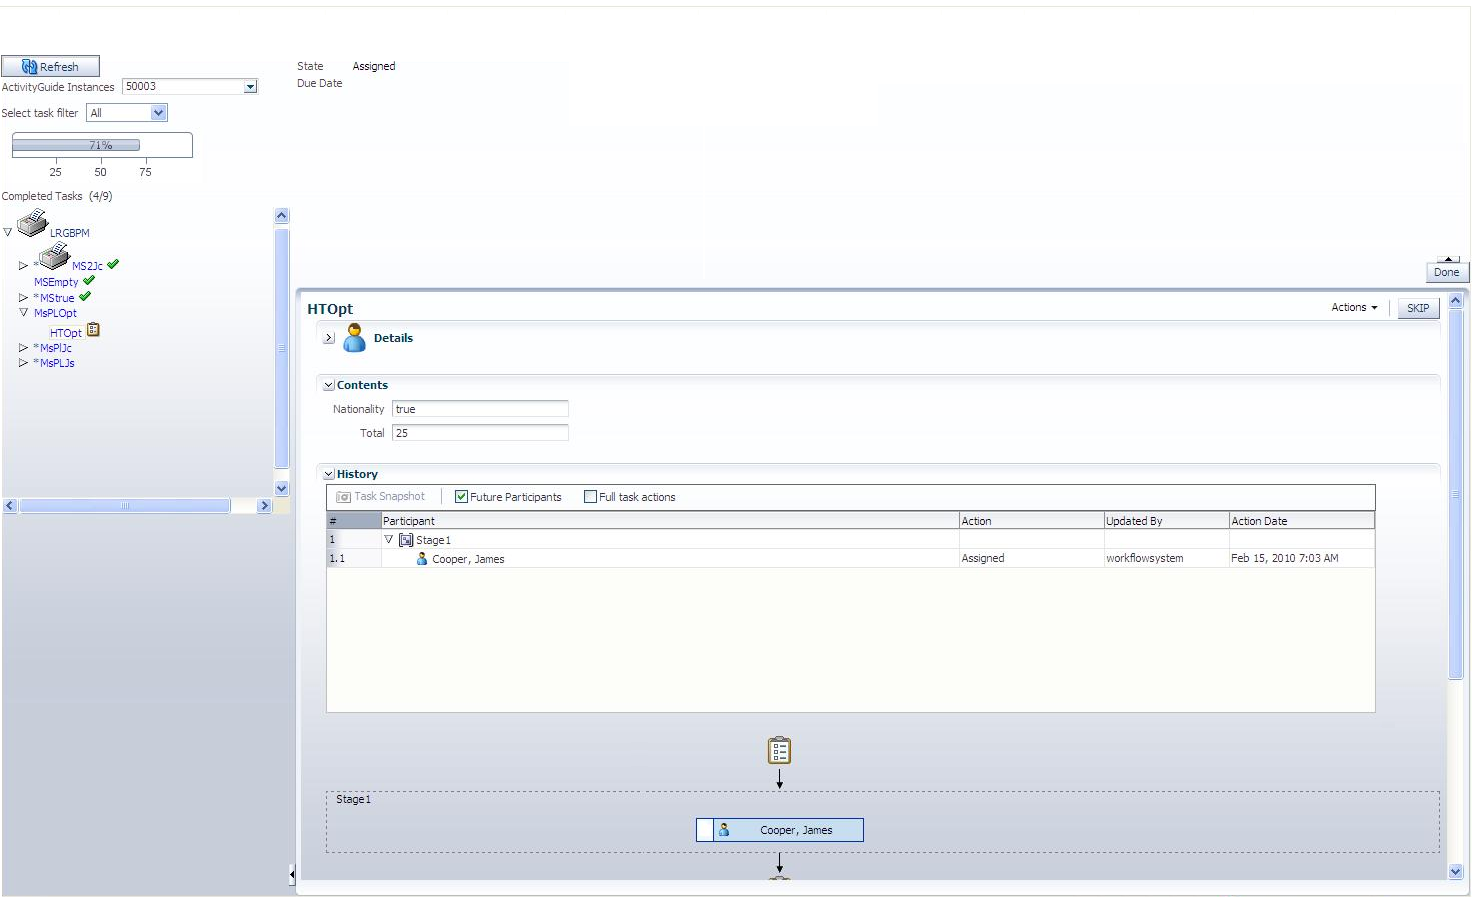
The Guided Business Process run time front end, or client application, enables end users to follow the task flow defined at design time in the Activity Guide. Using the client application, end users can:
-
Expand a milestone and drill down to the tasks it includes
-
Complete the tasks defined in the Milestones
-
View the status and percent completion of the business process as the Guided Business Process runs.
The Guided Business Process client tier components includes the following:
-
Customized Client Application: You can create customized client applications to display the Guided Business Process to end users using Oracle ADF UI, Oracle WebCenter UI or Guided Business Process APIs.
-
Worklist Application: An out-of-the-box interface for displaying the tasks in a Guided Business Process, to users completing the guided tasks.
-
Oracle Enterprise Manager Application Server Control console: A platform for administering and monitoring Guided Business Process instances. The console is also useful for testing Guided Business Processes following development.
Features of the Run-Time User Interface
Following are some features of the run-time user interface:
-
Auto-scroll: Once a Guided Business Process is deployed, you can generate a new Guided Business Process instance with milestone nodes and task nodes. Accessing the Guided Business Processes automatically opens the first milestone and task node. On completion of a task, the Guided Business Process auto-scrolls to the next task within the milestone.
-
Future Milestones and Tasks: When accessing a Guided Business Process, the Milestones display in the Activity Guide tree. The Activity Guide also displays the milestones and tasks to be completed in the future. This provides users with a holistic view of the tasks and milestones to be completed. If the Guided Business Process is to be executed sequentially, future tasks and milestones are grayed out. Future tasks and milestones may be viewed, but not executed.
-
Branching: Branching involves placing a switch in the business process flow which enables splitting the process into two or more branches.
Conditions are set to determine which branch executes. If the flow branching is determined by a condition, then the milestone branching node displays as an ellipsis ("...") in the Activity Guide tree. The milestones to be completed for the selected branch display only when the switch executes at real time.
-
Parallel Milestones: Parallel milestones are milestones that can be completed at any time, in any order without following a specific sequence, if previous milestones have completed.
-
Disabling Completed Tasks: When the end user completes a task, the link to the task is grayed out to avoid distracting the user with links that are no longer active.
-
Progress Indicator: The progress indicator provides feedback to the end user about their progress completing the entire Guided Business Process. The progress is shown using a bar graphic with the completion percentage of the Guided Business Process.
-
Filtering: Enables to filter the tasks within a milestone based on their functional state.
23.1.3.2 Business Logic Tier
The business logic tier includes the following components:
Guided Business Process Metadata Service
The SOA composite associated with an Guided Business Process drives it at run time. As such, no run-time environment data is stored in the Guided Business Process metadata. The Guided Business Process Metadata Service locates and retrieves the Guided Business Process definition at run time from the Metadata Service (MDS).
Guided Business Process Query Service
The Guided Business Process query service retrieves the Guided Business Process instance information based on specified search criteria. The query service uses the existing workflow service to query Guided Business Process data. The Guided Business Process query service is registered to the workflow service locator as an additional workflow service.
Guided Business Process Instance Management
Guided Business Process run-time states are maintained as separate objects, enabling Guided Business Processes to have a state separate from the SOA composites with which they are associated. The related SOA composite instances are managed by an SOA composite run-time manager.
Guided Business Process Instance Schema
A schema defines the structure of Guided Business Process instances. The schema represents Guided Business Process data persisted to the database at run time.
Workflow services enable you to interleave human interactions with connectivity to systems and services within an end-to-end process flow. Workflow services are typically linked to a BPEL process service component through a Web Services Description Language (WSDL) contract, like any other web service. In BPMN workflow services are linked to the BPMN process using a user task. The process assigns a task to a user or role and waits for a response. The users act on the task using Oracle BPM Worklist.The Human Workflow Service is responsible for handling all interactions with users or groups participating in the business process. It does this by creating and tracking tasks for the appropriate users in the organization. Users typically access tasks through a variety of clients, including Oracle BPEL Worklist application, e-mail, portals, or custom applications.
For more information about the Human Workflow Service, see the chapter "Introduction to Human Workflow" in Oracle Fusion Middleware Developer's Guide for Oracle SOA Suite.
23.1.3.3 Data Tier
Oracle BPEL Process Manager persists Guided Business Processes, BPEL or BPMN process and task instances to the database at run time. Oracle Metadata Repository (MDS) stores the schemas of available services, including BPEL, task and Guided Business Process metadata. The schemas are used when instantiating a Guided Business Process.
23.2 Guided Business Process Use Cases
The following use cases show you different situations where to use Guided Business Processes:
23.2.1 Online Public Sector Form Processing
Many public sector organizations process forms manually, a labor intensive and environmentally wasteful procedure.
For example, a state agency must provide, collect and process various forms to issue fishing and hunting licenses. The state agency hires additional outside contractors for the summer and fall season to handle the increase of license applications more efficiently while avoiding information loss or negligence.
Rather than manually processing the license applications, the end-to-end form processing procedure can be modeled as a Guided Business Process with two Milestones.
The following outline of an example form processing using Guided Business Process is generic, and can be adapted to enable end-to-end processing of similar forms:
Milestone 1: Filling in and Submitting an Application
Applicants on the state Web site for the Department of Fishing and Hunting can click the Apply button to fill in and submit an application for a fishing or hunting license.
The milestone includes the following tasks:
-
Personal details: Applicants must fill in personal details such as name, address, and so on.
-
License selection: Applicants select a fishing or hunting license.
-
Form submission: Applicants click the Submit button to send the forms to the state fishing and hunting department. The workflow selects an application approver and e-mails the approver a request for review and follow-up.
Milestone 2: Application Processing and Result Notification
Applications for hunting licenses require review and manual approval or rejection.
The milestone includes the following tasks:
-
Approval/Rejection of application: The license application approver navigates the approval/rejection flow.
-
Status notification: The workflow sends the applicant a notification regarding the status of the license application.
With its intuitive guided user experience, the Guided Business Process maximizes the efficiency of the license application process while increasing the productivity of license approvers. In addition, the Guided Business Process enables monitoring the end-to-end application process at both the front- and back-end levels.
23.2.2 Online Loan Application Procedure
In the loan-origination industry, banks must consider several business factors: process consolidation, regulatory compliance and faster product delivery, for example. Loan products change frequently, often depending on state or region where the loan is offered.
The following example focuses on a subset of loan origination. As such, only specific processes are illustrated.
In this example, the business process flow for an online loan application procedure is as follows:
-
Application or registration: The customer enters qualification information for a loan product.
-
Processing or locking of a loan: The customer agrees to a specific product and rate. This stage of the procedure spawns several sub-processes that gather additional information on the customer. This information enables the underwriters to decide on the loan.
-
Underwriting the loan: An underwriter uses the information gathered to approve or reject the loan.
-
Closing: The organization selling the loan closes the loan application and grant process.
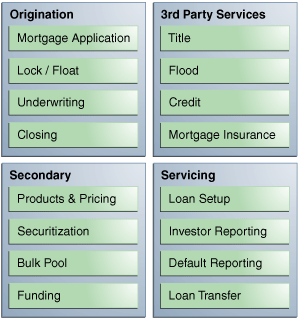
These processes rely on several interrelated services and procedures, as illustrated in Figure 23-5.
-
Origination: The process of acquiring customer data and related data, making decisions based on processing the data and requesting data from third-party services.
-
Third-party services: These are used to retrieve data on the customer and the item to be purchased with the loan.
-
Secondary processes: These are processes that execute while the main process runs. This example focuses on pricing for various mortgage products.
-
Servicing: Following origination, loans are either booked on the bank or sold on the secondary market, for example at other banks or by other loan vendors.
Although these processes appear simple, completing them involves many business challenges.
Increasingly, the interactions between real human actors in software must be coordinated. Humans are key participants in almost every software system, especially in collaborative processes and composite applications. Some common challenges are presented when involving humans interaction with structured workflow systems.
Deciding whether to grant a loan might entail working through a large set of rules based on the customer's credit history, income and other factors. These factors must be coordinated with several business process determined by the bank. Underwriters are alerted to approve or reject an applicant, depending on several factors, including the applicant's personal details and external data requests from third-party services.
A mortgage application Guided Business Process might include several milestones. The following Guided Business Process outline illustrates a mortgage application procedure.
A potential customer registers on the loan provider Web site and applies for the loan through a series of guided tasks.
-
Registration: The applicant registers on the bank's Web site.
-
Product selection: The applicant selects a loan based on the type of product required and the products available regionally.
-
Application: The applicant enters the personal details required to apply for a loan.
Milestone 2: Application Processing
Once the loan application process has completed, the loan is processed and reviewed for approval.
-
Information retrieval: Various services are used to access information regarding the loan and the applicant's finances and personal details.
-
Review: An underwriter must manually review the loan application.
-
Approval: Based on the data reviewed, the approver must approve or reject the loan.
Once the loan has been approved it is ready for closing.
The milestone includes the following tasks:
-
Closing appointment: The title company or closing attorney sets an appointment with the customer.
-
Closing documents: The loan closer gives the loan documents to the closing agent and provides to the customer any required documents, and as the final closing
23.3 Standards and Guidelines for Working with Guided Business Processes
The following standards and guidelines apply to Guided Business Processes:
-
Guided Business Processes must be deployed to a standalone Oracle WebLogic Server.
23.4 The Typical Flow of Developing a Guided Business Process
The following describes the main workflow of developing a Guided Business Process:
-
Develop the Guided Business Process:
-
Develop a BPEL or BPMN process and configure it as a Guided Business Process.
-
Configure Milestones and associated tasks.
-
Develop a task flow.
-
Deploy, instantiate, and test the Guided Business Process.
-
-
Develop a Guided Business Process front end for use at run time. To develop a front end, you can:
-
Develop a client application with Oracle ADF UI or Oracle WebCenter UI.
-
Use Oracle BPEL Worklist application as a client application.
-
Develop a custom UI with Guided Business Process run-time services.
-
-
Deploy the Guided Business Process client application.
-
Monitor Guided Business Process instances using the Oracle Enterprise Manager Application Server Control console.
23.5 Introduction to Developing a Guided Business Process
Guided Business Processes allow you to organize your processes into milestones. These milestones are meaningful to the end-user and hide the complexity of the process by showing them only relevant information to their tasks.
You can create a Guided Business Process and organize the tasks in your process into a set of milestones. Using milestones enables you to run your process and track its completion in a more efficient way.
The following list describes some features you can use:
-
Milestone Expiration: Milestones can be configured to specify a particular expiration date or duration for the all the tasks that comprise the milestone.
A milestone expires and becomes inactive upon reaching the expiration deadline. Once a milestone has expired, it becomes inactive. The duration of a milestone begins when the milestone is active at run time.
A milestone can also be configured to terminate the Guided Business Process instance to which it belongs. When the milestone expires and becomes inactive, the Guided Business Process instance that runs it, becomes inactive as well.
-
Branching: Branching involves placing a switch in the business process flow which enables splitting the process into two or more branches.
Conditions are set to determine which branch executes. If the flow branching is determined by a condition, the milestone branching node displays as an ellipsis ("...") in the Activity Guide tree. The milestones to be completed for the selected branch display only when the switch executes at real time.
-
Optional/Required Tasks: By default, sequential tasks are required, unless configured otherwise. Tasks that are required for the completion of the Activity Guide display with an asterisk (*). Required tasks cannot be skipped. An example use for an optional task might be a survey that end users can optionally fill out after completing required tasks in an Activity Guide.
Configuring tasks as required or optional enables task filtering by required or optional status at run time.
-
Parallel flow: Parallel flows enable a BPEL or BPMN process to perform multiple tasks at the same time, which is useful when you must perform several time-consuming and independent tasks.
If previous milestones have completed, then end users can complete parallel milestones in any order.
-
Future Milestones and Tasks: When accessing a Guided Business Process, the Milestones display in the Activity Guide tree. The Activity Guide also displays the milestones and tasks to be completed in the future. This provides users with a holistic view of the tasks and milestones to be completed. If the Activity Guide is to be executed sequentially, future tasks and milestones are grayed out. Future tasks and milestones may be viewed, but not executed.
-
Internationalization: Guided Business Processes support internationalization using resource bundles. Resource bundles separate text, labels, messages and other locale-sensitive objects from the core source code, maintaining a single code base for all localized versions of Activity Guides. To enable internationalization for an Activity Guide, see Section 23.7.19, "How to Enable Internationalization for a Guided Business Process".
23.6 Developing a BPMN Guided Business Process
To develop a BPMN Guided Business Process you must first create a BPMN process. Then you can develop the Guided Business Process based on the BPMN process.
You can only define one Guided Business Process per project. The Guided Business Process is based on a BPMN process in the project. This process is the root process.
23.6.1 How to Develop a BPMN Guided Business Process
You can develop a Guided Business Process based on a BPMN process.
To develop a BPMN Guided Business Process:
-
Create a BPMN process or use an existing BPMN process.
-
In the BPM Project Navigator, expand the project that contains your BPMN process.
-
Right-click the Activity Guide node.
-
Select Configure.
-
In the Title text-field, enter a title to identify the Guided Business Process.
-
From the Root Process list, select the BPMN process you want to transform into a Guided Business Process.
-
Click OK.
23.6.2 What Happens When You Develop a BPMN Guided Business Process
You can add the user tasks in the BPMN process to the milestones in the Guided Business Process. When you finish building the Guided Business Process, you can access the BPMN process using a Guided Business Process client.
23.6.3 How to Add a New Milestone to a Guided Business Process
You can add a new milestone to an existing Guided Business Process.
To add a new milestone to a Guided Business Process:
-
In the BPM Project Navigator, select the Activity Guide node.
-
In the Structure window, right-click the Activity Guide node.
-
Select New Milestone.
The New Milestone dialog appears.
-
Enter a title for the milestone.
-
Optionally, enter the number of tasks the user has to complete to consider this milestone completed in the Tasks Remaining field.
At run time, the activity guide tree uses this value to show the percentage of completed tasks over the total tasks, in the progress indicator.
-
Click OK.
23.6.4 What Happens When You Add a Milestone to a Guided Business Process
The Guided Business Process displays a new milestone. You can add the user tasks in the root process to the new milestone.
23.6.5 How to Add a User Task to a Milestone
You can add a user task to a milestone in the Guided Business Process.
To add a user task to a milestone:
-
Open the root process.
-
Right-click the user task.
-
Select Add to Milestone.
The Add User Task to Milestone dialog appears.
-
From the Milestone list, select the milestone to which you want to add the user task.
If you did not create the milestone, you can create it using the Add button next to the Milestone list.
-
If the user task is the last task in the milestone, select the Last Task in Milestone check box.
-
Click OK.
23.6.6 What Happens When You Add a User Task to a Milestone
You can run the user task from a Guided Business Process client. The user task appears under the milestone in the activity guide tree.
23.6.7 How to Move a User Task to Another Milestone
Ensure that your Guided Business Process contains at least two milestones. If it contains only one milestone, the Move to Milestone option is grayed out.
To move a user task to another milestone:
-
In the BPM Project Navigator, select the Activity Guide node.
-
In the Structure window, right-click the user task.
-
Select Move To Milestone.
The Move to Milestone dialog appears.
-
From the Milestones list, select the milestone where you want to move the user task.
-
Click OK.
23.6.8 What Happens When You Move a User Task to Another Milestone
The previous milestone does not list the user task anymore. The user task appears in the new milestone.
23.6.9 How to Order the Milestones in a BPMN Guided Business Process
Ensure that your Guided Business Process contains at least two milestones. If it contains only one milestone, the Move to Milestone option is grayed out.
To order the milestones in a BPMN Guided Business Process:
-
In the BPM Project Navigator, select the Activity Guide node.
-
In the Structure window, expand the Activity Guide node.
-
Move each milestone to the right position:
-
Right-click the milestone.
-
Select Move-Up or Move-Down according to where you want to move the milestone.
-
23.6.10 What Happens When You Order the Milestones in a Guided Business Process
The milestones appear in the order you arranged them in the activity guide tree.
23.6.11 How to Delete a Task from a Guided Business Process
You can delete a task from a Guided Business Process.
To delete a task from a Guided Business Process:
-
In the BPM Project Navigator, select the Activity Guide node.
-
In the Structure window, expand the Activity Guide node.
-
If the milestone that contains the task you want to remove is collapsed, then you must expand it.
-
Right-click the task you want to remove.
-
Select Delete.
A confirmation message appears.
-
Click OK.
23.6.12 What Happens When You Delete a Task from a Guided Business Process
You cannot access that task from the Guided Business Process. The milestone that contained it does not list that task anymore.
23.6.13 How to Delete a Milestone
You can delete a milestone that you do not use or need from the Guided Business Process.
-
In the BPM Project Navigator, select the Activity Guide node.
-
In the Structure window, expand the Activity Guide node.
-
Right-click the milestone you want to remove.
-
Select Delete.
A confirmation message appears.
-
Click OK.
23.6.14 What Happens When You Delete Milestone
The milestone does not appear in the Guided Business Process. All the user tasks in the milestone are deleted from the Guided Business Process. You cannot access these tasks from the Guided Business Process anymore.
23.6.15 How to Configure an Optional Task
You can configure a task as optional so that it is not required to complete the Guided Business Process.
To configure an optional task:
-
In the BPM Project Navigator, select the Activity Guide node.
-
In the Structure window, expand the Activity Guide node.
-
Expand the milestone that contains the task.
-
Right-click the task.
-
Select Edit.
The Edit User Task dialog appears.
-
Select Show Task as Optional.
-
Click OK.
23.6.16 What Happens When You Configure an Optional Task
By default all task are required unless you configure them to be optional.You must configure a skip button for the tasks you configure as optional.
23.6.17 How to Configure a Parallel Task Flow in a BPMN Guided Business Process
To configure a parallel task flow you must use gateways in the BPMN process. See Chapter 6, "Modeling Business Processes with Oracle BPM" for more information on how to use gateways.
23.6.18 How to Branch the Task Flow in a BPMN Guided Business Process
To branch the task flow you must use gateways and conditional sequence flows in the BPMN process. See Chapter 6, "Modeling Business Processes with Oracle BPM" for more information on how to use gateways and conditional sequence flows.
23.6.19 How to Configure a Task to Display a Blocked Icon
You can configure a task to display a blocked icon and message when it is not available for the end user to run it.
To configure a task to display a blocked icon and message:
-
In the BPM Project Navigator, select the Activity Guide node.
-
In the Structure window, expand the Activity Guide node.
-
Expand the milestone that contains the task.
-
Select Edit.
The Edit User Task dialog appears.
-
Select the Display Blocked Icon and Text check box.
-
If you want the Guided Business Process to display a message explaining it is blocked, enter the message in the field.
-
Click OK.
23.6.20 What Happens When You Configure a Task to Display a Blocked Icon and Message
When the current task is completed and the next task is not instantiated, the activity guide tree displays a blocked icon. If you defined an explanation message, it appears as a tooltip when you locate the cursor over the blocked icon.
23.6.21 How to Configure an Icon for a Guided Business Process
You can configure a custom icon for the Activity Guide tree to display next to the Activity Guide node.
To configure an icon for a Guided Business Process:
-
In the BPM Project Navigator, right-click the Activity Guide node.
-
Select Configure.
-
Click the Browse button, next to the Icon Location field.
The Browse Icons dialog appears.
-
Select an icon from your file system.
-
Click Open.
The icon path appears in the Edit Activity Guide dialog.
-
Click OK.
23.6.22 What Happens When You Configure an Icon for a Guided Business Process
The activity guide tree uses this icon to identify the activity guide node. If you do not specify an icon, then the activity guide node does not display an icon.
23.6.23 How to Configure an Icon for a Milestone
You can configure a custom icon for the Activity Guide tree to display next to each milestone.
To configure an icon for a milestone:
-
In the BPM Project Navigator, select the Activity Guide node.
-
In the Structure window, expand the Activity Guide node.
-
Right-click the milestone.
-
Select Edit.
-
Click the Browse button, next to the Icon Location field.
The Browse Icons dialog appears.
-
Select an icon from your file system.
-
Click Open.
The icon path appears in the Edit Milestone dialog.
-
Click OK.
23.6.24 What Happens When You Configure an Icon for a Milestone
The activity guide tree uses this icon to identify the milestone nodes. If you do not specify an icon, then the milestone nodes do not display an icon.
23.6.25 How to Configure the Display Mode for a Guided Business Process
You can configure the display mode for a Guided Business Process to specify how to display the milestone and task links.
To configure the display mode for a Guided Business Process:
-
In the BPM Project Navigator, right-click the Activity Guide node.
-
Select Edit.
-
From the Display Mode list, select an option from the following:
Display Mode Description Always Always display the milestone and task links for all the milestones in this Guided Business Process. When Instantiated Display the milestone and task links only when one or more of the user tasks in the milestone are instantiated, for all the milestones in the Guided Business Process. -
Click OK.
23.6.26 What Happens When You Configure the Display Mode for a Guided Business Process
The milestones and tasks within the Guided Business Process use this configuration to display the milestone and tasks links. If the milestone and tasks are configured to used another configuration then the Guided Business Process configuration is ignored.
23.6.27 How to Configure the Display Mode for a Milestone
You can configure the display mode for a milestone, to specify how to display the milestone and tasks links.
-
In the BPM Project Navigator, right-click the Activity Guide node.
-
Select Edit.
-
From the Display Mode list, select an option from the following:
Display Mode Description Default Use the Guided Business Process configuration. Always Always display the milestone link. When Instantiated Display the milestone link only when one or more of the user tasks in the milestone are instantiated. Use this mode for milestones located after a conditional gateway so that the activity guide tree does not display the milestone until the BPM Service Engine evaluates the condition.
-
Click OK.
23.6.28 What Happens When You Configure the Display Mode for a Milestone
The milestone links are displayed according to this configuration, regardless of the Guided Business Process configuration.
23.6.29 How to Configure the Display Mode for a User Task
You can configure the display mode for a user task to specify how to display the task link.
To configure the display mode for a user task:
-
In the BPM Project Navigator, select the Activity Guide node.
-
In the Structure window, expand the milestone that contains the user task.
-
Right-click the user task.
-
Select Edit.
-
From the Display Mode list, select an option from the following:
Display Mode Description Default Use the milestone configuration. Always Always display the task link when the milestone that contains it is visible. If the user task is not instantiated, then the link is grayed out. When Instantiated Display tasks only when the user task is instantiated. Use this mode for user tasks located after a conditional gateway so that the activity guide tree does not display the user task until the BPM Service Engine evaluates the condition.
-
Click OK.
23.6.30 What Happens When You Configure the Display Mode for a User Task
The task links are displayed according to this configuration, regardless of the Guided Business Process configuration and the milestone configuration. The tasks links appear when the milestone is visible.
23.6.31 How to Configure the Task Access Mode for a Guided Business Process
You can configure the task acess mode for a Guided Business Process to specify when to display the task links enabled.
To configure the task access mode for a Guided Business Process:
-
In the BPM Project Navigator, right-click the Activity Guide node.
-
Select Edit.
-
In the Task Access list select an option from the following:
Task Access Mode Description Active Only The link to the task is enabled only when the task is active and the user can update it. When you complete the task the link to the task is grayed out. Any State The link to the task is always enabled after you instantiate the task, even after you complete the task. -
Click OK.
23.6.32 What Happens When You Configure the Task Access Mode for a Guided Business Process
After the task is completed, the Guided Business Process uses this configuration to display the links. If the task mode is active only, the tasks links are grayed out. If the task mode is any state, the tasks links remain enabled and a message appears when you try to run the task.
23.6.33 How to Localize a BPMN Guided Business Process
You can localize a BPMN Guided Business Process so that the client can display it in different locales.
To localize a BPMN Guided Business Process:
-
In the BPM Project Navigator, select the Activity Guide node.
-
In the Structure window, right-click the Activity Guide node.
-
Select Edit.
-
From the Title list, select Translation.
-
Click the Translation icon, next to the title field.
The Edit Translatable Strings dialog appears.
-
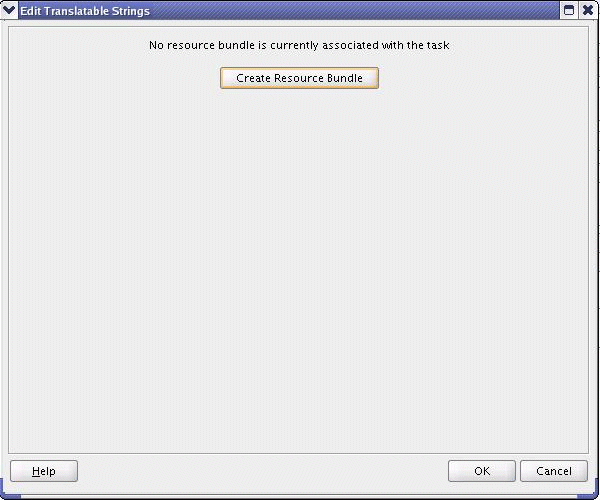
Click Create Resource Bundle.
The Create Resource Bundle dialog appears.
-
Enter a name to identify the resource bundle.
-
Click OK.
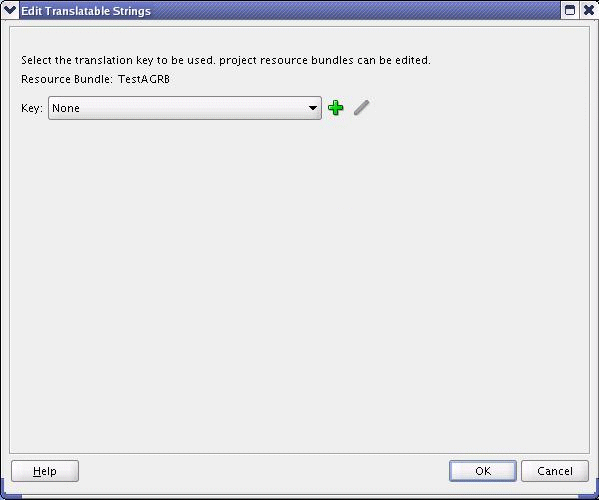
The Edit Translatable Strings dialog shows the resource bundle you created.
-
Click the Add icon next to the key list to add a new translation key.
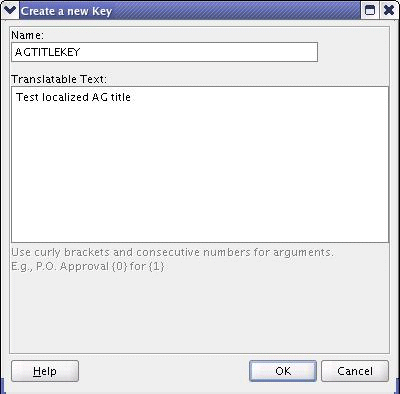
The Create a New Key dialog appears.
-
In the Name field, enter a name to identify the translation key.
-
In the Translatable Text field, enter the title.
-
Click OK.
-
From the Description list, select Translation.
-
Click the Translation icon, next to the description field.
The Edit Translatable Strings dialog appears.
-
Click the Add icon next to the key list to add a new translation key.
The Create a New Key dialog appears.
-
In the Name field, enter a name to identify the translation key.
-
In the Translatable Text field, enter the description.
-
Click OK.
-
In the Edit Activity Guide dialog, click OK.
-
Localize the milestones that compose the Guided Business Process.
23.6.34 How to Localize a Milestone
You can localize a milestone so that the client can display it in different locales.
-
In the BPM Project Navigator, select the Activity Guide node.
-
In the Structure window, right-click the Activity Guide node.
-
Select Edit.
-
From the Title list, select Translation.
-
Click the Translation icon, next to the title field.
The Edit Translatable Strings dialog appears.
-
Click the Add icon next to the key list to add a new translation key.
The Create a New Key dialog appears.
-
In the Name field, enter a name to identify the translation key.
-
In the Translatable Text field, enter the title.
-
Click OK.
-
From the Description list, select Translation.
-
Click the Translation icon, next to the description field.
The Edit Translatable Strings dialog appears.
-
Click the Add icon next to the key list to add a new translation key.
The Create a New Key dialog appears.
-
In the Name field, enter a name to identify the translation key.
-
In the Translatable Text field, enter the description.
-
Click OK.
-
In the Edit Activity Guide dialog, click OK.
-
If the milestone contains user tasks configured to display blocked icon and text, localize the user tasks that compose the milestone.
23.6.35 How to Localize a User Task
In a user task you can localize the following elements:
-
Title
-
Description
-
Blocked Text
This procedure shows you how to localize the blocked text. You can also localize the title and description of the user task following the standard procedure for localizing flow objects.
-
In the BPM Project Navigator, select the Activity Guide node.
-
In the Structure window, expand the Activity Guide node.
-
If the milestone that contains the task you want to remove is collapsed, then expand the milestone.
-
Right-click the task.
-
Select Edit.
-
From the Display Block Icon and Text list, select translation.
-
Click the Translation icon, next to the title field.
The Edit Translatable Strings dialog appears.
-
Click the Add icon next to the key list to add a new translation key.
The Create a New Key dialog appears.
-
In the Name field, enter a name to identify the translation key.
-
In the Translatable Text field, enter the title.
-
Click OK.
23.7 Developing a BPEL Guided Business Process
Developing the flow of a Guided Business Process is similar to developing a BPEL business process. Once you create a new BPEL process, configure the BPEL process to be a Guided Business Process. The milestone component displays in the Component Palette and can be dragged and dropped onto an Activity Guide. From your Guided Business Process you can invoke different components such as human task flows, ADF task flows, and other Guided Business Processes. For more information about components you can invoke in a Guided Business Process, see Section 23.1.2, "Components of a Guided Business Process".
23.7.1 How to Develop a BPEL Guided Business Process
When developing a Guided Business Process, use a top-down approach:
-
Create an application that contains an SOA project.
-
Create a composite process and expose it as an Activity Guide.
-
Build the Activity Guide, including Milestones, and human task activities within the milestones.
Note:
Currently, a milestone cannot be nested within another milestone.To develop an Activity Guide Process:
-
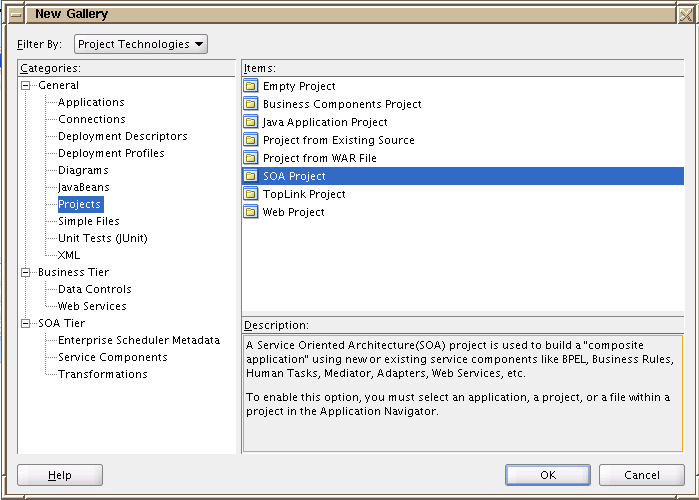
In JDeveloper, create a new SOA project.
-
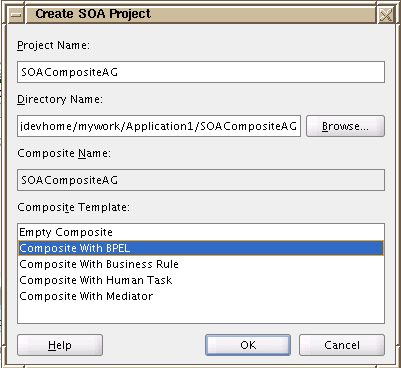
In the Create SOA Project window, select the Composite with BPEL template.
-
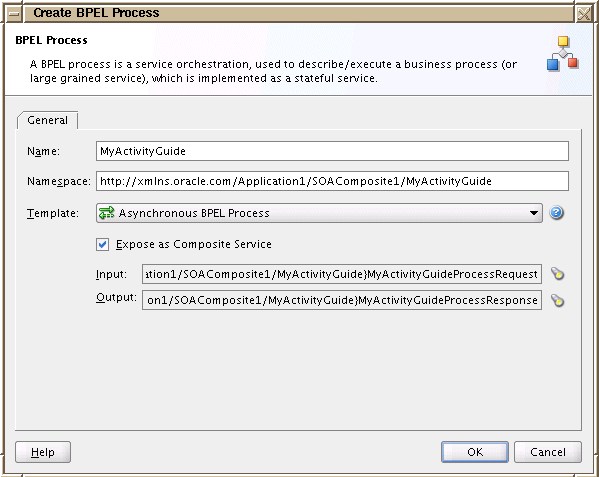
In the Create BPEL Process window, select Asynchronous BPEL Process from the Template drop-down list.
-
Select Expose as SOAP Service and browse for the schema defined for the service. The Input and Output fields enable selecting or importing specific input and output schemas from the Type Chooser dialog or SCA Resource Lookup dialog. This schema defines the structure of the message to submit. For the Input and Output fields, browse for the schema and select the Request and Response elements, respectively.
Click OK.
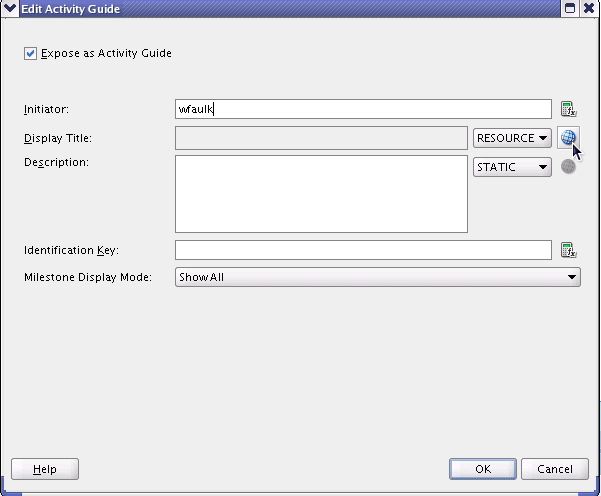
-
Open the BPEL process you created and click the Activity Guide Properties icon.
-
In the Edit Activity Guide window, select the Expose as Activity Guide check box and save the application.
-
From the Components Palette, drag and drop a milestone onto the Activity Guide. Optionally, enter the following in the milestone editor:
-
Name: Enter a meaningful name for the milestone so that it is easy to track.
-
Percent of Process: Enter a number to indicate the percentage of the SOA composite represented by the milestone. The percentage of the process displays to end users in the client application to indicate the portion of the process that has completed.
When entering the percentage of the process, think of the process flow as a whole and for each milestone, allocate percentages accordingly.
In a branched flow, evenly allocate the Percent of Process value to each branch.
-
Display Title: Enter a title for the milestone. This title displays to end users in the client application.
-
Description: Enter a description for the milestone, such as a brief summary of the tasks to be accomplished in the milestone.
-
Image: Browse for an image to represent the milestone. This image displays to end users in the client application.
-
-
Open the milestone and drag and drop a Human Task onto it.
Alternatively, you can call another Activity Guide from the milestone using an Invoke component with a Partner Link that references the second Activity Guide BPEL process.
-
Design an ADF task flow and bind it to the Human task flow.
Be sure to select Complete Task with Payload.
-
Develop the remainder of the Activity Guide, adding milestones and Human Tasks as required, and save your project.
-
Create a connection to the standalone Oracle WebLogic Server with Oracle SOA Infrastructure to which the Activity Guide is to be deployed.
-
Deploy the project to the standalone Oracle WebLogic Server. For information about deploying an Activity Guide to Oracle WebLogic Server see Section 23.8, "Deploying an Guided Business Process to Oracle Weblogic Server".
23.7.2 What Happens When You Develop a BPEL Guided Business Process
When configuring an SOA composite as a Guided Business Process, the BPEL Designer generates an Activity Guide metadata file (a file with the suffix .ag), which is available under the SOA project root directory. The Activity Guide metadata file includes values entered at design time, such as the name of the Activity Guide, its display title, description, identification key, and milestone metadata such as names, titles, expiration settings, and so on. The Activity Guide metadata file is saved to the Metadata Store along with BPEL metadata. The BPEL Designer automatically re-generates the Activity Guide metadata file whenever the BPEL process is updated.
The Activity Guide metadata file conforms to the schema AGDefinition.xsd.
23.7.3 What Happens at Run Time When You Develop a BPEL Guided Business Process
Oracle BPEL Service Engine manages the complete life cycle of the Guided Business Process. Once a Guided Business Process initiates, Oracle BPEL Service Engine checks whether the associated BPEL process is enabled as an Activity Guide. If the BPEL process is enabled as an Activity Guide, the Guided Business Process starts running.
Oracle BPEL Service Engine reads the Activity Guide metadata definition from the Metadata Store, and constructs an Guided Business Process instance using metadata values and run-time values, such as the creation date and the definition ID. Oracle BPEL Service Engine then assigns the same key value to the Activity Guide and its associated BPEL process, and loads the newly constructed Guided Business Process instance. The unique ID enables tracking the Guided Business Process instance in Oracle Enterprise Manager Application Server Control console.
The BPEL process begins sequentially executing activities following the Receive activity. When a milestone activates, the tasks within the milestone become available to end users. As Human Tasks are independent entities, Oracle BPEL Service Engine tags the task with its encompassing milestone. The Guided Business Process uses this information to display the Activity Guide, milestone and task in a hierarchical tree structure. The Milestones remain active until the tasks are complete. The Activity Guide displays the percent of completion to end users. A Guided Business Process complete when it reaches one hundred percent.
In the event of an unhandled fault, the BPEL process enters into a faulted state and the Guided Business Process errors out. Errors can be anticipated using the FaultHandling Framework. Guided Business Process with proper error handling can continue their execution even if errors occur.
23.7.4 How to Set an Expiration Date for a Milestone or Task
A milestone can be configured to expire on a given date or after a particular period has passed. The milestone can also be configured to terminate the execution of the Guided Business Process to which it belongs upon its expiration.
Tasks can also be configured to expire. For information about configuring a human task to expire, see the chapter "Using Oracle BPEL Process Manager" in Oracle Fusion Middleware Developer's Guide for Oracle SOA Suite.
To set an expiration for a Milestone:
-
Develop a Guided Business Process as described in Section 23.7.1, "How to Develop a BPEL Guided Business Process".
-
Open the SOA composite associated with the Guided Business Process and open the milestone for which you want to set an expiration date.
-
In milestone window, select the Set Expiration check box.
The milestone expiration options For and Until are enabled.
-
Set an expiration option. Available options are:
-
For: Enter a duration during which the milestone is valid. At the end of the specified time period, the milestone expires. The default value is ten years following the system date.
Fill in the duration in years, months, days, hours or seconds.
-
Until: Enter a future date, until which the milestone is valid. The milestone expires on the specified date. The default value is the system date.
Select an expiration date and enter a specific time at which the milestone expires.
The duration of the milestone begins when the milestone instantiates at run time. The minimum value for milestone expiration is 10 minutes. Validation occurs during design time.
-
-
Optionally, select Abort to terminate the execution of the milestone and the remainder of the Activity Guide upon expiration.
23.7.5 What Happens When You Set an Expiration Date for a Milestone
The milestone is configured to expire on the specified date, or until the configured duration has passed.
Tasks within expired Milestones are withdrawn following milestone expiration.
23.7.6 What Happens at Run Time: How an Expiration Date is Set for a Milestone
When the Guided Business Process runs, Oracle BPEL Process Manager enables the milestone to run until the specified expiration date or until its configured duration has passed. If the Abort check box is selected during design time, the Guided Business Process terminates upon milestone expiration.
End users may view the expired milestone, but not the tasks within the expired milestone. Milestone expiration affects only the specific milestone and not the entire Guided Business Process, unless the milestone is configured to terminate post expiration.
23.7.7 How to Branch the Flow of a Guided Business Process
You can create branches in the flow of an Guided Business Process using a Switch component. For more information about branching a BPEL process flow, see the chapter "Using Oracle BPEL Process Manager" in the Oracle Fusion Middleware Developer's Guide for Oracle SOA Suite.
To branch the flow of a Guided Business Process:
-
Develop a Guided Business Process as described in Section 23.7.1, "How to Develop a BPEL Guided Business Process".
-
Open the
composite.xmlfile and add the following property to enable reading the annotation value.Example 23-1 Adding a Property to the Composite.xml File for Reading Annotations
<property name="configuration.analysisSchema" type="xs:string" many="false">Design</property>
This property enables the design time process analysis schema which stores information about the process in a collection of database tables.
-
From the Components palette > BPEL Activity Guide Components, drag and drop a Switch onto the SOA composite.
-
Right-click the Switch and select Add Switch Case.
-
Configure the Switch and branch the BPEL process flow as described in the chapter "Using Oracle BPEL Process Manager" in the Oracle Fusion Middleware Developer's Guide for Oracle SOA Suite.
-
Drag and drop a milestone onto the first branch. Drag and drop a Human Task or other activity within the milestone.
Repeat for any other branch.
-
Continue developing each branch as necessary.
23.7.8 What Happens When You Branch the Flow of a Guided Business Process
The Switch component enables branching the flow of the Guided Business Process based on a condition.
23.7.9 What Happens at Run Time When You Branch the Flow of a Guided Business Process
Oracle BPEL Process Manager evaluates the condition set in the Switch component. One branch executes depending on the evaluation of the condition.
To end users, the branched Activity Guided flow displays as an ellipsis in the client application. When the selected branch executes, the ellipsis expands, displaying the Milestones and Tasks to be completed within the branched flow.
23.7.10 How to Configure a Required Task
A Human Task within a milestone can be configured as a required task within the flow of the Guided Business Process. The required task must be completed to complete the milestone. Similarly, a milestone containing a required task must also complete to complete the Guided Business Process that contains it.
Configuring tasks as required enables filtering tasks according to required or optional status in the Activity Guide user interface at run time.
-
Develop a Guided Business Process as described in Section 23.7.1, "How to Develop a BPEL Guided Business Process".
-
In the BPEL process file associated with the Activity Guide, click the Edit Activity Guide icon. A window displays, enabling setting parameters for the Activity Guide.
-
From the milestone Display Mode drop-down list, select Show All.
-
Double-click the Human Task to be configured as required.
-
Click the Annotations tab, and select the Enable Annotation check box.
-
Click Add to create a parameter. For the parameter name, enter
REQUIRED. For its value, enterYES. -
Open the
composite.xmlfile and add the following property to enable reading the annotation value.Example 23-2 Adding a Property to the Composite.xml File for Reading Annotations
<property name="configuration.analysisSchema" type="xs:string" many="false">Design</property>
This property enables the design time process analysis schema which stores information about the process in a collection of database tables.
23.7.11 What Happens When You Configure a Required Task
The task is configured as required, and its completion is therefore obligatory to continue to the next task or milestone.
The annotation name/value pair set in the required task generates an element af:icon with the attribute name set to required.
23.7.12 What Happens at Run Time When You Configure a Required Task
At run time, the af:icon elements generated at design time render. The Guided Business Process client application displays required tasks with an asterisk to indicate that they must be completed.
A milestone that includes a required task is itself displayed as required.
23.7.13 How to Configure an Optional Task
By default, most tasks are sequential and required, in that the previous task must be completed to continue to the next. An optional task, however, can be skipped and the Guided Business Process may continue following the skipped task.
Configuring a task in an Activity Guide as optional, requires the following main steps:
-
Removing the receive and taskSwitch activities from the optional task in the BPEL process.
-
Configuring a skip button in the Activity Guide composite .task file.
Configuring tasks as optional enables filtering tasks according to required or optional status in the Activity Guide user interface at run time.
To configure an optional task:
-
Develop a Guided Business Process as described in Section 23.7.1, "How to Develop a BPEL Guided Business Process".
-
Manually remove the receive and taskSwitch activities from the optional task.
For more information about working with receive activities, see the chapter "Using Oracle BPEL Process Manager" in Oracle Fusion Middleware Developer's Guide for Oracle SOA Suite.
-
In the user interface that displays the optional task, develop a skip button so that end-users can click over the optional task and continue to the next task.
23.7.14 What Happens When You Configure an Optional Task
When dragging and dropping a Human Task onto the BPEL process, invoke and receive activities to the task service are automatically added. The receive activity must execute to complete the task and move on to the next.
Removing the receive activity from the optional task enables the BPEL engine to skip the task and continue to the next.
The skip button enables tracking the status of optional tasks. A skipped task is displayed as attempted but not completed.
23.7.15 What Happens at Run Time When You Configure an Optional Task
At run time, the BPEL engine instantiates the optional task and continues on to the next activity without waiting for a callback.
23.7.16 How to Configure a Parallel Task Flow
Parallel flows enable a BPEL process to perform multiple tasks at the same time, which is useful when you must perform several time-consuming and independent tasks.
For information about configuring parallel tasks in the BPEL process associated with an Activity Guide, see the chapter "Using Oracle BPEL Process Manager" in Oracle Fusion Middleware Developer's Guide for Oracle SOA Suite.
23.7.17 What Happens When You Configure a Parallel Task Flow
Using a parallel flow is more time-efficient. Without a parallel flow, each callback must call each service one at a time.
23.7.18 What Happens at Run Time When You Configure a Parallel Task Flow
By breaking the calls into a parallel flow, a BPEL process can invoke multiple web services at the same time, and receive the responses as they come in.
23.7.19 How to Enable Internationalization for a Guided Business Process
Enabling internationalization for a Guided Business Process enables you to localize the display of static fields in Activity Guide components such as Tasks and Milestones. For example, the title and field names of all components of a given Guided Business Process can be localized to display in French.
To enable internationalization for a Guided Business Process:
-
Develop a Guided Business Process as described in Section 23.7.1, "How to Develop a BPEL Guided Business Process".
-
Open the SOA composite associated with the Activity Guide and click the Activity Guide Properties icon on the toolbar.
-
In the Edit Activity Guide window, from the drop-down list on the right, select Resource. Click the globe icon to the right of the drop-down list.
-
In the Edit Translatable Strings dialog, click Create Resource Bundle. In the dialog that displays, enter the name of the resource bundle and click OK.
-
Click the Add icon to add a key-value to the resource bundle.
-
Enter a key and value for the Activity Guide title and description.
Caution:
Do not enter any placeholders such as {0} {1} as dynamic values are not currently supported in translatable Activity Guide fields.
23.7.20 What Happens When You Enable Internationalization in a Guided Business Process
When enabling internationalization in an Guided Business Process, location and properties resource bundle files are generated, respectively. These are stored in the project source path. The resource bundles include key value pairs for the static fields of the Activity Guide.
The Activity Guide .ag file updates with the resource bundle properties. The name attribute of the resourceBundle tag contains the name of the resource bundle defined in Section 23.7.19, "How to Enable Internationalization for a Guided Business Process." The type attribute of the Activity Guide title and description elements is set to RESOURCE. The value element contains the resource bundle key.
23.7.21 What Happens at Run Time When You Enable Internationalization in a Guided Business Process
The resource bundles created at design time enable displaying localized versions of the static fields in Tasks and Milestones. For example, a Guided Business Process localized to display in French displays the static fields of a milestone (such as Name, Percent of process, Display Title, Description, Image) accordingly.
At run time, key value pairs stored in the resource bundles are looked up and interpreted to display the relevant localized value.
23.8 Deploying an Guided Business Process to Oracle Weblogic Server
Guided Business Process are deployed to the application server in the same way as an SOA composite process. However, Guided Business Processes must be deployed to a standalone instance of Oracle WebLogic Server rather than the embedded Oracle WebLogic Server included with JDeveloper.
23.8.1 How to Deploy a Guided Business Process
Deploying a Guided Business Process to Oracle WebLogic Server involves the following main steps:
-
Creating a connection to Oracle WebLogic Server
-
Using JDeveloper or an Ant script to deploy the Guided Business Process
To deploy an Guided Business Process:
Following are the main steps in deploying an Guided Business Process:
-
Create a connection to Oracle WebLogic Server.
-
Use connection type Weblogic 10.3.
-
Enter a name for the WLS Domain.
-
-
Deploy the Guided Business Process through JDeveloper or using an Ant script:
To deploy a Guided Business Process using JDeveloper:
-
Right-click the SOA composite associated with the Guided Business Process and select Deploy, then select the name of the SOA composite and the name of the server connection configured in the previous step.
To deploy a Guided Business Process using an Ant script:
-
Right-click the SOA composite and select Deploy, the name of the SOA composite and to JAR.
-
Run the command shown in Example 23-3:
-
For more information about deploying an SOA composite to the application server, see "Deploying SOA Applications with Enterprise Manager" in Oracle Fusion Middleware Developer's Guide for Oracle SOA Suite.
23.8.2 What Happens When You Deploy a Guided Business Process to Oracle WebLogic Server
The Guided Business Process runs on WLS. You can view the Guided Business Process using Oracle Enterprise Manager Application Server Control console.
For more information about deploying SOA applications to WLS, see " Deploying SOA Applications with Enterprise Manager" in Oracle Fusion Middleware Developer's Guide for Oracle SOA Suite.
23.9 Testing Guided Business Processes
You can create an instance of the deployed Guided Business Process in the Oracle Enterprise Manager Application Server Control console. This is useful for testing purposes.
To create a Guided Business Process instance:
-
In a Web browser, enter the URL of the Oracle Enterprise Manager Fusion Middleware Control Console as follows:
-
Browse for the application and click the SOA composite you created.
-
Select Actions > Test service - client.
-
Test the Guided Business Process by entering sample data and invoking the composite.
-
Refresh Fusion Middleware Control Console and verify that the SOA composite instance has been created. Check that the BPEL process has run.
