2 Installing Oracle Enterprise Repository
This chapter describes how to start the installation program on Windows and UNIX platforms.
This chapter contains the following sections:
2.1 Starting the Installation Program
This section contains the following topics:
-
Section 2.1.2, "Starting the Installation Program on Windows Platforms"
-
Section 2.1.3, "Starting the Installation Program on UNIX Platforms"
2.1.1 Before You Start
Before you start installing the software, please review the following information:
-
According to Sun Microsystems, the Firefox 3.6 browser requires Java SE 6 Update 10 or later. Otherwise, Java-based Web applications does not work. For more information, see http://www.java.com/en/download/faq/firefox_newplugin.xml.
-
Ensure your system meets the hardware and the software requirements before you install the Oracle Enterprise Repository software. A complete list of documents that describe Oracle Product family configurations supported by Oracle can be found at
http://www.oracle.com/technology/software/products/middleware/index.html
-
You cannot reinstall any Oracle product on top of a previously installed version of the same product - in the same Oracle Home directory or in the same file location. You can, however, add products and product components to an existing installation. For example, you can install Oracle Enterprise Repository during one installation, and Oracle BPM during a later installation. However, to reinstall the same version of one of the products, you must first uninstall the previous installation, as described in Chapter 4, "Uninstalling the Software".
-
If you are adding components to an existing installation of Oracle Enterprise Repository, you should shut down any running instances before starting the installation.
Note:
If you are installing the software on a Windows system that supports more than one monitor, you must disable all but one monitor before starting the installation program.-
Ensure that you have a supported application server available. The Oracle Enterprise Repository installer optionally provides a default application server.
-
Ensure that you have a supported database that is configured, running, and supports UTF-8/Unicode character encoding. For more information, see Section 1.6, "Database Installation Procedures".
-
Ensure that your supported application server is configured to use UTF-8/Unicode character encoding. Database Configuration for UTF-8/Unicode Character Encoding.
Table 2-1 describes the supported JDBC Driver file names for Oracle Enterprise Repository 11g as well as its mapping to the appropriate application server.
Table 2-1 Oracle Enterprise Repository 11g Supported JDBC Driver Information
App Server JDK Version Oracle JDBC Oracle Driver Version UDB JDBC UDB Driver Version SQL Server JDBC SQL Driver Version 1.5.x
ojdbc5.jar
11.1.0.7.0-Production
db2jcc.jar
db2jcc_license_cu.jar
db2jcc4.jar
3.50.152
sqljdbc4.jar
2.0.1803.100
1.6.x
ojdbc6.jar
11.1.0.7.0-Production
db2jcc.jar
db2jcc_license_cu.jar
db2jcc4.jar
3.50.152
sqljdbc4.jar
2.0.1803.100
For information about supported application servers and databases, see Oracle Enterprise Repository Supported Configurations.
Note:
If the installation process is aborted before it is completed, manually clear the database before running the installer again. The installer does not clear data from the database when an installation is aborted. The existing data causes an error when the installer runs for the second time. -
2.1.2 Starting the Installation Program on Windows Platforms
This section describes how to start the installation program on Windows Platforms:
-
Section 2.1.2.1, "Starting the Installation in Graphical Mode"
-
Section 2.1.2.2, "Starting the Installation in Console Mode"
2.1.2.1 Starting the Installation in Graphical Mode
To start the graphical-mode installation process on a Windows platform, perform the following steps:
-
Enter the following command to start the installation:
filename.exe [-log=full_path_to_log_file]
For example:
OER1111XX_generic.exe [-log=full_path_to_log_file]
Note:
-
-log=full_path_to_log_fileis optional. -
By default, the installer starts in the graphical mode.
-
You can also start the installer by double-clicking the file.
-
-
To continue the installation in the Graphical mode on Windows, see Section 2.2.1, "Running the Installation Program in Graphical Mode".
2.1.2.2 Starting the Installation in Console Mode
To start the console-mode installation process on a Windows platform, perform the following steps:
-
Log in to the target Windows system.
-
Launch the installation by entering one of the following commands:
filename.exe -mode=console
For example:
OER1111xx_generic.exe -mode=console
Note:
You can also include the-log=full_path_to_log_fileoption in the command line to create a verbose installation log. For example:OER1111xx_generic -mode=console -log=C:\logs\OER30_install.logFor more information on generating a verbose log, see Section 1.9, "Generating a Verbose Installation Log".
After a few moments, an Installer window opens and the installation program begins to install the software.
-
To continue the installation in the Console mode on Windows, see Section 2.2.2.3, "Install Oracle Enterprise Repository Using Console Mode".
2.1.2.3 Starting the Installation in Silent Mode
For details about silent-mode installation, see Section 2.2.3.1, "What Is Silent-Mode Installation?".
To start the installation in silent-mode follow these steps:
-
Log in to the Windows system.
-
Create a
silent.xmlfile that defines the configuration settings normally entered by a user during an interactive installation process, such as graphical-mode or console-mode installation. For information about creating a silent.xml file, see Section 2.2.3.3, "Creating a silent.xml File for Silent-Mode Installation".Note:
Incorrect entries in the silent.xml file can cause installation failures. To help you determine the cause of a failure, Oracle recommends that you create a log file when you start the installation. -
Launch the installation by entering the following commands:
filename.exe -mode=silent -silent_xml=path_to_silent.xml
Here,
filename.exeis the name of the software installation file, andpath_to_silent.xmlis the full pathname of thesilent.xmlfile.Note:
You can also include the-log=full_path_to_log_fileoption in the command line to create a verbose installation log. For example:OER1111xx_generic.exe -mode=silent -silent_xml=C:\silent.xml -log=C:\logs\OER_install.log
For more information, see Section 1.9, "Generating a Verbose Installation Log".
An Installer window is displayed, indicating that the files are being extracted. No other prompt or text is displayed.
For more information, see Section 2.2.3, "Running the Installation Program in Silent Mode".
2.1.3 Starting the Installation Program on UNIX Platforms
The Oracle Enterprise Repository installation program requires a Java run-time environment (JRE) to run. A JRE is bundled in the Windows installation program, and in some UNIX installation programs (those with filenames ending in .bin). For other UNIX platforms, the installation program does not include a JRE. Filenames for these installation programs end in .jar. To run the .jar installation programs, you must have an appropriate version of a JDK installed on your system, and include the bin directory of the JDK at the beginning of your PATH system variable.
Note:
It is important that you use a JDK because the installation process assigns values toJAVA_HOME and related variables to point to this directory. All scripts installed by your installation program use this JDK by default, including scripts to start sample applications, the Configuration Wizard, and other development tools.To run graphical-mode installation, your console must support a Java-based GUI. If the installation program determines that your system cannot support a Java-based GUI, it automatically starts running in console mode. For details, see Section 2.2.3, "Running the Installation Program in Silent Mode". The section describes how to start the installation using the following types of installers:
-
Section 2.1.3.1, "Using Installers with Filenames Ending in .bin"
-
Section 2.1.3.2, "Using Installers with Filenames Ending in .jar"
2.1.3.1 Using Installers with Filenames Ending in .bin
The following sections describe how to start the installation program on UNIX platforms using filenames that end in .bin:
-
Section 2.1.3.1.1, "Starting the Installation in Graphical Mode"
-
Section 2.1.3.1.2, "Starting the Installation in Console Mode"
-
Section 2.1.3.1.3, "Starting the Installation in Silent Mode"
2.1.3.1.1 Starting the Installation in Graphical Mode
To start the graphical-mode installation process using the installation files with names ending in .bin, do the following:
-
Log in to the target UNIX system.
-
To change the permissions of the file enter the following command:
chmod a+x filename.bin
For example:
chmod a+x OER10XX_linux32.bin.
Note:
You can also include the-log=full_path_to_log_fileoption in the command line to create a verbose installation log. For example:OER10XX_linux32.bin -log=/home/logs/OER_install.logFor more information, see Section 1.9, "Generating a Verbose Installation Log".
To continue the installation in the graphic mode, see Section 2.2.1, "Running the Installation Program in Graphical Mode".
2.1.3.1.2 Starting the Installation in Console Mode
To start the console-mode installation process for installation files with names ending in .bin, follow these steps:
-
Log in to the target UNIX system.
-
Launch the installation by entering the following commands:
chmod a+x filename.bin

./filename.bin -mode=console
Here
filename.binis the name of the installation program specific to your platform, for example,chmod a+x OER10XX_linux32.bin.
Note:
You can also include the-log=full_path_to_log_fileoption in the command line to create a verbose installation log. For example:OER10XX_linux32.bin -mode=console -log=/home/logs/OER_install.logFor more information about generating a verbose log, see Section 1.9, "Generating a Verbose Installation Log".
To continue the installation in the console mode, see Section 2.2.2, "Running the Installation Program in Console Mode".
2.1.3.1.3 Starting the Installation in Silent Mode
For details about silent-mode installation, see Section 2.2.3.1, "What Is Silent-Mode Installation?"
To start the silent-mode installation process for installation files with names ending in .bin, follow these steps:
-
Log in to the target UNIX system.
-
Create a
silent.xmlfile that defines the configuration settings normally entered by a user during an interactive installation process, such as graphical-mode or console-mode installation.For information about creating a silent.xml file, see Section 2.2.3.3, "Creating a silent.xml File for Silent-Mode Installation".
Note:
Incorrect entries in thesilent.xmlfile can cause installation failures. To help you determine the cause of a failure, Oracle recommends that you create a log file when you start the installation. -
Complete the appropriate procedure as in the following table.
If you are installing from... Do this... Web download Go to the directory to which you have downloaded the installation program. DVD - Insert the software DVD into the DVD drive and go to the DVD directory.
-
Navigate to the directory that contains the installation program for your platform.
-
Launch the installation program by entering the following commands:
chmod a+x filename

./filename.bin -mode=silent -silent_xml=/path_to_silent.xml
Here
filename.binis the name of the installation file, for example,chmod a+x OER10XX_linux32.bin
and
path_to_silent.xmlis the full pathname of thesilent.xmltemplate file.Note:
You can also include the-log=full_path_to_log_fileoption in the command line to create a verbose installation log. For example:OER10XX_linux32.bin -mode=silent -silent_xml=/home/silent.xml -log=/home/logs/OER_install.logFor more information on generating a verbose log, see Section 1.9, "Generating a Verbose Installation Log".
An Installer window is displayed, indicating that the files are being extracted. No other prompt or text is displayed. For more information on Silent-Mode installation, see Section 2.2.3, "Running the Installation Program in Silent Mode".
2.1.3.2 Using Installers with Filenames Ending in .jar
The following sections describe how to start the installation program on UNIX platforms using filenames that end in .jar:
-
Section 2.1.3.2.1, "Starting the Installation in Graphical Mode"
-
Section 2.1.3.2.2, "Starting the Installation in Console Mode"
-
Section 2.1.3.2.3, "Starting the Installation in Silent Mode"
2.1.3.2.1 Starting the Installation in Graphical Mode
To start the graphical-mode installation process using the installation files with names ending in .jar, do the following:
-
Log in to the target UNIX system.
-
Add the bin directory of the appropriate JDK to the beginning of the PATH variable definition on the target system. For example:
PATH=<JAVA_HOME>/bin:$PATH
export PATH
Here
<JAVA_HOME>represents the full path to the JDK directory. -
Launch the installation program by entering the following command::
java -jar filename.jar [-log=full_path_to_log_file]
Note:
You can also include the-log=full_path_to_log_fileoption in the command line to create a verbose installation log. For example:OER1111xx_generic.jar -log=/home/logs/OER_install.logFor more information about generating a verbose log, see Section 1.9, "Generating a Verbose Installation Log".
The installation program begins the graphical mode.
To continue the installation in the graphic mode, see Section 2.2.1, "Running the Installation Program in Graphical Mode".
2.1.3.2.2 Starting the Installation in Console Mode
To start the console-mode installation process for installation files with names ending in .jar, follow these steps:
-
Log in to the target UNIX system.
-
Add the bin directory of the appropriate JDK to the beginning of the PATH variable definition on the target system. For example:
PATH=<JAVA_HOME>/bin:$PATH
export PATH
Here
<JAVA_HOME>represents the full path to the JDK directory. -
Launch the installation by entering the following command:
java -jar filename.jar -mode=console [-log=full_path_to_log_file]
where, filename.jar is the name of the installation file, for example,
oer_generic.jar.
Note:
You can also include the-log=full_path_to_log_fileoption in the command line to create a verbose installation log. For example:java -jar OER1111xx_generic.jar -mode=console -log=/home/logs/OER_install.logFor more information about generating a verbose log, see Section 1.9, "Generating a Verbose Installation Log".
To continue the installation in the console mode, see Section 2.2.2, "Running the Installation Program in Console Mode".
2.1.3.2.3 Starting the Installation in Silent Mode
For details about silent-mode installation, see Section 2.2.3.1, "What Is Silent-Mode Installation?".
To start the silent-mode installation process for installation files with names ending in .jar, follow these steps:
-
Log in to the target UNIX system.
-
Create a
silent.xmlfile that defines the configuration settings normally entered by a user during an interactive installation process, such as graphical-mode or console-mode installation.For information about creating a silent.xml file, see Section 2.2.3.3, "Creating a silent.xml File for Silent-Mode Installation".
Note:
Incorrect entries in the silent.xml file can cause installation failures. To help you determine the cause of a failure, Oracle recommends that you create a log file when you start the installation. -
Add the bin directory of the appropriate JDK to the beginning of the PATH variable definition on the target system. For example:
PATH=<JAVA_HOME>/bin:$PATH
export PATH
Here
<JAVA_HOME>represents the full path to the JDK directory. -
Launch the installation by entering the following command:
java -jar filename.jar -mode=silent -silent_xml=/path_to_silent.xml [-log=full_path_to_log_file]
where, filename.jar is the name of the installation file for example,
oerXX_generic.jar
where, XX represents the version number of the software you are installing and
path_to_silent.xmlis the full path to thesilent.xmlfile.Note:
You can also include the-log=full_path_to_log_fileoption in the command line to create a verbose installation log. For example:oer_generic.jar -mode=silent -silent_xml=/home/silent.xml -log=/home/logs/OER_install.logFor more information on generating a verbose log, see Section 1.9, "Generating a Verbose Installation Log".
An Installer window is displayed, indicating that the files are being extracted. No other prompt or text is displayed. For more information on Silent-Mode installation, see Section 2.2.3, "Running the Installation Program in Silent Mode".
2.2 Running the Installation Program
This section contains the following topics:
-
Section 2.2.1, "Running the Installation Program in Graphical Mode"
-
Section 2.2.2, "Running the Installation Program in Console Mode"
-
Section 2.2.3, "Running the Installation Program in Silent Mode"
2.2.1 Running the Installation Program in Graphical Mode
Caution:
Before running the installer, follow the preparation guidelines in Preparing for Your Installation, especially the Database Installation Procedures for your DBMS.Start the installation program as described in Section 2.1, "Starting the Installation Program".
The installation program prompts you to enter specific information about your system and configuration.
Note:
If the installation process is aborted before it is completed, manually clear the database before running the installer again. The installer does not clear data from the database when an installation is aborted. The existing data causes an error when the installer runs for the second time.-
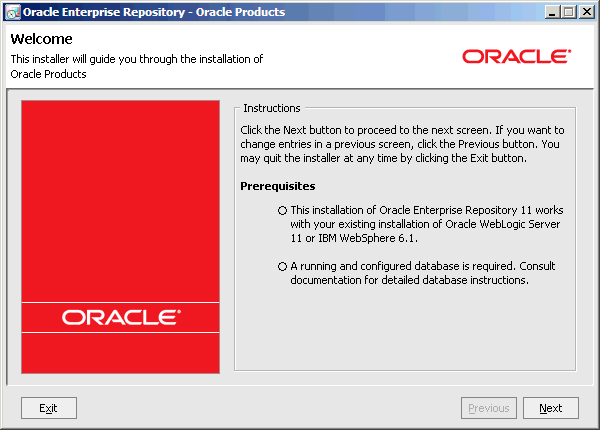
Double-click the installer file to start the installation. The Oracle Enterprise Repository - Oracle Products Welcome screen is displayed, as shown in Figure 2-1.
-
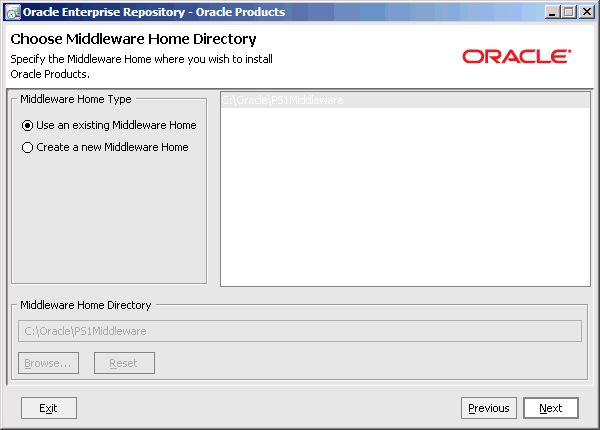
Click Next. The Choose Middleware Home Directory screen is displayed, as shown in Figure 2-2.
Choose either of the following options:
-
Use an existing Middleware Home: If you already have a Middleware Home directory on your system, you can select that directory (recommended).
-
Create a new Middleware Home: Creates a new Middleware Home directory. If you choose to create a new directory by typing a new directory name in this field, the installation program automatically creates one for you. You can also click Browse and select a directory from the Middleware Home Directory Selection dialog. Click Reset to reset the Middleware Home Directory field.
Note:
For information about the Middleare Home directory, see Section 1.7.1, "Choosing a Oracle Home Directory".
-
-
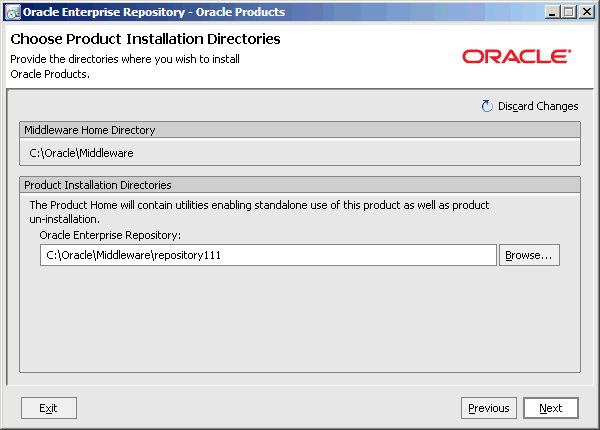
Click Next. The Choose Products Installation Directories screen is displayed, as shown in Figure 2-3.
-
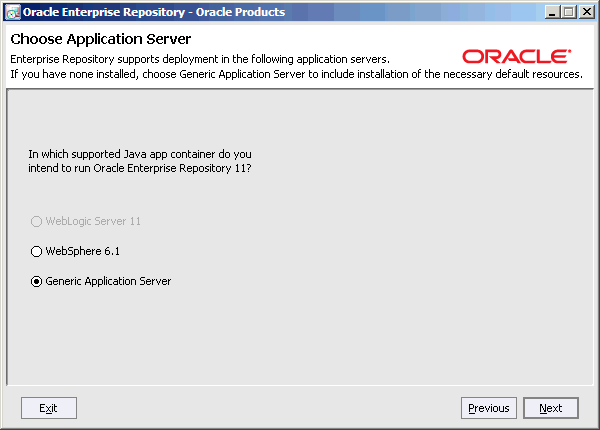
Click Next. The Choose Application Server screen is displayed, as shown in Figure 2-4.
-
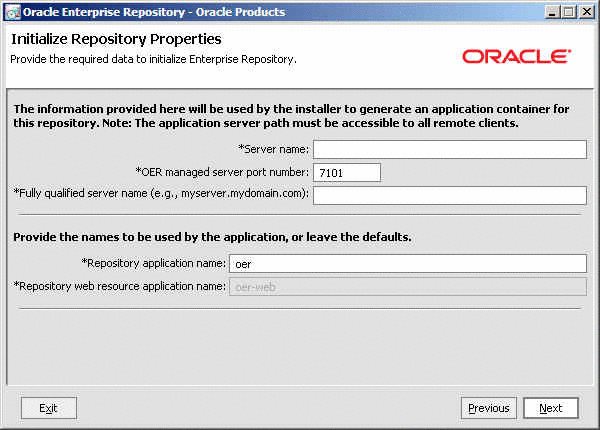
Select the appropriate application server and click Next. The Initialize Repository Properties screen is displayed, as shown in Figure 2-5.
-
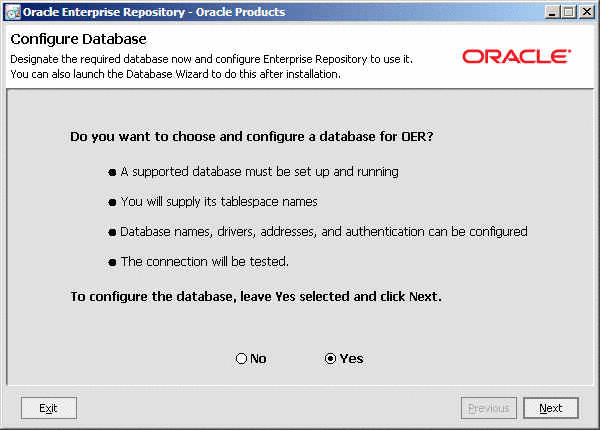
Specify the information required to initialize Oracle Enterprise Repository for your application server, and click Next. The Configure Database screen is displayed, as shown in Figure 2-6.
Specify whether you want to enter information for the Oracle Enterprise Repository Tablespaces that were configured as a prerequisite to this installation procedure or to configure a database at a later time.
Before selecting Yes, verify that your DBA completed the Database Installation Procedures for your DBMS. If you select No, see the Installation Complete window.
-
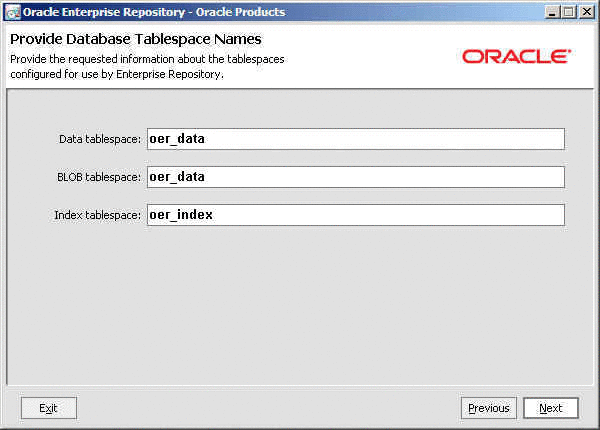
Select Yes and then click Next. The Provide Database Tablespace Names screen is displayed, as shown in Figure 2-7.
Specify the Oracle Enterprise Repository tablespace names that were created prior to the installation procedure, as follows:
-
SQL Server: provide the file group and index group names to be used by Oracle Enterprise Repository. Typically, the value for Data Tablespace would bePRIMARYand Index Tablespace would beINDEX. -
Oracle: provide the data and index tablespace names to be used by Oracle Enterprise Repository. Typically, the value for Data Tablespace would beOER_DATAand Index Tablespace would beOER_INDEX.
Note:
For the BLOB Tablespace field, enter the same value that you entered in the Data Tablespace field. -
-
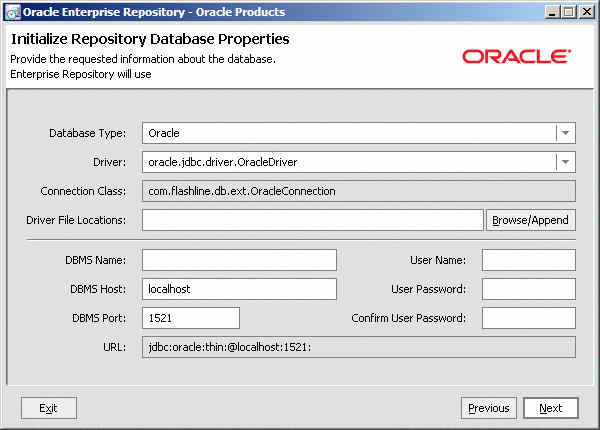
Click Next. The Initialize Repository Database Properties screen is displayed, as shown in Figure 2-8.
Note:
This window is displayed only when configuring an Oracle Enterprise Repository database.Specify the properties required to initialize your database.
-
Driver File Locations:
-
Oracle: ojdbc5.jar or ojdbc6.jar
For more information, see Table 2-1.
-
IBM UDB/DB2: db2jcc.jar, db2jcc_licence_cu.jar, db2jcc4.jar
-
SQL 2008: sqljdbc4.jar
Note:
By default, the Oracle Enterprise Repository installer does not have JDBC driver. You must download the respective JDBC driver. -
-
DBMS Name:
-
Oracle: Enter the SID that the Oracle Enterprise Repository schema was installed on. For Oracle, the default SID is orcl; for Oracle XE, the default SID is xe.
Note:
You can determine the SID needs to be entered by running this SQL statement: select instance_name from v$instance. -
SQL: Enter the database name, for example,
OER.
-
-
DBMS Host: Enter the fully-qualified server and domain name where Oracle Enterprise Repository is being installed, for example,
abc.mycompany.com. -
User Name and User Password fields: Ensure that you enter the appropriate user information from the Preparing for Your Installation instructions. If you used the recommended sample Build a Database User scripts for Oracle, or if you followed the Create a Database User steps for SQL Server 2008, they are
OERandOER_PWD.
-
-
Click Next. The Test Passed screen is displayed.
-
Click OK. If the test fails, confirm your user credential settings and retry. The Installation Complete screen is displayed.
Caution:
If the test passed, do not click Back or you may overwrite the database configuration.
After completing the installation process, complete the following post installation tasks, as described in Chapter 3, "Post-Installation Steps".
2.2.2 Running the Installation Program in Console Mode
This section describes how to run the installation program in the console mode. It contains the following topics:
-
Section 2.2.2.1, "Starting the Console Installer Using Windows"
-
Section 2.2.2.2, "Starting the Console Installer Using UNIX"
-
Section 2.2.2.3, "Install Oracle Enterprise Repository Using Console Mode"
2.2.2.1 Starting the Console Installer Using Windows
Use the following steps to install Oracle Enterprise Repository using console mode:
-
Perform the pre-installation tasks as described in Section 2.1.2, "Starting the Installation Program on Windows Platforms".
-
Install Oracle Enterprise Repository Using Console Mode.
2.2.2.2 Starting the Console Installer Using UNIX
This section describes the installation using the console mode on the UNIX platforms. The following sections describe the installation using:
Installers With Filenames Ending in .bin
Using the following steps to install Oracle Enterprise Repository using an installer with filename ending in .bin:
-
Complete the pre-installation tasks for installers with filename ending in .bin, see "Installers With Filenames Ending in .bin".
-
Install Oracle Enterprise Repository Using Console Mode.
Note:
Skip step 11 and step 12, choosing the shortcut location applies only to Windows systems.Installers With Filenames Ending in .jar
Using the following steps to install Oracle Enterprise Repository using an installer with filename ending in .jar:
-
Complete the pre-installation tasks for installers with filename ending in .jar, see "Installers With Filenames Ending in .jar".
-
Install Oracle Enterprise Repository Using Console Mode.
Note:
Skip step 11 and step 12, choosing the shortcut location applies only to Windows systems.2.2.2.3 Install Oracle Enterprise Repository Using Console Mode
Caution:
Before running the installer, follow the preparation guidelines in Preparing for Your Installation, especially the Database Installation Procedures for your DBMS.To complete the console-mode installation process, respond to the prompts in each section by entering the number associated with your choice or by pressing Enter to accept the default. To exit the installation process, enter exit (or x, for short) in response to any prompt. To review or change your selection, enter previous (or p, for short) at the prompt. To proceed to the following prompt, enter Next (or n, for short).
For Information on how to start the installation in the console mode, see Section 2.1.2.2, "Starting the Installation in Console Mode". When you start the installation in the console mode, the welcome screen is displayed, as in Listing 5-1 Welcome Screen in the Console Mode .
Note:
If the installation process is aborted before it is completed, manually clear the database before running the installer again. The installer does not clear data from the database when an installation is aborted. The existing data causes an error when the installer runs for the second time.Listing 5-1 Welcome Screen in the Console Mode
<------------------Oracle Enterprise Repository - Oracle Products ------------------>
Welcome:
--------
This installer will guide you through the installation of Oracle
Enterprise Repository 11.
Prerequisites:
This installation works with your existing installation of Oracle WebLogic Server
 11 or IBM WebSphere 6.1. A running and configured database is required. Consult
 documentation for detailed database instructions.
Type "Next" or enter to proceed to the next prompt.  If you want to change data
 entered previously, type "Previous". You may quit the installer at any time by
 typing "Exit".
Enter [Exit][Next]>
-
At the Welcome prompt, type
Next(or n for short) or pressEnterto continue with the installation process. The Oracle Home directory prompt is displayed. -
Specify the Oracle Home directory that serves as the central support directory for all products installed on the target system. For details about the Oracle Home directory, see Section 1.7.1, "Choosing a Oracle Home Directory". If Oracle Home directories exist on your system, a list of the directories is displayed, as shown in Listing 5-2 Choose a Oracle Home Directory.
-
To use an existing Oracle Home directory, type the number associated with the desired Oracle Home directory. If your application server is WebLogic 9.2.1, select the associated existing Oracle Home.
-
To create a new Oracle Home directory, type
1or pressEnter.If there are no Oracle Home directories on your system, or you have selected to create a new Oracle Home, the installation program is displayed, as shown in Listing 5-3 Choose a Oracle Home.
Listing 5-2 Choose a Oracle Home Directory
<------------- Oracle Enterprise Repository - Oracle Products ------------->
Choose Middleware Home Directory:
--------------------------
 ->1¦* Create a new Middleware Home   2¦C:\Oracle\PS1Middleware   3¦C:\Oracle\FMW
Enter index number to select OR [Exit][Previous][Next]>
Listing 5-3 Choose a Oracle Home
<------------- Oracle Enterprise Repository - Oracle Products ------------->
Choose Middleware Home Directory:
--------------------------
    "Middleware Home" = [Enter new value or use default "C:\Oracle\Middleware"]
Enter new Middleware Home OR [Exit][Previous][Next]>
Do one of the following:
-
To use the default Oracle Home directory, type
Next(ornfor short), or pressEnter. -
Enter the directory path and press
Enter.
The installation program displays the Oracle Home directory you have specified, as shown in Listing 5-4 Accept Oracle Home Directory.
Listing 5-4 Accept Oracle Home Directory
<-------------------- Oracle Installer - Oracle Products -------------------> Choose Product Installation Directories: ---------------------------------------- Middleware Home Directory: [C:\Oracle\Middleware] Product Installation Directories: "Oracle Enterprise Repository" = [Enter new value or use default "C:\Oracle\Middleware\repository111"] Enter new Oracle Enterprise Repository OR [Exit][Previous][Next]> -
-
Press
Enterto accept your selection. Otherwise, type1or2to return to the Choose Oracle Home Directory panel, where you can modify your entry.After you have selected your Oracle Home directory and confirmed your selection, type Next or press Enter. One of the following occurs:
-
If you are adding components to an existing installation, the Choose Components to install panel is displayed. Go to step 5.
-
If you are performing an initial installation, the Choose Install Type (see Listing 5-5 Accept Oracle Home Directory) prompt is displayed.
Listing 5-5 Accept Oracle Home Directory
<------------- Oracle Enterprise Repository - Oracle Products -------------> Choose Install Type: -------------------- Select the type of installation you wish to perform. ->1Default This option will install Oracle Enterprise Repository, also suitable for evaluation purposes. Install the following software: - Oracle Enterprise Repository Examples 2Custom Choose additional software products and components to install. Enter index number to select OR [Exit][Previous][Next]> -
-
Specify the type of installation you want to perform by entering the number associated with the install type, as shown in Listing 5-5 Accept Oracle Home Directory:
-
Type
1or pressEnterto choose a Default installation type. Proceed to step 8. -
Type
2to choose a Custom installation type. The Choose Components to install prompt is displayed.
For more information about complete and custom installations, see Section 1.1, "Installation Overview".
-
-
If you the choose the Custom type installation, select the components you want to install. The available components are displayed, as shown in Listing 5-6 Choose Components to Install.
Listing 5-6 Choose Components to Install
<------------- Oracle Enterprise Repository - Oracle Products ------------->
Choose Components to install:
-----------------------------
Release 3.0.0.0
    +----Oracle Enterprise Repository [1] v
     +----Core Repository with Examples [1.1] v
     +----Oracle Enterprise Repository Plug-In for Eclipse [1.2] v
      +----Process Engine [2.1] v
Enter number exactly as it appears in brackets to toggle selection OR
 [Exit][Previous][Next]>
The word Installed is shown in brackets for any components you have already installed on your system.
When you select or deselect components to install, the installation program checks for dependencies between components and automatically modifies the list of selected components. For example, if you deselect the Oracle BPM component, the Process Engine is also deselected.
When you have selected the components, press Enter or type Next (or n for short). The Install Eclipse Options prompt is displayed.
Listing 5-7 Install Eclipse Options
<------------- Oracle Enterprise Repository - Oracle Products -------------> Install Eclipse Options: ------------------------ Install Oracle installer bundled Eclipse or use the existing Eclispe. ->1¦Install Workspace Studio ¦ ¦ Installer will use the Oracle installer bundled ¦Eclipse kit and installs it to the default location. 2¦Use Existing Eclipse ¦ ¦ Do not install the installer bundled Eclipse. ¦I will specify Eclipse Home to use. Enter index number to select OR [Exit][Previous][Next]> -
Specify whether you want to install Eclipse, as shown in Listing 5-7 Install Eclipse Options. Do one of the following:
-
Type
1if you want to install Eclipse. Proceed to step 8. -
Type
2if you want to use an existing Eclipse installation. The Choose a Eclipse Home Directory prompt is displayed, as shown in Listing 5-8 Choose a Eclipse Home Directory.
Listing 5-8 Choose a Eclipse Home Directory
<------------- Oracle Enterprise Repository - Oracle Products -------------> Choose a Eclipse Home directory: -------------------------------- "Eclipse Home" = [] Enter new Eclipse Home OR [Exit][Next]> -
-
Enter the directory and type
n. Verify the directory as shown in Listing 5-9 Choose a Eclipse Home Directory.Listing 5-9 Choose a Eclipse Home Directory
<------------- Oracle Enterprise Repository - Oracle Products ------------->
Choose a Eclipse Home directory:
--------------------------------
->1Yes, use this Eclipse Home [e:\myEclipse]
  2No, select another Eclipse Home
Enter index number to select OR [Exit][Next]>
Do one of the following:
-
Type
1ornto select the Eclipse Home directory and pressEnter. -
Type
2to select a different directory, press Enter and return to Listing 5-8 Choose a Eclipse Home Directory.
-
-
Select an application server (see Listing 5-10 Choose Application Server). Enter the number representing your application server and press Enter.
The Initialize Repository Properties prompt for the selected application server is displayed (for example, see Listing 5-11 Initialize Repository Properties.
Listing 5-10 Choose Application Server
<------------- Oracle Enterprise Repository - Oracle Products ------------->
Choose Application Server:
--------------------------
Enterprise Repository supports deployment in the following application
servers.
*Select Application Server
   1¦WebSphere 6.1
   2¦Generic Application Server

Enter index number to select OR [Exit][Previous][Next]>
Listing 5-11 Initialize Repository Properties
<------------- Oracle Enterprise Repository - Oracle Products ------------->
Initialize Repository Properties:
---------------------------------
Provide the required data to initialize Enterprise Repository.
   1¦*Server name:[]   2¦*Fully qualified server name (e.g., abc.mycompany.com):[]   3¦*OER managed server port number:[7101]   4¦*Repository application name:[oer]

Enter index number to select OR [Exit][Previous][Next]>
-
Use the installer menus to provide the initialization properties for the selected application server. When finished, type
n.The Choose Product Installation Directories prompt is displayed (see Listing 5-12 Choose Product Installation Directories).
-
Verify your entry and press
Enterto proceed with the installation. Otherwise, do one of the following:-
Type
1and pressEnterto change the product installation directory for Oracle Enterprise Repository. -
Type
2and pressEnterto change the Process Engine directory.
Modify your entry, confirm it. Type
Next. PressEnter.Listing 5-12 Choose Product Installation Directories
<------------- Oracle Enterprise Repository - Oracle Products ------------->
Choose Product Installation Directories:
----------------------------------------
Oracle Home Directory: [E:\oer20_2]
Product Installation Directories:
   1Default Product Home: [E:\oer20_2\repostoryXXX]

Enter index number to select OR [Exit][Previous][Next]>Enter option number to
 select OR [Exit][Previous][Next]> Next
The locations for Shortcut prompt is displayed (see Listing 5-13 Location for the Shortcut ).
Listing 5-13 Location for the Shortcut
<------------- Oracle Enterprise Repository - Oracle Products -------------> Choose Shortcut Location: ------------------------- *The installer creates shortcuts to Oracle components, samples, and tools. As *a user with administrative privileges, you can specify where these *shortcuts are created. ->1¦"All Users" Start Menu folder (recommended) ¦For some installations, this setting may limit the automatic creation of server shortcuts ¦for users without administrative privileges. Refer to the documentation for more ¦information. 2¦Local user's Start Menu folder ¦Select this option if you must ensure that other profiles registered on this computer ¦will not have access to these shortcuts. Enter index number to select OR [Exit][Previous][Next]> -
-
Do one of the following:
-
Type
1ornto select All Users Start Menu folder and pressEnter. -
Type
2to select Local users Start Menu folder and pressEnter.
-
-
Type
nand pressEnterto confirm your choice for the location of the shortcut(see Listing 5-14 Confirm the Location for the Shortcut ).Listing 5-14 Confirm the Location for the Shortcut
<------------- Oracle Enterprise Repository - Oracle Products ------------->
Choose Shortcut Location:
-------------------------
*Are you sure you wish to create the shortcuts in the selected location?
    *
    *"All Users" Start Menu folder (recommended)
    *For some installations, this setting may limit the automatic creation of
    *server shortcuts for users without administrative privileges. Refer to the
 *documentation for more information.
 ->1Yes.
   2No, Go back to the previous screen and make another choice.

Enter index number to select OR [Exit][Previous][Next]>
Installation starts and you can see the progress of the installation at the prompt.
Note:
It is normal for the installation program to pause for a fairly long time.When the installation is complete, the Configure Repository Database panel is displayed (see Listing 5-15 Configure Repository Database).
Listing 5-15 Configure Repository Database
<------------- Oracle Enterprise Repository - Oracle Products -------------> Configure Repository Database ->1 - Yes, configure the database now. 2 - No, do not configure the database now. Enter a number or [Previous][Next]> -
Do one of the following:
-
Type
1and pressEnterto configure a database. -
Type
2and pressEnterto configure a database later. Proceed to step 17.
The Database Tablespace Names panel is displayed (see 13Listing 5-16 Database Tablespace Names).
Listing 5-16 Database Tablespace Names
<------------- Oracle Enterprise Repository - Oracle Products ------------->
Provide Database Tablespace Names:
----------------------------------
Provide the requested information about the tablespaces configured for use
by Enterprise Repository.
   1¦BLOB tablespace: []
   2¦Data tablespace: []
   3¦Index tablespace: []
Enter index number to select OR [Exit][Previous][Next]>
-
-
Use the installer menus to provide the table space names. When finished, type
n.The Select Database Driver prompt is displayed (see Listing 5-17 Select Database Driver).
Listing 5-17 Select Database Driver
<------------- Oracle Enterprise Repository - Oracle Products -------------> Select Database Driver: ----------------------- Select a JDBC driver for your database from the supported drivers list. ->1¦Oracle ¦ [oracle.jdbc.driver.OracleDriver] 2¦IBM DB2 General Type 4 Driver ¦ [com.ibm.db2.jcc.DB2Driver] 3¦Microsoft SQL Server Driver 2008 ¦ [com.microsoft.sqlserver.jdbc.SQLServerDriver] Enter index number to select OR [Exit][Previous][Next]> -
Use the installer menus to select a driver. When finished, type
n.The Configure Database Properties prompt is displayed (see Listing 5-18 Configure Database Properties).
Listing 5-18 Configure Database Properties
<------------- Oracle Enterprise Repository - Oracle Products ------------->
Configure the database properties below:
----------------------------------------
1¦Driver File Locations: []
   2¦DBMS Name: []
   3¦DBMS Host: [localhost]
   4¦DBMS Port: [50000]
   5¦User Name: []
   6¦User Password: []
   7¦Confirm Password: []
Enter index number to select OR [Exit][Previous][Next]>
-
Use the installer menus to provide the database properties. When finished, type
n.The connection is tested:
After completing the installation process, complete the following post installation tasks, as described in Chapter 3, "Post-Installation Steps".
2.2.3 Running the Installation Program in Silent Mode
This section describes how to run the installation program in the console mode. It contains the following topics:
-
Section 2.2.3.3, "Creating a silent.xml File for Silent-Mode Installation"
-
Section 2.2.3.4, "Sample silent.xml Files for Silent-Mode Installation"
2.2.3.1 What Is Silent-Mode Installation?
Silent-mode installation is a way of setting installation configurations once and then using these configurations to duplicate the installation on many computers. During installation in silent mode, the installation program reads the settings for your configuration from an XML file that you create prior to beginning the installation. The installation program does not display any configuration options during the installation process. Silent-mode installation works on both Windows and UNIX systems.
It is assumed that you have already acquired the installation program, either on DVD or from the Oracle Web site. For more information on different modes of product distribution, see Section 1.4, "Product Distribution Methods".
2.2.3.2 Using Silent-Mode Installation
The silent-mode installation process for Oracle Enterprise Repository has three primary steps:
-
Follow the preparation guidelines in Chapter 1, "Preparing for Your Installation", especially the Section 1.6, "Database Installation Procedures" for your DBMS.
-
Creating a
silent.xmlfile that defines the configuration settings normally entered by a user during an interactive installation process, such as graphical-mode or console-mode installation. For example, values for the Oracle Home directory, the product directory, and the components to be installed are supplied in a silent.xml file.For a detailed procedure, see Section 2.2.3.3, "Creating a silent.xml File for Silent-Mode Installation". For a sample
silent.xmlfile, see Section 2.2.3.4, "Sample silent.xml Files for Silent-Mode Installation". -
Starting the silent-mode installation process using the values specified in the
silent.xmlfile.For more information on launching the installation in silent mode, see Section 2.1, "Starting the Installation Program".
2.2.3.2.1 Important Considerations for Silent-Mode Installation
When you are performing an installation in silent mode, keep in mind the following considerations:
-
Before running the installer, follow the preparation guidelines in Chapter 1, "Preparing for Your Installation", especially the Section 1.6, "Database Installation Procedures" for your DBMS.
-
Silent-mode installation requires the same amount of temporary disk space and uses the same temporary storage directories as a standard installation. For more information, see Temporary Disk Space Requirements. The installation program does not alert you if there is insufficient space in the temporary directory.
-
A silent-mode installation takes the same amount of time as a standard installation. At the beginning of a silent-mode installation, an initial installation program window or message is displayed briefly, indicating that the installation has started. No messages are displayed to indicate that the installation is in progress or has been completed successfully.
-
Incorrect entries in the silent.xml file can cause installation failures. To help you determine the cause of a failure, Oracle recommends that you create a log file when you start the installation. For more information on generating a verbose log, see Section 1.9, "Generating a Verbose Installation Log".
-
The XML definition (<?xml version='1.0' encoding='UTF-8'?>) must be at the very beginning of the silent.xml file. There cannot be any spaces or line breaks before the XML definition.
-
You cannot reinstall any Oracle product on top of a previously installed version of the same product - in the same Oracle Home directory or in the same file location. You can, however, add products and product components to an existing installation. For example, you can install Oracle Enterprise Repository during one installation, and Oracle BPM during a later installation. However, to reinstall the same version of one of the products, you must first uninstall the previously installed instance of it, as described in or install the new instance in another location.
2.2.3.3 Creating a silent.xml File for Silent-Mode Installation
When you install your Oracle Enterprise Repository software in silent mode, the installation program uses an XML file (silent.xml) to determine which installation options should be implemented. Therefore, before you can run the installation program in silent mode, you must first create a silent.xml file in which you specify the installation options that you want to invoke.
Incorrect entries in the silent.xml file can cause installation to fail. To help you determine the cause of a failure, Oracle recommends that you create a log file when you start the installation.
Caution:
Before running the installer in silent mode, follow the preparation guidelines in Preparing for Your Installation, especially the Database Installation Procedures for your DBMS.To create a silent.xml file for use in the silent-mode installation process, follow these steps:
-
In a supported browser, view the sample
silent.xmlfile for silent-mode installation.The sample file is available at http://e-docs.bea.com/common/docs92/install/scripts/silent.xml
This sample silent.xml file is also presented in this section. See Section 2.2.3.4, "Sample silent.xml Files for Silent-Mode Installation".
-
Save the sample XML file, with the name
silent.xml, in the same directory that contains the installation program.Note:
The XML definition (<?xml version="1.0" encoding="ISO-8859-1"?>) must be at the very beginning of the silent.xml file. There should not be any spaces or line breaks before the XML definition. -
In the
silent.xmlfile that you saved on your system, edit the values for the keywords shown in Table 2-2 to reflect your configuration.Note:
You must follow XML guidelines for characters when modifying values. That is, do not use characters reserved for use in XML, such as <, >, [, and].Table 2-2 Parameters for Silent.xml
For this data-value name... Enter the following value... OracleHOMEThe full path for the Oracle Home directory of your choice. For details about the Oracle Home directory, see Section 1.7.1, "Choosing a Oracle Home Directory".
COMPONENT_PATHSThe components and subcomponents you want to install on your system:
To install Oracle Enterprise Repository, use the following values:
-
Oracle Enterprise Repository
-
Core Repository with Examples
-
Oracle Enterprise Repository Plug-In for Eclipse
APP_SERVER_TYPEThe application server type used to run Oracle Enterprise Repository. Valid values are:
-
value for user-supplied Tomcat (GUI = Tomcat 5.5.17/18 (user supplied))
-
value for WLS (GUI = WebLogic Server 10.3)
-
value for WAS (GUI = WebSphere 6.1)
-
value for Generic App Server (GUI =Generic Application Server)
APP_SERVER_NAMEThe application server name used to run Oracle Enterprise Repository.Valid values are:
-
Tomcat 5.5.17/18 (user supplied)
-
WebLogic Server 9.2.1/9.2.2
-
WebSphere 6.1
-
Generic Application Server
APP_PATHThe Oracle Enterprise Repository application path. For example, if the OER_URL is ultimately http://www.myhost.com:8001/OER1111, then the APP_PATH is OER1111.
WEB_PATHThe web application path. It is recommended that the WEB_PATH value should be the APP_PATH value with -web appended. For example, if APP_PATH=oer10300, then WEB_PATH is recommended to be oer10300-web.
OER_URLThe fully-qualified server and domain name where Oracle Enterprise Repository is being installed (for example, abc.mycompany.com)
DOMAIN_LISTING_PORTThe domain listening port.
USER_INSTALL_DIRThe directory where Oracle Enterprise Repository is installed within the specified OracleHOME.
RUN_DBCONFIG_WIZARDThe flag to run the DB Configuration Wizard:
-
true or yes, to run the Database Configuration wizard. The default is true.
-
false or no, to skip the database wizard.
CONFIG_RESPOSIT_DBThe flag to run the Repository Database Configuration wizard, which initializes the repository database properties.
-
true or yes, to configure a Repository Database Configuration wizard. The default is true.
-
false or no, to skip the configuration of a database.
Note: This flag is skipped if RUN_DBCONFIG_WIZARD is set to false or no.
DB_TABLE_BLOGTablespace name for BLOBs.Note: For the BLOB Tablespace field, enter the same value that you specify for DB_TABLE_DATA.
DB_TABLE_DATAThe data tablespace name to be used by Oracle Enterprise Repository. For example:
-
SQL Server – PRIMARY
-
Oracle – OER_DATA
-
DB2 – oerdatats
DB_TABLE_INDEXThe index tablespace name to be used by Oracle Enterprise Repository. For example:
-
SQL Server – INDEX
-
Oracle – OER_INDEX
-
DB2 – oerindxts
DB_DRIVERName of the driver. For example: oracle.jdbc.driver.OracleDriver
DB_JARFILESPath to the driver JAR file. For example:
-
Oracle – d:\jdbc14.jar
-
SQL 2008 – d:\qljdbc.jar
DB_DBMSThe database management system.
-
Oracle – enter the SID that the Oracle Enterprise Repository schema was installed on. For Oracle, the default SID is orcl; for Oracle XE, the default SID is xe.
Note: You can determine the SID needs to be entered by running this SQL statement: select instance_name from v$instance;
-
SQL – enter the database name (e.g., OER)
DB_PORTThe database port number.
DB_HOSTThe fully-qualified server and domain name where Oracle Enterprise Repository is being installed (for example, abc.mycompany.com).
DB_USERNAMEThe database user name.
Enter the appropriate user information from the Database Installation Procedures instructions for your DBMS.
DB_PASSWORDThe password for a database user.
Enter the appropriate user information from the Database Installation Procedures instructions for your DBMS.
APP_SERVER_HOMEThe application server home directory
For example: OracleHOME\weblogic103
USER_DOMAIN_DIRThe Oracle Enterprise Repository User Domain Directory directory.
For example: OracleHOME\user_projects\domains\oerDomain
SUPPORTED_WL_HOMEThe supported WebLogic Server home.For example: OracleHOME\weblogic103
WL_HOMEThe WebLogic Server home.For example: OracleHOME\weblogic103
ECLIPSE32_HOMEFor installations pointing at existing Eclipse plug-ins for Oracle Enterprise Repository, specifies the optional Eclipse installation. If this key/value is not specified, the installer continues as in the normal GUI installation.
<data-value name="ECLIPSE32_HOME" value="c:\my_eclipse_home" />
Note:
The application server name and the types supported for Oracle Enterprise Repository 11g are as follows (these combinations must be used together):Apache Tomcat Installs:
APP_SERVER_NAME=Tomcat 5.5.17/18 (user-supplied)APP_SERVER_TYPE=user_tomcatWebLogic Installs:
APP_SERVER_NAME=WebLogic Server 10.3APP_SERVER_TYPE=wlsWebSphere Installs:
APP_SERVER_NAME=WebSphere 6.1APP_SERVER_TYPE=wasGeneric Application Server Installs:
APP_SERVER_NAME=Generic Application ServerAPP_SERVER_TYPE=generic -
2.2.3.3.1 Guidelines for Component Selection
Use the following guidelines when you specify values for the COMPONENT_PATHS data-value name:
-
When you specify a product component to be installed, all subcomponents that are installed by default in a complete installation are also installed. For example, the following entry in silent.xml installs both Oracle Enterprise Repository and the examples:
<data-value name="
COMPONENT_PATHS" > -
To install multiple components, separate the components with a bar (|). Do not leave a space before or after the bar.
-
To specify subcomponents, you must specify a component/subcomponent combination for each entry.
Note:
You can include the component/subcomponent of the products you want to install. -
If you do not include the
COMPONENT_PATHSdata-value name in the silent.xml file, the "complete" Oracle Enterprise Repository product is installed.Note:
The installation program performs dependency checking to ensure that all components that provide functionality on which other components depend for proper operation are installed. These dependencies are visible during graphical and console mode installations. The same dependencies are enforced during silent installation: components on which other components depend are installed even if they are not explicitly referenced in a silent script.
2.2.3.4 Sample silent.xml Files for Silent-Mode Installation
The following sample silent.xml demonstrate how to install Oracle Enterprise Repository and configure a database.
Example 2-1 Sample XML File -- Install Oracle Enterprise Repository with Database Configuration and Oracle BPM Process Engine
<?xml version='1.0' encoding='UTF-8'?>
<Oracle-installer>
  <input-fields>
  <data-value name='OracleHOME' value='D:\dev\silentInstall\oer_albpm'/>
  <data-value name='COMPONENT_PATHS' value='Oracle Enterprise Repository/Core
 Repository with Examples|Oracle Enterprise Repository/Oracle Enterprise
 Repository Plug-In for Eclipse|Oracle BPM/Process Engine'/>
  <data-value name='APP_SERVER_TYPE' value='ce_tomcat' />
  <data-value name='APP_SERVER_NAME' value='Default'/>
  <data-value name='APP_PATH' value='oer3'/>
  <data-value name='WEB_PATH' value='oer3-web'/>
  <data-value name='OER_URL' value='MyURL' />
  <data-value name='DOMAIN_LISTEN_PORT' value='8080' />
  <data-value name='APP_SERVER_HOME' value='D:\dev\silentInstall\oer
_albpm\my\tomcat'/>
  <data-value name='USER_INSTALL_DIR' value='D:\dev\silentInstall\oer
_albpm\repositoryXXX'/>
  <data-value name='RUN_DBCONFIG_WIZARD' value='yes'/>
  <data-value name='CONFIG_RESPOSIT_DB' value='yes'/>
  <data-value name='DB_TABLE_BLOB' value='USER_BLOB'/>
  <data-value name='DB_TABLE_DATA' value='USER_DATA'/>
  <data-value name='DB_TABLE_INDEX' value='USER_INDEX'/>
  <data-value name='DB_DRIVER' value='oracle.jdbc.driver.OracleDriver'/>
  <data-value name='DB_JARFILES' value='d:\ojdbc14.jar'/>
  <data-value name='DB_DBMS' value='sid2'/>
  <data-value name='DB_PORT' value='1521'/>
  <data-value name='DB_HOST' value='MyHostName'/>
  <data-value name='DB_USERNAME' value='silent'/>
  <data-value name='DB_PASSWORD' value='silent'/>
  <data-value name='DBA_ALBPM_USER' value='system'/>
  <data-value name='DBA_ALBPM_PASSWORD' value='oer30'/>
  <data-value name='ALBPM_ADMIN_USER' value='system'/>
  <data-value name='ALBPM_ADMIN_PASSWORD' value='manager'/>
  <data-value name='FDI_USER_NAME' value='fd1'/>
  <data-value name='FDI_USER_PASSWORD' value='fd1'/>
  <data-value name='SERVER_USER_NAME' value='fd2'/>
  <data-value name='SERVER_USER_PASSWORD' value='fd2'/>
  <data-value name='CONFIGURE_WORKFLOW' value='yes'/>
  </input-fields>
\</Oracle-installer>
Example 2-2 Sample XML File -- Install Oracle Enterprise Repository Only with Database Configuration
<?xml version='1.0' encoding='UTF-8'?>
<Oracle-installer>
  <input-fields>
  <data-value name='BEAHOME' value='D:\dev\silentInstall\oer3'/>
  <data-value name='COMPONENT_PATHS' value='Oracle Enterprise Repository/Core
 Repository with Examples|Oracle Enterprise Repository/Oracle Enterprise
 Repository Plug-In for Eclipse'/>
  <data-value name='APP_SERVER_TYPE' value='ce_tomcat' />
  <data-value name='APP_SERVER_NAME' value='Default '/>
  <data-value name='APP_PATH' value='oer3'/>
  <data-value name='WEB_PATH' value='oer3-web'/>
  <data-value name='OER_URL' value='MyURL' />
  <data-value name='DOMAIN_LISTEN_PORT' value='8080' />
  <data-value name='APP_SERVER_HOME' value='D:\dev\silentInstall\oer
_albpm\my\tomcat'/>
  <data-value name='USER_INSTALL_DIR' value='D:\dev\silentInstall\oer
_albpm\repositoryXXX'/>
  <data-value name='RUN_DBCONFIG_WIZARD' value='yes'/>
  <data-value name='CONFIG_RESPOSIT_DB' value='yes'/>
  <data-value name='DB_TABLE_BLOB' value='USER_BLOB'/>
  <data-value name='DB_TABLE_DATA' value='USER_DATA'/>
  <data-value name='DB_TABLE_INDEX' value='USER_INDEX'/>
  <data-value name='DB_DRIVER' value='oracle.jdbc.driver.OracleDriver'/>
  <data-value name='DB_JARFILES' value='d:\ojdbc14.jar'/>
  <data-value name='DB_DBMS' value='sid2'/>
  <data-value name='DB_PORT' value='1521'/>
  <data-value name='DB_HOST' value='MyHostName'/>
  <data-value name='DB_USERNAME' value='silent'/>
  <data-value name='DB_PASSWORD' value='silent'/>
  </input-fields>
\</Oracle-installer>
For more information on launching the installation in silent mode, see Section 2.1, "Starting the Installation Program".
2.2.3.5 Returning Exit Codes to the Console
When run in silent mode, the installation program generates exit codes that indicate the success or failure of the installation. These exit codes are shown in the following table.
| Code | Description |
|---|---|
| 0 | Installation Completed Successfully. |
| 1 | Installation failed due to a fatal error. |
| 2 | Installation failed due to an internal XML parsing error. |
If you are launching the silent-mode installation process from a script, you can choose to have these exit codes displayed on the console. Example 2-3 provides a sample command file that invokes the installation program in silent mode and echoes the exit codes to the console from which the script is executed.
Example 2-3 Sample Command File Displaying Silent-Mode Exit Codes
rem Execute the installer in silent mode
@echo off
oer1111xx_generic.exe -mode=silent -silent_xml=mySilentXMLFile.xml -log=oer_30.log
@rem Return an exit code to indicate success or failure of installation
set exit_code=%ERRORLEVEL%
@echo.
@echo Exitcode=%exit_code%
@echo.
@echo Exit Code Key
@echo ---------------
@echo  0=Installation completed successfully
@echo -1=Installation failed due to a fatal error
@echo -2=Installation failed due to an internal XML parsing error
@echo.
After completing the installation process, complete the following post installation tasks, as described in Chapter 3, "Post-Installation Steps".
