5 Configuring an OracleAS Adapter for Tuxedo
This chapter provides an example for creating an OracleAS adapter for Tuxedo. To work with an OracleAS adapter for Tuxedo, you must also configure either a BPEL process or a Mediator process. For information on using BPEL or Mediator, see Creating the Project in JDeveloper Examples.
The following is required to perform the tasks described in this chapter:
-
Computer with Windows operating system
-
Computer with Windows or UNIX operating system
-
Oracle Connect v 11.1.1.2 installed on the Windows or UNIX computer
-
Oracle Studio v 11.1.1.2 installed on the Windows computer
-
Tuxedo installed on the Windows or UNIX computer with Oracle Connect
Creating Outbound Interactions with the OracleAS Adapter for Tuxedo
To work with the OracleAS Adapter for Tuxedo and create outbound interactions you create Tuxedo inteactions using the Tuxedo adapter and import the metadata.
Create the toUpper Interaction
You use a Tuxedo adapter to create the interactions used to get the data that you need. The interactions are used as services when you set up the endpoint in JDeveloper. For more information on using JDeveloper to create an endpoint, see Deploy a BPEL Outbound Process.
Do the following to create the interactions.
Prepare the System
Make sure to create the toUpper and toLower View files in Tuxedo and then set the correct environment properties on the Windows computer. For information on how to create the view files, see the Tuxedo documentation.
Set up Machine Access to Oracle Connect
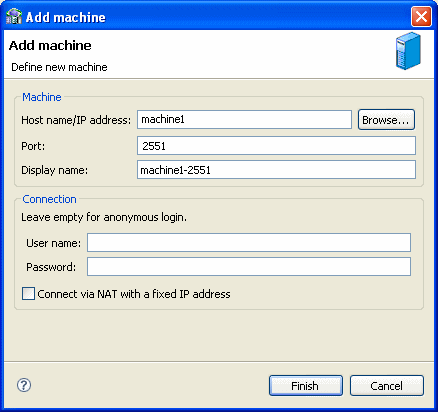
You begin by configuring access to the Windows computer with Tuxedo and Oracle Connect. You configure this access with Oracle Studio. Open Oracle Studio and follow the directions Securing Access to Oracle Connect. Enter the following information in the Add machine dialog box:
-
Host name/IP address: Enter the name or IP address for the computer with Tuxedo.
-
Port: Enter the port number where the daemon is running. The default port is 2551.
-
Display name: You do not need to enter any information in this field (By default, the display name is the host name and the port number).
-
User name: If the computer you are accessing needs an administrator password. If so enter the name o f the computer's administrator.
-
Password: If necessary, enter the computer administrator's password.
-
Connect via NAT with fixed IP address: Select this if the machine uses the NAT (Network Address Translation) firewall protocol, with a fixed configuration, mapping each external IP to one internal IP, regardless of the port specified.
The following figure shows the Add Machine dialog box with the correct information:
Add a Tuxedo Adapter
You now create an adapter, which lets you create interactions to get the information you are seeking. To create an adapter, do the following
-
Expand the computer you just added and then expand the NAV binding.
-
Right-click the Adapters folder and then select New adapter.
-
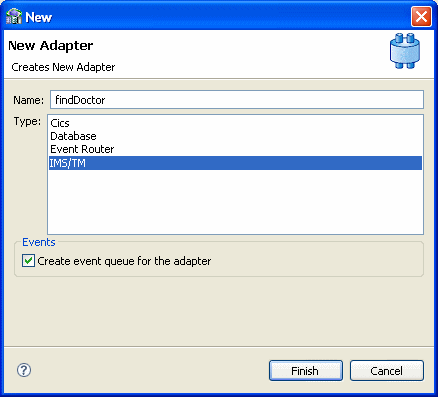
Enter the following information for your adapter, then click Finish.
-
Name: ToUpper
-
Type: Tuxedo
-
For a detailed explanation on how to set up a Tuxedo adapter, see Setting up the Tuxedo OracleAS Adapter.
The following figure shows the Add adapter dialog box with the correct information:
Import the Metadata
You now import the metadata from Tuxedo into the adapter. For information on how to import data, see Modeling Interactions for the Tuxedo OracleAS Adapter.
In this example you create the TOUPPER interaction.
-
In the Configuration view of the Design perspective, right-click the
toupperadapter that you created in Add a Tuxedo Adapter and select Show metadata view. The Metadata view opens with thetoupperadapter expanded and selected. -
Right-click Imports and select New Import.
-
Enter a name for the import and then select Tuxedo Import Manager Using FML/VIEW Files as the Import type then click Finish to view the Metadata Import Wizard.
-
You need the following information for the metadata import:
-
In the Get Input Files step, just click Next.
-
In the Add FML Records step, just click Next.
-
In the Get Tuxedo Records step, create two records. Name the records ToUpper_In and ToUpper_Out. Both records should have a Field Type of STRING and a Size of 20.
-
In the Add interactions step, under the Name column, enter TOUPPER, in the Input column, select ToUpper_In and in the Output column, select ToUpper_Out.
In the Interation-Specific Parameters section, select STRING for both the Input Buffer Type and Output Buffer Type.
-
In the Import Metadata step, select Yes and then click Finish.
-
Create the JCA Configuration Files
You must create both a WSDL and JCA file to set up your connection with JDeveloper. You create the files using Oracle Studio before setting up the BPEL process or Mediator connections.
For information on how to create JCA configuration files, see fix link. To create the files for the ToUpper adapter, do the following:
-
From the Configuration pane in Oracle Studio, expand the NAV binding and the Adaper folder.
-
Right-click the ToUpper adapter and select Generate JCA Configuration Files.
-
In the dialog box, save the files to a place you can find when you create the BPEL process or Mediator connection.
Creating Inbound Interactions with the Tuxedo Queue Adapter
To work with the OracleAS Adapter for Tuxedo and create inbound interactions you create Tuxedo interactions using the Tuxedo Queue adapter and import the metadata.
Create the DEQUEUE Event Queue
You use a Tuxedo Queue adapter to create the interactions used to send the data that you need. The interactions are used as services when you set up the endpoint in JDeveloper. For more information on using JDeveloper to create an endpoint, see Deploy a BPEL Inbound Process.
Do the following to create the interactions.
Prepare the System
In order to create an the DEQUEUE interaction, make sure to create a Tuxedo queue space and and individual queue for it. For information , see the Tuxedo documentation.
Set up Machine Access to Oracle Connect
You begin by configuring access to the Windows computer with Oracle Connect and Tuxedo. You configure this access with Oracle Studio. Open Oracle Studio and follow the directions Securing Access to Oracle Connect. Enter the following information in the Add machine dialog box:
-
Host name/IP address: Enter the name or IP address for the computer with Tuxedo. This should be installed in the same directory as Oracle Connect.
-
Port: Enter the port number where the daemon is running. The default port is 2551.
-
Display name: You do not need to enter any information in this field (By default, the display name is the host name and the port number).
-
User name: If the computer you are accessing needs an administrator password. If so enter the name o f the computer's administrator.
-
Password: If necessary, enter the computer administrator's password.
-
Connect via NAT with fixed IP address: Select this if the machine uses the NAT (Network Address Translation) firewall protocol, with a fixed configuration, mapping each external IP to one internal IP, regardless of the port specified.
The following figure shows the Add Machine dialog box with the correct information:
Add a Tuxedo Queue Adapter
You now create an adapter, which lets you create interactions to get the information you are seeking. To create an adapter, do the following
-
Expand the computer you just added and then expand the NAV binding.
-
Right-click the Events folder and then select New event.
-
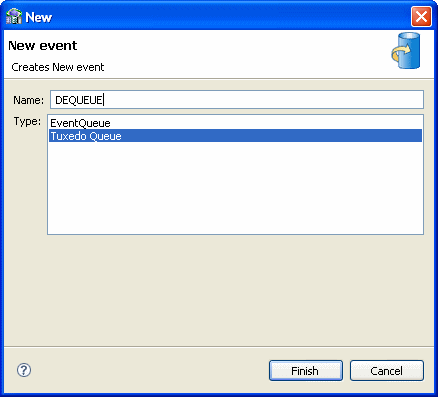
Enter the following information for your adapter, then click Finish.
-
Name: DEQUEUE
-
Type: Tuxedo Queue
-
For a detailed explanation on how to set up a Tuxedo Queue adapter, see Setting up the Tuxedo Queue OracleAS Adapter.
The following figure shows the New Event dialog box with the correct information:
Import the Metadata
You now import the metadata from Tuxedo into the adapter. For information on how to import data, see Modeling Interactions for the Tuxedo Queue OracleAS Adapter.
In this example you should import the create the event queue for the DEQUEUE adapter. You must also create the View files in Tuxedo. Do the following to import the metadata:
-
In the Configuration view of the Design perspective, right-click the
DEQUEUEadapter that you created in Add a Tuxedo Queue Adapter and select Show metadata view. The Metadata view opens with thetoupperadapter expanded and selected. -
Right-click Imports and select New Import.
-
Enter a name for the import and then select select Tuxedo Queue Import Manager for XML/STRING/CARRAY Buffer as the Import type then click Finish to view the Metadata Import Wizard.
-
You need the following information for the metadata import:
-
In the Get Records step, click Add Record and change the name to str_record with a size of 20. Leave STRING as the Field Type.
-
In the Configure Tuxedo Queue Records step, just click Next.
-
In the Import Metadata step, select Yes and then click Finish.
-
Create the JCA Configuration Files
You must create both a WSDL and JCA file to set up your connection with JDeveloper. You create the files using Oracle Studio before setting up the BPEL process or Mediator connections.
For information on how to create JCA configuration files, see fix link. To create the files for the DEQUEUE adapter, do the following:
-
From the Cofiguration pane in Oracle Studio, expand the NAV binding and the Adaper folder.
-
Right-click the DEQUEUE adapter and select Generate JCA Configuration Files.
-
In the dialog box, save the files to a place you can find when you create the BPEL process or Mediator connection.


