8 Advanced Features of OracleAS Adapter for Tuxedo
Oracle Connect includes several tuning parameters that can improve performance. Specifically, the daemon can be configured to optimize communication between the OracleAS Adapter for Tuxedo and a client. In addition, the binding environment can be tuned to optimize the request handling.
This chapter contains the following topics:
Configuring the Daemon for High Availability
The daemon workspace is responsible for allocating server processes to clients. You can configure a workspace to use a pool of server processes so that a server process is always available for a client request. Use Oracle Studio to maintain daemon and daemon workspace parameters to control the allocation of server processes and their management in a pool.
The daemon manages a pool of server processes on the legacy platform. Oracle Application Server manages connection pooling of the J2CA 1.5 Tuxedo adapter.
You can also have several daemon workspace configurations, enabling you to create individual workspaces for use with different adapters.
Adding a New Daemon Workspace Configuration
Use Oracle Studio to add a new daemon configuration. You can set up different daemon configurations for different situations. On the computer where Oracle Connect is installed, perform the following steps:
-
From the Start menu, select Programs, Oracle, and then select Studio.
-
In the Design perspective Configuration view, expand the Machine folder.
-
Expand the machine you are working with.
-
Expand the Daemons. The available daemon configurations are listed.
-
Right-click IRPCD and select New Workspace.
-
In the New daemon workspace screen, specify a name for the new workspace and optionally, provide a description.
-
Specify whether you want default settings or copy the properties of an existing workspace.
To copy the properties of an existing workspace, click Ellipsis and select the workspace from which you want to copy the properties.
-
Click Next. The Select Scenario screen is displayed.
-
Select Application Server using connection pooling and click Next.
-
Continue through the wizard, specifying the required values for the workspace.
-
To complete the workspace definition, click Finish.
The new workspace is now displayed under the IRPCD daemon.
Editing the Workspace
You edit a workspace by using the tabs described in the following table:
Table 8-1 Workspace Properties tabs
| Tab | Description |
|---|---|
|
General |
Specifies general information including the server type, the command procedure used to start the workspace, the binding configuration associated with this workspace (which dictates the data sources and applications that can be accessed) the timeout parameters, and logging information (which dictates the data sources and applications that can be accessed), the timeout parameters, and logging information. |
|
Server Mode |
Contains the workspace server information including features that control the operation of the servers started up by the workspace and allocated to clients. |
|
Security |
Specifies administration privileges, user access, ports available to access the workspace and workspace account specifications. |
Use Oracle Studio to access these tabs, as follows:
-
From the Start menu, select Programs, Oracle, and then select Studio.
-
In the Design perspective Configuration view, expand the Machines folder and then expand the machine where you want to edit the workspace.
-
Expand the Daemons folder. The daemon available on this computer are listed.
-
Expand the IRPCD daemon. The daemon workspaces are listed.
-
Right-click the workspace you are editing and select Open.
-
Click the tab that contains the information you want to edit. For full details of the tabs and the fields in these tabs, see Workspaces.
-
After editing the workspace, click Save.
Configuring the Server Mode
The server mode determines how the daemon starts new processes. The daemon supports the following server modes:
-
singleClient: Each client receives a dedicated server process. The account in which a server process runs is determined either by the client login information or by the specific server workspace.
-
This mode enables servers to run under a particular user account and isolates clients from each other (because each receives its own process). However, this server mode incurs a high overhead due to process startup times and may use a lot of server resources (because it requires as many server processes as concurrent clients).
-
multiClient: Clients share a server process and are processed serially.
-
This mode has low overhead because the server processes are initialized. However, because clients share the same process, they may impact one another, especially if they issue lengthy queries.
The number of clients that share a process is determined by the Clients per server limit (the maximum number of concurrent clients a server process for the current workspace accepts).
-
multiThreaded: When Tuxedo runs on a Windows platform, the server process can be multi-threaded.
-
reusable: This is an extension of the single client mode. When the client processing finishes, the server process does not die and can be used by another client, reducing startup times and application startup overhead.
This mode does not have the high overhead of single client mode because the servers are initialized. However, this server mode may use a lot of server resources (because it requires as many server processes as concurrent clients).
The other modes can be set so that the server processes are reusable by setting the number of times a process can be reused with the Reuse limit value (the maximum number of times a particular server process can be reused or how many clients it can serve before it is retired). Reuse of servers enhances performance because it eliminates the need to repeat initializations. However, reuse runs a risk of higher memory leakage over time. The default for the Reuse limit field value is None, indicating that no reuse limit is enforced.
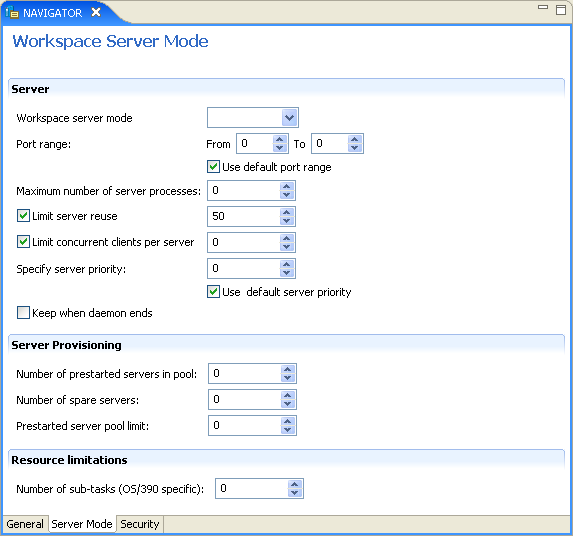
Set the server mode in the Server Mode tab of the daemon workspace editor, as shown in the following figure:
When using any of the server modes you can specify a pool of server processes. These server processes are started when the daemon starts and are maintained in a pool. The server processes are available for use by new client requests from the pool, saving initialization time. Instead of starting a new server process each time one is requested by a client, the client receives a process immediately from the pool of available processes. When the client finishes processing, this server process either dies, or if reusable servers have been specified, it is returned to the pool.
You set up a pool of server processes by specifying the following parameters in the WS Server tab.
-
Initial number of servers: The number of server processes that are prestarted for this workspace when the daemon starts. These are available for use by new client processes with minimal initialization time. Instead of starting a new server process each time one is requested by a client, the daemon immediately allocates (to the client) a server from a pool of available servers. When the number of available server processes drops lower than the value specified in the Minimum number of available servers field, the daemon again starts server processes until the specified number of available servers is reached. The default for this parameter is 0, meaning that no servers are prestarted for this workspace.
-
Minimum number of available servers: The minimum number of server processes in the prestarted server's pool before the Oracle Connect daemon resumes creating new server processes (up to the number specified in the Initial number of servers field value, described earlier). If this parameter is set to a value greater than that of the Initial number of servers field value, the daemon considers the value to be the same as the value specified in the Initial number of servers field. In this case, a new server process is started and added to the pool each time a server process is removed from the pool and allocated to a client). The default for this parameter is 0, which means that new servers are created only when there are no other available servers.
-
Set maximum number of servers: The maximum number of available server processes pooled for this workspace. If the server is reusable, once a client disconnects from the server, the daemon returns the server to the pool of available servers. If the limit is reached, excess server processes are discarded.
Configuring a Binding Environment
Each binding configuration includes the following information:
-
Environment settings, which are used to configure the environment used by any of the adapters defined in the binding.
-
Application adapters on the current computer.
Configuring adapters is described in Configuring OracleAS Adapters for Tuxedo in Oracle Studio.
To configure environmental settings in Oracle Studio, perform the following steps:
-
From the Start menu, select Programs, Oracle, and then select Studio.
-
In the Design perspective Configuration view, expand the Machine folder, then expand the machine where you want to configure the binding.
-
Expand the Bindings folder. The binding available on this computer are listed.
-
Right-click NAV and select Open.
-
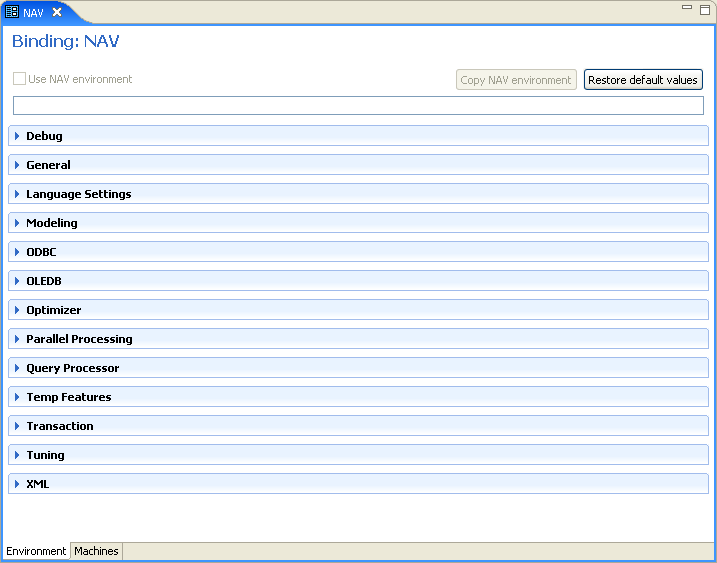
In the Environment tab edit the required environment settings as needed. To edit an environment setting, click the required property category and then click the required value to edit.
The binding Environment tab is displayed in the following figure:
The binding environment is divided into the following categories:
Debug
The following table lists the parameters that define debugging and logging operations:
| Parameter | Description |
|---|---|
|
Select this for the input xml sent to the back-end adapter and the output xml returned by the back-end adapter to be written to the log. |
|
|
This parameter is not applicable for use with OracleAS Adapter for IMS/DB. |
|
|
Select this to log general trace information. The default writes only error messages to the log. Note: Changing the default setting can degrade performance. |
|
|
This parameter is not applicable for use with OracleAS Adapter for IMS/DB. |
|
|
Select this to add a OracleAS Adapter on each event row in the log. |
|
|
This parameter is not applicable for use with OracleAS Adapter for IMS/DB. |
|
|
Select the binary XML log level from the list. The following logging levels are available:
|
|
|
The high-level qualifier of the log file for messages. The following type of message are written to the log:
|
|
|
This parameter is not applicable for use with OracleAS Adapter for IMS/DB. |
|
|
This parameter is not applicable for use with OracleAS Adapter for IMS/DB. |
|
|
Select this for the transaction manager to write additional information about transactions to the log. |
General
The following table lists the parameters that define general operations where temporary files are written:
| Parameter | Description |
|---|---|
|
This parameter is not applicable for use with OracleAS Adapter for IMS/DB. |
|
|
The directory where temporary files are written, including the temporary files created for use by hash joins and for sorting files. The default is the current high-level qualifier. |
|
|
Determines the way two-digit years are converted into four-digit years. When the Fixed Base Year: This solution is most required if there is live data at the low end (close to the year 1900), which the user wants to keep with the current two-digit format. The user probably changes the base date only after ensuring that these old dates have been deleted from the data source. Sliding Base Year: |
|
|
Enter the number of bytes to be used for a memory buffer on a client computer, which is used by the Oracle Connect client/server to store read-ahead data. The default is |
Language
The following table lists the parameters that define globalization support:
Table 8-4 Language Settings Parameters
| Parameter | Description |
|---|---|
|
Identifies the application language. A default Attunity SQLServer-CDC for SSIS.chm is selected based on the value specified for this parameter. For more information, see Globalization Settings. |
|
|
For use with globalization support to identify the Attunity SQLServer-CDC for SSIS.chm for the workspace. For more information, see Globalization Settings. |
|
|
Specifies the Attunity SQLServer-CDC for SSIS.chm used by a field whose data type is defined as
The default is |
Modeling
The Modeling parameters are not applicable with OracleAS Adapter for Tuxedo.
Query Processor
The Query Processor parameters are not applicable for use with OracleAS Adapter for Tuxedo.
Parallel Processing
The Parallel Processing parameters are not applicable for use with OracleAS Adapter for Tuxedo.
Transactions
The Transactions parameters are not applicable for use with OracleAS Adapter for Tuxedo.
XML
The following table lists the parameters that define XML support:
Table 8-5 XML Category Parameters
| Parameter | Description |
|---|---|
|
Specifies the maximum size of an XML document held in memory. The default is |
|
|
Specifies the maximum size of an XML document passed to another computer. The default is Note: When you increase this value for this property, you may need to increase the value for the Maximum XML in memory property in the daemon. For more information on daemons, see Control. |
|
|
Enter the maximum size of the internal communications buffer. The default value ( |
|
|
Enter the date format to use for XML. The options are:
|
|
|
Select this to replace invalid XML characters with a |
|
|
Select this to enable padded spaces to be trimmed from XML string columns when the record format is fixed. By default this is selected, and padded spaces are trimmed for fixed size character columns. If you do not want this behavior, clear this check box. |
Migration Considerations
You can migrate an adapter configuration from one platform to another. The configuration information is stored in the Oracle Connect repository on the source platform and is exported to an XML file which can then be imported to the target platform. Note that when migrating a configuration, file names and paths that are specific to the source platform must be changed to valid files on the target platform.
Perform the following steps to migrate an adapter configuration using Oracle Studio:
-
From the Start menu, select Programs, Oracle, and then select Studio.
-
In the Configuration Explorer, right-click the required computer and select Export XML definitions.
-
Specify the path and name of the XML file, which stores the XML representation and complete configuration.
-
Edit any paths in the XML definition to the paths required on the target platform. For example, the setting for the
serverLogFileproperty might need changing, depending on the platform. -
Set up the target platform in Oracle Studio in the same way you set up the source platform. For more information, see Configuring OracleAS Adapters for Tuxedo in Oracle Studio.
-
In the Configuration Explorer, right-click the target computer and select Import XML definitions.
-
Import the XML file to the target platform.
Security Considerations
Oracle Connect works within the confines of the legacy platform security system. In addition, Oracle Connect provides the following security components:
-
A binary XML encryption mechanism, which is activated as follows:
-
The client's first message to the server includes a pre-defined shared key, including the key name and value in the connection string. The server gets the key value for the key name passed from the client from the native object store (NOS).
-
The server generates a random 128-bit RC4 session key which is returned encrypted to the client, using the shared key. If no predefined shared key is provided, then a predefined, hard coded key is used (this key is hard coded on the client and on the server).
-
Passwords are always encrypted when passed over the wire, using an RC4, 128-bit session key, regardless of whether the entire session is encrypted or not.
-
If a predefined shared key was provided, then the entire session is encrypted. Otherwise, only the password exchange is encrypted (using the hard coded key).
-
-
Credentials: Passwords and OracleAS Adapters exchanged over the network are encrypted using a pre-defined, hard coded, 128-bit RC4 session key.
-
Design Time: Security within Oracle Studio to grant access to Oracle Studio itself and to grant access to computers, user profiles and workspaces.
-
Runtime: Security used to access Tuxedo, including controlling the daemon for the access.
Setting Design Time Security
Set the design time security as described in the following sections:
-
Securing access to Oracle Studio is described in Setting Password Access to Oracle Studio.
-
Securing rights to configure a computer in Oracle Studio is described in Specifying Users with Administrative Rights.
-
Securing access to user profiles is accomplished by right-clicking the relevant user profile in Oracle Studio and selecting Change Master Password. In the dialog box that is displayed, specify a password that must be provided in the future to edit the specific user profile.
-
Securing access to workspaces is accomplished by right-clicking the relevant workspace in Oracle Studio and selecting Set Authorization. In the dialog box that is displayed, specify a valid user and password that must be provided in the future to edit the specific workspace.
Setting Run-Time Security
During Attunity SQLServer-CDC for SSIS.chm, security considerations are implemented as follows:
-
When the client request accesses the legacy platform through the daemon, either anonymous access is allowed or a valid user name and password must be provided for the computer in the user profile. The OracleAS Adapter and password properties in the J2CA 1.5 Tuxedo adapter are used at this stage to access the daemon.
Note:
The user name used to access the daemon must also be the name of a user profile used. -
Access by the client must be through a valid port, according to the list of ports specified in the Workspace Access section of the Workspace Security tab in Oracle Studio. For more information, see Workspace Security.
Note:
Access to the legacy platform through a firewall using the NAT protocol is specified when the computer is added to Oracle Studio. -
To be allocated a server process, the client must be granted anonymous access to the workspace or be listed in the Workspace Users section of the Workspace Security tab in Oracle Studio. For more information, see Workspace Security.
-
The ability to run commands on the daemon, such as starting or stopping a daemon or ending server processes is available only to administrators who have been registered in Oracle Connect as a daemon administrator. A client is registered as a valid daemon administrator in the Daemon Security tab in Oracle Studio, as described in Daemon Security.
Note:
You can also specify administrators who can run commands only at the level of the workspace. Specify these administrators in the Workspace Security tab, as described in Security.
Encrypting Network Communications
The encryption protocol between the client and the server is defined on the client computer.
Perform the following steps to encrypt network communications:
-
Right-click the binding in Oracle Studio Design perspective Configuration view, and select Open.
-
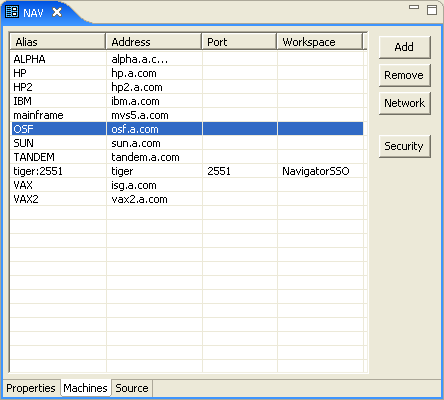
Select the Machines tab.
The Machines tab of the Binding editor is displayed, as shown in the following figure:
-
Select the client machine, and click Network.
The Network Settings screen is displayed.
-
Select the required encryption protocol from the Encryption Protocol list, and then click OK.
After specifying the encryption protocol, you must specify which servers the client is going to communicate with using the specified encryption protocol.
Perform the following steps to set the server computer for encrypted communications:
-
Right-click the user profile in the Configuration explorer and select Edit User.
-
In the User editor, select the client machine and click Add.
-
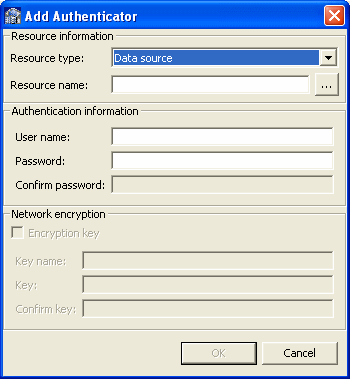
Configure the authenticator parameters as follows:
-
Resource type: Specify the resource type as Remote machine.
-
Resource name: Specify the communication to the machine is encrypted in the following format:
enckey: machine_namewhere
machine_nameis the machine to which you are connecting. -
User name: Specify the name associated with the encryption password and which the daemon on the remote machine looks up.
Multiple clients may specify this name in their user profile. In this case, the user profile on the remote machine must list only this one OracleAS Adapter/password entry for network encryption (rather than listing and looking up multiple OracleAS Adapter/password pairs).
If this user name entry is not specified, the daemon on the remote machine uses the name of the currently active user profile.
-
Password: Specify the password that is required to pass or access encrypted information over the network.
-
-
Click OK.
The server computer must also be configured to decipher the encrypted information using an encryption key.
Perform the following steps to set the encryption key on the server computer:
-
Select the server machine in the Oracle Studio Design perspective Configuration explorer.
-
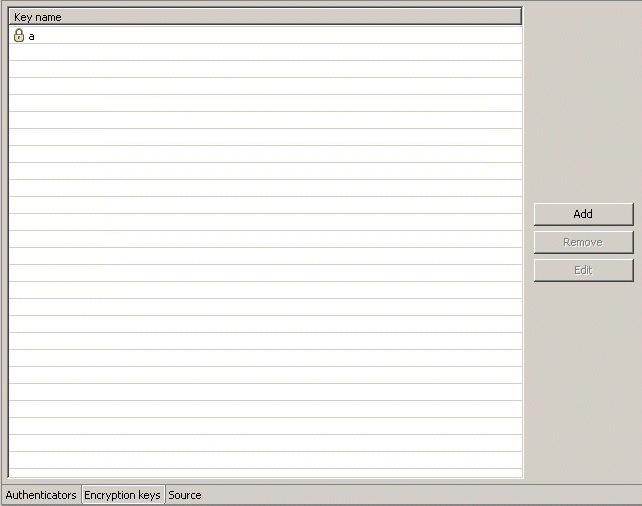
Right-click the user profile and select Edit User. The User editor is displayed.In the User editor, select the Encryption Key tab, shown in the following figure:
-
Click Add.
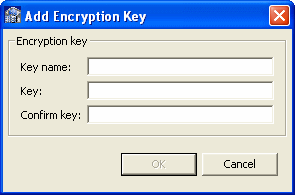
The Add Encryption Key screen is displayed, as shown in the following figure:
-
Configure the encryption key parameters as follows:
-
Key name: Enter the name associated with the encryption password and which the daemon on this machine looks up. -
Key: Enter the encryption key. -
Confirm key: Re-enter the encryption key.
-
-
Click OK.
-
In the explorer tree, expand the Daemons folder.
-
Right-click the daemon managing the connection and select Open.Select the Security tab.
-
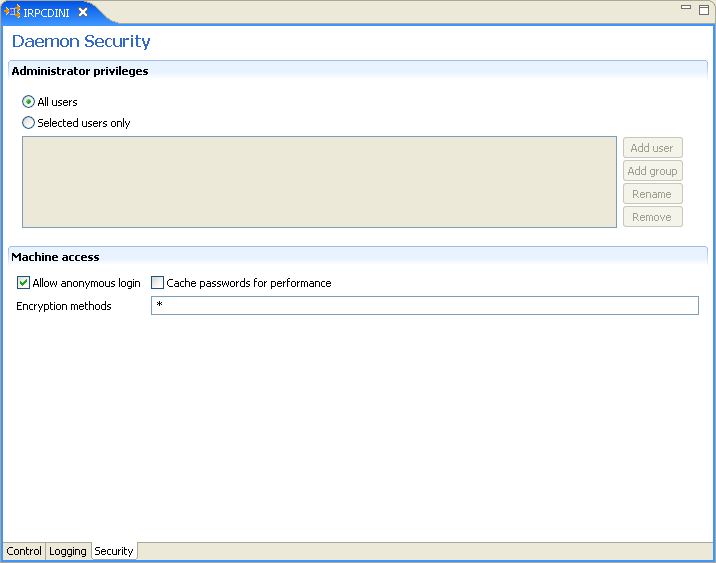
In the Machine access area, enter RC4 in the Encryption methods field.
The Daemon Security tab is shown in the following figure:
Transaction Support
Note:
The information in this section refers to the Tuxedo and Tuxedo Queue adapters only. the Tuxedo Gateway adapter can support two-phase commit transactions. for more information, see Configuring the Transactional Gateway Process.OracleAS Adapter for Tuxedo can participate in a distributed transaction, as the only one-phase commit resource. It supports local transactions by responding to ACX transactional verbs and issuing the corresponding ATMI transactional calls. The back-end service is responsible for the transaction semantics and implementation.
Transactional APIs included in the application, such as starting or committing a transaction, are mapped by OracleAS Adapter for Tuxedo to the corresponding Tuxedo transactional call. The adapter is also equipped with means to limit the Tuxedo transaction duration (timeout).
The following table maps the functionality of ACX transaction verbs to equivalent ATMI transaction calls.
Table 8-6 ACX-ATMI Transaction Correspondence.
| ACX Transactional Verbs | ATMI Transactional Call | Comment |
|---|---|---|
|
|
Transaction duration can be specified within the adapter definitions. |
|
|
|
||
|
|
|
See Also:
Advanced Tuning of the Metadata for further details about transaction support configuration parameters.