E Editing XML Files in Oracle Studio
In many cases you must manually edit the metadata to configure parts of a solution or composition. Metadata is created in XML format. You define aspects of a solution by changing the values of the elements and attributes of the XML files that belong to the solution. Oracle Studio provides a graphical interface where you can define the various aspects of a solution. This interface lets you make changes easily without having to manually edit the XML file.
Preparing to Edit XML Files in Oracle Studio
You can edit XML files for the following items in Oracle Studio:
-
Machines
-
Bindings.
-
Daemons
-
Users
When you open an XML file, a graphical representation of the file is opened in the editor. The editor displays the elements and attributes in the file in the first column and their corresponding values in the second column. Each entry has an icon that indicates whether the entry is an element or an attribute. Click the Source tab to view the file in its native format. The following figure is an example of the editor's view of an XML file.
Do the following to edit an XML file in Oracle Studio
-
In the Design perspective, open the Navigator view.
-
In the Navigator view, find the item with the XML file to edit. This can be a machine, binding, daemon, or user.
-
Right-click the item and select Open as XML. A graphical list of the file's elements and attributes opens in the editor.
-
Find the element or attribute (property) to change.
-
Click in the right column next to the property you are changing and edit or add the value.
-
Save the file, then select it again in the Project Explorer and press F5 to refresh.
The XML file is updated automatically.
Making Changes to the XML File
You can also make the following changes to XML files in Oracle Studio:
Remove Objects
You can delete an element, attribute, or other object from the XML file.
Do the following to remove an object
-
Right-click an object from the list in the editor.
-
Select Remove.
Add DTD Information
You can add DTD information to an element or attribute.
Do the following to add DTD Information
-
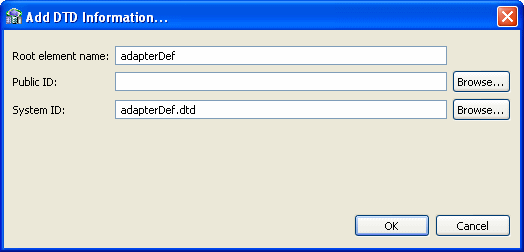
Right-click an element or attribute and select Add DTD Information. The Add DTD Information dialog box opens.
-
Enter the information requested in the dialog box. The following table describes the Add DTD Information dialog box.
Field Description Root element name
The name of the XML root element.
Public ID
The value in this field is the Public Identifier. It is used to associate the XML file (using an XML catalog entry) with a DTD file by providing a hint to the XML processor.
Click Browse to select an XML catalog entry from a list. An XML Catalog entry contains two parts, a Key (which represents a DTD or XML schema) and a URI (which contains information about a DTD or XML schema's location). Select the catalog entry you want to associate with your XML file.
System ID
The value in this field is the DTD the XML file is associated with. You can change the DTD the file is associated with by editing this field. The XML processor trys to use the Public ID to locate the DTD, and if this fails, it uses the System ID to find it.
Click Browse to select a system ID. You can this in two ways:
-
Select the file from the workbench. In this case, update the with the import dialog box.
-
Select an XML catalog entry.
-
-
Save the file, then select it again in the Project Explorer and press F5 to refresh.
The XML file is updated automatically.
Edit Namespaces
You can make changes to the namespaces associated with an element or attribute.
Do the following to edit namespaces
-
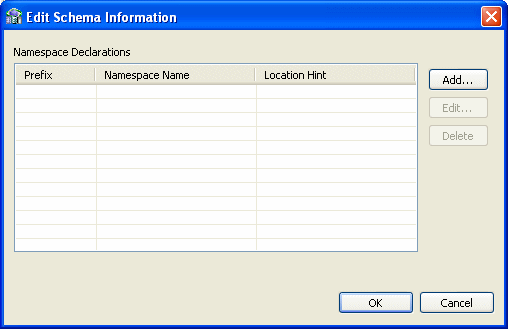
Right-click an element or attribute and select Edit namespaces. The Edit Schema Information dialog box opens.
-
Click a button to make any changes to this information.
Do the following to add a new namespace
-
From the Schema Information dialog box, click Add.
-
The Add Namespace Definitions dialog box opens. Select one of the following:
-
Select from registered namespaces. This selection is available when the dialog box opens. Select from the list of registered namespaces and then click OK. If no registered namespaces are available, the list is empty.
-
Specify new namespace. Enter the information described in the following table:
Field Description Prefix
The prefix is added to all qualified elements and attributes in the XML file.
Namespace Name
The namespace of the XML file.
Location Hint
The location of the XML schema of the XML file. An XML Catalog ID or a URI can be entered in this field.
Click Browse to search for the schema you want You can this in two ways:
-
Select the schema from the workbench. In this case, update the with the import dialog box.
-
Select an XML catalog entry.
The Namespace Name and Prefix fields are be filled with the appropriate values from the schema (you must leave the fields blank for this to occur).
Note: If you are creating an XML file from an XML schema, you cannot change the Namespace Name or Location Hint values.
-
-
-
From the Schema Information dialog box, click Edit.
-
Enter the information in the fields.
Add Elements and Attributes
You can add additional elements and attributes to the XML file.
Do the following to add Elements and Attributes
-
Right-click an element.
-
Select one of the following:
-
Add Attribute to add an attribute under the selected element.
-
Add Child to add another element under the selected element
-
Add Before to add another element above the selected element
-
Add After to add another element below the selected element
-
-
Provide a name for the element or attribute if required. You may also select the element from a submenu. The element or attribute is added to the file.
-
Save the file, then select it again in the Project Explorer and press F5 to refresh.
The XML file is updated automatically.
Replace an Element
You can replace an element with another legal element.
Do the following to replace an element
-
Right-click an element from the list in the editor.
-
Select Replace with.
-
Select an element from the submenu. Only legal elements are available.
-
The original element is replaced with the selected element.


