5 Defining SQL Queries Using View Objects
This chapter describes how to use the Create View Object wizard and various dialogs to join, filter, sort, and aggregate data for use in the application.
This chapter includes the following sections:
-
Section 5.2, "Populating View Object Rows from a Single Database Table"
-
Section 5.4, "Limiting View Object Rows Using Effective Date Ranges"
-
Section 5.5, "Working with Multiple Tables in Join Query Results"
-
Section 5.6, "Working with Multiple Tables in a Master-Detail Hierarchy"
-
Section 5.7, "Working with a Single Table in a Recursive Master-Detail Hierarchy"
-
Section 5.8, "Working with View Objects in Declarative SQL Mode"
-
Section 5.12, "Working with List of Values (LOV) in View Object Attributes"
-
Section 5.13, "Defining Attribute Control Hints for View Objects"
-
Section 5.14, "Adding Calculated and Transient Attributes to a View Object"
5.1 Introduction to View Objects
A view object is an Oracle ADF component that encapsulates a SQL query and simplifies working with its results. There are several types of view objects that you can create in your ADF Business Components project:
-
Read-only view objects when updates to data are not necessary (may be entity-based)
-
Entity-based view objects when data updates will be performed
-
Static data view objects for data defined by the view object itself
-
Programmatically populated view objects (for more information, see Chapter 39, "Advanced View Object Techniques")
An entity-based view object can be configured to support updatable rows when you create view objects that map their attributes to the attributes of one or more existing entity objects. The mapped entity object is saved as an entity usage in the view object definition. In this way, entity-based view object cooperate automatically with entity objects to enable a fully updatable data model. The entity-based view object queries just the data needed for the client-facing task and relies on its mapped entity objects to automatically validate and save changes made to its view rows. Like the read-only view object, an entity-based view object encapsulates a SQL query, it can be linked into master-detail hierarchies, and it can be used in the data model of your application modules.
5.1.1 Overview of View Object Concepts
View objects with no entity usage definition are always read-only. They do not pick up entity-derived default values, they do not reflect pending changes, and they do not reflect updated reference information. In contrast to entity-based view objects, read-only view objects require you to write the query using the SQL query language. The Create View Object wizard and overview editor for entity-based view objects, on the other hand, simplify this task by helping you to construct the SQL query declaratively. For this reason, it is almost always preferable to create a non-updatable, entity-mapped view object, even when you want to create a view object just to read data. Additionally, as an alternative to creating view objects that specify a SQL statement at design time, you can create entity-mapped view objects that dynamically generate SQL statements at runtime.
There remain a few situations where it is still preferable to create a non-entity-mapped view object to read data, including SQL-based validation, Unions, and Group By queries.
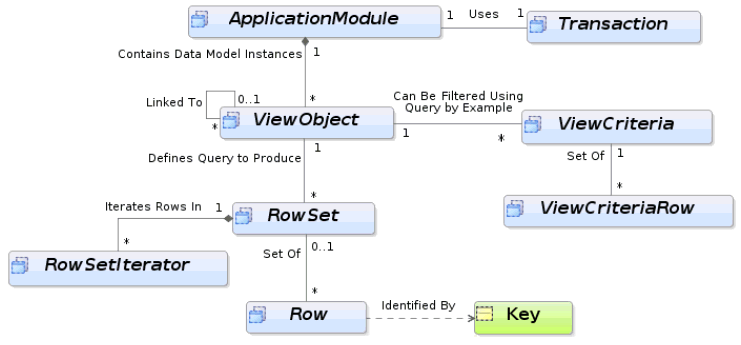
This chapter helps you understand these view object concepts as illustrated in Figure 5-1:
-
You define a view object by providing a SQL query (either defined explicitly or declaratively).
-
You use view object instances in the context of an application module that provides the database transaction for their queries.
-
You can link a view object to one or more others to create master-detail hierarchies.
-
At runtime, the view object executes your query and produces a set of rows (represented by a
RowSetobject). -
Each row is identified by a corresponding row key.
-
You iterate through the rows in a row set using a row set iterator.
-
You can filter the row set a view object produces by applying a set of Query-by-Example criteria rows.
5.1.2 Runtime Features Unique to Entity-Based View Objects
When a view object has one or more underlying entity usages, you can create new rows, and modify or remove queried rows. The entity-based view object coordinates with underlying entity objects to enforce business rules and to permanently save the changes to the database. In addition, entity-based view objects provide these capabilities that do not exist with read-only view objects:
-
Changes in cache (updates, inserts, deletes) managed by entities survive the view object's execution boundary
-
Changes made to relevant entity object attributes through other view objects in the same transaction are immediately reflected
-
Attribute values of new rows are initialized to the values from the underlying entity object attributes
-
Changes to foreign key attribute values cause reference information to get updated
-
Validation for row (entity) level is supported
-
Composition feature, including validation, locking, ordered-updates is supported
-
Support for effective dating, change indicator, and business events
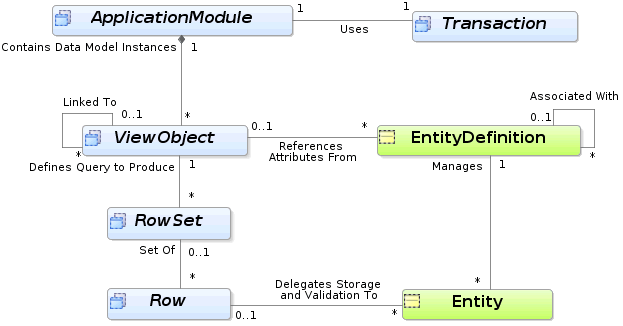
This chapter explains how instances of entity-based view objects contained in the data model of your application module enable clients to search for, update, insert, and delete business domain layer information in a way that combines the full data shaping power of SQL with the clean, object-oriented encapsulation of reusable domain business objects. And all without requiring a line of code.This chapter helps you to understand these entity-based view object concepts as illustrated in Figure 5-2:
-
You define an updatable view object by referencing attributes from one or more entity objects.
-
You can use multiple, associated entity objects to simplify working with reference information.
-
You can define view links based on underlying entity associations.
-
You use your entity-based view objects in the context of an application module that provides the transaction.
-
At runtime, the view row delegates the storage and validation of its attributes to underlying entity objects.
5.2 Populating View Object Rows from a Single Database Table
View objects provide the means to retrieve data from a data source. In the majority of cases, the data source will be a database and the mechanism to retrieve data is the SQL query. ADF Business Components can work with JDBC to pass this query to the database and retrieve the result.
When view objects use a SQL query, query columns map to view object attributes in the view object. The definition of these attributes, saved in the view object's XML definition file, reflect the properties of these columns, including data types and precision and scale specifications.
Performance Tip:
If the query associated with the view object contains values that may change from execution to execution, use bind variables. Using bind variables in the query allows the query to reexecute without needing to reparse the query on the database. You can add bind variables to the view object in the Query page of the overview editor for the view object. For more information, see Section 5.10, "Working with Bind Variables."Using the same Create View Object wizard, you can create view objects that either map to the attributes of existing entity objects or not. Only entity-based view objects automatically coordinate with mapped entity objects to enforce business rules and to permanently save data model changes. Additionally, you can disable the Updatable feature for entity-based view objects and work entirely declaratively to query read-only data. Alternatively, you can use the wizard or editor's expert mode to work directly with the SQL query language, but the view object you create will not support the transaction features of the entity-based view object.
While there is a small amount of runtime overhead associated with the coordination between view object rows and entity object rows, weigh this against the ability to keep the view object definition entirely declarative and maintain a customizable view object. Queries that cannot be expressed in entity objects, and that therefore require expert-mode query editing, include Unions and Group By queries. Expert mode-based view objects are also useful in SQL-based validation queries used by the view object-based Key Exists validator. Again, it is worth repeating that, by definition, using expert mode to define a SQL query means the view object must be read-only.
For more information about the differences between entity-based view objects and read-only view objects, see Section 5.1.2, "Runtime Features Unique to Entity-Based View Objects."
5.2.1 How to Create an Entity-Based View Object
Creating an entity-based view object is the simplest way to create a view object. It is even easier than creating an expert-mode, read-only view object, since you don't have to type in the SQL statement yourself. An entity-based view object also offers significantly more runtime functionality than its expert-mode counterpart.
In an entity-based view object, the view object and entity object play cleanly separated roles:
-
The view object is the data source: it retrieves the data using SQL.
-
The entity object is the data sink: it handles validating and saving data changes.
Because view objects and entity objects have cleanly separated roles, you can build a hundred different view objects — projecting, filtering, joining, sorting the data in whatever way your user interfaces require, application after application — without any changes to the reusable entity object. In fact, it is possible that the development team responsible for the core business domain layer of entity objects might be completely separate from another team responsible for the specific application modules and view objects needed to support the end-user environment. This relationship is enabled by metadata that the entity-based view object encapsulates. The metadata specifies how the SELECT list columns are related to the attributes of one or more underlying entity objects.
Your entity-based view object may be based on more than one database table. To use database joins to add multiple tables to the view object, see Section 5.5, "Working with Multiple Tables in Join Query Results."
5.2.1.1 Creating an Entity-Based View Object from a Single Table
To create an entity-based view object, use the Create View Object wizard, which is available from the New Gallery.
Create the desired entity objects as described in Section 4.2.1, "How to Create Multiple Entity Objects and Associations from Existing Tables."
To create an entity-based view object from a single table:
-
In the Application Navigator, right-click the project in which you want to create the view object and choose New.
-
In the New Gallery, expand Business Tier, select ADF Business Components and then View Object, and click OK.
If this is the first component you're creating in the project, the Initialize Business Components Project dialog appears to allow you to select a database connection.
-
In the Initialize Business Components Project dialog, select the database connection or choose New to create a connection. Click OK.
-
In the Create View Object wizard, on the Name page, enter a package name and a view object name. Keep the default setting Updatable access through entity objects enabled to indicate that you want this view object to manage data with its base entity object. Click Next.
-
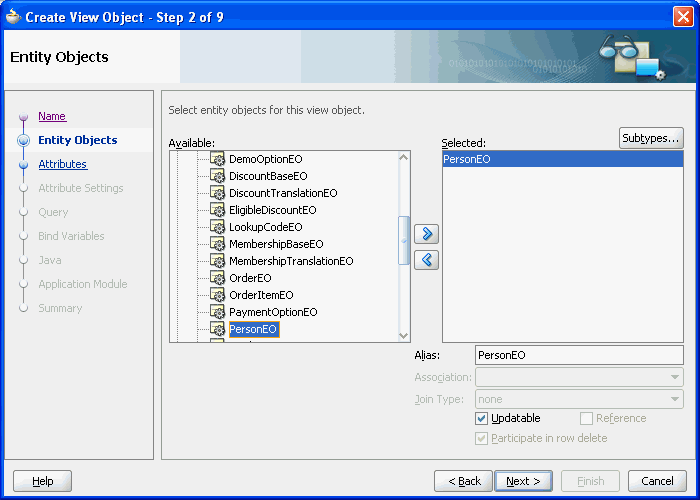
On the Entity Objects page, select an entity object whose data you want to use in the view object. Click Next.
An entry in this list is known as an entity usage, since it records the entity objects that the view object will be using. Each entry could also be thought of as an entity reference, since the view object references attributes from that entity. For information about working table joins to create additional entity usages, see Section 5.5, "Working with Multiple Tables in Join Query Results."
For example, Figure 5-3 shows the result after shuttling the
PersonEOentity object into the Selected list. -
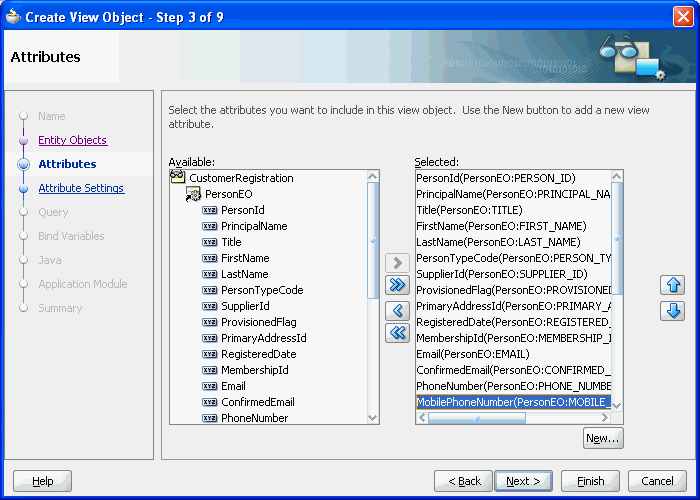
On the Attributes page, select the attributes you want to include from each entity usage in the Available list and shuttle them to the Selected list. Click Next.
For example, Figure 5-4 shows the attributes have been selected from the
PersonEO. -
On the Attribute Settings page, optionally, use the Select Attribute dropdown list to switch between the view object attributes in order to change their names or any of their initial settings.
For more information about any of the attribute settings, press F1 or click Help.
-
On the Query page, optionally, add a
WHEREandORDER BYclause to the query to filter and order the data as required. JDeveloper automatically generates the SELECT statement based on the entity attributes you've selected.Do not include the
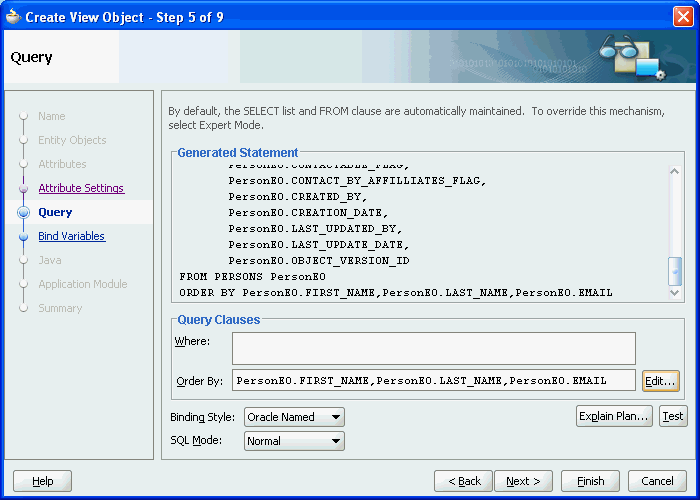
WHEREorORDER BYkeywords in the Where and Order By field values. The view object adds those keywords at runtime when it executes the query.For example, Figure 5-5 shows the
ORDER BYclause is specified to order the data by first name, last name, and email. -
When you are satisfied with the view object, click Finish.
5.2.1.2 Creating a View Object with All the Attributes of an Entity Object
When you want to allow the client to work with all of the attributes of an underlying entity object, you can use the Create View Object wizard as described in Section 5.2.1.1, "Creating an Entity-Based View Object from a Single Table." After selecting the entity object, simply select all of its attributes on the Attributes page. However, for this frequent operation, there is an even quicker way to perform the same task in the Application Navigator.
Create the desired entity objects as described in Section 4.2.1, "How to Create Multiple Entity Objects and Associations from Existing Tables."
To create a default entity-based view object:
-
In the Application Navigator, right-click the entity object and choose New Default View Object.
-
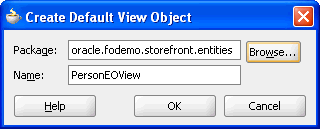
Provide a package and component name for the new view object in the Create Default View Object dialog.
In the Create Default View Object dialog you can click Browse to select the package name from the list of existing packages. For example, in Figure 5-6, clicking Browse locates
oracle.fodemo.storefront.entiespackage on the classpath for theStoreFrontServiceproject in theStoreFrontModuleapplication.
The new entity-based view object created will be identical to one you could have created with the Create View Object wizard. By default, it will have a single entity usage referencing the entity object you selected in the Application Navigator, and will include all of its attributes. It will initially have neither a WHERE nor ORDER BY clause, and you may want to use the overview editor for the view object to:
-
Remove unneeded attributes
-
Refine its selection with a
WHEREclause -
Order its results with an
ORDER BYclause -
Customize any of the view object properties
5.2.2 What Happens When You Create an Entity-Based View Object
When you create a view object, JDeveloper creates the XML component definition file that represents the view object's declarative settings and saves it in the directory that corresponds to the name of its package. For example, the view object Orders, added to the queries package, will have the XML file ./queries/Orders.xml created in the project's source path.
To view the view object settings, expand the desired view object in the Application Navigator, select the XML file under the expanded view object, and open the Structure window. The Structure window displays the list of definitions, including the SQL query, the name of the entity usage, and the properties of each attribute. To open the file in the editor, double-click the corresponding .xml node.
Note:
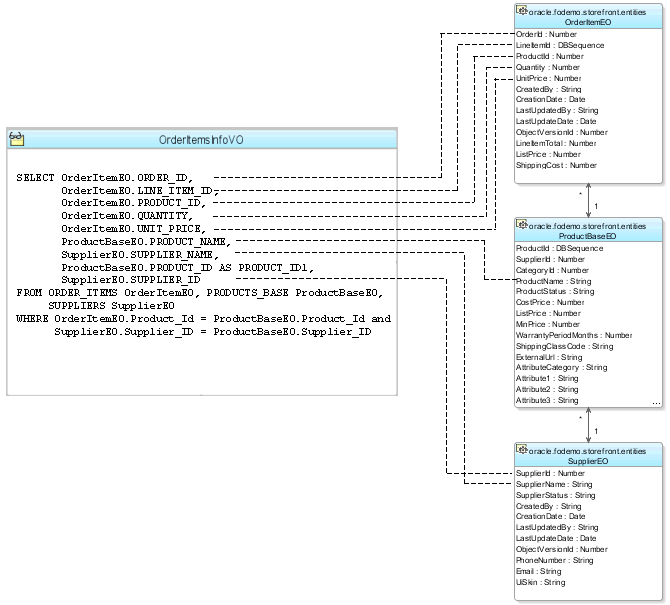
If your IDE-level Business Components Java generation preferences so indicate, the wizard may also create an optional custom view object classOrdersImpl.java and/or a custom view row class OrdersRowImpl.java class.Figure 5-7 depicts the entity-based view object OrderItemsInfoVO and the three entity usages referenced in its query statement. The dotted lines represent the metadata captured in the entity-based view object's XML component definition that map SELECT list columns in the query to attributes of the entity objects used in the view object. The query of the entity-based view object joins data from a primary entity usage (OrderItemEO) with that from secondary reference entity usages (ProductBaseEO and SupplierEO).
5.2.3 How to Create an Expert Mode, Read-Only View Object
When you need full control over the SQL statement, the Create View Object wizard lets you specify that you want a view object to be read-only. In this case, you will not benefit from the declarative capabilities to define a non-updatable entity-based view object. However, there are a few situations where it is desirable to create read-only view objects using expert mode. Primarily, the read-only view object that you create will be useful when you need to write Unions or Group By queries. Additionally, you can use a read-only view object if you need to create SQL-based validation queries used by the view object-based Key Exists validator, provided that you have marked a key attribute.
For more information about the tradeoffs between working with entity-based view objects that you define as non-updatable and strictly read-only view objects, see Section 39.2.2, "Consider Using Entity-Based View Objects for Read-Only Data."
To create a read-only view object, use the Create View Object wizard, which is available from the New Gallery.
To create a read-only view object:
-
In the Application Navigator, right-click the project in which you want to create the view object and choose New.
-
In the New Gallery, expand Business Tier, select ADF Business Components and then View Object, and click OK.
If this is the first component you're creating in the project, the Initialize Business Components Project dialog appears to allow you to select a database connection.
-
In the Initialize Business Components Project dialog, select the database connection or choose New to create a connection. Click OK.
-
In the Create View Object wizard, on the Name page, enter a package name and a view object name. Select Read-only access through SQL query to indicate that you want this view object to manage data with read-only access. Click Next.
-
On the Query page, use one of the following techniques:
-
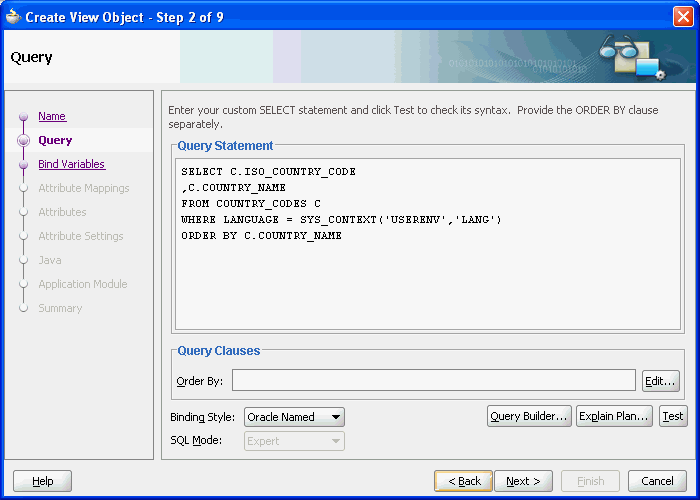
Paste any valid SQL statement into the Query Statement box. The query statement can use a
WHEREclause and anOrder Byclause. For example, Figure 5-8 shows a query statement that uses aWHEREclause and anOrder Byclause to query a list of country codes in the language used by the application. -
Click Query Builder to open the SQL Statement dialog and use the interactive query builder.
Note:
If the Entity Objects page displays instead of the Query page, go back to Step 1 of the wizard and ensure that you've selected Read-only Access.
-
-
After entering or building the query statement, click Next.
-
On the Bind Variables page, do one of the following:
-
If the query does not reference any bind variables, click Next to skip Step 3.
-
To add a bind variable and work with it in the query, see Section 5.10.1, "How to Add Bind Variables to a View Object Definition."
-
-
On the Attribute Mappings page, click Finish.
Note:
In the ADF Business Components wizards and editors, the default convention is to use camel-capped attribute names, beginning with a capital letter and using uppercase letters in the middle of the name to improve readability when the name comprises multiple words.5.2.4 What Happens When You Create a Read-Only View Object
When you create a view object, JDeveloper first parses the query to infer the following from the columns in the SELECT list:
-
The Java-friendly view attribute names (for example,
CountryNameinstead ofCOUNTRY_NAME)By default, the wizard creates Java-friendly view object attribute names that correspond to the
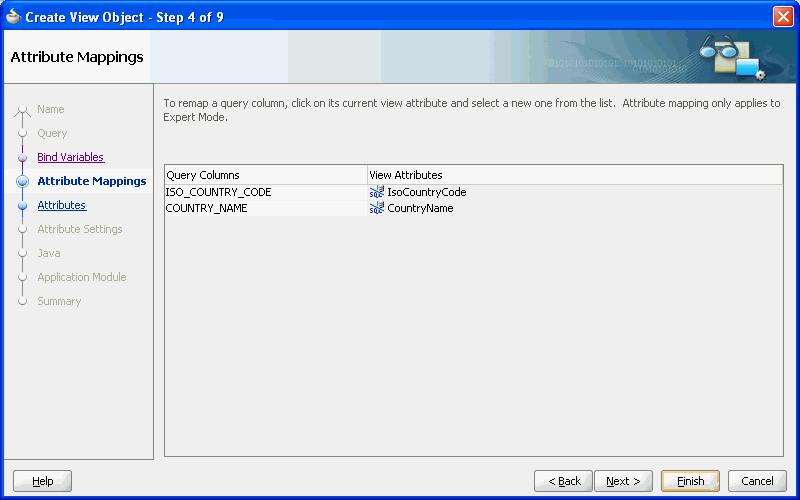
SELECTlist column names, as shown in Figure 5-9.For information about using view object attribute names to access the data from any row in the view object's result set by name, see Section 6.4, "Testing View Object Instances Programmatically."
-
The SQL and Java data types of each attribute
Each part of an underscore-separated column name like SOME_COLUMN_NAME is turned into a camel-capped word (like SomeColumnName) in the attribute name. While the view object attribute names correspond to the underlying query columns in the SELECT list, the attribute names at the view object level need not match necessarily.
Tip:
You can rename the view object attributes to any names that might be more appropriate without changing the underlying query.JDeveloper then creates the XML component definition file that represents the view object's declarative settings and saves it in the directory that corresponds to the name of its package. For example, the XML file created for a view object named CountriesVO in the lookups package is ./lookups/CountriesVO.xml under the project's source path.
To view the view object settings, expand the desired view object in the Application Navigator, select the XML file under the expanded view object, and open the Structure window. The Structure window displays the list of definitions, including the SQL query, the name of the entity usage, and the properties of each attribute. To open the file in the editor, double-click the corresponding .xml node.
Note:
If your IDE-level Business Components Java generation preferences so indicate, the wizard may also create an optional custom view object classCountriesVOImpl.java and/or a custom view row class CountriesVORowImpl.java class.5.2.5 How to Edit a View Object
After you've created a view object, you can edit any of its settings in the overview editor for the view object.
Performance Tip:
How you configure the view object to fetch data plays a large role in the runtime performance of the view object. For information about the tuning parameters that you can edit to optimize performance, see Section 6.3.10, "What You May Need to Know About Optimizing View Object Runtime Performance."To edit a view object definition:
-
In the Application Navigator, double-click the view object to open the overview editor.
-
Select a navigation tab to open any editor page where you can adjust the SQL query, change the attribute names, add named bind variables, add UI controls hints, control Java generation options, and edit other settings.
5.2.5.1 Overriding the Inherit Properties from Underlying Entity Object Attributes
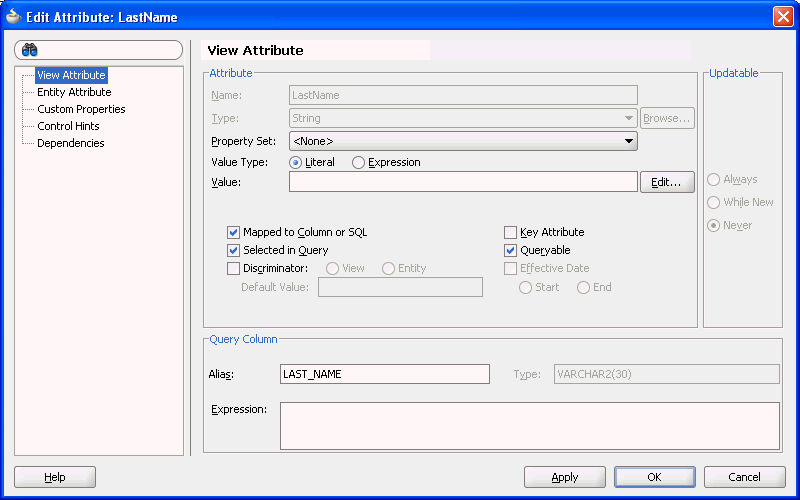
One interesting aspect of entity-based view objects is that each attribute that relates to an underlying entity object attribute inherits that attribute's properties. Figure 5-10 shows the Edit Attribute dialog with the inherited attribute selected. You can see that fields like the Java attribute type and the query column type are disabled and their values are inherited from the related attribute of the underlying entity object to which this view object is related. Some properties like the attribute's data type are inherited and cannot be changed at the view object level.
Other properties like Queryable and Updatable are inherited but can be overridden as long as their overridden settings are more restrictive than the inherited settings. For example, the attribute from underlying entity object might have an Updatable setting of Always. As shown Figure 5-10, the Edit Attribute dialog allows you to set the corresponding view object attribute to a more restrictive setting like While New or Never. However, if the attribute in the underlying entity object had instead an Updatable setting of Never, then the editor would not allow the view object's related attribute to have a less restrictive setting like Always.
5.2.5.2 Controlling the Length, Precision, and Scale of View Object Attributes
When you display a particular attribute of the view object in the Edit Attribute dialog, you can see and change the values of the declarative settings that control its runtime behavior. One important property is the Type in the Query Column section, shown in Figure 5-10. This property records the SQL type of the column, including the length information for VARCHAR2 columns and the precision and scale information for NUMBER columns.
JDeveloper tries to infer the type of the column automatically, but for some SQL expressions the inferred value might default to VARCHAR2(255). You can update the Type value for this type of attribute to reflect the correct length if you know it. In the case of read-only view objects, this property is editable in the Edit Attribute dialog you display from the overview editor for the view object. In the case of entity-based view objects, you must edit the Type property in the Edit Attribute dialog that you display for the entity object, as described in Section 4.10.2, "How to Indicate Data Type Length, Precision, and Scale."
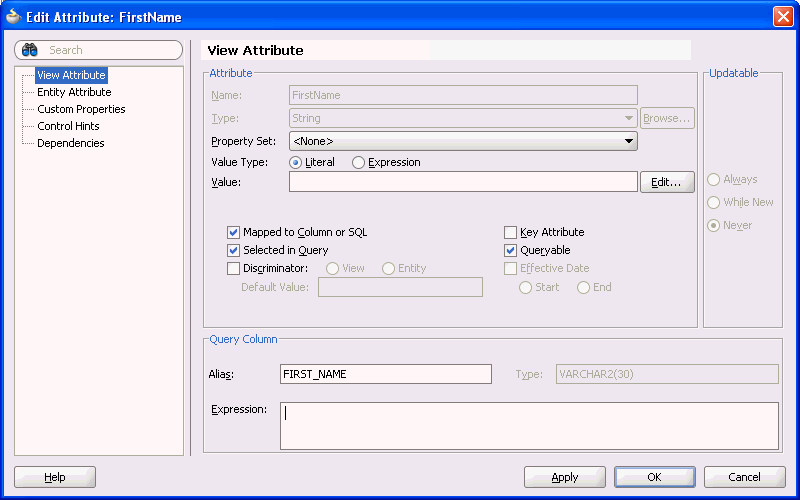
For example, VARCHAR2(30) which shows as the Type for the FirstName attribute in Figure 5-11 means that it has a maximum length of 30 characters. For a NUMBER column, you would indicate a Type of NUMBER(7,2) for an attribute that you want to have a precision of 7 digits and a scale of 2 digits after the decimal.
Performance Tip:
Your SQL expression can control how long the describe from the database says the column is. Use theSUBSTR() function around the existing expression. For example, if you specify SUBSTR(yourexpression, 1, 15), then the describe from the database will inform JDeveloper that the column has a maximum length of 15 characters.5.2.5.3 Converting a Read-Only View Object to Allow Attribute Updates
When you use the Create View Object wizard to create a read-only view object, by default the attributes of the view object will not be updateable. Later you may decide to convert the view object to one that permits updates to its SQL-mapped table columns. However, this cannot be accomplished by merely changing the attribute's Updateable property. To convert a read-only view object to one that is updateable, you must add an entity usage that maps to the same table as the one used to create the read-only view object. Choosing an entity usage that defines the same table ensures that you can then remap the SQL-derived view attributes to entity usage attributes corresponding to the same table columns.
To modify a read-only view object to allow updates:
-
In the Application Navigator, double-click the read-only view object.
-
In the overview editor, click the Entity Objects navigation tab.
-
In the Entity Objects page, expand the Available list and double-click the entity object that describes the attributes of the read-only view object.
The entity object that you double-click will appear in the Selected list as an entity usage. You will need to remap the SQL-derived attributes to corresponding attributes defined by the entity usage.
-
Click the Query navigation tab, and in the Query page, click the Edit SQL Query button.
-
In the Edit Query dialog, click Query and then click Attribute Mappings.
-
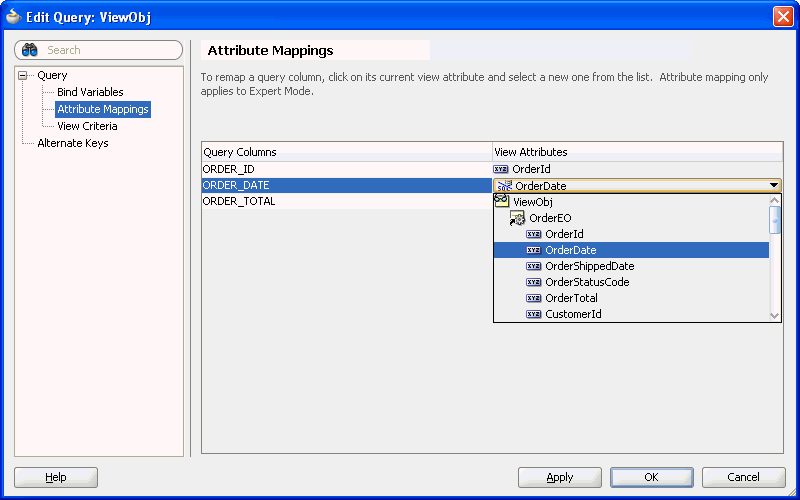
In the Attribute Mappings page, perform the following steps to convert all SQL-derived attributes to their corresponding entity usage mapped attribute.
-
Click an attribute field in the View Attributes column and scroll to the top of the dropdown list to locate the entity usage attributes.
-
In the entity usage attribute list, select the attribute corresponding to the read-only attribute that you want to remap, as shown in Figure 5-10.
-
-
Click OK.
5.2.5.4 Customizing View Object Attribute Display in the Overview Editor
When you edit view objects in the overview editor, you can customize the Attributes page of the overview editor to make better use of the attributes table displayed for the view object.
Customization choices that you make for the attributes table include the list of attribute properties to display as columns in the attributes table, the order that the columns appear (from left to right) in the attributes table, the sorting order of the columns, and the width of the columns. The full list of columns that you can choose to display correspond to the attribute properties that you might edit in the view object's Edit Attributes dialog.
For example, you can add the Updatable property as a column to display in the attributes table when you want to quickly determine which attributes of your view object are updatable. Or, you can add the attributes' Label property as a column and see the same description as the end user. Or, you might want to view the list of attributes based on their entity usages. In this case, you can display the Entity Usage column and sort the entire attributes table on this column.
When you have set up the attributes table with the list of columns that you find most useful, you can apply the same set of columns to the attributes table displayed for other view objects by right-clicking the attributes table and choose Apply to All View Objects.
To customize the attributes table display:
-
In the Application Navigator, double-click the view object.
-
In the overview editor, click the Attributes navigation tab.
-
In the Attributes page, click the dropdown menu to the right of the attribute column headers (just below the attributes table's button bar) and choose Select Columns.
-
In the Select Columns dialog, perform any of the following actions.
-
Click the left/right shuttle buttons to change the list of visible columns in the attributes table of the overview editor. The overview editor displays only those columns corresponding to the attribute properties that appear the Selected list.
-
Click one of the Move Selection buttons to change the position of the columns in the attributes table of the overview editor. The overview editor displays the attribute properties arranged from left to right starting with the property at the top of the Selected list.
-
-
Click OK.
-
On the Attributes page of the overview editor, perform any of the following actions.
-
Click any column header to sort all columns in the attributes table by the selected column.
This feature is particularly useful when you want to focus on a particular column. For example, in the case of an entity-based view object, you can click the Entity Usage column header to group attributes in the attributes table by their underlying entity objects. To save this setting across all view objects that you display in the overview editor, click the dropdown menu to the right of the column headers and choose Apply to All View Objects.
-
Click any column header border and drag to adjust the width of the attributes table's column.
-
Click the dropdown icon to the right of the column headers and select among the list of displayed columns to change the visibility of a column in the current attributes table display.
This feature lets you easily hide columns when you want to simplify the attributes table display in the current view object overview editor.
-
-
To extend the changes in the columns (including column list, column order, column sorting, and column width) to all other view object overview editors, click the dropdown menu to the right of the column headers and choose Apply to All View Objects.
This feature allows you to easily compare the same attributes across view objects. The overview editor will apply the column selections (and order) that you make in the Select Columns dialog and the current attributes table's column sorting and column widths to all view objects that you edit. View objects that are currently displayed in an open overview editor are not updated with these settings; you must close the open view object overview editor and then reopen the view object to see these settings applied.
5.2.5.5 Modifying the Order of Attributes in the View Object Source File
After you create a view object definition, you may decide to change the order of the attributes queried by the view object. This view object editing feature allows you to easily change the order that the attributes will appear in the attributes table displayed on the Attributes page of the view object overview editor. Because this feature acts on specific attributes and alters the XML definition of the current view object, it does not apply to other view objects that you may edit. Alternatively, you can sort the display of attributes on the Attribute page of the view object overview editor without affecting the source file by clicking any column header in the overview editor's attributes table.
To modify the order of attributes in the view object source file:
-
In the Application Navigator, double-click the view object.
-
In the overview editor, click the Attributes navigation tab and click Set Source Order.
-
In the Set Source Order dialog, select the attribute you want to reposition and click one of the Move Selection button.
-
Click OK.
This feature has no affect on other view objects that you may edit; it only affects the current view object.
5.2.6 How to Show View Objects in a Business Components Diagram
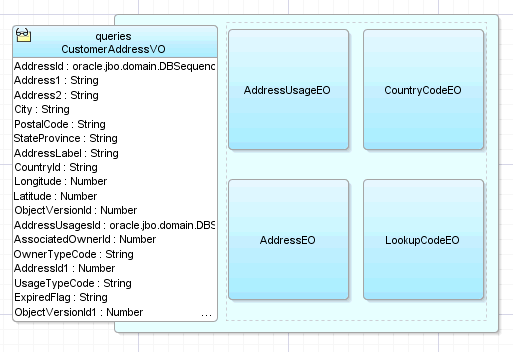
JDeveloper's UML diagramming lets you create a Business Components diagram to visualize your business domain layer. In addition to supporting entity objects, JDeveloper's UML diagramming allows you to drop view objects onto diagrams as well to visualize their structure and entity usages. For example, if you create a new Business Components Diagram named StoreFrontService Data Model in the oracle.fodemo.storefront package, and drag the CustomerAddressVO view object from the Application Navigator onto the diagram, its entity usages would display, as shown in Figure 5-13. When viewed as an expanded node, the diagram shows a compartment containing the view objects entity usages.
For information about creating the diagram, see Section 4.4, "Creating an Entity Diagram for Your Business Layer."
5.3 Populating View Object Rows with Static Data
ADF Business Components lets you create view objects in your data model project with rows that you populate at design time. Typically, you create view objects with static data when you have a small amount of data to maintain and you do not expect that data to change frequently. The decision whether to use a lookup table from the database or whether to use a static view object based on a list of hardcoded values depends on the size and nature of the data. The static view object is useful when you have no more than 100 entries to list. Any larger number of rows should be read from the database with a conventional table-based view object. The static view object has the advantage of being easily translatable. However, all of the rows of a static view object will be retrieved at once and therefore, using no more than 100 entries yields the best performance.
Best Practice:
When you need to create a view object to access a small list of static data, you should use the static view object rather than query the database. The static view object is ideal for lists not exceeding 100 rows of data. Because the Create View Object wizard saves the data in a resource message file, these data are easily translatable.Static list view objects are useful as an LOV data source when it is not desirable to query the database to supply the list of values. Suppose your order has the following statuses: open, closed, pending. You can create a static view object with these values and define an LOV on the static view object's status attribute. Because the wizard stores the values of the status view object in a translatable resource file, the UI will display the status values using the resource file corresponding to the application's current locale.
5.3.1 How to Create Static View Objects with Data You Enter
You use the Create View Object wizard to create static view objects. The wizard lets you define the desired attributes (columns) and enter as many rows of data as necessary. The wizard displays the static data table as you create it.
Note:
Because the data in a static view object does not originate in database tables, the view object will be read-only.You can also use the Create View Object wizard to create the attributes based on data from a comma-separated value (CSV) file format like a spreadsheet file. The wizard will attempt to create the attributes that you define in the wizard with data from the first row of the flat file.
To manually create attributes for a static view object:
-
In the Application Navigator, right-click the project in which you want to create the static list view object and choose New.
-
In the New Gallery, expand Business Tier, select ADF Business Components and then View Object, and click OK.
If this is the first component you're creating in the project, the Initialize Business Components Project dialog appears to allow you to select a database connection.
-
In the Initialize Business Components Project dialog, select the database connection or choose New to create a connection. Click OK.
-
In the Create View Object wizard, on the Name page, enter a package name and a view object name. Select Rows populated at design time (Static List) to indicate that you want to supply static list data for this view object. Click Next.
-
On the Attributes page, click New to add an attribute that corresponds to the columns in the static data table. In the New View Object Attribute dialog, enter a name and select the attribute type. Click OK to return to the wizard, and click Next.
-
On the Attribute Settings page, do nothing and click Next.
-
On the Static List page, click the Add icon to enter the data directly into the wizard page. The attributes you defined will appear as the columns for the static data table.
-
On the Application Module pages, do nothing and click Next.
-
On the Summary page, click Finish.
5.3.2 How to Create Static View Objects with Data You Import
Using the Import feature of the Create View Object wizard, you can create a static data view object with attributes based on data from a comma-separated value (CSV) file format like a spreadsheet file. The wizard will use the first row of a CSV flat file to identify the attributes and will use the subsequent rows of the CSV file for the data for each attribute. For example, if your application needs to display choices for international currency, you might define the columns Symbol, Country, and Description in the first row and then add rows to define the data for each currency type, as shown in Figure 5-14.
To create attributes of a static view object based on a flat file:
-
In the Application Navigator, right-click the project in which you want to create the static list view object and choose New.
-
In the New Gallery, expand Business Tier, select ADF Business Components and then View Object, and click OK.
If this is the first component you're creating in the project, the Initialize Business Components Project dialog appears to allow you to select a database connection.
-
In the Initialize Business Components Project dialog, select the database connection or choose New to create a connection. Click OK.
-
In the Create View Object wizard, on the Name page, enter a package name and a view object name. Select Rows populated at design time (Static List) to indicate that you want to supply static list data for this view object. Click Next.
-
On the Attributes page, optionally, click New to add an attribute that corresponds to the columns in the static data table. In the New View Object Attribute dialog, enter a name and select the attribute type. Click OK to return to the wizard, and click Next.
When the static data will be loaded from a CSV flat file, you can optionally skip this step. If you do not create the attributes yourself, the wizard will attempt to use the first row of the CSV file to create the attributes. However, if you create the attributes in the wizard, then the attributes you create must match the order of the columns defined by the flat file. If you have created fewer attributes than columns, the wizard will ignore extra columns during import. Conversely, if you create more attributes than columns, the wizard will define extra attributes with the value
NULL. -
On the Attribute Settings page, do nothing and click Next.
-
On the Static List page, click Import to locate the CSV file and display the data in the wizard. Verify the data and edit the values as needed.
To edit an attribute value, double-click in the value field.
-
Optionally, click the Add icon or Remove icon to change the number of rows of data. Click Next.
To enter values for the attributes of a new row, double-click in the value field.
-
On the Application Module page, do nothing and click Next.
-
On the Summary page, click Finish.
5.3.3 What Happens When You Create a Static List View Object
When you create a static view object, the overview editor for the view object displays the rows of data that you defined in the wizard. You can use the editor to define additional data, as shown in Figure 5-15.
The generated XML definition for the static view object contains one transient attribute for each column of data. For example, if you import a CSV file with data that describes international currency, your static view object might contain a transient attribute for Symbol, Country, and Description, as shown in Example 5-1.
Example 5-1 XML Definition for Static View Object
<ViewObject
...
// Transient attribute for first column
  <ViewAttribute
    Name="Symbol"
    IsUpdateable="false"
    IsSelected="false"
    IsPersistent="false"
    PrecisionRule="true"
    Precision="255"
    Type="java.lang.String"
    ColumnType="VARCHAR2"
    AliasName="Symbol"
    SQLType="VARCHAR"/>
// Transient attribute for second column
  <ViewAttribute
    Name="Country"
    IsUpdateable="false"
    IsPersistent="false"
    PrecisionRule="true"
    Precision="255"
    Type="java.lang.String"
    ColumnType="VARCHAR"
    AliasName="Country"
    SQLType="VARCHAR"/>
// Transient attribute for third column
  <ViewAttribute
    Name="Description"
    IsUpdateable="false"
    IsPersistent="false"
    PrecisionRule="true"
    Precision="255"
    Type="java.lang.String"
    ColumnType="VARCHAR"
    AliasName="Description"
    SQLType="VARCHAR"/>
  <StaticList
    Rows="4"
    Columns="3"/>
// Reference to file that contains static data
  <ResourceBundle>
    <PropertiesBundle
      PropertiesFile="model.ModelBundle"/>
  </ResourceBundle>
</ViewObject>
Because the data is static, the overview editor displays no Query page and the generated XML definition for the static view object contains no query statement. Instead, the <ResourceBundle> element in the XML definition references a resource bundle file. The resource bundle file describes the rows of data and also lets you localize the data. When the default resource bundle type is used, the file ModelNameBundle.properties appears in the data model project, as shown in Example 5-2.
Example 5-2 Default Resource Bundle File for Static View Object
model.ViewObj.SL_0_0=USD
model.ViewObj.SL_0_1=United States of America
model.ViewObj.SL_0_2=Dollars
model.ViewObj.SL_1_0=CNY
model.ViewObj.SL_1_1=P.R. China
model.ViewObj.SL_1_2=Yuan Renminbi
model.ViewObj.SL_2_0=EUR
model.ViewObj.SL_2_1=Europe
model.ViewObj.SL_2_2=Euro
model.ViewObj.SL_3_0=JPY
model.ViewObj.SL_3_1=Japan
model.ViewObj.SL_3_2=Yen
5.3.4 Editing Static List View Objects
When you need to make changes to the static list table, double-click the view object in the Application Navigator to open the overview editor for the view object. You can add and delete attributes (columns in the static list table), add or delete rows (data in the static list table), sort individual rows, and modify individual attribute values. The editor will update the view object definition file and save the attribute names in the message bundle file.
5.3.5 What You May Need to Know About Static List View Objects
The static list view object has a limited purpose in the application module's data model. Unlike entity-based view objects, static list view objects will not be updatable. You use the static list view object when you want to display read-only data to the end user and you do not want to create a database table for the small amount of data the static list table contains.
5.4 Limiting View Object Rows Using Effective Date Ranges
Applications that need to query data over a specific date range can generate date-effective row sets. To define an date-effective view object you must create an entity-based view object that is based on an date-effective entity object. User control over the view object's effective date usage is supported by metadata on the view object at design time. At runtime, ADF Business Components generates the query filter that will limit the view rows to an effective date.
5.4.1 How to Create an Date-Effective View Object
Whether or not the query filter for an effective date will be generated depends on the value of the Effective Dated property displayed in the Property Inspector for the view object (to view the property, select any tab in the overview editor for the view object other than Attributes).
Note:
Because the date-effective view object must be based on an date-effective entity object, setting a view object's Effective Dated property to True without an underlying date-effective entity object, will result in a runtime exception.The overview editor for the view object does not display the date-effective query clause in the WHERE clause. You can use the Explain Plan dialog or Test Query dialog to view the clause. A typical query filter for effective dates looks like this:
(:Bind_SysEffectiveDate BETWEEN Person.EFFECTIVE_START_DATE AND Person.EFFECTIVE_END_DATE)
At runtime, the bind value for the query is obtained from a property of the root application module. In order to set the effective date for a transaction, use code similar to the following snippet:
am.setProperty(ApplicationModule.EFF_DT_PROPERTY_STR, new Date("2008-10-01));
If you do not set EFF_DT_PROPERTY_STR on the application module, the current date is used in the query filter, and the view object returns the effective rows filtered by the current date.
The view object has its own transient attribute, SysEffectiveDate, that you can use to set the effective date for view rows. Otherwise, the SysEffectiveDate attribute value for new rows and defaulted rows is derived from the application module. ADF Business Components propagates the effective date from the view row to the entity object during DML operations only.
-
Create an effective dated entity object as described in Section 4.2.8, "How to Store Data Pertaining to a Specific Point in Time."
-
Use the Create View Object wizard to create the entity-based view object as described in Section 5.2.1, "How to Create an Entity-Based View Object."
The view object you create should be based on the effective dated entity object you created. In the Attributes page of the wizard, be sure to add the date-effective attributes that specify the start date and end date on the entity object to the Selected list for the view object.
To enable effective dates for a view object using the SysEffectiveDate attribute:
-
In the Application Navigator, double-click the view object you created based on the effective dated entity object.
-
In the overview editor, click the General navigation tab.
-
In the Property Inspector, expand the Name category.
If the Name category is not displayed in the Property Inspector, click the General navigation tab in the overview editor to set the proper focus.
-
Verify that the context menu for the Effective Dated property displays True.
-
In the overview editor, click the Attributes navigation tab and double-click the attribute for the start date.
-
In the Edit Attribute dialog, verify that Effective Date is enabled and that Start is selected, as shown in Figure 5-16. Verify that the attribute for the end date is also enabled correctly, as shown in the figure. Note that these fields appear grayed out to indicate that they cannot be edited for the view object.
-
Click OK.
No additional steps are required once you have confirmed that the view object has inherited the desired attributes from the date-effective entity object.
5.4.2 How to Create New View Rows Using Date-Effective View Objects
Creating (inserting) date-effective rows is similar to creating or inserting ordinary view rows. The start date and end date can be specified as follows:
-
The user specifies the effective date on the application module. The start date is set to the effective date, and the end date is set to end of time.
-
The user specifies values for the start date and the end date (advanced).
In either case, during entity validation, the new row is checked to ensure that it does not introduce any gaps or overlaps. During post time, ADF Business Components will acquire a lock on the previous row to ensure that the gap or overlaps are not created upon the row insert.
5.4.3 How to Update Date-Effective View Rows
You can update view rows by using API calls like Row.setAttribute(). ADF Business Components supports various modes to initiate the row update.
To set the update mode, invoke the Row.setEffectiveDateMode(int mode) method with one of the following mode constants.
-
CORRECTION(Correction Mode)The effective start date and effective end dates remain unchanged. The values of the other attributes may change. This is the standard row update behavior.
-
UPDATE(Update Mode)The effective end date of the row will be set to the effective date. All user modifications to the row values are reverted on this row. A new row with the modified values is created. The effective start date of the new row is set to the effective date plus one day, and the effective end date is set to end of time. The new row will appear after the transaction is posted to the database.
-
UPDATE_OVERRIDE(Update Override Mode)The effective end date of the modified row will be set to the effective date. The effective start date of the next row is set to effective date plus one day.
-
UPDATE_CHANGE_INSERT(Change Insert Mode)The effective end date of the modified row should be set to the effective date. All user modifications to the row values are reverted on this row. A new row with the modified values will be created. The effective start date of the new row is set to effective date plus one day, and the effective end date is set to effective start date of the next row minus one day. The new row will appear after the transaction is posted to the database.
5.4.4 How to Delete Date-Effective View Rows
ADF Business Components supports various modes to initiate the row deletion. You can mark view rows for deletion by using API calls like RowSet.removeCurrentRow() or Row.remove().
To set the deletion mode, invoke the Row.setEffectiveDateMode(int mode) method with one of the following mode constants.
-
DELETE(Delete Mode)The effective date of the row is set to the effective date. The operation for this row is changed from delete to update. All rows with the same noneffective date key values and with an effective start date greater than the effective date are deleted.
-
DELETE_NEXT_CHANGE(Delete Next Change Mode)The effective end date of the row is set to the effective end date of the next row with the same noneffective date key values. The operation for this row is changed from delete to update. The next row is deleted.
-
FUTURE_CHANGE(Delete Future Change Mode)The effective end date of the row is set to the end of time. The operation for this row is changed from delete to update. All future rows with the same noneffective date key values are deleted.
-
ZAP(Zap Mode)All rows with the same non-effective date key values are deleted.
The effective date mode constants are defined on the row interface as well.
5.4.5 What Happens When You Create a Date-Effective View Object
When you create an date-effective view object, the view object inherits the transient attribute SysEffectiveDate from the entity object to store the effective date for the row. Typically, the insert/update/delete operations modify the transient attribute while Oracle ADF decides the appropriate values for effective start date and effective end date.
The query displayed in the overview editor for the date-effective view object does not display the WHERE clause needed to filter the effective date range. To view the full query for the date-effective view object, including the WHERE clause, edit the query and click Explain Plan in the Edit Query dialog. The following sample shows a typical query and query filter for effective dates:
SELECT OrdersVO.ORDER_ID,        OrdersVO.CREATION_DATE,
       OrdersVO.LAST_UPDATE_DATE
FROM ORDERS OrdersVO
WHERE (:Bind_SysEffectiveDate BETWEEN OrdersVO.CREATION_DATE AND
                                      OrdersVO.LAST_UPDATE_DATE)
Example 5-3 shows sample XML entries that are generated when you create an date-effective view object.
Example 5-3 XML Definition for Date-Effective View Object
<ViewObject
...
// Property that enables date-effective view object.
  IsEffectiveDated="true">
  <EntityUsage
    Name="Orders1"
    Entity="model.OrdersDatedEO"
    JoinType="INNER JOIN"/>
// Attribute identified as the start date
  <ViewAttribute
    Name="CreationDate"
    IsNotNull="true"
    PrecisionRule="true"
    IsEffectiveStartDate="true"
    EntityAttrName="CreationDate"
    EntityUsage="Orders1"
    AliasName="CREATION_DATE"/>
// Attribute identified as the end date
  <ViewAttribute
    Name="LastUpdateDate"
    IsNotNull="true"
    PrecisionRule="true"
    IsEffectiveEndDate="true"
    EntityAttrName="LastUpdateDate"
    EntityUsage="Orders1"
    AliasName="LAST_UPDATE_DATE"/>
// The SysEffectiveDate transient attribute
  <ViewAttribute
    Name="SysEffectiveDate"
    IsPersistent="false"
    PrecisionRule="true"    Type="oracle.jbo.domain.Date"
    ColumnType="VARCHAR2"
    AliasName="SysEffectiveDate"
    Passivate="true"
    SQLType="DATE"/>
</ViewObject>
5.4.6 What You May Need to Know About Date-Effective View Objects and View LInks
Effective dated associations and view links allow queries to be generated that take the effective date into account. The effective date of the driving row is passed in as a bind parameter during the query execution.
While it is possible to create a noneffective dated association between two entities when using the Create Association wizard or Create View Link wizard, JDeveloper will by default make the association or link effective dated if one of the ends is effective dated. However, when the association or view link exists between an effective dated and a noneffective dated object, then at runtime ADF Business Components will inspect the effective dated nature of the view object or entity object before generating the query clause and binding the effective date. The effective date is first obtained from the driving row. If it is not available, then it is obtained from the property EFF_DT_PROPERTY_STR of the root application module. If you do not set EFF_DT_PROPERTY_STR for the application module, the current date is used in the query filter on the driving row and applied to the other side of the association or view link.
5.5 Working with Multiple Tables in Join Query Results
Many queries you will work with will involve multiple tables that are related by foreign keys. In this scenario, you join the tables in a single view object query to show additional descriptive information in each row of the main query result. You use the Create View Object wizard to define the query using declarative options. Whether your view object is read-only or entity-based determines how you can define the join:
-
When you work with entity-based view objects, the Create View Object wizard uses an existing association defined between the entities to automatically build the view object's join
WHEREclause. You can declaratively specify the type of join you want to result from the entity objects. Inner join (equijoin) and outer joins are both supported. -
When you work with read-only view objects, you will use the SQL Builder dialog to build the view object's join
WHEREclause. In this case, you must select the columns from the tables that you want to join.
Figure 5-17 illustrates the rows resulting from two tables queried by a view object that defines a join query. The join is a single flattened result.
5.5.1 How to Create Joins for Entity-Based View Objects
It is extremely common in business applications to supplement information from a primary business domain object with secondary reference information to help the end user understand what foreign key attributes represent. Take the example of the OrderItems entity object. It contains foreign key attribute of type Number like:
-
ProductId, representing the product to which the order item pertains
From experience, you know that showing an end user exclusively these "raw" numerical values won't be very helpful. Ideally, reference information from the view object's related entity objects should be displayed to improve the application's usability. One typical solution involves performing a join query that retrieves the combination of the primary and reference information. This is equivalent to populating "dummy" fields in each queried row with reference information based on extra queries against the lookup tables.
When the end user can change the foreign key values by editing the data, this presents an additional challenge. Luckily, entity-based view objects support easily including reference information that's always up to date. The key requirement to leverage this feature is the presence of associations between the entity object that act as the view object's primary entity usage and the entity objects that contribute reference information.
To include reference entities in a join view object, use the Create View Object wizard. The Create View Object wizard lets you specify the type of join:
-
Inner Join
Select when you want the view object to return all rows between two or more entity objects, where each entity defines the same primary key column. The inner join view object will not return rows when a primary key value is missing from the joined entities.
-
Outer Join
Select when you want the view object to return all rows that exist in one entity object, even though corresponding rows do not exist in the joined entity object. Both left and right outer join types are supported. The left and right designation refers to the source (left) and destination (right) entity object named in an association. For details about changing the default inner join to an outer join, see Section 5.5.5, "How to Modify a Default Join Clause to Be an Outer Join When Appropriate."
Both inner joins and outer joins are supported with the following options:
-
Reference
Select when you want the data from the entity object to be treated as reference information for the view object. Automatic lookup of the data is supported and attribute values will be dynamically fetched from the entity cache when a controlling key attribute changes.
-
Updatable
Deselect when you want to prevent the view object from modifying any entity attributes in the entity object. By default, the first entity object (primary) in the Selected list is updatable and subsequent entity objects (secondary) are not updatable. To understand how to create a join view object with multiple updatable entity usages, see Section 39.9, "Creating a View Object with Multiple Updatable Entities."
-
Participate in row delete
Select when you have defined the entity as updatable and you want the action of removing rows in the UI to delete the participating reference entity object. This option is disabled for the primary entity. For example, while it may be possible to delete an order item, it should not be possible to delete the order when a remove row is called from the join view object.
Create the desired entity objects as described in Section 4.2.1, "How to Create Multiple Entity Objects and Associations from Existing Tables."
To create a view object that joins entity objects:
-
In the Application Navigator, right-click the project in which you want to create the view object and choose New.
When you want to modify an existing view object that you created to include reference information from its related entity objects, double-click the view object and open the Entity Objects page in the overview editor for the view object.
-
In the New Gallery, expand Business Tier, select ADF Business Components and then View Object, and click OK.
-
In the Create View Object wizard, on the Name page, enter a package name and a view object name. Keep the default setting Updatable Access Through Entity Objects enabled to indicate that you want this view object to manage data with its base entity object. Click Next.
-
In the Entity Objects page, the first entity usage in the Selected list is known as the primary entity usage for the view object. Select the primary entity object from the Available list and shuttle it to the Selected list.
The list is not limited to a single, primary entity usage.
-
To add additional, secondary entity objects to the view object, select them in the Available list and shuttle them to the Selected list.
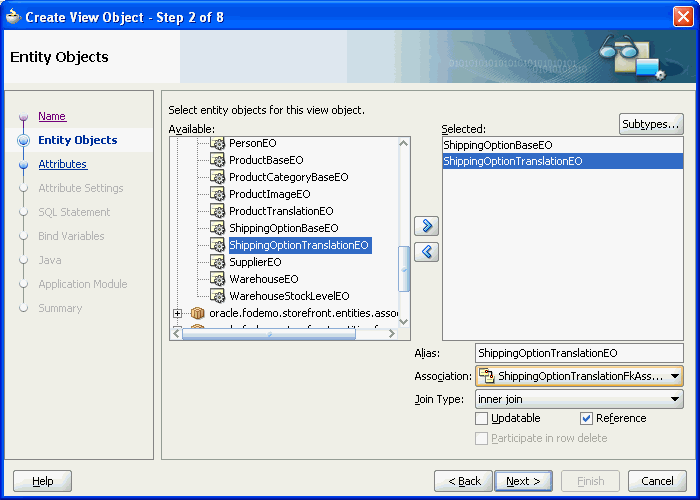
The Association dropdown list shows you the name of the association that relates the selected secondary entity usage to the primary one. For example, Figure 5-18 shows the result of adding one secondary reference entity usage,
ShippingOptionTranslationEO, in addition to the primaryShippingOptionBaseEOentity usage. The association that relates to this secondary entity usage isShippingOptionTranslationFkAssociation. -
Optionally, use the Alias field to give a more meaningful name to the entity usage when the default name is not clear.
-
If you add multiple entity usages for the same entity, use the Association dropdown list to select which association represents that usage's relationship to the primary entity usage. Click Next.
For each secondary entity usage, the Reference option is enabled to indicate that the entity provides reference information and that it is not the primary entity. The Updatable option is disabled. This combination represents the typical usage. However, when you want to create a join view object with multiple, updatable entity usages, see Section 39.9, "Creating a View Object with Multiple Updatable Entities."
Secondary entity usages that are updatable can also have the Participate in row delete option enabled. This will allow secondary entity attributes to appear
NULLwhen the primary entity is displayed. -
On the Attributes page, select the attributes you want each entity object usage to contribute to the view object. Click Next.
-
On the Attribute Settings page, you can rename an attribute when the names are not as clear as they ought to be.
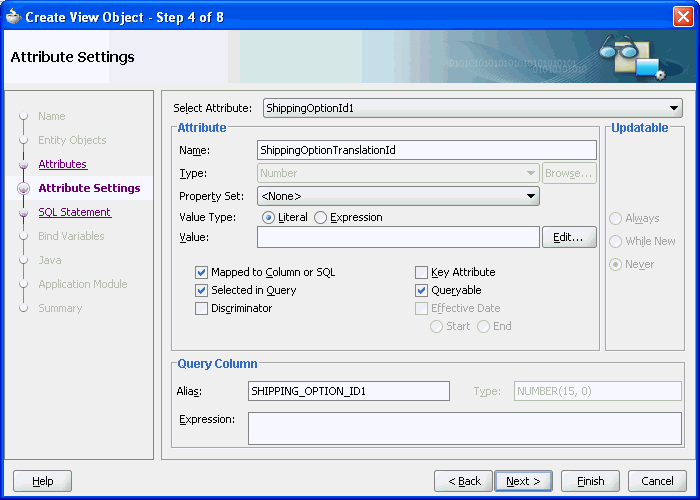
The same attribute name often results when the reference and secondary entity objects derive from the same table. Figure 5-19 shows the attribute
ShippingOptionId1in the Select Attribute dropdown list, which has been renamed toShippingOptionTranslationIdin the Name field. -
Click Finish.
5.5.2 How to Select Additional Attributes from Reference Entity Usages
After adding secondary entity usages, you can use the overview editor for the view object to select the specific, additional attributes from these new usages that you want to include in the view object.
Tip:
The overview editor lets you sort attributes displayed in the Attributes page by their entity usages. By default, the attributes table displays attributes in the order they appear in the underlying entity object. To sort the attributes by entity usage, click the header for the Entity Usage column of the attributes table. If the Entity Usage column does not appear in the attributes table, click the dropdown menu icon on the top-right corner of the table (below the button bar) and choose Select Columns to add the column to the Selected list.To select attributes from a secondary entity usage:
-
In the Application Navigator, double-click the view object.
-
In the overview editor, click the Attributes navigation tab and click the Add from Entity button to view the list of available entity-derived attributes.
-
In the Attributes dialog, select the desired attribute and add it to the Selected list.
Note that even if you didn't intend to include them, JDeveloper automatically verifies that the primary key attribute from each entity usage is part of the Selected list. If it's not already present in the list, JDeveloper adds it for you. When you are finished, the overview editor Query page shows that JDeveloper has included the new columns in the
SELECTstatement. -
Click OK.
5.5.3 How to Remove Unnecessary Key Attributes from Reference Entity Usages
The view object attribute corresponding to the primary key attribute of the primary entity usage acts as the primary key for identifying the view row. When you add secondary entity usages, JDeveloper marks the view object attributes corresponding to their primary key attributes as part of the view row key as well. When your view object consists of a single updatable primary entity usage and a number of reference entity usages, the primary key attribute from the primary entity usage is enough to uniquely identify the view row. Further key attributes contributed by secondary entity usages are not necessary and you should disable their Key Attribute settings.
For example, based on the view object with primary entity usage ShippingOptionEO, you could disable the Key Attribute property for the ShippingOptionTranslationEO entity usage so that this property is no longer selected for this additional key attribute: ShippingTranslationsId.
To remove unnecessary key attributes:
-
In the Application Navigator, double-click the view object.
-
In the overview editor, click the Attributes navigation tab.
-
In the Attributes page, in the attributes table, select the key attribute (identified by the key icon in the Name column), and click the Edit selected attribute(s) button.
-
In the View Attribute page of the Edit Attribute dialog, deselect the Key Attribute property.
-
Click OK.
5.5.4 How to Hide the Primary Key Attributes from Reference Entity Usages
Since you generally won't want to display the primary key attributes that were automatically added to the view object, you can set the attribute's Display Hint property in the Control Hints page of the Edit Attribute dialog to Hide.
To hide the primary key attribute:
-
In the Application Navigator, double-click the view object.
-
In the overview editor, click the Attributes navigation tab.
-
In the Attributes page, in the attributes table, select the primary key attribute (identified by the key icon in the Name column), and click the Edit selected attribute(s) button.
-
In the Control Hints page of the Edit Attribute dialog, select Hide in the Display Hint dropdown list.
-
Click OK.
5.5.5 How to Modify a Default Join Clause to Be an Outer Join When Appropriate
When you add a secondary entity usage to a view object, the entity usage is related to an entity usage that precedes it in the list of selected entities. This relationship is established by an entity association displayed in the Association dropdown list in the Entity Objects page of the overview editor for the view object. You use the Association dropdown list in the editor to select the entity association that relates the secondary entity usage to the desired preceding entity usage in the Selected list. The name of the preceding entity usage is identified in the Source Usage dropdown list.
When JDeveloper creates the WHERE clause for the join between the table for the primary entity usage and the tables for related secondary entity usages, by default it always creates inner joins. You can modify the default inner join clause to be a left or right outer join when appropriate. The left designation refers to the source entity object named in the selected association. This is the entity identified in the Source Usage dropdown list. The right designation refers to the current secondary entity usage that you have selected in the Selected list.
In the left outer join, you will include all rows from the left table (related to the entity object named in the Source Usage list) in the join, even if there is no matching row from the right table (related to the current secondary entity object selection). The right outer join specifies the reverse scenario: you will include all rows from the right table (related to the entity object named in the Source Usage list) in the join, even if there is no matching row from the left table (related to the current secondary entity object selection).
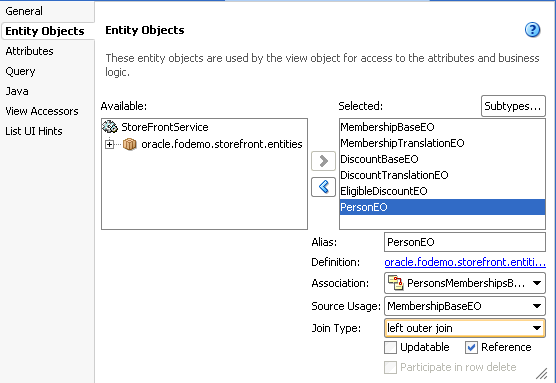
For example, assume that a person is not yet assigned a membership status. In this case, the MembershipId attribute will be NULL. The default inner join condition will not retrieve these persons from the MEMBERSHIPS_BASE table. Assuming that you want persons without membership status to be viewable and updatable through the MembershipDiscountsVO view object, you can use the Entity Objects page in the overview editor for the view object to change the query into an left outer join to the MEMBERSHIPS_BASE table for the possibly null MEMBERSHIP_ID column value. When you add the person entity to the view object, you would select the left outer join as the join type. As shown in Figure 5-20, the association PersonsMembershipsBaseFkAssoc identifies a source usage MembershipBaseEO on the left side of the join and the selected PersonEO entity usage on the right side. The view object MembershipDiscountsVO joins the rows related to both of these entity objects and defines a left outer join for PersonEO to allow the view object to return rows from the table related to MembershipBaseEO even if they do not have a match in the table related to PersonEO.
The view object's updated WHERE clause includes the addition (+) operator on the right side of the equals sign for the related table whose data is allowed to be missing in the left outer join:
PersonEO.MEMBERSHIP_ID = MembershipBaseEO.MEMBERSHIP_ID(+)
Create the desired entity objects and associations as described in Section 4.2.1, "How to Create Multiple Entity Objects and Associations from Existing Tables."
To change an inner join type to an outer join:
-
In the Application Navigator, double-click the view object.
-
In the overview editor, click the Entity Objects navigation tab.
The entity object you select represents the table on the right side of the join.
-
In the Entity Objects page, in the Selected list, select the entity object that you want to change the join type for.
The entity object you select represents the table on the right side of the join.
-
In the Association dropdown list, if only one association is defined, leave it selected; otherwise, select among the list of entity object associations that relate the secondary entity object to the desired entity object. The entity usage that represents the joined table will be displayed in the Source Usage dropdown list.
The entity object in the Source Usage dropdown list that you choose through the association selection represents the table on the left side of the join.
-
In the Join Type dropdown list, decide how you want the view object to return rows from the joined entity objects:
-
left outer join will include rows from the left table in the join, even if there is no matching row from the right table.
-
right outer join will include rows from the right table in the join, even if there is no matching row from the left table.
The Source Usage dropdown list is the left side of the join and the current entity usage in the Selected list is the right side.
-
5.5.6 What Happens When You Reference Entities in a View Object
When you create a join view object to include secondary entity usages by reference, JDeveloper updates the view object's XML component definition to include information about the additional entity usages. For example, the ShippingOptionsVO.xml file for the view object includes an additional reference entity usage. You will see this information recorded in the multiple <EntityUsage> elements. For example, Example 5-0 shows an entity usage entry that defines the primary entity usage.
Example 5-4 Primary Entity Usage
<EntityUsage
   Name="ShippingOptionBaseEO"
   Entity="oracle.fodemo.storefront.entities.ShippingOptionBaseEO"/>
The secondary reference entity usages will have a slightly different entry, including information about the association that relates it to the primary entity usage, like the entity usage shown in Example 5-0.
Example 5-5 Secondary Reference Entity Usage
<EntityUsage
   Name="ShippingOptionTranslationEO"
   Entity="oracle.fodemo.storefront.entities.ShippingOptionTranslationEO"
   Association="oracle.fodemo.storefront.entities.associations.
                    ShippingOptionTranslationFkAssoc"
   AssociationEnd="oracle.fodemo.storefront.entities.associations.
                    ShippingOptionTranslationFkAssoc.ShippingOptionTranslation"
   SourceUsage="oracle.fodemo.storefront.store.queries.ShippingOptionsVO.
                    ShippingOptionBaseEO"
   ReadOnly="true"
   Reference="true"/>
Each attribute entry in the XML file indicates which entity usage it references. For example, the entry for the ShippingOptionId attribute in Example 5-0 shows that it's related to the ShippingOptionBaseEO entity usage, while the ShippingMethod attribute is related to the ShippingOptionTranslationEO entity usage.
Example 5-6 Entity Usage Reference of View Object Attribute
   <ViewAttribute
      Name="ShippingOptionId"
      IsNotNull="true"
      EntityAttrName="ShippingOptionId"
      EntityUsage="ShippingOptionBaseEO"
      AliasName="SHIPPING_OPTION_ID" >
   </ViewAttribute>
...
   <ViewAttribute
      Name="ShippingMethod"
      IsUpdatable="true"
      IsNotNull="true"
      EntityAttrName="ShippingMethod"
      EntityUsage="ShippingOptionTranslationEO"
      AliasName="SHIPPING_METHOD" >
   </ViewAttribute>
The Create View Object wizard uses this association information at design time to automatically build the view object's join WHERE clause. It uses the information at runtime to enable keeping the reference information up to date when the end user changes foreign key attribute values.
5.5.7 How to Create Joins for Read-Only View Objects
To create a read-only view object joining two tables, use the Create View Object wizard.
To create a read-only view object joining two tables:
-
In the Application Navigator, right-click the project in which you want to create the view object and choose New.
-
In the New Gallery, expand Business Tier, select ADF Business Components and then View Object, and click OK.
-
In the Initialize Business Components Project dialog, select the database connection or choose New to create a connection. Click OK.
-
In the Create View Object wizard, on the Name page, enter a package name and a view object name. Select Read-only access through SQL query to indicate that you want this view object to manage data with read-only access. Click Next.
-
On the Query page, use one of the following techniques to create the SQL query statement that joins the desired tables:
-
Paste any valid SQL statement into the Query Statement box.
-
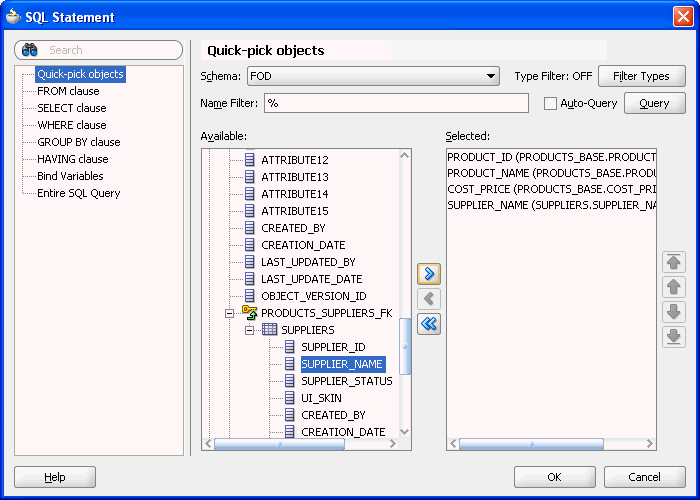
Click Query Builder to open the SQL Statement dialog and use the interactive query builder, as described in Section 5.5.9, "How to Use the Query Builder with Read-Only View Objects."
-
-
After entering or building the query statement, click Next.
-
On the Bind Variables page, do one of the following:
-
If the query does not reference any bind variables, click Next to skip Step 3.
-
To add a bind variable and work with it in the query, see Section 5.10.1, "How to Add Bind Variables to a View Object Definition."
-
-
On the Attribute Mappings page, click Finish.
5.5.8 How to Test the Join View
To test the new view object, edit the application module and on the Data Model page add an instance of the new view object to the data model. Then, use the Business Component Browser to verify that the join query is working as expected. For details about editing the data model and running the Business Component Browser, see Section 6.3, "Testing View Object Instances Using the Business Component Browser."
5.5.9 How to Use the Query Builder with Read-Only View Objects
The Quick-pick objects page of the SQL Statement dialog lets you view the tables in your schema, including the foreign keys that relate them to other tables. To include columns in the select list of the query, shuttle the desired columns from the Available list to the Selected list. For example, Figure 5-21 shows the result of selecting the PRODUCT_ID, PRODUCT_NAME, and COST_PRICE columns from the PRODUCTS table, along with the SUPPLIER_NAME column from the SUPPLIERS table. The column from the second table appears, beneath the PRODUCTS_SUPPLIERS_FK foreign key in the Available list. When you select columns from tables joined by a foreign key, the query builder automatically determines the required join clause for you.
Optionally, use the WHERE clause page of the SQL Statement dialog to define the expression. To finish creating the query, click OK in the SQL Statement dialog. The Edit Query dialog will show a query like the one shown in Example 5-7.
Example 5-7 Creating a Query Using SQL Builder
SELECT
    PRODUCTS_BASE.PRODUCT_ID PRODUCT_ID,
    PRODUCTS_BASE.PRODUCT_NAME PRODUCT_NAME,
    PRODUCTS_BASE.COST_PRICE COST_PRICE,
    SUPPLIERS.SUPPLIER_NAME SUPPLIER_NAME
FROM
    PRODUCTS_BASE JOIN SUPPLIERS USING (SUPPLIER_ID)
You can use the Attributes page of the Create View Object wizard to rename the view object attribute directly as part of the creation process. Renaming the view object here saves you from having to edit the view object again, when you already know the attribute names that you'd like to use. As an alternative, you can also alter the default Java-friendly name of the view object attributes by assigning a column alias, as described in Section 5.9.2, "How to Name Attributes in Expert Mode."
5.6 Working with Multiple Tables in a Master-Detail Hierarchy
Many queries you will work with will involve multiple tables that are related by foreign keys. In this scenario, you can create separate view objects that query the related information and then link a "source" view object to one or more "target" view objects to form a master-detail hierarchy.
There are two ways you might handle this situation. You can either:
-
Create a view link that defines how the source and target view objects relate.
-
Create a view link based on an association between entity objects when the source and target view objects are based on the underlying entity objects' association.
In either case, you use the Create View Link wizard to define the relationship.
Figure 5-22 illustrates the multilevel result that master-detail linked queries produce.
5.6.1 How to Create a Master-Detail Hierarchy for Read-Only View Objects
When you want to show the user a set of master rows, and for each master row a set of coordinated detail rows, then you can create view links to define how you want the master and detail view objects to relate. For example, you could link the Persons view object to the Orders view object to create a master-detail hierarchy of customers and the related set of orders they have placed.
To create the view link, use the Create View Link wizard.
Create the desired read-only view objects as described in Section 5.2.3, "How to Create an Expert Mode, Read-Only View Object."
To create a view link between read-only view objects:
-
In the Application Navigator, right-click the project in which you want to create the view object and choose New.
-
In the New Gallery, expand Business Tier, select ADF Business Components and then View Link, and click OK.
-
In the Create View Link wizard, on the Name page, enter a package name and a view link name. For example, given the purpose of the view link, a name like
OrdersPlacedByis a valid name. Click Next. -
On the View Objects page, select a "source" attribute from the view object that will act as the master.
For example, Figure 5-23 shows the
CustomerIdattribute selected from thePersonsVOview object to perform this role. Click Next. -
On the View Objects page, select a corresponding destination attribute from the view object that will act as the detail.
For example, if you want the detail query to show orders that were placed by the currently selected customer, select the
OrdersIdattribute in theOrdersVOto perform this role. -
Click Add to add the matching attribute pair to the table of source and destination attribute pairs below. When you are finished defining master and detail link, click Next.
Figure 5-23 shows just one (
CustomerId,OrderId) pair. However, if you require multiple attribute pairs to define the link between master and detail, repeat the steps for the View Objects page to add additional source-target attribute pairs. -
On the View Link Properties page, you can use the Accessor Name field to change the default name of the accessor that lets you programmatically access the destination view object.
By default, the accessor name will match the name of the destination view object. For example, you might change the default accessor name
OrdersVO1toCustomerOrdersto better describe the master-detail relationship that the accessor defines. -
Also on the View Link Properties page, you control whether the view link represents a one-way relationship or a bidirectional one.
By default, a view link is a one-way relationship that allows the current row of the source (master) to access a set of related rows in the destination (detail) view object. For example, in Figure 5-24, the checkbox settings indicate that you'll be able to access a detail collection of rows from the
Ordersfor the current row in thePersonsview object, but not vice versa. In this case, this behavior is specified by the checkbox setting in the Destination Accessor group box for theOrdersVOview object (the Generate Accessor In View Object: PersonsVO box is selected) and checkbox setting in the Source Accessor group box for thePersonsVOview object (the Generate Accessor In View Object: OrdersVO box is not selected). -
On the Edit Source Query page, preview the view link SQL predicate that will be used at runtime to access the master row in the source view object and click Next.
-
On the Edit Destination Query page, preview the view link SQL predicate that will be used at runtime to access the correlated detail rows from the destination view object for the current row in the source view object and click Next.
-
On the Application Module page, add the view link to the data model for the desired application module and click Finish.
By default the view link will not be added to the application module's data model. Later you can add the view link to the data model using the overview editor for the application module.
5.6.2 How to Create a Master-Detail Hierarchy for Entity-Based View Objects
Just as with read-only view objects, you can link entity-based view objects to other view objects to form master-detail hierarchies of any complexity. The only difference in the creation steps involves the case when both the master and detail view objects are entity-based view objects and their respective entity usages are related by an association. In this situation, since the association captures the set of source and destination attribute pairs that relate them, you create the view link just by indicating which association it should be based on.
To create an association-based view link, you use the Create View Link wizard.
Create the desired entity-based view objects as described in Section 5.2.1, "How to Create an Entity-Based View Object."
To create an association-based view link
-
In the Application Navigator, right-click the project in which you want to create the view object and choose New.
To avoid having to type in the package name in the Create View Link wizard, you can choose New View Link on the context menu of the links package node in the Application Navigator.
-
In the New Gallery, expand Business Tier, select ADF Business Components and then View Link, and click OK.
-
In the Create View Link wizard, on the Name page, supply a package and a component name.
-
On the View Objects page, in the Select Source Attribute tree expand the source view object in the desired package. In the Select Destination Attribute tree expand the destination view object.
For entity-based view objects, notice that in addition to the view object attributes, relevant associations also appear in the list.
-
Select the same association in both Source and Destination trees. Then click Add to add the association to the table below.
For example, Figure 5-25 shows the same
OrderItemsOrdersFkAssocassociation in both Source and Destination trees selected. -
Click Finish.
5.6.3 What Happens When You Create Master-Detail Hierarchies Using View Links
When you create a view link or an association-based view link, JDeveloper creates the XML component definition file that represents its declarative settings and saves it in the directory that corresponds to the name of its package. For example, if the view link is named OrderInfoToOrderItemsInfo and it appears in the queries.links package, then the XML file created will be ./queries/link/OrderInfoToOrderItemsInfo.xml under the project's source path. This XML file contains the declarative information about the source and target attribute pairs you've specified and, in the case of an association-based view link, contains the declarative information about the association that relates the source and target view objects you've specified.
In addition to saving the view link component definition itself, JDeveloper also updates the XML definition of the source view object in the view link relationship to add information about the view link accessor you've defined. As a confirmation of this, you can select the source view object in the Application Navigator and inspect its details in the Structure window. As shown in Figure 5-26, you can see the defined accessor in the ViewLink Accessors node for the OrderItemsInfoVO source view object of the OrderInfoToOrderItemsInfo view link.
Note:
A view link defines a basic master-detail relationship between two view objects. However, by creating more view links you can achieve master-detail hierarchies of any complexity, including:-
Multilevel master-detail-detail
-
Master with multiple (peer) details
-
Detail with multiple masters
The steps to define these more complex hierarchies are the same as the ones covered in Section 5.6.2, "How to Create a Master-Detail Hierarchy for Entity-Based View Objects," you just need to create it one view link at time.
5.6.4 How to Enable Active Master-Detail Coordination in the Data Model
When you enable programmatic navigation to a row set of correlated details by defining a view link as described in Section 5.6.2, "How to Create a Master-Detail Hierarchy for Entity-Based View Objects," the view link plays a passive role, simply defining the information necessary to retrieve the coordinated detail row set when your code requests it. The view link accessor attribute is present and programmatically accessible in any result rows from any instance of the view link's source view object. In other words, programmatic access does not require modifying the application module's data model.
However, since master-detail user interfaces are such a frequent occurrence in enterprise applications, the view link can be also used in a more active fashion so you can avoid needing to coordinate master-detail screen programmatically. You opt to have this active master-detail coordination performed by explicitly adding an instance of a view-linked view object to your application module's data model.
To enable active master-detail coordination, open the application module in the overview editor and select the Data Model page.
Create the desired view objects as described in Section 5.2.1, "How to Create an Entity-Based View Object" and Section 5.2.3, "How to Create an Expert Mode, Read-Only View Object."
To add a detail instance of a view object:
-
In the Application Navigator, double-click the application module.
-
In the overview editor, click the Data Model navigation tab.
-
In the Data Model page, expand the View Object Instances section and, in the Available View Objects list, select the detail view object node that is indented beneath the master view object.
Note that the list shows the detail view object twice: once on its own, and once as a detail view object via the view link. For example, in Figure 5-27 you would select the detail view object
OrderItemsInfoVO via OrderInfoToOrderItemInfoinstead of the view object labeled asOrderItemsInfoVO(which, in this case, appears beneath the highlighted view object). -
Enter a name for the detail instance you're about to create in the Name View Instance field below the Available View Objects list.
For example, Figure 5-27 shows the name
OrderItemsDetailVOfor the instance of theOrderItemsInfoVOview object that is a detail view. -
In the Data Model list, select the instance of the view object that you want to be the actively-coordinating master.
-
Click Add Instance to add the detail instance to the currently selected master instance in the data model, with the name you've chosen.
For example, in Figure 5-28, the Data Model list shows a master-detail hierarchy of view object instances with
OrderItemsDetailVOas the detail view object.
5.6.5 How to Test Master-Detail Coordination
To test active master-detail coordination, launch the Business Component Browser on the application module by choosing Run from its context menu in the Application Navigator. The Business Component Browser data model tree shows the view link instance that is actively coordinating the detail view object instance with the master view object instance. You can double-click the view link instance node in the tree to open a master-detail data view page in the Business Component Browser. Then, when you use the toolbar buttons to navigate in the master view object — changing the view object's current row as a result — the coordinated set of details is automatically refreshed and the user interface stays in sync.
If you double-click another view object that is not defined as a master and detail, a second tab will open to show its data; in that case, since it is not actively coordinated by a view link, its query is not constrained by the current row in the master view object.
For information about editing the data model and running the Business Component Browser, see Section 6.3, "Testing View Object Instances Using the Business Component Browser."
5.6.6 How to Access the Detail Collection Using the View Link Accessor
To work with view links effectively, you should also understand that view link accessor attributes return a RowSet object and that you can access a detail collection using the view link accessor programmatically.
5.6.6.1 Accessing Attributes of Row by Name
At runtime, the getAttribute() method on a Row object allows you to access the value of any attribute of that row in the view object's result set by name. The view link accessor behaves like an additional attribute in the current row of the source view object, so you can use the same getAttribute() method to retrieve its value. The only practical difference between a regular view attribute and a view link accessor attribute is its data type. Whereas a regular view attribute typically has a scalar data type with a value like 303 or ngreenbe, the value of a view link accessor attribute is a row set of zero or more correlated detail rows. Assuming that curUser is a Row object from some instance of the Orders view object, you can write a line of code to retrieve the detail row set of order items:
RowSet items = (RowSet)curUser.getAttribute("OrderItems");
Note:
If you generate the custom Java class for your view row, the type of the view link accessor will beRowIterator. Since at runtime the return value will always be a RowSet object, it is safe to cast the view link attribute value to RowSet.5.6.6.2 Programmatically Accessing a Detail Collection Using the View Link Accessor
Once you've retrieved the RowSet object of detail rows using a view link accessor, you can loop over the rows it contains just as you would loop over a view object's row set of results, as shown in Example 5-8.
Example 5-8 Programmatically Accessing a Detail Collection
while (items.hasNext()) {
  Row curItem = items.next();
  System.out.println("--> (" + curItem.getAttribute("LineItemId") + ") " +
                     curItem.getAttribute("LineItemTotal"));
}
For information about creating a test client, see Section 6.4.6, "How to Access a Detail Collection Using the View Link Accessor."
5.7 Working with a Single Table in a Recursive Master-Detail Hierarchy
A recursive data model is one that utilizes a query that names source and destination attributes in a master-detail relationship based on a single table. In a typical master-detail relationship, the source attribute is supplied by the primary key attribute of the master view object and the destination attribute is supplied by foreign key attribute in the detail view object. For example, a typical master-detail relationship might relate the DepartmentId attribute on the DEPARTMENT table and the corresponding DepartmentId attribute on the EMPLOYEE table. However, in a recursive data model, the source attribute EmployeeId and the target attribute ManagerId both exist in the EMPLOYEE table. The query for this relationship therefore involves only a single view object. In this scenario, you create the view object for a single base entity object that specifies both attributes and then you define a self-referential view link to configure this view object as both the "source" and the "target" view object to form a master-detail hierarchy.
After you create the view link, there are two ways you can handle the recursive master-detail hierarchy in the data model project. You can either:
-
Create a data model that exposes two instances of the same view object, one playing the role as master and the other playing the role as detail, actively coordinated by a view link instance. This can be useful when you anticipate needing to show a single level of master rows and detail rows at a time in two separate tables.
-
Create a data model that exposes only a single instance of the view object, and use the view link accessor attribute in each row to access a row set of details. This is the more typical use case of the two because it allows you to display (or programmatically work with) the recursive master-detail hierarchy to any number of levels that exist in the data. For example, to show the recursive hierarchy in a
treeortreeTablecomponent, you would use this approach, as described in Section 24.4.1, "How to Display Master-Detail Objects in Trees."
5.7.1 How to Create a Recursive Master-Detail Hierarchy for an Entity-Based View Object
In a recursive master-detail hierarchy, the attributes of the view object that you select for the source and destination in the view link will typically be the same pair of attributes that define the self-referential association between the underlying entity object, if this association exists. While this underlying association is not required to create the view link, it does simplify the creation of the view link, so you will first create a foreign key association for the base entity object of the view object.
To create an association, you use the Create Association wizard. Then the association will appear as a selection choice when you use the Create View Link wizard. The view link will be self-referential because the association you select for the source and the destination view object names the same entity object, which is derived from a single database table.
-
When you create the view link JDeveloper won't be able to infer the association between the source and destination attributes of the entity object. To support the recursive hierarchy, you can use the Create Association wizard to create an association between the source attribute and the destination attribute. On the Entity Objects page, select the same entity object to specify the source and destination attributes and leave all other default selections unchanged in the wizard. For details about creating an association, see Section 4.3, "Creating and Configuring Associations."
For example, assume the recursive master-detail hierarchy displays a list of employees based on their management hierarchy. In this scenario, you would create the association based on the
Employeesentity object. On the Entity Objects page of the Create Association wizard, you would selectEmployees.EmployeeIdas the source attribute andEmployee.ManagerIdas the destination attribute. The entity objectEmployeessupplies both attributes to ensure the association is self-referential. -
Create the entity-based view object and create a view criteria that will filter the view instance's results to include only those rows you want to see at the "root" of the hierarchy. To create a view criteria that uses a bind variable to filter the view object, see Section 5.11, "Working with Named View Criteria."
For example, in a recursive hierarchy of managers and employees, you would create the entity-based view object
EmployeesView. After you create the view object in the Create View Object wizard, you can use the Query page of the overview editor to create a bind variable and view criteria which allow you to identify the employee or employees that will be seen at the top of the hierarchy. If only a single employee should appear at the root of the hierarchy, then the view criteria in this scenario will filter the employees using a bind variable for the employee ID (corresponding to the source attribute) and theWHEREclause shown in the Create View Criteria dialog would look like( (Employees.EMPLOYEE_ID = :TheEmployeeId ) ), whereTheEmployeeIdis the bind variable name. For more information on creating a view criteria that uses a bind variable to filter the view object, see Section 5.12.2.1, "Creating a Data Source View Object to Control the Cascading List."When you are ready to expose the employees view object in your project's data model, you will configure the view instance in the data model to use this view criteria to filter the initial employee in the root of the tree. You'll configure the bind variable to specify the employee ID of the employee that you want to be the root value of the entire hierarchy. For example, the root value of the recursive hierarchy of managers and employees would be the employee ID of the highest level manager in the organization.
To create an association-based, self-referential view link:
-
In the Application Navigator, right-click the project in which you want to create the view object and choose New.
To avoid having to type in the package name in the Create View Link wizard, you can choose New View Link on the context menu of the links package node in the Application Navigator.
-
In the New Gallery, expand Business Tier, select ADF Business Components and then View Link, and click OK.
-
In the Create View Link wizard, on the Name page, supply a package and a component name.
-
On the View Objects page, in the Select Source Attribute tree expand the source view object in the desired package. In the Select Destination Attribute tree expand the destination view object.
For entity-based view objects, notice that in addition to the view object attributes, relevant associations also appear in the list.
-
Select the same association in both Source and Destination trees. Then click Add to add the association to the table below.
For example, Figure 5-29 shows the same
EmpManagersFkAssocassociation in both Source and Destination trees selected. The view link is self-referential because the definition of the association names the source and destination attribute on the same entity object (in this case,Employees). -
On the View Link Properties page, leave the default selections unchanged, but edit the accessor name of the destination accessor to provide a meaningful name.
For example, Figure 5-30 shows the destination accessor has been renamed from
EmployeesViewtoStaffList. This name will be exposed in the binding editor when the user interface developer populates the ADF Faces tree component by selecting this accessor. The name you provide will make clear to the UI developer the purpose of the accessor; in this case, to generate a list of employees associated with each manager. -
Click Finish.
To define the view object instance in an existing application module:
-
In the Application Navigator, double-click the application module.
-
In the overview editor, click the Data Model navigation tab.
-
In the Data Model page, expand the View Object Instances section and, in the Available View Objects list, select the view object definition that you defined the view criteria to filter.
The New View Instance field below the list shows the name that will be used to identify the next instance of that view object that you add to the data model.
-
To change the name before adding it, enter a different name in the New View Instance field.
-
With the desired view object selected, shuttle the view object to the Data Model list.
Figure 5-31 shows the view object
EmployeesViewhas been renamed toEmployeesbefore it was shuttled to the Data Model list. -
To filter the view object instance so that you specify the root value of the hierarchy, select the view object instance you added and click Edit.
-
In the Edit View Instance dialog, shuttle the view criteria you created to the Selected list and enter the bind parameter value that corresponds to the root of the hierarchy.
Figure 5-32 shows the view object
ByEmployeeIdview criteria with the bind parameterTheEmployeeIdset to the value100corresponding to the employee that is at the highest level of the hierarchy. -
Click OK.
5.7.2 What Happens When You Create a Recursive Master-Detail Hierarchy
When you create an self-referential view link, JDeveloper creates the XML component definition file that represents its declarative settings and saves it in the directory that corresponds to the name of its package. This XML file contains the declarative information about the source and target attribute pairs that the association you selected specifies and contains the declarative information about the association that relates the source and target view object you selected.
Example 5-9 shows how the EmpManagerFkLink defines the same view object EmployeesView for the source and destination in its XML component definition file.
Example 5-9 Self-Referential View Link Defined in XML
<ViewLink
  xmlns="http://xmlns.oracle.com/bc4j"
  Name="EmpManagerFkLink"
  Version="11.1.1.53.5"
  EntityAssociation="test.model.EmpManagerFkAssoc">
  <ViewLinkDefEnd
    Name="EmployeesView1"
    Cardinality="1"
    Owner="test.model.EmployeesView"
    Source="true">
    <DesignTime>
      <Attr Name="_finderName" Value="ManagerIdEmployeesView"/>
      <Attr Name="_isUpdateable" Value="true"/>
    </DesignTime>
    <AttrArray Name="Attributes">
      <Item Value="test.model.EmployeesView.EmployeeId"/>
    </AttrArray>
  </ViewLinkDefEnd>
  <ViewLinkDefEnd
    Name="EmployeesView2"
    Cardinality="-1"
    Owner="test.model.EmployeesView">
    <DesignTime>
      <Attr Name="_finderName" Value="DirectReports"/>
      <Attr Name="_isUpdateable" Value="true"/>
    </DesignTime>
    <AttrArray Name="Attributes">
      <Item Value="test.model.EmployeesView.ManagerId"/>
    </AttrArray>
  </ViewLinkDefEnd>
</ViewLink>
In addition to saving the view link component definition itself, JDeveloper also updates the XML definition of the view object to add information about the view link accessor you've defined. As a confirmation of this, you can select the view object in the Application Navigator and inspect its details in the Structure window. As shown in Figure 5-33, you can see the defined accessor in the ViewLink Accessors node for the EmployeesView view object of the EmpManagerFkLink view link.
5.8 Working with View Objects in Declarative SQL Mode
At runtime, when ADF Business Components works with JDBC to pass a query to the database and retrieve the result, the mechanism to retrieve the data is the SQL query. As an alternative to creating view objects that specify a SQL statement at design time, you can create entity-based view objects that contain no SQL statements. This capability of the ADF Business Components design time and runtime is known as declarative SQL mode. When the data model developer works with the wizard or editor for a view object in declarative SQL mode, they require no knowledge of SQL. In declarative SQL mode, the view object's metadata causes the ADF Business Components runtime to generate the SQL query statements as follows:
-
Generates
SELECTandFROMlists based on the rendered web page's databound UI components' usage of one or more entity objects' attributes -
Optionally, generates a
WHEREclause based on a view criteria that you add to the view object definition -
Optionally, generates an
ORDERBYclause based on a sort criteria that you add to the view object definition. -
Optionally, augments the
WHEREclause to support table joins based on named view criteria that you add to the view object definition -
Optionally, augments the
WHEREclause to support master-detail view filtering based on a view criteria that you add to either the source or destination of a view link definition
Additionally, the SQL statement that a declarative SQL mode view object generates at runtime will be determined by the SQL flavor specified in the Business Components page of the Project Properties dialog.
Note:
Currently, the supported flavors for runtime SQL generation are SQL92 (ANSI) style and Oracle style. For information about setting the SQL flavor for your project, see Section 3.3.1, "Choosing a Connection, SQL Flavor, and Type Map."Declarative SQL mode selection is supported in JDeveloper as a setting that you can apply either to the entire data model project or to individual view objects that you create. The ADF Business Components design time also allows you to override the declarative SQL mode project-level setting for any view object you create.
The alternatives to declarative SQL mode are normal mode and expert mode. When you work in either of those modes, the view object definitions you create at design time always contain the entire SQL statement based on the SQL flavor required by your application module's defined database connection. Thus the capability of SQL independence does not apply to view objects that you create in normal or expert mode. For information about using the wizard and editor to customize view objects when SQL is desired at design time, see Section 5.2, "Populating View Object Rows from a Single Database Table."
5.8.1 How to Create SQL-Independent View Objects with Declarative SQL Mode
All view objects that you create in JDeveloper rely on the same design time wizard and editor. However, when you enable declarative SQL mode, the wizard and editor change to support customizing the view object definition without requiring you to display or enter any SQL. For example, the Query page of the Create View Object wizard with declarative SQL mode enabled lacks the Generated SQL field present in normal mode.
Additionally, in declarative SQL mode, since the wizard and editor do not allow you to enter WHERE and ORDERBY clauses, you provide equivalent functionality by defining a view criteria and sort criteria respectively. In declarative SQL mode, these criteria appear in the view object metadata definition and will be converted at runtime to their corresponding SQL clause. When the databound UI component has no need to display filtered or sorted data, you may omit the view criteria or sort criteria from the view object definition.
Otherwise, after you enable declarative SQL mode, the basic procedure to create a view object with ensured SQL independence is the same as you would follow to create any entity-based view object. For example, you must still ensure that your view object encapsulates the desired entity object metadata to support the intended runtime query. As with any entity-based view object, the columns of the runtime-generated FROM list must relate to the attributes of one or more of the view object's underlying entity objects. In declarative SQL mode, you automatically fulfill this requirement when working with the wizard or editor when you add or remove the attributes of the entity objects on the view object definition.
Performance Tip:
A view object instance configured to generate SQL statements dynamically will requery the database during page navigation if a subset of all attributes with the same list of key entity objects is used in the subsequent page navigation. Thus performance can be improved by activating a superset of all the required attributes to eliminate a subsequent query execution.Thus there are no unique requirements for creating entity-based view objects in declarative SQL mode, nor does declarative SQL mode sacrifice any of the runtime functionality of the normal mode counterpart. You can enable declarative SQL mode as a global preference so that it is the Create View Object wizard's default mode, or you can leave the setting disabled and select the desired mode directly in the wizard. The editor for a view object also lets you select and change the mode for an existing view object definition.
To enable declarative SQL mode for all new view objects:
-
From the main menu, choose Tools > Preferences.
-
In the Preferences dialog, expand the Business Components node and choose View Objects.
-
On the Business Components: View Object page, select Enable Declarative SQL mode for new objects and click OK.
To predetermine how the
FROMlist will be generated at runtime you can select Include all attributes in runtime-generated query, as described in Section 5.8.4, "How to Force Attribute Queries for Declarative SQL Mode View Objects."
To create an entity-based view object in declarative SQL mode, use the Create View Object wizard, which is available from the New Gallery.
Create the desired entity objects as described in Section 4.2.1, "How to Create Multiple Entity Objects and Associations from Existing Tables."
To create declarative SQL-based view objects:
-
In the Application Navigator, right-click the project in which you want to create the view objects and choose New.
-
In the New Gallery, expand Business Tier, select ADF Business Components and then View Object, and click OK.
-
On the Name page, enter a package name and a view object name. Keep the default setting Updatable access through entity objects enabled to indicate that you want this view object to manage data with its base entity object. Click Next.
Any other choice for the data selection will disable declarative SQL mode in the Create View Object wizard.
-
On the Entity Objects page, select the entity object whose data you want to use in the view object. Click Next.
When you want to create a view object that joins entity objects, you can add secondary entity objects to the list. To create more complex entity-based view objects, see Section 5.5.1, "How to Create Joins for Entity-Based View Objects."
-
On the Attributes page, select at least one attribute from the entity usage in the Available list and shuttle it to the Selected list. Attributes you do not select will not be eligible for use in view criteria and sort criteria. Click Next.
You should select any attribute that you wish to customize in the Attribute Settings page or select for use in a view criteria or sort criteria in the Query page. Additionally, the tables that appear in the
FROMlist of the runtime-generated query will be limited to the tables corresponding to the attributes of the entity objects you select. -
On the Attribute Settings page, optionally, use the Select Attribute dropdown list to switch between the view object attributes in order to change their names or any of their initial settings. Click Next.
-
On the Query page, select Declarative in the Query Mode dropdown list if it is not already displayed. The wizard changes to declarative SQL mode.
If you did not select Enable declarative SQL mode for new objects, in the Preferences dialog, the wizard displays the default query mode, Normal. Changing the mode to Declarative in the wizard allows you to override the default mode for this single view object.
-
Optionally, define Where and Order By criteria to filter and order the data as required. At runtime, ADF Business Components automatically generates the corresponding SQL statements based on the criteria you create.
Click Edit next to the Where field to define the view criteria you will use to filter the data. The view criteria you enter will be converted at runtime to a
WHEREclause that will be enforced on the query statement. For information about specifying view criteria, see Section 5.11, "Working with Named View Criteria."In the Order By field select the desired attribute in the Available list and shuttle it to the Selected list. Attributes you do not select will not appear in the SQL
ORDERBYclause generated at runtime. Add additional attributes to the Selected list when you want the results to be sorted by more than one column. Arrange the selected attributes in the list according to their sort precedence. Then for each sort attribute, assign whether the sort should be performed in ascending or descending order. Assigning the sort order to each attribute ensures that attributes ignored by the UI component still follow the intended sort order.For example, as shown in Figure 5-34, to limit the
CustomerCardStatusview object to display only the rows in theCUSTOMERStable for customers with a specific credit card code, the view criteria in the Where field limits theCardTypeCodeattribute to a runtime-determined value. To order the data by customer ID and the customer's card expiration date, the Order By field identifies those attributes in the Selected list. -
Click Finish.
5.8.2 How to Filter Declarative SQL-Based View Objects When Table Joins Apply
When you create an entity-based view object you can reference more than one entity object in the view object definition. In the case of view objects you create in declarative SQL mode, whether the base entity objects are activated from the view object definition will depend on the requirements of the databound UI component at runtime. If the UI component displays attribute values from multiple entity objects, then the SQL generated at runtime will contain a JOIN operation to query the appropriate tables.
Just as with any view object that you create, it is possible to filter the results from table joins by applying named view criteria. In the case of normal mode view objects, all entity objects and their attributes will be referenced by the view object definition and therefore will be automatically included in the view object's SQL statement. However, by delaying the SQL generation until runtime with declarative SQL mode, there is no way to know whether the view criteria should be applied.
Note:
In declarative SQL mode, you can define a view criteria to specify theWHERE clause (optional) when you create the view object definition. This type of view criteria when it exists will always be applied at runtime. For a description of this usage of the view criteria, see Section 5.8.1, "How to Create SQL-Independent View Objects with Declarative SQL Mode."Because a SQL JOIN may not always result from a view object defined in declarative SQL mode with multiple entity objects, named view criteria that you define to filter query results should be applied conditionally at runtime. In other words, named view criteria that you create for declarative SQL-based view objects need not be applied as required, automatic filters. To support declarative SQL mode, named view criteria that you apply to a view object created in declarative SQL mode can be set to apply only on the condition that the UI component is bound to the attributes referenced by the view criteria. The named view criteria once applied will, however, support the UI component's need to display a filtered result set.
You use the Edit View Criteria dialog to create the named view criteria and enable its conditional usage by setting the appliedIfJoinSatisfied property in the Property Inspector.
To define a view criteria to filter only when the join is satisfied:
-
Create the view object with declarative SQL mode enabled as described in Section 5.8.1, "How to Create SQL-Independent View Objects with Declarative SQL Mode."
-
In the Application Navigator, double-click the view object.
-
In the overview editor, click the Query navigation tab.
-
In Query page, expand the View Criteria section, and click the Create new view criteria button.
-
In the Create View Criteria dialog, create the view criteria as described in Section 5.11.1, "How to Create Named View Criteria Declaratively."
-
After creating the view criteria, select it in the View Criteria section of Query page of the overview editor.
-
With the view criteria selected, open the Property Inspector and set the AppliedIfJoinSatisfied property to true.
The property value true means you want the view criteria to be applied only on the condition that the UI component requires the attributes referenced by the view criteria. The default value false means that the view criteria will automatically be applied at runtime. In the case of declarative SQL mode-based view objects, the value true ensures that the query filter will be appropriate to needs of the view object's databound UI component.
5.8.3 How to Filter Master-Detail Related View Objects with Declarative SQL Mode
Just as with normal mode view objects, you can link view objects that you create in declarative SQL mode to other view objects to form master-detail hierarchies of any complexity. The steps to create the view links are the same as with any other entity-based view object, as described in Section 5.6.2, "How to Create a Master-Detail Hierarchy for Entity-Based View Objects." However, in the case of view objects that you create in declarative SQL mode, you can further refine the view object results in the Source SQL or Destination SQL dialog for the view link by selecting a previously defined view criteria in the Create View Link wizard or the overview editor for the view link.
To define a view criteria for view link source or view link destination:
-
Create the view objects in declarative SQL mode as described in Section 5.8.1, "How to Create SQL-Independent View Objects with Declarative SQL Mode."
-
In the overview editor for the view objects, define the desired view criteria for either the source (master) view object or the destination (detail) view object as described in Section 5.8.2, "How to Filter Declarative SQL-Based View Objects When Table Joins Apply."
-
Create the view link as described in Section 5.6.2, "How to Create a Master-Detail Hierarchy for Entity-Based View Objects" and perform one of these additional steps:
-
On the SQL Source page, select a previously defined view criteria to filter the master view object. Click Next.
-
On the Destination SQL page, select a previously defined view criteria to filter the detail view object.
Figure 5-34 shows a view criteria that filters the master view object based on customer IDs.
-
-
After you create the view link, you can also select a previously defined view criteria. In the overview editor navigation list, select Query and expand the Source or Destination sections. In the View Criteria dropdown list, select the desired view criteria. The dropdown list will be empty if no view criteria exist for the view object.
If the overview editor does not display a dropdown list for view criteria selection, then the view objects you selected for the view link were not created in declarative SQL mode. For view objects created in normal or expert mode, you must edit the
WHEREclause to filter the data as required.
5.8.4 How to Force Attribute Queries for Declarative SQL Mode View Objects
Typically, when you define a declarative SQL mode view object, the attributes that get queried at runtime will be determined by the requirements of the databound UI component as it is rendered in the web page. This is the runtime-generation capability that makes view objects independent of the design time database's SQL flavor. However, you may also need to execute the view object programmatically without exposing it to an ADF data binding in the UI. In this case, you can enable the Include all attributes in runtime-generated query option to ensure that a programmatically executed view object has access to all of the entity attributes.
Note:
Be careful to limit the use of the Include all attributes in runtime-generated query option to programmatically executed view objects. If you expose the view object with this setting enabled to a databound UI component, the runtime query will include all attributes.The Include all attributes in runtime-generated query option can be specified as a global preference setting or as a setting on individual view objects. Both settings may be used in these combinations:
-
Enable the global preference so that every view object you create includes all attributes in the runtime query statement.
-
Enable the global preference, but disable the setting on view objects that will not be executed programmatically and therefore should not include all attributes in the runtime query statement.
-
Disable the global preference (default), but enable the setting on view objects that will be executed programmatically and therefore should include all attributes in the runtime query statement.
To set the global preference to include all attributes in the query:
-
From the main menu, choose Tools > Preferences.
-
In the Preferences dialog, expand Business Components and select View Objects.
-
On the Business Components: View Object page, select Enable Declarative SQL mode for new objects.
-
Select Include all attributes in runtime-generated query to force all attributes of the view object's underlying entity objects to participate in the query and click OK.
Enabling this option sets a flag in the view object definition but you will still need to add entity object selections and entity object attribute selections to the view object definition.
You can change the view object setting in the Tuning section of the overview editor's General page. The overview editor only displays the Include all attributes in runtime-generated query option if you have created the view object in declarative SQL mode.
To set the view object-specific preference to include all attributes in the query:
-
When you want to force all attributes for specific view objects, create the view object in the Create View Object wizard and be sure that you have enabled declarative SQL mode.
You can verify this in the overview editor. In the overview editor, click the Query navigation tab and click the Edit SQL Query button along the top of the page. In the Edit Query dialog, verify that the SQL Mode dropdown list shows the selection Declarative.
-
In the overview editor, click the General navigation tab.
-
In the General page, expand the Tuning section and select Include all attributes in runtime-generated query.
Enabling this option forces all attributes of the view object's underlying entity objects to participate in the query. When enabled, it sets a flag in the view object definition but you will still need to add entity object selections and entity object attribute selections to the view object definition.
5.8.5 What Happens When You Create a View Object in Declarative SQL Mode
When you create the view object in declarative SQL mode, three properties get added to the view object's metadata: SelectListFlags, FromListFlags, and WhereFlags. Properties that are absent in declarative SQL mode are the normal mode view object's SelectList, FromList, and Where properties, which contain the actual SQL statement (or, for expert mode, the SQLQuery element). Example 5-10 shows the three view object metadata flags that get enabled in declarative SQL mode to ensure that SQL will be generated at runtime instead of specified as metadata in the view object's definition.
Example 5-10 View Object Metadata with Declarative SQL Mode Enabled
<ViewObject
  xmlns="http://xmlns.oracle.com/bc4j"
  Name="CustomerCardStatus"
  SelectListFlags="1"
  FromListFlags="1"
  WhereFlags="1"
   ...
Similar to view objects that you create in either normal or expert mode, the view object metadata also includes a ViewAttribute element for each attribute that you select in the Attribute page of the Create View Object wizard. However, in declarative SQL mode, when you "select" attributes in the wizard (or add an attribute in the overview editor), you are not creating a FROM or SELECT list in the design time. The attribute definitions that appear in the view object metadata only determine the list of potential entities and attributes that will appear in the runtime-generated statements. For information about how ADF Business Components generates these SQL lists, see Section 5.8.6, "What Happens at Runtime: When a Declarative SQL Mode Query is Generated."
Example 5-11 shows the additional features of declarative SQL mode view objects, including the optional declarative WHERE clause (DeclarativeWhereClause element) and the optional declarative ORDERBY clause (SortCriteria element).
Example 5-11 View Object Metadata: Declarative View Criteria and Sort Criteria
<DeclarativeWhereClause>
    <ViewCriteria
        Name="CustomerStatusWhereCriteria"
        ViewObjectName="oracle.fodemo.storefront.store.queries.CustomerCardStatus"
        Conjunction="AND"
        Mode="3"
        AppliedIfJoinSatisfied="false">
        <ViewCriteriaRow
            Name="vcrow60">
            <ViewCriteriaItem
                Name="CardTypeCode"
                ViewAttribute="CardTypeCode"
                Operator="STARTSWITH"
                Conjunction="AND"
                Required="Optional">
            <ViewCriteriaItemValue
                Value=":cardtype"
                IsBindVarValue="true"/>
            </ViewCriteriaItem>
        </ViewCriteriaRow>
    </ViewCriteria>
    </DeclarativeWhereClause>
    <SortCriteria>
        <Sort
        Attribute="CustomerId"/>
    <Sort
        Attribute="CardTypeCode"/>
    </SortCriteria>
5.8.6 What Happens at Runtime: When a Declarative SQL Mode Query is Generated
At runtime, when a declarative SQL mode query is generated, ADF Business Components determines which attributes were defined from the metadata ViewCriteria element and SortCriteria element. It then uses these attributes to generate the WHERE and ORDERBY clauses. Next, the runtime generates the FROM list based on the tables corresponding to the entity usages defined by the metadata ViewAttribute elements. Finally, the runtime builds the SELECT statement based on the attribute selection choices the end user makes in the UI. As a result, the view object in declarative SQL mode generates all SQL clauses entirely at runtime. The runtime-generated SQL statements will be based on the flavor that appears in the project properties setting. Currently, the runtime supports SQL92 (ANSI) style and Oracle style flavors.
5.8.7 What You May Need to Know About Overriding Declarative SQL Mode Defaults
JDeveloper lets you control declarative SQL mode for all new view objects you add to your data model project or for individual view objects you create or edit. These settings may be used in these combinations:
-
Enable the global preference in the Preferences dialog (select Tools > Preferences). Every view object you create will delay SQL generation until runtime. Figure 5-36 shows the global preference Enable declarative SQL for new objects set to enabled.
-
Enable the global preference in the Preferences dialog, but change the SQL mode for individual view objects. In this case, unless you change the SQL mode, the view objects you create will delay SQL generation until runtime.
-
Disable the global preference (default) in the Preferences dialog, but select declarative SQL mode for individual view objects. In this case, unless you change the SQL mode, view objects you create will contain SQL statements.
To edit the SQL mode for a view object you have already created, open the Query page in the Edit Query dialog and select Declarative from the SQL Mode dropdown list. To display the Edit Query dialog, open the view object in the overview editor, select Query from the navigation list and click the Edit SQL Query button. The same option appears in the Query page of the Create View Object wizard.
5.8.8 What You May Need to Know About Working Programmatically with Declarative SQL Mode View Objects
As a convenience to developers, the view object implementation API allows individual attributes to be selected and deselected programmatically. This API may be useful in combination with the view objects you create in declarative SQL mode and intend to execute programmatically. Example 5-12 shows how to call selectAttributeDefs() on the view object when you want to add a subset of attributes to those already configured with SQL mode enabled.
Example 5-12 ViewObjectImpl API with SQL Mode View Objects
ApplicationModule am = Configuration.createRootApplicationModule(amDef, config);
ViewObjectImpl vo = (ViewObjectImpl) am.findViewObject("CustomerVO");
vo.resetSelectedAttributeDefs(false);
vo.selectAttributeDefs(new String[] {"FirstName, "LastName"});
vo.executeQuery();
The call to selectAttributeDefs() adds the attributes in the array to a private member variable of ViewObjectImpl. A call to executeQuery() transfers the attributes in the private member variable to the actual select list. It is important to understand that these ViewObjectImpl attribute calls are not applicable to the client layer and are only accessible inside the Impl class of the view object on the middle tier.
Additionally, you might call unselectAttributeDefs() on the view object when you want to deselect a small subset of attributes after enabling the Include all attributes in runtime-generated query option. Alternatively, you can call selectAttributeDefs() on the view object to select a small subset of attributes after disabling the Include all attributes in runtime-generated query option.
Caution:
Be careful not to expose a declarative SQL mode view object executed with this API to the UI since only the value of the Include all attributes in runtime-generated query option will be honored.5.9 Working with View Objects in Expert Mode
When defining entity-based view objects, you can fully specify the WHERE and ORDER BY clauses, whereas, by default, the FROM clause and SELECT list are automatically derived. The names of the tables related to the participating entity usages determine the FROM clause, while the SELECT list is based on the:
-
Underlying column names of participating entity-mapped attributes
-
SQL expressions of SQL-calculated attributes
When you require full control over the SELECT or FROM clause in a query, you can enable expert mode.
Tips:
The view object editors and wizard in the JDeveloper provide full support for generating SQL from choices that you make. For example, two such options allow you to declaratively define outer joins and work in declarative SQL mode (where no SQL is generated until runtime).5.9.1 How to Customize SQL Statements in Expert Mode
To enable expert mode, select Expert Mode from the SQL Mode dropdown list on the Query panel of the Create View Object wizard. You can also modify the SQL statement of an existing entity-based view object in the view object overview editor. In the overview editor, navigate to the Query page and click the Edit SQL Query button. In the Edit Query dialog, select Expert Mode from the SQL Mode dropdown list.
5.9.2 How to Name Attributes in Expert Mode
If your SQL query includes a calculated expression, use a SQL alias to assist the Create View Object wizard in naming the column with a Java-friendly name. Example 5-13 shows a SQL query that includes a calculated expression.
Example 5-13 SQL Query with Calculated Expression
select PERSON_ID, EMAIL,
       SUBSTR(FIRST_NAME,1,1)||'. '||LAST_NAME
from PERSONS
order by EMAIL
Example 5-14 uses a SQL alias USER_SHORT_NAME to assist the Create View Object wizard in naming the column with a Java-friendly name. The wizard will display UserShortName as the name of the attribute derived from this calculated expression.
5.9.3 What Happens When You Enable Expert Mode
When you enable expert mode, the read-only Generated Statement section of the Query page becomes a fully editable Query Statement text box, displaying the full SQL statement. Using this text box, you can change every aspect of the SQL query.
For example, Figure 5-37 shows the Query page of the Edit Query dialog for the OrderItems view object. It's an expert mode, entity-based view object that references a PL/SQL function decode that obtains its input values from an expression set on the ShippingCost attribute.
5.9.4 What You May Need to Know About Expert Mode
When you define a SQL query using expert mode in the Edit Query dialog, you type a SQL language statement directly into the editor. Using this mode places some responsibility on the Business Components developer to understand how the view object handles the metadata resulting from the query definition. Review the following information to familiarize yourself with the behavior of the Edit Query dialog that you use in expert mode.
5.9.4.1 Expert Mode Provides Limited Attribute Mapping Assistance
The automatic cooperation of a view object with its underlying entity objects depends on correct attribute-mapping metadata saved in the XML component definition. This information relates the view object attributes to corresponding attributes from participating entity usages. JDeveloper maintains this attribute mapping information in a fully automatic way for normal entity-based view objects. However, when you decide to use expert mode with a view object, you need to pay attention to the changes you make to the SELECT list. That is the part of the SQL query that directly relates to the attribute mapping. Even in expert mode, JDeveloper continues to offer some assistance in maintaining the attribute mapping metadata when you do the following to the SELECT list:
-
Reorder an expression without changing its column alias
JDeveloper reorders the corresponding view object attribute and maintains the attribute mapping.
-
Add a new expression
-
JDeveloper adds a new SQL-calculated view object attribute with a corresponding camel-capped name based on the column alias of the new expression.
-
Remove an expression
JDeveloper converts the corresponding SQL-calculated or entity-mapped attribute related to that expression to a transient attribute.
However, if you rename a column alias in the SELECT list, JDeveloper has no way to detect this, so it is treated as if you removed the old column expression and added a new one of a different name.
After making any changes to the SELECT list of the query, visit the Attribute Mappings page to ensure that the attribute-mapping metadata is correct. The table on this page, which is disabled for view objects in normal mode, becomes enabled for expert mode view objects. For each view object attribute, you will see its corresponding SQL column alias in the table. By clicking into a cell in the View Attributes column, you can use the dropdown list that appears to select the appropriate entity object attribute to which any entity-mapped view attributes should correspond.
Note:
If the view attribute is SQL-calculated or transient, a corresponding attribute with a "SQL" icon appears in the View Attributes column to represent it. Since neither of these type of attributes are related to underlying entity objects, there is no entity attribute related information required for them.5.9.4.2 Expert Mode Drops Custom Edits
When you disable expert mode for a view object, it will return to having its SELECT and FROM clause be derived again. JDeveloper warns you that doing this might cause your custom edits to the SQL statement to be lost. If this is what you want, after acknowledging the alert, your view object's SQL query reverts back to the default.
5.9.4.3 Expert Mode Ignores Changes to SQL Expressions
Consider a Products view object with a SQL-calculated attribute named Shortens whose SQL expression you defined as SUBSTR(NAME,1,10). If you switch this view object to expert mode, the Query Statement box will show a SQL query similar to the one shown in Example 5-15.
Example 5-15 SQL-Calculated Attribute Expression in Expert Mode
SELECT Products.PROD_ID,
       Products.NAME,
       Products.IMAGE,
       Products.DESCRIPTION,
       SUBSTR(NAME,1,10) AS SHORT_NAME
FROM PRODUCTS Products
If you go back to the attribute definition for the Shortens attribute and change the SQL Expression field from SUBSTR(NAME,1,10) to SUBSTR(NAME,1,15), then the change will be saved in the view object's XML component definition. Note, however, that the SQL query in the Query Statement box will remain as the original expression. This occurs because JDeveloper never tries to modify the text of an expert mode query. In expert mode, the developer is in full control. JDeveloper attempts to adjust metadata as a result of some kinds of changes you make yourself to the expert mode SQL statement, but it does not perform the reverse. Therefore, if you change view object metadata, the expert mode SQL statement is not updated to reflect it.
Therefore, you need to update the expression in the expert mode SQL statement itself. To be completely thorough, you should make the change both in the attribute metadata and in the expert mode SQL statement. This would ensure — if you (or another developer on your team) ever decides to toggle expert mode off at a later point in time — that the automatically derived SELECT list would contain the correct SQL-derived expression.
Note:
If you find you had to make numerous changes to the view object metadata of an expert mode view object, you can avoid having to manually translate any effects to the SQL statement by copying the text of your customized query to a temporary backup file. Then, you can disable expert mode for the view object and acknowledge the warning that you will lose your changes. At this point JDeveloper will rederive the correct generated SQL statement based on all the new metadata changes you've made. Finally, you can enable expert mode once again and reapply your SQL customizations.5.9.4.4 Expert Mode Returns Error for SQL Calculations that Change Entity Attributes
When changing the SELECT list expression that corresponds to entity-mapped attributes, don't introduce SQL calculations into SQL statements that change the value of the attribute when retrieving the data. To illustrate the problem that will occur if you do this, consider the query for a simple entity-based view object named Products shown in Example 5-16.
Example 5-16 Query Statement Without SQL-Calculated Expression
SELECT Products.PROD_ID,
       Products.NAME,
       Products.IMAGE,
       Products.DESCRIPTION
FROM PRODUCTS Products
Imagine that you wanted to limit the name column to display only the first ten characters of the name of a product query. The correct way to do that would be to introduce a new SQL-calculated field, such as ShortName with an expression like SUBSTR(Products.NAME,1,10). One way you should avoid doing this is to switch the view object to expert mode and change the SELECT list expression for the entity-mapped NAME column to the include the SQL-calculate expression, as shown in Example 5-17.
Example 5-17 Query Statement With SQL-Calculated Expression
SELECT Products.PROD_ID,
       SUBSTR(Products.NAME,1,10) AS NAME,
       Products.IMAGE,
       Products.DESCRIPTION
FROM PRODUCTS Products
This alternative strategy would initially appear to work. At runtime, you see the truncated value of the name as you are expecting. However, if you modify the row, when the underlying entity object attempts to lock the row it does the following:
-
Issues a
SELECT FOR UPDATEstatement, retrieving all columns as it tries to lock the row. -
If the entity object successfully locks the row, it compares the original values of all the persistent attributes in the entity cache as they were last retrieved from the database with the values of those attributes just retrieved from the database during the lock operation.
-
If any of the values differs, then the following error is thrown:
(oracle.jbo.RowInconsistentException)
JBO-25014: Another user has changed the row with primary key [...]
If you see an error like this at runtime even though you are the only user testing the system, it is most likely due to your inadvertently introducing a SQL function in your expert mode view object that changed the selected value of an entity-mapped attribute. In Example 5-17, the SUBSTR(Products.NAME,1,10) function introduced causes the original selected value of the Name attribute to be truncated. When the row-lock SQL statement selects the value of the NAME column, it will select the entire value. This will cause the comparison shown in Example 5-17 to fail, producing the "phantom" error that another user has changed the row.
The same thing would happen with NUMBER-valued or DATE-valued attributes if you inadvertently apply SQL functions in expert mode to truncate or alter their retrieved values for entity-mapped attributes.
Therefore, if you need to present altered versions of entity-mapped attribute data, introduce a new SQL-calculated attribute with the appropriate expression to handle the task.
5.9.4.5 Expert Mode Retains Formatting of SQL Statement
When you change a view object to expert mode, its XML component definition changes from storing parts of the query in separate XML attributes, to saving the entire query in a single <SQLQuery> element. The query is wrapped in an XML CDATA section to preserve the line formatting you may have done to make a complex query be easier to understand.
5.9.4.6 Expert Mode Wraps Queries as Inline Views
If your expert-mode view object:
-
Contains a
ORDERBYclause specified in the Order By field of the Query Clauses page at design time, or -
Has a dynamic
WHEREclause orORDERBYclause applied at runtime usingsetWhereClause()orsetOrderByClause()
then its query gets nested into an inline view before applying these clauses. For example, suppose your expert mode query was defined like the one shown in Example 5-18.
Example 5-18 Expert Mode Query Specified At Design Time
select PERSON_ID, EMAIL, FIRST_NAME, LAST_NAME
from PERSONS
union all
select PERSON_ID, EMAIL, FIRST_NAME, LAST_NAME
from INACTIVE_PERSONS
Then, at runtime, when you set an additional WHERE clause like email = :TheUserEmail, the view object nests its original query into an inline view like the one shown in Example 5-19.
Example 5-19 Runtime-Generated Query With Inline Nested Query
SELECT * FROM(
select PERSON_ID, EMAIL, FIRST_NAME, LAST_NAME
from PERSONS
union all
select PERSON_ID, EMAIL, FIRST_NAME, LAST_NAME
from INACTIVE_PERSONS) QRSLT
And, the view object adds the dynamic WHERE clause predicate at the end, so that the final query the database sees looks like the one shown in Example 5-20.
Example 5-20 Runtime-Generated Query With Dynamic WHERE Clause
SELECT * FROM(
select PERSON_ID, EMAIL, FIRST_NAME, LAST_NAME
from PERSONS
union all
select PERSON_ID, EMAIL, FIRST_NAME, LAST_NAME
from INACTIVE_PERSONS) QRSLT
WHERE email = :TheUserEmail
This query "wrapping" is necessary in general for expert mode queries, because the original query could be arbitrarily complex, including SQL UNION, INTERSECT, MINUS, or other operators that combine multiple queries into a single result. In those cases, simply "gluing" the additional runtime WHERE clause onto the end of the query text could produce unexpected results. For example, the clause might apply only to the last of several UNION'ed statements. By nesting the original query verbatim into an inline view, the view object guarantees that your additional WHERE clause is correctly used to filter the results of the original query, regardless of how complex it is.
5.9.4.7 Limitation of Inline View Wrapping at Runtime
Inline view wrapping of expert mode view objects, limits a dynamically added WHERE clause to refer only to columns in the SELECT list of the original query. To avoid this limitation, when necessary you can disable the use of the inline view wrapping by calling setNestedSelectForFullSql(false).
5.9.4.8 Expert Mode Changes May Affect Dependent Objects
When you modify a view object query to be in expert mode after you have already created the view links that involve that view object or after you created other view objects that extend the view object, JDeveloper will warn you with the alert shown in Figure 5-38. The alert reminds you that you should revisit these dependent components to ensure their SQL statements still reflect the correct query.
For example, if you were to modify the OrdersVO view object to use expert mode, because the OrdersByStatusVO view object extends it, you need to revisit the extended component to ensure that its query still logically reflects an extension of the modified parent component.
5.10 Working with Bind Variables
Bind variables provide you with the means to supply attribute values at runtime to the view object or view criteria. All bind variables are defined at the level of the view object and used in one of the following ways:
-
You can type the bind variable directly into the
WHEREclause of your view object's query to include values that might change from execution to execution. In this case, bind variables serve as placeholders in the SQL string whose value you can easily change at runtime without altering the text of the SQL string itself. Since the query doesn't change, the database can efficiently reuse the same parsed representation of the query across multiple executions, which leads to higher runtime performance of your application. -
You can select the bind variable from a selection list to define the attribute value for a view criteria in the Edit View Criteria dialog you open on the view object. In this case, the bind variables allow you to change the values for attributes you will use to filter the view object row set. For more information about filtering view object row sets, see Section 5.11, "Working with Named View Criteria."
If the view criteria is to be used in a seeded search, you have the option of making the bind variable updatable by the end user. With this updatable option, end users will be expected to enter the value in a search form corresponding to the view object query.
Bind variables that you add to a WHERE clause require a valid value at runtime, or a runtime exception error will be thrown. In contrast, view criteria execution need not require the bind variable value if the view criteria item for which the bind variable is assigned is not required. To enforce this desired behavior, the Bind Variable dialog lets you can specify whether a bind variable is required or not.
You can define a default value for the bind variable or write scripting expressions for the bind variable that includes dot notation access to attribute property values. Expressions are based on the Groovy scripting language, as described in Section 3.6, "Overview of Groovy Support."
5.10.1 How to Add Bind Variables to a View Object Definition
To add a named bind variable to a view object, use the Query page of the overview editor for the view object. You can define as many bind variables as you need.
Create the desired view objects as described in Section 5.2.1, "How to Create an Entity-Based View Object," and Section 5.2.3, "How to Create an Expert Mode, Read-Only View Object."
To define a named bind variable:
-
In the Application Navigator, double-click the view object.
-
In the overview editor, click the Query navigation tab.
-
In the Query page, expand the Bind Variables section and click the Create new bind variable button.
-
In the Bind Variable dialog, enter the name and data type for the new bind variable.
Because the bind variables share the same namespace as view object attributes, specify names that don't conflict with existing view object attribute names. As with view objects attributes, by convention bind variable names are created with an initial capital letter, but you can rename it as desired.
-
Optionally, specify a default value for the bind variable:
-
When you want the value to be determined at runtime using an expression, enter a Groovy scripting language expression, select the Expression value type and enter the expression in the Value field. Optionally, click Edit to open the Expression dialog. The Expression dialog gives you a larger text area to write the expression. For example, you might want to define a bind variable to filter view instances based on the current user, as described in Section 5.10.2, "How to Reference the Current User in a Named Bind Variable Using Groovy."
-
When you want to define a default value, select the Literal value type and enter the literal value in the Value field.
-
-
Decide on one of the following runtime usages for the bind variable:
-
When you want the value to be supplied to a SQL
WHEREclause using a bind variable in the clause, select the Required checkbox. This ensures that a runtime exception will be thrown if the value is not supplied. For more information, see Section 5.10.8.3, "Errors Related to Naming Bind Variables." -
When you want the value to be supplied to a view criteria using a bind variable in the view criteria, only select the Required checkbox when you need to reference the same bind variable in a SQL
WHEREclause or when you want to use the bind variable as the assigned value of a view criteria item that is specifically defined as required by a view criteria that is applied to a view object. When Required is unselected this ensures that the value is optional and that no runtime exception will be thrown if the bind variable is not resolved. For example, view criteria with bind variables defined can be used to create Query-by-Example search forms in the user interface. For more information, see Section 5.11, "Working with Named View Criteria."
-
-
Select the Control Hints tab and specify UI hints like Label Text, Format Type, Format mask, and others.
The view layer will use bind variable control hints when you build user interfaces like search pages that allow the user to enter values for the named bind variables. The Updatable checkbox controls whether the end user will be allowed to change the bind variable value through the user interface. If a bind variable is not updatable, then its value can only be changed programmatically by the developer.
-
Click OK.
After defining the bind variables, the next step is to reference them in the SQL statement. While SQL syntax allows bind variables to appear both in the SELECT list and in the WHERE clause, you'll typically use them in the latter context, as part of your WHERE clause. For example, Example 5-21 shows the bind variables LowUserId and HighUserId introduced into a SQL statement created using the Query page in the overview editor for the view object.
Example 5-21 Bind Variables in the WHERE Clause of View Object SQL Statement
select PERSON_ID, EMAIL, FIRST_NAME, LAST_NAME
from PERSONS
where (upper(FIRST_NAME) like upper(:TheName)||'%'
   or  upper(LAST_NAME)  like upper(:TheName)||'%')
  and PERSON_ID between :LowUserId and :HighUserId
order by EMAIL
Notice that you reference the bind variables in the SQL statement by prefixing their name with a colon like :TheName or :LowUserId. You can reference the bind variables in any order and repeat them as many times as needed within the SQL statement.
5.10.2 How to Reference the Current User in a Named Bind Variable Using Groovy
You can use the Groovy expression adf.context.securityContext.userName to set the default value for the named bind variable that you use to provide the current user in a view instance filter. Specifically, you can use the bind variable in a named view criteria that you define to filter a view object instance in the data model for the project. For example, in the StoreFront module of the Fusion Order Demo application, the named bind variable userPrincipal is defined for the PersonsVO view object, as shown in Figure 5-39.
The PersonsVO view object also defines the AuthenticatedUserByPrincipalCriteria view criteria. This view criteria defines a filter for the PrincipalName attribute of the PersonsVO with the bind variable userPrincipal providing the value. In this example, the bind variable userPrincipal is defined with Updatable enabled. This ensures that the view criteria is able to set the value obtained at runtime from the ADF security context. Since the bind variable is not used in the SQL WHERE clause for the PersonsVO view object, the Required field is unselected. This ensures that the value is optional and that no runtime exception will be thrown if the bind variable is not resolved.
Then in the data model for the StoreFrontService project, where the PersonsVO specifies the view definition for the usage AuthenticatedUser, the view criteria AuthenticatedUserByPrincipalCriteria with the named bind variable is defined as the view usage's runtime filter. For details about creating view instances for your project's data model, see Section 9.2.3.3, "Customizing a View Object Instance that You Add to an Application Module."
5.10.3 What Happens When You Add Named Bind Variables
Once you've added one or more named bind variables to a view object, you gain the ability to easily see and set the values of these variables at runtime. Information about the name, type, and default value of each bind variable is saved in the view object's XML component definition file. If you have defined UI control hints for the bind variables, this information is saved in the view object's component message bundle file along with other control hints for the view object.
5.10.4 How to Test Named Bind Variables
The Business Component Browser allows you to interactively inspect and change the values of the named bind variables for any view object, which can really simplify experimenting with your application module's data model when named bind parameters are involved. For more information about editing the data model and running the Business Component Browser, see Section 6.3, "Testing View Object Instances Using the Business Component Browser."
The first time you execute a view object in the Business Component Browser to display the results in the data view page, a Bind Variables dialog will appear, as shown in Figure 5-40.
The Bind Variables dialog lets you:
-
View the name, as well as the default and current values, of the particular bind variable you select from the list
-
Change the value of any bind variable by updating its corresponding Value field before clicking OK to set the bind variable values and execute the query
-
Inspect and set the bind variables for the view object in the current data view page, using the Edit Bind Parameters button in the toolbar — whose icon looks like "
:id" -
Verify control hints are correctly set up by showing the label text hint in the Bind Variables list and by formatting the Value attribute using the respective format mask
If you defined the bind variable in the Bind Variables dialog with the Reference checkbox deselected (the default), you will be able to test view criteria and supply the bind variable with values as needed. Otherwise, if you selected the Reference checkbox, then you must supply a value for the bind variable in the Business Component Browser. The Business Component Browser will throw the same exception seen at runtime for any view object whose SQL statement use bind variables that do not resolve with a supplied value.
5.10.5 How to Add a WHERE Clause with Named Bind Variables at Runtime
Using the view object's setWhereClause() method, you can add an additional filtering clause at runtime. This runtime-added WHERE clause predicate does not replace the design-time generated predicate, but rather further narrows the query result by adding to the existing design time WHERE clause. Whenever the dynamically added clause refers to a value that might change during the life of the application, you should use a named bind variable instead of concatenating the literal value into the WHERE clause predicate.
For example, assume you want to further filter the PersonList view object at runtime based on the value of the PERSON_TYPE_CODE column in the table. Also assume that you plan to search sometimes for rows where PERSON_TYPE_CODE = 'CUST' and other times for rows where PERSON_TYPE_CODE = 'SUPP'. While slightly fewer lines of code, Example 5-22 is not desirable because it changes the WHERE clause twice just to query two different values of the same PERSON_TYPE_CODE column.
Example 5-22 Incorrect Use of setWhereClause() Method
// Don't use literal strings if you plan to change the value!
vo.setWhereClause("person_type_code = 'CUST'");
// execute the query and process the results, and then later...
vo.setWhereClause("person_type_code = 'person'");
Instead, you should add a WHERE clause predicate that references named bind variables that you define at runtime as shown in Example 5-23.
Example 5-23 Correct Use of setWhereClause() Method and Bind Variable
vo.setWhereClause("person_type_code = :ThePersonType");
vo.defineNamedWhereClauseParam("ThePersonType", null, null);
vo.setNamedWhereClauseParam("ThePersonType","CUST");
// execute the query and process the results, and then later...
vo.setNamedWhereClauseParam("ThePersonType","person");
This allows the text of the SQL statement to stay the same, regardless of the value of PERSON_TYPE_CODE you need to query on. When the query text stays the same across multiple executions, the database will return the results without having to reparse the query.
If you later need to remove the dynamically added WHERE clause and bind variable, you should do so the next time you need them to be different, just before executing the query. This will prevent the type of SQL execution error as described in Section 5.10.8.1, "An Error Related to Clearing Bind Variables." Avoid calling removeNamedWhereClauseParam() in your code immediately after setting the WHERE clause. For a useful helper method to assist with this removal, see Section 5.10.8.2, "A Helper Method to Remove Named Bind Variables."
An updated test client class illustrating these techniques would look like what you see in Example 5-24. In this case, the functionality that loops over the results several times has been refactored into a separate executeAndShowResults() method. The program first adds an additional WHERE clause of person_id = :ThePersonId and then later replaces it with a second clause of person_type_code = :ThePersonType.
Example 5-24 TestClient Program Exercising Named Bind Variable Techniques
package devguide.examples.readonlyvo.client;

import oracle.jbo.ApplicationModule;
import oracle.jbo.Row;
import oracle.jbo.ViewObject;
import oracle.jbo.client.Configuration;
import oracle.jbo.domain.Number;

public class TestClientBindVars {
  public static void main(String[] args) {
    String        amDef = "devguide.examples.readonlyvo.PersonService";
    String        config = "PersonServiceLocal";
    ApplicationModule am =
     Configuration.createRootApplicationModule(amDef,config);
    ViewObject vo = am.findViewObject("PersonList");
    // Set the two design time named bind variables
    vo.setNamedWhereClauseParam("TheName","shelli%");
    vo.setNamedWhereClauseParam("HighUserId", new Number(215));
    executeAndShowResults(vo);
    // Add an extra where clause with a new named bind variable
    vo.setWhereClause("person_type_code = :ThePersonId");
    vo.defineNamedWhereClauseParam("ThePersonId", null, null);
    vo.setNamedWhereClauseParam("ThePersonId",new Number(116));
    executeAndShowResults(vo);
    vo.removeNamedWhereClauseParam("ThePersonId");
    // Add an extra where clause with a new named bind variable
    vo.setWhereClause("person_type_code = :ThePersonType");
    vo.defineNamedWhereClauseParam("ThePersonType", null, null);
    vo.setNamedWhereClauseParam("ThePersonType","SUPP");
    // Show results when :ThePersonType = 'SUPP'
    executeAndShowResults(vo);
    vo.setNamedWhereClauseParam("ThePersonType","CUST");
    // Show results when :ThePersonType = 'CUST'
    executeAndShowResults(vo);
    Configuration.releaseRootApplicationModule(am,true);
  }
  private static void executeAndShowResults(ViewObject vo) {
    System.out.println("---");
    vo.executeQuery();
    while (vo.hasNext()) {
      Row curUser = vo.next();
      System.out.println(curUser.getAttribute("PersonId")+" "+
                         curUser.getAttribute("ShortName"));
    }
  }
}
However, if you run this test program, you may actually get a runtime error like the one shown in Example 5-25.
Example 5-25 Runtime Error Resulting From a SQL Parsing Error
oracle.jbo.SQLStmtException: JBO-27122: SQL error during statement preparation.
Statement:
SELECT * FROM (select PERSON_ID, EMAIL, FIRST_NAME, LAST_NAME
from PERSONS
where (upper(FIRST_NAME) like upper(:TheName)||'%'
   or  upper(LAST_NAME)  like upper(:TheName)||'%')
  and PERSON_ID between :LowUserId and :HighUserId
order by EMAIL) QRSLT  WHERE (person_type_code = :ThePersonType)
## Detail 0 ##
java.sql.SQLException: ORA-00904: "PERSON_TYPE": invalid identifier
The root cause, which appears after the ## Detail 0 ## in the stack trace, is a SQL parsing error from the database reporting that PERSON_TYPE_CODE column does not exist even though the PERSONS table definitely has a PERSON_TYPE_CODE column. The problem occurs due to the mechanism that view objects use by default to apply additional runtime WHERE clauses on top of read-only queries. Section 5.10.7, "What Happens at Runtime: When a Read-Only View Object WHERE Clause is Set," explains a resolution for this issue.
5.10.6 How to Set Existing Bind Variable Values at Runtime
To set named bind variables at runtime, use the setNamedWhereClauseParam() method on the ViewObject interface. In JDeveloper, you can choose Refactor > Duplicate to create a new TestClientBindVars class based on the existing TestClient.java class as shown in Section 6.4.2, "How to Create a Command-Line Java Test Client." In the test client class, you can set the values of the bind variables using a few additional lines of code. For example, the setNamedWhereClauseParam() might take as arguments the bind variables HighUserId and TheName as shown in Example 5-26.
Example 5-26 Setting the Value of Named Bind Variables Programmatically
// changed lines in TestClient class
ViewObject vo = am.findViewObject("PersonList");
vo.setNamedWhereClauseParam("TheName","alex%");
vo.setNamedWhereClauseParam("HighUserId", new Number(315));
vo.executeQuery();
// etc.
Running the test client class shows that your bind variables are filtering the data. For example, the resulting rows for the setNamedWhereClauseParam() method shown in Example 5-26 may show only two matches based on the name alex as shown in Example 5-27.
Whenever a view object's query is executed, you can view the actual bind variable values in the runtime debug diagnostics like the sample shown in Example 5-28.
Example 5-28 Debug Diagnostic Sample With Bind Variable Values
[256] Bind params for ViewObject: PersonList
[257] Binding param "LowUserId": 0
[258] Binding param "HighUserId": 315
[259] Binding param "TheName": alex%
This information that can be invaluable when debugging your applications. Notice that since the code did not set the value of the LowUserId bind variable, it took on the default value of 0 (zero) specified at design time. Also notice that the use of the UPPER() function in the WHERE clause and around the bind variable ensured that the match using the bind variable value for TheName was performed case-insensitively. The sample code set the bind variable value to "alex%" with a lowercase "a", and the results show that it matched Alexander.
5.10.7 What Happens at Runtime: When a Read-Only View Object WHERE Clause is Set
If you dynamically add an additional WHERE clause at runtime to a read-only view object, its query gets nested into an inline view before applying the additional WHERE clause.
For example, suppose your query was defined as shown in Example 5-29.
Example 5-29 Query Specified At Design Time
select PERSON_ID, EMAIL, FIRST_NAME, LAST_NAME
from PERSONS
where (upper(FIRST_NAME) like upper(:TheName)||'%'
   or  upper(LAST_NAME)  like upper(:TheName)||'%')
  and PERSON_ID between :LowUserId and :HighUserId
order by EMAIL
At runtime, when you set an additional WHERE clause like person_type_code = :ThePersonType as the test program did in Example 5-24, the framework nests the original query into an inline view like the sample shown in Example 5-30.
Example 5-30 Runtime-Generated Query With Inline Nested Query
SELECT * FROM(
select PERSON_ID, EMAIL, FIRST_NAME, LAST_NAME
from PERSONS
where (upper(FIRST_NAME) like upper(:TheName)||'%'
   or  upper(LAST_NAME)  like upper(:TheName)||'%')
  and PERSON_ID between :LowUserId and :HighUserId
order by EMAIL) QRSLT
Then the framework adds the dynamic WHERE clause predicate at the end, so that the final query the database sees is like the sample shown in Example 5-31.
Example 5-31 Runtime-Generated Query With Dynamic WHERE Clause
SELECT * FROM(
select PERSON_ID, EMAIL, FIRST_NAME, LAST_NAME
from PERSONS
where (upper(FIRST_NAME) like upper(:TheName)||'%'
   or  upper(LAST_NAME)  like upper(:TheName)||'%')
  and PERSON_ID between :LowUserId and :HighUserId
order by EMAIL) QRSLT
WHERE person_type_code = :ThePersonType
This query "wrapping" is necessary in the general case since the original query could be arbitrarily complex, including SQL UNION, INTERSECT, MINUS, or other operators that combine multiple queries into a single result. In those cases, simply "gluing" the additional runtime WHERE clause onto the end of the query text could produce unexpected results because, for example, it might apply only to the last of several UNION'ed statements. By nesting the original query verbatim into an inline view, the view object guarantees that your additional WHERE clause is correctly used to filter the results of the original query, regardless of how complex it is. The consequence (that results in an ORA-00904 error) is that the dynamically added WHERE clause can refer only to columns that have been selected in the original query.
The simplest solution is to add the dynamic query column names to the end of the query's SELECT list on the Edit Query dialog (click the Edit SQL Query button on the Query page of the overview editor for the view object). Just adding the new column name at the end of the existing SELECT list — of course, preceded by a comma — is enough to prevent the ORA-00904 error: JDeveloper will automatically keep your view object's attribute list synchronized with the query statement. Alternatively, Section 5.9.4.7, "Limitation of Inline View Wrapping at Runtime" explains how to disable this query nesting when you don't require it.
The test client program in Example 5-24 now produces the results shown in Example 5-32.
5.10.8 What You May Need to Know About Named Bind Variables
There are several things you may need to know about named bind variables, including the runtime errors that are displayed when bind variables have mismatched names and the default value for bind variables.
5.10.8.1 An Error Related to Clearing Bind Variables
You need to ensure that your application handles changing the value of bind variables properly for use with activation and passivation of the view object instance settings at runtime. For example, before you deploy the application, you will want to stress-test your application in JDeveloper by disabling application module pooling, as described in Section 40.10, "Testing to Ensure Your Application Module is Activation-Safe." Following the instructions in that section effectively simulates the way your application will manage the passivation store when you eventually deploy the application.
When the application reactivates the pending state from the passivation store upon subsequent requests during the same user session, the application will attempt to set the values of any dynamically added named WHERE clause bind variables. Changing the values to null before passivation take places will prevent the bind variable values from matching the last time the view object was executed and the following error will occur during activation:
(oracle.jbo.SQLStmtException) JBO-27122: SQL error during statement preparation.
(java.sql.SQLException) Attempt to set a parameter name that does not occur in SQL: 1
Do not change the value of the bind variables (or other view object instance settings) just after executing the view object. Rather, if you will not be re-executing the view object again during the same block of code (and therefore during the same HTTP request), you should defer changing the bind variable values for the view object instance until the next time you need them to change, just before executing the query. To accomplish this, use the following pattern:
-
(Request begins and application module is acquired)
-
Call
setWhereClause(null)to clearWHEREclause -
Call
setWhereClauseParam(null)to clear theWHEREclause bind variables -
Call
setWhereClause()that references n bind variables -
Calling
setWhereClauseParam()to set the n values for those n bind variables -
Calling
executeQuery() -
(Application module is released)
5.10.8.2 A Helper Method to Remove Named Bind Variables
The helper method clearWhereState() that you can add to your ViewObjectImpl framework ensures that declaratively defined bind variables are not removed. Example 5-33 shows the use of clearWhereState() to safely remove named bind variables that have been added to the view instance at runtime.
Example 5-33 Helper Method to Clear Named Bind Variables Values Programmatically
protected void clearWhereState() {
        ViewDefImpl viewDef = getViewDef();
        Variable[] viewInstanceVars = null;
        VariableManager viewInstanceVarMgr = ensureVariableManager();
        if (viewInstanceVarMgr != null) {
        viewInstanceVars = viewInstanceVarMgr.getVariablesOfKind
                                       (Variable.VAR_KIND_WHERE_CLAUSE_PARAM);
        if (viewInstanceVars != null) {
              for (Variable v: viewInstanceVars) {
                  // only remove the variable if its not on the view def.
                  if (!hasViewDefVariableNamed(v.getName())) {
                    removeNamedWhereClauseParam(v.getName());
                  }
              }
         }
    }
    getDefaultRowSet().setExecuteParameters(null, null, true);
    setWhereClause(null);
    getDefaultRowSet().setWhereClauseParams(null);
}
private boolean hasViewDefVariableNamed(String name) {
    boolean ret = false;
    VariableManager viewDefVarMgr = getViewDef().ensureVariableManager();
    if (viewDefVarMgr != null) {
        try {
            ret = viewDefVarMgr.findVariable(name) != null;
        }
        catch (NoDefException ex) {
               // ignore
        }
    }
    return ret;
}
5.10.8.3 Errors Related to Naming Bind Variables
You need to ensure that the list of named bind variables that you reference in your SQL statement matches the list of named bind variables that you've defined in the Bind Variables section of the overview editor's Query page for the view object. Failure to have these two agree correctly can result in one of the following two errors at runtime.
If you use a named bind variable in your SQL statement but have not defined it, you'll receive an error like this:
(oracle.jbo.SQLStmtException) JBO-27122: SQL error during statement preparation.
## Detail 0 ##
(java.sql.SQLException) Missing IN or OUT parameter at index:: 1
On the other hand, if you have defined a named bind variable, but then forgotten to reference it or mistyped its name in the SQL, then you will see an error like this:
oracle.jbo.SQLStmtException: JBO-27122: SQL error during statement preparation.
## Detail 0 ##
java.sql.SQLException: Attempt to set a parameter name that does not occur in the SQL: LowUserId
To resolve either of these errors, double-check that the list of named bind variables in the SQL matches the list of named bind variables in the Bind Variables section of the overview editor's Query page for the view object. Additionally, open the Bind Variables dialog for the bind variable and verify that the Reference checkbox is not still deselected (the default). To use the bind variable in a SQL statement, you must select the Reference checkbox.
5.10.8.4 Default Value of NULL for Bind Variables
If you do not supply a default value for your named bind variable, it defaults to the NULL value at runtime. This means that if you have a WHERE clause like:
PERSON_ID = :ThePersonId
and you do not provide a default value for the ThePersonId bind variable, it will default to having a NULL value and cause the query to return no rows. Where it makes sense for your application, you can leverage SQL functions like NVL(), CASE, DECODE(), or others to handle the situation as you require. For example, the following WHERE clause fragment allows the view object query to match any name if the value of :TheName is null.
upper(FIRST_NAME) like upper(:TheName)||'%'
5.11 Working with Named View Criteria
A view criteria you define lets you specify filter information for the rows of a view object collection. The view criteria object is a row set of one or more view criteria rows, whose attributes mirror those in the view object. The view criteria definition comprises query conditions that augment the WHERE clause of the target view object. Query conditions that you specify apply to the individual attributes of the target view object.
The key difference between a view object row of query results and a view criteria row is that the data type of each attribute in the view criteria row is String. This key difference supports Query-by-Example operators and therefore allows the user to enter conditions such as "OrderId > 304", for example.
The Edit View Criteria dialog lets you create view criteria and save them as part of the view object's definition, where they appear as named view criteria. You use the Query page of the overview editor to define view criteria for specific view objects.
Additionally, view criteria have full API support, and it is therefore possible to create and apply view criteria to view objects programmatically.
5.11.1 How to Create Named View Criteria Declaratively
You create named view criteria definitions when you need to filter individual view object results. View criteria that you define at design time can participate in these scenarios where filtering results is desired at runtime:
-
Supporting Query-by-Example search forms that allow the end user to supply values for attributes of the target view object.
For example, the end user might input the value of a customer name and the date to filter the results in a web page that displays the rows of the
CustomerOrdersview object. The web page designer will see the named view criteria in the JDeveloper Data Controls panel and, from them, easily create a search form. For more information about the utilizing the named view criteria in the Data Controls panel, see Section 27.2, "Creating Query Search Forms." -
Filtering the list of values (LOV) components that allow the end user may select from one attribute list (displayed in the UI as an LOV component).
The web page designer will see the attributes of the view object in the JDeveloper Data Controls panel and, from them, easily create LOV controls. For more information about utilizing LOV-enabled attributes in the Data Controls panel, see Section 25.3, "Creating a Selection List."
-
Validating attribute values using a view accessor with a view criteria applied to filter the view accessor results.
For more information about create view accessor validators, see Section 10.4.2, "How to Validate Against a View Accessor."
-
Creating the application module's data model from a single view object definition with a unique view criteria applied for each view instance.
The single view object query modified by view criteria is useful with look up data that must be shared across the application. In this case, a base view object definition queries the lookup table in the database and the view criteria set the lookup table's
TYPEcolumn to define application-specific views. To define view instances in the data model using the view criteria you create for a base view object definition, see Section 10.3.3, "How to Define the WHERE Clause of the Lookup View Object Using View Criteria."
To define view criteria for the view object you wish to filter, you open the view object in the overview editor and use the View Criteria section of the Query page. A dedicated editor that you open from the View Criteria section helps you to build a WHERE clause using attribute names instead of the target view object's corresponding SQL column names. You may define multiple named view criteria for each view object.
Each view criteria definition consists of the following elements:
-
One or more view criteria rows consisting of an arbitrary number of view criteria groups or an arbitrary number of references to another named view criteria already defined for the current view object.
-
Optional view criteria groups consisting of an arbitrary number of view criteria items.
-
View criteria items consisting of an attribute name, an attribute-appropriate operator, and an operand. Operands can be a literal value when the filter value is defined or a bind variable that can optionally utilize a scripting expression that includes dot notation access to attribute property values.
Expressions are based on the Groovy scripting language, as described in Section 3.6, "Overview of Groovy Support."
When you define a view criteria, you control the source of the filtered results. You can limit the results of the filtered view object to:
-
Just the database table specified by the view object
-
Just the in-memory results of the view object query
-
Both the database and the in-memory results of the view object query.
Filtering on both database tables and the view object's in-memory results allows you to filter rows that were created in the transaction but not yet committed to the database.
View criteria expressions you construct in the Edit View Criteria dialog use logical conjunctions to specify how to join the selected criteria item or criteria group with the previous item or group in the expression:
-
ANDconjunctions specify that the query results meet both joined conditions. This is the default for each view criteria item you add. -
ORconjunctions specify that the query results meet either or both joined conditions. This is the default for view criteria groups.
Additionally, you may create nested view criteria when you want to filter rows in the current view object based on criteria applied to view-linked detail views. A nested view criteria group consists of an arbitrary number of nested view criteria items. You can use nested view criteria when you want to have more controls over the logical conjunctions among the various view criteria items. The nested criteria place restrictions on the rows that satisfy the criteria under the nested criteria's parent view criteria group. For example, you might want to query both a list of employees with (Salary > 3000) and belonging to (DeptNo = 10 or DeptNo = 20). You can define a view criteria with the first group with one item for (Salary > 3000) and a nested view criteria with the second group with two items DeptNo = 10 and DeptNo =20.
-
Create the desired view objects as described in Section 5.2.1, "How to Create an Entity-Based View Object," and Section 5.2.3, "How to Create an Expert Mode, Read-Only View Object."
-
If the view criteria will use a bind variable in the operand, create the bind variable as described in Section 5.10.1, "How to Add Bind Variables to a View Object Definition."
To define a named view criteria:
-
In the Application Navigator, double-click the view object for which you want to create the named view criteria.
-
In the overview editor, click the Query navigation tab.
-
In the Query page, expand the View Criteria section and click the Create new view criteria button.
-
In the Create View Criteria dialog, enter the name of the view criteria to identify its usage in your application.
-
In the Query Execution Mode dropdown list, decide how you want the view criteria to filter the view object query results.
You can limit the view criteria to filter the database table specified by the view object query, the in memory row set produced by the query, or both the database table and the in-memory results.
Choosing Both may be appropriate for situations where you want to include rows created as a result of enforced association consistency. In this case, in-memory filtering is performed after the initial fetch.
-
Click one of these Add buttons to define the view criteria.
-
Add Item to add a single criteria item. The editor will add the item to the hierarchy beneath the current group or view criteria selection. By default each time you add an item, the editor will choose the next attribute to define the criteria item. You can change the attribute to any attribute that the view object query defines.
-
Add Group to add a new group that will compose criteria items that you intend to add to it. When you add a new group, the editor inserts the
ORconjunction into the hierarchy. You can change the conjunction as desired. -
Add Criteria to add a view criteria that you intend to define. This selection is an alternative to adding a named criteria that already exists in the view object definition. When you add a new view criteria, the editor inserts the
ANDconjunction into the hierarchy. You can change the conjunction as desired. Each time you add another view criteria, the editor nests the new view criteria beneath the current view criteria selection in the hierarchy. The root node of the hierarchy defines the named view criteria that you are currently editing.Search forms that the UI designer will create from view criteria are not able to use directly nested view criteria. For more information about defining nested expressions for use with search forms, see Section 5.11.4, "What You May Need to Know About Nested Expressions."
-
Add Named Criteria to add a view criteria that the view object defines. The named criteria must appear in the overview editor for the view object you are defining the view criteria.
-
-
Select a view criteria item node in the view criteria hierarchy and define the added node in the Criteria Item section.
-
Choose the desired Attribute for the criteria item. By default the editor adds the first one in the list.
Optionally, you can add a nested view criteria inline when a view link exists for the current view object you are editing. The destination view object name will appear in the Attribute dropdown list. Selecting a view object lets you filter the view criteria based on view criteria items for the nested view criteria based on a view link relationship. For example,
AddressVOis linked to thePaymentOptionsVOand a view criteria definition forPaymentOptionsVOwill display the destination view objectAddressVO. You could define the nested view criteria to filter payment options based on theCountryIdattribute of the current customer, as specified by theCustomerIdcriteria item, as shown in Figure 5-41. -
Choose the desired Operator.
The list displays only the operators that are appropriate for the selected attribute or view object. In the case of a view object selection, the exists operator applies to a view criteria that you will define (or reference) as an operand. In the case of Strings and Date type attributes, the Between and Not between operators require you to supply two operand values to define the range. In the case of Date type attributes, you can select operators that test for a date or date range (with date values entered in the format YYYY-MM-DD). For example, for December 16th, 2010, enter 2010-12-16.
JDeveloper does not support the
INoperator. However, you can create a view criteria with theINoperator using the API, as described in Section 5.11.7, "How to Create View Criteria Programmatically."
-
-
Choose the desired Operand for the view criteria item selection.
-
Select Literal when you want to supply a value for the attribute or when you want to define a default value for a user-specified search field for a Query-by-Example search form. When the view criteria defines a query search form for the user interface, you may leave the Value field empty. In this case, the user will supply the value. You may also provide a value that will act as a search field default value that the user will be able to override. The value you supply in the Value field can include wildcard characters
*or%. -
Select Bind Variable when you want the value to be determined at runtime using a bind variable. If the variable was already defined for the view object, select it from the Parameters dropdown list. Otherwise, click New to display the Bind Variable dialog that lets you create a new bind variable on the view object. For more information about creating bind variables, see Section 5.10.1, "How to Add Bind Variables to a View Object Definition."
When you define bind variables on the view object for use by the view criteria, you must specify that the variable is not required by the SQL query that the view object defines. To do this, deselect the Required checkbox in the Bind Variables dialog, as explained in Section 5.10.1, "How to Add Bind Variables to a View Object Definition."
For further discussion about view criteria use cases for bind variables and literals, see Section 5.11.3, "What You May Need to Know About Bind Variable Options."
-
-
For each item, group, or nested view criteria that you define, optionally change the default conjunction to specify how the selection should be joined.
-
AND conjunction specifies that the query results meet both joined conditions. This is the default for each view criteria item or view nested view criteria that you add.
-
OR conjunction specifies that the query results meet either or both joined conditions. This is the default for view criteria groups.
-
-
Verify that the view criteria definition is valid by doing one of the following:
-
Click Explain Plan to visually inspect the view criteria's generated
WHEREclause. -
Click Test to allow JDeveloper to verify that the
WHEREclause is valid.
-
-
To prevent the attribute to be filtered based on the case of the runtime-supplied value, leave Ignore Case selected.
The criteria item can be a literal value that you define or a runtime parameter that the end user supplies. This option is supported for attributes of type String only. The default disables case sensitive searches.
-
In the Validation dropdown list, decide whether the view criteria item is a required or an optional part of the attribute value comparison in the generated
WHEREclause.-
Selectively Required means that the
WHEREclause will ignore the view criteria item at runtime if no value is supplied and there exists at least one criteria item at the same level that has a criteria value. Otherwise, an exception is thrown. -
Optional means the view criteria is added to the
WHEREclause only if the value is non-NULL. The default Optional for each new view criteria item means no exception will be generated for null values. -
Required means that the
WHEREclause will fail to execute and an exception will be thrown when no value is supplied for the criteria item.
-
-
If the view criteria uses a bind variable as the operand, decide whether the
IS NULLcondition is the generated in theWHEREclause. This field is enabled only if you have selected Optional for the validation of the bind variable.-
Leave Ignore Null Values selected (default) when you want to permit the view criteria to return a result even when the bind variable value is not supplied at runtime. For example, suppose you define a view criteria to allow users to display a cascading list of countries and states (or provinces) through a bind variable that takes the
countryIDas the child list's controlling attribute. In this case, the default behavior for the view criteria execution returns the list of all states if the user makes no selection in the parent LOV (an emptycountryIdfield). The generatedWHEREclause would look similar to(((CountryEO.COUNTRY_ID =:bvCountryId) OR (:bvCountryId IS NULL))), where the test for a null value guarantees that the child list displays a result even when the bind variable is not set. When validation is set to Required or Optionally Required, the view criteria expects to receive a value and thus this option to ignore null values is disabled. -
Deselect Ignore Null Values when you expect the view criteria to return a null result when the bind variable value is not supplied at runtime. In the example of the cascading lists, the view criteria execution returns no states if the user makes no selection with an empty
countryIDfield. In this case, the generatedWHEREclause would look similar to((CountryEO.COUNTRY_ID=:bvCountryId)), where the test for null is not performed, which means the query is expected to function correctly with a null value bind variable.Note that the validation settings Required or Optionally Required also remove the null value condition but support a different use case. They should be used in combination with Ignore Null Values feature to achieve the desired runtime behavior. For more details about the interaction of these features, see Section 5.11.3, "What You May Need to Know About Bind Variable Options."
-
-
Click OK.
5.11.2 What Happens When You Create a Named View Criteria
The Create View Criteria dialog in JDeveloper lets you easily create view criteria and save them as named definitions. These named view criteria definitions add metadata to the target view object's own definition. Once defined, named view criteria appear by name in the Query page of the overview editor for the view object.
JDeveloper then creates the XML component definition file that represents the view object's declarative settings and saves it in the directory that corresponds to the name of its package. For example, the XML file created for a view object named ProductsVO in the queries package is ./queries/ProductsVO.xml under the project's source path.
To view the view criteria, expand the desired view object in the Application Navigator, select the XML file under the expanded view object, open the Structure window, and expand the View Criteria node. Each view criteria definition for a view object contains one or more <ViewCriteriaRow> elements corresponding to the number of groups that you define in the Create View Criteria dialog. Example 5-34 shows the ProductsVO.xml file with the <ViewCriteria> definition FindByProductNameCriteria and a single <ViewCriteriaRow> that defines a developer-seeded search for products using the bind variable :bvProductName. Any UI hints that you selected to customize the behavior of a developer-seeded search will appear in the <ViewCriteria> definition as attributes of the <CustomProperties> element. For details about specific UI hints for view criteria, see Section 5.11.5, "How to Set User Interface Hints on View Criteria."
Example 5-34 FindByProductNameCriteria View Criteria in the ProductsVO View Object Definition
<ViewObject
    xmlns="http://xmlns.oracle.com/bc4j"
    Name="ProductsVO"
    ... >
  <SQLQuery>
    ...
  </SQLQuery>
  ...
  <ViewCriteria
    Name="FindByProductNameCriteria"
    ViewObjectName="oracle.fodemo.storefront.store.queries.ProductsVO"
    Conjunction="AND">
    <Properties>
      <CustomProperties>
        <Property
          Name="mode"
          Value="Basic"/>
        <Property
          Name="autoExecute"
          Value="false"/>
        <Property
          Name="showInList"
          Value="true"/>
        <Property
          Name="displayName"
          Value="Find Products By Name"/>
        <Property
          Name="displayOperators"
          Value="InAdvancedMode"/>
        <Property
          Name="allowConjunctionOverride"
          Value="true"/>
      </CustomProperties>
    </Properties>
    <ViewCriteriaRow
      Name="vcrow87">
      <ViewCriteriaItem
        Name="ProductName"
        ViewAttribute="ProductName"
        Operator="CONTAINS"
        Conjunction="AND"
        Value=":bvProductName"
        UpperColumns="1"
        IsBindVarValue="true"
        Required="Optional"/>
    </ViewCriteriaRow>
  </ViewCriteria>
  ...
</ViewObject>
Additionally, when you create view objects and specify them as instances in an application module, JDeveloper automatically creates a data control to encapsulate the collections (view instances) that the application module contains. JDeveloper then populates the Data Controls panel with these collections and any view criteria that you have defined, as shown in Section 12.2.1.3, "How View Objects Appear in the Data Controls Panel."
5.11.3 What You May Need to Know About Bind Variable Options
The view criteria filter that you define using a bind variable expects to obtain its value at runtime. This can be helpful in a variety of user interface scenarios. To support a particular use case, familiarize yourself with the combination of the Validation and Ignore Null Values settings shown in Table 5-1.
Table 5-1 Use Cases for Bind Variable Options in View Criteria
| Validation | Ignore Null Values | Use Cases | Notes |
|---|---|---|---|
|
|
|
Configure cascading List of Values (LOV) where the parent LOV value is optional. Generate an optional search field in a search form. |
This combination generates the SQL query When used for cascading LOVs, no selection in the parent LOV returns all rows in the child LOV. Note that the preferred implementation for an optional search field is a view criteria item with a literal operand type. |
|
|
|
Configure cascading LOVs where the parent LOV value is required. |
This combination generates the SQL query When used for cascading LOVs, no selection in the parent LOV returns no rows in the child LOV. Avoid this combination for search forms, because when the user leaves the search field blank the search will attempt to find rows where this field is explicitly NULL. A better way to achieve this is for the user to explicitly select the "IS NULL" operator in advanced search mode. |
|
|
|
Generate a required search field in a search form. |
This combination generates the SQL query Avoid this setting for cascading LOVs, because no selection in the parent LOV will cause a validation error. Note that the preferred implementation for a required search field is a view criteria item with a literal operand (not a bind variable) type. |
5.11.4 What You May Need to Know About Nested Expressions
Search forms that the UI designer will create from view criteria are not able to work with all types of nested expressions. Specifically, search forms do not support expressions with directly nested view criteria. This type of nested expression defines one view criteria as a direct child of another view criteria. Query search forms do support nested expressions where you nest the view criteria as a child of a criteria item which is itself a child of a view criteria. For more information about using view criteria to create search forms, see Section 27.1.5, "Implicit and Named View Criteria."
5.11.5 How to Set User Interface Hints on View Criteria
Named view criteria that you create for view object collections can be used by the web page designer to create Query-by-Example search forms. Web page designers select your named view criteria from the JDeveloper Data Controls panel to create search forms for the Fusion web application. In the web page, the search form utilizes an ADF Faces query search component that will be bound initially to the named view criteria selected in the Data Controls panel. At runtime, the end user may select among all other named view criteria that appear in the Data Controls panel. Named view criteria that the end user can select in a search form are known as developer-seeded searches. The query component automatically displays these seeded searches in its Saved Search dropdown list. For more information about creating search forms and using the ADF query search component, see Section 27.2, "Creating Query Search Forms."
Note:
By default, any named view criteria you create in the Edit View Criteria dialog will appear in the Data Controls panel. As long as the Show In List option appears selected in the UI Hints page of the Edit View Criteria dialog, JDeveloper assumes that the named view criteria should be available as a developer-seeded search. When you want to create a named view criteria that you do not want the end user to see in search forms, deselect the Show In List option in the dialog. For example, you might create a named view criteria only for an LOV-enabled attribute and so you would need to deselect Show In List.Because developer-seeded searches are created in the data model project, the UI Hints page of the Edit View Criteria dialog lets you specify the default properties for the query component's runtime usage of individual named view criteria. At runtime, the query component's behavior will conform to the selections you make for the following seeded search properties:
Search Region Mode: Select the mode that you want the query component to display the seeded search as. The Basic mode has all features of Advanced mode, except that it does not allow the end user to dynamically modify the displayed search criteria fields. The default is Basic mode for a view criteria you define in the Edit View Criteria dialog.
Query Automatically: Select when you want the query associated with the named view criteria to be executed and the results displayed in the web page. Any developer-seeded search with this option enabled will automatically be executed when the end user selects it from the query component's Saved Search list. Deselect when the web page designer prefers not to update the previously displayed results until the end user submits the search criteria values on the form. Additionally, when a search form is invoked from a task flow, the search form will appear empty when this option is deselected and populated when enabled. By default, this option is disabled for a view criteria you define in the Edit View Criteria dialog.
Show Operators: Determine how you want the query component to display the operator selection field for the view criteria items to the end user. For example, select Always when you want to allow the end user to customize the operators for criteria items (in either basic or advanced modes) or select Never when you want the view criteria to be executed using the operators it defines. Note that the end user cannot change the operator for criteria items that you specify with a bind variable because bind variables may be used in more than one criteria item.
Show Match All and Match Any: Select to allow the query component to display the Match All and Match Any radio selection buttons to the end user. When these buttons are present, the end user can use them to modify the search to return matches for all criteria or any one criteria. This is equivalent to enforcing AND (match all) or OR (match any) conjunctions between view criteria items. Deselect when you want the view criteria to be executed using the conjunctions it defines. In this case, the query component will not display the radio selection buttons.
Rendered Mode: Select individual view criteria items from the view criteria tree component and choose whether you want the selected item to appear in the search form when the end user toggles the query component between basic mode and advanced mode. The default for every view criteria item is All. The default mode permits the query component to render an item in either basic or advanced mode. By changing the Rendered Mode setting for individual view criteria items, you can customize the search form's appearance at runtime. For example, you may want basic mode to display a simplified search form to the end user, reserving advanced mode for displaying a search form with the full set of view criteria items. In this case, you would select Advanced for the view criteria item that you do not want displayed in the query component's basic mode. In contrast, when you want the selected view criteria item to be rendered only in basic mode, select Basic. Set any item that you do not want the search form to render in either basic or advanced mode to Never.
Note:
When your view criteria includes an item that should not be exposed to the user, use the Rendered Mode setting Never to prevent it from appearing in the search form. For example, a view criteria may be created to search for products in the logged-in customer's cart; however, you may want to prevent the user from changing the customer ID to display another customer's cart contents. In this scenario, the view criteria item corresponding to the customer ID would be set to the current customer ID using a named bind variable. Although the bind variable definition might specify the variable as not required and not updatable, with the control hint property Display set to Hide, only the Rendered Mode setting determines whether or not the search form displays the value.Support Multiple Value Selection: Select when you want to allow the end user to make multiple selections for an individual criteria item that the query component displays. This option is only enabled when the view object attribute specified by the view criteria item has a List of Values (LOV) defined. Additionally, multiple selections will only be supported by the query component when the end user selects the operator equal to or not equal to. For example, if the criteria item names an attribute CountryId and this attribute derives its values from a list of country IDs accessed by the attribute's associated LOV, then selecting this option would allow the end user to submit the query with multiple country selections. At runtime, the query component will generate the appropriate query clause based on the end user's operator selection.
Show In List: Select to ensure that the view criteria is defined as a developer-seeded query. Deselect when the named view criteria you are defining is not to be used by the query search component to display a search form. Your selection determines whether the named view criteria will appear in the query search component's Saved Search dropdown list of available seeded searches. By default, this option is enabled for a view criteria you define in the Edit View Criteria dialog.
Display Name: Enter the name of the seeded search that you want to appear in the query component's Saved Search dropdown list or click the ... button (to the right of the edit field) to select a message string from the resource bundle associated with the view object. The display name will be the name by which the end user identifies the seeded search. When you select a message string from the resource bundle, JDeveloper saves the string's corresponding message key in the view object definition file. At runtime, the UI locates the string to display based on the end user's locale setting and the message key in the localized resource bundle. When you do not specify a display name, the view criteria name displayed in the Edit View Criteria dialog will be used by default.
To create a seeded search for use by the ADF query search component, you select Show In List in the UI Hints page of the Edit View Criteria dialog. You deselect Show In List when you do not want the end user to see the view criteria in their search form.
-
Create the desired view objects as described in Section 5.2.1, "How to Create an Entity-Based View Object," and Section 5.2.3, "How to Create an Expert Mode, Read-Only View Object."
-
Create the view criteria as described in Section 5.11.1, "How to Create Named View Criteria Declaratively."
To customize a named view criteria for the user interface:
-
In the Application Navigator, double-click the view object that defines the named view criteria you want to use as a seeded search.
-
In the overview editor, click the Query navigation tab.
-
In the Query page, expand the View Criteria section and double-click the named view criteria that you want to allow in seeded searches.
-
On the UI Hints page of the Edit View Criteria dialog, ensure that Show In List is selected.
This selection determines whether or not the query component will display the seeded search in its Saved Search dropdown list.
-
Enter a user-friendly display name for the seeded search to be added to the query component Saved Search dropdown list.
When left empty, the view criteria name displayed in the Edit View Criteria dialog will be used by the query component.
-
Optionally, enable Query Automatically when you want the query component to automatically display the search results whenever the end user selects the seeded search from the Saved Search dropdown list.
By default, no search results will be displayed.
-
Optionally, apply Criteria Item UI Hints to customize whether the query component renders individual criteria items when the end user toggles the search from between basic and advanced mode.
By default, all view criteria items defined by the seeded search will be displayed in either mode.
If a rendered criteria item is of type
Date, you must also define UI hints for the corresponding view object attribute. Set the view object attribute's Format Type hint to Simple Date and set the Format Mask to an appropriate value, as described in Section 5.13.1, "How to Add Attribute Control Hints." This will allow the search form to accept date values. -
Click OK.
5.11.6 How to Test View Criteria Using the Business Component Browser
To test the view criteria you added to a view object, use the Business Component Browser, which is accessible from the Application Navigator.
The Business Component Browser, for any view object instance that you browse, lets you bring up the Business Components View Criteria dialog, as shown in Figure 5-42. The dialog allows you to create a view criteria comprising one or more view criteria rows.
To apply criteria attributes from a single view criteria row, click the Specify View Criteria toolbar button in the browser and enter Query-by-Example criteria in the desired fields, then click Find.
To test view criteria using the Business Component Browser:
-
In the Application Navigator, expand the project containing the desired application module and view objects.
-
Right-click the application module and choose Run.
-
In the Business Component Browser, right-click the view instance you want to filter and choose Find.
Alternatively, after you double-click a view instance, you can click the Specify View Criteria toolbar button to test the view criteria.
-
In the Business Components View Criteria dialog, perform one of the following tasks:
-
To test a view criteria that you added to the view object in your project, select from the list and click Find. Any additional criteria that you enter in the ad hoc Criteria panel will be added to the filter.
-
To test ad hoc criteria attributes from a single view criteria row, enter the desired values for the view criteria and click Find. For example, Figure 5-42 shows the filter to return all customers who possess a customer ID that begins with the letter "
d" and placed an order in the amount greater than100. -
To test additional ad hoc view criteria rows, click the OR tab and use the additional tabs that appear to switch between pages, each representing a distinct view criteria row. When you click Find, the Business Component Browser will create and apply the view criteria to filter the result.
-
5.11.7 How to Create View Criteria Programmatically
Example 5-35 shows the main() method finds the PersonList view object instance to be filtered, creates a view criteria for the attributes of this view object, and applies the view criteria to the view object.
To create a view criteria programmatically, follow these basic steps (as illustrated in Example 5-35):
-
Find the view object instance to be filtered.
-
Create a view criteria row set for the view object.
-
Use the view criteria to create one or more empty view criteria rows
-
Set attribute values to filter on the appropriate view criteria rows.
You can use the single method
setAttribute()on the view criteria rows to set attribute name, comparison operator, and value to filter on. Alternatively, useensureCriteriaItem(),setOperator(), andsetValue()on the view criteria rows to set attribute name, comparison operator, and value to filter on individually. -
Add the view criteria rows to the view criteria row set.Apply the view criteria to the view object.
-
Execute the query.
The last step to execute the query is important, since a newly applied view criteria is applied to the view object's SQL query only at its next execution.
Example 5-35 Creating and Applying a View Criteria
package devguide.examples.readonlyvo.client;

import oracle.jbo.ApplicationModule;
import oracle.jbo.Row;
import oracle.jbo.ViewCriteria;
import oracle.jbo.ViewCriteriaRow;
import oracle.jbo.ViewObject;
import oracle.jbo.client.Configuration;

public class TestClientViewCriteria {
    public static void main(String[] args) {
        String amDef = "devguide.examples.readonlyvo.PersonService";
        String config = "PersonServiceLocal";
        ApplicationModule am =
            Configuration.createRootApplicationModule(amDef, config);
        // 1. Find the view object to filter
        ViewObject vo = am.findViewObject("PersonList");
        // Work with your appmodule and view object here
        Configuration.releaseRootApplicationModule(am, true);
        // 2. Create a view criteria row set for this view object
        ViewCriteria vc = vo.createViewCriteria();
        // 3. Use the view criteria to create one or more view criteria rows
        ViewCriteriaRow vcr1 = vc.createViewCriteriaRow();
        ViewCriteriaRow vcr2 = vc.createViewCriteriaRow();
        // 4. Set attribute values to filter on in appropriate view criteria rows
        vcr1.setAttribute("PersonId","> 200");
        vcr1.setAttribute("Email","d%");
        vcr1.setAttribute("PersonTypeCode","STAFF");
        // Note the IN operator must be followed by a space after the operator.
        vcr2.setAttribute("PersonId","IN (204,206)");
        vcr2.setAttribute("LastName","Hemant");
        // 5. Add the view criteria rows to the view critera row set
        vc.add(vcr1);
        vc.add(vcr2);
        // 6. Apply the view criteria to the view object
        vo.applyViewCriteria(vc);
        // 7. Execute the query
        vo.executeQuery();
        while (vo.hasNext()) {
        Row curPerson = vo.next();
        System.out.println(curPerson.getAttribute("PersonId") + " " +
        curPerson.getAttribute("Email"));
        }
    }
}
Running the TestClientViewCriteria example produces the results shown in Example 5-35:
206 SHEMANT
5.11.8 What Happens at Runtime: When the View Criteria Is Applied to a View Object
When you apply a view criteria containing one or more view criteria rows to a view object, the next time it is executed it augments its SQL query with an additional WHERE clause predicate corresponding to the Query-by-Example criteria that you've populated in the view criteria rows. As shown in Figure 5-43, when you apply a view criteria containing multiple view criteria rows, the view object augments its design time WHERE clause by adding an additional runtime WHERE clause based on the non-null example criteria attributes in each view criteria row.
A corollary of the view criteria feature is that each time you apply a new view criteria (or remove an existing one), the text of the view object's SQL query is effectively changed. Changing the SQL query causes the database to reparse the statement the next time it is executed. You can eliminate the reparsing and improve the performance of a view criteria as described in Section 5.11.10, "What You May Need to Know About Query-by-Example Criteria."
5.11.9 What You May Need to Know About the View Criteria API
When you need to perform tasks that the Edit View Criteria dialog does not support, review the View Criteria API. For example, programmatically, you can alter compound search conditions using multiple view criteria rows, search for a row whose attribute value is NULL, search case insensitively, and clear view criteria in effect.
5.11.9.1 Referencing Attribute Names in View Criteria
The setWhereClause() method allows you to add a dynamic WHERE clause to a view object, as described in Section 6.4.1, "ViewObject Interface Methods for Working with the View Object's Default RowSet." You can also use setWhereClause() to pass a string that contains literal database column names like this:
vo.setWhereClause("LAST_NAME LIKE UPPER(:NameToFind)");
In contrast, when you use the view criteria mechanism, shown in Example 5-35, you must reference the view object attribute name instead, like this:
    ViewCriteriaItem vc_item1 = vc_row1.ensureCriteriaItem("UserId");
    vc_item1.setOperator(">");
    vc_item1.setValue("304");
The view criteria rows are then translated by the view object into corresponding WHERE clause predicates that reference the corresponding column names.
5.11.9.2 Referencing Bind Variables in View Criteria
When you want to set the value of a view criteria item to a bind variable, use setIsBindVarValue(true), like this:
    ViewCriteriaItem vc_item1 = vc_row1.ensureCriteriaItem("UserId");
    vc_item1.setIsBindVarValue(true);
    vc_item1.setValue(":VariableName");
5.11.9.3 Altering Compound Search Conditions Using Multiple View Criteria
When you add multiple view criteria, you can call the setConjunction() method on a view criteria to alter the conjunction used between the predicate corresponding to that view criteria and the one for the previous view criteria. The legal constants to pass as an argument are:
-
ViewCriteriaComponent.VC_CONJ_AND -
ViewCriteriaComponent.VC_CONJ_NOT -
ViewCriteriaComponent.VC_CONJ_UNION -
ViewCriteriaComponent.VC_CONJ_OR(default)
The NOT value can be combined with AND or OR to create filter criteria like:
( PredicateForViewCriteria1 ) AND (NOT ( PredicateForViewCriteria2 ) )
or
( PredicateForViewCriteria1 ) OR (NOT ( PredicateForViewCriteria2 ) )
The syntax to achieve compound search conditions requires using Java's bitwise OR operator like this:
vc2.setConjunction(ViewCriteriaComponent.VC_CONJ_AND | ViewCriteriaComponent.VC_CONJ_NOT);
Performance Tip:
Use theUNION value instead of an OR clause when the UNION query can make use of indices. For example, if the view criteria searches for sal > 2000 or job = 'CLERK' this query may turn into a full table scan. Whereas if you specify the query as the union of two inner view criteria, and the database table has an index on sal and an index on job, then the query can take advantage of these indices and the query performance will be significantly better for a large data set.The limitation for the UNION clause is that it must be defined over one view object. This means that the SELECT and the FROM list will be the same for inner queries of the UNION clause. To specify a UNION query, call setConjunction() on the outer view criteria like this:
vc.setConjunction(ViewCriteriaComponent.VC_CONJ_UNION);
The outer view criteria should contain inner queries whose results will be the union. For example, suppose you want to specify the union of these two view criteria:
-
A view criteria named
MyEmpJob, which searches forJob = 'SALESMAN'. -
A view criteria named
MyEmpSalary, which searches forSal = 1500.
To create the UNION query for these two view criteria, you would make the calls shown in Example 5-36.
Example 5-36 Applying the Union of Two View Criteria
vcu = voEmp.createViewCriteria();
vcm = voEmp.getViewCriteriaManager();

vcu.setConjunction(ViewCriteria.VC_CONJ_UNION);
vcu.add(vcm.getViewCriteria("MyEmpJob"));
vcu.add(vcm.getViewCriteria("MyEmpSal"));

voEmp.applyViewCriteria(vcu);
When this view criteria is applied, it will return rows where Job is SALESMAN or Sal is greater than 1500.
When you use a UNION view criteria, be sure that only one of the applied view criteria has the UNION conjunction. Other view criteria that you apply will be applied to each inner query of the UNION query.
5.11.9.4 Searching for a Row Whose Attribute Value Is NULL Value
To search for a row containing a NULL value in a column, populate a corresponding view criteria row attribute with the value "IS NULL" or use ViewCriteriaItem.setOperator("ISBLANK").
5.11.9.5 Searching for Rows Whose Attribute Value Matches a Value in a List
To search for all rows with a value in a column that matches any value in a list of values that you specify, populate a corresponding view criteria row attribute with the comma-separated list of values and use the IN operator. For example, to filter the list of persons by IDs that match 204 and 206, set:
vcr.setAttribute("PersonId","IN (204,206)");
Note that there must be a space between the IN operator and the brace:
-
IN (204,206)is correct. -
IN(204,206)throws aSQLSyntaxErrorExceptionerror.
5.11.9.6 Searching Case-Insensitively
To search case-insensitively, call setUpperColumns(true) on the view criteria row to which you want the case-insensitivity to apply. This affects the WHERE clause predicate generated for String-valued attributes in the view object to use UPPER(COLUMN_NAME) instead of COLUMN_NAME in the predicate. Note that the value of the supplied view criteria row attributes for these String-valued attributes must be uppercase or the predicate won't match. In addition to the predicate, it also possible to use UPPER() on the value. For example, you can set UPPER(ename) = UPPER("scott").
5.11.9.7 Clearing View Criteria in Effect
To clear any view criteria in effect, you can call getViewCriteria() on a view object and then delete all the view criteria rows from it using the remove() method, passing the zero-based index of the criteria row you want to remove. If you don't plan to add back other view criteria rows, you can also clear all the view criteria in effect by simply calling applyViewCriteria(null) on the view object.
5.11.10 What You May Need to Know About Query-by-Example Criteria
For performance reasons, you want to avoid setting a bind variable as the value of a view criteria item in these two cases:
-
In the specialized case where the value of a view criteria item is defined as selectively required and the value changes from non-
NULLtoNULL.In this case, the SQL statement for the view criteria will be regenerated each time the value changes from non-
NULLtoNULL. -
In the case where the value of the view criteria item is optional and that item references an attribute for an indexed column.
In the case of optional view criteria items, an additional SQL clause
OR (:Variable IS NULL)is generated, and the clause does not support using column indices.
In either of the following cases, you will get better performance by using a view object whose WHERE clause contains the named bind variables, as described in Section 5.10.1, "How to Add Bind Variables to a View Object Definition." In contrast to the view criteria filtering feature, when you use named bind variables, you can change the values of the search criteria without changing the text of the view object's SQL statement each time those values change.
5.12 Working with List of Values (LOV) in View Object Attributes
Edit forms displayed in the user interface portion of your application can utilize LOV-enabled attributes that you define in the data model project to predetermine a list of values for individual input fields. When the user submits the form with their selected values, ADF data bindings in the ADF Model layer update the value on the view object attributes corresponding to the databound fields. To facilitate this common design task, ADF Business Components provides declarative support to specify the LOV usage in the user interface.
Defining an LOV for attributes of a view object in the data model project greatly simplifies the task of working with list controls in the user interface. Because you define the LOV on the individual attributes of the view object, you can customize the LOV usage for an attribute once and expect to see the list component in the form wherever the attribute appears.
Note:
In order for the LOV to appear in the UI, the LOV usage must exist before the user interface designer creates the databound form. Defining an LOV usage for an attribute referenced by an existing form will not change the component that the form displays to an LOV.You can define an LOV for any view object attribute that you anticipate the user interface will display as a selection list. The characteristics of the attribute's LOV definition depend on the requirements of the user interface. The information you gather from the user interface designer will determine the best solution. For example, you might define LOV attributes in the following cases:
-
When you need to display attribute values resulting from a view object query against a business domain object.
For example, define LOV attributes to display the list of suppliers in a purchase order form.
-
When you want to display attribute values resulting from a view object query that you wish to filter using a parameter value from any attribute of the LOV attribute's current row.
For example, define LOV attributes to display the list of supplier addresses in a purchase order form but limit the addresses list based on the current supplier.
If you wish, you can enable a second LOV to drive the value of the parameter based on a user selection. For example, you can let the user select the current supplier to drive the supplier addresses list. In this case, the two LOVs are known as a cascading list.
Before you can define the LOV attribute, you must create a data source view object in your data model project that queries the eligible rows for the attribute value you want the LOV to display. After this, you work entirely on the base view object to define the LOV. The base view object is the one that contains the primary data for display in the user interface. The LOV usage will define the following additional view object metadata:
-
A view accessor to access the data source for the LOV attribute. The view accessor is the ADF Business Components mechanism that lets you obtain the full list of possible values from the row set of the data source view object.
-
Optionally, supplemental values that the data source may return to attributes of the base view object other than the data source attribute for which the list is defined.
-
User interface hints, including the type of list component to display, attributes to display from the current row when multiple display attributes are desirable, and a few options specific to the choice list component.
The general process for defining the LOV-enabled attribute relies on the Edit Attribute dialog that you display for the base view object attribute.
To define the LOV-enabled attribute, follow this general process:
-
Select the Enable List of Values option.
-
Create a new view accessor definition to point to the data source view object or select an existing view accessor that the base view object already defines.
Optionally, you can filter the view accessor by creating a view criteria using a bind variable that obtains its value from any attribute of base view object's current row.
-
Select the list attribute from the view accessor's data source view object.
This maps the attribute you select to the current attribute of the base view object.
-
Optionally, select list return values to map any supplemental values that your list returns to the base view object.
-
Select user interface hints to specify the list's display features.
-
Save the attribute changes.
Note:
If you create a view criteria to filter the data source view object, you may also set an LOV on the attribute of the base view object that you use to supply the value for the view criteria bind variable. You set cascading LOV lists when you want the user's selection of one attribute to drive the options displayed in a second attribute's list.Once you create the LOV-enabled attribute, the user interface designer can create the list component in the web page by dragging the LOV-enabled attribute's collection from the Data Controls panel. For further information about creating a web page that display the list, see Chapter 25, "Creating Databound Selection Lists and Shuttles." Specifically, for more information about working with LOV-enabled attributes in the web page, see Section 25.3.2, "How to Create a Model-Driven List."
5.12.1 How to Define a Single LOV-Enabled View Object Attribute
When an edit form needs to display a list values that is not dependent on another selection in the edit form, you can define a view accessor to point to the list data source. For example, assume that a purchase order form contains a field that requires the user to select the order item's supplier. In this example, you would first create a view accessor that points to the data source view object (SuppliersView). You would then set the LOV on the SupplierDesc attribute of the base view object (PurchaseOrdersView). Finally, you would reference that view accessor from the LOV-enabled attribute (SupplierDesc) of the base view object and select the data source attribute (SupplierDesc).
You will use the Create List of Values dialog to define an LOV-enabled attribute for the base view object. The dialog lets you select an existing view accessor or create a new one to save with the LOV-attribute definition.
Create the desired view objects as described in Section 5.2.1, "How to Create an Entity-Based View Object," and Section 5.2.3, "How to Create an Expert Mode, Read-Only View Object."
To define an LOV that displays values from a view object attribute:
-
In the Application Navigator, double-click the view object that contains the attribute you wish to enable as an LOV.
-
In the overview editor, click the Attributes navigation tab.
-
In the Attributes page, select the attribute that is to display the LOV, and then expand the List of Values section and click the Add list of values button.
Use the Create List of Values dialog to create the LOV on the attribute you have currently selected in the attribute list of the overview editor. JDeveloper assigns a unique name to identify the LOV usage. For example, the metadata for the attribute
SupplierDescwill specify the nameSupplierDescLOVto indicate that the attribute is LOV enabled. -
In the Create List of Values dialog, click the Create new view accessor button to add a view accessor to the view object you are currently editing.
Alternatively, you can expand List Data Source and select among the existing view accessors. The dropdown list displays all view accessors that you have added to the view object you are editing.
-
In the View Accessors dialog, select the view object definition or shared view instance that defines the data source for the attribute and shuttle it to the view accessors list.
By default, the view accessor you create will display the same name as the view object. You can edit the accessor name to supply a unique name. For example, assign the name
SuppliersViewAccessorfor theSuppliersViewview object.The view instance is a view object usage that you have defined in the data model of a shared application module. For more information about using shared view instances in an LOV, see Section 10.4.4, "How to Create an LOV Based on a Lookup Table."
-
Click OK to save the view accessor definition for the view object.
-
In the Create List of Values dialog, expand List Data Source and select the view accessor you created for the base view object to use as the data source. Then select the same attribute from this view accessor that will provide the list data for the LOV-enabled attribute.
The editor creates a default mapping between the list data source attribute and the LOV-enabled attribute. For example, the attribute
SuppliersDescfrom thePurchaseOrdersViewview object would map to the attributeSuppliersDescfrom theSuppliersViewAccessorview accessor.The editor does not allow you to remove the default attribute mapping for the attribute for which the list is defined.
-
Optionally, when you want to specify supplemental values that your list returns to the base view object, click the Create return attribute map button in the List Return Values section and map the desired base view object attributes with attributes accessed by the view accessor.
Supplemental attribute return values are useful when you do not require the user to make a list selection for the attributes, yet you want those values, as determined by the current row, to participate in the update. For example, to map the attribute
SupplierAddressfrom thePurchaseOrdersViewview object, you would choose the attributeSupplierAddressfrom theSuppliersViewAccessorview accessor. -
Click OK.
5.12.2 How to Define Cascading Lists for LOV-Enabled View Object Attributes
When the application user interface requires a list of values in one input field to be dependent on the user's entry in another field, you can create attributes that will display as cascading lists in the user interface. In this case, the list of possible values for the LOV-enabled attributes might be different for each row. As the user changes the current row, the LOV values vary based on the value of one or more controlling attribute values in the LOV-enabled attribute's view row. To apply the controlling attribute to the LOV-enabled attribute, you will create a view accessor to access the data source view object with the additional requirement that the accessor filters the list of possible values based on the current value of the controlling attribute. To filter the LOV-enabled attribute, you can edit the view accessor to add a named view criteria with a bind variable to obtain the user's selection.
For example, assume that a purchase order form contains a field that requires the user to select the supplier's specific site and that the available sites will depend on the order's already specified supplier. To implement this requirement, you would first create a view accessor that points to the data source view object. The data source view object will be specific to the LOV usage, because it must perform a query that filters the available supplier sites based on the user's supplier selection. You might name this data source view object definition SupplierIdsForCurrentSupplierSite to help distinguish it from the SupplierSitesView view object that the data model already contains. The data source view object will use a named view criteria (SupplierCriteria) with a single view criteria item set by a bind variable (TheSupplierId) to obtain the user's selection for the controlling attribute (SupplierId).
You would then set the LOV on the SupplierSiteId attribute of the base view object (PurchaseOrdersView). You can then reference the view accessor that points to the data source view object from the LOV-enabled attribute (PurchaseOrdersView.SupplierSiteId) of the base view object. Finally, you must edit the LOV-enabled attribute's view accessor definition to specify the corresponding attribute (SupplierIdsForCurrentSupplierSite.SupplierSiteId) from the view object as the data source and, importantly, source the value of the bind variable from the view row's result using the attribute SupplierId.
5.12.2.1 Creating a Data Source View Object to Control the Cascading List
The data source view object defines the controlling attribute for the LOV-enabled attribute. To make the controlling attribute accessible to the LOV-enabled attribute of the base view object, you must define a named view criteria to filter the data source attribute based on the value of another attribute. Because the value of the controlling attribute is expected to change at runtime, the view criteria uses a bind variable to set the controlling attribute.
To define the view criteria for the data source to be referenced by the LOV-enabled attribute:
-
In the Application Navigator, double-click the view object that you created to query the list of all possible values for the controlling attribute.
For example, if the LOV-enabled attribute
SupplierSiteIddepends on the controlling attributeSupplierIdvalue, you might have created the data source view objectSupplierIdsForCurrentSupplierSiteto query the list of all supplier sites. -
In the overview editor, click the Query navigation tab.
-
In the Query page, expand the Bind Variables section and click the Create new bind variable button to add a bind variable to the data source view object.
For example, for a data source view object
SupplierIdsForCurrentSupplierSiteused to query the list of all supplier sites, you would create the bind variableTheSupplierId, since it will be the controlling attribute for the LOV-enabled attribute. -
In the Bind Variable dialog, enter the name and type of the bind variable. Leave all other options unchanged and click OK.
By default, the view accessor you create will display the same name as the view object instance. You can edit the accessor name to supply a unique name. For example, assign the name
CurrencyLookupViewAccessorfor theCurrencyLookupViewview object instance. -
In Query page of the overview editor, expand the View Criteria section and click the Create new view criteria button to add the view criteria to the data source view object you are currently editing.
-
In the Create View Criteria dialog, click Add Group and define a single Criteria Item for the group as follows:
-
Enter a Criteria Name to identify the view criteria. For example, you might enter the name
SupplierCriteriafor theSupplierIdsForCurrentSupplierSite. -
Select the controlling attribute from the Attributes list. For example, you would select the
SupplierSiteIdattribute from theSupplierIdsForCurrentSupplierSite. -
Select equal to from the view criteria Operator list.
-
Select Bind Variable from the view criteria Operand list.
-
Select the name of the previously defined bind variable from the Parameter list.
-
Select among the following bind variable configuration options to determine whether or not the value is required by the parent LOV:
Optional from the Validation menu and deselect Ignore Null Values when you want to configure cascading LOVs where the parent LOV value is required. This combination supports the cascading LOV use case where no selection in the parent LOV returns no rows in the child LOV. The
WHEREclause shown in the Edit View Criteria dialog should look similar to((SupplierIdsForCurrentSupplierSite.SUPPLIER_ID = :TheSupplierId)).Optional from the Validation menu and leave Ignore Null Values selected (default) when you want to configure cascading LOVs where the parent LOV value is optional. This combination supports the cascading LOV use case where no selection in the parent LOV returns all rows in the child LOV. The
WHEREclause shown in the Edit View Criteria dialog should look similar to(((SupplierIdsForCurrentSupplierSite.SUPPLIER_ID = :TheSupplierId) OR ( :TheSupplierId IS NULL ))).For more details about these settings, see Section 5.11.3, "What You May Need to Know About Bind Variable Options." Do not select Required for the Validation option for cascading LOVs, because no selection in the parent LOV will cause a validation error.
-
-
Click OK.
5.12.2.2 Creating a View Accessor to Filter the Cascading List
To populate the cascading LOV-enabled attribute, you must first set up a named view criteria on a data source view object. To make the LOV-enabled attribute of the base view object dependent on the controlling attribute of the data source view object, you then add a view accessor to the LOV-enabled attribute of the base view object and reference the previously defined data source view object's named view criteria.
Create the data source view object and named view criteria as described in Section 5.12.2.1, "Creating a Data Source View Object to Control the Cascading List."
To create a view accessor that filters display values for an LOV-enabled attribute based on the value of another attribute in the same view row:
-
In the Application Navigator, double-click the base view object that contains the attribute you want to use the filtered view accessor as the list data source.
For example, the base view object
PurchaseOrdersViewmight contain the attributeSupplierSiteIdthat will depend on the value of the controlling attributeSupplierId. -
In the overview editor, click the Attributes navigation tab.
-
In the Attributes page, select the attribute that is to filter the cascading LOV, and then expand the List of Values section and click the Add list of values button.
-
In the Create List of Values dialog, click the Create new view accessor button to add a view accessor to the view object you are currently editing.
Alternatively, you can expand List Data Source and select among the existing view accessors. The dropdown list displays all view accessors that you have added to the view object you are editing.
-
In the View Accessors dialog, select the view object instance name you created for data source view object and shuttle it to the view accessors list.
-
With the new view accessor selected in the dialog, click Edit.
-
In the Edit View Accessor dialog, apply the previously defined view criteria to the view accessor and provide a value for the bind variable as follows:
-
Click the data source view object's view criteria in the Available list and add it to the Selected list. For example, you would select
SupplierCriteriafrom theSupplierIdsForCurrentSupplierSiteview object definition. -
Set the value for the bind variable to the name of the controlling attribute. The attribute name must be identical to the base view object's controlling attribute. For example, if the base view object
PurchaseOrdersViewcontains the LOV-enabled attributeSupplierSiteIdthat depends on the value of the controlling attributeSupplierId, you would enterSupplierIdfor the bind variable value. -
Select the name of the previously defined bind variable from the Parameter list.
-
Select Required from the Usage dropdown list.
-
-
Click OK to save the view accessor definition for the base view object.
-
In the Attributes page of the overview editor, select the attribute that is to display the LOV, and then expand the List of Values section and click the Add list of values button.
-
In the Create List of Values dialog, expand List Data Source and select the view accessor you created for the data source view object instance to use as the data source. Then select the controlling attribute from this view accessor that will serve to filter the attribute you are currently editing.
The editor creates a default mapping between the view object attribute and the LOV-enabled attribute. You use separate attributes in order to allow the bind variable (set by the user's controlling attribute selection) to filter the LOV-enabled attribute. For example, the LOV-enabled attribute
SupplierIdfrom thePurchaseOrdersViewview object would map to the controlling attributeSupplierSiteIdfor theSupplierIdsForCurrentSupplierSiteViewAccessor. The runtime automatically supports these two cascading LOVs where the row set and the base row attribute differ. -
Click OK.
5.12.3 How to Specify Multiple LOVs for an LOV-Enabled View Object Attribute
Another way to vary the list of values that your application user interface can display is to define multiple list of values for a single LOV-enabled view object attribute. In contrast to a cascading list, which varies the list contents based on a dependent LOV list selection, an LOV-enabled switcher attribute with multiple LOVs lets you vary the entire LOV itself. The LOV choice to display is controlled at runtime by the value of an attribute that you have defined specifically to resolve to the name of the LOV to apply.
For example, you might want to define one LOV to apply in a create or edit form and another LOV to apply for a search component. In the first case, the LOV-enabled attribute that the form can use is likely to be an entity-based view accessor that is shared across all the view objects that reference the entity. The entity-based view accessor is useful for user interface forms because a single accessor definition can apply to each instance of the LOV in the forms. However, in the case of the search component, LOV definitions based on view accessors derived from an underlying entity will not work. The LOV definitions for search components must be based on view accessors defined in the view object. Note that when the user initiates a search, the values in the criteria row will be converted into WHERE clause parameters. Unlike a regular view row displayed in create or edit type forms, the criteria row is not backed by an entity. In this scenario, one LOV uses the entity-based accessor as a data source and a second LOV uses the view object-based accessor as a data source.
To address this requirement to define multiple LOV lists that access the same attribute, you add a switcher attribute to the base view object. For example, you might add a ShipperLOVSwitcher attribute for the Orders view object that resolves through an expression to the name of the LOV to display. Such an expression can specify two LOVs that may apply to the ShipperID attribute:
(adf.isCriteriaRow) ? "LOV_ShipperID_ForSearch" : "LOV_ShipperID"
This expression would appear in the Value field of the switcher attribute. At runtime, in the case of the search component, the expression resolves to the value that identifies the view object-based accessor LOV. In the case of the create or edit form, the expression resolves to the value that identifies the entity-based accessor LOV.
You will use the Create List of Values dialog to add multiple LOV lists to an attribute of the base view object. You will also use the List of Values section in the Attributes page of the overview editor for the base view object to define the default LOV to display and the switcher attribute to apply.
Create the first LOV list for the attribute as described in Section 5.12.1, "How to Define a Single LOV-Enabled View Object Attribute."
To specify additional LOV lists for a view object attribute with an existing LOV:
-
In the Application Navigator, double-click the view object that contains the attribute for which you want to specify multiple LOV lists.
-
In the overview editor, click the Attributes navigation tab.
-
In the Attributes page, select the desired attribute, and then expand the List of Values section and click the Add list of values button.
-
In the Create List of Values dialog, define the first LOV as described in Section 5.12.1, "How to Define a Single LOV-Enabled View Object Attribute."
When you define the LOV, change the name of the LOV to match the value returned by the attribute that you will use to determine which LOV your application applies to the LOV-enabled attribute.
-
After you define the first LOV, return to the List of Values section of the Attributes page of the overview editor and, with the original attribute selected, click the Add List of Values button.
If you have selected the correct attribute from the Attributes page of the overview editor, the List of Values section should display your previously defined LOV.
-
In the Create List of Values dialog, repeat the procedure described in Section 5.12.1, "How to Define a Single LOV-Enabled View Object Attribute" to define each subsequent LOV.
The name of each LOV must correspond to a unique value returned by the attribute that determines which LOV to apply to the LOV-enabled attribute.
You can define the LOV using any accessor and any attribute. There are no restrictions on the type of LOV lists that you can add to an attribute with multiple LOV lists specified.
After you finish defining the second LOV, the List of Values section changes to display additional features that you will use to control the selection of the LOV.
-
In the Attributes page of the overview editor, expand the List of Values section and use the List of Values Switcher dropdown list to select the attribute that will return the name of the List of Value to use.
The dropdown list displays the attributes of the base view object. If you want your application to dynamically apply the LOV from the LOVs you have defined, your view object must define an attribute whose values resolve to the names of the LOVs you defined. If you have not added this attribute to the view object, be sure that the dropdown list displays <None Specified>. In this case, at runtime your application will display the LOV-enabled attribute with the default LOV and it will not be possible to apply a different LOV.
-
To change the default LOV to apply at runtime, choose the Default radio button corresponding to the desired LOV definition.
The default LOV selection determines which list of values your application will display when the List of Values Switcher dropdown list displays <None Specified>. Initially, the first LOV in the overview editor List of Values section is the default.
-
To change the component that your application will use to display the various LOV lists, select from desired component from the List Type UI Hint dropdown list.
The component you select will apply to all LOV lists. For a description of the available components, see Table 5-2.
5.12.4 How to Set User Interface Hints on a View Object LOV-Enabled Attribute
When you know how the view object attribute that you define as an LOV should appear in the user interface, you can specify additional properties of the LOV to determine its display characteristics. These properties, or UI hints, augment the attribute hint properties that ADF Business Components lets you set on any view object attribute. Among the LOV UI hints for the LOV-enabled attribute is the type of component the user interface will use to display the list. For a description of the available components, see Table 5-2. (Not all ADF Faces components support the default list types, as noted in the Table 5-2.)
Table 5-2 List Component Types for List Type Control Hint
| LOV List Component Type | Usage |
|---|---|
|
Choice List
|
This component does not allow the user to type in text, only select from the dropdown list. |
|
Combo Box
|
This component allows the user to type text or select from the dropdown list. This component sometimes supports auto-complete as the user types. This component is not supported for ADF Faces. |
|
Combo Box with List of Values
|
This component is the same the as the combo box, except that the last entry (More...) opens a List of Values lookup dialog that supports query with filtering when enabled for the LOV attribute in its UI hints. The default UI hint enables queries on all attributes. This component is not supported for ADF Faces. Note that when the LOV attribute appears in a table component, the list type changes to an Input Text with List of Values component. |
|
Input Text with List of Values
|
This component displays an input text field with an LOV button next to it. The List of Values lookup dialog opens when the user clicks the button or enters an invalid value into the text field. The List of Values lookup dialog for this component supports query with filtering when enabled in the UI hints for the LOV attribute. The default UI hint enables queries on all attributes. This component may also support auto-complete when a unique match exists. |
|
List Box
|
This component takes up a fixed amount of real estate on the screen and is scrollable (as opposed to the choice list, which takes up a single line until the user clicks on it). |
|
Radio Group
|
This component displays a radio button group with the selection choices determined by the LOV attribute values. This component is most useful for very short, fixed lists. |
Create the LOV list for the attribute as described in Section 5.12.1, "How to Define a Single LOV-Enabled View Object Attribute."
To set view object attribute UI hints for an LOV-enabled attribute:
-
In the Application Navigator, double-click the view object that contains the attribute that you want to customize.
-
In the overview editor, click the Attributes navigation tab.
-
In the Attributes page, and select the desired attribute and then expand the List of Values section.
-
In the List of Values section, select the LOV list that you want to customize and click the Edit list of values button.
-
In the Edit List of Values dialog, select the UI Hints tab.
-
In the UI Hints page, select a default list type as the type of component to display the list.
For a description of the available components, see Table 5-2.
The list component displayed by the web page and the view object's default list type must match at runtime or a method-not-found runtime exception results. To avoid this error, confirm the desired list component with the user interface designer. You can also edit the default list type to match, so that, should the user interface designer subsequently change the component used in the web page, the two stay in sync.
-
Optionally, select additional display attributes to add values to the display.
The list of additional attributes is derived from the LOV-enabled attribute's view row. The additional attribute values can help the end user select an item from the list.
-
If you selected the Combo Box with List of Values type component, by default, the dropdown list for the component will display the first 10 records from the data source. This limit also serves to keep the view object fetch size small. To change the number of records the dropdown list of a Combo Box with List of Values component can display, enter the number of records for Query Limit.
Because Query Limit also controls the number of rows the view object will fetch (its sets the view object definition
ListRangeSizeproperty), specifying a large value for Query Limit is not recommended. The end user can open the component's LOV lookup dialog to access the full set of records (by clicking the component's lookup icon). Query Limit is disabled for all other component types and those components place no restriction on the number of rows that the LOV will access.For details about the
ListRangeSizeproperty, see Section 5.12.9, "What Happens at Runtime: When an LOV Queries the List Data Source." -
If you selected a component type that allows the user to open a List of Values lookup dialog to select a list value (this includes either the Combo Box with List of Values type component or Input Text with List of Values type component), by default, the lookup dialog will display a search form that will allow the user to search on all queryable attributes of the data source view object (the one defined by the LOV-enabled attribute's view accessor). Decide how you want to customize these components.
-
When you select the Combo Box with List of Values type component and you have added a large number of attributes to the Selected list, use Show in Combo Box to improve the readability of the dropdown list portion of the component. To limit the attribute columns to display in the dropdown list that the Combo Box with List of Values component displays, choose First from Show in Combo Box and enter a number corresponding to the number of attributes from the top of the Selected list that you want the dropdown menu to display (this combination means you are specifying the "first" x number of attributes to display from the Create List of Values dialog's Selected list). Limiting the number of attribute columns to display in the dropdown list ensures that the user does not have to horizontally scroll to view the full list, but it does not limit the number of attribute columns to display in the List of Values lookup dialog. This option is disabled for all list component types except Combo Box with List of Values.
-
You can limit the attributes to display in the List of Values lookup dialog by selecting a view criteria from the Include Search Region dropdown list. To appear in the dropdown list, the view criteria must already have been defined on the data source view object (the one that the LOV-enabled attribute's view accessor defines). Click the Edit View Criteria button to set search form properties for the selected view criteria. For more information about customizing view criteria for search forms, see Section 5.11.5, "How to Set User Interface Hints on View Criteria."
-
You can prepopulate the results table of the List of Values lookup dialog by selecting Query List Automatically. The List of Values lookup dialog will display the results of the query when the user opens the dialog. If you leave this option deselected, no results will be displayed until the user submits the search form.
-
-
Alternatively, if you prefer not to display a search region in the List of Values lookup dialog, select <No Search> from the Include Search Region dropdown list. In this case, the List of Values lookup dialog will display only attributes you add to the Display Attributes list.
-
If you selected a choice type component to display the list, you can specify a Most Recently Used Count as an alternative to displaying all possible values.
For example, your form might display a choice list of
SupplierIdvalues to drive a purchase order form. In this case, you can allow the user to select from a list of their most recently viewed suppliers, where the number of supplier choices is determined by the count you enter. The default count0(zero) for the choice list displays all values for the attribute. -
If you selected a Combo Box with List of Values type component to display the list, you can select a view criteria from the Filter Combo Box Using dropdown list to limit the list of valid values the LOV will display.
When you enable Filter Combo Box Using, the dropdown list displays the existing view criteria from the view object definition related to the LOV's view accessor. If the dropdown list displays no view criteria, then the data source view object defines no view criteria. When you do not enable this feature, the Combo Box with List of Values component derives its values from the full row set returned by the view accessor. The filtered Combo Box with List of Values is a useful feature when you want to support the use of an LOV with popup search dialog or LOV with a dropdown list that has a limited set of valid choices. For details about using the Combo Box with List of Values component in user interfaces, see Section 27.1.6, "List of Values (LOV) Input Fields."
-
Decide how you want the list component to handle a
NULLvalue choice to display in the list component. This option is not enabled for every list component type that you can select.If you enable Include "No Selection" Item, you can also determine how the
NULLvalue selection should appear in the list by making a selection from the dropdown list. For example, when you select Labeled Item, you can enter the desired label in the edit field to the right of the dropdown list or you can click the ... button (to the right of the edit field) to select a message string from the resource bundle associated with the view object. When you select a message string from the resource bundle, JDeveloper saves the string's corresponding message key in the view object definition file. At runtime, the UI locates the string to display based on the current user's locale setting and the message key in the localized resource bundle. -
Click OK.
5.12.5 How to Handle Date Conversion for List Type UI Components
When the LOV-enabled attribute of the view object is bound to date information (such as the attribute OrderShippedDate), by default Oracle ADF assumes a format for the field like yyyy-MM-dd hh:mm:ss, which combines date and time. This combined date-time format is specified by the ADF Business Components Date domain class (jbo.domain.Date) and creates a conversion issue for the ADF Faces component when the user selects a date supplied by the LOV-enable attribute. When the ADF Faces component is unable to convert the domain type to the Date type, the user interface invalidates the input field and displays the message Error: The date is not in the correct format.
To avoid this potential conversion error, configure a UI hint setting for the date value attribute of the view object that you want to enable for an LOV. The UI hint you specify will define a date-only mask, such as yyyy-MM-dd. Subsequently, any ADF Faces component that references the attribute will perform the conversion based on a pattern specified by its EL value-binding expression (such as #{bindings.Hiredate.format) and will reference the UI hint format instead of the ADF Business Components domain date-time. The conversion error results when the EL expression evaluates to null because no format mask has been specified. For more information about control hints, see Section 5.13, "Defining Attribute Control Hints for View Objects."
To set a control hint to match the date format for the LOV-enable attribute:
-
In the Application Navigator, double-click the view object.
-
In the overview editor, click the Attributes navigation tab and double-click the date-value attribute that you want to customize with control hints.
Alternatively, display the Property Inspector for the selected attribute and select the UI Hints navigation tab. The Property Inspector provides a way to customize the attribute's control hints without using the Edit Attribute dialog.
-
In the Edit Attribute dialog, select Control Hints, and in the Control Hints page, select Simple Date for the Format Type and choose the format with the date only mask.
Mapping of the ADF Business Components domain type to it's available formatters is provided in the
formatinfo.xmlfile in the BC4J subdirectory of the JDeveloper system directory (for example,C:\Documents and Settings\<username>\Application Data\JDeveloper\system<version#>\o.BC4J.\formatinfo.xml). -
Click OK.
5.12.6 How to Automatically Refresh the View Object of the View Accessor
If you need to ensure that your view accessor always queries the latest data from the database table, you may be able to set the Auto Refresh property on the data source view object. This property allows the view object instance to refresh itself after a change in the database. You can enable this feature for any view instance that your application modules define. Once you enable this property on a view object, it ensures that changes a user commits to a database table will become available to any other user working with the same database table. A typical use case is to enable auto refresh for the data source view object when you define a view accessor for a LOV-enabled view object attribute.
Because the auto-refresh feature relies on the database change notification feature, observe these restrictions when enabling auto-refresh for your view object:
-
The view objects should query as few read-only tables as possible. This will ensure the best performance and prevent the database invalidation queue from becoming too large.
-
The application module that contains updateable, auto-refresh view instances must be configured to lock rows during updates.
-
The database user must have database notification privileges. For example, to accomplish this with a SQL*Plus command use
grant change notification to <user name>.
When you enable auto refresh for the view object, at runtime, prior to executing the view object query, the framework will use the JDBC API to register the view object query to receive Oracle database change notifications for underlying data changes. When the view object receives a notification (because its underlying data has changed), the row sets of the view object are marked as dirty and the framework will refresh the row set on the next server trip from the client to the middle tier. At that point, the dirty collections will be discarded and the request for the updated data will trigger a new query execution by the view object. For example, assume that a user can create or edit a calendar entry but cannot edit calendar entries added by other users. When the user creates a new entry, then in the same server trip the calendar entries that other users modified or entered will be updated. But when another user creates a calendar entry, the view object receives a notification and waits for the next server trip before it refreshes itself; the delay to perform the update prevents contention among various users to read the same data.
Best Practice:
Use optimistic row locking for web applications. Optimistic locking assumes that multiple transactions can complete without affecting each other. Optimistic locking therefore allows auto-refresh to proceed without locking the rows being refreshed. The default configuration setting, pessimistic row locking, prevents the row set refresh and causes the framework to throw an exception anytime the row set has a transaction pending (for example, a user may be in the process of adding a new row). To change the application module configuration to use optimistic row locking, open the Properties tab of the Business Components Configuration dialog and set the value of thejbo.locking.mode to optimistic.To register a view object to receive data change notifications:
-
In the Application Navigator, double-click the view object that you want to receive database change notifications.
-
In the Property Inspector expand the Tuning Database Retrieve section, and select True for the Auto Refresh property.
5.12.7 How to Test LOV-Enabled Attributes Using the Business Component Browser
To test the LOV you created for a view object attribute, use the Business Component Browser, which is accessible from the Application Navigator.
The Business Component Browser, for any view object instance that you browse, will display any LOV-enabled attributes using one of two component types you can select in the UI Hints page of the List of Values dialog. Currently, only a Choice List component type and Input Text with List of Values component type are supported. Otherwise, the Business Component Browser uses the default choice list type to display the LOV-enabled attribute.
To test an LOV using the Business Component Browser:
-
In the Application Navigator, expand the project containing the desired application module and view objects.
-
Right-click the application module and choose Run.
-
In the Select Business Components Configuration dialog, select the desired application module configuration from the Configuration Name list to run the Business Component Browser.
-
Click Connect to start the application module using the selected configuration.
-
In the Business Component Browser, select the desired view object from the section on the left. The Business Component Browser displays the LOV-enabled attribute as a dropdown choice list unless you specified the component type as an Input Text with List of Value, UI hint.
Figure 5-44 shows an LOV-enabled attribute,
TypeCouponCodefor theOrdersVO, that specifies an input text field and List of Values dialog as the UI hint list type. The Input Text with List of Values component is useful when you want to display the choices in a separate LOV dialog. Other list types are not supported by the Business Component Browser.
5.12.8 What Happens When You Define an LOV for a View Object Attribute
When you define an LOV for a view object attribute, the view object metadata defines the following additional information, as shown in Example 5-37 for the OrdersVO.TypedCouponCode attribute in the Fusion Order Demo application.
-
The
<ViewAttribute>element names the attribute, points to the list binding element that defines the LOV behavior, and specifies the component type to display in the web page. For example, the LOV-enabled attributeTypedCouponCodepoints to the list binding namedLOV_TypedCouponCodeand defines theCONTROLTYPEinput text field with list (input_text_lov) to display the LOV data.When the user interface designer creates the web page using the Data Controls panel, the
<CONTROLTYPE Value="namedType"/>definition determines the component that JDeveloper will add to the web page. When the component type definition in the data model project does not match the component type displayed in the web page, a runtime exception will result. For more information, see Section 5.12.9, "What Happens at Runtime: When an LOV Queries the List Data Source." -
The
<ListBinding>element defines the behavior of the LOV. It also identifies a view accessor to access the data source for the LOV-enabled attribute. The view accessor is the ADF Business Components mechanism that lets you obtain the full list of possible values from the row set of the data source view object. For example,ListVOName="Coupon"points to theCouponsview accessor, which accesses the view objectCouponsVO. -
The
<ListBinding>element maps the list data source attribute to the LOV-enabled attribute. For example, theListAttrNamesitemEasyCodeis mapped to the LOV-enabled attributeTypedCouponCode. -
Optionally, the
<ListBinding>element defines supplemental values that the data source may return to attributes of the base view object other than the data source attribute for which the list is defined. For example,DerivedAttrNamesitemCouponIdis a supplemental value set by theListAttrNamesitemDiscountId. -
The
<ListBinding>element also identifies one or more attributes to display from the current row and provides a few options that are specific to the choice list type component. For example, theListDisplayAttrNamesitemEasyCodeis the only attribute displayed by the LOV-enabled attributeTypedCouponCode. In this example, the valuenoneforNullValueFlagmeans the user cannot select a blank item from the list.
Example 5-37 View Object MetaData For LOV-Attribute Usage
<ViewAttribute
    Name="TypedCouponCode"
    LOVName="LOV_TypedCouponCode"
. . .
    <Properties>
        <SchemaBasedProperties>
            <CONTROLTYPE Value="input_text_lov"/>
        </SchemaBasedProperties>
    </Properties>
</ViewAttribute>
. . .
<ListBinding
    Name="LOV_TypedCouponCode"
    ListVOName="Coupons"
    ListRangeSize="-1"
    NullValueFlag="none"
    NullValueId="LOV_TypedCouponCode_NullValueId"
    MRUCount="0">
    <AttrArray Name="AttrNames">
        <Item Value="TypedCouponCode"/>
    </AttrArray>
    <AttrArray Name="DerivedAttrNames">
        <Item Value="CouponId"/>
    </AttrArray>
    <AttrArray Name="ListAttrNames">
        <Item Value="EasyCode"/>
        <Item Value="DiscountId"/>
    </AttrArray>
    <AttrArray Name="ListDisplayAttrNames">
        <Item Value="EasyCode"/>
    </AttrArray>
</ListBinding>

. . .
<ViewAccessor
    Name="Coupons"
    ViewObjectName="oracle.fodemo.storefront.store.queries.CouponsVO"/>
5.12.9 What Happens at Runtime: When an LOV Queries the List Data Source
The ADF Business Components runtime adds view accessors in the attribute setters of the view row and entity object to facilitate the LOV-enabled attribute behavior. In order to display the LOV-enabled attribute values in the user interface, the LOV facility fetches the data source, and finds the relevant row attributes and mapped target attributes.
The number of data objects that the LOV facility fetches is determined in part by the ListRangeSize setting in the LOV-enabled attribute's list binding definition which is specified in the Edit List of Values dialog that you display on the attribute from the view object overview editor. If the number of records fetched is very large, the default value for ListRangeSize may truncate the values available to the dropdown list component used to display the records. The default number of fetched records for LOV queries depends on the type of list component used to display the records. In the case of the Combo Box with List of Values component and the Input Text with List of Values component, the default value for ListRangeSize is 10. In the case of all other types of list components that you can select (including choice list, combo box, list box, and radio button group), the default value for ListRangeSize is set to -1. The value -1 means that the user will be able to view all the data objects from the data source. The ListRangeSize value has no effect on the records that the end user can search on in the lookup dialog displayed for the two List of Values type components. For more information about how each list component displays values, see Section 5.12.4, "How to Set User Interface Hints on a View Object LOV-Enabled Attribute."
Note that although you can alter the ListRangeSize value in the metadata definition for the <ListBinding> element, setting the value to a discrete number of records (for example, ListRangeSize="5") most likely will not provide the user with the desired selection choices. Instead, if the value is -1 (default for simple list components without a LOV dialog), then no restrictions are made to the number of records the list component will display, and the user will have access to the full set of values.
Performance Tip:
To limit the set of values a LOV displays, use a view accessor to filter the LOV binding, as described in Section 5.12.1, "How to Define a Single LOV-Enabled View Object Attribute." Additionally, in the case of component types that display a choice list, you can change the Most Recently Used Count setting to limit the list to display the user's previous selections, as described in Section 5.12.4, "How to Set User Interface Hints on a View Object LOV-Enabled Attribute."Note, a runtime exception will occur when a web page displays a UI component for an LOV-enabled attribute that does not match the view object's CONTROLTYPE definition. When the user interface designer creates the page in JDeveloper using the Data Controls panel, JDeveloper automatically inserts the list component identified by the Default List Type selection you made for the view object's LOV-enabled attribute in the List UI Hint dialog. However, if the user interface designer changes the list type subsequent to creating the web page, you will need to edit the selection in the List UI Hint dialog to match.
5.12.10 What You May Need to Know About Lists
There are several things you may need to know about LOVs that you define for attributes of view objects, including how to propagate LOV-enabled attributes from parent view objects to child view objects (by extending an existing view object) and when to use validators instead of an LOV to manage a list of values.
5.12.10.1 Inheritance of AttributeDef Properties from Parent View Object Attributes
When a view object extends another view object, you can create the LOV-enabled attribute on the base object. Then when you define the child view object in the overview editor, the LOV definition will be visible on the corresponding view object attribute. This inheritance mechanism allows you to define an LOV-enabled attribute once and later apply it across multiple view objects instances for the same attribute.
You can also use the overview editor to extend the inherited LOV definition. For example, you may add extra attributes already defined by the base view object's query to display in selection list. Alternatively, you can define a view object that uses a custom WHERE clause to query the supplemental attributes not already queried by the based view object. For information about customizing entity-based view objects, see Section 5.10, "Working with Bind Variables."
5.12.10.2 Using Validators to Validate Attribute Values
If you have created an LOV-enabled attribute for a view object, there is no need to validate the attribute using a List Validator. You only use an attribute validator when you do not want the list to display in the user interface, but still need to restrict the list of valid values. List validation may be a simple static list or it may be a list of possible values obtained through a view accessor you define. Alternatively, you might prefer to use Key Exists validation when the attribute displayed in the UI is one that references a key value (such as a primary, foreign, or alternate key). For information about declarative validation in ADF Business Components, see Chapter 7, "Defining Validation and Business Rules Declaratively."
5.13 Defining Attribute Control Hints for View Objects
One of the built-in features of Oracle ADF Business Components is the ability to define control hints on attributes. Control hints are additional attribute settings that the view layer can use to automatically display the queried information to the user in a consistent, locale-sensitive way. JDeveloper stores the hints in resource bundle files that you can easily localize for multilingual applications.
5.13.1 How to Add Attribute Control Hints
To create control hints for attributes of a view object, use the overview editor for the view object, which is accessible from the Application Navigator. You can also display and edit control hints using the Property Inspector that you display for an attribute.
Create the desired view objects as described in Section 5.2.1, "How to Create an Entity-Based View Object," and Section 5.2.3, "How to Create an Expert Mode, Read-Only View Object."
To customize view object attribute with control hints:
-
In the Application Navigator, double-click the view object.
-
In the overview editor, click the Attributes navigation tab and double-click the attribute that you want to customize with control hints.
Alternatively, display the Property Inspector for the selected attribute and select the UI Hints navigation tab. The Property Inspector provides a way to customize the attribute's control hints without using the Edit Attribute dialog.
-
In the Edit Attribute dialog, select Control Hints and define the desired hints.
For example, for an attribute
UserId, you might enter a value for its Label Text hint like "Id" or set the Format Type to Number, and enter a Format mask of00000. -
Click OK.
Note:
Java defines a standard set of format masks for numbers and dates that are different from those used by the Oracle database's SQL and PL/SQL languages. For reference, see the Javadoc for thejava.text.DecimalFormat and java.text.SimpleDateFormat classes.5.13.2 What Happens When You Add Attribute Control Hints
When you define attribute control hints for a view object, be default JDeveloper creates a project-level resource bundle file in which to store them. For example, when you define control hints for a view object in the StoreFront project, JDeveloper creates the message bundle file named StoreFrontBundle.xxx for the package. The hints that you define can be used by generated forms and tables in associated view clients.The type of resource bundle file that JDeveloper uses and the granularity of the file are determined by settings on the Resource Bundle page of the Project Properties dialog. By default, JDeveloper sets the option to Properties Bundle and generates one .properties file for the entire data model project.
Alternatively, if you select the option in the Project Properties dialog to generate one resource bundle per file, you can inspect the message bundle file for any view object by selecting the object in the Application Navigator and looking in the corresponding Sources node in the Structure window. The Structure window shows the implementation files for the component you select in the Application Navigator. You can inspect the resource bundle file for the view object by expanding the parent package of the view object in the Application Navigator, as shown in Figure 5-45.
For more information on the resource bundle options you can select, see Section 4.7.1, "How to Set Message Bundle Options."
Example 5-38 shows a sample message bundle file where the control hint information appears. The first entry in each String array is a message key; the second entry is the locale-specific String value corresponding to that key.
Example 5-38 Resource File With Locale-Sensitive Control Hints
devguide.examples.readonlyvo.queries.Persons.PersonId_FMT_FORMATTER=
                                       oracle.jbo.format.DefaultNumberFormatter
devguide.examples.readonlyvo.queries.Persons.PersonId_FMT_FORMAT=00000
devguide.examples.readonlyvo.queries.Persons.PersonId_LABEL=Id
devguide.examples.readonlyvo.queries.Persons.Email_LABEL=Email Address
devguide.examples.readonlyvo.queries.Persons.LastName_LABEL=Surname
devguide.examples.readonlyvo.queries.Persons.FirstName_LABEL=Given Name
5.13.3 What You May Need to Know About Resource Bundles
Internationalizing the model layer of an application built using ADF Business Components entails producing translated versions of each component's resource bundle file. For example, the Italian version of the QueryDataWithViewObjectsBundle.properties file would be a file named QueryDataWithViewObjectsBundle_it.properties, and a more specific Swiss Italian version would have the name QueryDataWithViewObjectsBundle_it_ch.properties.
Resource bundle files contain entries for the message keys that need to be localized, together with their localized translation. For example, assuming you didn't want to translate the number format mask for the Italian locale, the Italian version of the QueryDataWithViewoObjects view object message keys would look like what you see in Example 5-39. At runtime, the resource bundles are used automatically, based on the current user's locale settings.
Example 5-39 Localized View Object Component Resource Bundle for Italian
devguide.examples.readonlyvo.queries.Persons.PersonId_FMT_FORMATTER=                                           oracle.jbo.format.DefaultNumberFormatter
devguide.examples.readonlyvo.queries.Persons.PersonId_FMT_FORMAT=00000
devguide.examples.readonlyvo.queries.Persons.PersonId_LABEL=Codice Utente
devguide.examples.readonlyvo.queries.Persons.Email_LABEL=Indirizzo Email
devguide.examples.readonlyvo.queries.Persons.LastName_LABEL=Cognome
devguide.examples.readonlyvo.queries.Persons.FirstName_LABEL=Nome
5.14 Adding Calculated and Transient Attributes to a View Object
In addition to having attributes that map to underlying entity objects, your view objects can include calculated attributes that don't map to any entity object attribute value. The two kinds of calculated attributes are known as:
-
SQL-calculated attributes, when their value is retrieved as an expression in the SQL query's SELECT list
-
Transient attributes, when their value is not retrieved as part of the query
A view object can include an entity-mapped attribute which itself is a transient attribute at the entity object level.
5.14.1 How to Add a SQL-Calculated Attribute
You use the overview editor for the view object to add a SQL-calculated attribute.
Create the desired view objects as described in Section 5.2.1, "How to Create an Entity-Based View Object," and Section 5.2.3, "How to Create an Expert Mode, Read-Only View Object."
To add a SQL-calculated attribute to a view object:
-
In the Application Navigator, double-click the view object for which you want to define a SQL-calculated attribute.
-
In the overview editor, click the Attributes navigation tab and click the Create new attribute button.
-
In the New View Object Attribute dialog, enter a name for the attribute.
-
Set the Java attribute type to an appropriate value.
-
Select the Mapped to Column or SQL checkbox.
-
Provide a SQL expression in the Expression field.
For example, to change the order of first name and last name, you could write the expression
LAST_NAME||', '||FIRST_NAME, as shown in Figure 5-46. -
Consider changing the SQL column alias to match the name of the attribute.
-
Verify the database query column type and adjust the length (or precision/scale) as appropriate.
-
Click OK.
5.14.2 What Happens When You Add a SQL-Calculated Attribute
When you add a SQL-calculated attribute in the overview editor for the view object, JDeveloper updates the XML component definition for the view object to reflect the new attribute. The entity-mapped attribute's <ViewAttribute> tag looks like the sample shown in Example 5-40. The entity-mapped attribute inherits most of it properties from the underlying entity attribute to which it is mapped.
Example 5-40 Metadata For Entity-Mapped Attribute
<ViewAttribute
   Name="LastName"
   IsNotNull="true"
   EntityAttrName="LastName"
   EntityUsage="User1"
   AliasName="LAST_NAME" >
</ViewAttribute>
Whereas, in contrast, a SQL-calculated attribute's <ViewAttribute> tag looks like sample shown in Example 5-41. As expected, the tag has no EntityUsage or EntityAttrName property, and includes datatype information along with the SQL expression.
Example 5-41 Metadata For SQL-Calculated Attribute
<ViewAttribute Name="LastCommaFirst" IsUpdatable="false" IsPersistent="false" Precision="62" Type="java.lang.String" ColumnType="VARCHAR2" AliasName="FULL_NAME" Expression="LAST_NAME||', '||FIRST_NAME" SQLType="VARCHAR" > </ViewAttribute>
Note:
The' is the XML character reference for the apostrophe. You reference it by its numerical ASCII code of 39 (decimal). Other characters in literal text that require similar construction in XML are the less-than, greater-than, and ampersand characters.5.14.3 How to Add a Transient Attribute
Transient attributes are often used to provide subtotals or other calculated expressions that are not stored in the database.
Create the desired view objects as described in Section 5.2.1, "How to Create an Entity-Based View Object," and Section 5.2.3, "How to Create an Expert Mode, Read-Only View Object."
To add a transient attribute to a view object:
-
In the Application Navigator, double-click the view object for which you want to define a transient attribute.
-
In the overview editor, click the Attributes navigation tab and click the Create new attribute button.
-
In the New View Object Attribute dialog, enter a name for the attribute.
-
Set the Java attribute type to an appropriate value.
For example, a calculated attribute that concatenates a first name and a last name would have the type
String, as shown in Figure 5-47. -
Leave the Mapped to Column or SQL checkbox unselected.
-
Click OK.
To create a transient attribute based on an expression:
-
In the Application Navigator, double-click the view object for which you want to define a transient attribute.
-
In the overview editor, click the Attributes navigation tab and click the Create new attribute button.
-
In the New View Object Attribute dialog, enter a name for the attribute.
-
Set the Java attribute type to an appropriate value.
-
Leave the Mapped to Column or SQL checkbox unselected.
A transient attribute does not include a SQL expression.
-
Next to the Value field, click Edit to define an expression that calculates the value of the attribute.
Expressions you define will be evaluated using the Groovy Expression Language. Groovy lets you insert expressions and variables into strings. The expression will be saved as part of the view object definition. For more information about Groovy, see Section 3.6, "Overview of Groovy Support."
-
In the Edit Expression dialog, enter an expression in the field provided.
Attributes that you reference can include any attribute that the base entity objects define. Do not reference attributes in the expression that are not defined by the view object's underlying entity objects.
-
Select the appropriate recalculate setting.
If you select Always (default), the expression is evaluated each time any attribute in the row changes. If you select Never, the expression is evaluated only when the row is created.
-
You can optionally provide a condition for when to recalculate the expression.
For example, the following expression in the Based on the following expression field causes the attribute to be recalculated when either the Quantity attribute or the
UnitPriceattribute are changed:return (adf.object.isAttributeChanged("Quantity") || adf.object.isAttributeChanged("UnitPrice")); -
When either the value expression or the optional recalculate expression that you define references an attribute from the base entity object, you must define this as a dependency in the Edit Expression dialog. Locate each attribute in the Available list and shuttle it to the Selected list.
-
Click OK to save the expression and return to the New View Object Attribute dialog.
-
Click OK.
A view object can include an entity-mapped attribute which itself is a transient attribute at the entity object level.
To add a transient attribute from an entity object to an entity-based view object:
-
In the Application Navigator, double-click the view object for which you want to add a transient attribute based on an entity usage.
-
In the overview editor, click the Attributes navigation tab and click the Add From Entity button.
-
In the Attributes dialog, move the desired transient attribute from the Available list into the Selected list.
-
Click OK.
If you use the Business Component Browser to test the data model, you can see the usage of your transient attributes. Figure 5-48 shows three attributes that were created using a SQL-calculated attribute (LastCommaFirst), a transient attribute (FirstDotLast) and an entity-derived transient attribute (FullName).
5.14.4 How to Add a Validation Rule to a Transient Attribute
Attribute-level validation rules are triggered for a particular view object transient attribute when either the end user or the program code attempts to modify the attribute's value. Since you cannot determine the order in which attributes will be set, attribute-level validation rules should be used only when the success or failure of the rule depends exclusively on the candidate value of that single attribute.
The process for adding a validation rule to an view object transient attribute is similar to create declarative validation rules, and is done using the Add Validation Rule dialog. You can open this dialog from the overview editor for the view object by clicking the Add Validation Rule icon on the Attributes page. You must first select the transient attribute from the attributes list.
To add a validation rule for a transient attribute:
-
In the Application Navigator, double-click the desired view object.
-
Click the Attributes navigation tab on the overview editor.
-
Select the transient attribute for which you want to add a validation rule, expand the Validation Rules section, and then click the Add Validation Rule icon.
When you add a new validation rule, the Add Validation Rule dialog appears.
-
Select the type of validation rule desired from the Rule Type dropdown list.
-
Use the dialog settings to configure the new rule.
The controls will change depending on the kind of validation rule you select. For more information about the different validation rules, see Section 7.4, "Using the Built-in Declarative Validation Rules."
-
You can optionally click the Validation Execution tab and enter criteria for the execution of the rule, such as dependent attributes and a precondition expression. For more information, see Section 7.6, "Triggering Validation Execution."
-
Click the Failure Handling tab and enter or select the error message that will be shown to the user if the validation rule fails. For more information, see Section 7.7, "Creating Validation Error Messages."
-
Click OK.
5.14.5 What Happens When You Add a Transient Attribute
When you add a transient attribute in the overview editor for a view object, JDeveloper updates the XML component definition for the view object to reflect the new attribute. A transient attribute's <ViewAttribute> tag in the XML is similar to the SQL-calculated one, but it lacks an Expression property.
When you base a transient attribute on a Groovy expression, a <TransientExpression> tag is created within the appropriate attribute, as shown in Example 5-42.
5.14.6 Adding Java Code in the View Row Class to Perform Calculation
A transient attribute is a placeholder for a data value. If you change the Updatable property of the transient attribute to While New or Always, the end user can enter a value for the attribute. If you want the transient attribute to display a calculated value, then you'll typically leave the Updatable property set to Never and write custom Java code that calculates the value.
After adding a transient attribute to the view object, to make it a calculated transient attribute you need to enable a custom view row class and choose to generate accessor methods, in the Java dialog that you open clicking the Edit icon on the Java page of the overview editor for the view object. Then you would write Java code inside the accessor method for the transient attribute to return the calculated value. Example 5-42 shows the StaffListRowImpl.java view row class contains the Java code to return a calculated value in the getLastCommaFirst() method.
// In StaffListRowImpl.java
public String getFirstDotLast() {
  // Commented out this original line since we're not storing the value
  // return (String) getAttributeInternal(FIRSTDOTLAST);
  return getFirstName().substring(0,1)+". "+getLastName();
}
5.14.7 What You May Need to Know About Transient Attributes
The view object includes the SQL expression for your SQL-calculated attribute in the SELECT list of its query at runtime. The database is the one that evaluates the expression, and it returns the result as the value of that column in the query. The value is reevaluated each time you execute the query.
