23 Configuring a Relational Descriptor
This chapter describes how to configure a relational descriptor.
This chapter contains the following sections:
-
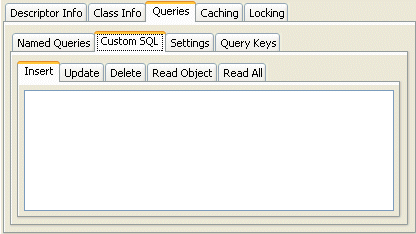
Configuring Custom SQL Queries for Basic Persistence Operations
-
Configuring a Relational Descriptor as a Class or Aggregate Type
For information on how to configure descriptor options common to two or more descriptor types, see Chapter 119, "Configuring a Descriptor".
Table 23-1 lists the default configurable options for a relational descriptor.
23.1 Introduction to Relational Descriptor Configuration
Table 23-1 lists the default configurable options for a relational descriptor.
Table 23-1 Configurable Options for Relational Descriptor
For more information, see Chapter 21, "Introduction to Relational Descriptors".
23.2 Configuring Associated Tables
Each relational class descriptor (see Section 22.2.1.1, "Creating Relational Class Descriptors") must be associated with a database table for storing instances of that class. This does not apply to relational aggregate descriptors (see Section 22.2.1.2, "Creating Relational Aggregate Descriptors").
23.2.1 How to Configure Associated Tables Using TopLink Workbench
To associate a descriptor with a database table, use this procedure:
-
Select a descriptor in the Navigator. Its properties appear in the Editor.
-
Click the Descriptor Info tab. The Descriptor Info tab appears.
Figure 23-1 Descriptor Info Tab, Associated Table Options
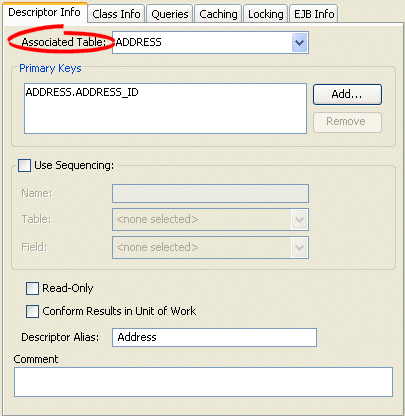
Description of "Figure 23-1 Descriptor Info Tab, Associated Table Options"
Use the Associated Table list to select a database table for the descriptor. You must associate a descriptor with a database table before specifying primary keys.
23.2.2 How to Configure Associated Tables Using Java
To configure a descriptor's associated table(s) using Java, use RelationalDescriptor methods setTableName or addTableName.
23.3 Configuring Sequencing at the Descriptor Level
Sequencing allows TopLink to automatically assign the primary key or ID of an object when the object is inserted.
You configure TopLink sequencing at the project level (Section 20.3, "Configuring Sequencing at the Project Level") or session level (see Section 98.4, "Configuring Sequencing at the Session Level") to tell TopLink how to obtain sequence values: that is, what type of sequences to use.
To enable sequencing, you must then configure TopLink sequencing at the descriptor level to tell TopLink into which table and column to write the sequence value when an instance of a descriptor's reference class is created.
Only descriptors that have been configured with a sequence field and a sequence name will be assigned sequence numbers.
The sequence field is the database field that the sequence number will be assigned to: this is almost always the primary key field (see Section 119.2, "Configuring Primary Keys"). The sequence name is the name of the sequence to be used for this descriptor. The purpose of the sequence name depends on the type of sequencing you are using:
When using table sequencing, the sequence name refers to the row's SEQ_NAME value used to store this sequence.
When using Oracle native sequencing, the sequence name refers to the Oracle sequence object that has been created in the database. When using native sequencing on other databases, the sequence name does not have any direct meaning, but should still be set for compatibility.
The sequence name can also refer to a custom sequence defined in the project.
For more information, see Section 18.2, "Sequencing in Relational Projects".
23.3.1 How to Configure Sequencing at the Descriptor Level Using TopLink Workbench
To configure sequencing for a descriptor, use this procedure:
-
Select a descriptor in the Navigator. Its properties appear in the Editor.
-
Click the Descriptor Info tab. The Descriptor Info tab appears.
Figure 23-2 Descriptor Info Tab, Sequencing Options
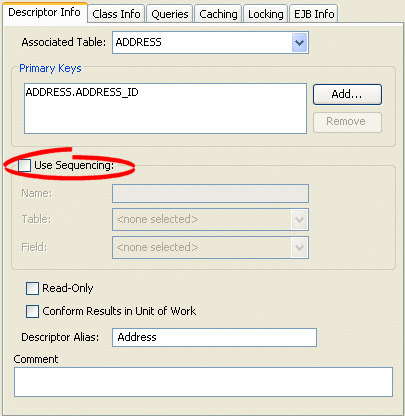
Description of "Figure 23-2 Descriptor Info Tab, Sequencing Options"
Use the following information to specify sequencing options:
| Field | Description |
|---|---|
| Use Sequencing | Specify if this descriptor uses sequencing. If selected, specify the Name, Table, and Field for sequencing. |
| Name | Enter the name of the sequence.
|
| Table | Specify the name of the database table that contains the field (see Field) into which TopLink is to write the sequence value when a new instance of this descriptor's reference class is created. This is almost always this descriptor's primary table. |
| Field | Specify the name of the field in the specified table (see Table) into which TopLink is to write the sequence value when a new instance of this descriptor's reference class is created. This field is almost always the class's primary key (see Section 119.2, "Configuring Primary Keys").
|
23.3.2 How to Configure Sequencing at the Descriptor Level Using Java
Using Java, you can configure sequencing to use multiple different types of sequence for different descriptors. You configure the sequence objects on the session's login and reference them from the descriptor by their name. The descriptor's sequence name refers to the sequence object's name you register in the session's login.
The following examples assume the session sequence configuration shown in Example 23-1.
Example 23-1 Example Sequences
dbLogin.addSequence(new TableSequence("EMP_SEQ", 25));
dbLogin.addSequence(new DefaultSequence("PHONE_SEQ", 30));
dbLogin.addSequence(new UnaryTableSequence("ADD_SEQ", 55));
dbLogin.addSequence(new NativeSequence("NAT_SEQ", 10));
Using Java code, you can perform the following sequence configurations:
23.3.2.1 Configuring a Sequence by Name
As Example 23-2 shows, you associate a sequence with a descriptor by sequence name. The sequence EMP_SEQ was added to the login for this project in Example 23-1. When a new instance of the Employee class is created, the TopLink runtime will use the sequence named EMP_SEQ (in this example, a TableSequence) to obtain a value for the EMP_ID field.
23.3.2.2 Configuring the Same Sequence for Multiple Descriptors
As Example 23-3 shows, you can associate the same sequence with more than one descriptor. In this example, both the Employee descriptor and Phone descriptor use the same NativeSequence. Having descriptors share the same sequence can improve pre-allocation performance. For more information on pre-allocation, see Section 18.2.3, "Sequencing and Preallocation Size".
Example 23-3 Configuring a Sequence for Multiple Descriptors
empDescriptor.setSequenceNumberFieldName("EMP_ID"); // primary key field
empDescriptor.setSequenceNumberName("NAT_SEQ");
phoneDescriptor.setSequenceNumberFieldName("PHONE_ID"); // primary key field
phoneDescriptor.setSequenceNumberName("NAT_SEQ");
23.3.2.3 Configuring the Platform Default Sequence
In Example 23-4, you associate a nonexistent sequence (NEW_SEQ) with a descriptor. Because you did not add a sequence named NEW_SEQ to the login for this project in Example 23-1, the TopLink runtime will create a DefaultSequence named NEW_SEQ for this descriptor. For more information about DefaultSequence, see Section 18.2.2.4, "Default Sequencing".
23.4 Configuring Custom SQL Queries for Basic Persistence Operations
You can use TopLink to define an SQL query for each basic persistence operation (insert, update, delete, read-object, read-all, or does-exist) so that when you query and modify your relational-mapped objects, the TopLink runtime will use the appropriate SQL query instead of the default SQL query.
SQL strings can include any fields that the descriptor maps, as well as arguments. You specify arguments in the SQL string using #<arg-name>, such as:
select * from EMP where EMP_ID = #EMP_ID
The insert and update SQL strings can take any field that the descriptor maps as an argument.
The read-object, delete and does-exist SQL strings can only take the primary key fields as arguments.
The read-all SQL string must return all instances of the class and thus can take no arguments.
You can define a custom SQL string for insert, update, delete, read-object, and read-all using Oracle JDeveloper TopLink Editor or TopLink Workbench (see Section 23.4.1, "How to Configure Custom SQL Queries for Basic Persistence Operations Using TopLink Workbench").
You can define a custom SQL string or Call object for insert, update, delete, read-object, read-all, and does-exist using Java (see Section 23.4.2, "How to Configure Custom SQL Queries for Basic Persistence Operations Using Java"). Using a Call, you can define more complex SQL strings and invoke custom stored procedures.
For CMP projects, the ejb-jar.xml file stores query lists. You can define the queries in the file and then read them into Oracle JDeveloper or TopLink Workbench, or define them on the Queries tab of TopLink Workbench and write them to the file (see Section 19.7, "Working with the ejb-xml.File").
Note:
When you customize the update persistence operation for an application that uses optimistic locking (see Section 119.26, "Configuring Locking Policy"), the custom update string must not write the object if the row version field has changed since the initial object was read. In addition, it must increment the version field if it writes the object successfully.For example:
update Employee set F_NAME = #F_NAME, VERSION = VERSION + 1 where (EMP_ID = #EMP_ID) AND (VERSION = #VERSION)
The update string must also maintain the row count of the database.
Note:
TopLink does not validate the SQL code that you enter. Enter the SQL code appropriate for your database platform (see Section 96.1.3, "Data Source Platform Types").23.4.1 How to Configure Custom SQL Queries for Basic Persistence Operations Using TopLink Workbench
To configure custom SQL queries for basic persistence operations:
-
In the Navigator, select a descriptor in a relational database project.
-
Click the Queries tab in the Editor.
Click the appropriate SQL function tab and type your own SQL string to control these actions for a descriptor. Use the following information to complete the tab:
23.4.2 How to Configure Custom SQL Queries for Basic Persistence Operations Using Java
The DescriptorQueryManager generates default SQL for the following persistence operations:
-
Insert
-
Update
-
Delete
-
Read-object
-
Read-all
-
Does-exist
Using Java code, you can use the descriptor query manager to provide custom SQL strings to perform these functions on a class-by-class basis.
Use ClassDescriptor method getQueryManager to acquire the DescriptorQueryManager, and then use the DescriptorQueryManager methods that Table 23-2 lists.
Table 23-2 Descriptor Query Manager Methods for Configuring Custom SQL
| To Change the Default SQL for... | Use Descriptor Query Manager Method... |
|---|---|
|
Insert |
|
|
|
|
|
|
|
|
Update |
|
|
|
|
|
|
|
|
Delete |
|
|
|
|
|
|
|
|
Read |
|
|
|
|
|
|
|
|
Read all |
|
|
|
|
|
|
|
|
Does exist |
|
|
|
|
|
|
Example 23-5 shows how to implement an amendment method to configure a descriptor query manager to use custom SQL strings. Alternatively, using an SQLCall, you can specify more complex SQL strings using features such as in, out, and in-out parameters and parameter types (see Section 109.4, "Using a SQLCall").
Example 23-5 Configuring a Descriptor Query Manager with Custom SQL Strings
public static void addToDescriptor(ClassDescriptor descriptor) {

    // Read-object by primary key procedure
    descriptor.getQueryManager().setReadObjectSQLString(
        "select * from EMP where EMP_ID = #EMP_ID");

    // Read-all instances procedure
    descriptor.getQueryManager().setReadAllSQLString(
        "select * from EMP");

    // Insert procedure
    descriptor.getQueryManager().setInsertSQLString(
        "insert into EMP (EMP_ID, F_NAME, L_NAME, MGR_ID) values
        (#EMP_ID, #F_NAME, #L_NAME, #MGR_ID)");

    // Update procedure
    descriptor.getQueryManager().setUpdateSQLString(
        "update EMP set (F_NAME, L_NAME, MGR_ID) values
        (#F_NAME, #L_NAME, #MGR_ID) where EMP_ID = #EMP_ID");
}
Example 23-6 shows how to implement an amendment method to configure a descriptor query manager to use Oracle stored procedures using a StoredProcedureCall (see Section 109.5, "Using a StoredProcedureCall"). This example uses output cursors to return the result set (see Section 111.11, "Handling Cursor and Stream Query Results").
Example 23-6 Configuring a Descriptor Query Manager with Custom Stored Procedure Calls
public static void addToDescriptor(ClassDescriptor descriptor) {

    // Read-object by primary key procedure
    StoredProcedureCall readCall = new StoredProcedureCall();
    readCall.setProcedureName("READ_EMP");
    readCall.addNamedArgument("P_EMP_ID", "EMP_ID");       readCall.useNamedCursorOutputAsResultSet("RESULT_CURSOR");       descriptor.getQueryManager().setReadObjectCall(readCall);

    // Read-all instances procedure
    StoredProcedureCall readAllCall = new StoredProcedureCall();
    readAllCall.setProcedureName("READ_ALL_EMP");
    readAllCall.useNamedCursorOutputAsResultSet("RESULT_CURSOR");         descriptor.getQueryManager().setReadAllCall(readAllCall );

    // Insert procedure
    StoredProcedureCall insertCall = new StoredProcedureCall();
    insertCall.setProcedureName("INSERT_EMP");
    insertCall.addNamedArgument("P_EMP_ID", "EMP_ID");
    insertCall.addNamedArgument("P_F_NAME", "F_NAME");
    insertCall.addNamedArgument("P_L_NAME", "L_NAME");
    insertCall.addNamedArgument("P_MGR_ID", "MGR_ID");
    descriptor.getQueryManager().setInsertCall(insertCall);

    // Update procedure
    StoredProcedureCall updateCall = new StoredProcedureCall();      updateCall.setProcedureName("UPDATE_EMP");
    updateCall.addNamedArgument("P_EMP_ID", "EMP_ID");
    updateCall.addNamedArgument("P_F_NAME", "F_NAME");
    updateCall.addNamedArgument("P_L_NAME", "L_NAME");
    updateCall.addNamedArgument("P_MGR_ID", "MGR_ID");
    descriptor.getQueryManager().setUpdateCall(updateCall);
}
23.5 Configuring Interface Alias
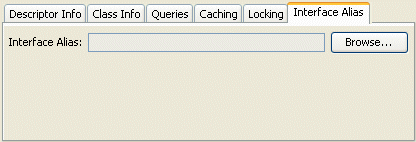
An interface alias allows an interface to be used to refer to a descriptor instead of the implementation class. This can be useful for classes that have public interface and the applications desire to refer to the class using the public interface. Specifying the interface alias allows any queries executed on a TopLink session to use the interface as the reference class instead of the implementation class.
Each descriptor can have one interface alias. Use the interface in queries and relationship mappings.
Note:
If you use an interface alias, do not associate an interface descriptor with the interface.This section includes information on configuring an interface alias. Interfaces cannot be created in Oracle JDeveloper or TopLink Workbench; you must add the Java package or class to your Oracle JDeveloper or TopLink Workbench project before configuring it.
23.5.1 How to Configure Interface Alias Using TopLink Workbench
To specify an interface alias, use this procedure:
-
In the Navigator, select a descriptor.
If the Interface Alias advanced property is not visible for the descriptor, right-click the descriptor and choose Select Advanced Properties > Interface Alias from context menu or from the Selected menu.
In the Interface Alias field, click Browse and select an interface.
23.5.2 How to Configure Interface Alias Using Java
To configure a descriptor with an interface alias using Java, create an amendment method (see Section 119.35, "Configuring Amendment Methods") and use InterfacePolicy method addParentInterface as Example 23-7 shows.
23.6 Configuring a Relational Descriptor as a Class or Aggregate Type
By default, when you add a Java class to a relational project (see Section 117.3, "Configuring Project Classpath"), Oracle JDeveloper or TopLink Workbench create a relational class descriptor for it. A class descriptor is applicable to any persistent object except an object that is owned by another in an aggregate relationship. In this case, you must describe the owned object with an aggregate descriptor. Using a class descriptor, you can configure any relational mapping except aggregate collection and aggregate object mappings.
An aggregate object is an object that is strictly dependent on its owning object. Aggregate descriptors do not define a table, primary key, or many of the standard descriptor options as they obtain these from their owning descriptor. If you want to configure an aggregate mapping to associate data members in a target object with fields in a source object's underlying database tables (see Chapter 35, "Configuring a Relational Aggregate Collection Mapping" and Chapter 37, "Configuring a Relational Aggregate Object Mapping"), you must designate the target object's descriptor as an aggregate.
Alternatively, you can remove the aggregate designation from a relational descriptor and return it to its default type.
You can configure inheritance for a descriptor designated as an aggregate (see Section 119.20, "Configuring Inheritance for a Child (Branch or Leaf) Class Descriptor"), however, in this case, all the descriptors in the inheritance tree must be aggregates. Aggregate and class descriptors cannot exist in the same inheritance tree. For more information, see Section 16.3.4, "Aggregate and Composite Descriptors and Inheritance".
If you configure a descriptor as an aggregate, you cannot configure the descriptor with EJB information (see Section 119.18, "Configuring a Descriptor with EJB CMP and BMP Information").
For more information, see Section 50.1.1, "XML Descriptors and Aggregation".
23.6.1 How to Configure a Relational Descriptor as a Class or Aggregate Type Using TopLink Workbench
To configure a relational descriptor as class or aggregate, use this procedure.
-
In the Navigator, select a relational descriptor.
-
Click the Class or Aggregate descriptor button on the mapping toolbar.
You can also select the descriptor and choose Selected > Descriptor Type > Class or Aggregate from the menu or by right-clicking on the descriptor in the Navigator window and selecting Descriptor Type > Class or Aggregate from the context menu.
-

If you select Aggregate, specify each of the aggregate descriptor's attributes as a direct to field mapping. See Chapter 29, "Configuring a Relational Direct-to-Field Mapping" for more information.
![]()
Specify each of the aggregate descriptor's attributes as a direct to field mapping. See Chapter 29, "Configuring a Relational Direct-to-Field Mapping" for more information.
Although the attributes of a target class are not mapped directly to a data source until you configure an aggregate object mapping, you must still specify their mapping type in the target class's descriptor. This tells TopLink what type of mapping to use when you do configure the aggregate mapping in the source object's descriptor. For more information, see Section 21.2, "Aggregate and Composite Descriptors in Relational Projects".
23.6.2 How to Configure a Relational Descriptor as a Class or Aggregate Type Using Java
Using Java, to configure a relational descriptor as an aggregate, use ClassDescriptor method descriptorIsAggregate.
To configure a relational descriptor for use in an aggregate collection mapping, use ClassDescriptor method descriptorIsAggregateCollection.
To configure a relational descriptor as a nonaggregate, use ClassDescriptor method descriptorIsNormal.
23.7 Configuring Multitable Information
Descriptors can use multiple tables in mappings. Use multiple tables when either of the following occurs:
-
A subclass is involved in inheritance, and its superclass is mapped to one table, while the subclass has additional attributes that are mapped to a second table.
-
A class is not involved in inheritance and its data is spread out across multiple tables.
When a descriptor has multiple tables, you must be able to join a row from the primary table to all the additional tables. By default, TopLink assumes that the primary key of the first, or primary, table is included in the additional tables, thereby joining the tables. TopLink also supports custom methods for joining tables. If the primary key field names of the multiple tables do not match, a foreign key can be used to join the tables. The foreign key can either be from the primary table to the secondary table, or from the secondary table to the primary table, or between two of the secondary tables (see Section 23.7.1, "How to Configure Multitable Information Using TopLink Workbench").
For complex multitable situations, a more complex join expression may be required. These include requiring the join to also check a type code, or using an outer-join. TopLink provides support for a multiple-table-join-expression for these cases (see Section 23.7.2, "How to Configure Multitable Information Using Java").
23.7.1 How to Configure Multitable Information Using TopLink Workbench
To associate multiple tables with a descriptor, use this procedure.
-
In the Navigator, select a descriptor.
If the Multitable Info advanced property is not visible for the descriptor, right-click the descriptor and choose Select Advanced Properties > Multitable Info from the context menu or from the Selected menu.
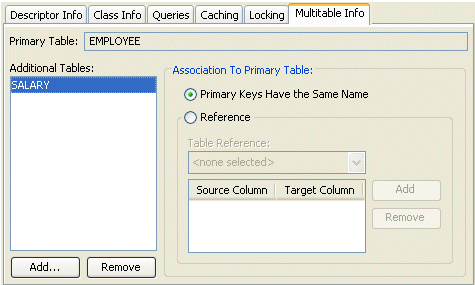
Use the following information to enter data in each field of the tab:
| Field | Description |
|---|---|
| Primary Table | The primary table for this descriptor. This field is for display only. |
| Additional Tables | Use Add and Remove to add or remove additional tables. |
| Association to Primary Table | Specify how each Additional Table is associated to the Primary Table:
|
Associating Tables with References
When associating a table using Reference, additional options appear. You must choose a reference that relates the correct fields in the primary table to the primary keys in the selected table.
Figure 23-6 Multitable Info Tab, Associated by Reference
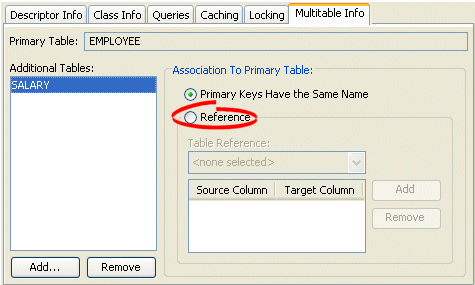
Description of "Figure 23-6 Multitable Info Tab, Associated by Reference"
Choose a Table Reference that defines how the primary keys of the primary table relate to the primary keys of the selected table. Click Add to add a primary key association.
23.7.2 How to Configure Multitable Information Using Java
Using Java, configure a descriptor with multitable information using the following oracle.toplink.descriptors.ClassDescriptor methods:
-
addTableName(java.lang.String tableName) -
addForeignKeyFieldNameForMultipleTable(java.lang.String sourceForeignKeyFieldName, java.lang.String targetPrimaryKeyFieldName)
To specify a complex multiple-table-join-expression, create a descriptor amendment method (see Section 119.35, "Configuring Amendment Methods") and add the join expression using oracle.toplink.descriptors.DescriptorQueryManager method setMultipleTableJoinExpression. For more information, see Section 111.7, "Appending Additional Join Expressions".
