| Oracle® Role Manager User's Guide Release 10g (10.1.4.2) Part Number E14609-02 |
|
|
View PDF |
| Oracle® Role Manager User's Guide Release 10g (10.1.4.2) Part Number E14609-02 |
|
|
View PDF |
This chapter discusses the procedure to access Oracle Role Manager and will help you to familiarize yourself with the Oracle Role Manager application. This will enable you to quickly start using Oracle Role Manager. This chapter discusses the following topics:
Note:
The topics discussed in this section assume that you have installed Oracle Role Manager and loaded the sample data.To log in to Oracle Role Manager:
Browse to the following URL by using a Web browser:
http://hostname:port/webui
In this URL, hostname represents the name of the computer hosting the application server and port refers to the port on which the server is listening. The default port number for JBoss Application Server is 8080.
Note:
The application name, webui, is case-sensitive.For example:
http://localhost:8080/webui/
After the Oracle Role Manager login page is displayed, log in with your user name and password.
Note:
While logging in to Oracle Role Manager, if you enter n number of incorrect passwords, then your account will be locked. Here, n is the account lockout threshold or the number of attempts to log in before the account is locked. Account lockout threshold is set by the system administrator. By default, the value of n is set to 5.Each page in the Oracle Role Manager user interface is divided into two panes. The left pane consists of a navigation tree that enables you to navigate through various nodes. The right pane consists of a Search For field, using which you can search for one or more records in Oracle Role Manager.
Note:
You can use the percent sign (%) as the wildcard character to perform search operations.Depending on the navigation options that you select, the contents displayed on the left and right panes vary. Figure 2-1 shows a sample page, and the layout of most pages in Oracle Role Manager is similar to the user interface layout on this page.
Figure 2-1 Layout of the Business Roles Page
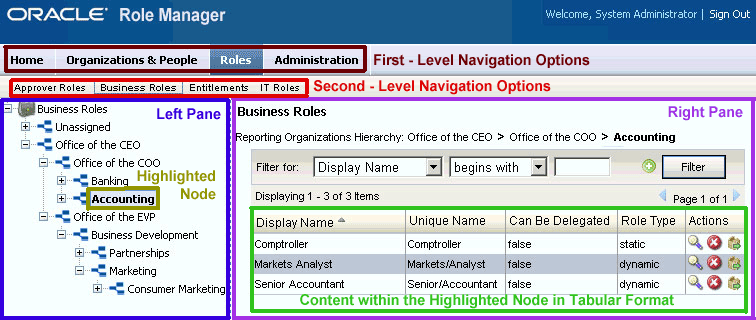
There are some pages in the Oracle Role Manager user interface that have a layout different than the one shown in Figure 2-1. Figure 2-2 shows one such page.
The Oracle Role Manager user interface contains the first-level navigation bar that consists of the following options:
Figure 2-3 shows the first-level navigation bar in Oracle Role Manager.
Figure 2-3 Oracle Role Manager First-Level Navigation Bar

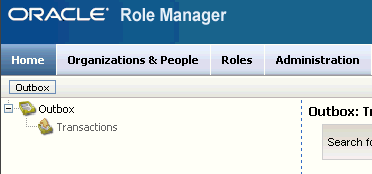
Home is the first option on the first-level navigation bar. It contains Outbox, which is a second-level navigation option. On the left pane, the Outbox node consists of the Transactions child node.
You can use the Outbox node to search for and view details of all transactions performed using the interface.
Figure 2-4 shows the Outbox node by using which you search for transactions. You must right-click the Transactions node to search for transactions.
Figure 2-4 Home: Second-Level Navigation Option
A transaction in Oracle Role Manager is a sequence of actions performed multiple times in the UI to update values before they can be committed to the database. For example, the sequence of steps performed to create a role is a transaction. Another example is, updating and submitting a role.
A transaction can be in any one of the following statuses:
Pending
Finalized
Cancelled
Submitted
The status of a transaction is pending when the transaction is neither submitted nor canceled. For example, if you perform a sequence of actions to update the details of an IT role but do not submit the details, then the Update IT Role transaction is said to be in the pending status. Figure 2-5 shows the status of the Update IT Role transaction.
The status of a transaction is finalized if the transaction is complete and the changes are committed to the database. For example, if you perform a sequence of actions to enter the details to create a business role and then submit the details, then the Create Business Role transaction is said to be in the finalized status. Figure 2-5 shows the status of the Create Business Role transaction.
The status of a transaction is cancelled if the transaction is not complete and the sequence of actions performed are canceled. For example, if you perform a sequence of actions to update the details of a person and then cancel the details, then the Update Person transaction is said to be in the cancelled status. Figure 2-5 shows the status of the Update Person transaction.
The status of a transaction is submitted if the transaction to grant a static business role is submitted to the database and the corresponding approval workflow in Oracle Identity Manager is under operation. This status is applicable only to the Grant A Business Role with SOC transaction. After the request to grant a static business role is submitted to the database, if the request is approved by all the approvers in Oracle Identity Manager, then the status of the Grant A Business Role with SOC transaction is said to be finalized. If the request is rejected by any approver, then the status of the Grant A Business Role with SOC transaction is said to be cancelled. Figure 2-5 shows the status of the Grant A Business Role with SOC transaction.
You can view details of all transactions that are performed in Oracle Role Manager.
To view the details of a transaction:
On the first-level navigation bar, click Home.
On the left pane, right-click the Transactions node under the Outbox node and the click Search.
On the Outbox: Transactions page, specify the search criterion for the transaction that you want to locate and view details.
A list of all transactions that meet the search criterion is displayed in a tabular format with the following columns:
Status: This column displays the current status of the transaction. Information about the various statuses in which a transaction can exist has already been explained.
Transaction: This column displays the name of a transaction. For example, Update Person, Create Business Role to IT Role Mapping, and Create System Role.
Submission Date: This column displays the date and time on which the transaction was submitted, canceled, or left pending.
Actions: This column displays the View/Edit icon. You use this icon to view the details of the corresponding transaction.
To display the details of the transaction, click the View/Edit icon in the row for transaction.
The Details section is displayed as shown in Figure 2-6.
Figure 2-6 Details Section for the Update Person Transaction
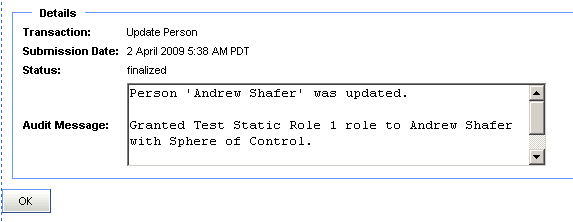
The Details section displays the following fields:
Transaction: This field displays the name of the transaction. For example, Delete IT Role, Update Person, and Update Business Role.
Submission Date: This column displays the date and time on which the transaction was submitted, canceled, or left pending.
Status: This field displays the status of a transaction. Information about the various statuses in which a transaction can exist has already been explained
Audit Message: This fields displays a message that summarizes the actions performed during the transaction.
In addition to all the fields discussed in the preceding paragraph, the Details section for the Grant A Business Role with SOC transaction displays the Audit Events field. Figure 2-7 displays the Details section for the Grant A Business Role with SOC transaction.
Figure 2-7 Details Section for the Grant A Business Role with SOC Transaction
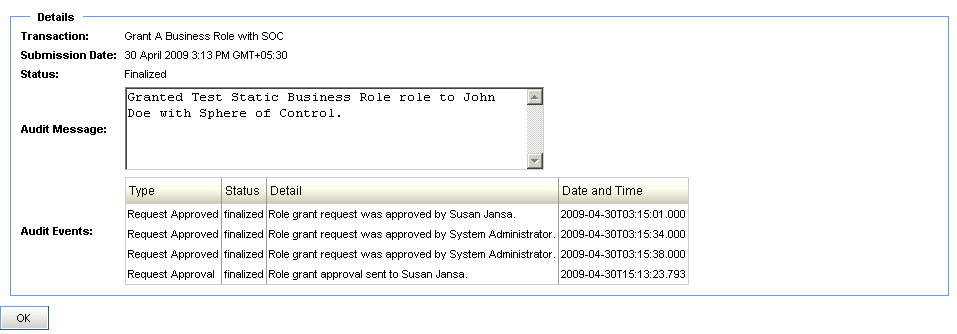
The Audit Events field displays all event details in a tabular format with the following columns:
Type: This column displays the type of audit event being recorded, which can be one of the following:
Request Approval: An audit event is of the type Request Approval when the request for granting a static business role is submitted.
Request Approved: An audit event is of type Request Approved when an approver approves the static role grant request.
Request Rejected: An audit event is of type Request Rejected when an approver rejects the static business role grant request.
Status: This field displays the status of the audit event, which can be one of the following:
Submitted: The status of an audit event is submitted if the transaction to grant a static business role is submitted to the database and the corresponding approval workflow in Oracle Identity Manager kicks off.
Approved: The status of an audit event is approved if the approvers have approved the role grant request.
Rejected: The status of an audit event is rejected if any approver in the workflow has rejected the role grant request.
Detail: This column displays the details of an audit events. For example, the name of the role being granted, the grantee name, approver name, and request name.
Date and Time: This column displays the date and time at which the audit event occurred.
You can create, update, delete, and search cost centers, locations, people, and reporting organizations by using the second-level navigation options available under Organizations & People, as shown in Figure 2-8.
Figure 2-8 Organization & People: Second-Level Navigation Options

The first-level navigation option Organizations & People contains the following second-level navigation options:
Cost Centers
Locations
People
Reporting Organizations
Note:
In this document, entities created under each of the hierarchies (such as Cost Centers, Locations, and Reporting Organizations) are called nodes.For example, Operations is a node under the Cost Centers hierarchy.
Right-clicking a node on the left pane of the Organizations & People page will display the menu options listed in Table 2-1. You can perform the actions listed in this table depending on the system privileges that you have been granted. For example, the New option is grayed out if you do not have the appropriate system privilege to create a reporting organization.
Table 2-1 Organizations & People: Shortcut Menu Options
| Menu Item | Action |
|---|---|
|
View Details |
Displays details of the node. |
|
New |
Creates a node. |
|
Search |
Searches for nodes within the current node and all its child nodes. |
|
Move |
Moves the node to another location within the node-navigation tree. Note: This option is not available in the People view. |
|
Collapse |
Changes the display of the current node to show only the parent node and hide all child nodes. |
|
Expand |
Changes the display of the current node to show all its child nodes. |
|
Refresh |
Refreshes the view of the node. |
|
Delete |
Deletes the node. If the node has child nodes, then this option is grayed out. Note: This option is not available in the People view. |
You can create, modify, and delete cost centers, locations, people, and reporting organizations. To perform these procedures, you must be a member of a system role that contains the All or Manage privileges for each of the objects. See "Working with System Roles" for more information about system roles.
For example, if you want to create person records, then you must be a member of a system role that contains one of the following system privileges:
All for Person objects
Manage Person objects
Similarly, if you want to modify a reporting organization of the type country, then you must be a member of a system role that contains one of the following system privileges:
All for Country objects
Manage Country objects
This section discusses the following procedures:
Creating Cost Centers, Locations, and Reporting Organizations
Modifying Cost Centers, Locations, People, and Reporting Organizations
Deleting Cost Centers, Locations, and Reporting Organizations
To create a cost center, location, or reporting organization:
On the first-level navigation bar, click Organizations & People.
Depending on the node that you want to create, on the second-level navigation bar, select one of the following:
Cost Centers
Locations
Reporting Organizations
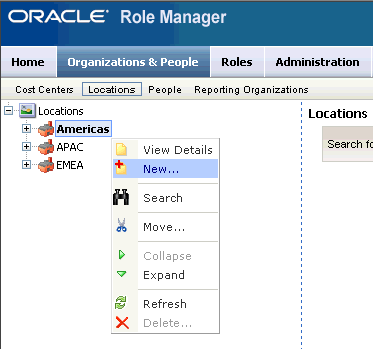
On the left pane, right-click the node within which you want to create a node and then click New.
For example, if you want to create the South America location, then you right-click the Americas location.
Figure 2-9 shows the menu that is displayed when you right-click the Americas location.
Figure 2-9 Shortcut Menu That Is Displayed When You Right-Click a Location Node
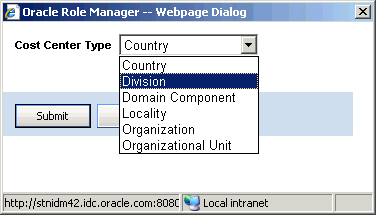
In the dialog box that appears, select the type of node that you want to create and then click Submit.
Note:
The list in the dialog box displays only list items for which you have theManage or All system privilege. For example, if you have the Manage system privilege for the Country and Locality objects, then you can view only the nodes of type Country and Locality in the list displaying node types.For example, in the Cost Center Type box, select Division and then click Submit.
Figure 2-10 shows the dialog box containing the Cost center Type box.
Figure 2-10 Dialog Box for Selecting the Cost Center Type
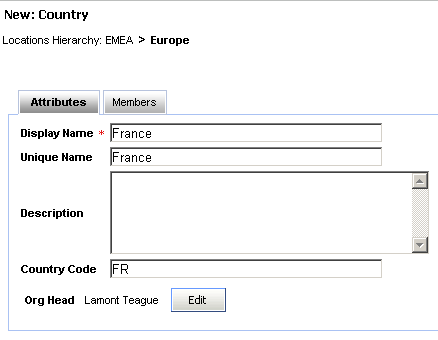
On the Attributes tab of the New page, enter appropriate values in the fields.
Note:
You can successfully create two or more nodes with the same display name because there are no uniqueness constraints on the Display Name field. Enter a value in the Unique Name field to uniquely identify a node in Oracle Role Manager.Figure 2-11 shows the Attributes tab on which sample values have been specified for creating a location of the type country.
Figure 2-11 Attributes Tab for a New Location
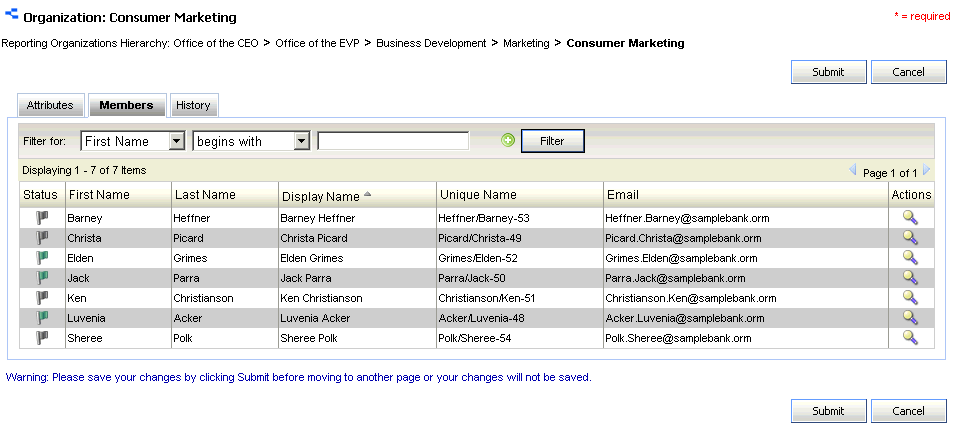
You cannot perform any action on the Members tab while creating a node. However, while you modify a node, the Members tab displays a list of all persons who are members of the node.
Figure 2-12 shows the list of all persons who belong to the Consumer Marketing reporting organization.
Figure 2-12 Members Tab for a Reporting Organization
You cannot perform any action on the History tab while creating a node. However, while you modify a node, the History tab displays a list of events for the corresponding node.
For example, if you update the telephone number of the Risk Management cost center, then this event is stored and displayed on the History tab. Figure 2-13 shows the History tab for the Risk Management cost center.
Figure 2-13 History Tab for a Cost Center

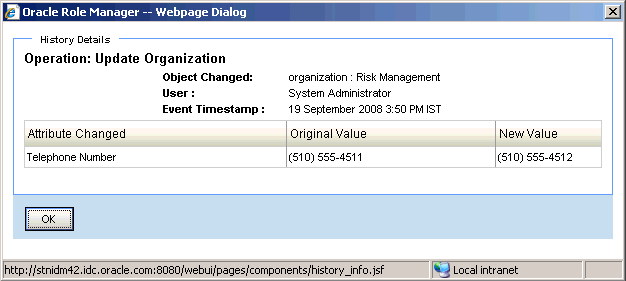
In addition, by clicking the View icon in the row for an event, you can view details of the event such as the time at which the event occurred, the name of the attribute that has been modified, its original value, and its new value.
Figure 2-14 shows a dialog box that displays details of an event.
Figure 2-14 History Dialog Box for a Cost Center
Click Submit.
A message indicating that the node was created successfully is displayed.
Note:
You cannot perform the procedure described in this section, if the Integration Library is installed. Creating persons must be performed in a provisioning system.A provisioning system, such as Oracle Identity Manager, is the authoritative source for people data, and this data is imported into Oracle Role Manager by using the Integration Library.
To create a person:
On the first-level navigation bar, click Organizations & People.
On the second-level navigation bar, click People.
On the left pane, right-click the node within which you want to create a person and then click New Person.
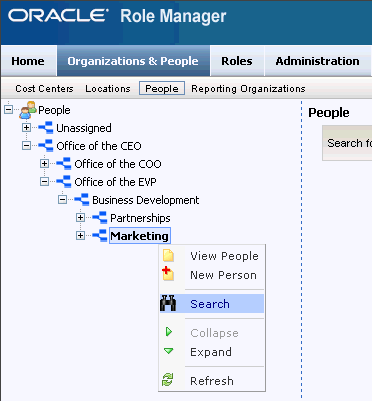
For example, if you want to create a person belonging to the Marketing organization, then right-click the Marketing organization and then click New Person.
Figure 2-15 shows the menu that is displayed when you right-click the Marketing organization.
Figure 2-15 Shortcut Menu That Is Displayed When You Right-Click a Reporting Organization Node
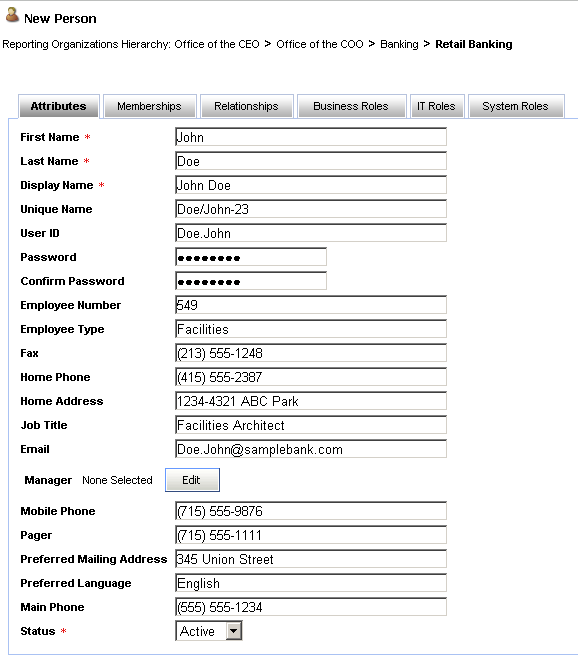
On the Attributes tab of the New Person page, enter the appropriate values in the fields.
Note:
You can successfully create two or more persons with the same display name because there are no uniqueness constraints on the Display Name field. Enter a value in the Unique Name field to uniquely identify a person in Oracle Role Manager.Figure 2-16 shows the Attributes tab on which sample values have been specified.
Figure 2-16 Attributes Tab for a New Person Record
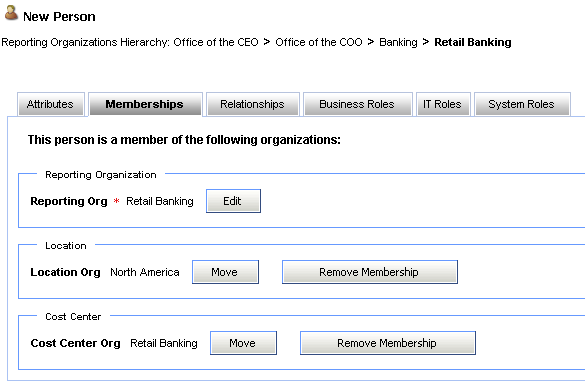
Optionally, on the Memberships tab of the New Person page, you can:
Change the reporting organization to which a person belongs, by using Edit to search for and select a new reporting organization.
Set the location to which a person belongs, by using Move to search for and select a new location.
Set the cost center to which a person belongs, by using Move to search for and select a new cost center.
Figure 2-17 shows the Memberships tab on which sample values have been specified.
Figure 2-17 Memberships Tab for a New Person
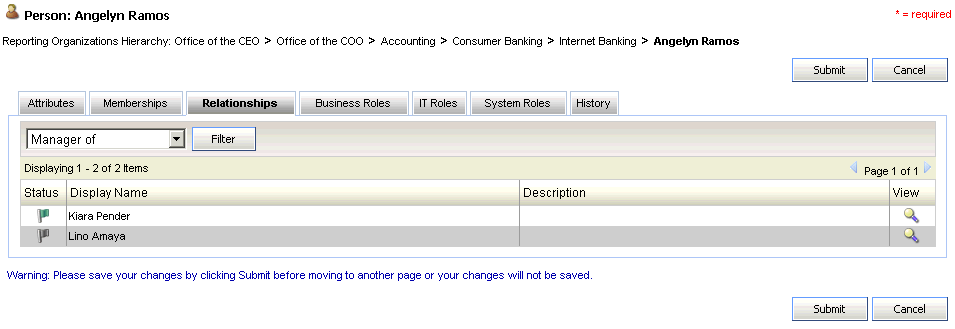
You cannot perform any action on the Relationships tab while creating a person. However, while you modify a person node on the Relationships tab:
To view the list of people a person is managing, select Manager of and click Filter.
To view the list of organizations the person is heading, select Head of Organization of and click Filter.
To view the list of roles the person owns, select Owner of and click Filter.
Figure 2-18 shows the Relationships tab for a person node.
Figure 2-18 Relationships Tab for an Existing Person
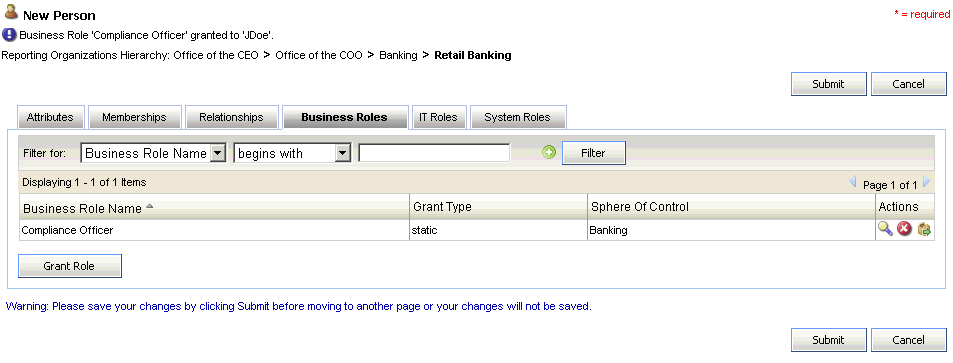
Optionally, on the Business Roles tab, you can:
Grant static business roles by using Grant Role. See "Granting and Revoking Static Business Roles" for information about granting static business roles.
View details of business roles granted to the person by clicking the View icon in the row for the business role.
Delegate static business roles by using the Delegate icon. See "Delegating Static Business Roles" for more information about delegating static business roles.
Filter business roles (for reference or verification) by providing a criterion for filtering business roles and then clicking Filter.
Figure 2-19 shows the Business Roles tab.
Figure 2-19 Business Roles Tab for a New Person
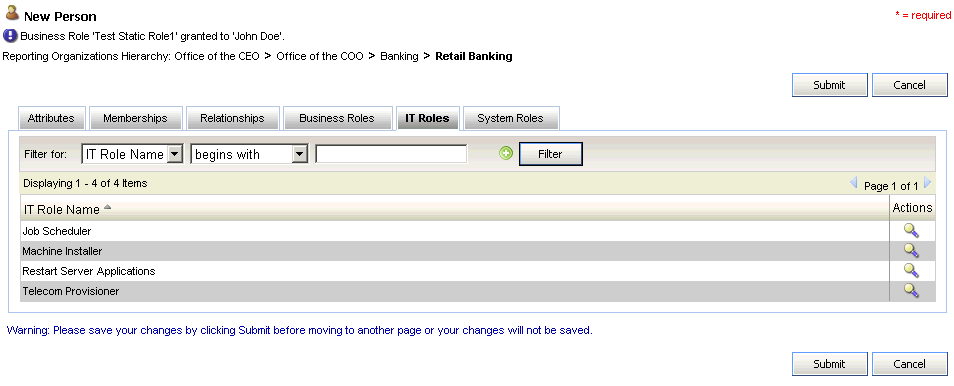
Optionally, on the IT Roles tab, you can:
View details of IT roles of which the person is a member, by clicking the View icon in the row for the IT role.
Filter IT roles (for reference or verification) by providing a criterion for filtering IT roles and then clicking Filter.
Figure 2-20 shows the IT Roles tab.
Figure 2-20 IT Roles Tab for a New Person
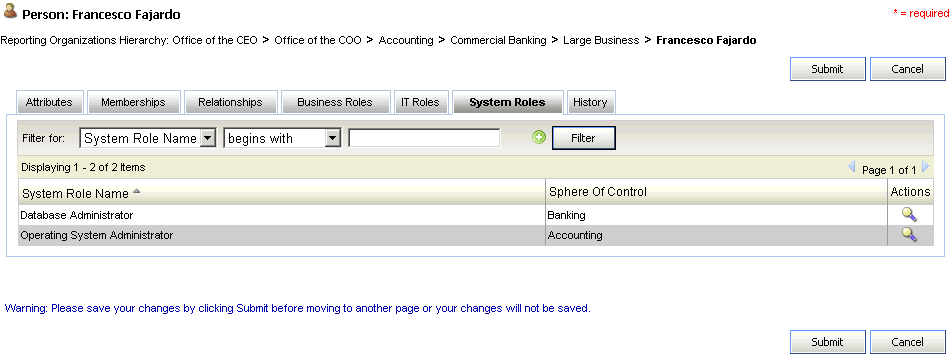
You cannot perform any action on the System Roles tab while creating a person. However, while you modify a person node, the System Roles tab displays a list of system roles that have been granted to the person.
Note:
Unless the person has been granted a system role, you will not be able to view any system roles on the System Roles tab.Figure 2-21 shows the System Roles tab for a person node.
Figure 2-21 System Roles Tab for an Existing Person
You cannot perform any action on the History tab while creating a person record. However, while you modify a person record, the History tab displays a list of events for the person records.
For example, if you grant a static business role to a person, then this event is stored and displayed on the History tab. Figure 2-22 shows the History tab for a person record.
Figure 2-22 History Tab for an Existing Person
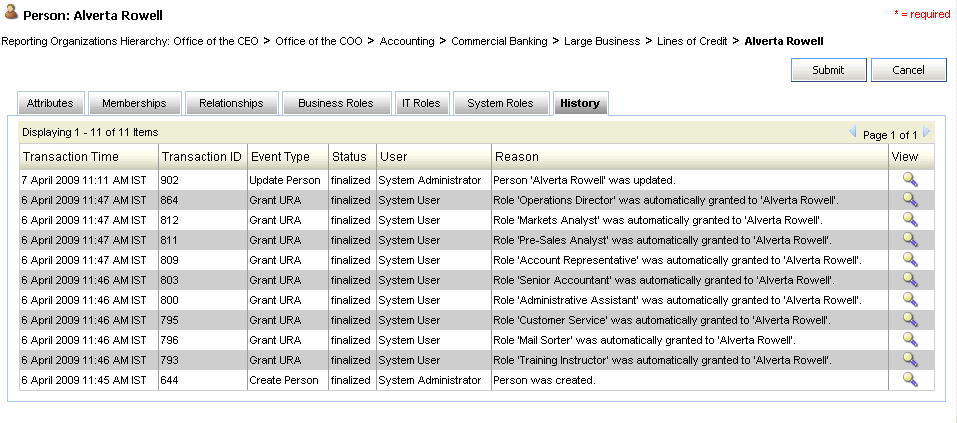
The History tab displays the list of events for a person record in a tabular format with the following columns:
Transaction Time: This columns displays the date and time at which the event occurred.
Transaction ID: This column displays a number that uniquely identifies transactions performed on the person record.
Event Type: This column displays the type of event that was performed on the person record. The Event Type columns displays any one of the following values:
Create Person: This value is displayed when a person record is created in Oracle Role Manager
Update Person: This value is displayed when the attributes or the membership of the person record has been modified.
Grant URA: This value is displayed when the person record has been granted a dynamic business role.
Revoke URA: This value is displayed when a dynamic business role grant for the person record has been revoked.
Grant A Business Role with SOC: This value is displayed when a static business role is granted to the person record.
Revoke a Role Grant: This value is displayed when the static business role grant for the person record has been revoked.
Reconcile User: This value is displayed only when the integration library is installed and the information about the person record created or modified in Oracle Identity Manager has been reconciled into Oracle Role Manager.
Request Approved: This value is displayed only when the integration library is installed and the person has been granted a static business role after obtaining the necessary approvals.
Request Rejected: This value is displayed only when the integration library is installed and an approver has rejected the static business role grant request for a person.
Status: This column displays the status of the event. The values of this column are the same as the values of the Status column for a transaction on the Outbox page.
User: This column displays the name of the user that performed the event.
Reason: This column displays the reason for the occurrence of the event.
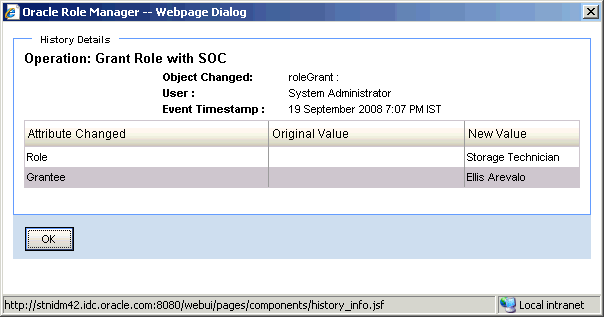
In addition, by clicking the View icon in the row for an event, you can view details of the event, such as the time at which the event occurred, the name of the attribute that has been modified, its original value, and its new value.
Figure 2-23 shows a dialog box that displays details of an event.
Figure 2-23 History Dialog Box for an Existing Person
Click Submit.
A message indicating that the person was created successfully is displayed.
To modify a cost center, location, person, or reporting organization:
On the first-level navigation bar, click Organizations & People.
Depending on the node that you want to modify, on the second-level navigation bar, select one of the following:
Cost Centers
Locations
People
Reporting Organizations
On the left pane, right-click the node within which you want to search the node that has to be modified, and then click Search.
On the right pane, specify the search criterion for the node that you want to modify.
A list of all nodes that meet the search criterion is displayed.
Figure 2-24 shows the list of people who meet the sample search criterion.
Figure 2-24 Search Results Displayed on the People Page

To display the details of the node that you want to modify, click the View/Edit icon in the row for the node.
Depending on the node that you want to modify, select one of the following:
If you want to modify a node under cost center, location, or reporting organization, then perform Step 5 of "Creating Cost Centers, Locations, and Reporting Organizations".
If you want to modify a person account, then perform Steps 4 through 8 of "Creating People".
Note:
If there are person records in the Unassigned node, then you must perform this procedure. See "Unassigned Node" for information about the Unassigned node.Click Submit.
A message indicating that the node was updated successfully is displayed.
Person records can be loaded from external systems into Oracle Role Manager. If the organization to which a person belongs was not specified on the external system, then the person is created under the Unassigned node during the loading operation.
For example, consider the following person records that are loaded into Oracle Role Manager:
John Doe, Accounting, San Jose
Because the Accounting reporting organization exists in Oracle Role Manager, this person record is created in Oracle Role Manager.
Jane Doe, Engineering, San Francisco
The record is not created in Oracle Role Manager because, the Engineering reporting organization does not exist in Oracle Role Manager.
Richard Roe, , Oakland
This record is created in the Unassigned node of Oracle Role Manager because no reporting organization has been specified for the person record.
Note:
You cannot modify the Unassigned node. For example, you cannot change the display name of the Unassigned node. Similarly, you cannot delete the Unassigned node.To delete a cost center, location, or a reporting organization:
On the first-level navigation bar, click Organizations & People.
Depending on the node that you want to delete, on the second-level navigation bar, select one of the following:
Cost Centers
Locations
Reporting Organizations
Select one of the following:
Note:
You can delete a node only if it does not have a child node and associated memberships. For example, you cannot delete an organization that contains persons. Similarly, you cannot delete a locality that contains a building.Right-click the node that you want to delete and click Delete. Then, proceed to Step 6.
A dialog box prompting you to confirm if you want to delete the node is displayed.
Right-click the reporting organization within which you want to search the node that you want to delete, and then click Search.
On the right pane, specify the search criterion for the node that you want to delete.
A list of all nodes that meet the search criterion is displayed.
Figure 2-25 shows the list of reporting organizations that meet the sample search criterion.
Click the Delete icon in the row for the node that you want to delete.
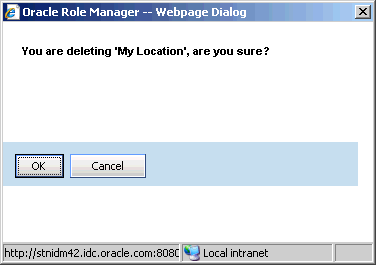
A dialog box prompting you to confirm if you want to delete the node is displayed.
Figure 2-26 shows the dialog box that is displayed when you delete the France location node.
Figure 2-26 Delete Confirmation Dialog Box
Click OK.
A message indicating that the node was deleted successfully is displayed.
Note:
You cannot perform the procedure described in this section, if the Integration Library is installed. Deleting persons must be performed in a provisioning system.A provisioning system, such as Oracle Identity Manager, is the authoritative source for people data, and this data is imported into Oracle Role Manager by using the Integration Library.
To delete a person:
On the first-level navigation bar, click Organizations & People.
On the second-level navigation bar, click People.
On the left pane, perform one of the following:
Right-click People and then click Search.
Right-click the reporting organization within which you want to search the person that you want to delete, and then click Search.
Perform Steps 4 through 6 of "Deleting Cost Centers, Locations, and Reporting Organizations".
You can create, update, delete, and search approver roles, business roles, IT roles, and entitlements by using the second-level navigation options available under Roles, as shown in Figure 2-27:
Figure 2-27 Roles: Second-Level Navigation Options

Roles is a first-level navigation option. It contains the following second-level navigation options:
Approver Roles
Business Roles
IT Roles
Entitlements
Right-clicking a node for any role or entitlement on the left pane of the Roles page displays the menu options listed in Table 2-2. You can perform the actions listed in this table depending on the system privileges that you have been granted. For example, the New option is grayed out if you do not have the appropriate system privilege to create a business role.
Table 2-2 Roles: Shortcut Menu Options
| Menu Item | Action |
|---|---|
|
View <Role Type> In this menu item, <Role Type> can take values such as Approver Roles, Business Role, or IT roles. |
Displays a list of roles within the selected reporting organization. For example, you can right-click Office of the CEO reporting organization under the IT Roles node, and then click View IT Roles to view the list of IT roles within the Office of the CEO reporting organization. Note: This option is not available for the entitlement node. |
|
New <Role Type> In this menu item, <Role Type> can take the values such as Approver Roles, Business Role, or IT roles Note: The New menu item is also available for the entitlement node. |
Creates a role or an entitlement. |
|
Search |
Searches for roles or entitlements within the current node and all its child nodes. |
|
Collapse |
Changes the display of the current node to show only the parent node and hide all child nodes. |
|
Expand |
Changes the display of the current node to show all its child nodes. |
|
Refresh |
Refreshes the view of the node |
For information about creating, modifying, and deleting approver roles, business role, IT roles, and entitlements see Working with Entitlements and IT Roles, Working with Business Roles, and Working with Approver Roles.
Roles can be loaded into Oracle Role Manager by using a command line script or the Oracle Role Manager administrative console. If the organization to which a role belongs was not specified on the external system, then the role is created under the Unassigned node during the loading operation.
For example, consider the following roles that are loaded into Oracle Role Manager:
Risk Manager, Marketing, Active
Because the Marketing reporting organization exists in Oracle Role Manager, this role is created in Oracle Role Manager.
Compliance Officer, Financial Banking, Inactive
The role is not created in Oracle Role Manager because the Financial Banking reporting organization does not exist in Oracle Role Manager.
Sales Representative, , Active
This role is created in the Unassigned node of Oracle Role Manager because no reporting organization has been specified for the role.
Note:
You cannot modify the Unassigned node. For example, you cannot change the display name of the Unassigned node. Similarly, you cannot delete the Unassigned node.You can create, update, delete, and search system roles by using the second-level navigation option available under Administration, as shown in Figure 2-28:
Figure 2-28 Administration: Second-Level Navigation Options

Administration is a first-level navigation option. It contains System Roles, which is the second-level navigation option.
Right-clicking the system roles node on the left pane of the Administration page displays the menu options listed in Table 2-3. You can perform the actions listed in this table depending on the system privileges that you have been granted. For example, the New option is grayed out if you do not have the appropriate system privilege to create a system role.
Table 2-3 Administration: Shortcut Menu Options
| Menu Item | Action |
|---|---|
|
View |
Displays a list of system roles within the selected reporting organization. For example, if you right-click the Office of the COO reporting organization under the System Roles node and then click View System Roles, then you can view the list of system roles within the Office of the COO reporting organization. |
|
New |
Creates a system role. |
|
Search |
Searches for system roles within the current node and all its child nodes. |
|
Collapse |
Changes the display of the current node to show only the parent node and hide all child nodes. |
|
Expand |
Changes the display of the current node to show all its child nodes. |
|
Refresh |
Refreshes the view of the node. |
For information about creating, modifying, and deleting system roles see Working with System Roles.