 Understanding the Report Design Process
This chapter provides overviews of the report design process and report object naming, and discusses how to:
Create report objects
Create detail sections
Understanding the Report Design ProcessBefore you create a report, you should plan it so that it is functional, useful, and complete. A successful report design begins with planning. Determine the report requirements by:
Asking questions of the stakeholders.
Creating a model of the report.
Determining which section types are required.
Ask these questions of the stakeholders to determine the report requirements:
What is the purpose of the report?
Who will use the report?
What does the intended audience want to see in the report?
What information in the report will come directly from the database and what information needs to be calculated?
What are the best business views to use?
Which data fields and records should be included in the report?
In what order should the data be presented?
What is the most effective format in which to present the information?
Which reports are used to produce this information now?
Does a report already exist that could be copied and modified?
Will a new version of an existing report meet the business needs?
How frequently will the report be run?
Does the report output need to be exported to another software package using Output Stream Access (OSA) or Comma Separated Values (CSV)?
When you have determined the report requirements, create a report model. The report model helps you determine the format of the data and what section types meet the business requirements.
For example, you are creating a report to be used for invoicing or ordering. The following example illustrates a report model that meets this requirement:
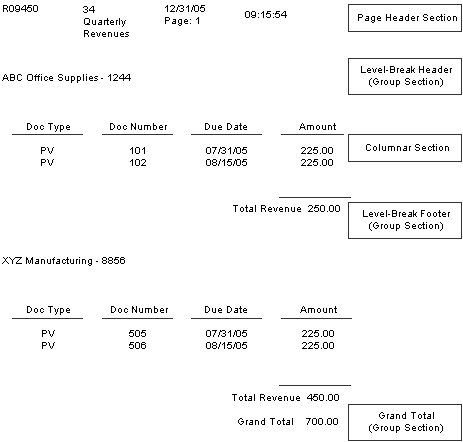
Report model
Determining the Report Sections
After you and the report requester agree on the model, determine the sections that are required to support the model. You might conclude that the report requires multiple sections: a page header section to provide general information, a level break header section to display each company's address number and description, a columnar section to display the business data, a level break footer section to calculate and display subtotals, and a grand total section.
To determine the sections that are required for a report, consider these questions:
Is a report header required at the beginning of the report for clear and meaningful presentation of the information?
Is a report footer required at the end of the report to highlight an important function or fact about the report?
Is a page header required to present information on each page of the report?
Is a page footer required to give the reader vital information on each page of the report?
Does an existing business view contain all of the data fields that are required by the report?
Do you need two detail sections that use different business views so that you can include all relevant information?
Do the two detail sections need to be joined to present the information appropriately?
What is the best format to present the required information?
Is the data best presented in the free-form layout of a group section?
Is the data better presented in a columnar format using columnar or tabular sections?
Do you need the flexibility of a tabular section to create rows in the report?
If you use group or columnar sections, do you need to include level break footers for totaling?
Would the automatic totaling features of a tabular section be more efficient?
Can you use a Director template to help you create the report?
Do you need to modify a Director template or create a new one?
How should you sequence the business view fields and records for the report?
How should you filter the data from the business view?
What enhancements can you apply to report objects to make the report more useful?
For example, do you want to emphasize the information in one column by changing the column spacing? Do you want to change the font size of the contents of a column to call attention to the information?
Are event rules required to define conditional, mathematical, or other logic for the report?
Is an audit trail required?
After you have finished planning the design of the report, create the report in Oracle's JD Edwards Report Design Aid (RDA).
Understanding Report Object NamingTo provide consistency for developers and users, Oracle's JD Edwards EnterpriseOne enforces standard naming conventions by which all objects are named. When you create custom objects, you should adhere to these standard naming conventions.
The JD Edwards EnterpriseOne naming conventions require that each object, whether it be a table, report, interactive application, or business view, has a unique name. The naming conventions help you identify objects and prevent users from creating objects with duplicate names. They also simplify searching for object types and for specific objects. Object names begin with one or two characters that indicate the object type. A V indicates that the object is a business view. An R indicates that the object is a batch application.
When creating multiple objects that are intended to be used together, name the objects the same, changing the first character to indicate the object type. For example, this table illustrates how to name related objects created to meet an address book business requirement:
|
Object Type |
Object Name |
|
Business view |
V550101A |
|
Processing option |
T550101 |
|
Report template |
R550101 |
See Object Naming Conventions.
Creating Report Objects
This section provides overviews of default settings for reports, report objects, how to open existing reports, and how to delete report objects from multiple locations and discusses how to:
Create report objects from RDA.
Create report objects from Oracle's JD Edwards EnterpriseOne Object Management Workbench (OMW).
Copy report templates from OMW.
Open report objects from OMW.
Delete report objects.
 Understanding Default Settings for Reports
A report is defined by the system as a universal batch engine (UBE) object type. You must provide a report with:
Object name
Begins with an R to indicate that it is a report template.
Description
Describes the type of report and the data that it contains.
Product code
Indicates the system that is associated with the interactive application that uses the data, the system where the associated data resides. For example, address book data resides in system 01.
After you create a report object, you can save it and add object specifications at a later time.
When you create a new report, or other batch application, the system automatically applies default standards for some report components.
This table lists the report components that have default standards:
|
Report Component |
Default Standard |
|
Font |
Appears in 7 point, Arial font. |
|
Report object name |
Appears in the upper-left corner of the page header. |
|
Company name |
Appears in the center at the top of the page header. |
|
Report description |
Appears in the center at the top of the page header under the company name. |
|
Date and time values |
Appears in the upper-right corner of the page header. |
|
Page number |
Appears in the upper-right corner of the page header, under the date and time. |
Understanding Report ObjectsYou can create report objects using OMW. You can also access RDA directly from Oracle's JD Edwards EnterpriseOne Solution Explorer to create report objects. The object information that you are required to enter varies depending on which method you use. When you create a new report object in RDA, you create a report template and, optionally, a batch version. The only time that you can create a batch version in RDA is when you initially create a report template. All other batch versions are created from the Oracle's JD Edwards EnterpriseOne Batch Versions (P98305) application.
When you create a new report object, you must provide the following information regarding the report:
|
Field |
Description |
|
Object Name |
Identifies the name of the report. Begin report names with the letter R, followed by the product code, and then a unique identifier. The object name appears in the upper-left corner of the page header. |
|
Description |
Describes the purpose of the report. Enter a description that serves as a useful identifier, such as General Ledger by Batch. The description appears in the center of the page header below the company name. |
|
Product Code |
Use product codes to ensure that the custom objects remain unaltered by JD Edwards EnterpriseOne software upgrades. Product codes 55–59 are reserved for customers. |
|
Product System Code |
Identifies the system where the required data resides. Typically, the report shares the same product system code as the business view that will be used to fetch the data. |
|
Object Use |
Use this range of codes to classify the report. Object use codes 160–166 are report-related classifications. |
|
Update Report/No Update Report |
Indicates whether the report will update data in the database. Only report developers with permissions can design an update report. If the developer has permissions, the Update Report option is selected by default. |
Note. If you do not have permission to create a report that updates the database, the Update Report option does not appear. In this situation, the No Update Report option is selected by the system. The system administrator defines permission for the update option through JD Edwards EnterpriseOne security.
Understanding How to Open Existing ReportsYou can open an existing report to make modifications. You can open and modify either a report template or a batch version. Open existing report templates either from OMW or directly from RDA. To open a report object in OMW, you must add the report object to a project. If you open and modify a report template, the changes are reflected in the associated versions, unless prohibited by overrides in the batch versions.
Open batch versions either from OMW or from Batch Versions. You can open a batch version to modify it without affecting the report template or other associated versions.
When you open an existing report, the Director is not available to assist with changes. Rather, the report template or batch version opens automatically to the RDA workspace.
Warning! If you want to modify a report template that was shipped with JD Edwards EnterpriseOne, copy the report template first and name the copy according to the recommended naming conventions. Then modify the copied report template. This ensures that the modifications are not overwritten during a software update. The same holds true for batch versions: Do not modify batch versions that begin with XJDE or ZJDE. Copy the batch version, name the copy according to your company's requirements, and modify the copied version.
Understanding How to Delete Report Objects from Multiple LocationsYou can delete batch versions and report templates from the system. If you delete a report template, all of its batch versions are deleted automatically.
You can delete report objects from these locations:
Check-in server
Local environment
Save location
Transfer locations
All locations
Note. The objects must be checked in and you must possess the proper role and permissions to delete objects.
Depending on the delete option that you select, and whether the system administrator has set options to allow immediate deletion, the object might not be deleted immediately. In some instances, the object is marked in bold text in the OMW project and deleted later in the development cycle.
See Also
Creating Report Objects from RDAIn JD Edwards Solution Explorer, select the Report Management menu (GH9111), Report Design Aid to access the JD Edwards Report Design Aid form.
Click New.
On the Create New Report form, enter a name for the report template in the Report Name field.
Use the JD Edwards EnterpriseOne recommended naming conventions.
In the Description field, enter a description that identifies the purpose of the report.
In the Product Code field, enter a value between 55 and 59.
Product codes 55–59 are reserved for clients for creating custom objects.
Select either the Update Report option or the No Update Report option, and click OK.
If you do not have permission to create reports that update the database, the Update Report option is not visible.
Use the Director to design the report.
On the final page of the Director, select the Yes, create a version of this report option, and name the version.
Creating Report Objects from OMWIn JD Edwards Solution Explorer, from the Tools menu, select Object Management Workbench to access the Object Management Workbench form.
Click Find.
In the project view, expand the project to which the new report object will be added.
Click the Objects node of the project, and click Add.
On the Add EnterpriseOne Object to the Project form, select the Batch Application option, and click OK.
On the Add Object form, enter the name of the report template in the Object Name field.
In the Description field, enter a description that identifies the purpose of the report.
In the Product Code field, enter a value between 55 and 59.
In the Product System Code field, enter the system code that reflects where the required data resides.
In the Object Use field, enter a value between 160 and 166.
Select either the Update Report or No Update Report option, and click OK.
On the Batch Application Design form, select the Design Tools tab, and click Start Report Design Aid.
Use the Director to design the report.
On the final page of the Director, select the Yes, create a version of this report option, and name the version.
See Also
Copying Report Templates from OMWAccess the Object Management Workbench form.
Click Find.
In the project view, expand the project where the report template that you want to copy resides.
Expand the Objects node, click the report, and then click Copy.
On the Copy Object form, enter the name of the new report template in the Copy to field.
In the Description field, enter a description that identifies the purpose of the report.
In the Product Code field, enter a value between 55 and 59.
In the Product System Code field, enter the system code that reflects where the required data resides
In the Object Use field, enter a value between 160 and 166.
Select either the Update Report option or the No Update Report option, and click OK.
On the Batch Application Design form, select the Design Tools tab, and click Start Report Design Aid.
Use the Director to design the report.
Opening Report Objects from OMWAccess the Object Management Workbench form.
Click Find.
In the project view, expand the project where the report object resides.
If the report object does not reside in a project, search for the object using the OMW search tab, and move the object into a project.
Expand the Objects node, click the report object, and then click the Design action button.
If you select a report template, select the Design Tools tab on the Batch Application Design form, and click Start Report Design Aid.
If you select a batch version, select the Tools tab on the Batch Version Design form, and click Report Design.
Warning! Batch versions beginning with XJDE and ZJDE are owned by JD Edwards EnterpriseOne and should not be modified.
Deleting Report ObjectsAccess the Object Management Workbench form.
Click Find.
In the project view, expand the project where the report object resides.
Expand the Objects node, click the report, and then click Delete.
On the Delete of form, select one of these options and click OK:
Delete Object from Server.
Delete Object Locally.
Delete Object from the SAVE Location.
Mark Object to be Deleted from Transfer Locations.
Remove Object from ALL Locations.
Select this option to select all delete options.
The deleted object appears in bold text in the project view. If the system administrator has set options to allow immediate deletion, the system deletes the object when you quit JD Edwards EnterpriseOne. Otherwise, the object is deleted when the project is advanced.
Creating Detail Sections
This section provides an overview of detail sections and discusses how to:
Add detail sections.
Select business views.
Select business views from the Select Business View tab.
Select business views from the Favorite Business Views tab.
Add business view columns from Quick Section.
Define section data sequencing.
Define sort properties.
Define section data selection.
Understanding Detail SectionsDetail sections refer to report sections that present data to meet the business requirement. Detail sections are typically populated using a business view, which links the report section to the data in the database. After you select a business view for the detail section, you can select individual fields from that business view to include in the section layout. Other types of fields can be included in the section layout and populated using event rules.
In RDA, the Director guides you through the steps of creating a report template. Initially, the Director allows you to include only one detail section in the report template. However, after you complete the initial design of the report template, you can add additional detail sections to the report.
Types of detail sections include:
Columnar
Group
Tabular
Note. JD Edwards EnterpriseOne supports Arabic and the right-to-left display preferences for the Microsoft Windows client, web client, and batch applications. However, when designing a report, you must design it from left to right. When you generate the report by printing it or generating a PDF, it displays information right to left, including the alignment of text and numeric strings. The system displays strings that contain a mixture of Arabic and non-Arabic characters in accordance with generally accepted bidirectional standards.
In RDA, you can create as many group, columnar, and tabular sections in a report template as required. To add one of these detail sections to an existing report template, open the report template in RDA and select the appropriate section type from the Section menu. The Director guides you through the steps of creating the new detail section.
The system automatically launches the Director when you select a section type from the menu. You can quit the Director if you prefer to design the detail section manually. Begin the detail section design by attaching a business view. Then select individual columns from that business view to include in the section layout. The options to manually design the section reside on the Section menu in the order that they are used by the Director.
Business views are the link between the report and the data in the JD Edwards EnterpriseOne database. They present data fields from one or more tables and limit the column selection to columns that are relevant to the business requirement of the report. Business views also improve performance by moving only the required fields across the network.
You can select a business view for a detail section using one of two methods:
Select Business View
Use the Query by Example (QBE) line to filter through all business views in the system. You can filter by product code, business view name, or entire or partial description, or you can leave the QBE line empty to return all business views.
Business view names begin with the letter V and contain a maximum of eight characters. The name is formatted as VxxzzzzA, where the variable characters represent this information:
xx is the product code (55–59 are reserved for clients).
zzzz are the characters of the primary table.
A indicates the sequence in which the business view was created over the primary table.
Favorite Business Views
Select from a list of business views that you, or other users, have defined as favorites.
No matter which method you use to select a business view, the title bar of the detail section reflects the selected business view.
Detail Section Layout
You select the required fields for the detail section layout from the attached business view.
When you use the Director to create detail sections, you are presented with a Section Layout form after you select the business view. This form presents all of the columns that are included in the attached business view. Select the fields that are required by the report from these available business view columns. The selected columns appear in the Selected Columns list. You can remove columns from the section layout by removing the column from the Selected Columns list.
When you design the detail section without the use of the Director, use Quick Section to select data fields from the attached business view. You should use Quick Section for the initial section layout only. The selected columns appear in the Selected Columns list. You can remove columns from the section layout by removing the column from the Selected Columns list.
No matter which method you use to define the section layout, when the initial layout is complete, insert additional business view columns into the detail section using the Business View Columns Browser. Remove unwanted columns by clicking the column in the section layout and selecting Delete from the Edit menu.
Data Sequencing
Use data sequencing to indicate the order in which the system should read records from the database and display them in the detail section. Data sequencing is the same as data sorting and the terms are interchangeable. For example, define section data sequencing to display records in a detail section by address book number and then by name.
JD Edwards EnterpriseOne can sort records in a report section by any column that is included in the attached business view, regardless of whether you included the column in the section layout. Other field types that you included in the section layout are not available for use in data sequencing.
After you select business view fields for data sequencing, you can define sort properties for those fields. Use sort properties to indicate whether:
Records are sorted in ascending or descending order.
The system displays an arrow pointing up to indicate an ascending order. Click the arrow once to display an arrow pointing down to indicate a descending order.
Sequencing fields trigger level breaks.
Select this option to trigger a level break when the value of the field changes. A check mark indicates that the option is selected.
Level break fields produce page breaks.
Select this option to begin each unique value for the level break field on a new page. A check mark indicates that the option is selected.
Note. To set a field as a page break, you must first define the field as a level break.
For example, you can sort records by search type in ascending order, define search type as a level break field, and begin each unique search type on a new page.
Data Selection
Use data selection to limit the number of records that are retrieved from the JD Edwards EnterpriseOne database. Define data selection to include only specific, relevant records in the detail section. For example, define data selection to display records for hourly employees only.
JD Edwards EnterpriseOne filters data in a detail section by any column that is included in the attached business view, regardless of whether you included the column in the section layout.
Define data selection using options that are available for each of these components:
The operator for the first line of the data selection is Where. You have a choice between And and Or for additional lines of data selection.
The left operand must be a column from the attached business view.
is equal to.
is equal to or empty.
is greater than.
is greater than or equal to.
is less than.
is less than or equal to.
is not equal to.
The options that are available in the right operand column depend on the selection that you made in the comparison column.
This table identifies the available options:
|
Option |
Description |
|
<Blank> |
Enters a blank (space) value. |
|
<Literal> |
Enables you to enter specific values. |
|
<Null> |
Indicates that no value is associated with the field. |
|
<Zero> |
Enters a value of zero. |
|
BC |
Indicates a business view column. |
|
RI |
Indicates a value that is passed through a report interconnect to this report. |
|
PC |
Indicates a previous business view column. |
|
PO |
Indicates a processing option value that is available for this report. |
|
PV |
Indicates the previous value for the variable. |
|
RC |
Indicates a constant from this report. |
|
RV |
Indicates a variable from this report. |
|
SV |
Indicates a system variable. |
|
SL |
Indicates a system value. |
|
TV |
Indicates a text variable. |
|
VA |
Indicates an event rule variable. |
When you select the Literal option for the right operand, the system presents you with a Single value form. This form includes tabs that are based on the comparison option that you selected. The tab options might include:
Single value
Indicates a single value such as company 00060.
Indicates a range of values such as companies 00001 to 00060. When using a range of values, the only valid comparisons are is equal to and is not equal to.
Indicates a list of values that are not sequential. You must click Add or press Enter after each entry. To delete a value, select the value and then click Delete.
A list of values might include several user-defined codes for search types such as C for Customers, E for Employees, and V for Suppliers. When you are using a list of values, the only valid comparisons are is equal to and is not equal to.
You can lock the data selection that you define by individual row. Click the data selection row to highlight it. Right-click the row and select Advanced from the menu. On the Data Selection Protection form, select the Locked option.
The user can clear the locked option from the JD Edwards Batch Versions application, from either the Row menu or at runtime. The locked option sends a visual to the user that the defined data selection might be required for the report to function as designed. The locked option is particularly beneficial when a section of the report adopts it's data selection from another section.
Adding Detail Sections
Open a report template.
From the Section menu, select Create, and select one of these detail section types:
Group
Columnar
Tabular
Use the Director to design the section.
Selecting Business Views
Open a report template in RDA.
Click inside the detail section of the report.
From the Section menu, click Select Business View.
On the Business View Director, select a tab:
Select Business View
Favorite Business Views
Proceed to the appropriate task.
Selecting Business Views from the Select Business View Tab
From the Section menu in RDA, click Select Business Views to access the Business View Director.
Select the Select Business View tab.
On the Select Business View form, enter the business view name on the Object Name QBE line, and click Find or press Enter.
Select a business view, and click OK.
Selecting Business Views from the Favorite Business Views Tab
From the Section menu in RDA, click Select Business Views to access the Business View Director.
Select the Favorite Business Views tab.
From the Favorites view, expand each folder until you locate the required business view.
Select the Description tab to view a brief description of the business view that you have selected.
Select the Columns tab to view the data fields that are included in the business view that you have selected.
When you are certain that you have selected the appropriate business view, click OK.
See Also
Setting Up Business Views as Favorites
Adding Business View Columns Using Quick Section
Open a report template in RDA.
Click a detail section of the report that includes an attached business view but no fields.
From the Section menu, select Quick Section.
On the Quick Section form, click a required column in the Available Business View Columns list, and perform one of these tasks:
Click the right arrow to move the column to Selected Columns.
Drag the column to Selected Columns.
You can move multiple columns to Selected Columns by using the Shift or Ctrl keys.
Click the right-double arrow to move all columns to Selected Columns.
To remove columns, click a column in the Selected Columns list and perform one of these tasks:
Click the left arrow or press Delete to remove the selected column.
You can remove multiple columns by using the Shift or Ctrl keys.
Click the left-double arrow to remove all columns.
To change the order in which the columns appear on the report, click a column from the Selected Columns list and perform one of these tasks:
Click the up arrow or down arrow to move the selected column up or down one position in the list.
Drag the selected column to another position in the list.
Click the up-double arrow or the down-double arrow to move the selected column to the top or bottom of the list.
Complete the layout of the section, and click OK.
Defining Section Data Sequencing
Click a detail section of the report in which the section layout is defined.
On the Data Sequencing form, select the Section Data Sequencing tab.
To select columns for data sequencing, click a column in the Available Columns list and perform one of these tasks:
Click the right arrow to move the column to Selected Columns.
Drag the column to Selected Columns.
You can move multiple columns to Selected Columns by using the Shift or Ctrl key.
Click the right-double arrow to move all columns to Selected Columns.
To remove columns from the data sequencing, click a column in the Selected Columns list and perform one of these tasks:
Click the left arrow or press Delete to remove the selected column.
You can remove multiple columns by using the Shift or Ctrl key.
Click the left-double arrow to remove all columns.
To change the order of the fields that are used to sort the section data, click a column in the Selected Columns list and perform one of these tasks:
Click the up arrow or down arrow to move the selected column up or down one position in the list.
Drag the selected column to another position in the list.
Click the up-double arrow or the down-double arrow to move the selected column to the top or bottom of the list.
Defining Sort PropertiesFrom the Section menu in RDA, select Define Data Sequence to access the Data Sequencing form.
Select the Define Sort Properties tab.
Complete the Sort Order field for each sort column.
Click these fields as appropriate, and click OK:
Level Break
Page Break
You must define a field as a level break before you can define it as a page break.
Defining Section Data Selection
Click a detail section of the report that has a business view attached.
From the Section menu, select Define Data Selection.
On the Data Selection form, click in the Operator column of the detail area and select Where for the first set of criteria.
Click in the Left Operand column to display the list of available business view fields, and perform one of these tasks:
Scroll through the list until you find the required business view field, and then double-click the field to populate the Left Operand column.
Begin entering the business view field name in the Left Operand column.
The system presents the first business view field in the list that matches the criteria. Continue entering the field name until the required field appears, and then double-click the field.
When you double-click the business view field to select it for the Left Operand column, the list in the Comparison column appears.
Select an operator in the Comparison column.
When you double-click the comparison operator, the list in the Right Operand column appears.
In the Right Operand column, select from the available objects, special values, and variables.
To delete a line of criteria on the Data Selection form, click the row header to highlight the row, and then click the Delete button at the top of the form.
To change the order of the criteria, click the row header to highlight the row, and then click the up arrow or down arrow button.