| Oracle® Identity Manager Tools Reference Release 9.1.0.2 Part Number E14763-02 |
|
|
View PDF |
| Oracle® Identity Manager Tools Reference Release 9.1.0.2 Part Number E14763-02 |
|
|
View PDF |
The concept of Segregation of Duties (SoD) is aimed at applying checks and balances on business processes. Each stage of a business process may require the involvement of more than one individual. An organization can convert this possibility into a requirement for all IT-enabled business processes by implementing SoD as part of its user provisioning solution. The overall benefit of SoD is the mitigation of risk arising from intentional or accidental misuse of an organization's resources.
In the Oracle Identity Manager implementation of SoD, IT privilege (entitlement) requests submitted by a user are checked and approved by an SoD engine and other users. Multiple levels of system and human checks can be introduced to ensure that even changes to the original request are vetted before the request is cleared. This preventive simulation approach helps identify and correct potentially conflicting assignment of entitlements to a user, before the requested entitlements are granted to the user.
This chapter describes how SoD is used to process entitlement requests generated in Oracle Identity Manager and the procedures that you can follow to implement SoD.
This chapter is divided into the following sections:
Section 13.1, "SoD Implementation in Oracle Identity Manager" provides information about the implementation of SoD in Oracle Identity Manager.
Section 13.2, "SoD Validation Process in Oracle Identity Manager" describes how the SoD validation process works in Oracle Identity Manager.
Section 13.3, "Implementing and Enabling SoD" describes the procedures involved in implementing and enabling SoD in Oracle Identity Manager.
Section 13.4, "Configuring Connectors for SoD" describes procedures that you must perform if you want to use a target system other than Oracle e-Business Suite, SAP CUA, and SAP R/3.
Section 13.5, "Creating SIL Providers" describes procedures that you must perform if you want to use an SoD engine other than SAP GRC and Oracle Application Access Controls Governor.
The SoD Invocation Library (SIL) forms the basis of the SoD implementation in Oracle Identity Manager. The SIL is a collection of Java-based adapters that enable integration with predefined Oracle Identity Manager connectors. The connectors, in turn, link Oracle Identity Manager with the target systems. The following Oracle Identity Manager connectors are preconfigured for SoD validation:
The SIL also acts as the base for specialized adapters that integrate the SIL with SoD engines. These adapters are called SIL providers. A SIL provider acts as the interface between the SIL and a specific SoD engine. There are predefined SIL providers for the following SoD engines:
SIL Provider for SAP GRC
This provider is also known as the SAP GRC SIL Provider.. The certified versions of SAP GRC are versions 5.2 SP4 or later and 5.3 SP5 or later
SIL Provider for Oracle Application Access Controls Governor release 8.2.1 or later
This provider is also known as the OAACG SIL Provider.
Note:
Contact Oracle Support for information about the latest patch set for Oracle Application Access Controls Governor. You must install the latest patch set before you start implementing and using SoD in Oracle Identity Manager.Figure 13-1 shows the architecture of SoD implementation in Oracle Identity Manager.
Figure 13-1 Architecture of SoD Implementation in Oracle Identity Manager

If required, you can configure any Oracle Identity Manager connector with either the SAP GRC SIL Provider or OAACG SIL Provider. For example, you can use the PeopleSoft User Management connector and the OAACG SIL Provider to automate SoD validation of requests for entitlements on PeopleSoft Enterprise Applications.
You can also create and use a SIL provider for a custom SoD engine, along with either one of the preconfigured Oracle Identity Manager connectors or an Oracle Identity Manager connector that you configure for SoD validation.
Oracle Identity Manager is a user provisioning solution. Entitlement requests can be managed on Oracle Identity Manager.
The SoD validation process in Oracle Identity Manager begins when a user creates a request for an entitlement on a particular target system. The resource approval workflow of Oracle Identity Manager can be configured to validate this request in real time with an SoD engine. The SoD engine uses predefined rules to check if the entitlement assignment would lead to SoD violations. The outcome of this check is then sent back to Oracle Identity Manager. If the request fails SoD validation, then the approval workflow can be configured to take remediation steps. If the request passes SoD validation and if the approver approves the request, then the resource provisioning workflow is initiated. This resource provisioning workflow can also be configured to perform the SoD validation again. This is to ensure SoD compliance of the entitlement assignment immediately before the entitlement assignment is provisioned to the target system. You can also configure the SoD validation check in the resource provisioning workflow to be bypassed if this validation has been passed in the resource approval workflow.
Oracle Identity Manager is integrated with both the SoD engine and the target system. In addition, the target system and SoD engine are integrated to enable the synchronization of entitlement data from the target system to the SoD engine.
Figure 13-2 shows the flow of data during the SoD validation process.
Figure 13-2 SoD Validation Process in Oracle Identity Manager

The following is a summary of the steps involved in implementing and enabling SoD in Oracle Identity Manager:
The SoD process involves the use of dedicated database tables. These tables are automatically created when you install the database schema for Oracle Identity Manager release 9.1.0.2. If you decide not to use the Oracle Identity Manager database schema, then perform the procedure described in Section 13.3.1, "Creating the SIL Database Schema" to create a schema for the SIL.
Install and configure the Oracle Identity Manager connector for the target system that you want to use for SoD validation.
See Section 13.3.2, "Installing and Configuring the Oracle Identity Manager Connector" for instructions.
Download external files required by the SIL providers. See Section 13.3.3, "Copying Files Required by the SIL Providers" for instructions.
Import entitlement data from the target system into the SoD engine. See Section 13.3.4, "Configuring the SoD Engine" for instructions.
Perform the procedure described in Section 13.3.5, "Deploying the SIL and SIL Providers" to deploy and configure the SIL and SIL providers.
See Section 13.3.7, "Enabling SoD" for instructions on enabling SoD validation of entitlement requests.
See Section 13.3.8, "Enabling Logging for SoD-Related Events" for instructions on enabling logging for SoD-related events.
Note:
Perform the procedure described in this section only if you do not want to use the Oracle Identity Manager database schema for the SIL database tables.The SIL database tables are created in the Oracle Identity Manager database schema when you perform the procedure to upgrade to Oracle Identity Manager release 9.1.0.2.
If you want to use a different schema for the SIL database tables, then:
To create the SIL database tables, run the SoDInvocationDBScript.sql script provided in one of the following directories:
For Microsoft SQL Server:
SIL_HOME/database/script/mssql
For Oracle Database:
SIL_HOME/database/script/oracle
Install and configure the Oracle Identity Manager connector for the target system that you want use for SoD validation.
To access the complete Oracle Identity Manager connector documentation set, visit Oracle Technology Network at
Depending on the SIL provider that you plan to use, see the instructions in one of the following sections:
Section 13.3.3.1, "Copying Files Required by the OAACG SIL Provider"
Section 13.3.3.2, "Copying Files Required by the SAP GRC SIL Provider"
To copy the external files required by the OAACG SIL Provider:
Download the abdera.0.3.0-incubating.jdk142.zip file from the Apache Abdera Web site at
Extract the contents of this ZIP file into a temporary directory.
From the extracted contents, copy the following jars to the OIM_HOME/ext directory.
abdera.parser.0.3.0-incubating.retro.jar
abdera.core.0.3.0-incubating.retro.jar
From the lib directory in the extracted contents, copy the following jars to the OIM_HOME/ext directory.
abdera-i18n-0.3.0-incubating.retro.jar
commons-codec-1.3.jar
log4j-1.2.14.jar
axiom-api-1.2.5.jar
commons-logging-1.0.4.jar
retroweaver-rt-2.0.jar
axiom-impl-1.2.5.jar
jaxen-1.1.1.jar
stax-api-1.0.1.jar
Download a JAR file implementation of STAX (stax-1.2.0.jar) from the following Web page:
Copy this JAR file into the OIM_HOME/ext directory.
To copy the external files required by the SAP GRC SIL Provider:
Search for and download the axis-bin-1_4.zip file from the following Web site:
Extract the contents of the axis2-1.4-bin.zip file to a temporary directory.
From the TEMPORARY_DIRECTORY/axis-1_4/lib directory, copy the following files into the OIM_HOME/xellerate/ext directory:
wsdl4j-1.5.1.jar
axis.jar
jaxrpc.jar
saaj.jar
commons-discovery-0.2.jar
commons-logging-1.0.4.jar
You must import entitlement data from the target system to the SoD engine. If required, you must also configure SoD validation rules on the SoD engine.
The following sections provide these instructions for the preconfigured SoD engines:
Configuring Oracle Application Access Controls Governor involves the following procedures:
Creating an Oracle Application Access Controls Governor Account for SoD Operations
Defining Access Policies in Oracle Application Access Controls Governor
Creating an Oracle Application Access Controls Governor Account for SoD Operations
Create an account of the Basic type for SoD validation operations. While performing the procedure described in Section 13.3.5.1, "Creating an IT Resource to Hold Information about the SoD Engine", you provide the user name and password of this account.
See Oracle Application Access Controls Governor documentation for information about creating the account.
Synchronizing Role and Responsibility Data from Oracle e-Business Suite to Oracle Application Access Controls Governor
You must import (synchronize) role and responsibility data from Oracle e-Business Suite into Oracle Application Access Controls Governor. After first-time synchronization, you must schedule periodic synchronization of data.
See Oracle Application Access Controls Governor documentation for more information.
Defining Access Policies in Oracle Application Access Controls Governor
After you import role and responsibility data, set up access policies in Oracle Application Access Controls Governor. These access policies are based on various combinations of roles and responsibilities.
See Oracle Application Access Controls Governor documentation for more information.
SAP GRC uses user, role, and profile data from SAP R/3 to validate requests for accounts, roles, and responsibilities. Configuring SAP GRC involves the following procedures:
Synchronizing User, Role, and Profile Data from SAP ERP to SAP GRC
Configuring the Oracle Identity Manager Application Server for SAP GRC
Creating an SAP GRC Account for SoD Operations
You must create an SAP GRC account for SoD operations. During SoD operations, this account is used to call the SAP GRC Web service.
When you create this user account, you must assign it to the following groups:
Everyone
Authenticated Users
You must not assign any roles to this account.
Generating the Keystore
To generate the keystore:
In a Web browser, open the Web Services Navigator page of SAP GRC Access Control. The URL is similar to the following:
https://SAP_GRC_HOST:PORT_NUMBER/VirsaCCRiskAnalysisService/Config1?wsdl
Export the certificate.
Copy the certificate into the bin directory inside the JDK installation directory of SAP GRC.
Run the following command to create the keystore from the certificate file that you download:
keytool -import -v -trustcacerts -alias sapgrc -file CERTIFICATE_FILENAME -keystore sgil.keystore -keypass changeit -storepass changeit
Note:
In this sample command, the keystore file name is sgil.keystore.When prompted for the keystore password, specify changeit. This is the default keystore password.
When prompted to specify whether you want to trust the certificate, enter yes.
The sgil.keystore file is created in the bin directory. Copy the file to the OIM_HOME\config directory.
Configuring the Risk Terminator
The Risk Terminator is a feature of GRC Access Control. It is the main component of the SoD validation functionality of SAP GRC. Whenever a role is created in the profile generator or assigned to a user, the Risk Terminator verifies if this role creation or assignment would result in an SoD violation.
See the Risk Terminator Configuration document for detailed information.
Synchronizing User, Role, and Profile Data from SAP ERP to SAP GRC
User, role, and profile data must be imported (synchronized) from SAP ERP into SAP GRC. After first-time synchronization, you must schedule periodic synchronization of data.
Defining Risk Policies in SAP GRC
After you import role and responsibility data, use the Risk Analysis and Remediation feature of SAP GRC to define risk policies of type Segregation of Duty.
See SAP GRC documentation for more information.
Configuring the Oracle Identity Manager Application Server for SAP GRC
If Oracle Identity Manager is running on Oracle Application Server, then:
Extract the contents of the OAS_HOME/j2ee/home/oc4j.jar file into a temporary directory.
In a text editor, open the boot.xml file. This is one of the files in the oc4j.jar file.
Add the following lines under the <system-class-loader> element in the boot.xml file:
<code-source path="OIM_HOME/xellerate/ext/wsdl4j-.5.1.jar"/>
<code-source path="OIM_HOME/xellerate/ext/log4j-1.2.8.jar"/>
<code-source path="OIM_HOME/xellerate/ext/saaj.jar"/>
<code-source path="OIM_HOME/xellerate/ext/axis.jar"/>
<code-source path="OIM_HOME/xellerate/ext/commons-discovery-0.2.jar"/>
<code-source path="OIM_HOME/xellerate/ext/commons-logging-1.0.4.jar"/>
<code-source path="OIM_HOME/xellerate/ext/jaxrpc.jar"/>
Here, replace OIM_HOME with the full path of the OIM_HOME directory. For example, if OIM_HOME directory is c:/programfiles/oim, then the line of code must be:
<code-source path="c:/programfiles/oim/xellerate/ext/wsdl4j-.5.1.jar"/>
Re-create the oc4j.jar file and copy it into the OAS_HOME/j2ee/home directory.
If Oracle Identity Manager is running on Oracle WebLogic Application Server, then:
Open the OIM_HOME/config/log.properties file in a text editor.
In this file, add the following line:
log4j.logger.org.apache.axis.ConfigurationException = INFO
Save and close the file.
Open the OIM_HOME/bin/xlStartServer.bat file in a text editor.
Search for the Domain Location entry in this file. The following is a sample entry in the file:
pushd "D:\bea\user_projects\domains\oim9102\bin"
xlStartWLS.cmd
popd
Here D:\bea\user_projects\domains\oim9102 is the Domain Location entry in the file.
Copy the commons-logging-1.0.4.jar file into the lib directory that is inside the Domain Location directory.
When you register the SIL, you provide details of the Oracle Identity Manager installation, SoD engine, and target system that you want to use. During a single registration session, you can register multiple Oracle Identity Manager installations, SoD engines, and target systems. Each combination of Oracle Identity Manager installation, SoD engine, and target system is assigned a unique ID during the registration process.
The registration script (registration.sh and registration.bat) drives the registration process. When you run this script, it prompts you for the required information. The initial set of prompts displayed by the script are read from the registration.xml file. The registration script is in the SIL_HOME/scripts directory. The registration.xml file is in the SIL_HOME/registrationXML directory.
Deploying the SIL and SIL providers involves the following procedures:
Section 13.3.5.1, "Creating an IT Resource to Hold Information about the SoD Engine"
Section 13.3.5.2, "Running the Registration Script and Providing Registration Information"
Section 13.3.5.4, "Deploying the SIL_HOME Directory in a Clustered Environment"
As mentioned earlier, the registration.xml file provides the initial set of prompts that are displayed by the registration script. In this XML file, the SystemType element is used to display prompts that ask for information about the SoD engine.
You must create an IT resource to hold information about the SoD engine.
See Oracle Identity Manager Design Console Guide for detailed information about creating an IT resource type (if it does not already exist) and IT resource. You can specify any name for the IT resource type and IT resource. The following table specifies the names of the parameters that the IT resource must contain:
| Parameter | Description | Sample Value |
|---|---|---|
| Source Datastore Name | Enter the name of the source data store (the target system) that you defined in the SoD engine.
You specify a source data store name while performing the procedure described in the "Configuring Oracle Application Access Controls Governor" section. |
EBS STMD122 |
| dbuser | Enter the user name of the schema owner on the database used by the SoD engine.
This account is used to access the Application Access Controls Governor database during SoD operations. Note: This parameter is specific to Oracle Application Access Controls Governor. |
databaseusr1 |
| dbpassword | Enter the password of the schema owner on the database used by the SoD engine.
Note: This parameter is specific to Oracle Application Access Controls Governor. |
Cryp100ne |
| jdbcURL | Enter the JDBC URL for connecting to the database used by the SoD engine.
Note: This parameter is specific to Oracle Application Access Controls Governor. |
jdbc:oracle:thin:@10.123.123.123 |
| password | Enter the password of the account created on the SoD engine for API calls. | K1rb1r0s |
| port | Enter the number of the port at which the SoD engine is listening. | 8090 |
| server | Enter the IP address of the host computer on which the SoD engine is running. | 10.231.231.231 |
| sslEnable | Enter true if the SoD engine accepts only HTTPS communication requests. Otherwise, enter false. |
false |
| username | Enter the user name of an account created on the SoD engine. This account is used to call the SoD engine APIs that are used during SoD validation. | jdoe |
Note:
If you want to use multiple SoD engines, then create multiple IT resources with the same IT resource type.Note:
You can run the registration script multiple times, at any time during the lifecycle of the Oracle Identity Manager installation. For example, you might want to register a new SoD engine. When you run the script, use the prompts to guide you to the section (set of prompts) in which you want provide input. You can skip the remaining sections.See Example 13-1 for a sample run of the registration script. In that example, it is assumed that an IT resource has been created to provide information about the SoD engine.
To run the script and provide registration information for the Oracle Identity Manager installation, SoD engine, and target system:
Ensure that the appropriate Oracle Database or Microsoft SQL Server database drivers are available in the OIM_HOME/xellerate/ext directory.
Open the SIL_HOME/SILConfig.xml file in a text editor and provide values for the following elements:
SecurityImpl
Enter one of the following class names as the value of this element:
Enter oracle.iam.grc.sod.infrastructure.impl.OIM91CryptoOperations if you want to use the security implementation (model) predefined in Oracle Identity Manager.
Enter oracle.iam.grc.sod.infrastructure.impl.SILCryptoOperations if you want to use the security implementation (model) predefined in the SIL.
DirectDB: Set values for the following elements:
Note:
If the SIL is using the Oracle Identity Manager database schema, then the connection information must be the same as the information given in the xlconfig.xml file.Provide the database connection parameters as follows:
Open the SIL_HOME/SILConfig.xml file in a text editor.
Note:
Whenever you make changes in the SILConfig.xml file, you must restart Oracle Identity Manager for the changes to take effect. If you are going to perform the remaining procedures described in this chapter, then you need not restart Oracle Identity Manager at this point. You will be instructed to restart Oracle Identity Manager later.In the SILConfig.xml file, search for the following lines:
<!-- SIL DB Parameters for jdbc connectivity -->
    <directDB>
        <driver>@jdbcDriver</driver>
        <url>@jdbcUrl</url>
        <username>@dbUserName</username>
        <password encrypted="false">@dbPassword</password>
    </directDB>
In these lines, replace the following with values from the database that you are using:
@jdbcDriver
Replace this string with the JDBC driver for the database that you want to use:
Sample driver for Microsoft SQL Server:
com.microsoft.sqlserver.jdbc.SQLServerDriver
Sample driver for Oracle Database:
oracle.jdbc.driver.OracleDriver
@jdbcUrl
Replace this string with the JDBC URL for the database that you want to use.
Sample URL for Microsoft SQL Server:
jdbc:sqlserver://HOST_NAME/IP_ADDRESS:DATABASE_PORT;DatabaseName=DATABASE_NAME
Sample URL for Oracle Database:
jdbc:oracle:thin:@HOST_NAME/IP_ADDRESS:DATABASE_PORT:SID
@dbUserName
Replace this string with the user name of the database account that you want to use for SoD operations.
@dbPassword
Replace this string with the password in plain text of the database account that you want to use for SoD operations.
Note:
The password is converted to encrypted format at the end of the registration process.Save and close the SILConfig.xml file.
DOMBuilderFactoryImpl
The value of the DOMBuilderFactoryImpl element depends on the JRE that you are using:
If you are using the Sun JRE or Oracle JRockit JRE, then uncomment the DOMBuilderFactoryImpl element containing the following value:
com.sun.org.apache.xerces.internal.jaxp.DocumentBuilderFactoryImpl
If you are using the IBM JRE, then uncomment the DOMBuilderFactoryImpl element containing the following value:
org.apache.xerces.jaxp.DocumentBuilderFactoryImpl
Save and close the SILConfig.xml file.
Open one of the following script files in a text editor:
For Microsoft Windows: SIL_HOME/scripts/registration.bat
For UNIX: SIL_HOME/scripts/registration.sh
In the script file, search for OIM_HOME.
Specify the full path of the Oracle Identity Manager installation directory as the value of the OIM_HOME variable in the file. For example:
OIM_HOME = /Installations/OIM9102/server/xellerate
Save and close the file.
In a command window, switch to the SIL_HOME/scripts directory and run the registration script.
Note:
From this point onward, an explanation of each prompt displayed by the script is followed by the actual message of the prompt. The actual message is shown in monospace font in this document.Select the security model that you want to use. You are prompted with the following message:
Which Security Model you want to use? (1 or 2)
1) Idm System
2) SoD Invocation Library
Your response can be one of the following:
Enter 1 if you want to use the security model offered by Oracle Identity Manager. When you enter 1, the full path of the OIM_HOME directory that you entered in the registration script is displayed:
For example:
/Installations/OIM9102/server/xellerate
Enter 2 to select the SIL security model. You are prompted to specify whether or not you want to generate a keystore:
Generate new Keystore?(y/n)
Enter y, because you are registering SIL for the first time. You are prompted to set a password for the keystore.
Generating Keystore
Password for DB Access:
Note:
You can ignore the warning messages that are displayed at this point.Provide a password to generate the keystore. An encrypted password is generated by using the password provided. You must copy this encrypted password into the SIL_HOME/SILConfig.xml file.
The following lines show a sample encrypted password value:
Encrypted value of password: cuMcTHK60ZMa+HnX2FK9vw==
Keystore Generated, Copy Encrypted Password in SIL_Config."
The following is the block of code in the SILConfig.xml file where you must copy the encrypted password:
Note:
The placeholder that you must replace with the encrypted password is highlighted in bold.<Security>
<!-- Symmetric Encryption Provider implementation java class.
A sample value is "oracle.iam.grc.sod.encryption.DefaultDBEncryptionImpl"-->
<!--<SymmetricProvider>@providerClass</SymmetricProvider>-->
<SymmetricProvider>oracle.iam.grc.sod.encryption.DefaultDBEncryptionImpl</SymmetricProvider>
<XLSymmetricProvider>
<KeyStore>
<!-- Location of the generated keystore, used during database level encryption.
The value of the directory location including the filename of the keystore should
be relative to SIL home directory. A sample value is "security/.silkeystore"-->
<!--<Location>@keystoreLocation</Location>-->
<Location>security/.silkeystore</Location>
<!-- Keystore password. It should be first encrypted using "Encryptpassword.bat"
and the encrypted value should be defined below.
A sample value is "RN2+ji9vQ1OX6l/BQ6hPUA=="-->
<Password encrypted="true">@keystorePassword</Password>
<!-- Keystore Type. A sample value is "JCEKS"-->
<!--<Type>@keystoreType</Type>-->
<Type>JCEKS</Type>
<!-- Keystore provider. A sample value is "com.sun.crypto.provider.SunJCE"-->
<!--<Provider>@providerClass</Provider>-->
<Provider>com.sun.crypto.provider.SunJCE</Provider>
</KeyStore>
<Keys>
<DBSecretKey>
<!-- Alias for the symmetric key. Should be same the value
of parameter "alias" in "SetDBKey.bat". A sample value is "sil"-->
<!--<Alias>@alias</Alias>-->
<Alias>sil</Alias>
<!-- Key password. It should be first encrypted using "Encryptpassword.bat"
and the encrypted value should be defined below.
A sample value is "RN2+ji9vQ1OX6l/BQ6hPUA=="-->
<Password encrypted="true">@keyPassword</Password>
<!-- Block Mode for the symmetric key. A sample value is "CBC"-->
<!--<BlockMode>@keyBlockMode</BlockMode>-->
<BlockMode>CBC</BlockMode>
</DBSecretKey>
</Keys>
</XLSymmetricProvider>
</Security>
You are prompted to specify whether or not you want to proceed with registration:
Do you want to proceed with registration? (y/n)
Enter y to proceed with the registration. You are prompted to specify whether or not you want to register an Oracle Identity Manager installation:
Register System Instance for type OIM?(y/n)
Enter y.
You are prompted to enter an instance name for the Oracle Identity Manager installation:
Provide instance name
Enter a name for the Oracle Identity Manager installation. For example:
oim0
You are prompted to specify whether or not you want to register an Oracle e-Business Suite installation:
Register System Instance for type EBS? (y/n)
Enter y if you want to use an Oracle e-Business Suite installation as the target system. Otherwise, enter n.
If you enter y, then you are prompted to enter an instance name for the Oracle e-Business Suite installation:
Provide instance name
Enter a name for the Oracle e-Business Suite installation. For example:
ebs2
You are prompted to specify whether or not you want to register an Oracle Application Access Controls Governor installation:
Register System Instance for type OAACG? (y/n)
If you enter y, then you are prompted to enter an instance name for the Oracle Application Access Controls Governor installation:
Provide instance name
Enter a name for the Oracle Application Access Controls Governor installation. For example:
oaacg01
You are prompted to enter the name of the IT resource that you have created:
OIM ITResource Instance Name:
Enter the name of the IT resource that you created: OAACG ITR2
If there are no more SoD components (system instances) to register, then enter n in response to the remaining prompts.
Example 13-1 shows the output of a sample run of the registration script. Here, it is assumed that an IT resource has been created to provide information about the SoD engine.
Example 13-1 Sample Run of the Registration Script
Which Security Model you want to use?(1 or 2)
1) IdM System
2) SoD Invocation Library
1
OIM_HOME provided by you via Registration.bat is: C:\OIM_installations\wls_ibm_2
\installation\xellerate
Do you want to proceed with registration? (y/n)
y
log4j:WARN No appenders could be found for logger (XELLERATE.JAVACLIENT).
log4j:WARN Please initialize the log4j system properly.
Register System Instance for type OIM ?(y/n)
y
Provide instance name
oim1
Register System Instance for type EBS ?(y/n)
y
Provide instance name
ebs1
Register System Instance for type OAACG ?(y/n)
y
Provide instance name
oaacg1
OIM ITResource Instance Name:
OAACG ITR2
Register System Instance for type SAP ?(y/n)
n
Register System Instance for type GRC ?(y/n)
n
At the end of the registration process, the names of the system types are set in the Oracle Identity Manager database. You can retrieve these names from the database by using the registration script. After you retrieve these names, you must enter them in the SILConfig.xml file.
To retrieve and record the names of the service components:
In a command window, switch to the following directory:
SIL_HOME/script
Run one the following commands:
For Microsoft Windows:
registration.bat printRegistrationIDs
For UNIX:
registration.sh printRegistrationIDs
The following is sample output of this command:
-----------------------------------------------
System Type     Instance Name  Registration ID
-----------------------------------------------
OIM                 oim                     1
EBS                 Ebs                     2
OAACG               oaacg                   3
Copy these instance names for your reference.
Open the SIL_HOME/SILConfig.xml file in a text editor and provide values for the Topologies element:
The following block of XML shows the Topologies element and its child elements:
Note:
If you have multiple target system and SoD engine combinations, then you can add multiple Topology elements inside the Topologies element.<Topologies> <Topology> <name>@topologyName</name> <IdmId>@Idm RegistrationId</IdmId> <SodId>@Sod RegistrationId</SodId> <SDSId>@Sds RegistrationId</SDSId> </Topology> </Topologies>
Enter values for the following child elements of the Topologies element:
@topologyName: Enter a name for the topology.
Note:
Later in this procedure, you set the value of the TopologyName IT resource parameter to the name that you specify for the Topology element.@Idm RegistrationId: Enter the registration ID of the Oracle Identity Manager installation.
@Sod RegistrationId: Enter the registration ID of the SoD engine.
@Sds RegistrationId: Enter the registration ID of the target system.
Set the value of the DataAccessImpl element in the SILConfig.xml file as follows
Comment the following line:
<DataAccessImpl>oracle.iam.grc.sod.infrastructure.impl.DBOperationsTest</DataAccessImpl>
Uncomment the following line:
<DataAccessImpl>oracle.iam.grc.sod.infrastructure.impl.OIM91DBOperations</DataAccessImpl>
Save and close the SILConfig.xml file.
In a clustered environment, copy the SIL_HOME directory to each node of the cluster. In addition, ensure that the structure of this directory is the same across all nodes of the cluster.
Note:
Whenever you make changes in the SILConfig.xml file, you must restart Oracle Identity Manager for the changes to take effect. If you are going to perform the remaining procedures described in this chapter, then you need not restart Oracle Identity Manager at this point. You will be instructed to restart Oracle Identity Manager later.Note:
This section describes an optional procedure. Perform this procedure only if you want to enable SSL communication between the SoD engine and Oracle Identity Manager.Perform one of the following procedures:
To enable SSL communication between Oracle Application Access Controls Governor and Oracle Identity Manager:
Note:
It is assumed that you have set sslEnable totrue during the registration process.Export the certificate on the Oracle Application Access Controls Governor host computer as follows:
Note:
In Step 1, JAVA_HOME refers to the directory on the Oracle Application Access Controls Governor host computer.Run the following commands from the JAVA_HOME/bin directory:
keytool -genkey -alias tomcat -keyalg RSA -keystore JAVA_HOME/lib/security/.keystore
keytool -certreq -alias tomcat -file JAVA_HOME/lib/security/xell.cvs -keystore JAVA_HOME/lib/security/.keystore
keytool -export -alias tomcat -file JAVA_HOME/lib/security/server.cert -keystore JAVA_HOME/lib/security/.keystore
After you run these commands, the server certificate (server.cert) is created in the JAVA_HOME/lib/security directory.
In the TOMCAT_HOME/conf/server.xml file, enter the details of the keystore as attributes of the Connector element. See the following example:
<Connector port="8443" maxHttpHeaderSize="8192"
maxThreads="150" minSpareThreads="25" maxSpareThreads="75"
enableLookups="false" disableUploadTimeout="true"
acceptCount="100" scheme="https" secure="true"
clientAuth="false" sslProtocol="TLS" keystoreFile="JAVA_HOME/lib/security/.keystore">
Restart Oracle Application Access Controls Governor.
Import the certificate on the Oracle Identity Manager host computer as follows:
Note:
In Step 2, JAVA_HOME refers to the directory on the Oracle Identity Manager host computer.Copy the server certificate created on the Oracle Application Access Controls Governor host computer to the JAVA_HOME/lib/security directory of the Oracle Identity Manager host computer.
Run the following command from the JAVA_HOME/bin directory:
keytool -import -alias oaacg_trusted_cert -file JAVA_HOME/lib/security/server.cert -trustcacerts -keystore JAVA_HOME/lib/security/cacerts -storepass changeit
To enable SSL communication between SAP GRC and Oracle Identity Manager export the certificate on the SAP GRC host computer as follows:
Note:
In this section, JAVA_HOME refers to the directory on the Oracle Identity Manager host computer that is used to run the application server.In a Web browser, open the Web Services Navigator page of SAP GRC Access Control. The URL is similar to the following:
https://mysapserver01:50001/VirsaCCRiskAnalysisService/Config1?wsdl
The next step depends on the browser that you are using:
On Microsoft Internet Explorer: In the Security Alert dialog box, click View Certificate. On the Details tab of the dialog box, use the Copy to file button to export the certificate.
On Mozilla Firefox: Export the certificate as a .pem file. To be able to perform this step, you might need to download and install the Certificate Viewer enhancement from the Mozilla Web site.
Copy the certificate into the JAVA_HOME/lib/security directory used by the application server hosting Oracle Indentity Manager.
In a terminal window, change to the JAVA_HOME/bin directory.
Run the following command to import the GRC certificate to cacerts:
keytool -import -alias sapgrc_trusted_cert -file JAVA_HOME/lib/security/ CERTIFICATE_FILENAME -trustcacerts -keystore JAVA_HOME/lib/security/cacerts -storepass changeit
In this command:
CERTIFICATE_FILENAME is the name of certificate that has been exported from the SAP GRC host computer
The -storepass changeit clause specifies the password for the cacerts
keystore.
When prompted to specify whether or not you want to trust the certificate, enter yes.
The "Certificate was added to keystore" message is displayed.
To enable the SoD feature:
Set the XL.SoDCheckRequired system property to true.
Set the XL.SIL.Home.Dir system property to the full path and name of the SIL_HOME directory.
If you are using SAP GRC as the SoD engine, then perform the following step:
SAP GRC might take a long time to return the results of a request validation operation. If required, you can schedule the submission of requests for SoD validation at a specified time instead of waiting for SAP GRC to process the SoD validation request right away. In other words, you can change the synchronous SoD validation process on SAP GRC to an asynchronous process. To do this:
See Also:
Oracle Identity Manager Design Console Guide for detailed information about these stepsSet the XL.SoD.Offlined.Sync system property to true.
Configure the following scheduled tasks to run:
Resubmit Uninitiated Provisioning SOD Checks
During direct provisioning, if the SoD validation process remains in the SODCheckNotInitinitated state or SODCheckCompletedWithError state, then you can run the Resubmit Uninitiated Provisioning SOD Checks scheduled task to initiate the SoD validation process. When you run the scheduled task, the status of the process task is changed from SODCheckNotInitinitated or SODCheckCompletedWithError to SODCheckPending. Tasks in the SODCheckPending state are completed in the next run of the Get SOD Check Results Provisioning scheduled task.
Resubmit Uninitiated Approval SOD Checks
During request-based provisioning, if the SoD validation process remains in the SODCheckNotInitinitated state or SODCheckCompletedWithError state, then you can run the Resubmit Uninitiated Approval SOD Checks scheduled task to initiate the SoD validation process. When you run the scheduled task, the status of the process task is changed from SODCheckNotInitinitated or SODCheckCompletedWithError to SODCheckPending. Tasks in the SODCheckPending state will be completed in the next run of the Get SOD Check Results Provisioning scheduled task.
Note:
If you set the XL.SoD.Offlined.Sync system property tofalse, then these scheduled tasks are automatically disabled.Alternatively, you can manually run these scheduled tasks after you submit entitlement request data through direct or request-based provisioning.
Set the TopologyName parameter in the IT resource of the connector to the topology name specified during SIL registration.
Disabling SoD
At any time after you enable SoD, you can disable it by performing the following procedure:
Set the XL.SoDCheckRequired system property to false.
Disable the Holder andSODChecker process tasks.
See the connector guide for detailed information about disabling these process tasks.
If you want to enable logging for all SoD-related events
Open the OIM_HOME/xellerate/config/log.properties file in a text editor.
Add the following line to the log.properties file:
log4j.logger.XELLERATE.SOD=DEBUG
Enable the JAVACLIENT logger as follows:
Search for the following line in the log.properties file:
#log4j.logger.XELLERATE.JAVACLIENT=DEBUG
Uncomment the line by removing the number sign (#) at the start of the line as shown here:
log4j.logger.XELLERATE.JAVACLIENT=DEBUG
Note:
Perform the procedure described in this section only if you want to use a target system other than Oracle e-Business Suite, SAP CUA, and SAP R3. You must also perform the procedures given in Section 13.5, "Creating SIL Providers" if you are using an SoD engine other than Oracle Application Access Controls Governor and SAP GRC.
You can perform this procedure either before or at any time after first-time implementation of SoD in Oracle Identity Manager.
The following is a summary of the procedure to configure the SIL for a new target system:
Follow instructions given in the Section 13.4.1, "Addressing Prerequisites" section.
Create Java class implementations of the IdMvsSoDDataTransformationOper interface for the connector. See Section 13.4.2, "Creating the Transformation Layer" for instructions.
Add entries in the registration XML file for the new target system. See Section 13.4.3, "Modifying the Registration XML File" for instructions.
Perform the procedure described in Section 13.4.4, "Configuring the Provisioning and Approval Workflows for SoD".
Mark child process forms that hold entitlement data. See Section 13.4.5, "Marking Child Process Form Tables That Hold Entitlement Data" for instructions.
Register the new target system. See Section 13.4.6, "Registering the New Target System" for instructions.
Ensure that the following prerequisites are addressed:
Load entitlement data from the target system to the SoD engine.
If you are using Oracle Application Access Controls Governor, then create policy definitions by using the data loaded from the target system.
If you are using SAP GRC, then create risk definitions by using the data loaded from the target system.
For details, see vendor documentation for the SoD engine.
Deploy the Oracle Identity Manager connector for the target system. See the connector documentation for more information.
The transformation layer is used to transform target system attribute values into values that can be used by the SoD engine.
You must create the transformation layer as an implementation of the IdMvsSoDDataTransformationOper interface.
See Also:
The Javadocs shipped with this release of Oracle Identity ManagerIf you are using Oracle Application Access Controls Governor, then create an implementation of the transformInput method in the implementation class of the IdMvsSoDDataTransformationOper interface.
If you are using an SoD engine other than Oracle Application Access Controls Governor, then create implementations of the transformInput and transformSoDAnalysisInput methods in the implementation class of the IdMvsSoDDataTransformationOper interface.
Enter the details of the transformation layer in the registration.xml file as follows:
Open the registration.xml file in a text editor. This file is in the SIL_HOME/registrationXML directory.
Add the SystemType and ServiceComponent elements as shown in this block of XML lines:
Note:
Values that you must set are highlighted in bold. Guidelines and sample values are given after this block of XML.<SystemType name="SYSTEM_TYPE_NAME" type="Sod Source DataStore"></SystemType> <ServiceComponent type="IdMvsSoDDataTransformationOper" name="NAME_FOR_IMPLEMENTATION" <Impl-Class>NAME_OF_IPMLEMENTATION_CLASS</Impl-Class> <IdMSystemType>OIM</IdMSystemType> <SoDEngineType>SoD_ENGINE</SoDEngineType> <srcSystemType>SYSTEM_TYPE_NAME</srcSystemType> <DataTransformation> <AttrSoD type="user" name="NAME_OF_ATTRIBUTE_ON_TARGET_SYSTEM" sourceIdMAttrName="NAME_OF_ATTRIBUTE_ON_SOD_ENGINE" isSourceKey="true"/> <AttrSoD type="user" name="firstname" sourceIdMAttrName="firstname" isSourceKey="false"/> <AttrSoD type="user" name="lastname" sourceIdMAttrName="lastname" isSourceKey="false"/> <AttrSoD type="duty" dutyType="ENTITLEMENT_TYPE" name="accessorigid" sourceIdMAttrName="ENTITLEMENT_NAME" isSourceKey="true"/> </DataTransformation> <DataTransformation> . . . </DataTransformation> <DataTransformation> . . . </DataTransformation> </ServiceComponent>
Apply the following guidelines while adding the SystemType and ServiceComponent elements in the registration.xml file
Replace the placeholders with the following values:
SYSTEM_TYPE_NAME: Specify a name for the system type.
NAME_FOR_IMPLEMENTATION: Specify a name for the service component. For example: DBToOAACG
NAME_OF_IPMLEMENTATION_CLASS: Specify the name that you have set for the class that you create by performing the procedure described in Section 13.4.2, "Creating the Transformation Layer". For example: oracle.iam.grc.sod.scomp.impl.oaacg.transformation.IdMvsSoDDataTransformationOperDBvsOAACG
SoD_ENGINE: Enter OAACG if you are using Oracle Application Access Controls Governor as the SoD engine. Enter GRC if you are using SAP GRC as the SoD engine. If you are using a custom SIL provider, then enter the name that you set for that SoD engine.
See Also:
Section 13.5, "Creating SIL Providers"SYSTEM_TYPE_NAME: Specify the system type name that you entered earlier.
NAME_OF_ATTRIBUTE_ON_TARGET_SYSTEM: Specify the name of the attribute on the target system.
NAME_OF_ATTRIBUTE_ON_SOD_ENGINE: Specify the name of the corresponding attribute on the SoD engine.
ENTITLEMENT_TYPE: Enter the type of entitlement. For example: ROLE
ENTITLEMENT_NAME: Enter the name of one instance of the entitlement. For example: Resource Manager
Add one DataTransformation element for each attribute mapping that you want to create.
Save and close the registration.xml file.
Note:
Perform the procedure described in this section only if you are not using one of the preconfigured SoD-compatible connectors (Oracle e-Business User Management, SAP User Management, and SAP CUA).This section discusses the following procedures:
To modify the approval workflow for SoD validation:
See Also:
Oracle Identity Manager Design Console Guide for detailed information about this procedureIf parent and child object forms are not already available in the predefined connector for the target system, then you must create these object forms.
Note:
The parent object form must contain a field of type ITResourceLookup that will point to the target system installation. The child forms must contain the entitlements.Add the following text (string data type) fields on the parent object form:
Note:
These fields must be made read-only fields. Only the SoD validation process adapter and scheduled task can modify them. During the SoD validation process, these fields hold the SoD validation process status and results returned by the SoD engine.SoDCheckStatus: Valid values of this field are SoDCheckNotInitiated, SoDCheckResultPending, and SoDCheckCompleted. Set SoDCheckNotInitiated as the default value of this field.
SoDCheckTrackingID: The SoD framework library returns a string value for this when an SoD validation process is initiated. The value can be used later for polling SoD validation process results.
SoDCheckResult: The valid values of this field are Passed and Failed.
SoDCheckTimestamp: This field displays the date and time at which the SoD validation process results were generated.
SoDCheckViolation: This field displays policies in the SoD engine that are violated by the request and the corresponding entitlements. Set the length of this field to 4000 characters.
The following screenshot shows an example of a parent object form:

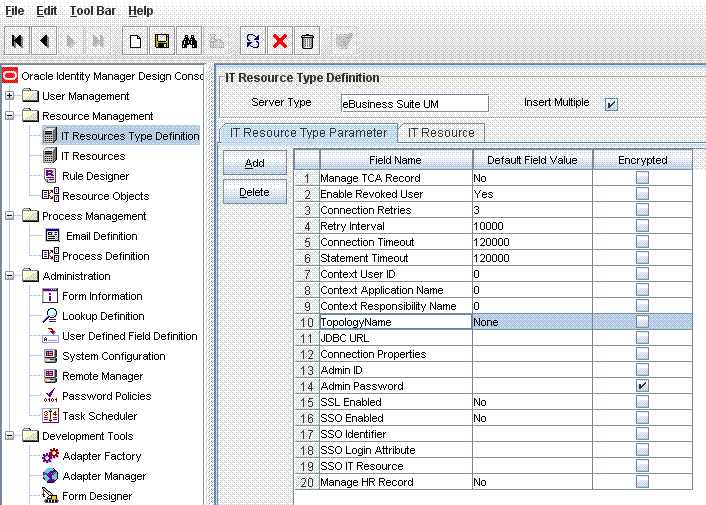
In the IT resource of the connector, create the TopologyName parameter if it does not already exist.
The following screenshot shows a sample IT resource in which this parameter has been added:
Modify the existing approval workflow or define an approval workflow.
Add the following process tasks to the approval workflow:
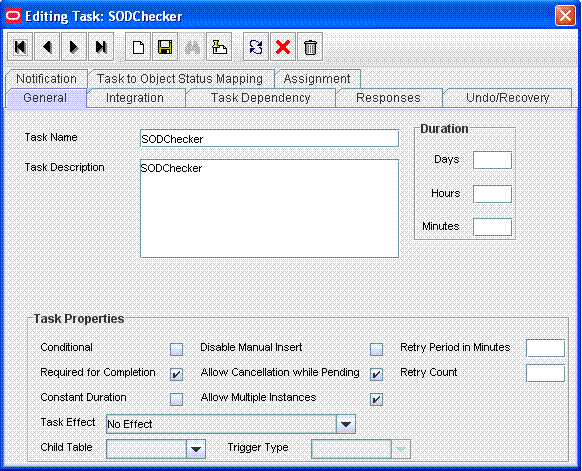
Add a new task with a name starting with SODChecker (for example, SODChecker1). The task must be non-conditional and must be set to Required for Completion.
The following screenshot displays a sample SODChecker task:
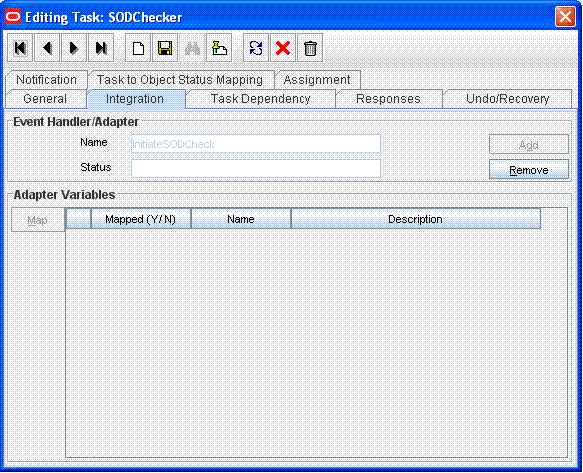
Attach the InitiateSODCheck process task adapter to this task.
This is shown in the following screenshot:
Attach a human approval task to the workflow. This task must be conditional and marked as Required for Completion. The generation of this task will depend on the completion of the SODChecker task.
The following screenshot shows the human approval task to the workflow:
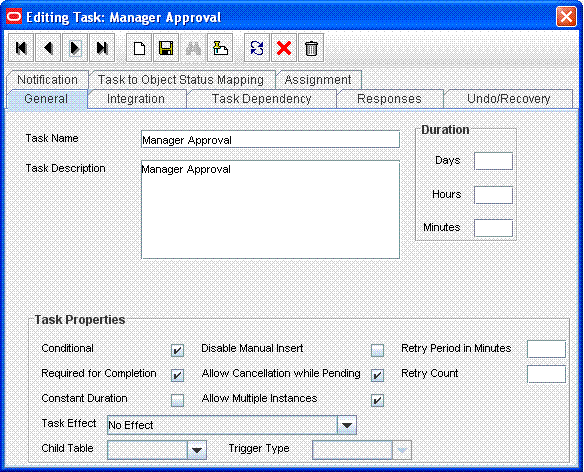
In addition, the human approval task must be generated when the SODCheckCompleted response code is received. The following screenshot shows a Manager Approval task attached as a task to be generated on completion of the SODChecker task:
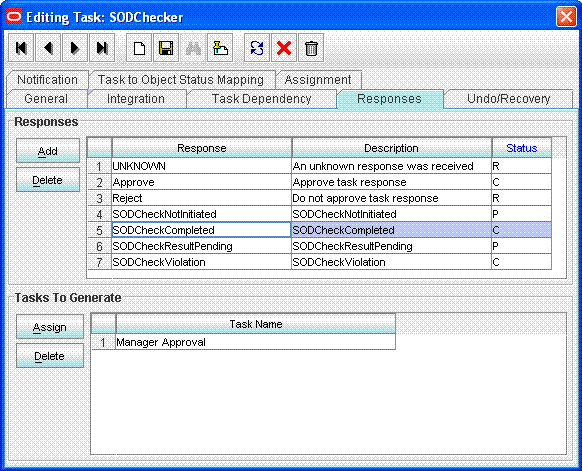
Attach the following response codes to the SODChecker task:
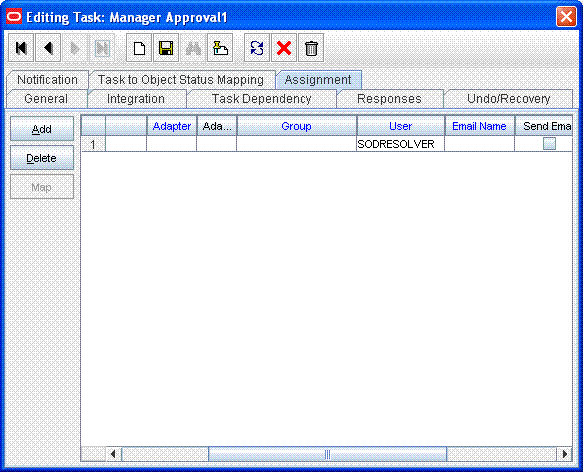
Add a human approval task (for example, Manager Approval1) similar to the one described earlier. Assign this task to a user (for example, SODResolver).
Note:
The SODResolver user can be any user in your Oracle Identity Manager installation. You must ensure that the SODResolver user has permissions to modify the object form entitlement data. This can be achieved by adding the SODResolver user to a group that has read/write permissions on the object form.The following screenshot shows the second approval task assigned to the SODResolver user:
Note:
Two approval tasks are required to enable the introduction of two separate approvers. Depending on the SoD validation process results, an approver can be selected.Attach the second approval task as a task to be generated in the event that an SoD validation process encounters a violation.
The following screenshot shows the second approval task attached as a task to be generated in the event that a violation is encountered:
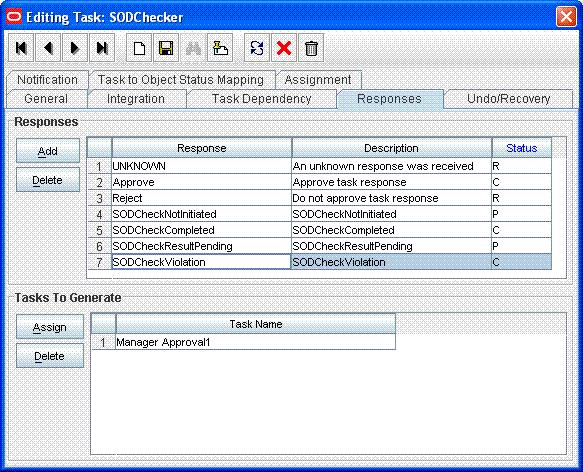
According to this workflow, if the SoD validation process is successfully completed, then the system administrator is assigned the approval task. However, if a violation is encountered, then the approval task is assigned to the user identified by SODResolver. This user is expected to resolve the conflict by removing one of the conflicting entitlements.
Alternatively, in your operating environment, you might want to reject the provisioning request if a violation is encountered. This can be achieved by mapping the SODCheckViolation response code to the Cancelled (X) task status. In the event that a violation is encountered, the SODChecker task is canceled and provisioning does not proceed further.
The process task adapter attached to the SoDChecker task triggers the SoD validation process by calling the SoD Invocation Library (SIL) synchronous/asynchronous API.
Note:
The registration of Oracle Identity Manager, SoD engine, and target system must be completed before any SIL call is triggered, because their reference IDs must be passed to the SIL APIs.The adapter initiates one of the following forms of SoD analysis:
The adapter immediately returns the results and SoDCheckStatus is set to SoDCheckCompleted in the parent object form. If there are no violations, then the adapter sets the SODChecker task to Completed. The SoDChecker can then approve the request. If there is a violation, then the SODCheckViolation response code is returned.
The adapter sets SoDCheckStatus to SoDResultPending in the parent object form and sets the task status to Pending. The adapter does not provide results in a single API call. You must run a scheduled task to call the SIL API for collecting results. This scheduled task looks for process tasks that are awaiting approval, are of SoD Type (prefixed with SODChecker), and for which the corresponding SoDCheckStatus in the parent object form is SoDResultPending. For each such task, the scheduled task retrieves the tracking ID value and invokes the SoD framework library to retrieve SoD results. If the SoD result is available, the SoDCheckStatus is updated to SoDCheckCompleted. In addition, the SoDCheckResult and the SoDCheckViolation fields are updated appropriately with the returned values and the task is either completed or rejected based on the outcome.
Multilevel Approval
A multilevel approval system may be required if you want to allow the first approver to modify entitlement data before granting approval. In this case, either the SODResolver user must be trusted to provide nonconflicting entitlements or SoD validation must be rerun after the SODResolver user has approved the request.
To implement multilevel approval:
Create a task whose name starts with SODChecker (for example SODChecker1), same as the SODChecker task that you created earlier. This task must be generated on completion of the Manager Approval1 task.
The following screenshot shows a sample SODChecker task:
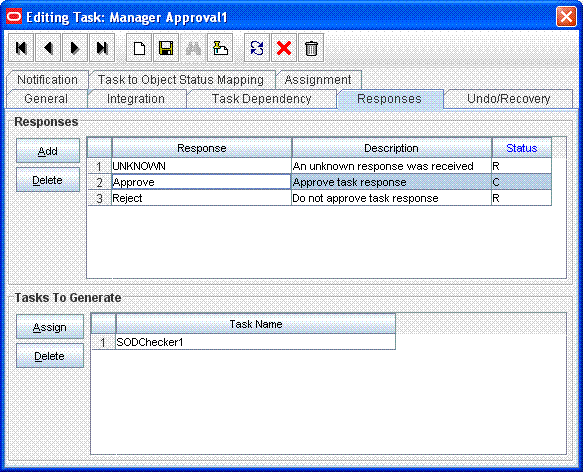
Attach an approval task (Manager Approval2) that is triggered on completion of SODChecker1. This is similar to the way in which the Manager Approval task is triggered on completion of SODChecker.
In this case, there will be two tasks and two levels of approval:
Note:
The multilevel approval approach can be extended to any number of levels. However, the final approver must not modify the data.SODChecker: Non-Conditional, Required for Completion, and attach InitiateSODCheck Adapter
Manager Approval: Conditional, Required for Completion, and generated on completion of SODChecker when the response code is SODCheckCompleted
Manager Approval1: Conditional, Required for Completion, and generated on completion of SODChecker when the response code is SODCheckViolation
SODChecker1: Conditional, Required for Completion, and generated on completion of Manager Approval1
Manager Approval2: Conditional, Required for Completion, and generated on completion of SODChecker1
Each process definition has a process task attached to provision entitlements to a user. The SoD validation process must be performed before triggering this task and immediately after inserting all data in the child table that holds entitlements on the target system. Therefore, you must hold this process task until the SoD validation process is completed after inserting the data in child tables. To achieve this, you create a Holder task that precedes the provisioning of an entitlement to a user.
The Holder task is added to prevent provisioning of a resource to a user before the SoD validation process is completed. User entitlements are provisioned only if this task is complete. The task is completed when the SoD engine validates that SoD policies or rules are not violated by the assignment of the entitlements.
If an SoD validation process has been performed before human approval, then the SoD validation process need not be performed again even if the SoD validation process is enabled at the provisioning level. Whether the SoD validation process needs to be performed or not can be assessed by checking the following before the SoD validation process at the provisioning level:
Is the provisioning related to a request?
If yes, is the SoDCheckStatus field set to SoDCheckCompleted?
If yes, then do not perform the SoD validation process during entitlement provisioning.
Note:
The SoD validation process will be performed again only when the process child form is edited to add, update, or remove entitlements.To modify the provisioning workflow for SoD validation:
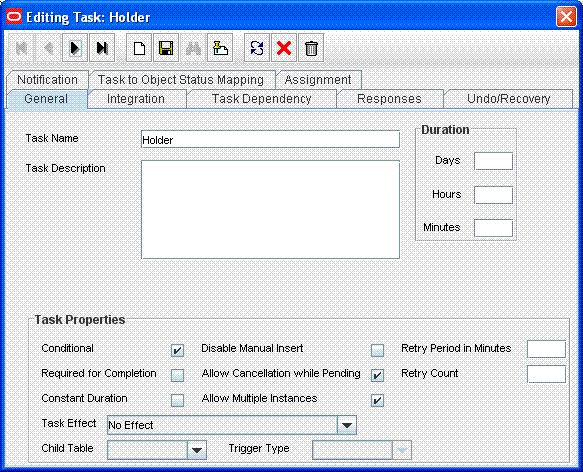
Add a Holder task to the provisioning workflow. This task must be made conditional and the Allow Multiple instances option must be selected.
The following screenshot shows this Holder task:
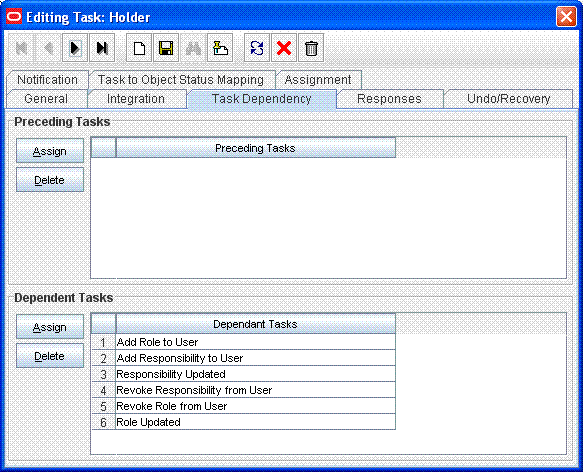
Make the connector insert, update, and revoke entitlement tasks dependent on the Holder task.
The following screenshot shows all entitlement tasks of the Oracle e-Business User Management connector dependent on the Holder task:
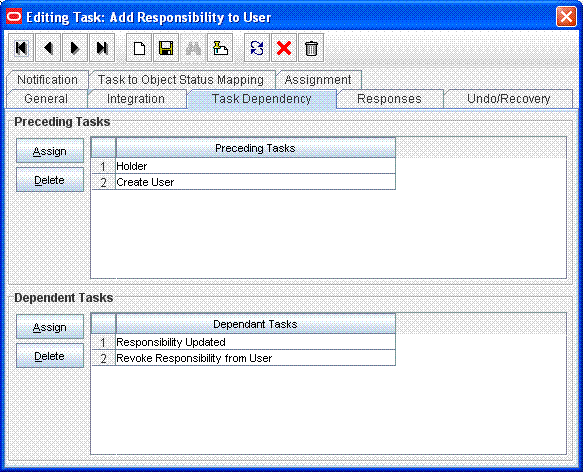
The following screenshot shows the Holder task as a preceding task of the Add Responsibility to User task:
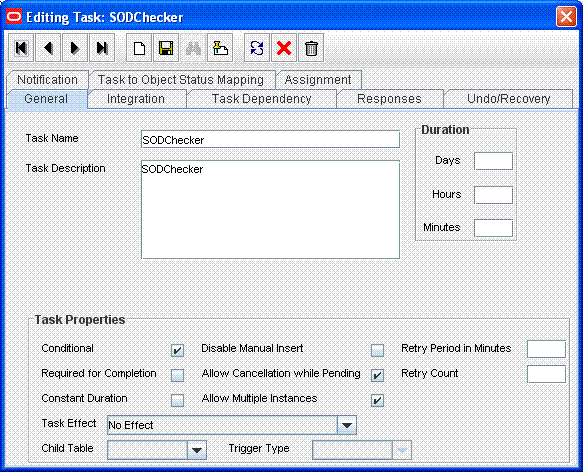
Add the SODChecker task (any task whose name starts with SODChecker). This task must be made conditional.
The following screenshot shows the SODChecker task:
Attach the InitiateSODCheck process task adapter to the SoDChecker task.
Attach the following response codes to the SODChecker task:
The following screenshot shows these response codes:
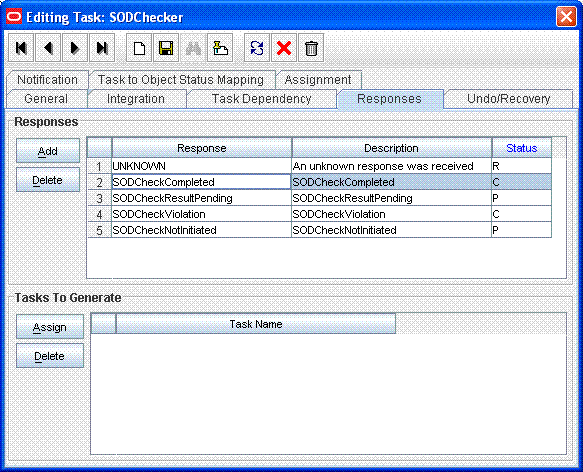
Child process form tables can hold different types of multivalued data, for example, role data, profile data, and address information. You must mark the child process form tables holding entitlement data that you want to use for SoD operations. See Section 14.4, "Marking Entitlement Attributes on Child Process Forms" for information.
To register the new target system, perform the procedure described in the following sections:
See Section 13.3.5.2, "Running the Registration Script and Providing Registration Information" for information on rerunning the registration script. In this run of the script, do not enter values for service components that have already been registered.
See Section 13.3.5.3, "Recording the Names of the System Types" for information on entering data about the new target system in the SILConfig.xml file.
Note:
Perform the procedure described in this section only if you want to use an SoD engine other than Oracle Application Access Controls Governor and SAP GRC. You must also perform the procedures given in Section 13.4, "Configuring Connectors for SoD" if you are using a target system other than Oracle e-Business Suite, SAP CUA, and SAP R3.
You must install the SoD engine before you begin creating the SIL provider.
You can perform this procedure either before or at any time after first-time implementation of SoD in Oracle Identity Manager.
The following is a summary of the procedure to create a SIL provider:
Follow instructions given in Section 13.5.1, "Addressing Prerequisites".
Create Java class implementations of the interfaces for the SIL provider. See Section 13.5.2, "Implementing the Interfaces for the Provider" for instructions.
Add entries in the registration XML file for the new SoD engine. See Section 13.5.3, "Modifying the Registration XML File for the New SoD Engine" for instructions.
Register the new SoD engine. See Section 13.5.4, "Registering the New SIL Provider" for instructions.
Ensure that the following prerequisites are addressed:
Load entitlement data from the target system to the SOD engine. You can use any ETL utility to perform this step. For details, see vendor documentation for the SoD engine.
On the SoD engine, create policy definitions or risk definitions by using the data loaded from the target system.
Deploy the Oracle Identity Manager connector for the target system. See the connector documentation for more information.
Create Java implementations of the following service components:
See Also:
The Javadocs shipped with this release of Oracle Identity ManagerCallBackIdMOper
SoDAnalysisExecutionOper
SoDDataValidationOper
Enter the details of the transformation layer in the registration.xml file as follows:
Open the registration.xml file in a text editor. This file is in the SIL_HOME/registrationXML directory.
Add a SystemType element for the SoD engine.
Save and close the registration.xml file.
To register the new SIL provider, perform the procedure described in the following sections:
See Section 13.3.5.2, "Running the Registration Script and Providing Registration Information" for information on rerunning the registration script. In this run of the script, do not enter values for service components that have already been registered.
See Section 13.3.5.3, "Recording the Names of the System Types" for information on entering data about the new target system in the SILConfig.xml file.