 Understanding Equipment Time Billing
This chapter provides overviews of equipment time billing and equipment location billing, lists prerequisites, and discusses how to:
Enter charges using equipment time entry.
Process location billings.
Understanding Equipment Time Billing
You can charge a job or business unit for the use of equipment. When you enter equipment billing information, the system creates debit journal entries to the Account Ledger table (F0911). You can then review and approve billing entries for posting. When you post the entries, the system creates the offsetting credit entries to the general ledger Account Balances table (F0902). Equipment time billing transactions must also be posted to the Asset Account Balances table (F1202). Use JD Edwards EnterpriseOne Payroll or JD Edwards EnterpriseOne Time Accounting to bill for employee labor.
Note. You can use the JD Edwards EnterpriseOne Time Accounting system without JD Edwards EnterpriseOne Payroll to bill for employee labor. However, you cannot use JD Edwards EnterpriseOne Payroll to bill for employee labor without the JD Edwards EnterpriseOne Time Accounting system.
See Also
Posting Financial Transactions
 Prerequisite
Before you complete the tasks in this section, set up the Equipment Rate table.
See Setting Up Equipment Billing.
Understanding Equipment Location Billing
Use location billing when you want to bill for equipment time based solely on the location of the equipment. When you bill for equipment by location, you do not have to enter additional billing information manually. The system creates location billings based on the location information that you enter as you relocate equipment. Billing for equipment by location is effective when you want to bill for small tools.
You can bill for equipment based on location when you want to:
Create location billings based on any time period.
Assign and bill quantities of the same equipment item at different rates among different locations.
Specify multiple billing rate codes for a single piece of equipment.
Set up rental rates for groups of equipment or individual pieces of equipment.
Change the billing rate after a specified billing amount is reached.
Rent or sell equipment to a job.
If you sell the equipment to a job, the equipment can be purchased back at a percentage of the replacement cost.
You can set up the system to meet the location billing needs. Use category codes to organize equipment information. Set up rental rates and billing rates to specify any default values that you want the system to use when you enter information that requires billing data. This table indicates elements you can use to bill equipment by location:
|
Element |
Description |
|
You should reserve category code 10 to specify equipment billing rate groups for the individual pieces of equipment. You can use the equipment billing rate groups to combine similar equipment for billing. |
|
|
Use rental rules to specify the default values, rate table limits, and so on for individual jobs. You also can specify the regular work hours in a workday and the workdays in a given month. |
|
|
Use billing rate tables to set up and maintain billing rates for billing processes. For example, use billing rate tables to:
All rate tables have effective dates so that the billing is date-sensitive. For example, you can set up the same billing rate with different values that are based on dates. |
Prerequisites
Verify that this information is set up:
Valid rate codes
Billing rate codes
Rental Rates table
Rental rules
Account distribution rules
Entering Charges Using Equipment Time Entry
This section provides an overview of equipment time entry charges and discusses how to:
Set processing options for the Equipment Time Entry program (P12110).
Enter time billing information for equipment.
Use a model time entry.
Post time entries to the general ledger.
Post general ledger entries to equipment.
Understanding Equipment Time Entry Charges
Use equipment time entry to charge equipment time directly to a job or business unit. Using equipment time entry, you can:
Enter multiple pieces of equipment on the same form.
Charge more than one job or account number on the same form.
Override default billing rates.
Use Time Entry Models to facilitate data entry.
Forms Used to Enter Time Billing Information
|
Form Name |
FormID |
Navigation |
Usage |
|
Work With Equipment Time Entries |
W12110B |
Equipment Time Billing (G1313), Equipment Time Entry. |
Locate equipment time billing records. |
|
Equipment Time Entry |
W12110C |
|
|
Setting Processing Options for the Equipment Time Entry Program (P12110)
Processing options enable you to specify the default processing for programs and reports.
Display
|
1. Display Assets |
Specify which assets that the system displays when using a model. Values are: Blank: Display all assets when using a model. 1: Display parent assets when using a model. |
Edits
|
1. Location Warning |
Specify whether the system issues a warning when time is charged to a location other than the asset's current location. Values are: Blank: Do not issue a warning. 1: Issue a warning. |
Versions
|
1. Accounts (P0901) Version |
Specify the version of the Accounts program (P0901) that the system uses. Blank: ZJDE0001. |
|
2. Job Cost Master (P51006) Version |
Specify the version of the Job Cost Master program (P51006) that the system uses. Blank: ZJDE0002. |
|
3. Budget Original (P510121) Version |
Specify the version of the Budget Original program (P510121) that the system uses. Blank: ZJDE0003. |
Entering Time Billing Information for Equipment
When you enter equipment time, the system creates debit entries to update the Account Ledger table. When you post the entries to the Account Ledger table, the system creates the offsetting credit entries in the Account Balances table. You must then post the entries to the Asset Account Balances table.
Access the Equipment Time Entry form.
Business Unit
G/L Date (general ledger date)
Date Worked
Complete these fields for each piece of equipment requiring time entries, and click OK:
Equipment Number
Rate Code
Billing Rate
Units/Hours
Using a Model Time Entry
You can save time and reduce the possibility for error by using a model time entry to create a new billing batch. A model time entry is based on any posted time entry batch. A model time entry is especially useful if you charge for equipment on a regular basis and can use the time entry batch from the prior period as a model.
Ensure that you have posted at least one time entry to the general ledger.
Access the Work With Equipment Time Entries form.
Complete any of these fields, and click Find to locate a time entry on which you want to base the model:
Batch Number
Batch Type
Select the batch that you want to copy and click Copy.
On the Equipment Time Entry form, make any changes necessary to the record and then click OK.
Note. FMJE automatic accounting instructions (AAIs) are used to exclude accounts that you do not want to see when the model is used. For example, typically the credit entries on a posted batch would be filtered out to display only the debit entries.
See Understanding AAIs for Equipment/Plant Maintenance and Equipment Billing.
Posting Time Entries to the General Ledger
Select Equipment Time Billing (G1313), Post Time Entries to G/L.
You must post time entries to update the general ledger and equipment balances. Post the entries to the general ledger first. When you select Post Time Entries to G/L, the system displays Work With Batch Versions - Available Versions. You can select the appropriate version from the Work With Batch Versions - Available Versions form.
When you run the post program to post journal entries to the general ledger, the system automatically creates the Posting Edit report. This standard report indicates which batches posted successfully. An error message prints when a batch does not post.
Posting General Ledger Entries to Equipment
Select Posting G/L to Fixed Assets (G1212), Post G/L Entries to Fixed Assets.
After you post journal entries for equipment time to the general ledger, you must post them to the Asset Account Balances table. When you post journal entries for equipment time to the Asset Account Balances table, the system verifies that each of the batch transactions includes:
A general ledger post code of P, which indicates that the transaction has been posted to the G/L Account Balances table.
An account that falls within the cost account range set up in the AAIs.
A fixed asset post code of blank, which indicates the eligibility to post to the Asset Account Balances table.
A valid equipment number.
A hold code of blank.
When you select Post G/L Entries to Fixed Assets, the system displays the Work With Batch Versions - Available Versions form. You can select the appropriate version from the Work With Batch Versions - Available Versions form. The post program updates the Asset Account Balances table and marks each transaction as posted.
You determine which accounts post to equipment when you set up AAIs FX01–FX98. Only the accounts within the FX01–FX98 range appear on the posted transaction ledger report. The Unposted F/A report version includes all time entry transactions, regardless of the affected accounts.
Processing Location Billings
This section provides an overview of the location billing process and discusses how to:
Set processing options for the Location Billings program (R1304).
Create location billings.
Review a location billing.
Approve a location billing batch.
Set processing options for the Batch Type program (P0011).
Post location billings.
Revise location billings.
Understanding the Location Billing Process
After you set up location billing and enter location information for equipment, you can create a location billing. The system automatically creates journal entries to distribute revenues and expenses to the appropriate accounts. The system creates billing journal entries based on the location billing setup and the location information for the equipment that is dated from the last bill date through the bill to date that you specify for the billing. This diagram illustrates the process flow:
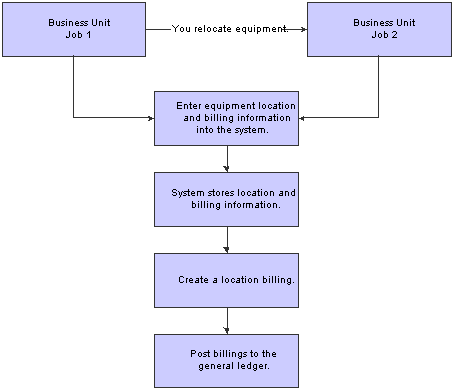
Location billing process
Note. You do not have to relocate equipment to bill by location. You can create as many billings as you want for a piece of equipment based on the initial location that you enter on the equipment master.
After you create location billings, you must process the billing information to update the general ledger and equipment balances.
Forms Used to Process Location Billings
|
Form Name |
FormID |
Navigation |
Usage |
|
Location Billing Inquiry |
W13200A |
Equipment Location Billing (G1321), Location Billing Inquiry. |
Review billing information before posting to the general ledger. |
|
Work With Batches |
W0011A |
Equipment Location Billing (G1321), General Journal Review. |
Review the general journal batches. Post the billing batches to the general ledger. When you post to the general ledger, the system updates the Account Balances table and creates the credit side of the billing. Select a batch and then click Post by Batch from the Row menu. |
|
General Journal Review |
W0911BA |
Locate the batch on the Work With Batches form, and then click Select. |
Review the individual journal entries. |
|
Batch Approval |
W0011C |
Locate the batch on the Work With Batches form, and then select Approve from the Row menu. |
Approve billing batches before you post them to the general ledger. |
|
Voucher Entry Journal Review |
W0411BA |
Locate the batch on the Work With Batches form, and then click Select. |
Delete unposted location billing batches. When you delete a location billing batch, you delete both the Account Ledger transaction in the general ledger and the Equipment Billing Transaction table. |
Setting Processing Options for the Location Billings Program (R1304)
Processing options enable you to specify the default processing for programs and reports.
Date Selection
|
1. Thru Date |
Specify the through date that the system uses for billing calculations. Blank: System Date. |
|
2. G/L Date (general ledger date) |
Specify the general ledger date that the system uses when posting billings. Blank: Thru Date. |
Partial Hour
|
1. Partial Hours |
Specify the increments in which the system bills partial hours. Values are: Blank: Bill in hour increments. 1: Bill in quarter-hour increments. |
Update Option
|
1. Proof or Final Mode |
Specify the mode that the system uses when updating tables. When you specify proof mode, the system prints a report that lists all selected records, as well as a message that indicates whether they are processed. The system does not update any tables in proof mode. When you specify final mode, the system updates the tables. Values are: Blank: Proof mode. 1: Final mode. |
Creating Location Billings
Select Equipment Location Billing (G1321), Location Billings.
Run the Location Billings program to bill locations for equipment use. The Location Billings program is a batch program in which you use data selections to indicate what location tracking information you want to include in the billing. The system accesses the location information that matches the selection criteria and creates the appropriate debit and credit transactions.
The Location Billings program creates debit journal entries that affect the appropriate jobs or business units for the use of equipment based on the location information stored in the Location Tracking Table (F1204). The General Ledger Post program creates the credit side of the journal entry using the AAIs that define rate components.
You can review and approve the batch transactions on the Billing Journal Review form to verify equipment location information before posting the new billing information.
Verifying the Location Billing
When you run a version of the Location Billings program, the system prints a location billing register that displays:
All equipment billed and the amount.
An explanation for all locations for which the system could not process the billing.
Running the Proof or Final Version
You can run the proof version of the Location Billings program to verify that the billing and location information that you entered for the equipment is correct. When you run the proof version, the program prints the location billing report without creating journal entries or updating equipment information. The system does not assign batch numbers to billings that you create using the proof version. When you run the final version, the program updates equipment information and creates a batch of journal entries that you must post to the general ledger and equipment balances.
Excluding Non-Billable Location Information
You can use data selection to exclude location tracking information that you do not want to bill. If you do not exclude location tracking information on the system before you create a location billing, the information appears on the billing register as Not able to be billed. Possible selections that you can use to exclude billing information are:
A beginning date after the date that the Location Billing program was installed.
Billing rate codes not equal to blank.
Reviewing a Location Billing
Access the Location Billing Inquiry form.
To review location billing:
Complete any of these fields and click Find to locate a billing batch:
Location
Batch Number
User ID
As of
Unposted (Y/N)
To review a location, select the location and then select Transfers from the Row menu.
|
As of |
Enter the date of the current billing. |
|
Unposted (Y/N) |
Enter a code that specifies how to display unposted transactions. Values are: Y: Include unposted transactions. N: Do not include unposted transactions. U: Display only unposted transactions. |
Approving a Location Billing Batch
If the system is set up to require batch approval, you must approve billing batches before the system can post them. You can approve the location billings by batch or review each transaction individually. If you review a batch and find it in error, you can prevent it from posting by changing the status of the batch from approved to pending.
Access the Work With Batches form.
To approve a location billing batch:
Display all batches for all users or limit the search by completing one or more of these fields:
Batch Number
Batch Type
To review only posted or unposted batches, select one of these batch status options:
Unposted Batches
Posted Batches
To limit the search further, complete one or more of these fields and click Find:
Batch Date
Batch Status
User ID
Select a row and select Batch Approval from the Row menu.
On the Batch Approval form, click the Approved option and click OK.
To verify the approval, review the Status Description field on the Work With Batches form.
To prevent an approved batch from posting, change its status to pending.
|
Batch Type |
Enter a value from user-defined code (UDC) table 98/IT (Batch Types) that specifies the system and type of transactions entered in a batch. The system assigns the value when you enter a transaction. You cannot assign new values. All batch types are hard coded. To limit the search to specific transactions, such as G for general accounting entries or V for accounts payable vouchers, enter the transaction batch type in this field. If you want to see a specific batch, you must enter both the batch number and type. |
|
Batch Date |
Enter the date of the batch. Blank: The system date is used. |
|
Batch Status |
Enter a value from UDC 98/IC (Batch Status) that indicates the posting status of a batch. Values are: Blank: Unposted batches that are pending approval or have a status of approved. A: Approved for posting. The batch has no errors, and is in balance, but has not yet been posted. D: Posted. The batch posted successfully. E: Error. The batch is in error. You must correct the batch before it can post. P: Posting. The system is in the process of posting the batch to the general ledger. The batch is unavailable until the posting process is complete. If errors occur during the post, the batch status changes to E (error). U: In use. The batch is temporarily unavailable because someone is working with it, or the batch appears to be in use because a power failure occurred while the batch was open. If appropriate, select one of these options to display records by batch status:
|
Setting Processing Options for the Batch Type Program (P0011)
Processing options enable you to specify the default processing for programs and reports.
Batch Type
|
1. Batch Type |
Specify the batch type to use as the default value on the Work With Batches form. |
Posting Location Billings
Access the Work With Batches form.
You must post billings to the general ledger and equipment balances.
After you post the location billings to the general ledger, you must then post them to equipment. When you post the billings to equipment, the system updates the Asset Account Balances table. You can post the billings to equipment, or you can set up the system to post the billings to equipment when you run the post to the general ledger.
Revising Location Billings
Access the Voucher Entry Journal Review form.
If you find an error in the location billing information, you can revise the billing to correct the error.
You cannot revise unposted billings created in location billing. To change location billing information before you post the billing to the general ledger, you must delete the billing and recreate it.
You can delete unposted location billing batches only on the Equipment Time Entry form. On the Equipment Time Entry form, enter the number of the location billing batch that you want to delete. When you delete a location billing batch, you delete both the Account Ledger transaction in the general ledger and the Equipment Billing Transaction table.
To revise location billings:
On the Voucher Entry Journal Review form, select a document to review and click Select.
To delete an unposted journal entry, select the journal entry and click Delete.
The Amount field appears blank on the Voucher Entry Journal Review form if the journal entries are in balance.
On the Enter Voucher - Payment Information form, enter any necessary changes and click OK.