 Understanding Setup Requirements for Capacity Planning
This section provides an overview of setup requirements for capacity planning and discusses how to:
Set up user-defined codes (UDCs) for capacity planning.
Set up work center capacity information.
Determine available capacity.
Generate resource profiles.
Understanding Setup Requirements for Capacity Planning
Capacity planning is the process of validating if you have sufficient resources to complete the requirements plan. Setting up capacity planning is the process of defining the available capacity and critical areas where capacity constraints exist.
 Prerequisite
Set up the work centers and dispatch groups as business units.
See Setting Up Business Unit Supplemental Data.
Setting Up User-Defined Codes for Capacity Planning
To run capacity planning, you must set up the UDCs.
Capacity Requirements Planning Display (33/CR)
The system uses 33/CR as the UDC for the capacity requirements planning display. Use the capacity requirements planning display to specify row descriptions for all Capacity Requirements Planning (CRP) forms and reports.
Rough Cut Capacity Planning Display (33/RC)
The system uses 33/RC as the UDC for the rough cut capacity planning display. Use the rough cut capacity planning display to specify row descriptions for all Rough Cut Capacity Requirements (RCCP) forms and reports.
Resource Requirements Planning (33/RR)
The system uses 33/RR as the UDC for resource requirements planning (RRP). The resource requirements planning display identifies the types of loads on a work center. You can review these types of loads on the Review Work Center Load form in the Capacity Load program (P3313).
Unit Types (33/UT)
The system uses 33/UT as the UDC for unit types. You need to identify all of the different types of resource units that can be associated with any work center.
Setting Up Work Center Capacity Information
This section provides an overview of the work center capacity setup and discusses how to set up work center capacity information.
Understanding Work Center Capacity Setup
Set up the work center information to correspond to the facilities on the shop floor. Specify whether the work center is machine- or labor-paced, and whether it is a critical work center. You also specify other values, such as the percent efficiency and utilization of the work center and the crew.
Work centers also provide additional information such as:
Pay points.
Prime load codes.
Number of machines and workers.
Crew size.
Backflush locations.
Rates.
See Also
Form Used to Set Up Work Center Capacity Information
|
Form Name |
FormID |
Navigation |
Usage |
|
Work Center Master Revisions |
W3006A |
Daily PDM Discrete (G3011), Enter/Change Work Center On the Work With Work Centers form, click Add. |
Define capacity information for work centers. |
Setting Up Work Center Capacity Information
Access the Work Center Master Revisions form.
|
Work Center |
Enter a number that identifies a branch, plant, work center, or business unit. |
|
Dispatch Group |
Enter a category code to group work centers within an overall business unit. For example, you can use this code to group similar machines that operate out of several work centers and report to one business unit. |
|
Location Branch |
Specify the branch plant of the location that is associated with the work center. |
|
Prime Load |
Enter a code that determines if a work center is machine- or labor-intensive. The system also uses prime load codes in Resource Requirements Planning and Capacity Requirements Planning calculations to develop load profiles. Codes are: L: Run labor hours only. M: Machine hours only. B: Run labor plus setup labor hours. C: Machine plus setup hours. O: Other (will not generate resource units). |
|
Critical W/C (critical work center) |
Enter a code that indicates whether the work center is critical or not critical when the system calculates capacity. Values are: N: Not a critical work center. 1: A critical work center in calculating RRP only. 2: A critical work center in calculating RCCP and CRP. 3: A critical work center in calculating RRP, RCCP, and CRP. The system also displays Type 3 work centers when you select Type 1 or Type 2 in this field. 4: Not a capacity work center. The system does not include this work center in capacity planning. Note. The data selection is a system feature that processes certain groups of information with the RRP, RCCP, and CRP programs. |
|
Resource Offset |
Enter a value from the Resource Profile table (F3303) to determine the number of days that the actual use of a work center resource should be offset from the forecasted need date. |
|
Standard Capacity |
Enter the standard capacity level at which a production line usually operates. Capacity is stated in units per hour. This level is used for repetitive processing only. |
|
Capacity UOM (capacity unit of measure) |
Enter a unit of measure to express the capacity of a production line. Examples of units of measure include hours, number of stampings, coats of paint, and so on. This item is used for repetitive processing only. |
|
Minimum Capacity |
Enter the lower limit of the capacity, beyond which the production line should not operate. Management sets this limit based on factors such as efficiencies, costs, and so on. Capacity is stated in units per hour. This limit is used for repetitive processing only. |
|
Maximum Capacity |
Enter the upper limit of the capacity, beyond which a production line cannot produce. Capacity is stated in units per hour. This limit is used for repetitive processing only. |
|
Queue Hours |
Enter the total hours that an order is expected to be in queue at work centers and moving between work centers. The system stores this value in the Item Branch table (F4102) table. You can calculate this value using the Leadtime Rollup program (R30822A) or you can enter it manually. When you run the Leadtime Rollup program, the system overrides manual entries and populates the table with calculated values. |
|
Move Hours |
Enter the planned hours that are required to move the order from this operation to the next operation in the same work center. If the Routing Master values are blank, the system retrieves the default value from the work order routing. However, the system uses these values only for backscheduling variable leadtime items. If you leave the Hours field on the Routing Revisions form blank, the system uses the value in this field for leadtime and scheduling calculations. |
|
Replen. Hrs. (replenishment hours) |
Enter the time that is required before a consuming location has a replacement kanban available from its supplying location. This value is used only for kanban card processing in JD Edwards EnterpriseOne Shop Floor Management. |
|
Efficiency |
Enter a user-defined value that indicates how efficiently a work center operates. This value usually refers to staff efficiency. When you enter a value in this field and the Modify Cost by Work Center Efficiency field in the Job Shop Manufacturing Constants table (F3009) is set to Y, the system creates a new cost component (B4) from the cost calculated from the direct labor cost (B1). For example, if the constant is set to Y, the value of this field is 80 percent, and the direct labor cost is 10, the system creates a B4 cost component for two in the Item Cost Component Add-Ons table (F30026). The Work Center Resource Units Generation program (R3007G) also uses this value as a default when calculating rated capacity. Enter percents as whole numbers. For example, enter 80 percent as 80.00. Note. The system expects that the routing times for each operator are the actual times it takes to complete an operation. Efficiency does not affect total cost. Efficiency does reassign some of the costs into different cost components. Efficiency does not change the duration or backscheduling of a work order. |
|
Utilization |
Enter a percentage that indicates how intensively a work center is being used. This value usually refers to machine use. It is the ratio of the direct time charged for production activities to the planned hours. The Work Center Resource Units Generation program also uses this value as a default when calculating rated capacity. Enter percents as whole numbers. For example, enter 80 percent as 80.00. |
Determining Available Capacity
This section provides overviews of available capacity and resource units automatic generation, list prerequisites, and discusses how to:
Generate resource units automatically.
Set the processing options for Work Center Resource Units Generation (R3007G).
Set the processing options for Work Center Resource Units (P3007).
Revise resource units manually.
Understanding Available Capacity
You must determine how much production capacity the work centers have. You determine a work center's available capacity on a given day by entering resource units.
You can have the system generate resource units or you can enter them manually. Use the Work Center Resource Units Generation program to automatically recalculate the work center hours. The system generates resource units, based on an hour (HR) unit of measure. Revise units manually if you need to make adjustments.
You can assign resource units for different units of measure in different work centers. For example, you might want to estimate the square footage that you need to store items as well as the hours that you need to produce an item.
You can revise resource units manually if you need to make adjustments to them. For example, you might need to make adjustments to account for machine downtime or employee vacations. You can change the values on the Enter/Change Resource Units form to account for scheduled or unscheduled downtime, additional shifts, or vacation time.
Important! Each time that you run Work Center Resource Units Generation based on effectivity dates, the program recalculates the form values and overwrites the manual changes based on information in the Work Center Master File table (F30006), the Workday Calendar program (P00071) (shop floor calendar), and the F3009 table.
Understanding Resource Units Automatic Generation
Run the Work Center Resource Units Generation program (R3007G) to automatically recalculate the work center hours. You can view the results in the Work Center Resource Units program or on the Work Center Resource Unit Revision form (W3007B). You can also change values on the Work Center Resource Unit Revision form.
You should run this program whenever you revise the hours per day on the Manufacturing Constants Revision form, the number of machines in a work center, or the number of employees who are assigned to a work center. You can also run the program to define resource units for specific time periods.
The system recalculates the resource units for a work center based on:
Shop floor calendar.
Important! Based on effectivity dates, the system overwrites any manual changes that you make to the units on Work Center Resource Units when you run Work Center Resource Units Generation.
Resource Unit Calculations
The program uses these resource unit calculations:
|
Resource Unit |
Resource Unit Calculation |
|
Machine-related hours (Prime load code = C or M) |
Number of machines × work hours per day |
|
Labor-related hours (Prime load code = L or B) |
Number of employees × work hours per day |
Prerequisites
Before you complete the tasks in this section:
Ensure that work centers exist for the resource units before you enter those resource units.
Set up manufacturing constants.
Determine the branch/plants for which you want to generate resource units.
Verify that you have set up a current shop calendar for the time period that you specify.
Form Used to Determine Available Capacity
|
Form Name |
FormID |
Navigation |
Usage |
|
Work Center Resource Unit Revision |
W3007B |
Periodic Resource/Capacity Planning (G3321), Enter/Change Resource Units On the Work with Resource Units form, complete the Branch/Plant and Work Center fields and click Find. Select the record to revise. |
Revise resource units manually. |
Generating Resource Units Automatically
Select Periodic Resource / Capacity Planning (G3321), Refresh Resource Units.
Setting Processing Options for Work Center Resource Units Generation (R3007G)
Use these processing options to specify the default processing for programs and reports.
Defaults
These processing options define default values.
|
1. From Date |
Specify the beginning date that the system uses to generate resource units. Enter the beginning date or select a date from the calendar. The system generates resource units and refreshes them for the month in which the From Date falls. For example, if the From Date is January 1, and the Thru Date is January 31, the system generates resource units for January. The system requires that you enter values for this processing option before you can run the generation. |
|
2. Thru Date |
Specify the ending date that the system uses to generate resource units. Enter the ending date or select a date from the calendar. Resource units are generated, refreshed, or both for the entire month. For example, if the From Date is January 1, and the Thru Date is January 31, the system generates resource units for January. The system requires that you enter values for this processing option before you can run the generation. |
|
3. Branch/Plant |
Specify the branch/plant that the system updates in the Work Center Resource Units table (F3007) when you generate resource units. Enter the branch/plant or select a branch/plant from the Business Unit Master Search form. This processing option is required before you can run the generation. |
Process
These processing options define processing criteria.
|
1. Shift Code through 6. Shift 6 Code |
Specify a UDC (06/SH) that identifies the type of shift (for example, day, night, or graveyard). These processing options specify the shift codes to include in the resource unit generation. You can enter up to six different shift codes. Enter the code or select it from the Select User Define Code form. If you leave all shift codes blank, the system processes all valid shifts for the requested branch/plant. |
Setting Processing Options for Work Center Resource Units (P3007)
Processing options enable you to specify the default processing for programs and reports.
Defaults
This processing option defines a default value.
|
Unit of Measure as Input |
Specify a value from UDC 00/UM that indicates the default unit of measure for work center resource units. This is the quantity in which to express an inventory item (for example, CS [case] or BX [box]). If left blank, HR is used as the default unit of measure. |
|
Enter Work Day Calendar Version (P00071) |
Enter the version of Work Day Calendar (P00071) that the system uses. If left blank, version ZJDE0001 will be used. |
Revising Resource Units Manually
Access the Work Center Resource Unit Revision form.
|
Work Center |
Enter a number that identifies the work center. |
|
Month |
Enter a number that corresponds to the month in a calendar year. |
|
Year |
Enter the calendar year for this calendar. |
|
Unit of Measure |
Displays the default value that comes from the component and production units of measure from the Item Master table. |
|
Work Center Efficiency |
Enter a user-defined value that indicates how efficiently a work center operates. This value usually refers to staff efficiency. When you enter a value in this field and the Modify Cost by Work Center Efficiency field in the F3009 table is set to Y, the system creates a new cost component (B4) from the cost calculated from the direct labor cost (B1). For example, if the constant is set to Y, the value of this field is 80 percent,, and the direct labor cost is 10, then the system creates a B4 cost component for two in the F30026 table. The Refresh Resource Units program also uses this value as a default when calculating rated capacity. Enter percents as whole numbers. For example, enter 80 percent as 80.00. Note. The system expects that the routing times for each operator are the actual times it takes to complete an operation. Efficiency does not affect total cost. Efficiency does reassign some of the costs into different cost components. Efficiency does not change the duration or backscheduling of a work order. |
|
Work Center Utilization |
Enter a percentage that indicates how intensively a work center is being used. This value usually refers to machine use. It is the ratio of the direct time charged for production activities to the planned hours. The Refresh Resource Units program also uses this value as a default when calculating rated capacity. Enter percents as whole numbers. For example, enter 80 percent as 80.00. |
|
Total Resource Units |
Identifies the monthly total resource units for the work center. |
Generating Resource Profiles
This section provides overviews of resource profiles and resource profile automatic generation, list prerequisites, and discusses how to:
Run resource profile generation.
Set the processing options for Resource Profile Generation (R3365).
Define resource profiles manually.
Understanding Resource Profiles
Long-range load is an estimate of how many load hours are required to meet sales projections. To determine long-range load, the system uses resource profiles. The resource profile is a list of all work centers and their load requirements for a master-scheduled item. The resource profile is the sum of all labor, machine, and setup hours that are required for all work centers and for all parts in the multilevel bill of material for a master-scheduled item.
You can have the system automatically generate a resource profile, or you can manually enter the profile. You manually enter the profile if you have not defined bills of material and routings for an end item. You can also use the manual method for prototype items and new products.
Understanding Resource Profile Automatic Generation
If you have defined bills of material (BOMs) and routings for an end item and all of its subassemblies, you can run the Resource Profile Regeneration program (R3365) to automatically generate the resource profile. The program calculates the load on a work center by extending the hours in the routing by the forecasted quantities for the master-scheduled items.
The Resource Profile Regeneration program creates units of measure only in hours (HR). Enter the resource profile manually if you want to use other units of measure.
Resource Profile Regeneration changes or updates the resource profile by using components with effectivity dates within the period that you specify. The specific items that are affected by the program are determined by such factors as:
The system retrieves routings only for BOM components that are effective within the range of effectivity dates in the processing options for the regeneration.
The system creates resource profiles only from BOM components with effectivity dates that are within the effectivity dates that are assigned to the item and the processing options.
The Effective From date in the resource profile is the earliest of the dates in the processing option, the BOM, or the routing Effective From dates.
The Effective Thru date for resource profiles is the latest of the dates in the processing option, the BOM, or the routing Effective Thru dates.
This diagram illustrates all the BOMs and routings with effectivity dates that are within the Effective From and Effective Thru dates:
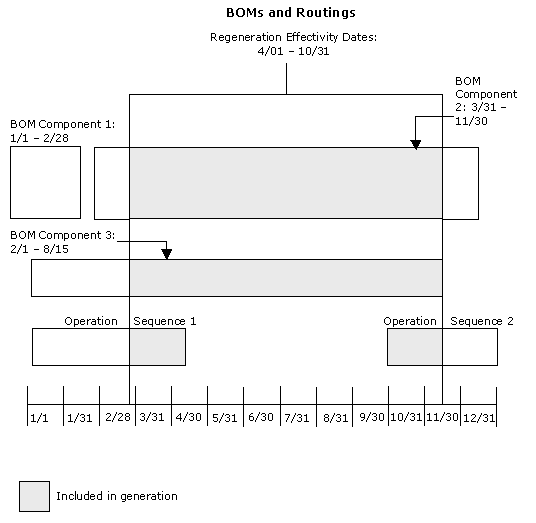
BOMs and Routings Regeneration Effectivity Dates
Prerequisites
Before you complete the tasks in this section:
Enter all applicable bills of material, routings, and work centers.
Review these topics in the JD Edwards EnterpriseOne Product Data Management Implementation Guide:
Entering Bills of Material.
Working With Routing Instructions.
Working with Work Centers.
Form Used to Generate Resource Profiles
|
Form Name |
FormID |
Navigation |
Usage |
|
Resource Profile Revisions |
W3303B |
Periodic Resource/Capacity Planning (G3321), Enter/Change Resource Profile On the Work With Resource Profile Revisions form, click Add. |
Create resource profiles manually. You must set up item branch/plant information before entering a resource profile. |
Running Resource Profile Generation
Select Periodic Resource / Capacity Planning (G3321) Generate Resource Profile.
Setting Processing Options for Resource Profile Regeneration (R3365)
Processing options enable you to specify the default processing for programs and reports.
Process
These processing options define processing criteria.
|
1. Enter the effectivity dates for the regeneration: |
Effective From: Specify a date that indicates:
Effective Thru: Specify a date that indicates:
You can enter future effective dates so that the system plans for upcoming changes. You can continue to record and recognize items that are no longer effective in the future in JD Edwards EnterpriseOne Product Costing, JD Edwards EnterpriseOne Shop Floor Management, and Capacity Requirements Planning. Material Requirements Planning determines valid components by effectivity dates, not by the bill of material revision level. Some forms display data based on the effectivity dates that you enter. |
Defining Resource Profiles Manually
Access the Resource Profile Revisions form.
|
Unit Type |
Enter a code that indicates the type of resource unit that is associated with this work center. Possible types are: 1: Run Labor Hours 2: Setup Labor Hours 3:: Machine Hours 9: Miscellaneous (storage space and so on) |
|
Effective From |
Enter a date that indicates:
|
|
Effective Thru (effective through) |
Enter a date that indicates:
|
|
Time Basis |
Enter a UDC (30/TB) that indicates how machine or labor hours are expressed for a product. Time basis codes identify the time basis or rate to use for machine or labor hours that are entered for every routing step (for example, 25 hours per 1,000 pieces or 15 hours per 10,000 pieces). You can maintain the time basis codes in the Time Basis Codes UDC (30/TB). The system uses the values in the Description-2 field on the User-Defined Code form for costing and scheduling calculations. The description is what the code represents, but it is not used in calculations. |