2 Quick Start Procedures
This chapter provides instructions for quickly starting up JRockit Flight Recorder and creating your first recording.
This chapter contains the following sections:
2.1 Using JRockit Mission Control Client
The simplest way to control JRockit Flight Recorder is by using the Oracle JRockit Mission Control Client. JRockit Mission Control Client is a tools suite that you can use to monitor, manage, profile, and eliminate memory leaks in your Java application, without introducing the performance overhead normally associated with these types of tools. For more information on JRockit Mission Control, see the Introduction to JRockit Mission Control, available on the Oracle Technology Network.
2.2 Step 1: Start the Flight Recorder
Start JRockit Mission Control Client from the command line by entering:
JROCKIT_HOME/bin/jrmc (or JROCKIT_HOME\bin\jrmc.exe
Note:
You can also launch Mission Control from the Start menu by selecting Programs then Oracle JRockit JDK <version and JDK information> then Oracle JRockit Mission Control <version>.When JRockit Mission Control Client launches, a list of all the JVMs running on the system appears in the JVM Browser.
-
Choose the JVM for which you want to create a recording and right-click to open a context menu.
-
From the context menu, select Start Flight Recording…
The Start Flight Recording dialog box appears.
2.3 Step 2: Set Recording Parameters
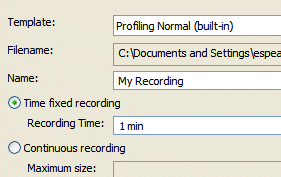
Use the Start Flight Recording dialog box to specify key recording parameters. Complete this dialog box by doing the following:
-
Choose the recording template (for more information on templates, see Section 4.2, "Mission Control Templates").
-
Set recording time (the duration of the recording) by selecting Time fixed recording and entering a duration in Recording Time.
See Figure 2-1.
Figure 2-1 Flight Recording Parameter Fields

Description of ''Figure 2-1 Flight Recording Parameter Fields''
2.4 Step 3: Start the Recording
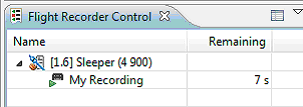
Click OK to start the recording. You can follow the progress of the recording in the Flight Recorded Control view at the bottom of the screen (Figure 2-2). The Remaining column indicates the amount of time left before the recording terminates.
Once the recording has finished it will open automatically in JRockit Mission Control Client and you can analyze the results.
2.5 Stopping a Recording
Usually, a recording will continue for the length of time specified in the Start Flight Recording dialog box. If you want to terminate before the specified time elapses, do the following:
-
On the Flight Recorder Control view, right-click the recording you want to stop to open a context menu.
-
Select Stop.
The recording will stop and open automatically in JRockit Mission Control, showing all recording data up to the termination point.
2.6 Additional Information on the Flight Recorder GUI
For additional information on using the Flight Recorder GUI, refer to the online help that is installed with the product.
