Getting Started With the Oracle Database Plugin for Eclipse
- Introduction
- Using the Tool
- Known Issues
- Related Information
Welcome to the first step towards supporting the Eclipse Data Tool Platform (DTP) by Oracle. This document provides a high-level tour through each of the Oracle Database Plugin features.
Note that screen shots and examples in this document use the HR schema that is installed by default with Oracle Database. You may use Oracle Database 11g Release 1, or download ![]() Oracle Database 10g Express Edition - Free Download.
Oracle Database 10g Express Edition - Free Download.
The Database Explorer is the Datasource View provided by the DTP. You use it to create Database connections and to navigate the database.
2.1.1. Connecting to an Oracle Database
You can create a connection to a database using the Data Source Explorer view, as follows:- To open the Database Development perspective, click
Windows > Open Perspective > Other from the Main menu, and then select Database Development from the Open Perspective dialog. This perspective
opens the Data Source Explorer (DSE) view.

Figure 1. Opening Database Perspective - Right click on the Databases node in DSE and select
New... to create a database connection, as Figure 2 shows.
Figure 2. New Database Connection
This displays the New Connection Profile wizard, as Figure 3 shows.
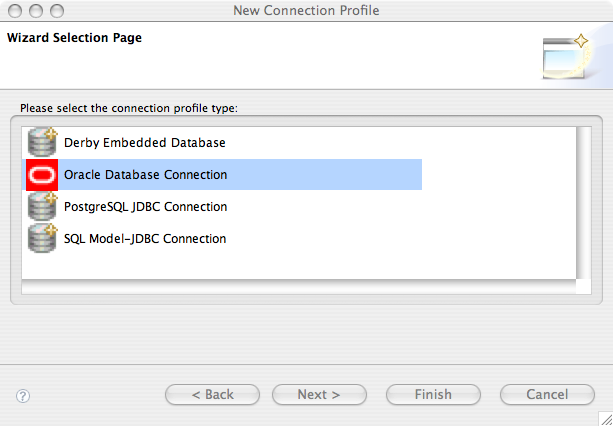
Figure 3. New Connection Profile Dialog - Select Oracle Database Connection from the list and provide a name for the connection. Click Next to proceed to the next step.
- Complete the rest of the dialog as follows:
- Select either Oracle Database 10g Driver Default or Oracle Database 11g Driver Default from the drop-down list of drivers, as Figure 4 shows.
- If the default settings are not appropriate for your configuration, change the following information on the Properties > General tab of the New Connection Profile dialog:
- In the SID field, replace xe with the Service Name (or SID) of the Database Service.
- In the Host field, replace server with the hostname or IP address of the Oracle Database server (possibly localhost).
- In the Port number field, replace 1521 with the port number of the Oracle Database Listener service.
- Provide the database user name and password for the
connection.
Note that the Connection URL field reflects your changes. - Select a use group in the Catalog field.
- On the Properties > Optional tab, set the following optional properties, if required:
- autocommit=
false
By default, autocommit is set totrue, which results in immediate commit of the operations from SQL Editor. When set to false, you need to execute the explicitCOMMITto commit the changes. See Oracle Database SQL Reference for more information. - sysdba=
true
Use this property to login with SYSDBA account. - sysoper=
true
Use this property to login with SYSOPER account. - Click Test Connection to test the connectivity. If this fails, try restarting Eclipse with -clean command option.
- Select Connect when the wizard completes checkbox to enable the database connection.
- Select Finish to complete the wizard.

Figure 4. Database Connection Details
2.1.2. Exploring the Oracle Database
The open database connection allows you to navigate through the database objects.
Figure 5.
Exploring the Database
2.1.3. Editing Data from a Table
With the enabled database connection, you can edit the table data in the Data Source Explorer (DSE).Note that, for comprehensive editing capabilities, it is recommended that you install Data Tools Platform SQL Development Tools Data Functions feature, as follows:
http://www.oracle.com/technology/software/products/oepe/oepe_12g.html in the Location field of the Add Site dialog, and then click OK.
To edit a table data, navigate to the table you want to edit in the DSE, then right-click the table, and select Data > Edit, as Figure 6 shows.
Figure 6. Editing Database Table
This opens the table data in the editor, as Figure 7 shows. You can make changes to the table data by right-clicking on a table cell and using the popup menu. When you have finished editing, click Save to save the changes to the database.
Figure 7.
Database Table Editor
2.1.4. Loading Data into a Table
To load data into a table from a text file, in the DSE, navigate to the table into which you want to load data. Right-click the table, and select Data > Load from the drop-down menu, as Figure 8 show.
Figure 8.
Loading Data
This opens the Load Data dialog, as Figure 9 shows. Complete fields on the dialog, and then click Finish.
Figure 9.
Load Data Dialog
Note that this may fail if there is a foreign key violation.
2.1.5. Extracting Data from a Table
To extract data from a table to a text file, in the DSE, navigate to the table from which you want to extract data. Right-click the table and select Data > Extract from the drop-down menu, as Figure 10 shows.
Figure 10.
Extracting Data
This opens the Extract Data dialog, as Figure 11 shows. Complete fields on the dialog, and then click Finish.
Figure 11.
Extract Data Dialog
2.1.6. Generating DDL
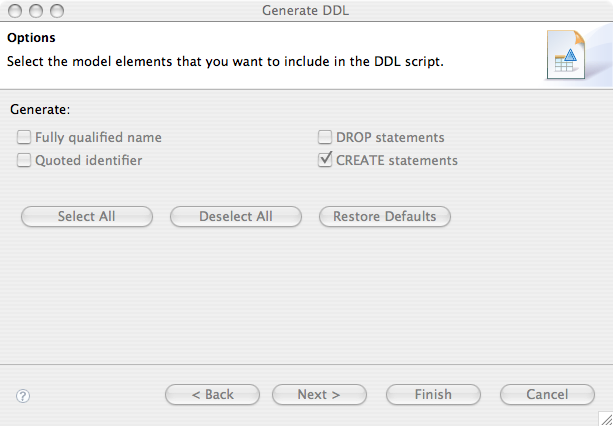
You can use the Generate DDL option on most database objects to create or drop the object.In the DSE, navigate to the object you want to create or drop, right-click the object, and select Generate DDL from the drop-down menu to create a DDL script, as Figure 12 and Figure 13 show.
Note that you need to create a project in order to save the generated DDL script. See Creating a project for more details.
Figure 13. Generating
DDL The preceding
steps generate the following statements:
Figure 12.
Generate DDL

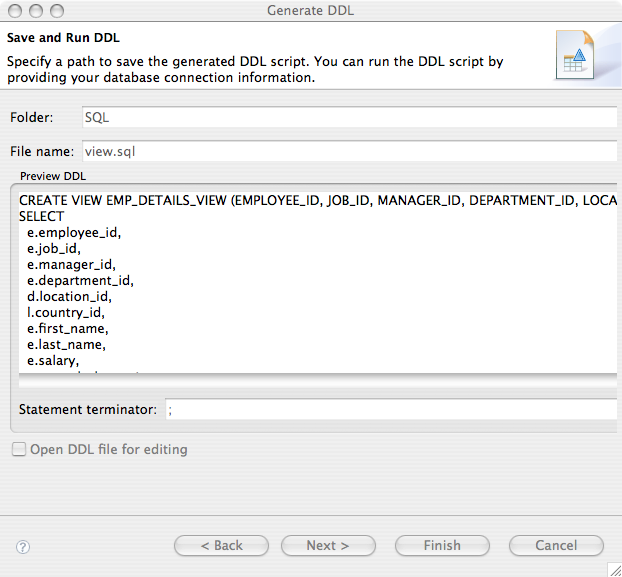
CREATE VIEW EMP_DETAILS_VIEW
  (EMPLOYEE_ID, JOB_ID, MANAGER_ID,
  DEPARTMENT_ID, LOCATION_ID, COUNTRY_ID, FIRST_NAME, LAST_NAME,
  SALARY, COMMISSION_PCT, DEPARTMENT_NAME, JOB_TITLE, CITY,
  STATE_PROVINCE, COUNTRY_NAME, REGION_NAME)
AS
SELECT
  e.employee_id,
  e.job_id,
  e.manager_id,
  e.department_id,
  d.location_id,
  l.country_id,
  e.first_name,
  e.last_name,
  e.salary,
  e.commission_pct,
  d.department_name,
  j.job_title,
  l.city,
  l.state_province,
  c.country_name,
  r.region_name
FROM
  employees e,
  departments d,
  jobs j,
  locations l,
  countries c,
  regions r
WHERE e.department_id = d.department_id
  AND d.location_id = l.location_id
  AND l.country_id = c.country_id
  AND c.region_id = r.region_id
  AND j.job_id = e.job_id
WITH READ ONLY;
SQL Tools enable you to edit and run stored procedures and functions, as well as execute the so-called explain plans in either graphic or text mode.
To use an SQL Editor, do the following:
- In the DSE, navigate to the procedure or function you want to edit.
- Right-click the procedure or function and select Edit from the drop-down menu, as Figure 14 shows.
Figure 14. Editing Stored Procedure
The procedure or function opens in the SQL Editor, as Figure 15 shows.
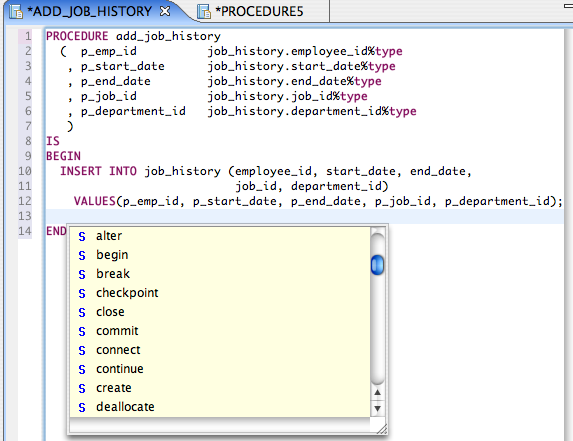
The SQL Editor enables standard
text-based editing of SQL statements, provides syntax color, and multiple statement support.
2.2.2. Executing a Stored
Procedure or Function
To execute a stored procedure or function, do the following:
- In the DSE, navigate to the procedure or function you want to run.
- Right-click the procedure or function and select Run from the drop-down menu.

Figure 16. Configure Parameters Dialog
2.2.3. Executing Explain
Plans
- In the Navigator or DSE, navigate to the script containing the SQL statement for which you want to execute an explain plan.
- Highlight the script.
- Right-click on the selection and select either Execute Text Explain Plan or Execute Graphic Explain Plan from the drop-down menu, as Figure 17 shows.
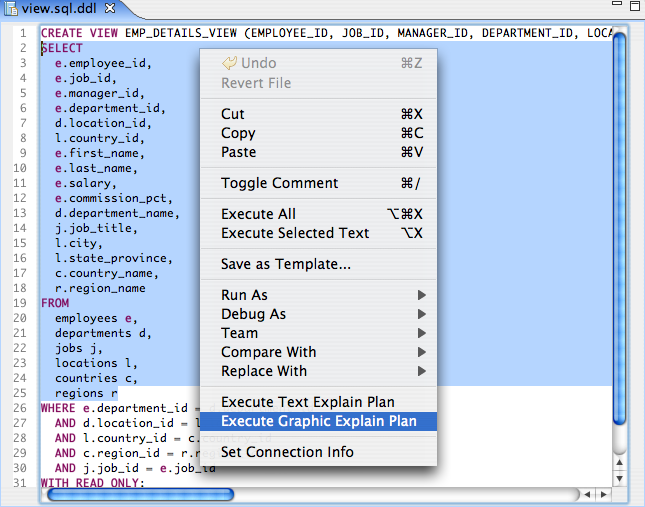
Figure 17. Executiong Explain Plan
For example, open the views.sql file
that you created in the Generating DDL section.
Highlight the SELECT statement block, as shown in Figure 19. Right-click
and select Execute Graphic Explain Plan from the drop-down menu. This opens the
execution plan in graphic mode in the Execution Plan view, as Figure 18 shows.
Figure 18. Execution
Plan - Graphical Mode
Alternatively, if you select Execute Text Explain Plan from the drop-down menu, it will result in a text version of the execution plan, as Figure 19 demonstrates.
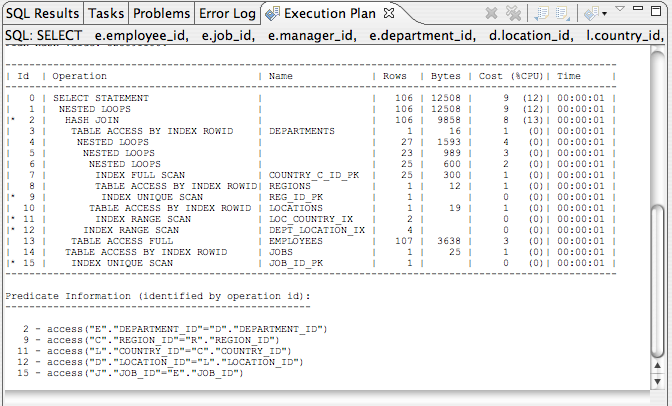
Figure 19. Execution
Plan - Text Mode
To grant specific database privileges to a specific user, do the following:
- In the DSE, navigate to the element (such as a table, for example) for which you want the user to have certain privileges.
- Right-click the element and select Grant Privileges from the drop-down menu, as Figure 20 shows.
Figure 20. Granting Privileges
This will open the Grant Privileges dialog, as Figure 21 shows.
Figure 21. Grant Privileges Dialog
Select one of the privileges from the list and click OK.
To revoke specific database privileges from a specific user, do the following:
- In the DSE, navigate to the element (such as a table, for example) for which you want to revoke the user privileges.
- Right-click the element and select Revoke Privileges from the drop-down menu.
Figure 22. Revoke Privileges Dialog
Select one of the privileges from the list and click OK.
Using the tool, you can create new database tables by declaring new columns, defining primary, unique, and foreign keys, as well as adding checked constraints and indices.
To create a new database table, follow this procedure:
- In the DSE, navigate to the Tables element.
- Right-click the element and select New Table from the drop-down menu, as Figure 23 shows.

Figure 23. Creating a New Table
This opens the Create Table dialog that Figure 24 shows.
Figure 24. Create Table Dialog
Even though by default the table is created using the schema of the user who established the connection, you can change the database schema. If the user who established the connection does not have privileges to create a new table in another schema, the SQL Result view will display an error message after the wizard completes. - Using the Create Table dialog, specify the following:
- The name for your table.
- One or more table columns: to define a column, click Add, and then provide the column's name, select the type using the Type dialog (see Figure 25), and specify whether or not the value can be
null.
Figure 25. Type Dialog
For each column, you can set data type as either a predefined SQL type, or a user-defined type. Depending on the column type, the Details portion of the dialog (see Figure 26) displays different settings. For example, for theNUMBERtype, Details portion lets you specify the default value, precision and scale; forVARCHAR2type, you can specify the default value and size.
Figure 26. Completed Create Table Dialog
- Click Next on the Create Table dialog to open the Create Table > Primary Key dialog. On this dialog, select Add primary key, and then define the name and select one or more columns that make up the primary key, as Figure 27 shows. If a column type is not suitable as a primary key column, a validation error will be displayed. Proceed by clicking Next.

Figure 27. Primary Key Dialog
- On the next Create Table > Unique Constraints dialog that Figure 28 shows, define unique constraints for the table by clicking Add. When defined, click Next to proceed.
Figure 28. Unique Constraints Dialog
There are three types of validation for the unique constraints:
- Each column must be suitable for unique constraints. For example, a column of type
CLOBis not suitable as a column in unique constraints. - A unique constraint must not contain the same columns as the primary key.
- A unique constraint must not contain the same columns as another unique constraint.
- Each column must be suitable for unique constraints. For example, a column of type
- On the next Create Table > Foreign Keys dialog that Figure 29 shows, define foreign keys for the table by clicking Add.
Note that foreign keys can reference the primary key of a table which resides in another schema. You can switch schemas by clicking Browse for the Referenced schema field. By clicking Browse for the Referenced table field you can switch to different tables in the referenced schema. When the referenced table is selected, the wizard will look up its primary key and fill the Referenced constraint field if the primary key exist. It will also try to match the columns in the referenced table with columns in the new table based on their types. Matched columns will show in the Associations table. If there are multiple columns that match a column in the referenced table, the wizard will choose the first one it finds, which you can change.
When finished, click Next.

Figure 29. Foreign Keys Dialog - Using the next Create Table > Check Constraints dialog that Figure 30 shows, add checked constraints for the new table by clicking Add.
Note that the Condition field is represented by a free-formatted text area. When using it, you have to ensure that the text for the checked constraints conforms to PL/SQL syntax. Otherwise, you will not be able to set the condition successfully.
When finished, click Next.
Figure 30. Check Constraints Dialog - Use the next Create Table > Indices dialog that Figure 31 shows to add create indices for the new table by clicking Add, and then click Next.
Figure 31. Indices Dialog - The next Create Table > DDL dialog that Figure 32 shows summarizes the DDL used to create the new table. You can make changes to the DDL before it is executed. Note that if you do make changes to the DDL, and then go back to previous dialogs and decide to add a new column, then your changes to the DDL will be lost and a new DDL will be generated.
.
Click Finish to complete the wizard.
Figure 31. DDL Dialog
Upon completion, the table creation DDL is sent to the JDBC driver and executed there. If the execution is successful, a new table with all the specified constraints will be created. You can examine the result of new table creation from the SQL Result view that opens (see Figure 32).
Figure 32. SQL Result View
Note that the table creation DDL is not executed as a single SQL statement. For any constraint, an ALTER TABLE... statement is executed. If any of the ALTER TABLE statements fails, you have the option on whether or not to continue to execute subsequent statements.
If the newly created table is not displayed in the Tables node in Data Source Explorer, you will need to refresh the view.
-
Unable to sort folders - this issue results in an inability to sort the nodes on Data Source Explorer (DSE) in an order that is consistent with how it is displayed in Oracle SQL Developer.
