Oracle WebLogic Server Support: Editing Deployment Descriptors
This document describes the following:
1. Using Deployment Descriptor Editors
OEPE provides a graphical design view that you can use to edit Oracle WebLogic Servier-specific deployment descriptors in the form ofweblogic.xml, weblogic-application.xml, weblogic-ejb-jar.xml, and NN-jms.xml files.
To open your deployment descriptor files in the editor, either double-click on the file name, or right-click the file and select one of the following from the drop-down menu:
- Open With > WebLogic Web Module Deployment Descriptor Editor to open
weblogic.xml. - Open With > WebLogic Application Deployment Descriptor Editor to open
weblogic-application.xml. - Open With > WebLogic Application Client Deployment Descriptor Editor to open
weblogic-application-client.xml. - Open With > WebLogic EJB Jar Editor to open
weblogic-ejb-jar.xml. - Open With > WebLogic JDBC Configuration Editor to open
weblogic-jdbc.xml. - Open With > JMS Descriptor Editor to open
NN-jms.xml.
Figure 1 shows a sample
weblogic.xml file in the editor view.
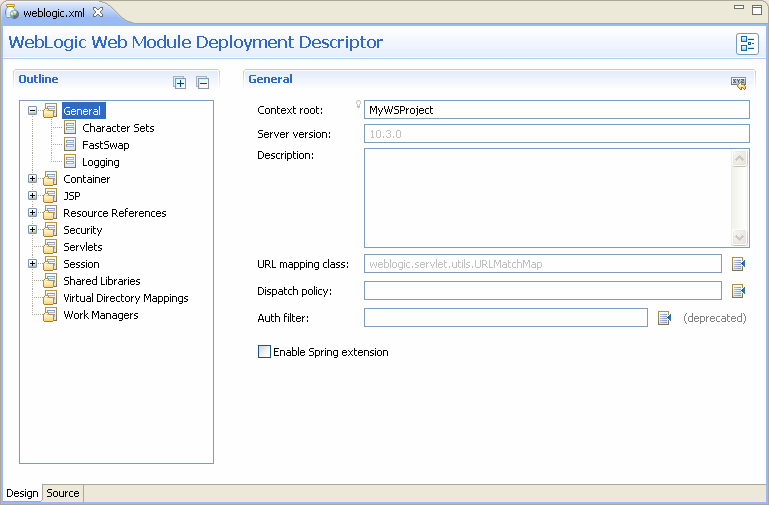
Figure 1. Deployment Descriptor Editor
You can specify values, as well as enable or disable various descriptor elements by making selections on the Outline pane, and then modifying values on the right side of the editor. To obtain information about fields and possible settings for each of them, consult the online help by moving the focus to the subject field, and then pressing F1.
Note that the setting in the Server version field in the General section of the editor is particularly important to the rest of the editor: some functionality in the editor may be enabled or disabled depending on which Oracle WebLogic Server version you specify, so you must be accurate in setting your target environment.
The descriptor editor has the following features:
- Every field is enabled for online help, which you can access by moving the focus to the subject field and pressing F1.
- There is a field-level validation on every field.
- Clicking on a linked field name takes you to the element or object (such as a class, for example) that is entered in this field.
- You can restore default settings by clicking the Restore Defaults button (icon) located at the top right corner of the editor.
- Table cells are equipped with a cell editor: when working with tables in the editor, double-clicking on a cell activates a cell editor. Some cells have a browse button when the cell is in the edit mode.
- A limited keyboard navigation is enabled on the editor.
1.1 Editor Keyboard Navigation
The deployment descriptor editors allow you to use the following keys or key combinations to perform some of the operations that can also be done through mouse actions:| Tab | Navigates through editor fields. |
| Arrow Keys | Navigate through the content outline and tables. |
| ESC | Closes many of the dialogs opened by the editor, including the property editor assistance popup. |
| Enter | Selects items in combo boxes and deactivates cell editors in tables. |
| Ctrl+L | Opens the Browse dialog when focus is on a browseable field. |
| Ctrl+I | Opens the property editor assistance popup. |
| Ctrl+J | Jumps to the entity referenced by the value contained in the current field. The value can be a class name, a file path, etc. |
| Ctrl+Up | Moves the selected entity towards the head of the list by one position. |
| Ctrl+Down | Moves the selected entity towards the tail of the list by one position. |
You can create a JMS descriptor for Oracle WebLogic Server by following this procedure:
- Ensure that the EAR project to which you are planning to add a JMS desriptor has a WebLogic EAR Extentions facet enabled. If the facet is disabled, enable it as follows:
- Right-click the project in the Project Explorer.
- Select Properties from the drop-down menu.
- Select Project Facets from the list of properties.
- Select WebLogic EAR Extentions.
- Click Apply and OK to finalize your configuration.
- In the Project Explorer, right-click your EAR project and select New > Other from the drop-down menu. On the New dialog, select WebLogic Descriptors > WebLogic JMS Descriptor, as Figure 2 shows, and then click Next. This will open the New WebLogic JMS Descriptor > File Name and Location dialog, shown in Figure 4.
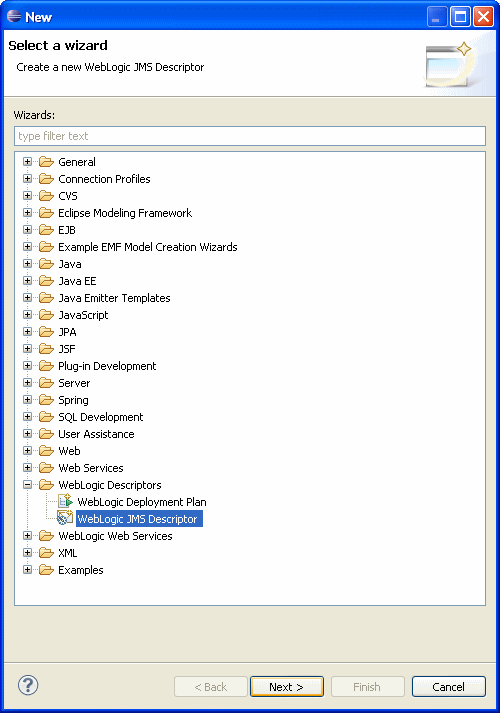
Figure 2. Creating New JMS Descriptor
- On the New WebLogic JMS Descriptor > File Name and Location dialog, shown in Figure 4, set the following:
- select the parent folder for your descriptor;
- specify the name for your descriptor;
- make an appropriate selection in the Register a corresponding JMS module in weblogic-application.xml field: if you enable this option, the following code will be added to your project's
weblogic-application.xmlsource file:

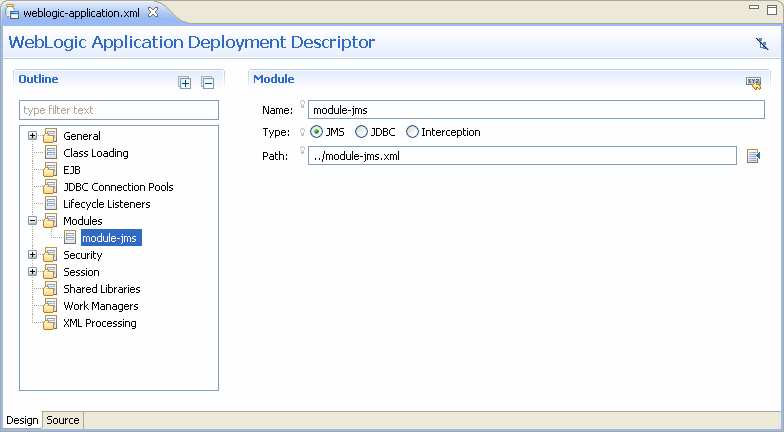
Figure 3. JMS Module Entry in Design View ofweblogic-application.xmlFile - click Finish.
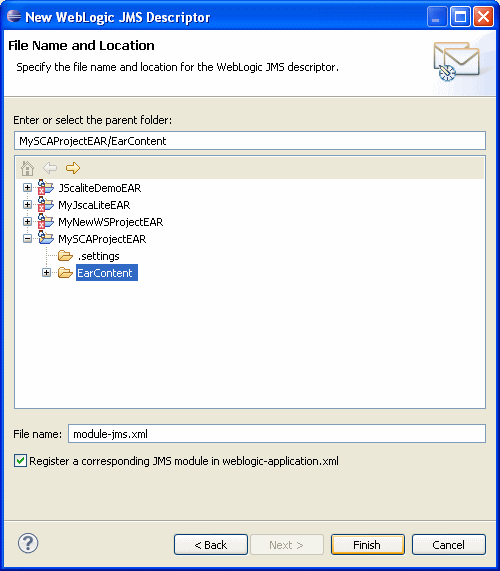
Figure 4. New WebLogic JMS Descriptor Wizard - File Name and Location
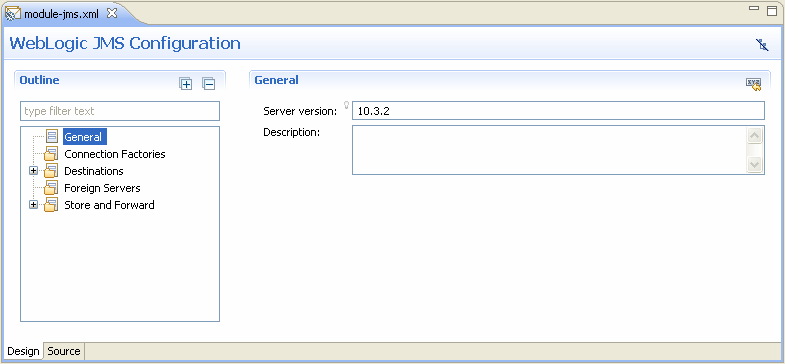
Figure 5. WebLogic JMS Descriptor Editor
Overview of Oracle WebLogic Server Application Development Oracle WebLogic Server: XML Deployment Descriptors
