2.1 Reports
The topics in this section build on the basic concepts discussed in Section 1.2, "Reports".
2.1.1 About report titles
You can add a title to a report in either of the following ways:
-
Manually, by creating a boilerplate text object in the margin of the Paper Layout view.
-
Typing in the Title field on the Style page of the Report Wizard.
When you use the Report Wizard to add a title and do not select a template for your report output, the title is inserted into the margin of the report with default attributes defined by Oracle Reports Builder. You can modify the attributes in the Paper Layout view.
When you use the Report Wizard to add a title, and do select a predefined template or a user-defined template file for your report output, Reports Builder looks for a boilerplate text object named B_OR$REPORT_TITLE defined for the selected template:
-
If
B_OR$REPORT_TITLEexists, the title is displayed using the attributes of this object, with the text you typed in the Report Wizard. -
If
B_OR$REPORT_TITLEis not found, the title is displayed using the attributes defined by the Default properties (under the Title node in the Property Inspector) of the selected template.Note:
If you do not specify a title in the Report Wizard, theB_OR$REPORT_TITLEobject is not copied to your report.
For layouts created using the Report Block Wizard, the title is inserted into the new layout as a group title rather than into the margin of the report. In this case, the attributes are set per the Default properties (under the Title node in the Property Inspector) of the selected template, and B_OR$REPORT_TITLE is ignored. If you do not select a template, the title uses the default attributes defined by Oracle Reports Builder.
Section 4.5.6, "Adding a title to a report"
2.1.2 About report sectioning and sections
Report sectioning enables you to define multiple layouts in the same report, each with a different target audience, output format, page layout, page size, or orientation. You can define up to three report sections, each with a body area and a margin area: the names of the sections are Header, Main, and Trailer. By default, a report is defined in the Main section. In the other sections, you can define different layouts, rather than creating multiple separate reports. If you wish, you can use the margin and body of the Header and Trailer sections to create a Header and Trailer page for your reports.
In the Object Navigator, the report sections are exposed in the Object Navigator under the Paper Layout node as Header Section, Main Section, and Trailer Section.
You can specify the order in which the three sections of a report (Header, Main, and Trailer) are formatted using SRW.SET_FORMAT_ORDER or the Format Order of Sections property. This capability allows Oracle Reports to format any section first to create information that is only known at the time of formatting, such as page numbers, then use that information in the formatting of another section. As an example, this property can be used to create a table of contents. For an example of using SRW.SET_FORMAT_ORDER for this purpose, see Chapter 35, "Building a Paper Report with a Simple Table of Contents and Index" and Chapter 36, "Building a Paper Report with a Multilevel Table of Contents".
For an example of using section-level distribution, see Chapter 37, "Bursting and Distributing a Report". This chapter covers defining distribution of a single section to multiple destinations, using the Repeat On property and a sample distribution XML file. For information about advanced section-level distribution and creating your own distribution XML file, see the chapter "Creating Advanced Distributions" in the Oracle Fusion Middleware Publishing Reports to the Web with Oracle Reports Services .
You can use sectioning and distribution to publish your report output in HTML, and also send a PostScript version to the printer.
You can send an executive summary of the report to senior management, and also e-mail detailed breakdowns to individual managers. In this example, a single report with two report sections needs to be created: a portrait-sized summary section and a landscape-sized detail section. Use the Repeat On property to associate the detail section with a data model group that lists the managers and then alter the destination on each instance of the data model group to send the output to the appropriate managers.
Section 2.8.3, "About report distribution"
2.1.3 About the report unit of measurement
A report can be defined using inches, centimeters, or points. The unit of measurement is independent of the device on which you build the report. As a result, you can design reports that will run on any platform on which Reports Builder runs. You can change a report's unit of measurement in these ways:
-
Setting the Unit of Measurement property.
-
Converting the report using rwconverter, specifying a different unit of measurement with the DUNIT keyword.
-
Opening the report in a different environment. For example, if you open a character-mode report, Reports Builder will change the report's unit of measurement to the bit-mapped environment's default. If you then save the report, it will be saved with the new unit of measurement.
2.1.4 About the report dimensions
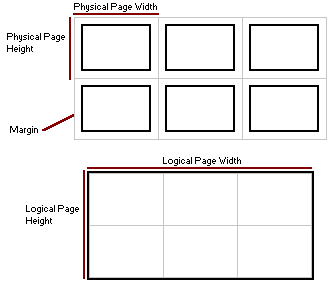
A report page can have any length and any width. Because printer pages may be smaller or larger than your paper report's "page," the concept of physical and logical pages is used. A physical page is the size of a page that is output by your printer. A logical page is the size of one page of your report; one logical page may be made up of multiple physical pages.
For each section (header, main, trailer) of a report:
-
you specify the dimensions of the physical page (including the margin) using the Width property and Height property.
-
you specify the dimensions of the logical page (report page) in physical pages (printer pages) using the Horizontal Panels per Page property (width) and the Vertical Panels per Page property (height). For example, a Horizontal Panels per Page size of 1 means that each logical page is one physical page wide, and a Vertical Panels per Page size of 2 means that each logical page is two physical pages in height.
In this example, one logical page is made up of six physical pages. The logical page is three physical pages wide and two physical pages high. Consequently, Horizontal Panels per Page size is 3 and Vertical Panels per Page size is 2. If you wanted the logical page to be two physical pages wide and three physical pages high, you would specify a Horizontal Panels per Page size of 2 and a Vertical Panels per Page size of 3.
2.1.5 About fonts in reports
For detailed information about using and adding fonts in Oracle Reports, including font configuration files, font aliasing, troubleshooting font issues, and font types, refer to the chapter "Managing Fonts in Oracle Reports" in the Oracle Fusion Middleware Publishing Reports to the Web with Oracle Reports Services manual.
2.1.6 About conditional formatting
Using the Conditional Formatting and Format Exception dialog boxes, you can specify output formatting attributes (font and color) for a selected layout object based on conditions that exist. The conditions that you define are called format exceptions.
You can display the Conditional Formatting dialog box from the Paper Layout view or Paper Design view in any of the following ways:
-
Double-click the object to display the Property Inspector. Under the General Layout node, click the Conditional Formatting value field (labeled...).
-
Display the pop-up menu (right-click in Windows) for the object.
-
Click the object, then choose Format > Conditional Formatting.
The Format Exception dialog box displays when you click New or Edit in the Conditional Formatting dialog box, and enables you to quickly and easily specify output formatting attributes for a selected layout object based on defined conditions. After you specify conditions and formatting for the current layout object in the Format Exception dialog box, the entire definition is exported to a PL/SQL format trigger. If a format trigger already exists for the layout object, the definition in the Format Exception dialog box overwrites the existing trigger code when you confirm the Oracle Reports Builder prompt.
You can edit the format trigger manually through the PL/SQL Editor; however, if you subsequently modify the definition using the Format Exception dialog box, Oracle Reports Builder displays a prompt to overwrite the existing format trigger.
Section 4.9.1.5, "Applying conditional formatting to a layout object"
2.1.7 About nested matrix reports
A nested matrix report is a matrix report in which at least one parent/child relationship appears within the matrix grid.
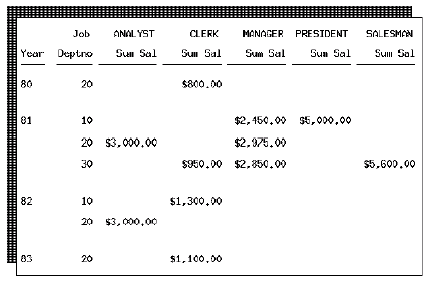
A nested matrix report has more than two dimensions; therefore, it has multiple dimensions going across or down the page. For example, see . Notice that for each year there is a nested list of related departments. Also notice that the list of jobs (the across values) appears only once. Because the job values appear only once, a summary of each category of jobs can be made to line up with the values it summarizes.
Note:
In a nested matrix report, where you create a matrix query that has a child matrix query, the fields on which you join should be separated into a separate group in your master matrix. Otherwise, on some platforms, only the first group prints.For a detailed example, see Chapter 26, "Building a Nested Matrix Report".
2.1.8 About matrix with group reports
A matrix with group report is a group above report with a separate matrix for each value of the master group. For example, for each year (master) in the report below there is a unique matrix that contains only that year's departments and jobs. This means that a summary of each job category may not line up with the values it summarizes because the position of each job category in the matrix may vary for each year.
A multiquery matrix with group report is similar to a nested matrix report in that it has more than two dimensions. For example, in the following report, notice that for each year there is a nested list of related departments.
Figure 2-2 Sample matrix with group and nested matrix report

Description of "Figure 2-2 Sample matrix with group and nested matrix report"
The advantage of using multiple queries is that you get a real break, or master/detail relationship, for the nesting groups (for example, notice that in the multiquery example above, Year 80 shows only record 20; with a single query, Year 80 would show all records whether or not they contain data for Year 80). If you want to suppress detail records that do not contain data for a particular master record, you must use multiple queries.
For a complete example, see the example report in Chapter 27, "Building a Matrix with Group Above Report".
