2 Using SmartUpgrade with Oracle JDeveloper
This chapter describes how to use SmartUpgrade within Oracle JDeveloper. Refer to the following sections for more information:
2.1 Verifying the Oracle JDeveloper SmartUpgrade Extension Installation
Before you begin, verify that the Oracle JDeveloper SmartUpgrade extension has been installed and configured:
-
Start Oracle JDeveloper.
-
Select File > New.
-
In the Categories tree of the New Gallery, select General then Applications.
-
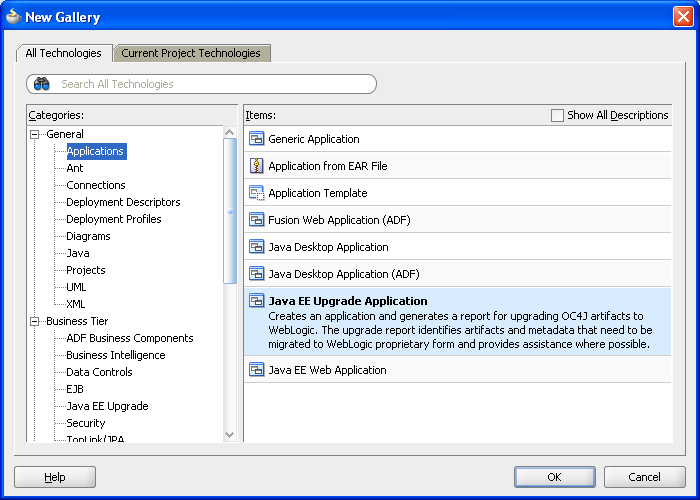
In the Items list, verify that the Java EE Upgrade Application option appears in the list of Items, as shown in Figure 2-1.
If this option does not appear in the list, then refer to Section 1.6, "Downloading and Installing SmartUpgrade".
2.2 Starting and Using the Java EE Upgrade Wizard
To generate a SmartUpgrade report or to optionally generate artifacts to help you upgrade your applications, you use the Java EE Upgrade Wizard.
Refer to the following sections for more information:
2.2.1 Starting the Java EE Upgrade Wizard
There are two ways to start Java EE Upgrade wizard, which guides you through the process of analyzing your application with SmartUpgrade.
The following sections describe these two options:
2.2.1.1 Using the Java EE Upgrade Application Wizard
To start the Java EE Upgrade wizard and save the results to a new Oracle JDeveloper application:
-
Choose File > New to display the New Gallery.
-
In the Categories tree, select General then Applications.
-
In the Items list, double-click Java EE Upgrade Application(Figure 2-1).
2.2.1.2 Using the Java EE Upgrade Project Wizard
To start the Java EE Upgrade wizard and save the results to a new project within an existing Oracle JDeveloper application:
-
Choose File > New to display the New Gallery.
You can also right-click an existing project and select New from the context menu.
-
In the Categories tree, select General then Projects.
-
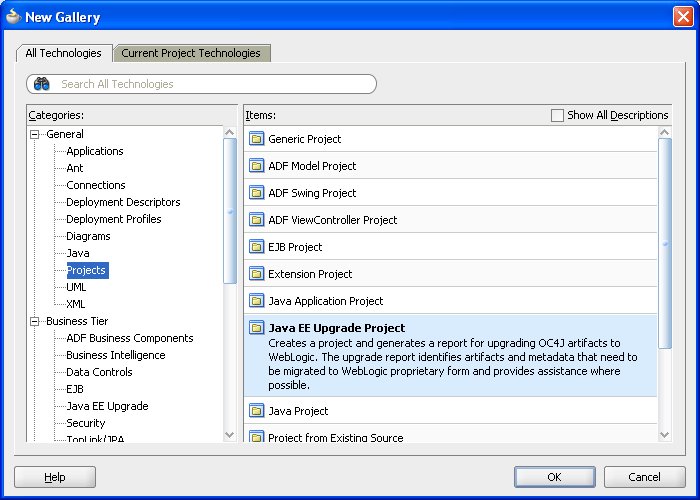
In the Items list, double-click Java EE Upgrade Project (Figure 2-2).
2.2.2 Using the Java EE Upgrade Wizard
Refer to the following sections for information about using the Java EE Upgrade wizard:
-
Types of Archives and Projects Supported by the SmartUpgrade Oracle JDeveloper Extension
-
Limiting the Analysis to Specific SmartUpgrade Rule Categories
-
Analyzing Applications Deployed on Oracle Application Server 10g Release 2 (10.1.2)
2.2.2.1 Summary of the Java EE Upgrade Wizard Pages
Table 2-1 describes the pages of the Java EE Upgrade wizard. Note that the pages that appear will vary depending on how you started the wizard and the type of report you want to generate.
Table 2-1 Summary of the Java EE Upgrade Application Wizard Pages
| Page Name | Description | More Information |
|---|---|---|
|
This page appears only if you use the Java EE Upgrade Application wizard. Enter a name for the new Oracle JDeveloper application that SmartUpgrade creates after analyzing your OC4J application. The resulting upgrade report will be saved in a project inside the application. |
Press F1 or click Help on the wizard page. |
|
|
Enter a name for the default project that SmartUpgrade creates after analyzing the selected application or project. The resulting upgrade report will be saved in this project. |
Press F1 or click Help on the wizard page. |
|
|
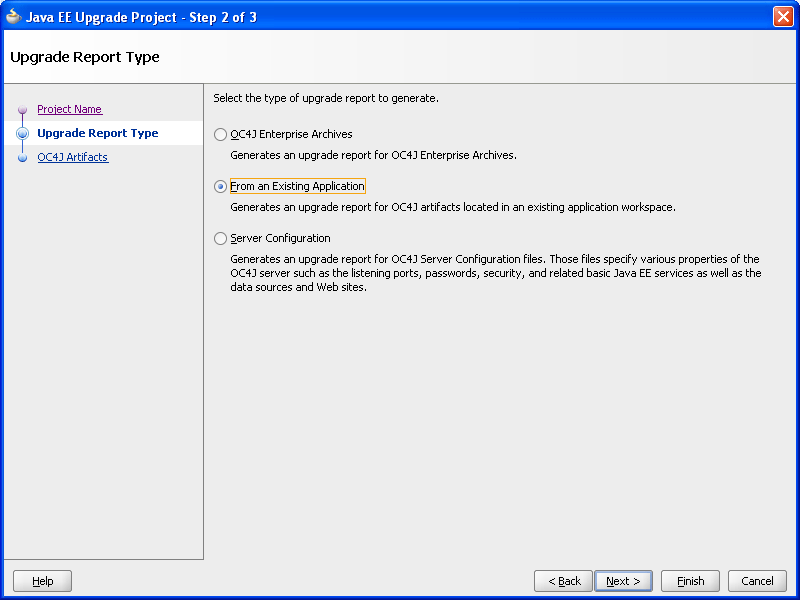
Upgrade Report Type (Figure 2-3) |
Select the type of upgrade report you want to create. Note that if you are creating a new application, then the option to analyze an existing application does not appear on the page. To analyze one or more existing Oracle JDeveloper projects, you must use the Java EE Upgrade Project wizard. |
Press F1 or click Help on the wizard page. |
|
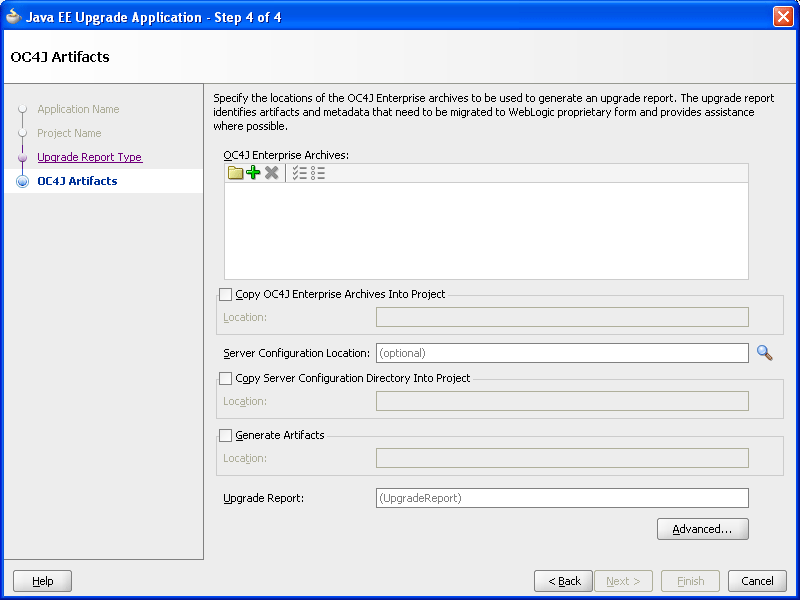
OC4J Artifacts (Figure 2-4) |
The content of this page varies, depending upon the upgrade report type you select on the previous page. Select the enterprise archives, Oracle JDeveloper projects, or OC4J server directory you want to analyze, and specify any related options available on the page. In addition, you can:
|
Press F1 or click Help on the wizard page. Section 2.2.2.3, "Limiting the Analysis to Specific SmartUpgrade Rule Categories" |
|
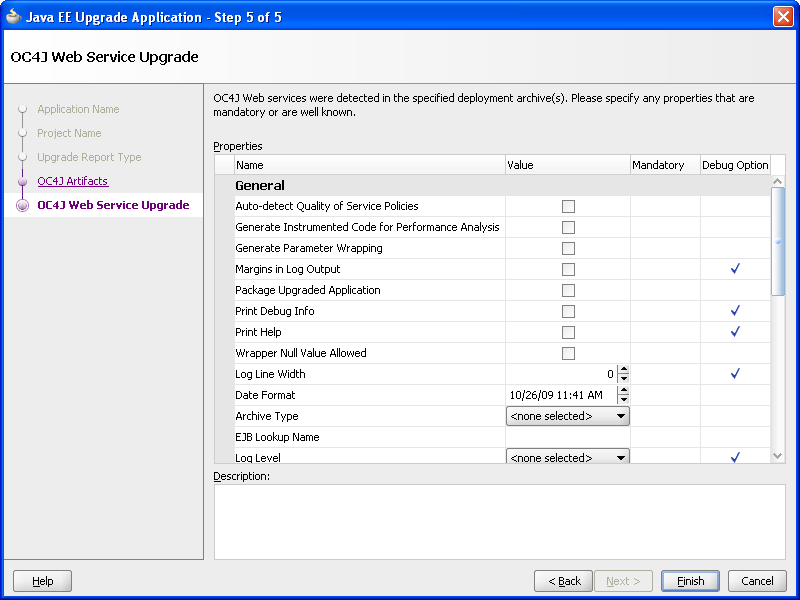
OC4J Web Services Upgrade (Figure 2-5) |
This page appears if the following are true:
|
Section 2.2.3, "Setting Properties When Upgrading OC4J Web Services with SmartUpgrade" |
2.2.2.2 Types of Archives and Projects Supported by the SmartUpgrade Oracle JDeveloper Extension
When running SmartUpgrade from Oracle JDeveloper, you can analyze the following:
-
An existing enterprise archive (EAR) file
-
One or more Oracle JDeveloper projects within the current Oracle JDeveloper application
If you want to analyze other types of archives, such as WAR, RAR, or JAR files, you have two options:
-
Package the WAR, RAR, or JAR file in an EAR file and select the EAR file for processing.
-
Use the SmartUpgrade command-line interface.
If you want to analyze Web services within an application, you must select an EAR file. You cannot analyze or generate artifacts for Web services within an open Oracle JDeveloper application or project.
2.2.2.3 Limiting the Analysis to Specific SmartUpgrade Rule Categories
By default, SmartUpgrade generates a report and optionally generates artifacts by applying all rule categories to the selected archive or OC4J server configuration.
However, if you want to limit the size of the report, or if you want to focus on a particular aspect of your application, you can limit the analysis to a specific set of SmartUpgrade rule categories.
For example, to analyze only the data-source configuration of the myApp.ear application:
-
Start the Java EE Upgrade wizard, as described in Section 2.2.1, "Starting the Java EE Upgrade Wizard".
-
On the OC4J Artifacts page in the wizard, click Advanced to display the Rules Management dialog box.
-
Use the check boxes to select the rules categories you want SmartUpgrade to use during the current application analysis.
For a description of the SmartUpgrade rule categories you can apply when generating your reports and, optionally, your application artifacts, refer to Table 3-5.
2.2.2.4 Analyzing Applications Deployed on Oracle Application Server 10g Release 2 (10.1.2)
By default, SmartUpgrade is configured to analyze applications that were previously deployed on Oracle Application Server 10g Release 3 (10.1.3). However, if you are upgrading from 10g Release 2 (10.1.2), you can indicate the specific version of OC4J you are using:
-
Start the Java EE Upgrade wizard, as described in Section 2.2.1, "Starting the Java EE Upgrade Wizard".
-
On the OC4J Artifacts page in the wizard, click Advanced to display the Rules Management dialog box.
-
Select 10.1.3 or 10.1.2 from the OC4J Server Version section of the dialog box.
2.2.3 Setting Properties When Upgrading OC4J Web Services with SmartUpgrade
If the application or project you are upgrading contains any Web services, then the Java EE Upgrade wizard displays the OC4J Web Services Upgrade wizard page (Figure 2-5).
For information about setting some the options on this page, refer to the following sections:
-
Learning About Each of the Web Services Artifact Generation Options
-
Packaging the Upgraded Web Services Artifacts as a Deployable Enterprise Archive
2.2.3.1 Learning About Each of the Web Services Artifact Generation Options
You can learn more about the options on the page by referring to the following resources:
-
Select a option on the page and review the text in the Description field.
-
Table 3-2, "Summary of Optional SmartUpgrade Command-Line Options"
2.2.3.2 Setting the Mandatory Target Server Home Directory Option
The only mandatory option on the OC4J Web Services Upgrade wizard page is the Target Server Home Directory option. Select this option to specify the target WebLogic Server home directory.
For example:
C:\Oracle\Middleware\wlserver_10.3
If you are migrating a large number of applications, you can avoid repeatedly specifying this property by setting the WL_HOME environment variable before you start Oracle JDeveloper. The value you set in WL_HOME environment variable will be applied to all applications during the upgrade process.
Important Note:
The Target Server Home Directory must be for a WebLogic Server home that is installed separately from Oracle JDeveloper. Do not select the WebLogic Server home that is installed with the Oracle JDeveloper installer.2.2.3.3 Generating Instrumented Code for Performance Analysis
Select the Generate Instrumented Code for Performance Analysis property on the OC4J Web Services Upgrade wizard page if you want SmartUpgrade to collect performance data and generate an HTML report that displays the performance impact of the additional code generated for the upgraded application.
SmartUpgrade generates an HTML report that summarizes the performance impact of the glue code. If there are multiple Web services, multiple report files will be generated.
For more information, see Section 4.4, "Analyzing the Performance Impact of the Web Services Glue Code Generated by SmartUpgrade".
2.2.3.4 Packaging the Upgraded Web Services Artifacts as a Deployable Enterprise Archive
Select the Package Upgraded Application option if you want SmartUpgrade to package the upgraded application into an archive you can then deploy on Oracle WebLogic Server.
The archive will be written to a directory called Final, which SmartUpgrade creates inside the output directory you defined as the location of generated artifacts.
You can use this option for applications that are dedicated Web services applications that do not contain other features that need to be upgraded to run on Oracle WebLogic Server.
For more information, see Section 4.3, "Using Web Services Artifacts Generated by SmartUpgrade".
2.2.4 Continuing with the Upgrade of Web Services Artifacts
In some cases, when SmartUpgrade is analyzing the Web services artifacts of your application, it might find that some manual steps are required before the Web services can be upgraded. In other cases, it might find that some properties that you did not provide are required.
In those cases, a warning appears in the SmartUpgrade log window at the bottom of the Oracle JDeveloper window. Example 2-1 is a typical example of a warning that alerts you that the Web services analysis and artifact generation could not be completed and that you need to continue the Web services upgrade process.
In other cases, the warning or error message will describe additional steps you must take before continuing with the Web services upgrade.
Example 2-1 Web Services Upgrade Warning in the SmartUpgrade Log Window
15:36 WARNING - ---------------Attention Required - Start-------------
15:36 WARNING - Action Recommended: Please rerun the command, passing all the
                arguments used in this invocation, and ensure the following
                additional arguments are also passed:
15:36 WARNING - 1: -acceptDuplicates
15:36 WARNING - 2: -skipSourcePlan
15:36 WARNING - ---------------Attention Required - End---------------
To run SmartUpgrade again and continue with the Web services upgrade process:
-
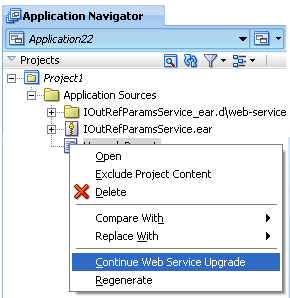
Right-click the upgrade report in the Oracle JDeveloper Application Navigator and select Continue Web Service Upgrade from the context menu (Figure 2-6).
Oracle JDeveloper displays the OC4J Web Services Properties dialog, which is similar to the OC4J Web Services Upgrade wizard page, except that it contains only the properties you originally supplied, plus the additional properties that are required to continue the upgrade process.
-
Provide the missing property values and click OK.
SmartUpgrade analyzes the Web services in the application again and attempts to complete the artifact generation. If additional properties are required, you might be prompted to continue the upgrade process again.
2.3 Using a SmartUpgrade Report
After you generate a SmartUpgrade upgrade report in Oracle JDeveloper, you can sort and filter the findings. You can use this feature to focus on the most important findings first.
Refer to the following sections for more information:
-
Using the Upgrade Findings Toolbar to Filter SmartUpgrade Findings
-
Using the Structure Window to Sort and Filter SmartUpgrade Findings
2.3.1 Viewing a SmartUpgrade Report
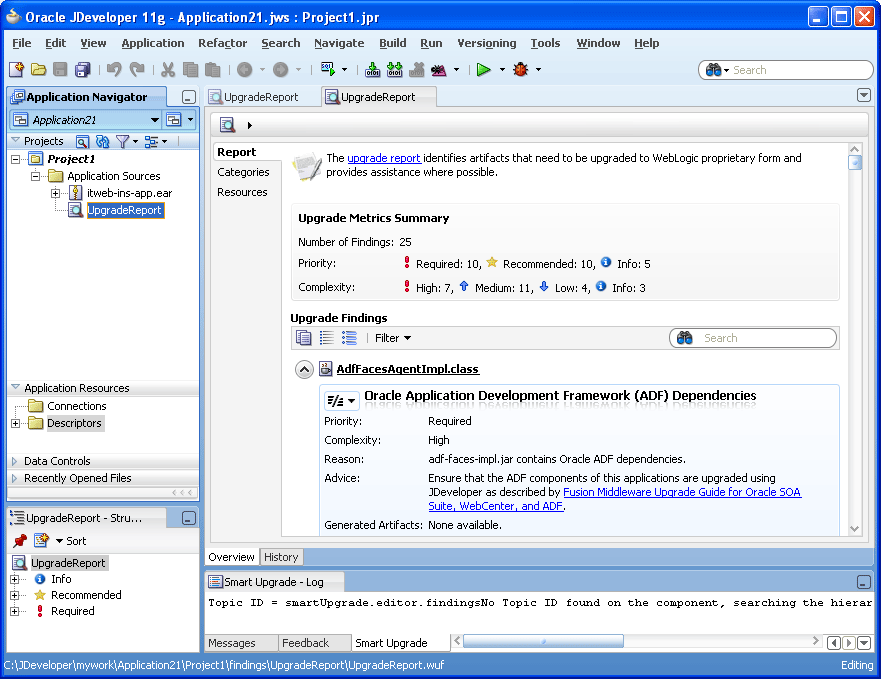
To view the upgrade report, use the Application Navigator to open the project you created with the Java EE Upgrade wizard. Locate the upgrade report under the Application Sources folder in the project and select the upgrade report (Figure 2-7).
Note that the report is divided into three tabs:
-
The Report tab, which contains a summary of the report and a list containing each finding generated by SmartUpgrade for the selected application
-
The Categories tab, which lists the categories of SmartUpgrade rules that were applied when generating the report.
-
The Resources tab, which lists the archives or projects that were analyzed by SmartUpgrade to generate the report.
2.3.2 Using the Upgrade Findings Toolbar to Filter SmartUpgrade Findings
If your report contains a long list of findings, you can easily sort or filter the list using the Upgrading Findings toolbar (Figure 2-8).
Table 2-2 describes each of the icons and menus available in the Upgrade Findings toolbar.
Table 2-2 Summary of the Upgrade Findings Toolbar Options
| Icon or Menu | Description |
|---|---|
|
|
Click this icon to copy the contents of the report to the clipboard in regular text format. You can then paste it into a separate document or program. |
|
|
Click this icon to collapse all the findings so you can scroll down and see the main headings for each finding, but not the details. |
|
|
Click this icon to expand all the findings so the detail is displayed for every finding in the report. |
|
Use this submenu to filter the findings by finding type. The finding types are organized by the types of archive associated with each finding. For example, you can filter out all but the findings related to WAR files. |
|
|
Use this submenu to filter the findings by priority. For example, you can filter out all but the required findings. |
|
|
Use this submenu to filter the findings by complexity. For example, you can filter out all but the findings with the highest complexity. |
2.3.3 Using the Structure Window to Sort and Filter SmartUpgrade Findings
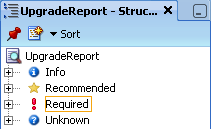
The structure window (Figure 2-9) under the Oracle JDeveloper navigation pane provides a view of the report structure. You can use this structure window to filter the findings in your report.
In this default view, you can quickly view all findings of a particular priority. For example, click Required to show only the findings that are marked as "Required."
You can also use the Sort menu in the Structure view to change the list. For example, select Complexity from the Sort menu to show a list of the complexity categories. You can then select one of the categories to view only the findings of that category in the Report window.
At any time, you can click the root node in the structure view (UpgradeReport in Figure 2-9) to view all the findings in the report.
