2 Configuring OracleAS Adapters for CICS
This chapter describes how to configure Oracle Connect using Oracle Studio.
All modeling of Oracle Connect is performed using Oracle Studio. To use Oracle Studio, you first configure it to enable access to the IBM z/OS platform where CICS runs.
This chapter includes the following topics:
Note:
The following tasks assume you have permission to access the IBM z/OS platform and that the Oracle Connect daemon is running on this computer.Check with the system administrator to ensure these requirements are fulfilled.
Setting Up the IBM z/OS Platform in Oracle Studio
Perform the following steps to configure the IBM z/OS, using Oracle Studio:
-
From the Start menu, select Programs, Oracle, and then select Studio.
-
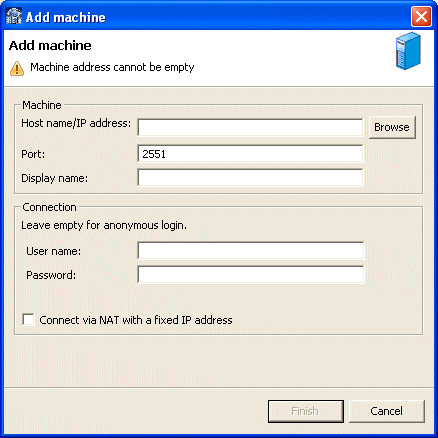
Right-click Machines in the Configuration Explorer and select Add Machine. The Add Machine screen is displayed, as shown in Figure 2-1.
-
Enter the name of the computer you want to connect to, or click Browse to select the computer from the list of computers that is displayed and uses the default port,
2551. -
Enter the user name and password of the user who was specified as the administrator when Oracle Connect was installed.
Note:
Selecting Anonymous connection enables anyone having access to the computer to be an administrator.The Add Machine screen is shown in the following figure:
-
Click Finish.
The computer is displayed in the Configuration Explorer.
Securing Access to Oracle Connect
Oracle Studio includes mechanisms to secure access to Oracle Connect both during modeling and at run time.
During modeling the following security mechanisms can be applied:
During run time client access to Oracle Connect is provided by the user profile:
Setting Password Access to Oracle Studio
Initially, any operation performed using Oracle Studio does not require a password. You can set a password so that the first operation that involves accessing the server from Oracle Studio requires a password to be entered.
Perform the following steps:
-
From the Start menu, select Programs, Oracle, and then select Studio. Oracle Studio opens.
-
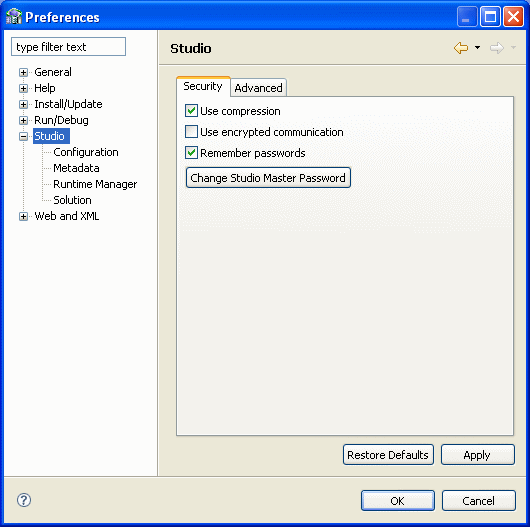
Select Window from the menu bar, and then select Preferences.
The Preferences screen is displayed as shown in the following figure:
-
Select Studio.
-
Click Change Studio Master Password.
-
In the Change master password screen, leave the Enter current master password field empty and type a new master password.
-
Confirm the password.
-
Click OK.
Specifying Users with Administrative Rights
By default, only the user who was specified during the installation as an administrator has the authorization to modify settings on that computer from Oracle Studio. This user can then authorize other users to make changes or to view the definitions for a selected computer. Adding a computer to Oracle Studio is described in "Setting Up the IBM z/OS Platform in Oracle Studio".
Note:
The default during installation is to enable all users to be administrators.Perform the following steps to specify a user with administrative rights:
-
From the Start menu, select Programs, Oracle and then select Studio. Oracle Studio opens, displaying the Design perspective.
-
Right-click the computer in the Configuration Explorer and select Administration Authorization.
The Administration Authorization screen is displayed, as shown in the following figure:
This screen has the following sections:
Administrators: Administrators can view and modify all the definitions in Oracle Studio for the selected computer. On initial entry to Oracle Studio, every user is defined as a system administrator.
Designers: Designers can view all the definitions for the computer in Oracle Studio and can modify any of the definitions under the Bindings and Users nodes for the selected computer. For example, Oracle Studio database administrator can add new data sources and adapters and can change metadata definitions for a table in a data source.
Users: Users can view all the definitions for the computer in Oracle Studio for the selected computer. Regular users cannot modify any of the definitions.
-
Add users or groups of users by clicking Add User or Add Group for the relevant sections. The user or group that is added must be recognized as a valid user or group for the computer.
Once a name has been added to a section, only the user or group that logs on with that user name has the relevant authorization.
Setting Up Run-Time User Access to the IBM z/OS Platform
During run time, client access to Oracle Connect is provided by the user profile. A user profile contains name and password pairs that are used to access a computer, data source or application during run time, when anonymous access is not allowed.
-
From the Start menu, select, Programs, Oracle, and then select Studio. Oracle Studio opens.
-
From the Design perspective, Configuration view, expand the Machines folder, then expand the machine where you want to set the user name and password.
-
Expand Users.
-
Right-click the NAV user profile and select Edit User. The User editor is displayed, as shown in the following figure:
-
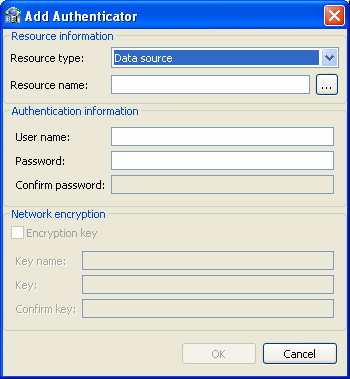
In the User editor, click Add to display the Add Authenticator screen.
-
Select Remote Machine from the Resource type list, as shown in the following figure:
-
Enter the name of the IBM z/OS computer defined in Oracle Studio.
-
Enter the name and password used to access the computer and confirm the password.
-
Click OK.
Modeling Interactions for OracleAS Adapter for CICS
Modeling interactions for OracleAS Adapter for CICS involve defining an Oracle Connect back-end adapter using Oracle Studio. All the definitions specified in Oracle Studio are written to the IBM z/OS platform.
This section contains the following topics:
Configuring an Oracle Connect Adapter
To work with the Oracle Connect, you must configure adapter definitions on the IBM z/OS platform to handle the interactions to and from a CICS program. You use Oracle Studio to specify these definitions.
Perform the following steps:
-
From the Start menu, select Programs, Oracle, and then select Studio.
-
In the Design perspective, Configuration view, expand Machine folder.
-
Expand the machine defined in "Setting Up the IBM z/OS Platform in Oracle Studio".
-
Expand the Bindings. The binding configurations available on this computer are listed.
-
Expand the NAV binding. The NAV binding configuration includes branches for data sources and adapters that are located on the computer.
-
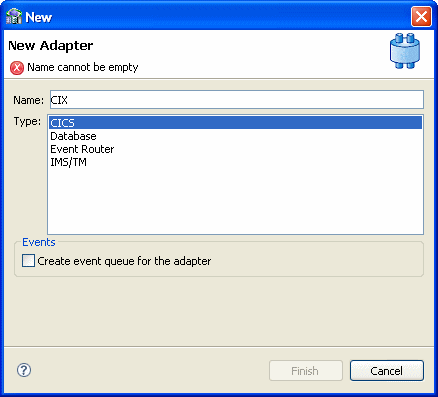
Right-click Adapters and select New Adapter to start the New Adapter wizard.
-
Enter a name for the back-end adapter.
Note:
The word event is a reserved word and cannot be used to name an adapter. -
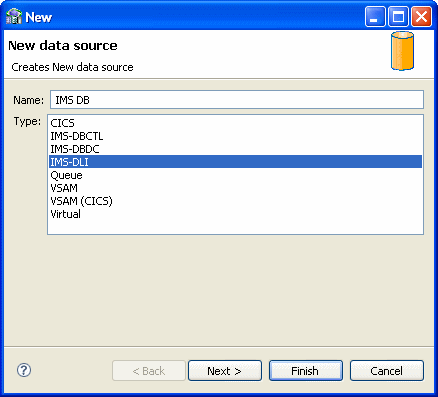
Select CICS as the back-end adapter type from the Type list as shown in the following figure:
-
Select Create event queue for the adapter.
-
Click Finish. The back-end adapter is added to the list and the definition opens for editing.
Note:
Other adapters that are displayed in the Type list are not supported with the version of Oracle Connect installed at the site. -
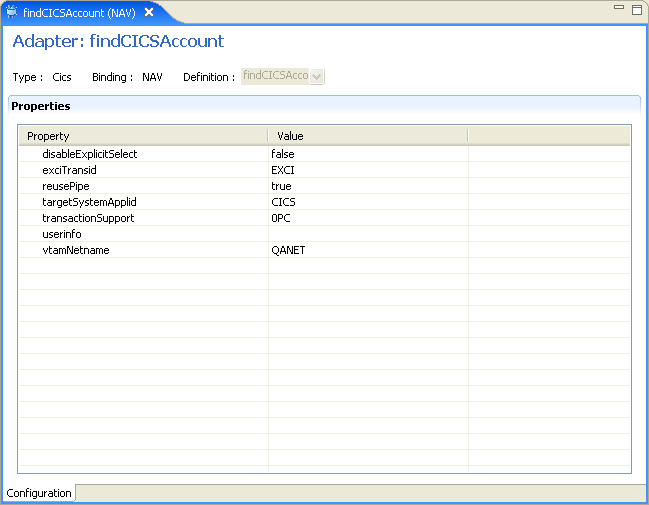
Click the Properties tab and change any of the properties for the adapter, as required.
The Properties tab is shown in the following figure:
The Properties tab comprises fields, as listed in the following table:
Table 2-1 CICS Adapter Properties
Property Description exciTransidThe CICS TRANSID. This value must be EXCI or a copy of this transaction
targetSystemApplidThe VTAM applid of the CICS target system.
You can determine this value by activating the
CEMTtransaction on the target CICS system. On the bottom right corner of the screen appears the legendAPPLID=target_system.transactionSupportFor future use. The level of transaction support for this adapter that is reported to the transaction manager
In the current version leave this value as
0PCvtamNetnameThe VTAM netname of the specific connection being used by EXCI (and MRO) to relay the program call to the CICS target system.
For example, if you issue to
CEMTthe following command:CEMT INQ CONNYou see on the display screen that the netname is BATCHCLI (this is the default connection supplied by IBM upon the installation of CICS). If you plan to use the IBM defaults, then specify
BATCHCLIas the VTAM_netname parameter, otherwise, define a specific connection (with EXCI protocol) and use the netname you provided there for this parameter.
Generating Outbound Interactions
Oracle Connect requires metadata describing the adapter interactions, including the structures used to pass information to and from the adapter.
If COBOL copybooks describing the adapter input and output structures are available, then you can import the adapter definition using the Metadata Import wizard in Oracle Studio Design perspective to generate interaction metadata. If the metadata is provided in multiple COBOL copybooks, with different filter settings (such as whether the first six columns are ignored or not), then you first import the metadata from copybooks with the same settings and later import the metadata from the other copybooks.
If COBOL copybooks describing the input and output structures are not available, then you must manually define the metadata.
The following information is required during the import procedure:
The COBOL copybooks: These are copied to the computer running Oracle Studio as part of the import procedure.
The names of the CICS programs run through the application adapter.
Use the Metadata Import procedure using Oracle Studio to generate interaction metadata, as follows:
-
From the Start menu, select Programs, Oracle, and then select Studio.
-
In the Design perspective, Configuration view, expand Machine folder.
-
Expand the machine defined in "Setting Up the IBM z/OS Platform in Oracle Studio".
-
Expand the Bindings. The binding configurations available on this computer are listed.
-
Expand the NAV binding. The NAV binding configuration includes branches for data sources and adapters that are located on the computer.
-
Expand the Adapters folder.
-
Right-click the CICS adapter you defined in "Configuring an Oracle Connect Adapter" and select Show Metadata View to display the Metadata view, with the CICS back-end adapter displayed under the Adapters list.
-
Right-click the Imports node and select New Import. The New Metadata Import screen is displayed.
-
Enter a name for the import. The name can contain letters and numbers and the underscore character only.
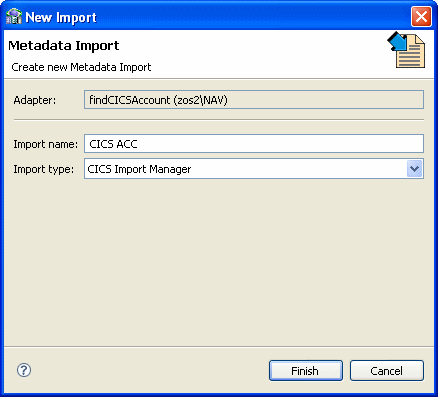
-
Select CICS Import Manager from the Import type list, as shown in the following figure:
-
Click Finish. The Metadata Import wizard is displayed.
-
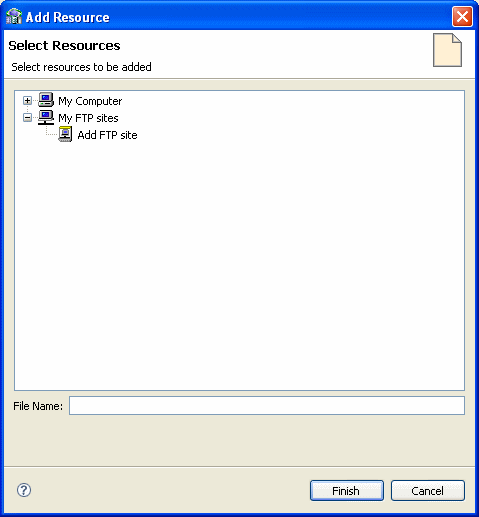
Click Add. The Select Resources screen is displayed, which provides the option to select files from the local computer or copy the files from another computer.
-
If the files are on another computer, then right-click My FTP Sites and select Add. Optionally, double-click Add FTP site. The Add FTP Site screen is displayed.
-
Enter the server name or IP address where the COBOL copybooks reside and enter a valid user name and password to access the computer (if anonymous access is used, click the Anonymous connection check box) then click OK.
The FTP site is added to the list of available sites, as shown in the following figure:
Note:
The selected server is accessed using the user name as the high-level qualifier, which enables you to browse and transfer files. -
Right-click the computer and select Set Transfer Type. Enter the transfer type (
ASCIIorBINARY) and click OK. -
Expand the list of the added site until you find the necessary COBOL files. To change the high-level qualifier, right-click the computer and select Change Root Directory. Enter the new high-level qualifier enclosed in quotes, and click OK.
-
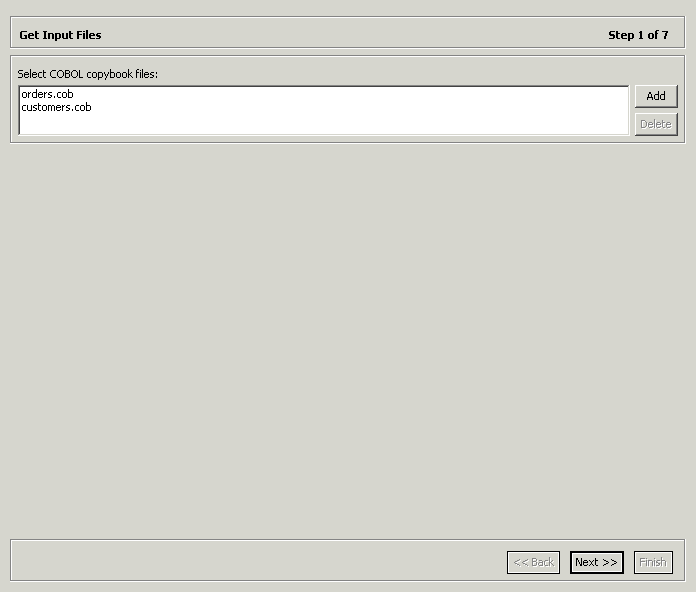
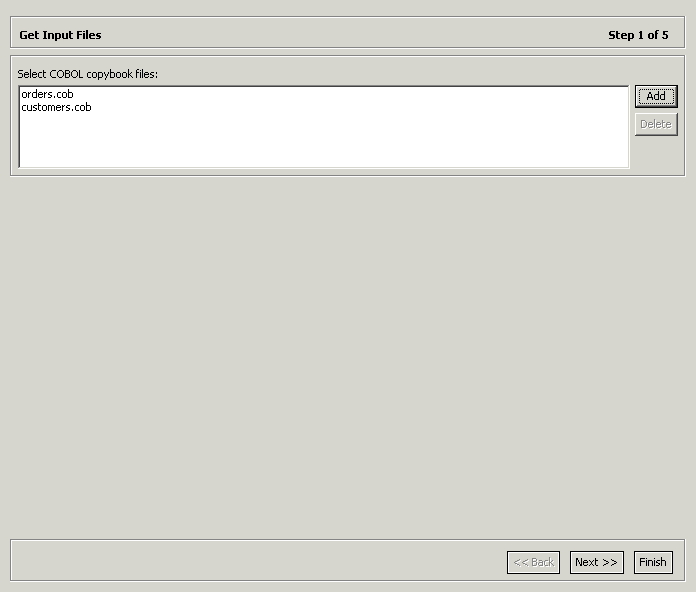
Select the required COBOL copybook file or files and click Finish. The selected file or files are displayed in the Metadata Import wizard as shown in the following figure:
Note:
You can import the metadata from one COBOL copybook and later add to this metadata by repeating the import procedure using different COBOL copybooks.The format of the COBOL copybooks must be identical. That is, you cannot import a COBOL copybook that uses the first six columns with a COBOL copybook that ignores the first six columns. In this type of case you must repeat the import procedure.
-
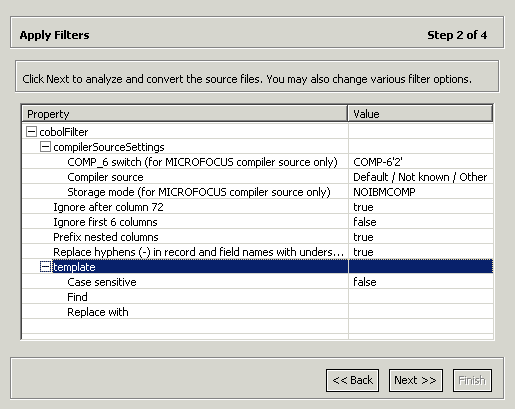
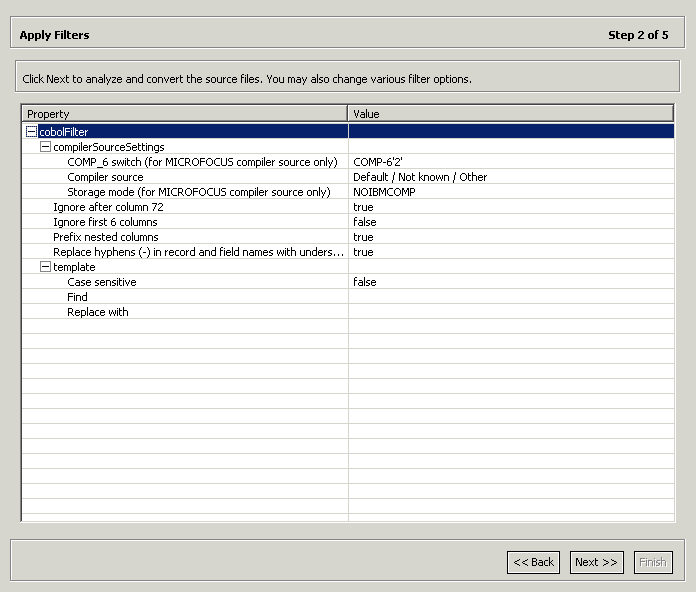
Click Next. The Apply Filters screen is displayed as shown in the following figure.
-
Apply filters to the copybooks, as needed.
The following table lists the available filters:
Filter Description COMP_6 switch
The MicroFocus COMP-6 compiler directive. Specify either COMP-6'1' to treat COMP-6 as a COMP data type or COMP-6'2' to treat COMP-6 as a COMP-3 data type.
Compiler source
The compiler vendor.
Storage mode
The MicroFocus Integer Storage Mode. Specify either
NOIBMCOMPfor byte storage mode orIBMCOMPis for word storage mode.Ignore after column 72
Ignores columns 73 to 80 in the COBOL copybook.
IgnoreFirst6
Ignores the first six columns in the COBOL copybook.
Replace hyphens (-) in record and field names with underscores (_)
Replaces all hyphens in either the record or field names in the metadata generated from the COBOL with underscore characters.
Prefix nested columns
Prefix all nested columns with the previous level heading.
Case sensitive
Specifies whether to be sensitive to the search string case.
Find
Searches for the specified value.
Replace with
Replaces the value specified for Find with the value specified here
-
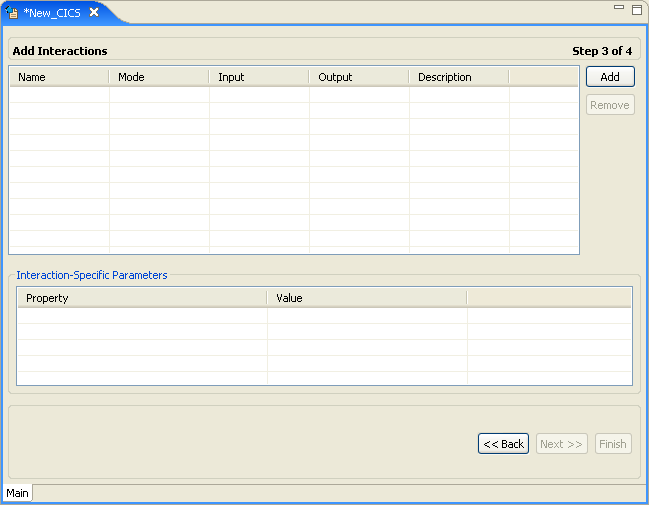
In the import wizard, click Next. The Add Interactions screen is displayed, as shown in the following figure:
-
Click Add to add an interaction for the CICS adapter. Provide the information as listed in the following table:
Table 2-3 Interaction Parameters
Parameter Description NameThe name of the interaction. You can change the default name specified.
ModeThe interaction mode. You can select one of the following:
-
sync-send-receive: The interaction sends a request and expects to receive a response. This is the default mode.
-
sync-receive: The interaction expects to receive a response
-
sync-send: The interaction sends a request and does not expect to receive a response.
InputIdentifies an input record. The input record is the data structure for the interaction. The records generated from the COBOL files specified at the beginning of the procedure are listed. Select the relevant record for the interaction.
Note: You must specify an input record for each interaction before you can click Next. If the interaction does not require an input record, then the record specified here is ignored.
OutputIdentifies an output record. The output record is the data structure for the results of the interaction. The records generated from the files specified at the beginning of the procedure are listed. Select the relevant record for the interaction.
Note: You must specify an output record for the interaction if the mode is set to sync-send-receive or sync-receive, before you can click Next.
DescriptionFree text describing the interaction.
Interaction-Specific ParametersCICS specific parameters:
-
commitMode: The interaction commit mode. -
maxSegmentSize: The maximum size of the segment. The default value is 32768 (bytes). -
transaction: The name of the transaction that runs. You must specify a transaction name for each interaction.
The
maxSegmentSizeparameter enables dynamically splitting large messages into smaller segments. Although the default value can be changed, the logic of CICS transaction must correspond accordingly. The transaction must perform a GU call followed by a series of GN calls to compile the entire input message. A transaction output message, larger than 32K, is handled by the OTMS C/I interface which performs the task of assembling the output segments into a single buffer. -
-
Add as many interactions as necessary and click Next to generate the metadata definitions for the adapter.
-
For Do you want to transfer the metadata to the server, click Yes to transfer the data from the Windows computer to the IBM z/OS computer and click Finish.
The metadata is imported based on the options specified and it is stored on the IBM z/OS platform. An XML representation of the metadata is also generated.
After performing the import, you can view the metadata in Oracle Studio Design perspective Metadata tab. You can also make any fine adjustments to the metadata and maintain it, as necessary.
See Also:
Appendix A, "Advanced Tuning of the Metadata" for details about fine tuning the adapter metadata.
Generating Inbound Interactions
Inbound interactions are defined as events in Oracle Studio. When you defined the Oracle Connect for CICS back-end adapter with Events selected, as described in Configuring an Oracle Connect Adapter, an event adapter was defined automatically. The event adapter is defined with the same name as the back-end adapter with the word event appended to it. The back-end adapter and the event adapter are linked by Oracle Studio.
You can skip from the adapter definition to the event definition by right-clicking the adapter or event in the Configuration Explorer list and selecting the Linked Event or Linked Adapter option, respectively.
The event adapter requires metadata describing the inbound interactions, including the structure used to pass information.
Note:
The generation of inbound interactions involves similar steps to the steps described to generate outbound interactions. For details, see "Generating Outbound Interactions".Use the Metadata Import procedure in Oracle Studio to generate interaction metadata, as follows:
-
In the Configuration Explorer, right-click the CICS back-end adapter defined in "Configuring an Oracle Connect Adapter".
-
Select Linked Event, to skip to the event adapter.
-
Right-click the event adapter and select Edit Event.
-
Select the Properties tab to add the names of Oracle Application Server users who can retrieve inbound interactions and z/OS users who can send inbound interactions.
-
To add Oracle Application Server users, expand the Routers node and right-click the users property to add the user. The Properties tab is shown in the following figure:
-
Enter the name of Oracle Application Server user in the Value column for the item added.
-
To add z/OS users, expand the Senders node and right click the users property to add the user.
-
Enter the name of the z/OS user in the Value column for the item added.
-
Click Save to save the changes.
-
Right-click the event adapter in the Configuration Explorer and select Edit metadata, to display the Metadata tab, with the event adapter displayed under the Events list.
-
Right-click the Imports node and select New Import. The New Import screen is displayed.
-
Enter a name for the import. The name can contain letters and numbers and the underscore character only.
-
Select Event Queue Import Manager Using Cobol COPYBOOK Input Files as the import type, and click Finish.
The New Import screen is shown in the following figure:
After defining an import type, the metadata import wizard opens in Oracle Studio. COBOL copybooks are used to create the metadata. The import wizard generates record structures, which are used for the record structures for inbound interactions.
-
Click Add in the Metadata Import wizard. The Select Resources screen is displayed, which provides the option to select files from the local computer or copy the files from another computer.
-
If the files are on another computer, then right-click My FTP Sites and select Add. Optionally, double-click Add FTP Site. The Add FTP Site screen is displayed.
-
Enter the server name or IP address where the COBOL copybooks reside and enter a valid user name and password to access the computer (if anonymous access is used, click Anonymous connection) then click OK. The FTP site is added to the list of available sites.
Note:
The selected server is accessed using the user name as the high-level qualifier, enabling you to browse and transfer files.The Add Resource screen is shown in the following figure:
-
Right-click the computer and select Set Transfer Type. Enter the transfer type (ASCII or BINARY) and click OK.
-
Expand the node of the added site and locate the necessary COBOL files. To change the high-level qualifier, right-click the computer and select Change Root Directory. Enter a high-level qualifier enclosed in quotes, and click OK.
-
Select the file or files and click Finish. The selected file or files are displayed in the metadata import wizard, as shown in the following figure:
-
In the Import wizard, click Next. The Apply Filters screen is displayed as shown in the following figure:
-
Apply filters to the copybooks. The following table lists the available filters:
Filter Description COMP_6 switch
The MicroFocus COMP-6 compiler directive. Specify either COMP-6'1' to treat COMP-6 as a COMP data type or COMP-6'2' to treat COMP-6 as a COMP-3 data type.
Compiler source
The compiler vendor.
Storage mode
The MicroFocus Integer Storage Mode. Specify either NOIBMCOMP for byte storage mode or IBMCOMP is for word storage mode.
Ignore after column 72
Ignores columns 73 to 80 in the COBOL copybook.
IgnoreFirst6
Ignores the first six columns in the COBOL copybook.
Replace hyphens (-) in record and field names with underscores (_)
Replaces all hyphens in either the record or field names in the metadata generated from the COBOL with underscore characters.
Prefix nested columns
Prefix all nested columns with the previous level heading.
Case sensitive
Specifies whether to be sensitive to the search string case.
Find
Searches for the specified value.
Replace with
Replaces the value specified for Find with the value specified here
-
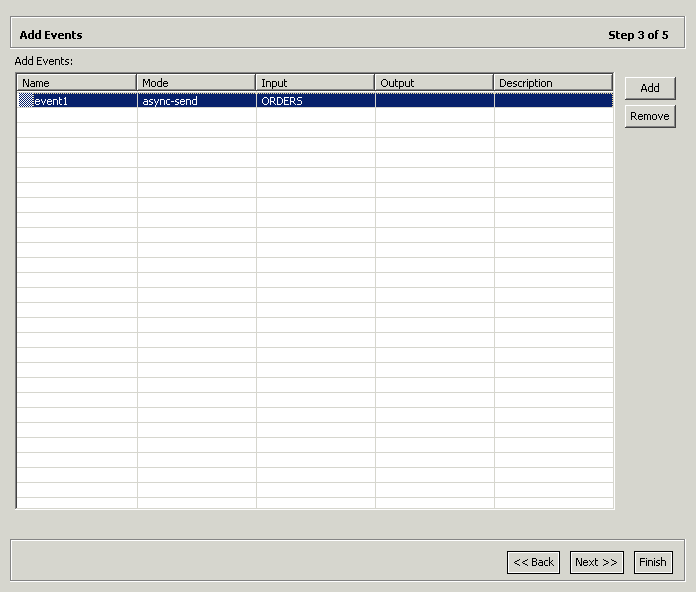
Click Next. The Add Events screen is displayed.
-
Click Add to add an event for the CICS adapter and provide the following information:
Parameter Description NameThe name of the event. You can change the default name specified.
ModeThe event mode. You can select the async-send mode, which is the event sends a request and does not expect to receive a response.
InputIdentifies an input record. The input record is the data structure for the event. The records generated from the COBOL files specified at the beginning of the procedure are listed. Select the relevant record for the event.
Note: You must specify an input record for each event before you can click Next. If the interaction does not require an input record, then the record specified here is ignored.
DescriptionFree text describing the event.
The Add Events screen is shown in the following figure:
-
Add the required events.
-
Click Next to generate the metadata definitions for the adapter.
-
For Do you want to transfer the metadata to the server, click Yes to transfer the data from the Windows computer to the IBM z/OS computer, and click Finish, as shown in the following figure:
The metadata is imported based on the options specified and it is stored on the IBM z/OS platform. An XML representation of the metadata is also generated.
After performing the import, you can view the metadata in Oracle Studio Design perspective Metadata tab. You can also make any fine adjustments to the metadata and maintain it, as necessary.
See Also:
Appendix A, "Advanced Tuning of the Metadata" for details about fine tuning the adapter metadata.Modeling Interactions for OracleAS Adapter for CICS Queue
Modeling interactions for OracleAS Adapter for CICS Queue involves defining an Oracle Connect back-end adapter using Oracle Studio. All the definitions specified in Oracle Studio are written to the IBM z/OS platform.
This section contains the following topics:
Preliminary Considerations
CICS TD queues can receive events with different structures. Therefore it is essential to appropriately pre-plan the mapping of these events, based on the various applications that write to these queues. If events with different structures are written to a queue, then use variants. These variants enable you to pre-define the fields which are used to identify the events that are read from the queue.
Queuing systems use headers which provide metadata for events written to its queues. When headers are used, each event is made of the header part and the data part. The header contains fields which represent the common fields of all the variants defined in the main record (AR_RECKEY in "Adapter Definition"), and variants which define multiple event types.
The adapter definition includes the eventHeader boolean parameter, which determines the structure of the event records. When set to true, it indicates that the payload of each event has the following structure:
<event-name> <header... header-attributes/> <data ...> ... </data></event-name>
Where header-attributes represent the common fields of all the variants defined.
If simple records are used, then the header field contains no fields and the data is simply the entire named record. When complex records are used (in this case, with a variant field), then the remaining header fields are the fields from the first level of the header's eventsRecord field, and the data part for a specific instance of an event is the Case of the variant field, as defined by the header's eventsVariantField parameter.
When the eventHeader parameter is set to false, CICS Queue handles the payload of each event as a single record structure. This record can be simple or complex (with variants). This is useful when the queue contains only one type of events.
The COBOL copybook used for the CICS Queue adapter metadata should be prepared in advance. This file should include the various event types that are sent to the CICS Queue. Next, you should prepare a file in cob_adl format (for more information, see "COB_ADL Format"), which includes the variant description: the redefined record, the selector field and the values for the variant cases in the order of appearance in the COBOL copybook (these files are used in the metadata import procedure for the OracleAS Adapter for CICS Queue).
The methodology for preparing a single, suitable COBOL copybook that is imported as part of the Queue adapter metadata definition, is as follows:
-
Copying a common root record which includes a SELECTOR field, and placing it as the root record in a new copybook.
-
Copying the REDEFINED records, and placing them under the root record.
-
The first record is copied as is.
-
The subsequent records are also copied, but a code line, which sets the redefinition of the first record (REDEFINE), is added to each of them.
-
Example 2-1 Adapter Definition
Consider the following adapter definition sample. It is the metadata generated after importing the required files for the Queue adapter.
<?xml version="1.0" encoding="UTF-8"?>
<adapterDef type="CICSQ" transactionLevelSupport="2PC" name="sela_q1">
   <adapterSpec eventsHeader="false" eventsRecord="AR_RECORD"     eventsVariantField="VAR_0" />
   <schema noAlignment="true">
      <record name="AR_RECORD">
         <field name="AR_SELECTOR" type="string" nativeType="numstr_u" size="3" />
         <field name="AR_RECKEY" type="AR_RECORD__AR_RECKEY" />
         <field name="VAR_0" type="AR_RECORD__VAR_0" selector="AR_SELECTOR" />
      </record>
      <record name="AR_RECORD__AR_RECKEY">
         <field name="AR_INST" type="string" nativeType="string" size="2" />
      </record>
      <variant implicit="true" name="AR_RECORD__VAR_0">
         <field name="AR_CNTL_RECORD" type="AR_RECORD__VAR_0__AR_CNTL_RECORD"            case="1" />
         <field name="AR_TIR_RECORD" type="AR_RECORD__VAR_0__AR_TIR_RECORD"            case="2" />
         <field name="AR_TCR_RECORD" type="AR_RECORD__VAR_0__AR_TCR_RECORD"            case="3" />
      </variant>
      <record name="AR_RECORD__VAR_0__AR_CNTL_RECORD">
         <field name="AR_CNTL_ROOT" type="AR_RECORD__VAR_0__AR_CNTL_RECORD__AR            _CNTL_ROOT" />
         <field name="AR_CNTL_SEGMENT" type="AR_RECORD__VAR_0__AR_CNTL_RECORD__AR            _CNTL_SEGMENT" />
      </record>
      <record name="AR_RECORD__VAR_0__AR_CNTL_RECORD__AR_CNTL_ROOT">
         <field name="AR_CNTL_CTR" type="string" nativeType="numstr_u" size="3" />
         <field name="FILLER" type="string" nativeType="string" size="6" />
      </record>
      <record name="AR_RECORD__VAR_0__AR_CNTL_RECORD__AR_CNTL_SEGMENT">
         <field name="AR_CN_KEY" type="AR_RECORD__VAR_0__AR_CNTL_RECORD__AR_CNTL            _SEGMENT__AR_CN_KEY" />
      </record>
      <record name="AR_RECORD__VAR_0__AR_CNTL_RECORD__AR_CNTL_SEGMENT__AR_CN_KEY">
       <field name="AR_CN_TIR_CTR" type="string" nativeType="numstr_u" size="3" />
       <field name="AR_CN_TCR_CTR" type="string" nativeType="numstr_u" size="3" />
      </record>
      <record name="AR_RECORD__VAR_0__AR_TIR_RECORD">
         <field name="AR_TIR_ROOT" type="AR_RECORD__VAR_0__AR_TIR_RECORD__AR_TIR            _ROOT" />
         <field name="AR_TIR_SEGMENT" array="100" type="AR_RECORD__VAR_0__AR_TIR            _RECORD__AR_TIR_SEGMENT" />
      </record>
      <record name="AR_RECORD__VAR_0__AR_TIR_RECORD__AR_TIR_ROOT">
         <field name="AR_TIR_CTR" type="string" nativeType="numstr_u" size="3" />
         <field name="FILLER2" type="string" nativeType="string" size="6" />
      </record>
      <record name="AR_RECORD__VAR_0__AR_TIR_RECORD__AR_TIR_SEGMENT">
         <field name="AR_TI_KEY" type="AR_RECORD__VAR_0__AR_TIR_RECORD__AR_TIR            _SEGMENT__AR_TI_KEY" />
         <field name="AR_TI_HRS_RANGE" type="AR_RECORD__VAR_0__AR_TIR_RECORD__AR            _TIR_SEGMENT__AR_TI_HRS_RANGE" />
      </record>
      <record name="AR_RECORD__VAR_0__AR_TIR_RECORD__AR_TIR_SEGMENT__AR_TI_KEY">
         <field name="AR_TI_CLASS" type="string" nativeType="string" size="3" />
         <field name="AR_TI_RESID" type="string" nativeType="string" size="1" />
         <field name="AR_TI_COLL" type="string" nativeType="string" size="2" />
         <field name="AR_TI_MAJOR" type="string" nativeType="string" size="4" />
         <field name="AR_TI_SPPGM" type="string" nativeType="string" size="3" />
      </record>
      <record name="AR_RECORD__VAR_0__AR_TIR_RECORD__AR_TIR_SEGMENT__AR_TI_HRS        _RANGE">
         <field name="AR_TI_LO_HR" type="string" nativeType="numstr_u" size="2" />
         <field name="AR_TI_HI_HR" type="string" nativeType="numstr_u" size="2" />
      </record>
      <record name="AR_RECORD__VAR_0__AR_TCR_RECORD">
         <field name="AR_TCR_ROOT" type="AR_RECORD__VAR_0__AR_TCR_RECORD__AR_TCR            _ROOT" />
         <field name="AR_TCR_SEGMENT" array="99" type="AR_RECORD__VAR_0__AR_TCR            _RECORD__AR_TCR_SEGMENT" />
      </record>
      <record name="AR_RECORD__VAR_0__AR_TCR_RECORD__AR_TCR_ROOT">
         <field name="AR_TCR_CTR" type="string" nativeType="numstr_u" size="3" />
         <field name="FILLER3" type="string" nativeType="string" size="6" />
      </record>
      <record name="AR_RECORD__VAR_0__AR_TCR_RECORD__AR_TCR_SEGMENT">
       <field name="AR_TC_KEY" type="AR_RECORD__VAR_0__AR_TCR_RECORD__AR_TCR          _SEGMENT__AR_TC_KEY" />
       <field name="AR_TC_HOURS" type="string" nativeType="numstr_u" size="2" />
       <field name="AR_TC_TUIT_TYPE" type="string" nativeType="string" size="1" />
      </record>
      <record name="AR_RECORD__VAR_0__AR_TCR_RECORD__AR_TCR_SEGMENT__AR_TC_KEY">
         <field name="AR_TC_COURS" type="string" nativeType="string" size="11" />
      </record>
   </schema>
</adapterDef>
The following is a sample of three COBOL copybooks. Note the common AR-RECORD record (marked in bold) in each copybook. This field is used as the root record of the final copybook.
01  AR-RECORD1.
  03  AR-SELECTOR             PIC 9(03).
    03  AR-RECKEY.
        05  AR-INST             PIC X(02).
**
**  CONTROL RECORD
**
    03  AR-CNTL-RECORD.
        05  AR-CNTL-ROOT.
            07  AR-CNTL-CTR     PIC 9(03).
            07  FILLER          PIC X(06).
        05  AR-CNTL-SEGMENT.
            07  AR-CN-KEY.
                09  AR-CN-TIR-CTR  PIC 9(03).
                09  AR-CN-TCR-CTR  PIC 9(03).


01  AR-RECORD2.
  03  AR-SELECTOR             PIC 9(03).
    03  AR-RECKEY.
        05  AR-INST             PIC X(02).
**
**  TIR - INSTITUTIONAL TUITION RATES.
**
    03  AR-TIR-RECORD.
        05  AR-TIR-ROOT.
            07  AR-TIR-CTR      PIC 9(03).
            07  FILLER          PIC X(06).
        05  AR-TIR-SEGMENT   OCCURS 100 TIMES.
            07  AR-TI-KEY.
                09  AR-TI-CLASS PIC X(03).
                09  AR-TI-RESID PIC X(01).
                09  AR-TI-COLL  PIC X(02).
                09  AR-TI-MAJOR PIC X(04).
                09  AR-TI-SPPGM PIC X(03).
            07  AR-TI-HRS-RANGE.
                09  AR-TI-LO-HR PIC 9(02).
                09  AR-TI-HI-HR PIC 9(02).


01  AR-RECORD3.
  03  AR-SELECTOR             PIC 9(03).
    03  AR-RECKEY.
        05  AR-INST             PIC X(02).
**  TCR - COURSE TUITION AND FEES.
**
    03  AR-TCR-RECORD.
        05  AR-TCR-ROOT.
            07  AR-TCR-CTR      PIC 9(03).
            07  FILLER          PIC X(06).
        05  AR-TCR-SEGMENT   OCCURS 99 TIMES.
            07  AR-TC-KEY.
                09  AR-TC-COURS PIC X(11).
            07  AR-TC-HOURS     PIC 9(02).
            07  AR-TC-TUIT-TYPE PIC X(01).
The following provides an example of the final COBOL copybook. Note the first record has been copied "as is", while the subsequent records have a REDEFINE appended to them.
01  AR-RECORD.
  03  AR-SELECTOR             PIC 9(03).
    03  AR-RECKEY.
        05  AR-INST             PIC X(02).
**
**  CONTROL RECORD
**
    03  AR-CNTL-RECORD.
        05  AR-CNTL-ROOT.
            07  AR-CNTL-CTR     PIC 9(03).
            07  FILLER          PIC X(06).
        05  AR-CNTL-SEGMENT.
            07  AR-CN-KEY.
                09  AR-CN-TIR-CTR  PIC 9(03).
                09  AR-CN-TCR-CTR  PIC 9(03).
**
**  TIR - INSTITUTIONAL TUITION RATES.
**
    03  AR-TIR-RECORD   REDEFINES   AR-CNTL-RECORD.
        05  AR-TIR-ROOT.
            07  AR-TIR-CTR      PIC 9(03).
            07  FILLER          PIC X(06).
        05  AR-TIR-SEGMENT   OCCURS 100 TIMES.
            07  AR-TI-KEY.
                09  AR-TI-CLASS PIC X(03).
                09  AR-TI-RESID PIC X(01).
                09  AR-TI-COLL  PIC X(02).
                09  AR-TI-MAJOR PIC X(04).
                09  AR-TI-SPPGM PIC X(03).
            07  AR-TI-HRS-RANGE.
                09  AR-TI-LO-HR PIC 9(02).
                09  AR-TI-HI-HR PIC 9(02).
**
**  TCR - COURSE TUITION AND FEES.
**
    03  AR-TCR-RECORD   REDEFINES   AR-CNTL-RECORD.
        05  AR-TCR-ROOT.
            07  AR-TCR-CTR      PIC 9(03).
            07  FILLER          PIC X(06).
        05  AR-TCR-SEGMENT   OCCURS 99 TIMES.
            07  AR-TC-KEY.
                09  AR-TC-COURS PIC X(11).
            07  AR-TC-HOURS     PIC 9(02).
            07  AR-TC-TUIT-TYPE PIC X(01).
COB_ADL Format
The following provides an example of the variant description file, which must comply to cob_adl format:
variant_record_name, selector_field_name, "case1", "case2",..., "caseN"
For the above samples, the variant description file is as follows:
AR-CNTL-RECORD, AR-SELECTOR, "1", "2", "3"
CICS TD Queue Sample
The following is sample of the commands used to define a CICS TD Queue on the z/OS platform:
CEDA DEFINE TDQUEUE

 TDqueue      ==> YTST
 Group        ==> ATY
 DEscription  ==>
 TYPE         ==> INTra              Extra | INTra | INDirect
EXTRA PARTITION PARAMETERS
 DAtabuffers    :                    1-255
 DDname         :
 DSname         :
 Sysoutclass    :
 Erroroption    :                    Ignore | Skip
 Opentime       :                    Initial | Deferred
 REWind         :                    Leave | Reread
 TYPEFile       :                    Input | Output | Rdback
 RECORDSize     :                    0-32767
 BLOCKSize      :                    0-32767
 RECORDFormat   :                    Fixed | Variable
 BLOCKFormat    :                    Blocked | Unblocked

INTRA PARTITION PARAMETERS
 Atifacility  ==> File               Terminal | File | System
 RECOVstatus  ==> Logical            No | Physical | Logical
 Facilityid   ==>
 TRAnsid      ==>
 TRIggerlevel ==> 00000              0-32767

Userid       ==>
NDOUBT ATTRIBUTES
WAIT         ==> Yes                No | Yes
WAITAction   ==> Reject             Queue | Reject
NDIRECT PARAMETERS
Indirectname   :
EMOTE PARAMETERS
REMOTEName   ==>
REMOTESystem ==>
The ATYGTEVT CICS Program
The ATYGTEVT CICS program returns events from the CICS Transient Data Queue.
For the CICS programs to work transactionally with the TD queues, the TD queues must be set to Logically Recoverable, where only one task at a time can write to the TD queue and only when that task ends (or when it issues a sync-point) can other tasks write to that queue.
To use the ATYGTEVT program, perform the following steps:
-
Copy the program from
NAVROOT.LOADto a CICSDFHRPLlibrary (such asCICS.USER.LOAD). -
Define the
ATYGTEVTprogram under CICS using any available group (such asATYgroup) as follows:CEDA DEF PROG(ATYGTEVT) G(ATY) LANG(C) DA(ANY) DE(ORACLE CICSQ GET EVENTS)
-
Install the
ATYGTEVTprogram as follows:CEDA IN G(ATY)
Configuring the CICS Queue Adapter
To work with the Oracle Connect, you must configure adapter definitions on the IBM z/OS platform to handle the interactions from a CICS queue. You use Oracle Studio to specify these definitions.
Perform the following steps:
-
From the Start menu, select Programs, Oracle, and then select Studio.
-
Expand the Machines folder.
-
In the Design perspective, Configuration view expand the computer defined in "Setting Up the IBM z/OS Platform in Oracle Studio".
-
Expand the Bindings. The binding configurations available on this computer are listed.
-
Expand the NAV binding. The NAV binding configuration includes branches for data sources, adapters, and events that are located on the computer.
-
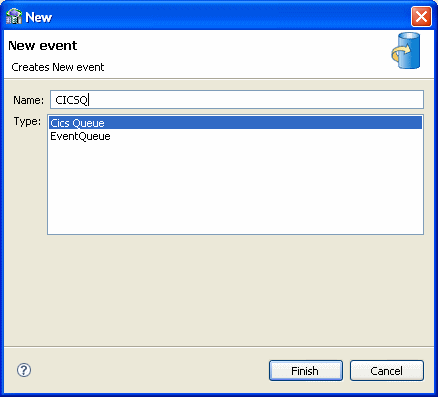
Right-click Events and select New Event to open the New Event wizard.
-
Enter a name for the queue event.
Note:
The word event is a reserved word and cannot be used to name an event. -
Select CICS Queue as the event type from the Type list, as shown in the following figure:
-
Click Finish.
Note:
Other events that are displayed in the Type list are not supported with the version of Oracle Connect installed at the site.
Generating Outbound Interactions
OracleAS adapter for CICS Queue requires metadata describing the interaction, including the structure used to pass information.
During the import procedure, a COBOL copybook file and a variant description file are copied to the computer running Oracle Studio.
Perform the following steps to generate the interaction metadata:
-
From the Start menu, select Programs, Oracle, and then select Studio.
-
Expand the Machines folder.
-
In the Design perspective, Configuration view expand the computer defined in "Setting Up the IBM z/OS Platform in Oracle Studio".
-
Expand the Bindings. The binding configurations available on this computer are listed.
-
Expand the NAV binding. The NAV binding configuration includes branches for data sources, adapters, and events that are located on the computer.
-
Expand the Events folder and select the CICS Queue you created in "Configuring the CICS Queue Adapter".
-
Expand the Bindings. The binding configurations available on this computer are listed.
-
Right-click the queue adapter and select Show in Metadata View.
The Metadata tab is displayed, with the queue adapter displayed under the Adapters list.
-
Right-click Imports and select New Import.
The New Import screen is displayed.
-
Enter a name for the import. The name can contain letters, numbers and the underscore character only.
-
Select CICS Queue Import Manager from the Import Type list.
-
Click Finish.
After defining an import type, the metadata import wizard opens in Oracle Studio. COBOL copybooks are used to create the metadata. The import wizard generates record structures, which are used to define the records for outbound interactions.
-
Click Add in the Metadata Import wizard. The Select Resources screen is displayed (Figure 2-20), which provides the option to select files from the local computer or copy the files from another computer.
-
If the files are on another computer, then right-click My FTP Sites and select Add. Optionally, double-click Add FTP Site. The Add FTP Site screen is displayed.
-
Enter the server name or IP address where the COBOL copybooks reside and enter a valid user name and password to access the computer (if anonymous access is used, click Anonymous connection) then click OK. The FTP site is added to the list of available sites.
Note:
The selected server is accessed using the user name as the high-level qualifier, enabling you to browse and transfer files.The Select Resource screen is shown in the following figure:
-
Right-click the computer and select Set Transfer Type. Enter the transfer type (ASCII or BINARY) and click OK.
-
Expand the node of the added site and locate the necessary COBOL files. To change the high-level qualifier, right-click the computer and select Change Root Directory. Enter a high-level qualifier enclosed in quotes, and click OK.
-
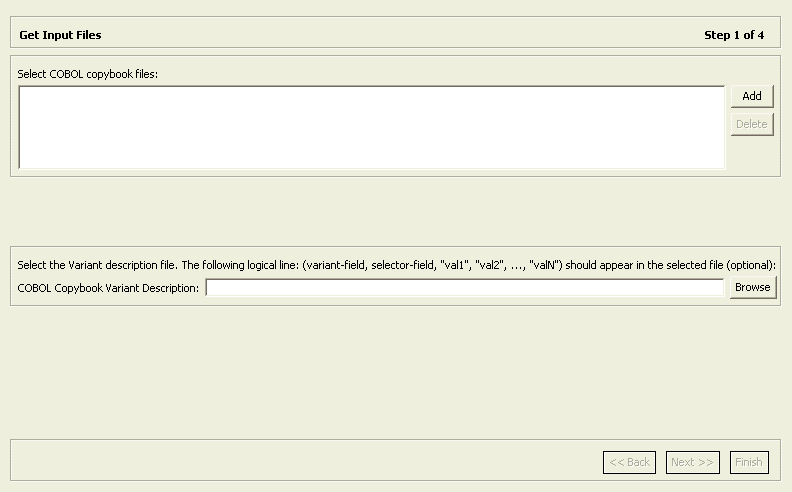
Select the file or files and click Finish. The selected file or files are displayed in the metadata import wizard.
-
Click Browse, and navigate to the variant description COBOL file. If required, repeat steps 2-6, described above.
-
Click Finish.
-
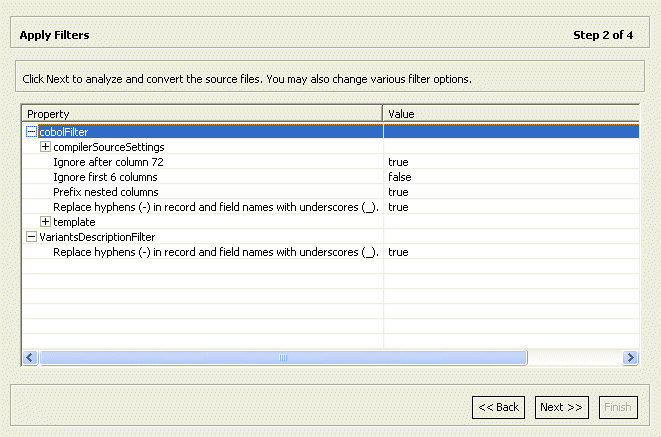
In the Import wizard, click Next.
The Apply Filters screen is displayed as shown in the following figure:
-
Apply filters to the copybooks. The available filters are listed in the table below. In addition, if required, apply the variant description filter.
-
Click Next.
The Configure Adapter Specification screen is displayed, as shown in the following figure:
Figure 2-23 The Configure Adapter Specification screen
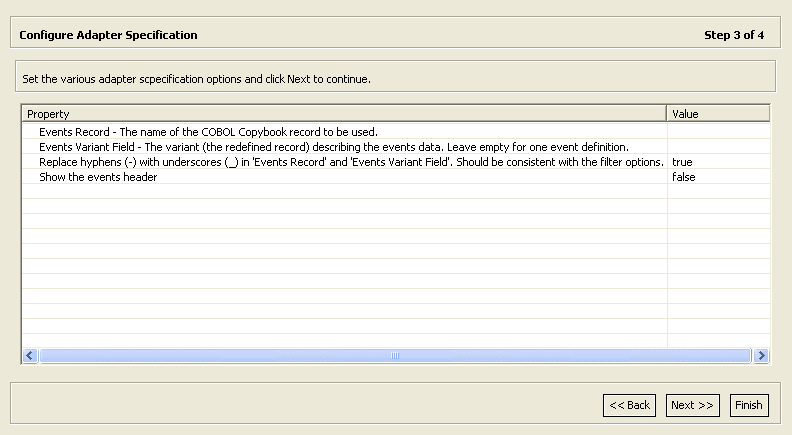
Description of "Figure 2-23 The Configure Adapter Specification screen"
-
In the Value column of the Events Record field, enter the name of the COBOL Copybook record that is used.
-
In the Value column of the Events Variant Field field, enter the name of the variant (the redefined record) which describes the relevant event's data. This property should be specified only ,if multiple event types are expected. Otherwise leave blank.
-
Specify whether to replace hyphens (
true/false). -
Specify whether to show the events header in the metadata (
true/false). -
Click Next to generate the metadata definitions for the adapter.
-
For Do you want to transfer the metadata to the server, click Yes to transfer the data to the IBM z/OS computer, and click Finish.
Viewing the XML Schema
The XML schema describing the adapter interactions can be viewed by selecting the Source tab when you view the metadata as XML. For more information, see Appendix E, "Editing XML Files in Oracle Studio".
Creating XML Schemas
The XML schema describing the adapter interactions and the input and output records for these interactions are created automatically during the import procedure, as described in "Generating Outbound Interactions" and in "Generating Inbound Interactions".
