5 Configuring an OracleAS Adapter for IMS/DB for Outbound Interactions
This chapter provides an example for creating an OracleAS adapter for IMS/DB. To work with an OracleAS adapter for IMS/DB, you must also configure either a BPEL process or a Mediator process. For information on using BPEL or Mediator, see Creating the Project in JDeveloper Examples.
Creating Outbound Interactions with the OracleAS Adapter for IMS/DB
To work with the OracleAS Adapter for IMS/DB and create outbound interactions you must create an IMS/DB data source, import the metadata from IMS/DB, create a database adapter, then create interactions that are used to access the data.
Adding the IMS/DB Hospital Data Source
To create an IMS/DB data source you must do the following:
Prepare the System
Make sure that the Hospital database is available under IMS/DB on the Mainframe computer.
Set up Machine Access to Oracle Connect
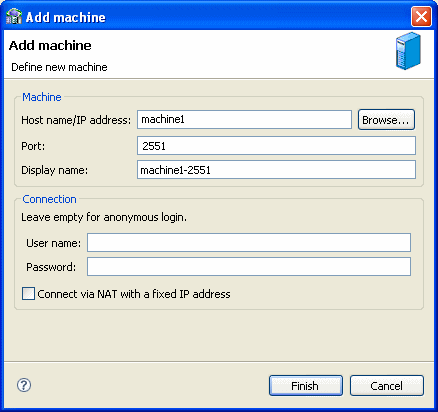
You begin by configuring access to the Mainframe computer with your IMS/DB data. You configure this access with Oracle Connect. Open Oracle connect and follow the directions Setting Up the IBM z/OS Platform in Oracle Studio. Enter the following information in the Add machine dialog box:
-
Host name/IP address: Enter the name or IP address for the Mainframe computer whith the Hospital database. This should be installed in the same directory as Oracle Connect.
-
Port: Enter the port number where the daemon is running. The default port is 2551.
-
Display name: You do not need to enter any information in this field (By default, the display name is the host name and the port number).
-
User name: If the computer you are accessing needs an administrator password. If so enter the name o f the computer's administrator.
-
Password: If necessary, enter the computer administrator's password.
-
Connect via NAT with fixed IP address: Select this if the machine uses the NAT (Network Address Translation) firewall protocol, with a fixed configuration, mapping each external IP to one internal IP, regardless of the port specified.
The following figure shows the Add Machine dialog box with the correct information:
Add an IMS/DB Data Source
After you add the computer configuration to Oracle Studio, you can add your IMS/DB data source to the Configuration view. To add an IMS/DB data source, do the following:
-
Expand the computer you just added and then expand the NAV binding.
-
Right-click the Data sources folder and then select New data source.
-
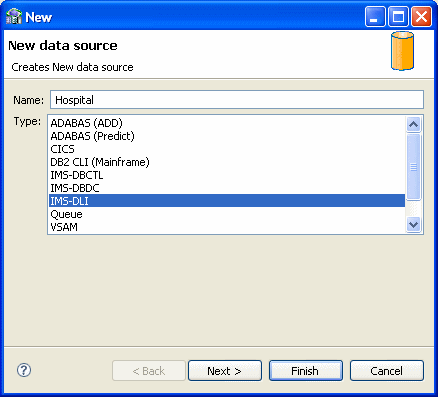
In the New data source dialog box, type Hospital in the Name field.
-
In the Type field, select IMS-DLI and then click Finish. You do not need to add any additional connection information.
For detailed information on adding the IMS/DB data source, see Configuring the Data Source Driver.
The following figure shows the Add data source dialog box with the correct information:
Import the Metadata
You now import the metadata from the IMS/DB data into the data source. For information on how to import data, see Importing Metadata for the IMS/DB Data Source.
In this example you should import the metadata for the Doctor and Patient coluumns of the Hospital database. This database is supplied as an example with Oracle Connect and should be installed when you install Oracle Connect on your Mainframe computer.
You need the following information for the metadata import:
-
In the Get Input Files step, add the files,
hospital.dbd,hospital.cob, andhospital.psb. -
In the Apply Filters step, just click Next.
-
In the Select Tables step, select DOCTOR and PATIENT.
-
In the Match DBD to COBOL screen, click Next.
-
In the Import Manipulation step, click Next.
-
In the Metadata Model Selection step, select Default value for all tables, then click Next.
-
In the Import Metadata step, select Yes and then click Finish.
Create the findDoctor and findPatient Interactions
You use a database adapter to create the interactions used to get the data that you need. The interactions are used as services when you set up the endpoint in JDeveloper. For more information on using JDeveloper to create an endpoint, see Creating the Project in JDeveloper Examples.
Do the following to create the interactions.
Add a Database Adapter
You now create a database adapter, which lets you create interactions to get the information you are seeking. To create a database adapter, do the following
-
Expand the computer you just added and then expand the NAV binding.
-
Right-click the Adapters folder and then select New adapter.
-
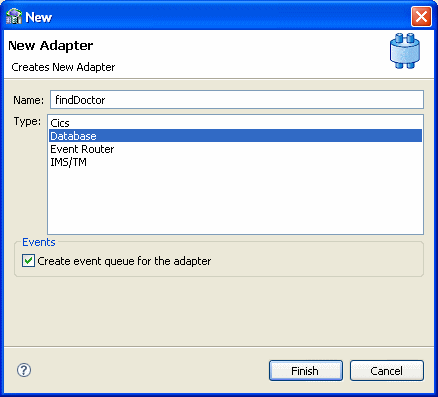
Enter the following information for your adapter, then click Finish.
-
Name: findDoctor
-
Type: Database
-
Select Create event queue for the adapter.
-
For a detailed explanation on how to set up a database adapter, see Setting Up an Oracle Connect Adapter.
The following figure shows the Add adapter dialog box with the correct information:
Create Interactions
You create interactions to work with the data under the Oracle Application Server. You use the interactions that you create when you create your endpoint using JDeveloper. In this example, you should create an interaction called findDoctor. To create an intearction, do the following:
-
Expand the computer you just added and then expand the NAV binding.
-
Right-click the adapter you are using and select Show in Metadata.
-
Right-click Interactions and select New.
-
Enter the following information for in the wizard, then click Finish.
-
Name: findDoctor
-
Type: Database
-
Select Create event queue for the adapter.
-
-
In Creation Mode: select Manual, and Database query.
-
Interaction Name:
findDoctor. -
Select Create New Query
-
Create a Select statement find a doctor in the database.
For detailed information on how to create an interaction, see Generating Outbound Interactions.
Save all of your infomation and exit Oracle Studio.
Create the JCA Configuration Files
You must create both a WSDL and JCA file to set up your connection with JDeveloper. You create the files using Oracle Studio before setting up the BPEL process or Mediator connections.
For information on how to create JCA configuration files, see Creating JCA Configuration Files. To create the files for the findDoctor adapter, do the following:
-
From the Cofiguration pane in Oracle Studio, expand the NAV binding and the Adaper folder.
-
Right-click the findDoctor adapter and select Generate JCA Configuration Files.
-
In the dialog box, save the files to a place you can find when you create the BPEL process or Mediator connection.


