2 Configuring OracleAS Adapter for VSAM
This chapter describes how to configure Oracle Connect using Oracle Studio.
All modeling of Oracle Connect is performed using Oracle Studio. To use Oracle Studio, you first configure it to enable access to the IBM z/OS platform where the VSAM data resides.
This chapter contains the following topics:
Note:
These tasks assume you have permission to access the IBM z/OS platform and that the Oracle Connect daemon is running on this computer.Check with the system administrator to ensure these requirements are fulfilled.
Setting Up the IBM z/OS Platform in Oracle Studio
Using Oracle Studio, perform the following steps to configure the IBM z/OS platform:
-
From the Start menu, select Programs, Oracle, and then select Studio. Oracle Studio opens.
-
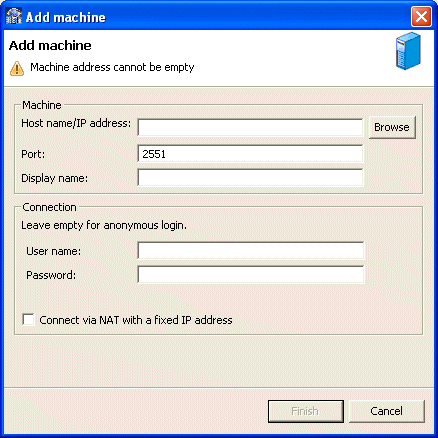
Right-click Machines in the Configuration Explorer and select Add Machine. The Add Machine screen is displayed. For more information, see Figure 2-1).
-
Enter the name of the computer you want to connect to, or click Browse to select the computer from the list of computers that is displayed and which use the default port
2551. -
Specify the user name and password of the user who was specified as the administrator when Oracle Connect was installed.
Note:
Selecting Anonymous connection enables anyone having access to the computer to be an administrator, if this was defined for the computer.The Add Machine screen is shown in the following figure:
-
Click Finish.
The computer is displayed in the Configuration Explorer.
Securing Access to Oracle Connect
Oracle Studio includes mechanisms to secure access to Oracle Connect both during modeling and run time.
During modeling the following security mechanisms can be applied:
During run time client access to Oracle Connect is provided by the user profile:
Setting Password Access to Oracle Studio
Initially, any operation performed using Oracle Studio does not require a password. You can set a password so that the first operation that involves accessing the server from Oracle Studio requires a password to be entered.
Perform the following steps to set the password:
-
From the Start menu, select Programs, Oracle, and then select Studio.
-
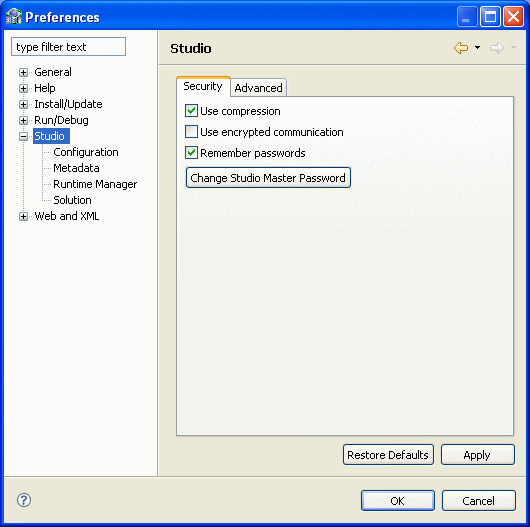
Select Window from the menu bar and then select Preferences. The Preferences screen is displayed.
-
Select the Studio node, as shown in the following figure:
-
Click Change Studio Master Password. The Change Master Password screen is displayed as shown in the following figure:
Figure 2-3 The Change Master Password screen
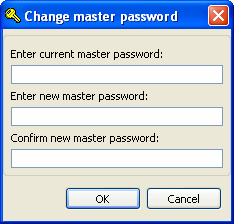
Description of "Figure 2-3 The Change Master Password screen"
-
Leave the Enter current master password field blank and type a new master password.
-
Confirm the new password.
-
Click OK.
Specifying Users with Administrative Rights
By default, only the user who was specified during the installation as an administrator has the authorization to modify settings on that computer from Oracle Studio. This user can then authorize other users to make changes or to view the definitions for a selected computer. Adding a computer to Oracle Studio is described in "Setting Up the IBM z/OS Platform in Oracle Studio".
Note:
The default during installation is to enable all users to be administrators.-
From the Start menu, select Programs, Oracle, and then select Studio.
-
Right-click the computer in the Configuration Explorer and select Administration Authorization.
The Administration Authorization screen is displayed as shown in the following figure.
Figure 2-4 The Administration Authorization Identities tab

Description of "Figure 2-4 The Administration Authorization Identities tab"
The screen has the following sections:
Administrators: Administrators can view and modify all the definitions in Oracle Studio for the selected computer. On initial entry to Oracle Studio, every user is defined as a system administrator.
Designers: Designers can view all the definitions for the computer in Oracle Studio and can modify any of the definitions under the Bindings and Users nodes for the selected computer. For example, Oracle Studio database administrator can add new data sources and adapters and can change metadata definitions for a table in a data source.
Users: Users can view all the definitions for the computer in Oracle Studio for the selected computer. Regular users cannot modify any of the definitions.
-
Add users or groups of users by clicking Add User or Add Group for the relevant sections.
The user or group that is added must be recognized as a valid user or group for the computer. Once a name has been added to a section, only the user or group that logs on with that user name has the relevant authorization.
Setting Up Run-Time User Access to the IBM z/OS Platform
During run time, client access to Oracle Connect is provided by the user profile. A user profile contains name and password pairs that are used to access a computer, data source or application at run time, when anonymous access is not allowed.
-
From the Start menu, select, Programs, Oracle, and then select Studio. Oracle Studio opens.
-
From the Design perspective, Configuration view, expand the Machines folder, then expand the machine where you want to set the user name and password.
-
Expand Users.
-
Right-click NAV and select Edit User. The NAV user profile editor is displayed.
-
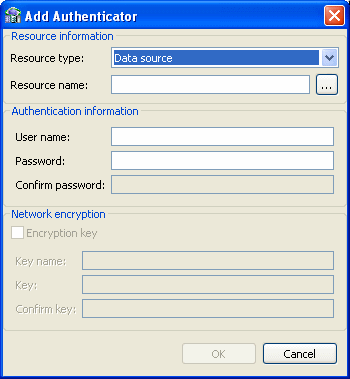
In the User editor, click Add. The Add Authenticator screen is displayed as shown in the following figure:
-
Select Remote Machine from the Resource Type list.
-
Enter the name of the IBM z/OS computer defined in Oracle Studio.
-
Enter the name and password used to access the computer and confirm the password.
-
Click OK.
Modeling Interactions for OracleAS Adapter for VSAM
Modeling interactions for OracleAS Adapter for VSAM involves defining an Oracle Connect back-end adapter, using Oracle Studio. All the definitions specified in Oracle Studio are written to the IBM z/OS platform.
This section contains the following:
Setting Up the VSAM Data Source
Oracle Connect requires you to specify the VSAM data source as the first step in setting up the adapter.
Perform the following steps to setup the VSAM data source:
-
From the Start menu, select Programs, Oracle and then select Studio.
-
In the Design Perspective Configuration view, expand the Machines folder.
-
Expand the machine defined in "Setting Up the IBM z/OS Platform in Oracle Studio".
-
Expand the Bindings. The binding configurations available on this computer are listed.
-
Expand the NAV binding. The NAV binding configuration includes branches for data sources and adapters that are located on the computer.
-
Right-click Data sources and select New Data source.
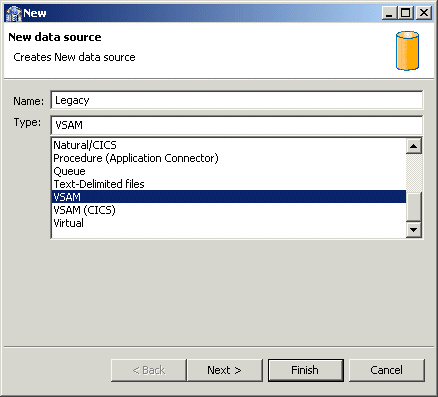
The New Data Source screen is displayed.
-
Enter a name for the VSAM data source. The name can contain letters and numbers and the underscore character only.
-
Select the data source type from the
Typelist, as follows:-
If you are accessing VSAM data under CICS, then select VSAM (CICS).
-
If you are accessing VSAM data directly, then select VSAM.
Note:
Only use the VSAM option to connect directly to the VSAM data in the following circumstances:-
The VSAM records are not managed by CICS.
-
The VSAM records are required for read only purposes and changes to the data buffered by CICS while reading the data are not expected.
The New Data Source screen is shown in the following figure:
-
-
-
Click Next. The Data Source Connect String screen is displayed.
-
Enter the Data source connect string. If you select VSAM (CICS), then the following screen is displayed:
Figure 2-7 The Data Source Connect String screen
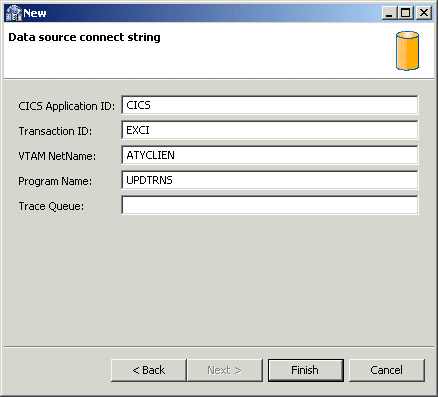
Description of "Figure 2-7 The Data Source Connect String screen"
Where:
-
CICS Application ID: The VTAM applid of the CICS target system. The default value is
CICS. This parameter is used when updating VSAM data. You can determine this value by activating theCEMTtransaction on the target CICS system. On the bottom right corner of the screen appears the legendAPPLID=target_system. -
Transaction ID: The mirror transaction within CICS that receives control through
MRO, which transfers the transaction from the Oracle Connect for VSAM environment to CICS. The default value isEXCI. -
VTAM NetName: The
VTAMnetname of the specific connection being used byEXCI(andMRO) to relay the program call to the CICS target system. For example, if you issue toCEMTthe following command:CEMT INQ CONN
Then you see that the netname is
BATCHCLI(this is the default connection supplied by IBM upon the installation of CICS) on the display screen. The default value isATYCLIEN. -
Program Name: The
UPDTRNSprogram that is supplied by Oracle Connect for VSAM to enable updating VSAM data.For more information, see the OracleAS Legacy Adapters Installation Guide.
-
Trace Queue: The name of queue for output which is defined under CICS when tracing the output of the UPDTRNS program. When not defined, the default CICS queue is used.
If you select VSAM, then the Data Source Connect String screen is displayed, where you provide the following connection string properties:
-
Data HLQ: The high-level qualifier where the data files are located. If a value is not specified in this field, then data files are written to the DEF high-level qualifier where Oracle Connect for VSAM is installed.
-
Disk Volume name: The high-level qualifier (volume) where the data resides.
-
-
Click Finish.
The new data source is displayed in the Configuration Explorer.
Importing Metadata for the VSAM Data Source
Oracle Connect requires metadata describing the VSAM data source records and the fields in these records. Use the Import Metadata procedure in Oracle Studio to import metadata for the VSAM data source from COBOL copybooks, which describe the data.
Perform the following steps to import metadata for the VSAM data source, as follows:
-
From the Start menu, select Programs, Oracle, and then select Studio.
-
In the Design Perspective Configuration view, expand the Machines folder.
-
Expand the machine defined in "Setting Up the IBM z/OS Platform in Oracle Studio".
-
Expand the Bindings. The binding configurations available on this computer are listed.
-
Expand the NAV binding
-
Expand the Data sources folder.
-
Right-click the VSAM data source defined in "Setting Up the VSAM Data Source".
-
Select Show in Metadata View to open the Metadata tab, with the VSAM data source displayed under the data sources list.
-
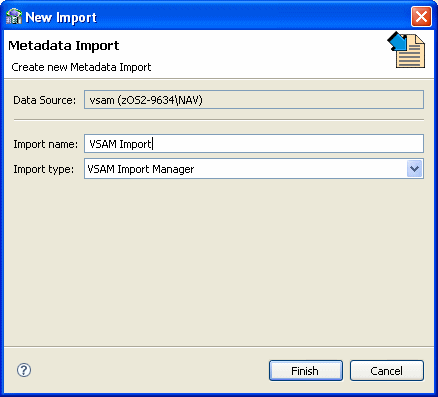
Right-click the VSAM data source and select New Import.
The New Import screen is displayed.
-
Enter a name for the import. The name can contain letters and numbers and the underscore character only.
-
Select the import type from the Import Type list, as shown in the following figure:
Note:
The same New Import screen is displayed for both VSAM imports (VSAM under CICS and VSAM direct) except for theImport typefield value: eitherVSAM Under CICS Import ManagerorVSAM Import Manager, respectively) -
Click Finish. The Metadata Import wizard opens.
-
Click Add.
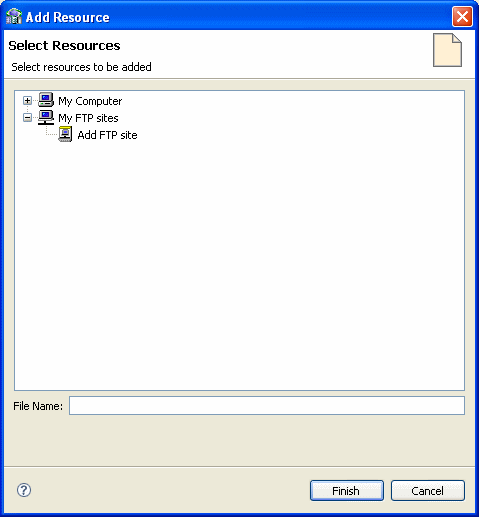
The Select Resources screen is displayed, which provides the option to select files from the local computer or copy the files from another computer.
-
If the files are on another computer, then right-click My FTP Sites and select Add. Optionally, double-click Add FTP site. The Add FTP Site screen is displayed.
-
Enter the server name or IP address where the COBOL copybooks reside and enter a valid user name and password to access the computer (if anonymous access is used, then click the Anonymous connection check-box) then click OK. The FTP site is added to the list of available sites.
Note:
The selected server is accessed using the user name as the high-level qualifier, enabling you to browse and transfer files.The Select Resources screen is shown in the following figure:
-
Right-click the computer and select Set Transfer Type. Enter the transfer type (ASCII or BINARY) and click OK.
-
Expand the node of the added site and locate the necessary COBOL files. To change the high-level qualifier, right-click the computer and select Change Root Directory. Enter the high-level qualifier enclosed in quotes, and click OK.
-
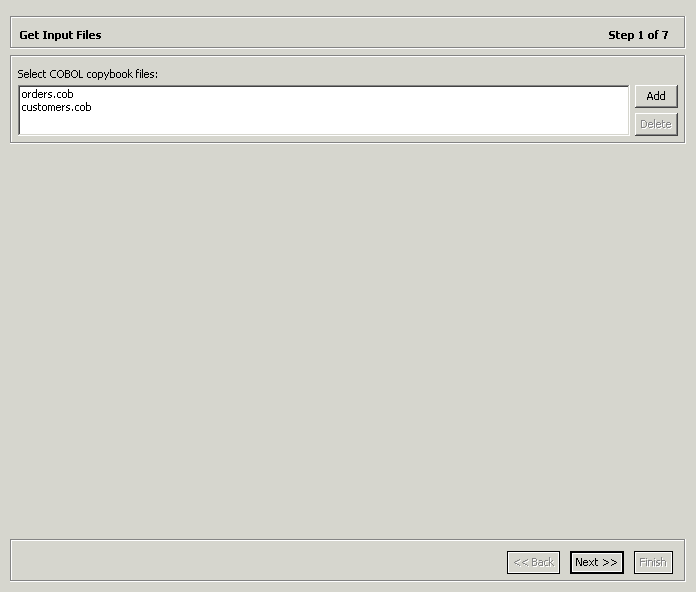
Select the file or files and click Finish.
The selected file or files are displayed in the Metadata Import wizard, as shown in the following figure:
Note:
You can import the metadata from one COBOL copybook and later add to this metadata by repeating the import procedure using different COBOL copybooks.The format of the COBOL copybooks must be identical. That is, you cannot import a COBOL copybook that uses the first six columns with a COBOL copybook that ignores the first six columns. In this type of case you must repeat the import procedure.
-
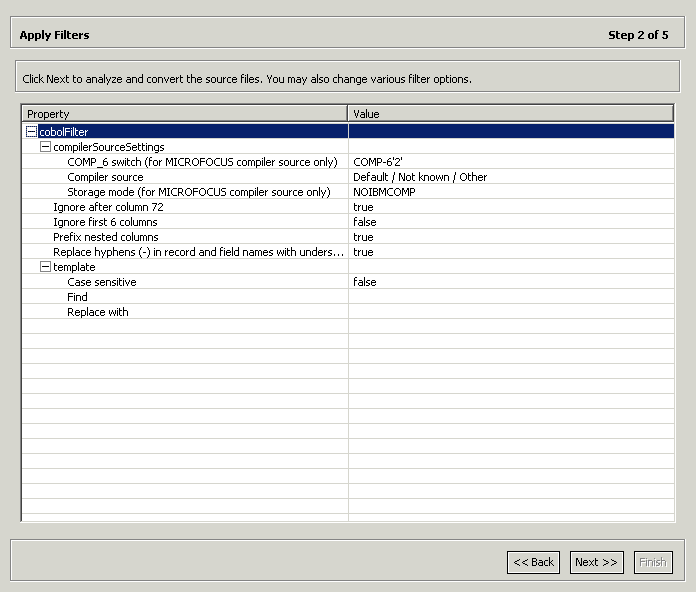
Click Next. The Apply Filters screen is displayed.
The Apply Filters screen is shown in the following figure:
-
Apply filters to the copybooks as required.
The following table lists the avaiable filters:
Filter Description COMP_6 switch
The MicroFocus COMP-6 compiler directive. Specify either COMP-6'1' to treat COMP-6 as a COMP data type or COMP-6'2' to treat COMP-6 as a COMP-3 data type.
Compiler source
The compiler vendor.
Storage mode
The MicroFocus Integer Storage Mode. Specify either NOIBMCOMP for byte storage mode or IBMCOMP is for word storage mode.
Ignore after column 72
Ignores columns 73 to 80 in the COBOL copybook.
IgnoreFirst6
Ignores the first six columns in the COBOL copybook.
Replace hyphens (-) in record and field names with underscores (_)
Replaces all hyphens in either the record or field names in the metadata generated from the COBOL with underscore characters.
Prefix nested columns
Prefix all nested columns with the previous level heading.
Case sensitive
Specifies whether to be sensitive to the search string case.
Find
Searches for the specified value.
Replace with
Replaces the value specified for Find with the value specified here
-
Click Next.
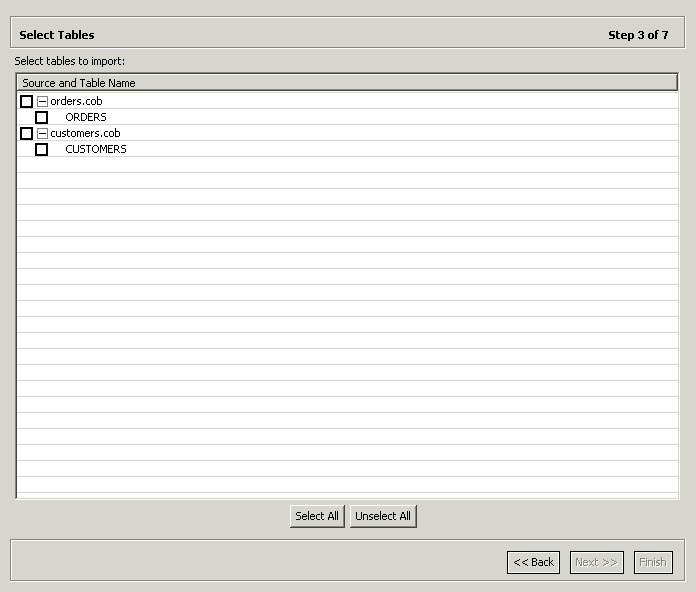
The Select Tables screen is displayed, showing the records that are identified in the COBOL copybooks, as shown in the following figure:
-
Select the required tables or click Select All, then click Next.
The Import Manipulation screen is displayed as shown in the following figure:
Figure 2-13 The Import Manipulation screen
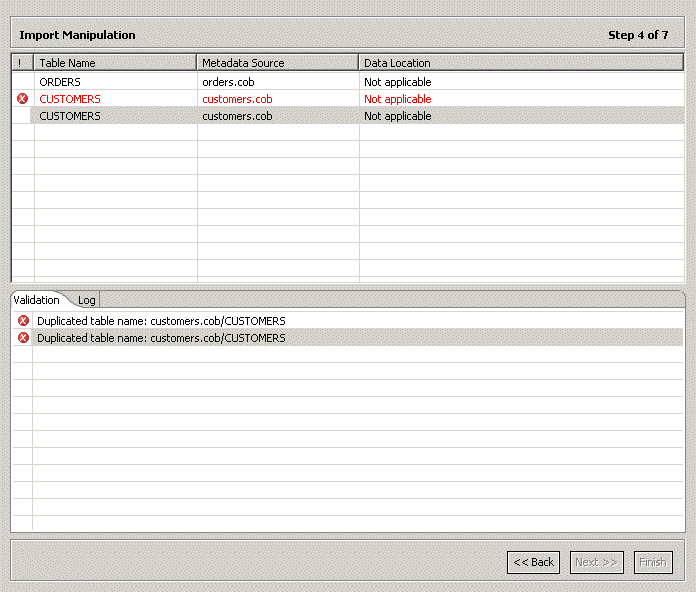
Description of "Figure 2-13 The Import Manipulation screen"
This screen enables you to perform the following operations:
-
Resolve table names, where tables with identical names are generated from different COBOL copybooks specified during the import.
-
Specify the physical location for the data.
-
Specify table attributes.
-
Manipulate the fields generated from the COBOL, as follows:
-
Merging sequential fields into one for simple fields.
-
Resolving variants by either marking a selector field or specifying that only one case of the variant is relevant.
-
Adding, deleting, hiding, or renaming fields.
-
Changing a data type.
-
Setting a field size and scale.
-
Setting a field as nullable.
-
Changing the order of the fields.
-
Selecting a counter field for fields with dimensions (arrays). You can select the counter for the array from a list of potential fields.
-
Setting column wise normalization for fields with dimensions (arrays). You can create new fields instead of the array field where the number of generated fields are determined by the array dimension.
-
Creating arrays and setting the array dimensions.
-
The Validation tab at the lower area of the screen displays information about what must be resolved to validate the tables and fields generated from the COBOL. The Log tab displays a log of what has been performed (such as renaming a table or specifying a data location).
-
-
To manipulate table metadata, right-click the table record, and select the necessary operation. The following table lists the available options:
Table 2-2 Table Manipulation options
Option Description Fields manipulation
Customizing the fields definitions, using the Fields Manipulation screen. You can also access this screen by double-clicking the required table record.
Rename
Renaming a table. This option is used especially when multiple tables are generated from the COBOL with the same name.
Set data location
Setting the physical location of the data file for the table.
Set table attributes
Setting the table attributes.
XSL manipulation
Specifying an XSL transformation or JDOM document that is used to transform the table definitions.
-
Once all the validation error issues have been resolved, the Import Manipulation screen is displayed with no error indicators.
-
Click Next. The next step depends whether the VSAM Under CICS Import Manager or the VSAM Import Manager is used.
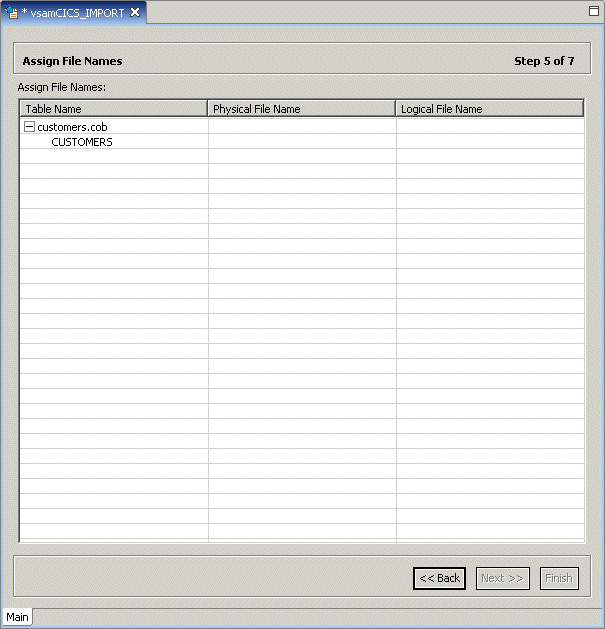
If the VSAM Under CICS Import Manager is used, then the Assign File Names screen is displayed, as shown in the following figure:
In this screen you specify the physical file name, including the high-level qualifiers and the logical file name, for each record listed.
If the VSAM Import Manager is used, then the Create VSAM Indexes screen is displayed.
-
Click Next to retrieve index information.
If the VSAM Under CICS Import Manager is used and this step fails for any reason (such as the IBM z/OS platform is temporarily not accessible), a warning message is issued and you continue to the next step. Click Continue in the message box to continue with the next step.
Note:
If the indexes are not generated, then define manually in the Metadata tab of Oracle Studio Design perspective. For details, refer to "Metadata for VSAM". -
The next step (assigning index file names) applies only if the VSAM under CICS Import Manager is used.
The Assign Index FIle Names screen is shown in the following figure:
Figure 2-15 The Assign Index File Names screen
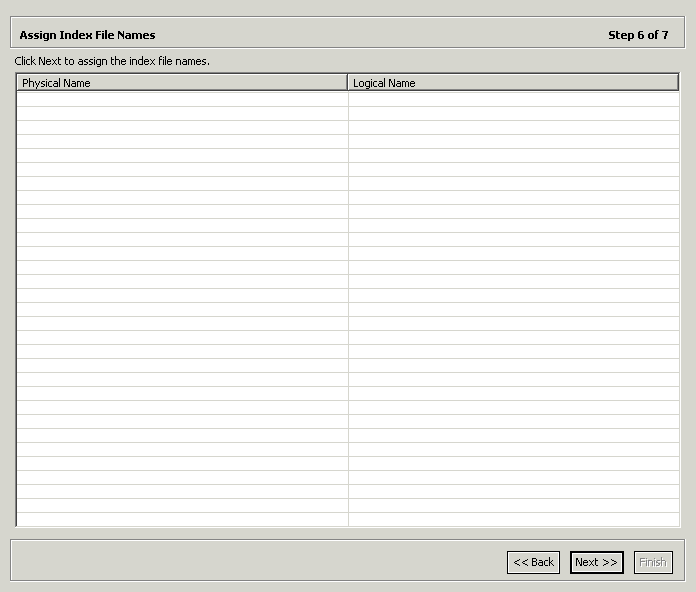
Description of "Figure 2-15 The Assign Index File Names screen"
-
For each table listed, specify the logical file name for the index.
-
Click Next.
-
For Do you want to transfer the metadata to the server? click Yes to transfer the metadata from the your computer to the IBM z/OS computer and click Finish.
The metadata is imported based on the options specified and it is stored on the IBM z/OS platform. An XML representation of the metadata is generated. This XML file can be viewed by expanding the Output node.
After performing the import, you can view the metadata in the Metadata tab in Oracle Studio. You can also make any fine adjustments to the metadata and maintain it, as necessary.
See Also:
"Metadata for VSAM" for details about the data source metadata.Setting Up an Oracle Connect Adapter
To work with the Oracle Connect against the VSAM data source from an Oracle Application Server, you must set up an adapter definition on the IBM z/OS platform to handle the interactions to and from the VSAM data.
Perform the following steps to setup the adapter:
-
From the Start menu, select Programs, Oracle, and then select Studio.
-
In the design perspective, Configuration view, expand the Machine folder.
-
Expand the machine defined in "Setting Up the IBM z/OS Platform in Oracle Studio".
-
Expand the Bindings.
-
Expand the NAV binding.
-
Right-click Adapters and select New Adapter to open the New Adapter wizard.
-
Enter a name for the back-end adapter.
Note:
The word event is a reserved word and cannot be used when naming an adapter. -
Select Database as the back-end adapter type from the
Typelist. The Database adapter enables accessing the VSAM data source from Oracle Application Server. -
Select Events to create an event queue for the adapter.
-
Click Finish. The back-end adapter is added to the adapters list and its definition opens for editing.
Note:
Other adapters that are displayed in theTypelist are not supported with the version of Oracle Connect installed at the site. -
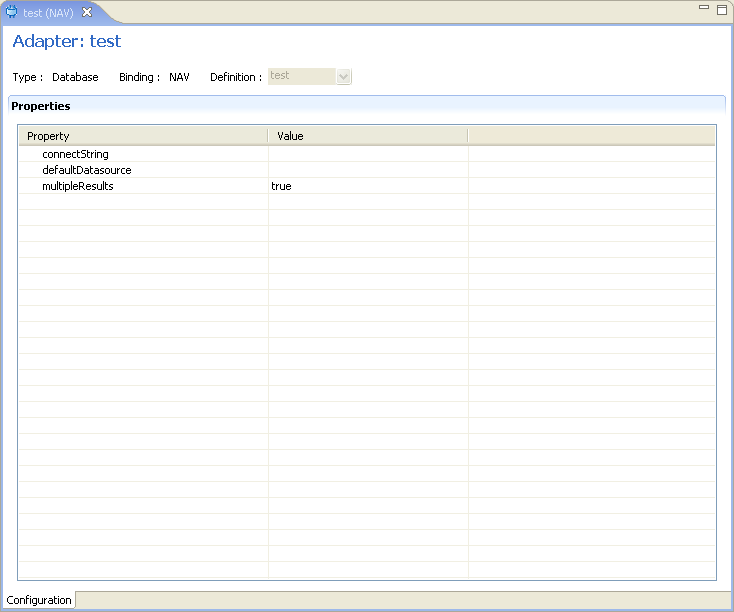
Select the Properties tab and change any of the properties for the adapter, as required.
The Properties tab is shown in the following figure:
Property Description connectString
Leave this value blank.
defaultDatasource
The name of the data source defined in Oracle Studio to access with the Database adapter.
For example,
Legacy.multipleResults
Leave this value as
true.Note:
You must specify the VSAM data source name you used to define in Oracle Studio for the defaultDatasoure property.
Generating Outbound Interactions
Oracle Connect requires metadata describing the adapter interactions, including the structures used to pass information to and from the adapter.
Use the Metadata Import wizard in Oracle Studio to generate interaction metadata, as follows:
-
From the Start menu, select Programs, Oracle, and then select Studio.
-
In the Design perspective, Configuration view, expand the Machines folder.
-
Expand the machine defined in "Setting Up the IBM z/OS Platform in Oracle Studio".
-
Expand the Bindings. The binding configurations available on this computer are listed.
-
Expand the NAV binding.
-
Expand the Adapters folder.
-
Right-click the Database back-end adapter defined in "Setting Up an Oracle Connect Adapter".
-
Select Show in Metadata View to open the Metadata tab, with the database back-end adapter displayed under the adapters list.
-
Right-click the Interactions node and select New to open the New Interaction wizard. The wizard opens with the following options displayed:
-
Automatic: Four interactions are generated for each VSAM table, enabling you to run the
SELECT,INSERT,UPDATE, andDELETEcommands. -
Manual: One interaction is generated, based on the type of SQL selected: Database Query (a
SELECTstatement) or Database Modification (anINSERT,UPDATEorDELETEstatement).Note:
VSAM does not support the stored procedure option.
-
-
Select how you want to generate interactions (Automatic or Manual).
If you select Automatic generation, then perform the following steps:
-
Click Next. The Select Tables screen is displayed, enabling you to add tables to access with the interaction from the VSAM data source.
-
Click Add to add tables. The data sources that have been defined and all the tables, for each data source, that have had metadata defined for them are displayed.
-
Select the tables to access with the interaction and click the right-pointing arrow to move the selected tables to the right-hand pane.
-
Click Finish. The selected tables are displayed.
-
Click Finish. Four interactions are generated for each table selected with the record structures to support the interactions and the responses from the VSAM data source.
-
Click Yes to complete the task. The interactions and the record structures that relate to the interactions are displayed in the Metadata tab.
If you select Manual generation, then perform the following steps:
-
Select the type of SQL (query or modification) for the interaction and click Next. The Interaction Name screen is displayed.
-
Enter a name for the interaction, and select Create new query.
Note:
The option to use a previously. saved query is not applicable. -
Click Next. The Define Interaction screen is displayed, enabling you to build the SQL query.
Note:
If Database query was selected in step a, then the Define Interaction screen is displayed, enabling you to build a SELECT statement only, as indicated in the Query type field. If the Database Modification option was selected, then this field enables you to select the required SQL modification statement from a list (INSERT,UPDATE, orDELETE).The
SELECTor Modification query is built as follows:-
Selecting Tables: In the left-hand pane, expand the data source node where the required table resides and select the required table. Drag and drop it to the first available row in the Tables tab in the right-hand pane.
-
Selecting Columns: Click the Columns tab in the right-hand pane. In the left-hand pane, expand the data source and the table containing the required column. Select the required column and drag and drop it into the Columns tab in the right-hand pane.
-
Joining columns from different tables: When a column from a different table is selected, the Join Tables wizard is displayed. Expand the table node in the left-hand pane, select the required column and click the right-pointing arrow. Click Next to set the operator and logical parameters for each column/segment as required, and then click Finish to close the wizard.
-
Adding conditions in a
WHEREclause: Select the column you are setting the WHERE clause for, and drag and drop it into the Where tab in the right-hand pane. Set the operator, value and logical parameters as required. -
Grouping columns: Select the required columns and drag and drop them into the Group tab in the right-hand pane.
-
Filtering results using a
HAVINGclause: The HAVING clause provides conditions for grouping columns. Select the required column and drag and drop it into the Having tab in the right-hand pane. Set the operator, value and logical parameters as required. -
Sorting results: Select the column whose results you want to sort and drag and drop it into the Sort tab in the right-hand pane. Set the sort order as required.
-
-
Click Next. The Interaction Parameters screen is displayed, enabling you to specify input parameters for the interaction. The following parameters are specified:
Table 2-4 Interaction Input Parameters
Parameter Description passThroughDefines whether the query is passed directly to the back-end database for processing or processed by the Query Processor.
Reuse compiled queryDefines whether the query is saved in cache for reuse.
EncodingSets the encoding method used to return binary data in text format. You can select between the base 64 and the hexadecimal encoding methods.
EventDefines whether the interaction mode is sync-send or sync-receive.
Fail on no rows returnDefines whether an error is returned in case no data is returned
Root elementDefines the root element name for records returned by the query, using the
<root> \ <record>format.Record elementDefines the record element name for records returned by the query, using the <root> \ <record> format.
Max. recordsSets the maximum number of record returned by the query.
Null stringSets the string returned for a null value. If not specified, then the column is skipped.
-
Click Next. The Interaction Parameters screen is displayed, enabling you to specify parameters for the interaction. The following parameters are specified:
Table 2-5 Interaction Parameters
Parameter Description NameThe name of the parameter.
TypeThe type of parameter (such as string, number, binary).
NullableThe nullable value (true or false).
DefaultThe default value for the parameter.
Context FieldThis field is not applicable.
Bind to SqlsThis field is not applicable.
-
Click Finish to generate the interaction, including the record schema required to support the interaction input and output.
-
See Also:
"Adapter Metadata" for details about the data source metadataViewing the XML Schema
The XML schema describing the adapter interactions can be viewed by selecting the Source tab when you view the metadata as XML. For more information, see Appendix F, "Editing XML Files in Oracle Studio".
Creating XML Schemas
The XML schema describing the adapter interactions and the input and output records for these interactions is created automatically during the import procedure, as described in "Generating Outbound Interactions".
