121 Configuring a Mapping
This chapter describes how to configure TopLink mapping options common to two or more mapping types.
This chapter includes the following sections:
Table 121-1 lists the types of TopLink mappings that you can configure and provides a cross-reference to the type-specific chapter that lists the configurable options supported by that type.
Table 121-1 Configuring TopLink Mappings
| If you are creating... | See... |
|---|---|
|
Chapter 41, "Configuring an Object-Relational Data Type Mapping" |
|
Table 121-2 lists the configurable options shared by two or more TopLink mapping types.
For more information, see the following:
121.1 Configuring Common Mapping Options
Table 121-2 lists the configurable options shared by two or more TopLink mapping types. In addition to the configurable options described here, you must also configure the options described for the specific mapping types (see Section 17.1, "Mapping Types"), as shown in Table 121-1
Table 121-2 Common Mapping Options
121.2 Configuring Read-Only Mappings
Mappings that are read-only will not be affected during insert, update, and delete operations.
Use read-only mappings when multiple attributes in an object map to the same fields in the database but only one of the mappings can write to the field.
You can also use read-only mappings with bi-directional many-to-many mappings to designate which mapping will be responsible for updating the many-to-many join table.
Mappings defined for the write-lock or class indicator field must be readEonly, unless the write-lock is configured not to be stored in the cache or the class indicator is part of the primary key.
Use read-only mappings only if specific mappings in a descriptor are read-only. If the entire descriptor is read-only, use the descriptor-level setting (see Section 119.3, "Configuring Read-Only Descriptors").
Note:
Even though read-only mappings are not written to the database, they are merged into the TopLink cache.Table 121-3 summarizes which mappings support this option.
Table 121-3 Mapping Support for Read-Only
| Mapping | How to Use Oracle JDeveloper | How to Configure Read-Only Mappings Using TopLink Workbench |
How to Configure Read-Only Mappings Using Java |
|---|---|---|---|
|
|
|
|
|
|
|
|||
|
|
|
|
|
|
|
|
|
121.2.1 How to Configure Read-Only Mappings Using TopLink Workbench
To specify a mapping as read-only, use this procedure:
-
Select the mapped attribute in the Navigator. Its properties appear in the Editor.
-
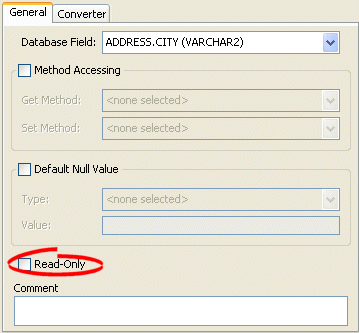
Click the General tab. The General tab appears.
Figure 121-1 General Tab, Read-Only Option
Description of "Figure 121-1 General Tab, Read-Only Option"
Select the Read-Only option to set the mapping to be read-only and not affected during update and delete operations.
121.2.2 How to Configure Read-Only Mappings Using Java
Use the following DatabaseMapping methods to configure the read access of a mapping:
-
readOnly–configures mapping read access to read-only; -
readWrite–configures mapping read access to read and write (default).
Example 121-1 shows how to use these methods with a class that has a read-only attribute named phones.
121.3 Configuring Indirection (Lazy Loading)
If indirection is not enabled, when TopLink retrieves a persistent object, it retrieves all of the dependent objects to which it refers. When you enable indirection (lazy loading) for an attribute mapped with a relationship mapping, TopLink uses an indirection object as a placeholder for the referenced object: TopLink defers reading the dependent object until you access that specific attribute. This can result in a significant performance improvement, especially if the application is interested only in the contents of the retrieved object rather than the objects to which it refers.
Oracle strongly recommends using indirection for all relationship mappings. Not only does this allow you to optimize data source access, but it also allows TopLink to optimize the unit of work processing, cache access, and concurrency.
Table 121-4 summarizes which mappings support this option.
Table 121-4 Mapping Support for Indirection
In general, Oracle recommends that you use value holder indirection for one-to-one mappings and transparent indirect container indirection for collection mappings. Enable indirection for transformation mappings if the execution of the transformation is a resource-intensive task (such as accessing a database, in a relational project).
When using indirection with EJB, the version of EJB and application server you use affects how indirection is configured and what types of indirection are applicable.
When using indirection with an object that your application serializes, you must consider the effect of any untriggered indirection objects at deserialization time.
For JPA entities or POJO classes that you configure for weaving, TopLink weaves value holder indirection for one-to-one mappings. If you want TopLink to weave change tracking and your application includes collection mappings (one-to-many or many-to-many), then you must configure all collection mappings to use transparent indirect container indirection only (you may not configure your collection mappings to use eager loading nor value holder indirection).
For more information, see the following:
-
Section 17.2.4.2, "Transparent Indirect Container Indirection"
-
Section 17.2.4.7, "Indirection, Serialization, and Detachment"
-
"Using EclipseLink JPA Weaving" section of EclipseLink Developer's Guide at
http://wiki.eclipse.org/Using_EclipseLink_JPA_Extensions_%28ELUG%29#Using_EclipseLink_JPA_Weaving
121.3.1 How to Configure Indirection Using TopLink Workbench
To complete the indirection options on a mapping's General tab use this procedure:
-
Select the mapped attribute in the Navigator. Its properties appear in the Editor.
-
Click the General tab. The General tab appears.
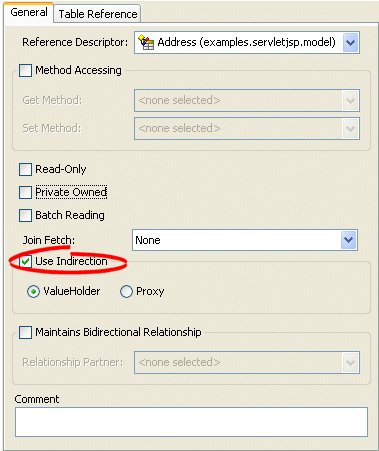
Figure 121-2 General Tab, Indirection Options
Description of "Figure 121-2 General Tab, Indirection Options"
Use the following information to complete the Indirection fields on the tab:
| Field | Description |
|---|---|
| Use Indirection | Specify if this mapping uses indirection. |
| ValueHolder | Specify that the mapping uses Value Holder indirection. See Section 17.2.4.1, "Value Holder Indirection" for more information. |
| Proxy | Specify that the mapping uses Proxy indirection. See Section 17.2.4.3, "Proxy Indirection" for more information. |
121.3.2 How to Configure Indirection Using Java
When creating mappings through the Java API, all foreign reference mappings default to using value-holder indirection and all transformation mappings default to not using indirection.
To disable indirection use ForeignReferenceMapping method dontUseIndirection.
To enable value holder indirection, use ForeignReferenceMapping method useBasicIndirection.
To enable transparent container indirection, use one of the following CollectionMapping methods:
-
useTransparentCollection -
useTransparentList -
useTransparentMap -
useTransparentSet
To enable proxy indirection, use ObjectReferenceMapping method useProxyIndirection.
This section provides additional information on the following:
121.3.2.1 Configuring Value Holder Indirection
Instances of oracle.toplink.mappings.ForeignReferenceMapping and oracle.toplink.mappings.foundation.AbstractTransformationMapping provide the useBasicIndirection method to configure a mapping to an attribute that you code with an oracle.toplink.indirection.ValueHolderInterface between it and the real object.
If the attribute is of a Collection type (such as a Vector), then you can either use an IndirectContainer (see Section 121.3.2.4, "Configuring IndirectContainer Indirection") or define the ValueHolder in the constructor as follows:
addresses = new ValueHolder(new Vector());
Example 121-2 illustrates the Employee class using ValueHolder indirection. The class definition conceals the use of ValueHolder within the existing getter and setter methods.
Example 121-2 Class Using ValueHolder Indirection
public class Employee {

    protected ValueHolderInterface address;

    // Initialize ValueHolders in constructor
    public Employee() {
        address = new ValueHolder();
    }

    public Address getAddress() {
        return (Address) this.addressHolder.getValue();
    }

    public void setAddress(Address address) {
        this.addressHolder.setValue(address);
    }
}
Example 121-3 shows how to configure a one-to-one mapping to the address attribute.
Example 121-3 Mapping Using ValueHolder Indirection
OneToOneMapping mapping = new OneToOneMapping();
mapping.useBasicIndirection();
mapping.setReferenceClass(Employee.class);
mapping.setAttributeName("address");
The application uses Employee methods getAddress and setAddress to access the Address object. Because basic indirection is enabled, TopLink expects the persistent fields to be of type ValueHolderInterface.
121.3.2.2 Configuring Value Holder Indirection with Method Accessing
If you are using ValueHolder indirection with method accessing (see Section 121.6, "Configuring Method or Direct Field Accessing at the Mapping Level"), in addition to changing your attributes types in your Java code to ValueHolderInterface, you must also provide TopLink with two pairs of getter and setter methods:
-
getter and setter of the indirection object that are registered with the mapping and used only by TopLink. They include a
getmethod that returns an instance that conforms toValueHolderInterface, and asetmethod that accepts one argument that conforms to the same interface; -
getter and setter of the actual attribute value used by the application.
Example 121-4 illustrates the Employee class using ValueHolder indirection with method access. The class definition is modified so that the address attribute of Employee is a ValueHolderInterface instead of an Address, and appropriate getter and setter methods are supplied.
Example 121-4 Class Using ValueHolder Indirection with Method Accessing
public class Employee {

    protected ValueHolderInterface address;

    // Initialize ValueHolders in constructor
    public Employee() {
        address = new ValueHolder();
    }

    // getter and setter registered with the mapping and used only by TopLink
    public ValueHolderInterface getAddressHolder() {
        return address;
    }
    public void setAddressHolder(ValueHolderInterface holder) {
        address = holder;
    }

    // getter and setter methods used by the application to access the attribute
    public Address getAddress() {
        return (Address) address.getValue();
    }

    public void setAddress(Address theAddress) {
        address.setValue(theAddress);
    }
}
Example 121-5 shows how to configure a one-to-one mapping to the address attribute.
Example 121-5 Mapping Using ValueHolder Indirection with Method Accessing
OneToOneMapping mapping = new OneToOneMapping();
mapping.useBasicIndirection();
mapping.setReferenceClass(Employee.class);
mapping.setAttributeName("address");
mapping.setGetMethodName("getAddressHolder");
mapping.setSetMethodName("setAddressHolder");
The application uses Employee methods getAddress and setAddress to access the Address object. Because basic indirection is enabled, TopLink uses Employee methods getAddressHolder and setAddressHolder methods when performing persistence operations on instances of Employee.
121.3.2.3 Configuring Value Holder Indirection with JPA
When using indirection with JPA, if your application serializes any indirection-enabled (lazily loaded) entity (see Section 17.2.4.7, "Indirection, Serialization, and Detachment"), then, to preserve untriggered indirection objects on deserialization, configure your client to use TopLink agent, as follows:
-
Include the following JAR files (from
<TOPLINK_HOME>\jlib) in your client classpath:-
toplink.jar -
<your-application-persistence>.jar
-
-
Add the following argument to the Java command line you use to start your client:
-javaagent:toplink.jar
You can also use static weaving (see "How to Configure Static Weaving for JPA Entities" section of EclipseLink Developer's Guide at http://wiki.eclipse.org/Using_EclipseLink_JPA_Extensions_%28ELUG%29#How_to_Configure_Static_Weaving_for_JPA_Entities). This will provide you with better error messages and will resolve merging issues.
Note:
The use of static weaving will not affect serialization as it functions without static weaving enabled.121.3.2.4 Configuring IndirectContainer Indirection
Instances of oracle.toplink.mappings.ForeignReferenceMapping and oracle.toplink.mappings.foundation.AbstractTransformationMapping provide the useContainerIndirection method to configure a mapping to an attribute that you code with an oracle.toplink.indirection.IndirectContainer between it and the real object.
Using an IndirectContainer, a java.util.Collection class can act as a TopLink indirection object: the Collection will only read its contents from the database when necessary (typically, when a Collection accessor is invoked). Without an IndirectContainer, all members of the Collection must be retrieved when the Collection attribute is accessed.
Example 121-6 illustrates the Employee class using IndirectContainer indirection with method access. Note that the fact of using indirection is transparent.
Example 121-6 Class Using IndirectContainer Indirection
public class Employee {

    protected List addresses;

    public Employee() {
        this.addresses = new ArrayList();
    }

    public List getAddresses() {
        return this.addresses;
    }

    public void setAddresses(List addresses) {
        this.addresses = addresses;
    }
}
Example 121-7 shows how to configure a one-to-one mapping to the addresses attribute.
Example 121-7 Mapping Using IndirectContainer Indirection
OneToOneMapping mapping = new OneToOneMapping();
mapping.useBasicIndirection();
mapping.setReferenceClass(Employee.class);
mapping.setAttributeName("addresses");
mapping.setGetMethodName("getAddresses");
mapping.setSetMethodName("setAddresses");
121.3.2.5 Configuring Proxy Indirection
Example 121-8 illustrates an Employee to Address one-to-one relationship.
Example 121-8 Classes Using Proxy Indirection
public interface Employee {

    public String getName();
    public Address getAddress();
    public void setName(String value);
    public void setAddress(Address value);
    . . .
}

public class EmployeeImpl implements Employee {

    public String name;
    public Address address;
    . . .
    public Address getAddress() {
        return this.address;
    }

    public void setAddress(Address value) {
        this.address = value;
    }
}

public interface Address {

    public String getStreet();
    public void setStreet(String value);
    . . .
}

public class AddressImpl implements Address {

    public String street;
    . . .
}
In Example 121-8, both the EmployeeImpl and the AddressImpl classes implement public interfaces (Employee and Address respectively). Therefore, because the AddressImpl class is the target of the one-to-one relationship, it is the only class that must implement an interface. However, if the EmployeeImpl is ever to be the target of another one-to-one relationship using transparent indirection, it must also implement an interface, as shown in the following example:
Employee emp = (Employee)session.readObject(Employee.class);
System.out.println(emp.toString());
System.out.println(emp.getAddress().toString());
// Would print:
[Employee] John Smith
{ IndirectProxy: not instantiated }

String street = emp.getAddress().getStreet();
// Triggers database read to get Address information
System.out.println(emp.toString());
System.out.println(emp.getAddress().toString());
// Would print:
[Employee] John Smith
{ [Address] 123 Main St. }
Using proxy indirection does not change how you instantiate your own domain objects for an insert operation. You still use the following code:
Employee emp = new EmployeeImpl("John Smith");
Address add = new AddressImpl("123 Main St.");
emp.setAddress(add);
Example 121-9 illustrates an Employee to Address one-to-one relationship mapping.
121.4 Configuring XPath
TopLink uses XPath statements to map the attributes of a Java object to locations in an XML document. When you create an XML mapping or EIS mapping using XML records, you can specify the XPath based on any of the following:
-
Name
-
Position
-
Path and name
Table 121-5 summarizes which mappings support this option.
Table 121-5 Mapping Support for XPath
| Mapping | How to Use Oracle JDeveloper | How to Configure XPath Using TopLink Workbench |
How to Use Java |
|---|---|---|---|
|
|
|
|
|
|
|
|
|
|
|
|
|
|
|
|
|
|
|
|
|
|
|
|
|
|
|
|
|
|
|
|
|
|
|
|
|
|
|
|
|
|
|
|
|
|
|
|
|
|
|
|
|
|
|
|
|
|
|
|
|
|
|
|
|
|
|
|
|
|
|
|
|
|
|
|
|
|
|
Footnote 1 When used with XML records only (see Section 76.4, "Configuring Record Format").
Footnote 2 Supports the self XPath (".") so that the TopLink runtime performs all read and write operations in the parent's element and not an element nested within it (see Section 17.2.9, "Mappings and the jaxb:class Customization").
Before you can select an XPath for a mapping, you must associate the descriptor with a schema context (see Section 76.2, "Configuring Schema Context for an EIS Descriptor" or Section 52.2, "Configuring Schema Context for an XML Descriptor").
For more information, see Section 17.2.7, "Mappings and XPath".
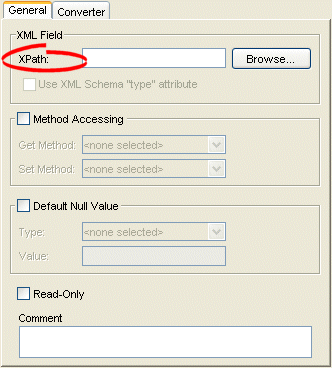
121.4.1 How to Configure XPath Using TopLink Workbench
Use this table to select the XPath for an XMl mapping or EIS mapping using XML records:
-
Select the mapped attribute in the Navigator. Its properties appear in the Editor.
-
If necessary, click the General tab. The General tab appears.
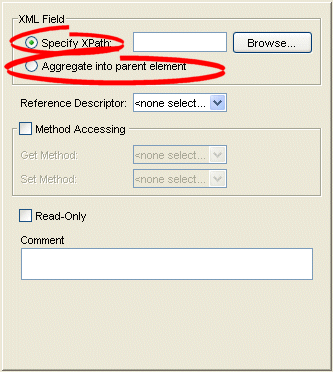
Figure 121-4 XPath Options for Composite Object Mappings
Description of "Figure 121-4 XPath Options for Composite Object Mappings"
Click Browse and select the XPath to map to this attribute (see Section 121.4.1.1, "Choosing the XPath").
For an EIS composite object mapping using XML records or an XML composite object mapping, you can choose one of the following:
-
Specify XPath: select the XPath to map to this attribute (see Section 121.4.1.1, "Choosing the XPath").
-
Aggregate into parent element: select the self XPath (
".") (see Section 17.2.7.4, "Self XPath") so that the TopLink runtime performs all read and write operations in the parent's element, and not an element nested within it (see Section 17.2.9, "Mappings and the jaxb:class Customization").
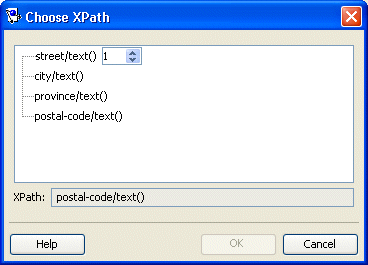
121.4.1.1 Choosing the XPath
From the Choose XPath dialog box, select the XPath and click OK. TopLink Workbench builds the complete XPath name.
121.5 Configuring a Default Null Value at the Mapping Level
A default null value is the Java Object type and value that TopLink uses instead of null when TopLink reads a null value from a data source.
When you configure a default null value at the mapping level, TopLink uses it to translate in the following two directions:
-
When TopLink reads
nullfrom the data source, it converts thisnullto the specified type and value. -
When TopLink writes or queries to the data source, it converts the specified type and value back to
null.
Table 121-6 summarizes which mappings support this option.
Table 121-6 Mapping Support for Default Null Values
| Mapping | How to Use Oracle JDeveloper | How to Configure a Default Null Value at the Mapping Level Using TopLink Workbench |
How to Configure a Default Null Value at the Mapping Level Using Java |
|---|---|---|---|
|
|
|
|
|
|
|
|
|
|
|
|
|
|
|
|
|
|
|
|
|
|
|
|
|
|
|
|
|
|
|
|
|
|
|
|
|
|
|
Note:
A default null value must be anObject. To specify a primitive value (such as int), you must use the corresponding Object wrapper (such as Integer).You can also use TopLink to set a default null value for all mappings used in a session (see Section 97.6, "Configuring a Default Null Value at the Login Level").
121.5.1 How to Configure a Default Null Value at the Mapping Level Using TopLink Workbench
To configure a default null value for a mapping, use this procedure.
-
Select the mapped attribute in the Navigator. Its properties appear in the Editor.
-
Click the General tab. The General tab appears.
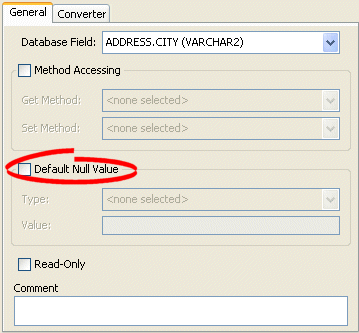
Figure 121-6 General Tab, Default Null Value Options
Description of "Figure 121-6 General Tab, Default Null Value Options"
Use the following information to complete the Default Null Value fields on the tab:
| Field | Description |
|---|---|
| Default Null Value | Specify if this mapping contains a default value in the event that the data source is null. If selected, you must enter both the Type and Value of the default. |
| Type | Select the Java type of the default value. |
| Value | Enter the default value. |
121.5.2 How to Configure a Default Null Value at the Mapping Level Using Java
To configure a mapping null value using Java API, use the AbstractDirectMapping method setNullValue.
For example:
// Defaults a null salary to 0
salaryMapping.setNullValue(new Integer(0));
121.6 Configuring Method or Direct Field Accessing at the Mapping Level
By default, TopLink uses direct access to access public attributes. Alternatively, you can use getter and setter methods to access object attributes when writing the attributes of the object to the database, or reading the attributes of the object from the database. This is known as method access.
Using private, protected or package variable or method access requires you to enable the Java reflect security setting. This is enabled by default in most application servers (see Section 8.2.3, "How to Set Security Permissions"), but may need to be enabled explicitly in certain JVM configurations. If necessary, use the java.policy file to grant ReflectPermission to the entire application or the application's code base. For example:
grant{
     permission java.lang.reflect.ReflectPermission;
};
Oracle recommends using direct access whenever possible to improve performance and avoid executing any application-specific behavior while building objects.
Table 121-7 summarizes which mappings support this option.
Table 121-7 Mapping Support for Method Accessing
| Mapping | How to Use Oracle JDeveloper | How to Configure Method or Direct Field Accessing Using TopLink Workbench |
How to Configure Method or Direct Field Accessing Using Java |
|---|---|---|---|
|
|
|
|
|
|
|
|
|
|
|
|
|
|
|
|
|
|
|
For information on configuring method accessing at the project level, see Section 117.4, "Configuring Method or Direct Field Access at the Project Level".
If you enable change tracking on a property (for example, you decorate method getPhone with @ChangeTracking) and you access the field (phone) directly, note that TopLink does not detect the change. For more information, see Section 2.4.1.4, "Using Method and Direct Field Access".
121.6.1 How to Configure Method or Direct Field Accessing Using TopLink Workbench
To complete the field access method for a mapping, use this procedure:
-
Select the mapped attribute in the Navigator. Its properties appear in the Editor.
-
Click the General tab. The General tab appears.
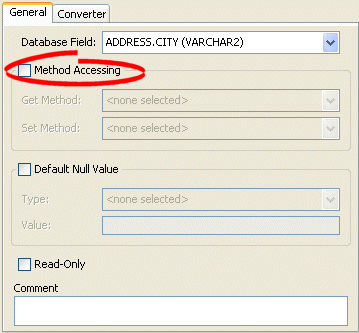
Figure 121-7 General Tab, Method Accessing Options
Description of "Figure 121-7 General Tab, Method Accessing Options"
Use the following information to complete the Method Accessing fields on this tab:
| Field | Description |
|---|---|
| Method Accessing | Specify if this mapping uses specific accessor methods instead directly accessing public attributes. By default, this option is not selected (that is, the mapping uses direct access). |
| Get Method | Select a specific get method. |
| Set Method | Select a specific set method. |
To change the default access type used by all new mappings, use the Defaults tab on the project Editor window. See Section 117.4, "Configuring Method or Direct Field Access at the Project Level" for more information.
121.6.2 How to Configure Method or Direct Field Accessing Using Java
Use the following DatabaseMapping methods to configure the user-defined getters and setters that TopLink will use to access the mapped attribute:
For mappings not supported in Oracle JDeveloper and TopLink Workbench, use the setGetMethodName and setSetMethodName methods to access the attribute through user-defined methods, rather than directly, as follows:
-
setGetMethodName–set theStringname of the user-defined method to get the mapped attribute; -
setSetMethodName–set theStringname of the user-defined method to set the mapped attribute.
Example 121-10 shows how to use these methods with a class that has an attribute phones and accessor methods getPhones and setPhones in an object-relational data type mapping.
121.7 Configuring Private or Independent Relationships
In TopLink, object relationships can be either private or independent:
-
In a private relationship, the target object is a private component of the source object. The target object cannot exist without the source and is accessible only through the source object. Destroying the source object will also destroy the target object.
-
In an independent relationship, the source and target objects are public ones that exist independently. Destroying one object does not necessarily imply the destruction of the other.
Tip:
TopLink automatically manages private relationships. Whenever an object is written to the database, any private objects it owns are also written to the database. When an object is removed from the database, any private objects it owns are also removed. Be aware of this when creating new systems, since it may affect both the behavior and the performance of your application.Table 121-8 summarizes which mappings support this option.
Table 121-8 Mapping Support for Private or Independent Relationships
| Mapping | Implicitly Private | Private or Independent | How to Use Oracle JDeveloper | How to Configure Private or Independent Relationships Using TopLink Workbench |
How to Configure Private or Independent Relationships Using Java |
|---|---|---|---|---|---|
|
|
|
|
|
|
|
|
|
|
|
|
|
|
|
|
|
|
|
|
|
|
|
|
|
|
|
|
|
|
|
|
|
|
|
|
|
|
|
|
|
|
|
|
|
|
|
|
|
|
|
|
|
|
|
|
|
|
|
|
|
|
|
|
|
|
|
|
|
|
|
|
|
|
|
|
|
|
|
|
|
|
|
|
|
|
|
|
|
|
|
|
|
|
|
|
|
|
|
|
|
|
|
|
|
|
|
|
|
|
|
|
|
|
|
|
|
|
|
|
|
|
|
|
|
|
|
|
|
|
|
|
|
|
|
|
|
|
|
|
|
|
|
|
|
|
121.7.1 How to Configure Private or Independent Relationships Using TopLink Workbench
To create a privately owned mapping, use this procedure:
-
Select the mapped attribute in the Navigator. Its properties appear in the Editor.
-
Click the General tab. The General tab appears.
Figure 121-8 General Tab, Private Owned option
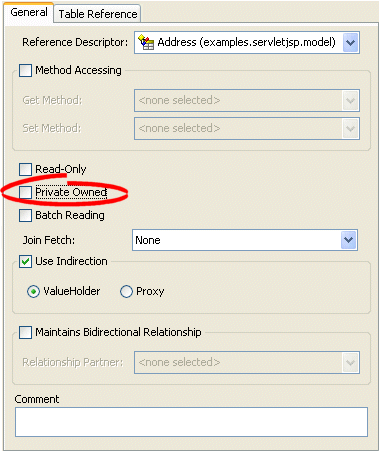
Description of "Figure 121-8 General Tab, Private Owned option"
To create private ownership, select the Private Owned option.
121.7.2 How to Configure Private or Independent Relationships Using Java
For mappings not supported in Oracle JDeveloper and TopLink Workbench, use the independentRelationship (default), privateOwnedRelationship, and setIsPrivateOwned methods.
Example 121-10 shows how to use these methods with a class that has a privately owned attribute, phones, in a mapping.
121.8 Configuring Mapping Comments
You can define a free-form textual comment for each mapping. You can use these comments however you whish: for example, to record important project implementation details such as the purpose or importance of a mapping.
Comments are stored in the Oracle JDeveloper or TopLink Workbench project, in the TopLink deployment XML file. There is no Java API for this feature.
Table 121-9 summarizes which mappings support this option.
Table 121-9 Mapping Support for Comments
| Mapping | How to Use Oracle JDeveloper | How to Configure Mapping Comments Using TopLink Workbench |
How to Use Java |
|---|---|---|---|
|
|
|||
|
|
|||
|
|
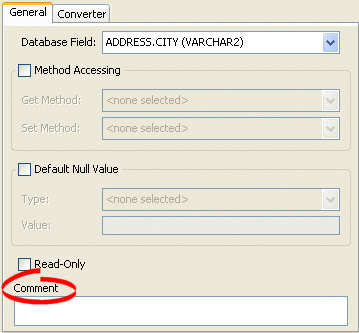
121.8.1 How to Configure Mapping Comments Using TopLink Workbench
To add a comment for a mapping, use this procedure.
-
Select the mapped attribute in the Navigator. Its properties appear in the Editor.
-
Click the General tab. The General tab appears.
Enter a comment that describes this mapping.
121.9 Configuring a Serialized Object Converter
A serialized object converter can be used to store an arbitrary object or set of objects into a data source binary large object (BLOB) field. It uses the Java serializer so the target must be serializable.
For more information about the serialized object converter, see Section 17.2.6.1, "Serialized Object Converter".
Table 121-10 summarizes which mappings support this option.
Table 121-10 Mapping Support for Serialized Object Converter
| Mapping | How to Use Oracle JDeveloper | How to Configure a Serialized Object Converter Using TopLink Workbench |
How to Configure a Serialized Object Converter Using Java |
|---|---|---|---|
|
|
|
|
|
|
|
|
|
|
|
|
|
|
|
|
|
|||
|
|
|
|
|
|
|
|
|
|
|
|
|
|
|
|
|
|
|
|
|
|
|
|
|
|
|
|
|
|
|
|
|
|
|
|
|
|
|
121.9.1 How to Configure a Serialized Object Converter Using TopLink Workbench
To create an serialized object direct mapping, use this procedure:
-
Select the mapped attribute in the Navigator. Its properties appear in the Editor.
-
Click the Converter tab. The Converter tab appears.
Figure 121-10 Converter Tab, Serialized Object Converter Option
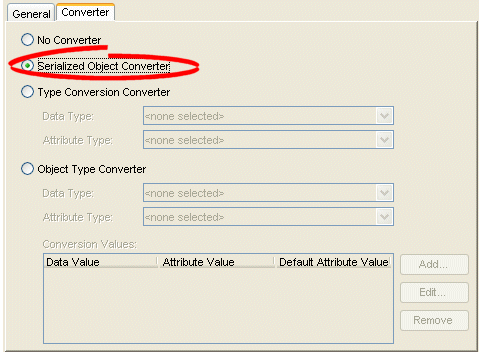
Description of "Figure 121-10 Converter Tab, Serialized Object Converter Option"
To specify a serialized object converter, select the Serialized Object Converter option.
121.9.2 How to Configure a Serialized Object Converter Using Java
You can set an oracle.toplink.converters.SerializedObjectConverter on any instance of oracle.toplink.mappings.foundation.AbstractCompositeDirectCollectionMapping or its subclasses using the AbstractCompositeDirectCollectionMapping method setValueConverter, as Example 121-12 shows.
Example 121-12 Configuring a SerializedObjectConverter
// Create SerializedObjectConverter instance
SerializedObjectConverter serializedObjectConvter = new SerializedObjectConverter();

// Set SerializedObjectConverter on ArrayMapping
ArrayMapping arrayMapping = new ArrayMapping();
arrayMapping.setValueConverter(serializedObjectConvter);
arrayMapping.setAttributeName("responsibilities");
arrayMapping.setStructureName("Responsibilities_t");
arrayMapping.setFieldName("RESPONSIBILITIES");
orDescriptor.addMapping(arrayMapping);
You can also set a SerializedObjectConverter on any instance of oracle.toplink.mappings.foundation.AbstractDirectMapping or its subclasses using the AbstractDirectMapping method setConverter.
121.10 Configuring a Type Conversion Converter
A type conversion converter is used to explicitly map a data source type to a Java type.
For more information about the type conversion converter, see Section 17.2.6.2, "Type Conversion Converter".
Table 121-11 summarizes which mappings support this option.
Table 121-11 Mapping Support for Type Conversion Converter
| Mapping | How to Use Oracle JDeveloper | How to Configure a Type Conversion Converter Using TopLink Workbench |
How to Configure a Type Conversion Converter Using Java |
|---|---|---|---|
|
|
|
|
|
|
|
|||
|
|
|
|
|
|
|
|
|
|
|
|
|
|
|
|
|
|
|
|
|
|
|
|
|
|
|
|
|
|
|
|
|
|
|
|
|
|
|
121.10.1 How to Configure a Type Conversion Converter Using TopLink Workbench
To create an type conversion direct mapping, use this procedure:
-
Select the mapped attribute in the Navigator. Its properties appear in the Editor.
-
Click the Converter tab. The Converter tab appears.
-
Select the Type Conversion Converter option.
Figure 121-11 Converter Tab, Type Conversion Converter Option
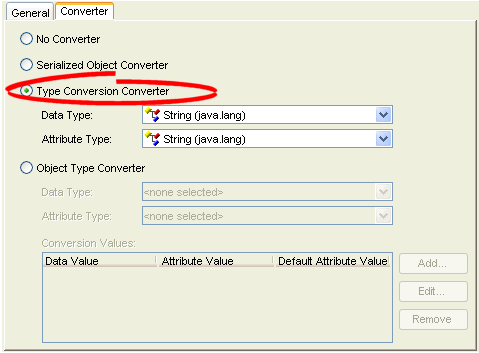
Description of "Figure 121-11 Converter Tab, Type Conversion Converter Option"
Use the following information to complete the Type Conversion Converter fields on the Converter tab:
| Field | Description |
|---|---|
| Data Type | Select the Java type of the data in the data source. |
| Attribute Type | Select the Java type of the attribute in the Java class. |
121.10.2 How to Configure a Type Conversion Converter Using Java
You can set an oracle.toplink.converters.TypeConversionConverter on any instance of oracle.toplink.mappings.foundation.AbstractCompositeDirectCollectionMapping or its subclasses using the AbstractCompositeDirectCollectionMapping method setValueConverter, as Example 121-13 shows.
Example 121-13 Configuring a TypeConversionConverter
// Create TypeConversionConverter instance
TypeConversionConverter typeConversionConverter = new TypeConversionConverter();
typeConversionConverter.setDataClass(java.util.Calendar.class);
typeConversionConverter.setObjectClass(java.sql.Date.class);

// Set TypeConversionConverter on ArrayMapping
ArrayMapping arrayMapping = new ArrayMapping();
arrayMapping.setValueConverter(typeConversionConverter);
arrayMapping.setAttributeName("date");
arrayMapping.setStructureName("Date_t");
arrayMapping.setFieldName("DATE");
orDescriptor.addMapping(arrayMapping);
You can also set a TypeConversionConverter on any instance of oracle.toplink.mappings.foundation.AbstractDirectMapping or its subclasses using the AbstractDirectMapping method setConverter.
Configure the TypeConversionConverter instance using the following API:
-
setDataClass(java.lang.Class dataClass)–to specify the data type class. -
setObjectClass(java.lang.Class objectClass)–to specify the object type class.
121.11 Configuring an Object Type Converter
An object type converter is used to match a fixed number of data source data values to Java object values. It can be used when the values in the data source and in Java differ.
For more information about the object type converter, see Section 17.2.6.3, "Object Type Converter".
Table 121-12 summarizes which mappings support this option.
Table 121-12 Mapping Support for Object Type Converter
| Mapping | How to Use Oracle JDeveloper | How to Configure an Object Type Converter Using TopLink Workbench |
How to Configure an Object Type Converter Using Java |
|---|---|---|---|
|
|
|
|
|
|
|
|||
|
|
|
|
|
|
|
|
|
|
|
|
|
|
|
|
|
|
|
|
|
|
|
|
|
|
|
|
|
|
|
|
|
|
|
|
|
|
|
121.11.1 How to Configure an Object Type Converter Using TopLink Workbench
To add an object type converter to a direct mapping, use this procedure:
-
Select the mapping in the Navigator. Its properties appear in the Editor.
-
Click the Converter tab. The Converter tab appears.
Figure 121-12 Converter Tab, Object Type Converter
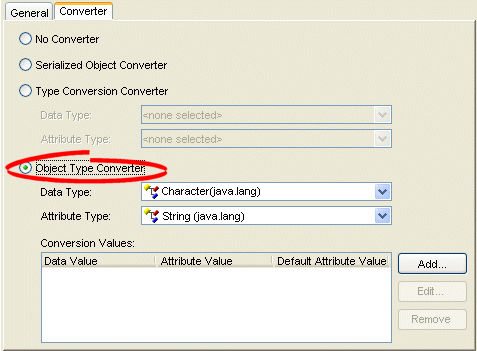
Description of "Figure 121-12 Converter Tab, Object Type Converter"
Use the following fields on the mapping's Converter tab to specify the object type converter options:
| Field | Description |
|---|---|
| Data Type | Select the Java type of the data in the data source. |
| Attribute Type | Select the Java type of the attribute in the Java class. |
| Conversion Values | Click Add to add a new conversion value. Click Edit to modify an existing conversion value. Click Remove to delete an existing conversion value.
Use to specify the selected value as the default value. If TopLink retrieves a value from the database that is not mapped as a valid Conversion Value, the default value will be used. |
| Data Value | Specify the value of the attribute in the data source. |
| Attribute Value | Specify the value of the attribute in the Java class |
| Default Attribute Value | Specify whether or not to use the selected value as the default value. If TopLink retrieves a value from the database that is not mapped as a valid Conversion Value, the default value will be used. |
121.11.2 How to Configure an Object Type Converter Using Java
You can set an oracle.toplink.converters.ObjectTypeConverter on any instance of oracle.toplink.mappings.foundation.AbstractCompositeDirectCollectionMapping using AbstractCompositeDirectCollectionMapping method setValueConverter.
You can also set an ObjectTypeConverter on any instance of oracle.toplink.mappings.foundation.AbstractDirectMapping or its subclasses using the AbstractDirectMapping method setConverter, as Example 121-14 shows.
Example 121-14 Configuring an ObjectTypeConverter
// Create ObjectTypeConverter instance
ObjectTypeConverter objectTypeConvter = new ObjectTypeConverter();
objectTypeConverter.addConversionValue("F", "Female");

// Set ObjectTypeConverter on DirectToFieldMapping
DirectToFieldMapping genderMapping = new DirectToFieldMapping();
genderMapping.setConverter(objectTypeConverter);
genderMapping.setFieldName("F");
genderMapping.setAttributeName("Female");
descriptor.addMapping(genderMapping);
Configure the ObjectTypeConverter instance using the following API:
-
addConversionValue(java.lang.Object fieldValue, java.lang.Object attributeValue)–to associate data-type values to object-type values. -
addToAttributeOnlyConversionValue(java.lang.Object fieldValue, java.lang.Object attributeValue)–to add one-way conversion values. -
setDefaultAttributeValue(java.lang.Object defaultAttributeValue)–to set the default value.
121.12 Configuring a Simple Type Translator
The simple type translator allows you to automatically translate an XML element value to an appropriate Java type based on the element's <type> attribute, as defined in your XML schema. You can use a simple type translator only when the mapping's XPath goes to an element. You cannot use a simple type translator if the mapping's XPath goes to an attribute.
For more information, see Section 17.2.6.4, "Simple Type Translator".
Table 121-13 summarizes which mappings support this option.
Table 121-13 Mapping Support for Simple Type Translator
| Mapping | How to Use Oracle JDeveloper | How to Configure a Simple Type Translator Using TopLink Workbench |
How to Configure a Simple Type Translator Using Java |
|---|---|---|---|
|
|
|
|
|
|
|
|
|
|
|
|
|
|
|
|
|
|
|
|
|
|
|
|
|
|
|
|
|
121.12.1 How to Configure a Simple Type Translator Using TopLink Workbench
Use this table to qualify elements from the XML schema
-
Select the mapped attribute in the Navigator. Its properties appear in the Editor.
-
Click the General tab. The General tab appears.
Figure 121-13 General Tab, Use XML Schema "type" Attribute Option
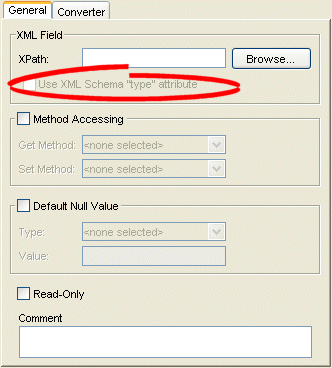
Description of "Figure 121-13 General Tab, Use XML Schema "type" Attribute Option"
Select the Field Uses XML Schema "type" attribute field to qualify elements from the XML schema.
121.12.2 How to Configure a Simple Type Translator Using Java
To create an XML mapping with a simple type translator with Java code in your IDE, you need the following elements:
-
EISDirectMappingorEISCompositeDirectCollectionMappingorXMLDirectMappingorXMLCompositeDirectCollectionMapping -
instance of
Converter -
instance of
TypedElementField
Example 121-15 shows how to implement your own simple type translator with an XMLDirectMapping to override the built-in conversion for writing XML so that TopLink writes a Byte array (ClassConstants.ABYTE) as a Base64 (XMLConstants.BASE64_BINARY) encoded string.
Example 121-15 Creating a Type Translation XML Mapping
XMLDirectMapping mapping = new XMLDirectMapping();
mapping.setConverter(new SerializedObjectConverter());
TypedElementField field = new TypedElementField("element");
field.getSimpleTypeTranslator().addJavaConversion(
                          ClassConstants.ABYTE,
                          new QName(XMLConstants.SCHEMA_URL, XMLConstants.BASE64_BINARY));
mapping.setField(field);
121.13 Configuring a JAXB Typesafe Enumeration Converter
The JAXB typesafe enumeration converter allows you to automatically translate an XML element value to an appropriate typesafe enumeration value as defined in your XML schema.
For more information, see Section 17.2.10, "Mappings and JAXB Typesafe Enumerations".
Table 121-14 summarizes which mappings support this option.
Table 121-14 Mapping Support for JAXB Typesafe Enumeration Converter
| Mapping | How to Use Oracle JDeveloper | How to Use TopLink Workbench | How to Configure a JAXB Typesafe Enumeration Converter Using Java |
|---|---|---|---|
|
|
|||
|
|
|||
|
|
|||
|
|
|||
|
|
|||
|
|
|||
|
|
|||
|
|
Footnote 1 When used with XML records only (see Section 76.4, "Configuring Record Format").
Oracle JDeveloper andTopLink Workbench do not support the JAXBTypesafeEnumConverter directly: to configure a mapping with this converter, you must use Java to create an amendment method (see Section 121.13.1, "How to Configure a JAXB Typesafe Enumeration Converter Using Java").
If you create a project and object model using the TopLink JAXB compiler (see Section 48.2, "Creating an XML Project from an XML Schema"), the compiler will create the type safe enumeration class and a class with descriptor amendment methods and register the required amendment methods automatically.
121.13.1 How to Configure a JAXB Typesafe Enumeration Converter Using Java
To configure a mapping with a JAXBTypesafeEnumConverter in Java, use a descriptor amendment method (see Section 119.35, "Configuring Amendment Methods"). Example 121-16 illustrates an amendment method that configures an XMLDirectMapping with a JAXBTypesafeEnumConverter. In this example, attribute _Val is mapped to a JAXB typesafe enumeration corresponding to typesafe enumeration class MyTypesafeEnum.
Example 121-16 Creating a JAXB Typesafe Enumeration XML Mapping
public class DescriptorAfterLoads {

    public static void amendRootImplDescriptor(ClassDescriptor descriptor) {
        DatabaseMapping _ValMapping = descriptor.getMappingForAttributeName("_Val");
        JAXBTypesafeEnumConverter _ValConverter = new JAXBTypesafeEnumConverter();
        ValConverter.setEnumClassName("MyTypesafeEnum");
        ((XMLDirectMapping) _ValMapping).setConverter(_ValConverter);
    }
}
121.14 Configuring Container Policy
Collection mapping container policy specifies the concrete class TopLink should use when reading target objects from the database.
Collection mappings can use any concrete class that implements the java.util.List, java.util.Set, java.util.Collection, or java.util.Map interface. You can map object attributes declared as List, Set, Collection, Map, or any subinterface of these interfaces, or as a class that implements one of these interfaces.
By default, the TopLink runtime uses the following concrete classes from the oracle.toplink.indirection package for each of these container types:
-
List–IndirectListorVector -
Set–IndirectSetorHashSet -
Collection–IndirectListorVector -
Map–IndirectMaporHashMap
Alternatively, you can specify in the mapping the concrete container class to be used. When TopLink reads objects from the database that contain an attribute mapped with a collection mapping, the attribute is set with an instance of the concrete class specified. For example, TopLink does not sort in memory. If you want to sort in memory, override the default Set type (IndirectList) with java.util.TreeSet as the concrete collection type. By default, a collection mapping's container class is java.util.Vector.
Note:
If you are using TopLink Workbench and you override the defaultCollection class with a custom Collection class of your own, you must put your custom Collection class on the TopLink Workbench classpath (see Section 5.2, "Configuring the TopLink Workbench Environment").Table 121-15 summarizes which mappings support this option.
Table 121-15 Mapping Support for Container Policy
| Mapping | List | Set | Collection | Map | How to Use Oracle JDeveloper | How to Configure Container Policy Using TopLink Workbench |
How to Configure Container Policy Using Java |
|---|---|---|---|---|---|---|---|
|
|
|
|
|
|
|
|
|
|
|
|
|
|
|
|
|
|
|
|
|
|
|
|
|
|
|
|
|
|
|
|
|
|
|
|
|
|
|
|
|
|
|
|
|
|
|
|
|
|
|
|
|
|
|
|
|
|
|
|
|
|
|
|
|
|
|
|
|
|
|
|
|
|
|
|
|
|
|
|
|
|
|
|
|
|
|
|
|
|
|
|
|
|
|
|
|
|
|
|
|
|
|
|
|
|
|
|
|
|
|
|
|
|
|
|
|
|
|
|
|
|
|
|
|
|
|
|
|
|
|
|
|
|
|
|
|
|
|
|
|
|
|
121.14.1 How to Configure Container Policy Using TopLink Workbench
To specify a mapping's container policy, use this procedure:
-
Select the mapped attribute in the Navigator. Its properties appear in the Editor.
-
Click the General tab. The General tab appears.
-
Click the Advanced button. The Advanced Container Options appear on the General tab.
Figure 121-14 General Tab, Advanced Container Options
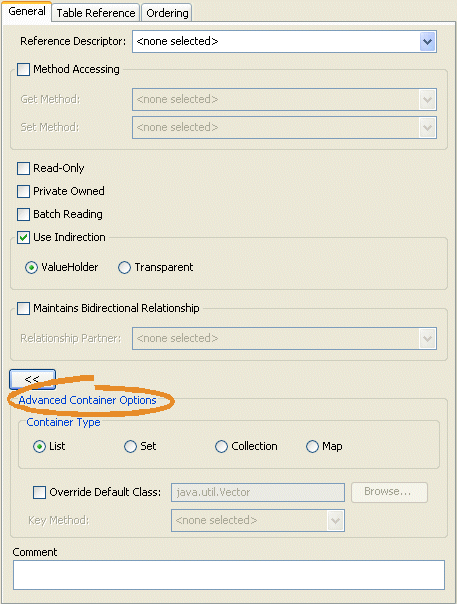
Description of "Figure 121-14 General Tab, Advanced Container Options"
Use the following Advanced Container Options fields on the General tab to specify the container options:
| FieldFoot 1 | Description |
|---|---|
| Container Type | Specify the type of Collection class to use:
|
| Override Default Class | Specify to use a custom class as the mapping's container policy. Click Browse to select a different class. The container class must implement (directly or indirectly) the java.util.Collection interface. |
| Key Method | If you configure Container Type as Map, use this option to specify the name of the zero argument method whose result, when called on the target object, is used as the key in the Hashtable or Map. This method must return an object that is a valid key in the Hashtable or Map. |
Footnote 1 Not all mappings support all options. For more information, see Table 121-15.
121.14.2 How to Configure Container Policy Using Java
Classes that implement the oracle.toplink.mappings.ContainerMapping interface provide the following methods to set the container policy:
-
useCollectionClass(java.lang.Class concreteClass)–Configure the mapping to use an instance of the specifiedjava.util.Collectioncontainer class to hold the target objects. -
useMapClass(java.lang.Class concreteClass, java.lang.String methodName)–Configure the mapping to use an instance of the specifiedjava.util.Mapcontainer class to hold the target objects. The key used to index a value in theMapis the value returned by a call to the specified zero-argument method. The method must be implemented by the class (or a superclass) of any value to be inserted into theMap.
Classes that extend oracle.toplink.mappings.CollectionMapping (which implements the ContainerMapping interface) also provide the following methods to set the container policy:
-
useSortedSetClass(java.lang.Class concreteClass, java.util.Comparator comparator)–Configure the mapping to use an instance of the specifiedjava.util.SortedSetcontainer class. Specify theComparatorto use to sort the target objects.
Example 121-17 shows how to configure a DirectCollectionMapping to use a java.util.ArrayList container class.
Example 121-17 Direct Collection Mapping
// Create a new mapping and register it with the source descriptor
DirectCollectionMapping phonesMapping = new DirectCollectionMapping();
phonesMapping.setAttributeName("phones");
phonesMapping.setGetMethodName("getPhones");
phonesMapping.setSetMethodName("setPhones");
phonesMapping.setReferenceTableName("PHONES_TB");
phonesMapping.setDirectFieldName("PHONES");
phonesMapping.useCollectionClass(ArrayList.class); // set container policy
descriptor.addMapping(phonesMapping);
121.15 Configuring Attribute Transformer
A transformation mapping is made up of an attribute transformer for field-to-attribute transformation at read (unmarshall) time and one or more field transformers for attribute-to-field transformation at write (marshall) time (see Section 121.16, "Configuring Field Transformer Associations").
This section describes how to configure the attribute transformer that a transformation mapping uses to perform the field-to-attribute transformation at read (unmarshal) time.
You can do this using either a method or class-based transformer.
A method-based transformer must map to a method in the domain object.
A class-based transformer allows you to place the transformation code in another class, making this approach non-intrusive: that is, your domain object does not need to implement a TopLink interface or provide a special transformation method
Table 121-16 summarizes which mappings support this option.
Table 121-16 Mapping Support for Attribute Transformer
| Mapping | How to Use Oracle JDeveloper | How to Configure Attribute Transformer Using TopLink Workbench |
How to Configure Attribute Transformer Using Java |
|---|---|---|---|
|
|
|
|
|
|
|
|
|
|
|
|
|
|
121.15.1 How to Configure Attribute Transformer Using TopLink Workbench
To specify a mapping's attribute transformer, use this procedure:
-
Select the transformation mapping in the Navigator. Its properties appear in the Editor.
Figure 121-15 Transformation Mapping, Attribute Transformer Field
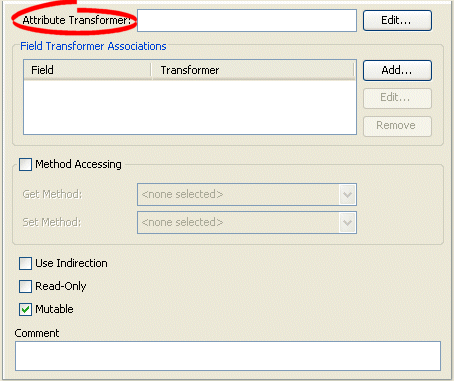
Description of "Figure 121-15 Transformation Mapping, Attribute Transformer Field"
-
Click Edit. The Specify Transformer dialog box appears.
Figure 121-16 Specify Transformer Dialog Box
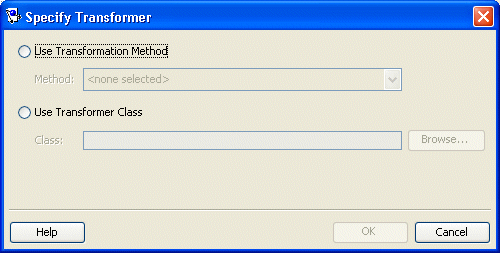
Description of "Figure 121-16 Specify Transformer Dialog Box"
Use the following information to enter data in each field of the dialog box and click OK:
| Field | Description |
|---|---|
| Use Transformation Method | Select a specific method to control the transformation. A method based transformer must map to a method in the domain object. |
| Use Transformer Class | Select a specific class to control the transformation. The class must be available on the TopLink Workbench application classpath. |
121.15.2 How to Configure Attribute Transformer Using Java
You can configure a method-based attribute transformer using AbstractTransformationMapping method setAttributeTransformation, passing in the name of the domain object method to use.
You can configure a class-based attribute transformer using AbstractTransformationMapping method setAttributeTransformer, passing in an instance of oracle.toplink.mappings.Transfomers.AttributeTransformer.
A convenient way to create an AttributeTransformer is to extend AttributeTransformerAdapter.
121.16 Configuring Field Transformer Associations
A transformation mapping is made up of an attribute transformer for field-to-attribute transformation at read (unmarshall) time (see Section 121.15, "Configuring Attribute Transformer") and one or more field transformers for attribute-to-field transformation at write (marshall) time.
This section describes how to configure the field transformers that a transformation mapping uses to perform the object attribute-to-field transformation at write (marshal) time.
You can do this using either a method or class-based transformer.
A method-based transformer must map to a method in the domain object.
A class-based transformer allows you to place the transformation code in another class, making this approach non-intrusive: that is, your domain object does not need to implement a TopLink interface or provide a special transformation method.
Table 121-17 summarizes which mappings support this option.
Table 121-17 Mapping Support for Field Transformer
| Mapping | How to Use Oracle JDeveloper | How to Configure Field Transformer Associations Using TopLink Workbench |
How to Configure Field Transformer Associations Using Java |
|---|---|---|---|
|
|
|
|
|
|
|
|
|
|
|
|
|
|
121.16.1 How to Configure Field Transformer Associations Using TopLink Workbench
Use this procedure to complete the Object->Field Method fields:
-
Select the mapped attribute in the Navigator. Its properties appear in the Editor.
Figure 121-17 Transformation Mapping, Field Transformer Associations
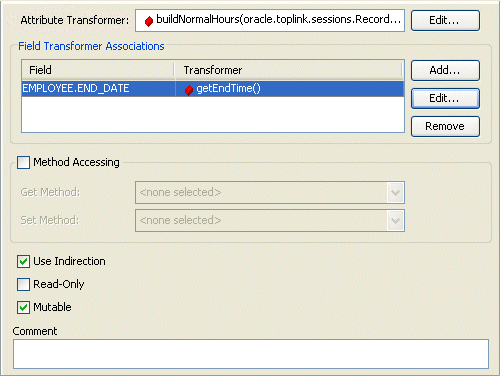
Description of "Figure 121-17 Transformation Mapping, Field Transformer Associations"
To add a new association, click Add. Continue with Section 121.16.1.1, "Specifying Field-to-Transformer Associations".
To change an existing association, click Edit. Continue with Section 121.16.1.1, "Specifying Field-to-Transformer Associations".
To delete an existing association, select the field transformation association and click Delete.
121.16.1.1 Specifying Field-to-Transformer Associations
To specify the actual transformation method or class used for the field of a transformation mapping, use this procedure.
-
From the Transformation Mapping, Field Transformer Associations, click Add or Edit. The Specify Field-Transformer Association dialog box appears.
Figure 121-18 Specify Field-Transformer Association Dialog Box
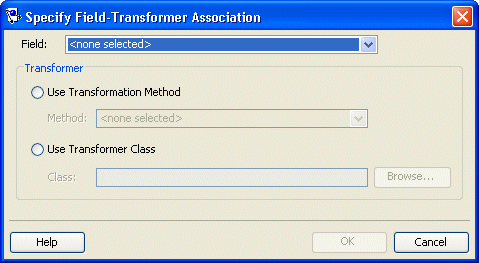
Description of "Figure 121-18 Specify Field-Transformer Association Dialog Box"
Use the following information to complete each field on the dialog box:
| Field | Description |
|---|---|
| Field | Select the database field (from the descriptor's associated table) for this transformation. |
| Transformer | Select one of the following methods to control the transformation: |
| Use Transformation Method | Select a specific method to control the transformation. A method based transformer must map to a method in the domain object. |
| Use Transformer Class | Select a specific class to control the transformation. The class must be available on TopLink Workbench application classpath. |
121.16.2 How to Configure Field Transformer Associations Using Java
You can specify a specific transformation method on your domain object or an instance of oracle.toplink.mappings.Transfomers.FieldTransformer (you can also extend the FieldTransformerAdapter). Using a FieldTransformer is non-intrusive: that is, your domain object does not need to implement a TopLink interface or provide a special transformation method.
You can configure a method-based field transformer using AbstractTransformationMapping method addFieldTransformation, passing in the name of the database field and the name of the domain object method to use.
You can configure a class-based field transformer using AbstractTransformationMapping method addFieldTransformer, passing in the name of the database field and an instance of oracle.toplink.mappings.Transfomers.FieldTransformer.
A convenient way to create a FieldTransformer is to extend FieldTransformerAdapter.
121.17 Configuring Mutable Mappings
Direct mappings typically map simple, nonmutable values such as String or Integer. Transformation mappings can potentially map complex mutable object values, such as mapping several database field values to an instance of a Java class.
If a transformation mapping maps a mutable value, TopLink must clone and compare the value in a unit of work (see Section 119.29, "Configuring Copy Policy").
By default, TopLink assumes that all transformation mappings are mutable. If the mapping maps a simple immutable value, you can improve the unit of work performance by configuring the IsMutable option to false.
By default, TopLink also assumes that all direct mappings are mutable unless a serialized converter is used. These mappings can also set the IsMutable option. You should set it if you want to modify Date or Calendar fields.
Table 121-18 summarizes which mappings support this option.
For more information, see Section 2.8.11, "Mutability".
Table 121-18 Mapping Support for Mutable Mappings
| Mapping | How to Use Oracle JDeveloper | How to Configure Mutable Mappings Using TopLink Workbench |
How to Configure Mutable Mappings Using Java |
|---|---|---|---|
|
|
|
|
|
|
|
|
|
|
|
|
|
|
|
|
|
|
|
|
|
|
|
|
|
|
|
|
|
121.17.1 How to Configure Mutable Mappings Using TopLink Workbench
Use this table to complete the Object->Field Method fields:
-
Select the mapped attribute in the Navigator. Its properties appear in the Editor.
Figure 121-19 Transformation Mapping, Mutable Option
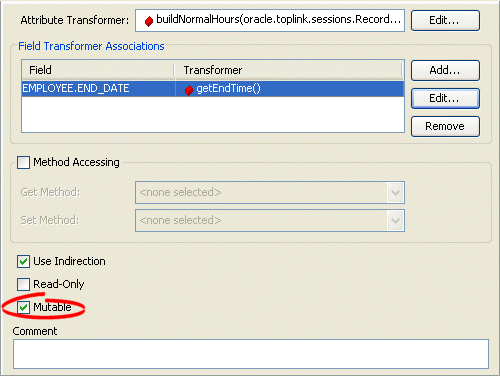
Description of "Figure 121-19 Transformation Mapping, Mutable Option"
By default, the IsMutable option is selected in all transformation mappings. If the mapping maps to a simple atomic value, unselect this option.
121.17.2 How to Configure Mutable Mappings Using Java
You can specify whether or not a mapping is mutable using AbstractTransformationMapping method setIsMutable for transformation mappings, and AbstractDirectMapping method isMutable for direct mappings.
121.18 Configuring Bidirectional Relationship
TopLink can automatically manage the bidirectional relationship (see Section 2.14.3.4, "Maintaining Bidirectional Relationships"): if one side of the relationship is set or modified, TopLink will automatically set the other side. To enable this functionality, use the value holder indirection (see Section 17.2.4.1, "Value Holder Indirection") for one-to-one mappings, and transparent collections (see Section 17.2.4.2, "Transparent Indirect Container Indirection")–for one-to-many and many-to-many mappings.
Note:
Oracle does not recommend using this TopLink feature: if the object model is used outside the persistence context it must be responsible for managing the bidirectional relationship.Instead, your application should maintain the bidirectional relationship in its getter and setter methods.
Table 121-18 summarizes which mappings support this option.
Table 121-19 Mapping Support for Mutable Mappings
| Mapping | How to Use Oracle JDeveloper | How to Configure Bidirectional Relationship Using TopLink Workbench |
How to Configure Bidirectional Relationship Using Java |
|---|---|---|---|
|
|
|
|
|
|
|
|
|
|
|
|
|
|
|
|
|
|
|
|
|
|
|
|
121.18.1 How to Configure Bidirectional Relationship Using TopLink Workbench
To maintain a bidirectional relationship for a mapping, use this procedure:
-
Select the mapped attribute in the Navigator. Its properties appear in the Editor.
-
Click the General tab. The General tab appears.
Figure 121-20 General tab, Maintains Bidirectional Relationship option
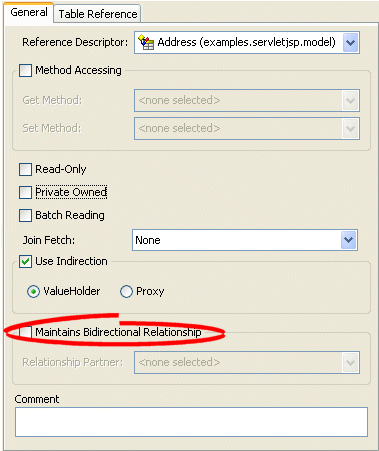
Description of "Figure 121-20 General tab, Maintains Bidirectional Relationship option"
Use this table to enter data in the following fields on the tab:
| Field | Description |
|---|---|
| Maintains Bidirectional Relationship | Specify if TopLink should maintain the bidirectional link for this relational mapping. |
| Relationship Partner | Select the relationship partner (from the list of mapped attributes of the Reference Descriptor) for this bidirectional relationship. |
121.18.2 How to Configure Bidirectional Relationship Using Java
If a mapping has a bidirectional relationship (see Section 2.14.3.4, "Maintaining Bidirectional Relationships") in which the two classes in the relationship reference each other with one-to-one mappings, then set up the foreign key information as follows:
-
One mapping must call the
setForeignKeyFieldNamemethod. -
The other mapping must call the
setTargetForeignKeyFieldNamemethod.
You can also set up the composite foreign key information by calling the addForeignKeyFieldName and addTargetForeignKeyFieldName methods. Because TopLink enables indirection (lazy loading) by default, the attribute must be a ValueHolderInterface.
Note:
When your application does not use a cache, enable indirection for at least one object in a bidirectional relationship. In rare cases, disabling indirection on both objects in the bidirectional relationship can lead to infinite loops. For more information, see the following:Example 121-18 demonstrates setting of bidirectional relationship between the Policy and Carrier classes. The foreign key is stored in the Policy's table referencing the composite primary key of the Carrier.
Example 121-18 Implementing a Bidirectional Mapping Between Two Classes that Reference Each Other
public class Policy {
    ...
    // create the mapping that references the Carrier class
    OneToOneMapping carrierMapping = new OneToOneMapping();
    carrierMapping.setAttributeName("carrier");
    carrierMapping.setReferenceClass(Carrier.class);
    carrierMapping.addForeignKeyFieldName("INSURED_ID", "CARRIER_ID");
    carrierMapping.addForeignKeyFieldName("INSURED_TYPE", "TYPE");
    descriptor.addMapping(carrierMapping);
    ...
}

public class Carrier {
    ...
    // create the mapping that references the Policy class
    OneToOneMapping policyMapping = new OneToOneMapping();
    policyMapping.setAttributeName("masterPolicy");
    policyMapping.setReferenceClass(Policy.class);
    policyMapping.addTargetForeignKeyFieldName("INSURED_ID", "CARRIER_ID");
    policyMapping.addTargetForeignKeyFieldName("INSURED_TYPE", "TYPE");
    descriptor.addMapping(policyMapping);
    ...
}
121.19 Configuring the Use of a Single Node
For the XML-based mappings that Table 121-6 summarizes, when you map a list value, you can configure whether or not the mapping unmarshalls (writes) the list to a single node, like <item>aaa bbb ccc</item>, or to multiple nodes, like the following:
<item>aaa</item>
<item>bbb</item>
<item>ccc</item>
Table 121-6 summarizes which mappings support this option.
Table 121-20 Mapping Support for Use Single Node
| Mapping | How to Use Oracle JDeveloper | How to Configure the Use of a Single Node Using TopLink Workbench |
How to Configure the Use of a Single Node Using Java |
|---|---|---|---|
|
|
|||
|
|
|
|
|
|
|
|||
|
|
|
|
|
|
|
|||
|
|
|
|
Footnote 1 When used with XML records only (see Section 76.4, "Configuring Record Format").
121.19.1 How to Configure the Use of a Single Node Using TopLink Workbench
To configure a mapping to use a single node, use this procedure.
-
Select the mapped attribute in the Navigator. Its properties appear in the Editor.
-
Click the General tab. The General tab appears.
Figure 121-21 General Tab, Use Single Node Option
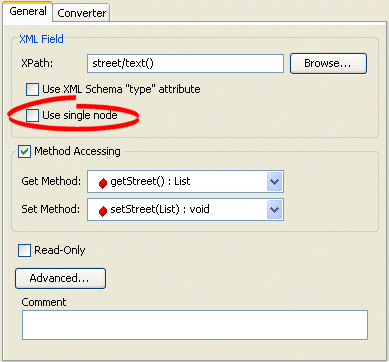
Description of "Figure 121-21 General Tab, Use Single Node Option"
To configure the mapping to unmarshall (write) a list value to a single node (like <item>aaa bbb ccc</item>), click Use single node.
By default, the mapping unmarshalls a list value to separate nodes.
121.19.2 How to Configure the Use of a Single Node Using Java
Use AbstractCompositeDirectCollectionMapping method setUsesSingleNode to configure the mapping to write a list value to a single node by passing in a value of true. To configure the mapping to write a list value to multiple nodes, pass in a value of false.
For any mapping that takes an XMLField, use XMLField method setUsesSingleNode to configure the mapping to write a list value to a single node by passing in a value of true. To configure the mapping to write a list value to multiple nodes, pass in a value of false. Example 121-19 shows how to use this method with an XMLDirectMapping:
121.20 Configuring the Use of CDATA
For the XML-based mappings that Table 121-6 summarizes, when you create a mapping, you can configure whether or not the mapping's text is wrapped in a <![CDATA[...]]> statement.
Table 121-6 summarizes which mappings support this option.
Table 121-21 Mapping Support for Use of CDATA
| Mapping | How to Use Oracle JDeveloper | How to Use TopLink Workbench | How to Configure the Use of CDATA Using Java |
|---|---|---|---|
|
|
|||
|
|
|||
|
|
|||
|
|
121.20.1 How to Configure the Use of CDATA Using Java
Use the isCDATA() method on an XMLDirectMapping or XMLCompositeDirectCollectionMapping to specify if the mapping's text is wrapped in a <![CDATA[...]]> statement.
Example 121-19 shows the results of using this method:
When isCDATA = false on the name mapping, TopLink writes the text as a regular text node:
<employee>
  <name>Jane Doe</name>
</employee>
When isCDATA = true on the name mapping, TopLink wraps the text in a <![CDATA[...]]> statement:
<employee>
  <name>
    <![CDATA[Jane Doe]]>
  </name>
</employee>
