8 Adding Interactivity to Your Integrated Excel Workbook
This chapter describes how to add interactivity options to your integrated Excel workbook.
This chapter includes the following sections:
-
Section 8.1, "Introduction to Adding Interactivity to an Integrated Excel Workbook"
-
Section 8.4, "Displaying Web Pages from a Fusion Web Application"
-
Section 8.5, "Inserting Values in an ADF Table Component from a Web Page Pick Dialog"
-
Section 8.6, "Creating ADF Databound Search Forms in an Integrated Excel Workbook"
-
Section 8.7, "Adding a Form to an Integrated Excel Workbook"
-
Section 8.8, "Creating Dependent Lists of Values in an Integrated Excel Workbook"
-
Section 8.9, "Configuring a Cell to Display a Dynamically Generated Hyperlink"
-
Section 8.10, "Using Calculated Cells in an Integrated Excel Workbook"
-
Section 8.11, "Using Macros in an Integrated Excel Workbook"
8.1 Introduction to Adding Interactivity to an Integrated Excel Workbook
Adding interactivity to an integrated Excel workbook permits end users to execute action sets that invoke Oracle ADF functionality in the workbook. It also provides status messages, alert messages, and error handling in the integrated Excel workbook while these action sets execute. In addition to end-user gestures (double-click, click, select) on the Oracle ADF Desktop Integration components that invoke action sets, you can configure workbook and worksheet menu items that end users use at runtime to invoke action sets.
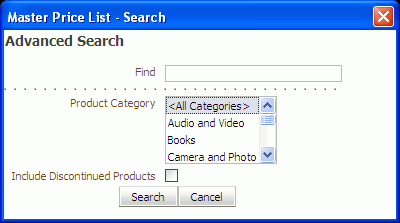
The action sets that end users invoke can make use of functionality defined in the Excel workbook and in pages of the Fusion web application with which you integrate the Excel workbook. For example, the EditPriceList-DT.xlsx workbook in the Master Price List module renders an ADF Button component that, at runtime, invokes a page from the Fusion web application. The invoked page allows end users to specify additional search criteria to what can be specified in the workbook's search form which is rendered using ADF Button, ADF Input Text, and ADF Label components.
In addition to action sets, you can configure Excel functionality, such as macros and Excel formulas, to manage the data that you want to download from or upload to your Fusion web application.
8.2 Using Action Sets
An action set is an ordered list of one or more of the following actions that execute in a specified order:
An action set can be invoked by an end-user's gesture (for example, clicking an ADF Button) or an Excel worksheet event. Where an end-user gesture invokes an action set, the name of the action set property in the ADF component's property inspector is prefaced by the name of the gesture required. The following list describes the property names that the Oracle ADF Desktop Integration module displays in property inspectors and what user gesture can invoke an action set:
-
ClickActionSetfor an ADF Button component, as an end user clicks the button to invoke the associated action set -
DoubleClickActionSetfor an ADF InputText or ADF Output Text component, as an end user double-clicks these components to invoke the associated action set -
SelectActionSetfor a worksheet menu item, as an end user selects a menu item to invoke the associated action set -
ActionSetfor a worksheet event, as no explicit end-user gesture is required to invoke the action set
You invoke the Action Collection Editor from an ADF component, worksheet menu item, or worksheet event to define or configure an action set. In addition to defining the actions that an action set invokes, you can configure the action set's Alert properties to provide feedback on the result of invocation of an action set. You configure the Status properties for an action set to display a status message to end users while an action set executes the actions you define. For information about opening the Action Collection Editor, see Section 5.10, "Using the Collection Editors".
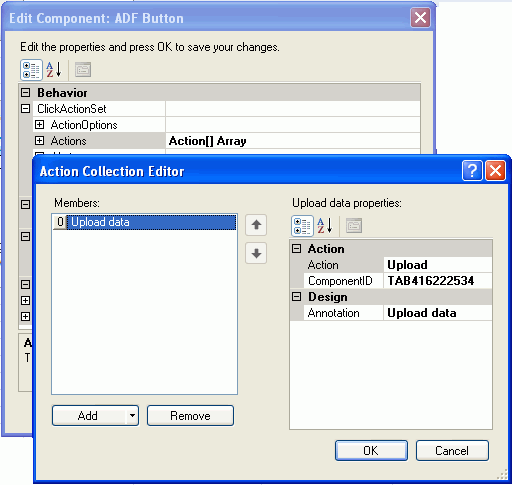
The Master Price List module provides many examples of action sets in use. One example is the ADF Button component labeled Upload Data at runtime in the EditPriceList-DT.xlsx workbook. An action set has been configured for this ADF Button component that invokes the ADF Table component's Upload action illustrated by Figure 8-1 which shows the Action Collection Editor in design mode.
Tip:
Write a description in the Annotation field for each action that you add to the Action Collection Editor. The description you write appears in the Members list view and, depending on how you write it, may be more meaningful than the default entry that the Oracle ADF Desktop Integration module generates.Execution Sequence for an Action Set
The Oracle ADF Desktop Integration module invokes the actions in an action set in the order that you specify in the Members list view.
8.2.1 How to Invoke an ADFm Action in an Action Set
You can invoke one or more ADFm actions in an action set. An ADFm action is also known as an action binding in the JDeveloper project where you develop your Fusion web application. Page definition files define what action bindings are available to invoke in a worksheet that you integrate with your Fusion web application. For more information about page definition files and action bindings in an integrated Excel workbook, see Section 4.3, "Working with Page Definition Files for an Integrated Excel Workbook".
You use the Action Collection Editor to specify an ADFm action to invoke.
To invoke an ADFm action in an action set:
-
Open the Action Collection Editor and invoke the dropdown list from the Add button illustrated here.

-
Select ADFmAction and configure its properties as described in the following list:
-
ActionIDClick the ellipsis button (...) beside the input field for
ActionIDto invoke the Binding ID picker and select the ADFm action that the action set invokes at runtime. -
AnnotationOptionally, enter a comment about the purpose of the action that you are configuring. The value you set for this property has no functional impact.
-
-
Click OK.
8.2.2 How to Invoke Component Actions in an Action Set
The ADF Table and the ADF Read-only Table components in the Oracle ADF Desktop Integration module expose actions that can be used to manage the transfer of data between Excel worksheets that you integrate with a Fusion web application. The ADF Read-only Table component exposes one component action, Download, while the ADF Table component exposes a number of other actions. More information about the actions for both components can be found in Appendix A, "Oracle ADF Desktop Integration Component Properties and Actions".
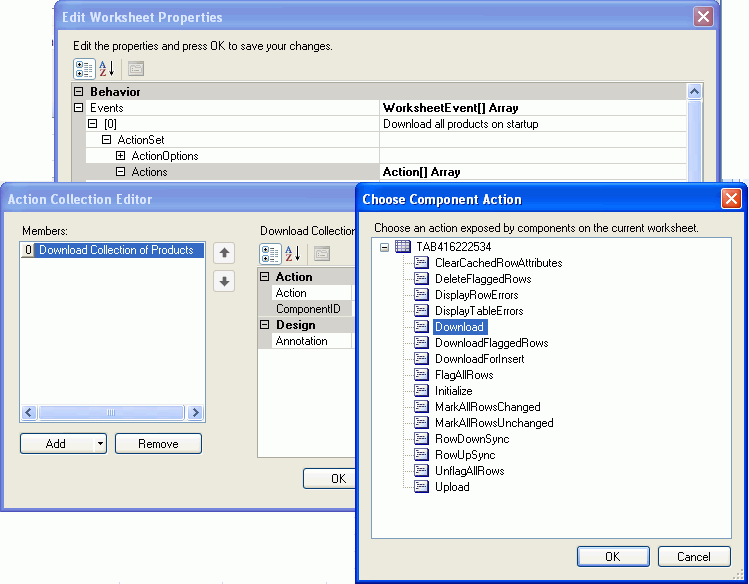
You configure action sets to invoke one or more component actions by referencing the component action in the array of actions. For example, Figure 8-2 shows the Choose Component Method dialog box where the actions exposed by the ADF Table and ADF Read-only Table components present in a worksheet can be invoked by a SelectActionSet action set.
Note:
An Excel worksheet must include an ADF Table or ADF Read-only Table component before one or more of these components' actions can be invoked by an action set.To invoke a component action from an action set:
-
Open the Action Collection Editor and invoke the dropdown list from the Add button illustrated here.

-
Select ComponentAction and configure its properties as described in the following list:
-
Click the ellipsis button (...) beside the input field for
ComponentIDto invoke the Choose Component Method dialog box and select the component action that the action set invokes at runtime. This populates theComponentIDandMethodinput fields. -
The component's action that the action set invokes at runtime.
-
AnnotationOptionally, enter a comment about the purpose of the action that you are configuring. The value you set for this property has no functional impact.
-
-
Click OK.
8.2.3 What You May Need to Know About an Action Set Invoking a Component Action
Note the following pieces of information about the behavior of action sets in integrated Excel workbooks.
Verifying an Action Set Invokes the Correct Component Action
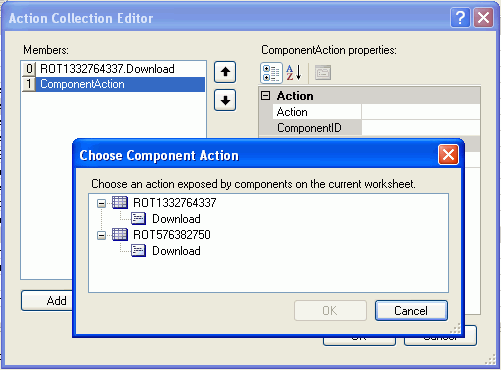
When creating an action set, make sure that you invoke the component action from the correct instance of a component when a worksheet includes more than one instance of an ADF Read-only Table or ADF Table component. Figure 8-3 shows the Choose Component Action dialog box displaying two instances of the ADF Read-only Table component. Use the value of the ComponentID property described in Table A-1 to correctly identify the instance of a component on which you want to invoke a component action.
Invoking Action Sets in a Disconnected Workbook
End users can use integrated Excel workbooks while disconnected from a Fusion web application, as described in Chapter 15, "Using an Integrated Excel Workbook Across Multiple Web Sessions and in Disconnected Mode". Some component actions, such as the Download action of the ADF Table component, require a connection to the Fusion web application to complete successfully. If an end user invokes an action set that includes such a component action, the integrated Excel workbook attempts to connect to the Fusion web application and, if necessary, invokes the authentication process described in Section 11.2, "Authenticating the Excel Workbook User".
8.2.4 How to Invoke an Action Set from a Worksheet Event
The Oracle ADF Desktop Integration module provides a number of worksheet events that, when triggered, can invoke an action set. The following worksheet events can invoke an action set:
-
Do not invoke a
Dialogaction from this event if theDialogaction'sTargetproperty is set toTaskPane.
You add an element to the array of events (WorksheetEvent[] Array) referenced by the Events worksheet property. You specify an event and the action set that it invokes in the element that you add. For more information about the Events worksheet property and the worksheet events that can invoke an action set, see Table A-19. See Table A-14 for more information about action sets.
Use the WorkSheetEvent Collection Editor to specify an action set to be invoked by a worksheet event.
To invoke an action set from a worksheet event:
-
In the Oracle ADF Desktop Integration Designer, click Worksheet Properties to display the Edit Worksheet Properties dialog box.
-
Click the ellipsis button (...) beside the input field for the
Eventsproperty to display the WorksheetEvent Collection Editor. -
Click Add to add a new element that specifies an event and a corresponding action set that the event invokes.
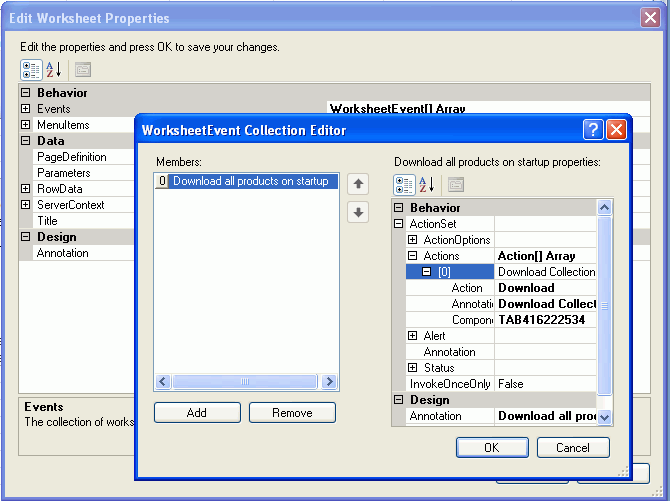
Figure 8-4 shows an example from the
EditPriceList-DT.xlsxfile in the Master Price List module where the worksheet event,Startup, invokes an action set that invokes the ADF Table component'sDownloadaction. -
Click OK.
8.2.5 How to Display a Status Message While an Action Set Executes
You can display a status message to end users while an action set executes by specifying values for the Status properties in an action set.
Some of the default values for properties in the ActionSet.Status group are EL expressions that resolve to strings defined in the reserved resource bundle at runtime. You can replace these default values with EL expressions that refer to your custom resource bundles. For more information, see Section 10.2, "Using Resource Bundles in an Integrated Excel Workbook".
You use the Action Collection Editor to configure values for the ActionSet.Status properties.
-
Open the Action Collection Editor.
-
Set values for the properties in the
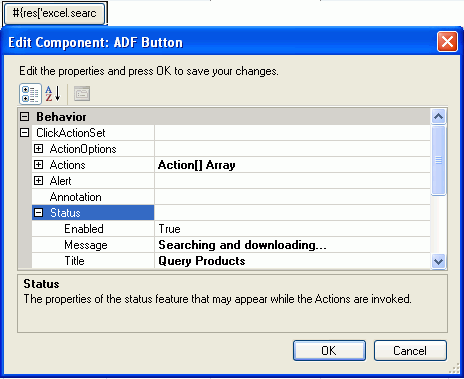
ActionSet.Statusgroup of properties as described in the following table.For this property... Enter or select this value... EnabledTrueto display a status message.Trueis the default value.MessageAn EL expression or string that resolves to the status message to display at runtime. For example, the Search button in the Master Price List module's EditPriceList-DT.xlsxfile has the following value configured for theMessageproperty:Searching and downloading...Title An EL expression or string that resolves to the title of the status message to display at runtime. For example, the Search button in the Master Price List module's EditPriceList-DT.xlsxfile has the following value configured for theTitleproperty:Query ProductsFigure 8-5 shows the values configured for the
ActionSet.Statusgroup of properties of the Search ADF Button component in theEditPriceList-DT.xlsxworkbook of the Master Price List module that is labeled Search at runtime.For more information about the
ActionSet.Statusgroup of properties, see the entry forStatusin Table A-14. -
Click OK.
8.2.6 What Happens at Runtime When an Action Set Displays a Status Message
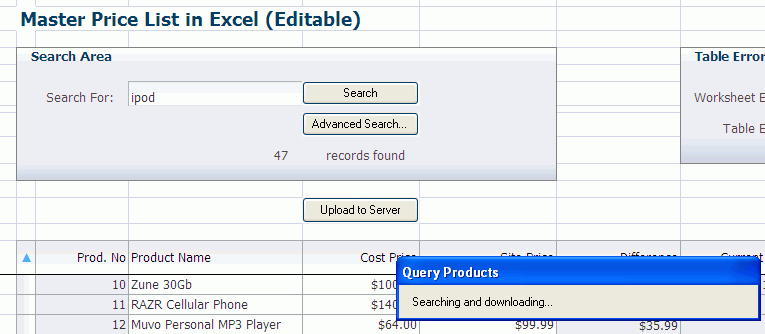
Once an action set is invoked, a status message appears if the ActionSet.Status properties are configured to display a status message. Figure 8-6 shows the status message that appears at runtime when the action set configured for the Search button in the EditPriceList-DT.xlsx workbook executes.
8.2.7 How to Provide an Alert After the Invocation of an Action Set
You can display an alert message to end users that notifies them when an action set operation completes successfully or fails. For example, you can display a message when all actions in an action set succeed or when there was at least one failure. The ActionSet.Alert group of properties configures this behavior.
Note:
An alert message does not appear if an end user cancels the execution of an action set. For example, you configure an alert message to appear after an action set that invokes a web page in a popup dialog completes execution. At runtime, the end user cancels execution of the action set by closing the popup dialog using the close button of the Excel web browser control that hosts the popup dialog. In this scenario, no alert message appears. For more information about displaying web pages, see Section 8.4, "Displaying Web Pages from a Fusion Web Application".Many of the default values for properties in the ActionSet.Alert group are EL expressions that resolve to strings defined in the reserved resource bundle at runtime. You can replace these default values with EL expressions that refer to your custom resource bundles. For more information, see Section 10.2, "Using Resource Bundles in an Integrated Excel Workbook".
You use the Action Collection Editor to configure values for the ActionSet.Alert group of properties.
To add an alert to an action set:
-
Open the Action Collection Editor.
-
Set values for the properties in the
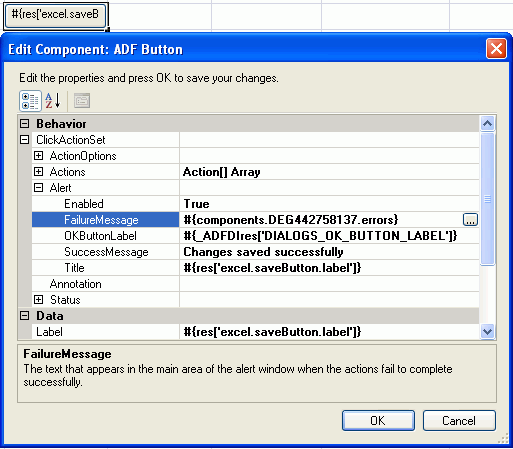
ActionSet.Alertgroup of properties as described in the following table.For this property... Enter or select this value... EnabledSelect Truefrom the dropdown list to display an alert message once the action set completes. The default value isFalse.FailureMessageSpecify an EL expression or string that evaluates to a message to appear in the dialog box if errors occur during execution of the action set. For example, the Upload to Server button in the Master Price List module's EditPriceList-DT.xlsxworkbook has the following value configured for theFailureMessageproperty:#{components.TAB442758137.errors}The Upload to Server button invokes an action set that, in turn, invokes the ADF Table component's
Uploadaction. The EL expression specified forFailureMessageretrieves error messages if theUploadaction encounters errors. For more information about error handling, see Section 12.4, "Error Reporting in an Integrated Excel Workbook".OKButtonLabelSpecify an EL expression that evaluates to a message to appear in the OK button of the dialog box. The default EL expression is: #{_ADFDIres['DIALOGS_OK_BUTTON_LABEL']}SuccessMessageSpecify an EL expression that evaluates to a message to appear in the dialog box if no errors occur during the execution of the action set. For example, the Save Changes button in the Master Price List module's EditPriceList-DT.xlsxworkbook has the following value configured for theSuccessMessageproperty:Changes saved successfullyTitleSpecify an EL expression that evaluates to a message to appear in the title area of the dialog box. For example, the Save Changes button in the Master Price List module's EditPriceList-DT.xlsxworkbook has the following value configured for theTitleproperty:#{res['excel.saveButton.label']}Figure 8-7 shows the values configured for an ADF Button component's
ActionSet.Alertgroup of properties in theEditPriceList-DT.xlsxworkbook of the Master Price List module. This ADF Button component is labeled Upload to Server at runtime. -
Click OK.
8.2.8 What Happens at Runtime When an Action Set Provides an Alert
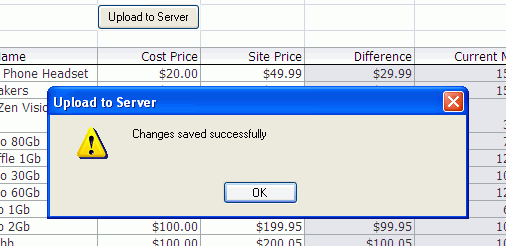
Figure 8-8 shows the alert message that appears at runtime when the action set invoked by the ADF Button component labeled Upload to Server successfully completes execution.
8.2.9 How to Configure Error Handling for an Action Set
You specify values for an action set's ActionOptions properties to determine what an action set does if one of the following events occurs:
-
An action in the action set fails
-
All actions in the action set complete successfully
For information about how to invoke these editors, or about an ADF component's property inspector, see Chapter 5, "Getting Started with the Development Tools". More information about action set properties can be found in Table A-13.
To configure error handling for an action set:
-
Open the appropriate editor or property inspector and configure values for the action set's
ActionOptionsproperties as described in the following table. -
Click OK.
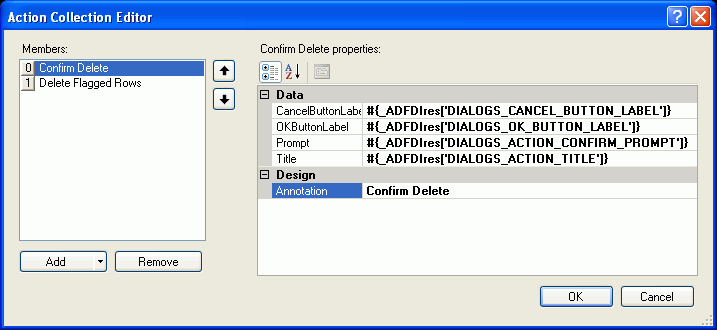
8.2.10 How to Invoke a Confirmation Action in an Action Set
The Confirmation action presents the end user with a simple message dialog that displays the title and prompt message specified in the Confirmation action properties.
The execution of the action set pauses until the end user clicks one of the two buttons provided. If the user clicks OK, the action sets proceed with the remaining actions in the Action Set. If the user clicks Cancel, the action set is aborted at that point and the remaining actions are not invoked. As there is no error or success, the FailureActionID or SuccessActionID action is not invoked.
To invoke a Confirmation action from a component
-
Open the Action Collection Editor and click the down arrow in the Add button to open a dropdown list, as illustrated here.

-
Select Confirmation and configure its Data properties as described in the following list:
-
CancelButtonLabelSpecify an EL expression or string that evaluates to a message to appear in the Cancel button of the dialog box. The default EL expression is:
#{_ADFDIres['DIALOGS_CANCEL_BUTTON_LABEL']} -
OKButtonLabelSpecify an EL expression or string that evaluates to a message to appear in the OK button of the dialog box. The default EL expression is:
#{_ADFDIres['DIALOGS_OK_BUTTON_LABEL']} -
PromptSpecify an EL expression or string that evaluates to a message to appear as the prompt of the dialog box. The default EL expression is:
#{_ADFDIres['DIALOGS_ACTION_CONFIRM_PROMPT']} -
TitleSpecify an EL expression or string that evaluates to a title of the confirmation dialog to display at runtime. The default EL expression is:
#{_ADFDIres['DIALOGS_ACTION_TITLE']}
-
-
Optionally, enter a comment in the
Annotationproperty about the purpose of the action that you are configuring. The value you set for this property has no functional impact. -
Click OK.
Figure 8-9 shows the Action Collection Editor with default attribute values for a Delete button.
8.2.11 What Happens at Runtime When an Action Set Provides a Confirmation
Once the action set is invoked, the user is prompted with a confirmation dialog box. If the user clicks OK, the next action operation is performed; and if the user clicks Cancel, the Action Set execution terminates without an error.
Note:
If the user cancels a Confirmation action, theFailureActionID binding will not run.Figure 8-10 shows a default Confirmation dialog box with OK and Cancel buttons.
8.3 Creating Menu Items
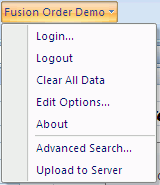
You can create a menu with items that invoke Oracle ADF functionality in your integrated Excel workbook. Setting the ToolbarMenu.Enabled workbook property to True makes this menu appear. The ToolbarMenu.Title property determines the title of the menu that the end user sees at runtime. At runtime, end users must click Excel's Add-Ins tab to view any menu that you configure using the ToolbarMenu properties. Any menu that you configure appears in the Custom Toolbar section of the Add-Ins tab illustrated by Figure 8-11.
Two groups of items can appear in the menu at runtime: items that invoke commands on the workbook and items that invoke commands on the current worksheet. You configure the WorkbookMenuItems[] array in the properties of the workbook so that the menu contains items allowing an end user to invoke workbook actions such as Login and Logout. You configure the WorksheetMenuItem[] array in the properties of the worksheet so that the menu contains items allowing a user to invoke an action set.
A menu separator appears between the workbook menu items and the worksheet menu items. If a worksheet has no items defined for the menu, no menu separator appears. Worksheet menu items appear only if the worksheet is in focus.
Figure 8-12 shows a menu at runtime where the workbook actions appear first, followed by a menu separator, and finally the worksheet menu items that invoke SelectActionSet action sets.
8.3.1 How to Configure a Workbook Menu Item
To define a workbook menu item, you configure a number of workbook properties. By default, menu items for all workbook actions are defined in the workbook toolbar. The following procedure shows how to create or remove an item in the menu by using the workbook action, Login, as an example.
To define a workbook menu item:
-
Click Workbook Properties in the Oracle ADF Desktop Integration Designer.
-
Click ToolbarMenu and then click the ellipsis button (...) beside the
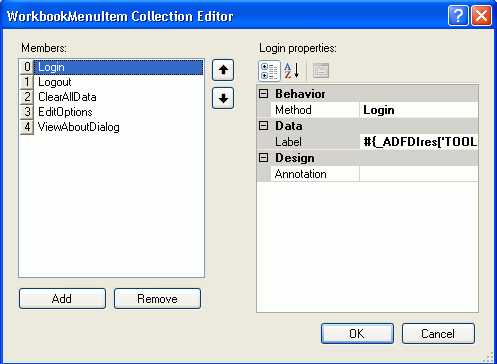
WorkbookMenuItem[]array to display the WorkbookMenuItem Collection Editor illustrated in Figure 8-13. -
Click Add and specify values for the properties of the workbook menu item as follows:
-
MethodSpecify the workbook action that you want the menu item to invoke.
-
LabelEnter a value in the input field that appears as the label at runtime. Alternatively, invoke the expression builder by clicking the ellipsis button (...) and write an EL expression that resolves to a string value in a resource bundle. Note that the runtime value that appears in the label cannot exceed 255 characters. A runtime value that exceeds 255 characters is truncated so that only 255 characters appear.
For more information about using resource bundles, see Section 10.2, "Using Resource Bundles in an Integrated Excel Workbook".
For more information about labels, see Section 9.4, "Using Labels in an Integrated Excel Workbook".
Tip:
Use the arrow controls to determine the order in which menu items appear at runtime.
-
8.3.2 How to Configure a Worksheet Menu Item
To define a worksheet menu item, you configure properties for the worksheet using the property inspector. By default, no menu items are defined for the toolbar in the worksheet properties. You add members to the array that is referenced by the MenuItems property in the properties of the worksheet.
WARNING:
Set the ToolbarMenu.Enabled workbook property to TRUE to display menu items. If ToolbarMenu.Enabled is set to FALSE, no menu items appear. For more information about workbook properties, see Table A-18.
To define a worksheet menu item:
-
Click Worksheet Properties in the Oracle ADF Desktop Integration Designer.
-
Click the ellipsis button (...) beside the input field for the
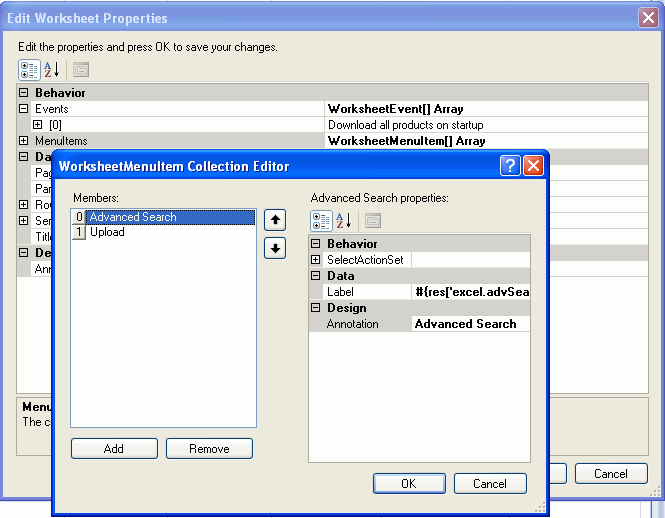
MenuItemsproperty to invoke the WorksheetMenuItem Collection Editor illustrated in Figure 8-14. -
Click Add to add a new menu item in the Members list of the collection editor.
-
Configure the properties of
SelectActionSetto specify the type of action(s) that the menu item invokes.
8.4 Displaying Web Pages from a Fusion Web Application
You configure a Dialog action in an action set to display pages from the Fusion web application with which you integrate your Excel workbook. These pages provide additional functionality for your integrated Excel workbook. Examples of additional functionality that you can provide include search dialogs and display pick dialogs that interact with your Fusion web application. You can also configure upload options.
The Dialog action in an action set can be configured to display in one of the following two types of dialog:
The value for the Dialog.Target property (Popup or TaskPane) of the component's action set determines where a web page is rendered.
The value for the Dialog.Page property specifies the web page to display when the action is invoked. Valid values include a URL relative to the value of the WebAppRoot property or an absolute URL. For example, the EditPriceList-DT.xlsx workbook in the Master Price List module specifies the following relative URL as a value for the page to invoke when a user clicks the Advanced Search button at runtime:
/faces/secured/excelAdvSearch.jspx
Absolute URLs such as the following are also valid:
http://www.oracle.com/technology/products/middleware/index.html
Note:
TheDialog.Page property does not accept EL expressions8.4.1 How to Display a Web Page in a Popup Dialog
You can configure a Dialog action in an action set to invoke a web page from your Fusion web application in a modal popup dialog hosted by Excel's web browser control. This feature provides end users with functionality that allows them to, for example, input values displayed by a page from the Fusion web application into the integrated Excel workbook.
The web page that the action set invokes must contain a reserved HTML Document Object Model (DOM) element (for example, a span element) that has a case-sensitive ID attribute set to ADFdi_CloseWindow. Example 8-1 shows how you can automatically set the value of the span element in the excelAdvSearch.jspx page of the Master Price List module using the rendered property of the f:verbatim tag.
Example 8-1 Use of HTML Document Object Model Span Element
<f:verbatim rendered="#{requestScope.searchAction eq 'search'}">
                <span id="ADFdi_CloseWindow">Continue</span>
        </f:verbatim>
<f:verbatim rendered="#{requestScope.searchAction eq 'cancel'}">
                <span id="ADFdi_CloseWindow">Abort</span>
        </f:verbatim>
Figure 8-15 shows the excelAdvSearch.jspx page hosted by the EditPriceList-DT.xlsx workbook's browser control.
In scenarios where you cannot use the rendered property of the f:verbatim tag as outlined in Example 8-1, you may need to:
-
Create a backing bean that exposes the
Dialogaction's result value as a property -
Use an action listener to invoke the backing bean, and an EL expression in the span element to set the value
ADFdi_CloseWindowto the bean property value.
Whichever approach you take, the Oracle ADF Desktop Integration module monitors the value of ADFdi_CloseWindow to determine when to close the popup dialog. If ADFdi_CloseWindow references:
-
An empty string or is not present, the popup dialog remains open.
-
"
Continue", the popup dialog closes and the action set invokes its next action.The following example shows
ADFdi_CloseWindowassigned a value of "Continue":var closeWindowSpan = document.getElementById("ADFdi_CloseWindow");closeWindowSpan.innerHTML = "Continue"; -
Some other string value, the popup dialog remains open.
You set the Target property for a Dialog action to Popup to display a web page from the Fusion web application in a modal popup dialog hosted by Excel's web browser control. Displaying a web page in a modal popup dialog differs from displaying a web page in Excel's Document Actions, as the Dialog action that the action set invokes cannot continue execution until it receives user input. While the popup dialog is open, the end user cannot interact with any other part of the integrated Excel workbook, as the popup dialog retains focus.
End users can navigate between multiple web pages from the Fusion web application within the browser control until they or the Oracle ADF Desktop Integration module close the browser control.
To immediately synchronize the changes that an end user makes to a data control through a popup dialog, specify the next action in the action set after the Dialog action to download all modified bindings to the worksheet (use the DownSync worksheet action) or ADF Table component (use the Download action). This scenario assumes that you specify "Continue" as the value for ADFdi_CloseWindow.
8.4.2 How to Display a Web Page in Excel's Document Actions
You set the Dialog.Target property for an action to TaskPane to display a web page specified by the Dialog.Page property in Excel's Document Actions. In contrast to displaying a web page in a popup dialog, displaying a web page in Excel's Document Actions allows an action set to continue executing actions while the web page displays. End users can access and interact with other parts of the integrated Excel workbook while the web page displays.
Note the following if you set the Target property of a Dialog action to TaskPane:
-
The Oracle ADF Desktop Integration module ignores the value of
ADFdi_CloseWindow(and other elements). -
You cannot configure the worksheet
Shutdownevent to invoke theDialogaction.
8.4.3 What You May Need to Know About Displaying Pages from a Fusion Web Application
You can keep the data an integrated Excel workbook contains synchronized with a Fusion web application by specifying additional actions in the action set that invokes the Dialog action. You can make sure that the Fusion web application page and the integrated Excel worksheet both use the same data control frame by setting the ShareFrame property of the Dialog action.
The ADF Desktop Integration web browser control, which renders web pages invoked from integrated Excel workbooks, does not support web pages built with the ADF Faces dialog framework. It is recommended that you do not create web pages using the ADF Faces dialog framework. If you have created pages using the ADF Faces dialog framework, then do not specify links that open web pages in a new browser window.
Keeping an Integrated Excel Workbook and a Fusion Web Application Synchronized
To make sure that data in the integrated Excel workbook and the Fusion web application remains synchronized while end users use pages from the Fusion web application, configure the action set that invokes the Dialog action to:
-
Send changes from the integrated Excel workbook to the Fusion web application before invoking the
Dialogaction.Invoke the
RowUpSyncworksheet action to synchronize changes from the current row in the ADF Table component. -
Send changes from the Fusion web application to the integrated Excel workbook after invoking the
Dialogaction.Invoke the
RowDownSyncworksheet action to send changes from the Fusion web application to the current row in the ADF Table component.
For DoubleClickActionSet, you must ensure that the server-side model is in the same state after executing the action set as it was before executing the action set. In most cases, it is sufficient to roll back any and all uncommitted changes at the end of each DoubleClickActionSet, as there are no pending uncommitted changes when the action set execution begins.
For more information about synchronizing data between an integrated Excel workbook and a Fusion web application, see Chapter 15, "Using an Integrated Excel Workbook Across Multiple Web Sessions and in Disconnected Mode". For information about worksheet actions and ADF Table component actions, see Chapter A, "Oracle ADF Desktop Integration Component Properties and Actions".
Sharing Data Control Frames Between Integrated Excel Worksheets and Fusion Web Application Pages
Fusion web applications and integrated Excel workbooks both use data control frames to manage the transactions and state of view objects and, by extension, the bindings exposed in a page definition file. When you invoke a Fusion web application's page from an integrated Excel worksheet, you can make sure that the page and the integrated Excel worksheet both use the same data control frame by setting the ShareFrame property of the Dialog action that invokes the page to True.
The Page property in the Dialog action specifies the page that the Dialog action invokes. If the Dialog action invokes an absolute URL or a page that is not part of your Fusion web application, the Oracle ADF Desktop Integration module ignores the value of ShareFrame if ShareFrame is set to True.
Set ShareFrame to False in the following scenarios:
-
The
Dialog.Pageproperty in the action set references an absolute URL or a page that is not part of your Fusion web application. -
The
Dialog.Pageproperty in the action set references a page that is part of your Fusion web application, but that does not need to share information with the integrated Excel worksheet. For example, a page that displays online help information.
For more information about data control frames in a Fusion web application, see the "Sharing Data Control Instances" section of the Oracle Fusion Middleware Fusion Developer's Guide for Oracle Application Development Framework.
Configuring a Fusion Web Application for Oracle ADF Desktop Integration Frame Sharing
When you add the ADF Desktop Integration Technology scope to your Fusion web application, the application is automatically configured to support Oracle ADF Desktop Integration frame sharing. Frame sharing allows each worksheet of an integrated Excel workbook to use a dedicated DataControl frame. Web pages displayed in dialogs invoked from each worksheet can then share the same DataControl frame as the integrated Excel worksheet.
To verify that your Fusion web application is configured to support frame sharing:
-
Open your Fusion web application project in JDeveloper.
-
In the Application Navigator, expand the Application Resources panel.
-
Open the
adf-config.xmlfile available in Descriptors > ADF META-INF folder. -
Click the Source tab to open the source editor.
-
Confirm that the following
adf-desktopintegration-servlet-configelement is present in the file before the</adf-config>tag:<adf-desktopintegration-servlet-config xmlns="http://xmlns.oracle.com/adf/desktopintegration/servlet/config"> <controller-state-manager-class> oracle.adf.desktopintegration.controller.impl.ADFcControllerStateManager </controller-state-manager-class> </adf-desktopintegration-servlet-config> -
Save the
adf-config.xml file and close JDeveloper.
8.5 Inserting Values in an ADF Table Component from a Web Page Pick Dialog
You can configure the DoubleClickActionSet of an ADF Table component's column to invoke a Fusion web application page that renders a pick dialog where an end user selects a value to insert in the ADF Table component column.
This functionality is useful when you want to constrain the values that end users can enter in an ADF Table component. For example, you may want a runtime ADF Table component column to be read-only in the Excel worksheet so that end users cannot manually modify values to prevent them from introducing errors. Invoking a pick dialog rendered by a Fusion web application page allows the end user to change values in the ADF Table component without entering incorrect data.
In addition to configuring the DoubleClickActionSet, you configure the ADF Table component's RowData.CachedAttributes property to reference attribute binding values if you want:
-
End users to modify values in the Fusion web application's page that you do not want to appear in the ADF Table component of the integrated Excel workbook
-
An ADF Table component's column to be read-only in the integrated Excel workbook
-
Cache data in an ADF Table component over one or more user sessions that is not visible to end users but is modified by a pick dialog
For example, an ADF Table component displays a list of product names to end users. A pick dialog is invoked that refreshes the list of product names in the ADF Table component and, as part of the process, sets the value of product IDs. In this scenario, you specify the attribute binding value for the product ID in the ADF Table component's
RowData.CachedAttributesproperty. After the action set executes, the ADF Table component displays the refreshed list of product names in the rows of the Excel worksheet and references the associated product IDs in itsRowData.CachedAttributesproperty.
For information about populating values in the pick dialog, see the "Creating Databound Selection Lists and Shuttles" chapter in the Oracle Fusion Middleware Fusion Developer's Guide for Oracle Application Development Framework.
To invoke a pick dialog from an ADF Table component:
-
Select the cell in the Excel worksheet that anchors the ADF Table component and click the property inspector button in the Oracle ADF Desktop Integration Designer toolbar to display the property inspector.
-
Configure the ADF Table component's
RowData.CachedAttributesproperty to reference attribute binding values. -
Click the ellipsis button (...) beside the input field for Columns to display the TableColumn Collection Editor.
-
In the Members list select the column from which an end user will invoke the pick dialog at runtime.
-
Configure the
DoubleClickActionSetof theUpdateComponentproperty as described in the following table.Add this action... To... ADFmAction(Optional) Invoke the CreateInsertaction binding if the end user invokes theDoubleClickActionSetfrom a newly created row in the Excel worksheet's ADF Table component. In this scenario, the ADF Table component'sRowUpSyncaction (invoked in the next action) fails if the Fusion web application does not contain a placeholder row.ComponentInvoke the ADF Table component's RowUpSyncaction to synchronize any pending changes in the current row of the ADF Table component to the Fusion web application.DialogConfigure the Dialogaction to invoke the pick dialog page from the Fusion web application. Set theDialogaction'sShareFrameproperty toTrue. For more information, see Section 8.4, "Displaying Web Pages from a Fusion Web Application".ComponentInvoke the ADF Table component's RowDownSyncaction to synchronize data from the row in the ADF Table component's iterator in the Fusion web application that corresponds to the current ADF Table component row in the worksheet. -
Click OK.
8.6 Creating ADF Databound Search Forms in an Integrated Excel Workbook
You can create forms in your integrated Excel workbooks using ADF Input Text and ADF Button components. End users can use the forms you create to insert data or query for information. This section uses the latter example to demonstrate how you create forms.
End users can enter a search term in the ADF Input Text component and retrieve matching results by clicking an ADF Button component. If you want to present a more sophisticated user interface to end users for a search operation, you can invoke search forms from your Fusion web application. Results from these search operations can be downloaded to the ADF Table or ADF Read-only Table components in your integrated Excel workbook.
Figure 8-16 shows a design time view of the Oracle ADF components that the EditPriceList-DT.xlsx workbook in the Master Price List module uses to configure search options where:
-
ADF Label component is used in a simple search form
-
ADF Input Text component is used in a simple search form
-
ADF Button component is used in a simple search form
-
ADF Button component is used to invoke an advanced search form
Note:
The Oracle ADF Desktop Integration module does not support usage of theFindMode attribute in page definition files. For more information about the FindMode attribute, see the "pageNamePageDef.xml" section of the Oracle Fusion Middleware Fusion Developer's Guide for Oracle Application Development Framework.8.6.1 How to Create a Simple Search Form in an Integrated Excel Workbook
You insert an ADF Input Text component and configure it so that an end user can enter a search term. Insert an ADF Button component and configure its action set to:
-
Take the value the end user enters in the ADF Input Text component.
-
Query for the value.
-
Download the results to an ADF Table or ADF Read-only Table component in the integrated Excel workbook.
To create a simple search form in an integrated Excel workbook:
-
Insert an ADF Input Text component in the Excel worksheet cell where you want the end user to enter the search criteria.
-
Configure the ADF Input Text component so that it assigns the search term, that a user enters, to an attribute binding.
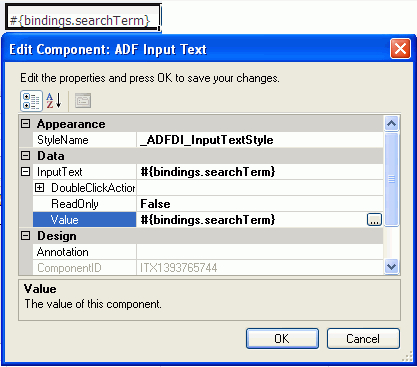
Figure 8-17 shows an example from the
EditPriceList-DT.xlsxworkbook in the Master Price List module where an ADF Input Text component assigns the user-entered value to thesearchTermattribute binding. ThesearchTerm, which is a part of variable iterator, is then passed as aNamedDataargument to theexecuteSimpleProductQuerymethod. -
Optionally, apply a style to the ADF Input Text component to indicate to end users that they can enter a search term in the cell.
-
Optionally, create an ADF Label component in an adjoining cell to indicate to end users that they can enter a search term in the ADF Input Text component you created in Step 1.
-
Create an ADF Button component in the Excel worksheet.
-
Set the
Labelproperty of the ADF Button component so that it displays a string at runtime to indicate to end users that they can start a search operation by clicking the button. -
Open the Action Collection Editor to configure the array of actions (
Action[]Array) in theClickActionSetproperties of the ADF Button component. The following table describes the actions to invoke in sequence.Add this action... To... WorksheetInvoke the UpSyncworksheet action to copy the value entered in the cell that hosts an ADF Input Text or ADF Desktop Integration List of Values component to the Fusion web application. For more information about worksheet actions, see Section A.13, "Worksheet Actions and Properties".ADFmActionInvoke an ADFm action that is bound to the attribute binding you specified in Step 2. The ADFm action queries for the end user's search term value referenced by the attribute binding. The corresponding example in the
EditPriceList-DT.xlsxworkbook is theexecuteSimpleProductQueryaction binding, which is bound to thesearchTermattribute binding.WorksheetInvoke the DownSyncworksheet action to synchronize any pending changes from the Fusion web application to the ADF Input Text, ADF Output Text, and ADF Desktop Integration List of Values components in the worksheet. For more information about worksheet actions, see Section A.13, "Worksheet Actions and Properties".ComponentInvoke a Downloadaction from the ADF Table or ADF Read-only Table components to download the results that the ADFm action retrieved. -
Click OK.
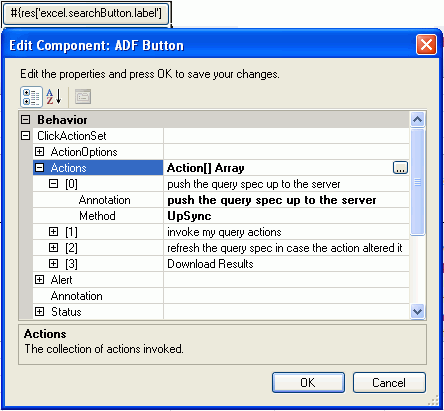
Figure 8-18 shows an example from the
EditPriceList-DT.xlsxworkbook in the Master Price List module where an ADF Button component invokes theexecuteSimpleProductQueryaction binding using the search term an end user entered in the ADF Input Text component.
8.6.2 How to Create an Advanced Search Form in an Integrated Excel Workbook
You use the ADF Button component to invoke a page from the Fusion web application that displays a search form to the end user. Configure the action set for the ADF Button component to invoke the Download action for the ADF Table or ADF Read-only Table component so that the search results from the search operation are downloaded to the integrated Excel workbook.
For information about creating a search form in a Fusion web application, see the "Creating ADF Databound Search Forms" chapter in the Oracle Fusion Middleware Fusion Developer's Guide for Oracle Application Development Framework.
To invoke an advanced search form in an integrated Excel workbook:
-
Create an ADF Button component in the Excel worksheet.
-
Set the
Labelproperty of the ADF Button component so that it displays a string at runtime to indicate to end users that they can start a search operation by clicking the button. -
Use the Action Collection Editor to configure the array of actions (
Action[]Array) in theClickActionSetproperties of the ADF Button component. Table 8-1 describes the actions to invoke in sequence.Table 8-1 Actions to Invoke an Advanced Search Form
Add this action... To... DialogDisplay the page from your Fusion web application that contains the search form. For more information about displaying pages from a Fusion web application, see Section 8.4, "Displaying Web Pages from a Fusion Web Application".
ADFmActionInvoke an ADFm action to query for the values that the end user entered in the search form.
ComponentInvoke a
Downloadaction from the ADF Table or ADF Read-only Table components to download the results that the ADFm action retrieved. -
Click OK.
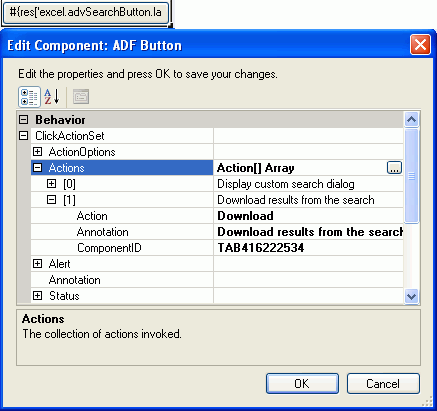
Figure 8-19 shows an example from the
EditPriceList-DT.xlsxworkbook in the Master Price List module where an ADF Button component invokes theExecuteaction binding to retrieve the values specified by the end user in the Master Price List's module Search page (excelAdvSearch.jspx). The ADF Table component'sDownloadaction downloads the returned values to the integrated Excel workbook.
8.7 Adding a Form to an Integrated Excel Workbook
The Oracle ADF Desktop Integration components described in Chapter 6, "Working with Oracle ADF Desktop Integration Form-type Components" can be used to create forms in your integrated Excel workbook. These components can be useful when you want to provide end users with functionality that allows them to view and edit individual fields rather than use the functionality provided by the table-type components to download rows of data from the Fusion web application. Use one or more of the following components to create a form:
-
ADF Button
Use this component to provide end users with a button that can invoke a
ClickActionSet. Figure 8-20 shows an ADF Button labeled Search that invokes a search operation using the search term entered by the end user in the ADF Input Text component. -
ADF Input Text
Use this component to provide end users with a read/write field where the current value of a binding appears. This component can also be used to input a value, as in the example illustrated in Figure 8-20, where users enter a search term in the ADF Input Text component.
-
ADF Output Text
Use this component to provide end users with a read-only field where the current value of a binding appears.
-
ADF Desktop Integration List of Values
Use this component to provide end users with a dropdown menu from which a user can select a value from a list binding.
-
ADF Label
Use this component to provide end users with instructions or other information on how to use the form you create. For example, the Master Price List module's
EditPriceList-DT.xlsxworkbook uses ADF Label components to display an instruction to end users and the number of matches for a search term. Figure 8-20 shows the runtime values of these components. The textSearch For:is a label instructing end uses to enter the search string, and8 records foundlabel displays the number of records found matching the search string.
You use the Oracle ADF Desktop Integration Designer to insert the components you require into a worksheet.
To create a form in an integrated Excel workbook:
-
Decide which ADF form components you require for the finalized form and insert them in the Excel worksheet.
For more information about these components, see Chapter 6, "Working with Oracle ADF Desktop Integration Form-type Components".
-
Configure the layout and appearance of the components you insert.
For more information about configuring the appearance of components, see Chapter 9, "Configuring the Appearance of an Integrated Excel Workbook".
-
Test your form.
For more information about testing an integrated Excel workbook, see Chapter 13, "Testing Your Integrated Excel Workbook".
8.8 Creating Dependent Lists of Values in an Integrated Excel Workbook
The Oracle ADF Desktop Integration module provides the following components that you use to create lists of values in an integrated Excel workbook:
-
ADF Desktop Integration List of Values
You configure properties for this component when you want to create a list of values in the Excel worksheet.
-
TreeNodeList subcomponent
You configure properties for this component when you want to create a list of values in an ADF Table component column.
Using these two components, you can create a dependent list of values in your integrated Excel workbook. A dependent list of values is a list of values component (referred to as a child list of values) whose values are determined by another list of values component (referred to as a parent list of values).
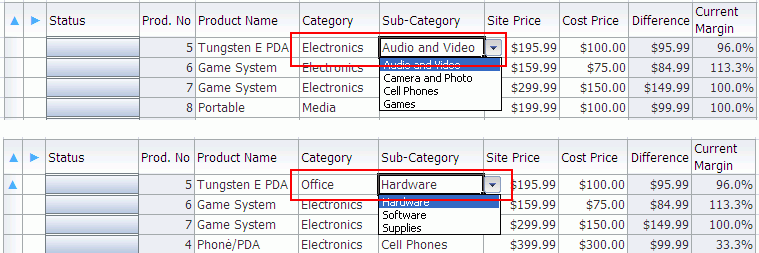
The server-side list bindings must be defined such that when the selected item of the parent list of values is changed, the available child list of values items are updated properly. Figure 8-21 shows an example with two illustrations from the AdvEditPriceList-DT.xlsx file of Master Price List module, where the Sub-Category column (child list of values) changes when the value in the Category column (parent list of values) changes.
Table 8-2 describes the dependent list of values implementations you can create using the previously listed components and the requirements to achieve each implementation.
Some of the implementations described in Table 8-2 require model-driven lists. For information about creating a model-driven list, see the "How to Create a Model-Driven List" section of the Oracle Fusion Middleware Fusion Developer's Guide for Oracle Application Development Framework.
Table 8-2 Dependent List of Values Configuration Options
| Configuration | Requirements |
|---|---|
|
Render both the parent and child list of values in the Excel worksheet using ADF Desktop Integration List of Values components. |
Both instances of the ADF Desktop Integration List of Values component must reference a list binding. One or both of the list bindings that you reference can be model-driven lists. Both list bindings can reference model-driven lists only if the underlying iterator has at least one row of data. At runtime, if the underlying iterator has zero rows of data and an end user selects a value from the parent list of values (list binding referenced by the ADF Desktop Integration List of Values component's To work around this scenario, choose one of the following options:
For more information, see Section 8.8.1, "How to Create a Dependent List of Values in an Excel Worksheet". |
|
Render both the parent and child list of values in ADF Table component columns using TreeNodeList subcomponents. |
Both the parent and child list of values (TreeNodeList subcomponents) must reference tree binding attributes associated with model-driven lists. For more information, see Section 8.8.3, "How to Create a Dependent List of Values in an ADF Table Component's Columns". |
|
Render the parent list of values in an ADF Desktop Integration List of Values component and the child list of values in an ADF Table component column using the TreeNodeList subcomponent. |
The child list of values (TreeNodeList subcomponent) must reference a tree binding attribute associated with a model-driven list. The parent list of values (ADF Desktop Integration List of Values component) must reference a list binding. For more information, see Section 8.8.5, "Creating a Dependent List of Values in an Excel Worksheet and an ADF Table Component Column". |
Note the following points if you plan to create a dependent list of values:
-
When the cell value referenced by
DependsOnListorDependsOnListIDis changed, the Oracle ADF Desktop Integration module overrides any previous changes to the child component list of values without warning the end user. -
The dependent list of values will not work unless the list specified in the
DependsOnList(orDependsOnListID) property is referenced by a component in the Excel worksheet. -
If a circular dependency is defined (List A depends on List B, and List B depends on List A), the first dependency (List A depends on List B) triggers the expected behavior. The Oracle ADF Desktop Integration module considers other dependencies to be misconfigurations.
-
You can create a chain of dependencies as follows:
-
List A depends on List B
-
List B depends on List C
In this scenario, a change to List C (parent list of values) updates both Lists A (grand child list of values) and B (child list of values). If you create a similar scenario, you must ensure that the grand child list of values contains two bind variables, one referring to the child list of values and the other referring to the parent list of values.
-
-
Caching in a dependent list of values is discussed in Section 15.4, "Caching Lists of Values for Use in Disconnected Mode".
-
The Oracle ADF Desktop Integration module caches the values that appear in a dependent list of values. Hence, the dependent list item values for a given parent list selection must remain constant across all rows of an ADF Table component.
8.8.1 How to Create a Dependent List of Values in an Excel Worksheet
Use two instances of the ADF Desktop Integration List of Values component to create a dependent list of values in an Excel worksheet.
Specify the list binding referenced by the parent ADF Desktop Integration List of Values component as a value for the child ADF Desktop Integration List of Values component's ListOfValues.DependsOnListID property.
For more information about ADF Desktop Integration List of Values, see Section A.5, "ADF Desktop Integration List of Values Component Properties".
To create a dependent list of values in an Excel worksheet:
-
If not already present, add the required list bindings to your page definition file.
For more information about adding bindings to page definition files, see Section 4.3, "Working with Page Definition Files for an Integrated Excel Workbook".
-
Insert two ADF Desktop Integration List of Values components into your integrated Excel workbook, as described in Section 6.6, "Inserting an ADF Desktop Integration List of Values Component".
-
Display the property inspector for the ADF Desktop Integration List of Values component that is to serve as the parent in the dependent list of values and set the value of the
ListOfValues.ListIDproperty to the list binding that is the parent. -
Display the property inspector for the ADF Desktop Integration List of Values component that is to serve as the child in the dependent list of values and set its values as follows:
-
ListOfValues.ListIDSpecify the list binding that is the child in the dependent list of values.
-
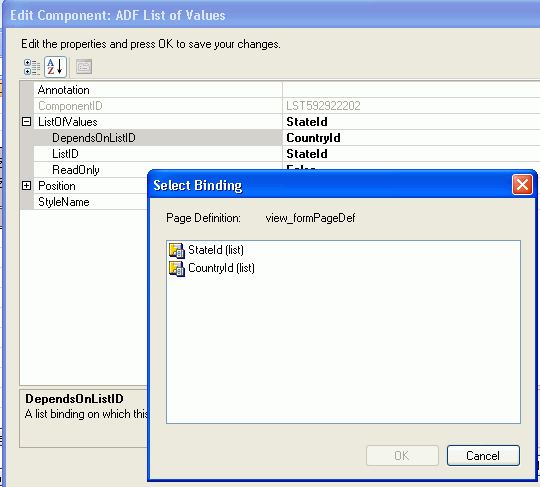
ListOfValues.DependsOnListIDSelect the list binding that you specified for the ADF Desktop Integration List of Values component that serves as a parent in Step 3.
Figure 8-22 shows the property inspector for the child ADF Desktop Integration List of Values where the
CountryIdlist binding is specified as the parent list of values andStateIdlist is the dependent list of values.
-
-
Click OK.
8.8.2 What Happens at Runtime When a Dependent List of Values Renders in an Excel Worksheet
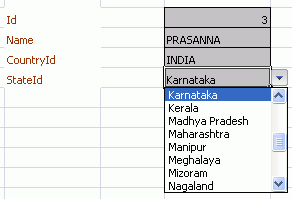
At runtime, the Oracle ADF Desktop Integration module renders both instances of the ADF Desktop Integration List of Values component. When an end user selects a value from the parent list of values, the selected value determines the list of values in the child list.
Figure 8-23 shows an example where StateID, a dependent list value, displays only the states from the selected CountryId list value.
8.8.3 How to Create a Dependent List of Values in an ADF Table Component's Columns
Use instances of the TreeNodeList subcomponent to render both lists of values in a dependent list of values in ADF Table component columns at runtime.
Specify a tree binding attribute as a value for the parent TreeNodeList subcomponent's List property. You also specify a tree binding attribute as a value for the child TreeNodeList subcomponent's List property and the same tree binding attribute referenced by the parent TreeNodeList subcomponent as a value for its DependsOnList property.
Make sure that both tree binding attributes are associated with model-driven lists before you add the tree binding to your page definition file. For information about creating a model-driven list, see the "How to Create a Model-Driven List" section of the Oracle Fusion Middleware Fusion Developer's Guide for Oracle Application Development Framework. For information about adding a tree binding to your page definition file, see Section 4.3, "Working with Page Definition Files for an Integrated Excel Workbook".
For information about the TreeNodeList subcomponent, see Section A.6, "TreeNodeList Subcomponent Properties".
To create a dependent list of values in an ADF Table component:
-
If not already present, insert an ADF Table component into your integrated Excel workbook.
For more information, see Section 7.3, "Inserting an ADF Table Component into an Excel Worksheet".
-
Display the property inspector for the ADF Table component and invoke the TableColumn Collection Editor by clicking the ellipsis button (...) beside the input field for TableColumn[] Array.
-
If not already created, click Add to add a new column to serve as the parent list of values. For more information about creating a list of values, see Section 7.12, "Creating a List of Values in an ADF Table Component Column".
-
Add a new column to the ADF Table component to serve as the child list of values in the runtime-dependent list of values. For more information about creating a list of values, see Section 7.12, "Creating a List of Values in an ADF Table Component Column".
-
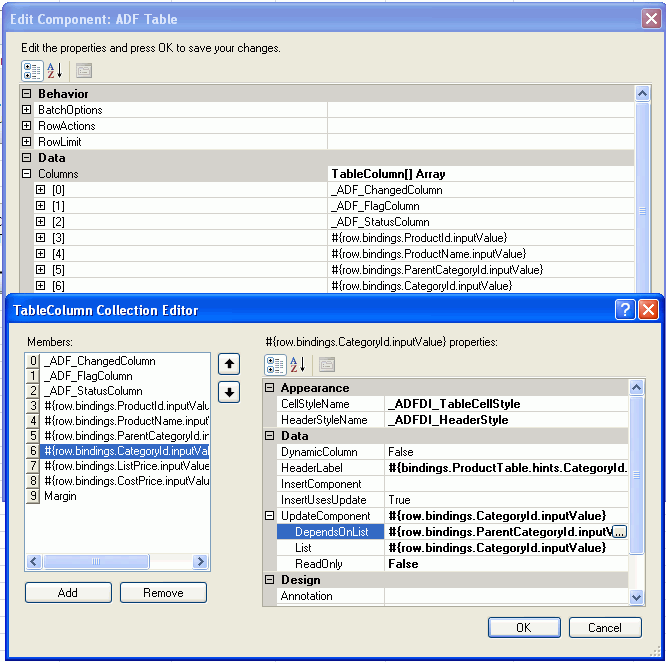
Specify the tree binding attribute of the parent list of values as a value for the
DependsOnListproperty.Figure 8-24 shows the property inspector for a child ADF Desktop Integration Tree Node component, where the
ParentCategoryIdtree binding attribute is specified as the parent list of values. -
Click OK.
8.8.4 What Happens at Runtime When a Dependent List of Values Renders in an ADF Table Component's Columns
At runtime, the ADF Table component renders both instances of the TreeNodeList subcomponent in the columns that you configured to display these instances. When an end user selects a value from the parent list of values, the selected value determines the list of values in the child list.
Figure 8-25 shows an example where the value that an end user selects in the Category column list of values results in the corresponding values for sub-category appearing in the Sub-Category column list of values.
Note:
If the child list and the parent list are bound to columns in the same ADF Table component, the child list items are changed for the current row only, when the end user changes the parent list selection.8.8.5 Creating a Dependent List of Values in an Excel Worksheet and an ADF Table Component Column
Use an instance of the ADF Desktop Integration List of Values component and an instance of the TreeNodeList subcomponent to create a dependent list of values where you render the parent and the child list of values.
-
Parent list of values in the Excel worksheet
An instance of the ADF Desktop Integration List of Values component renders the parent list of values in the Excel worksheet.
-
Child list of values in an ADF Table component column
An instance of the TreeNodeList subcomponent renders the child list of values in the ADF Table component column.
Specify a list binding as a value for the parent ADF Desktop Integration List of Values component's ListID property. You specify a tree binding attribute as a value for the child TreeNodeList subcomponent's List property, and the same list binding referenced by the parent ADF Desktop Integration List of Values component as a value for its DependsOnList property.
Make sure that the tree binding attribute is associated with a model-driven list before you add the tree binding to your page definition file. For information about creating a model-driven list, see the "How to Create a Model-Driven List" section of the Oracle Fusion Middleware Fusion Developer's Guide for Oracle Application Development Framework. For information about adding a list and tree binding to your page definition file, see Section 4.3, "Working with Page Definition Files for an Integrated Excel Workbook".
For more information about the ADF Desktop Integration List of Values component, see Section A.5, "ADF Desktop Integration List of Values Component Properties". For information about the TreeNodeList subcomponent, see Section A.6, "TreeNodeList Subcomponent Properties".
To create a dependent list of values in an Excel worksheet and an ADF Table component column:
-
Insert an ADF Desktop Integration List of Values component into your integrated Excel workbook, as described in Section 6.6, "Inserting an ADF Desktop Integration List of Values Component".
-
Display the property inspector for the ADF Desktop Integration List of Values component and set the value of the
ListIDproperty to the list binding that is to serve as the parent list of values in the dependent list of values. -
Click OK.
-
Display the property inspector for the ADF Table component and invoke the TableColumn Collection Editor by clicking the ellipsis button (...) beside the input field for TableColumn[] Array.
-
Click Add to add a new column to the ADF Table component to serve as the child list of values in the runtime-dependent list of values.
-
Choose the appropriate option for the newly created column:
-
Click the ellipsis button (...) beside the input field for InsertComponent if you want to configure the runtime list of values for insert operations.
-
Click the ellipsis button (...) beside the input field for UpdateComponent if you want to configure the runtime list of values for update and download operations.
In both options, the Select subcomponent to create dialog appears.
-
-
Select TreeNodeList and click OK.
-
Expand the property that you selected in Step 6 and configure values as follows:
-
Select the same list binding that you specified as a value for the ADF Desktop Integration List of Values component's
ListIDproperty in Step 2 as a value for theDependsOnListproperty. -
Select a tree binding attribute associated with a model-driven list for the
Listproperty. -
Configure the
ReadOnlyproperty as desired.
-
-
Click OK.
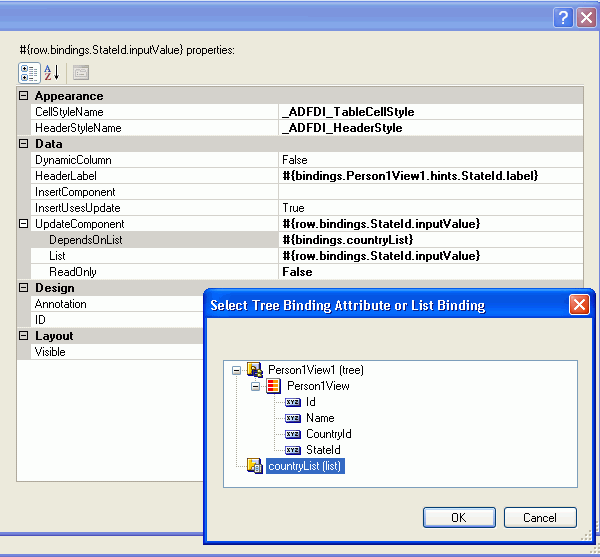
Figure 8-26 shows the property inspector for a child ADF Desktop Integration Tree Node component where the
countryListlist binding is specified as the parent list of values.
8.8.6 What Happens at Runtime When a Dependent List of Values Renders in an Excel Worksheet and an ADF Table Component Column
At runtime, the ADF List of Values component renders the parent list of values and the ADF Table component renders the child list of values in the column that you configured to display the TreeNodeList subcomponent. When an end user selects a value from the parent list of values, the selected value determines the list of values in the child list.
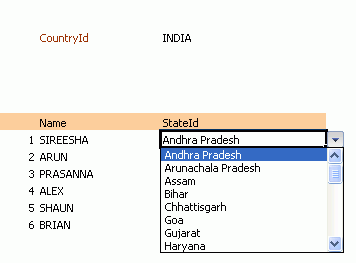
Figure 8-27 shows an example where the value that an end user selects in the CountryId list of values determines the list of values that appears in the StateId column of the ADF Table component.
Figure 8-27 Runtime-Dependent List of Values in an Excel Worksheet and an ADF Table Component's Column
Note:
When the parent list is bound to a cell in the worksheet and the child list is bound to an ADF Table Component column, the child list items are updated for all rows in the table when the end user changes the parent list selection.8.9 Configuring a Cell to Display a Dynamically Generated Hyperlink
If you use the Excel HYPERLINK function in an EL expression, you must enclose the HYPERLINK function within an Excel T function if you want an Oracle ADF component, such as an ADF Output Text component, to display a hyperlink at runtime. You enclose the HYPERLINK function because the Oracle ADF Desktop Integration module interprets Excel formula. To work around this, you wrap the T function around the HYERLINK function so that the value of the HYPERLINK function is evaluated by the T function. The resulting value is inserted into the Excel cell that the ADF component references.
8.9.1 How to Configure a Cell to Display a Dynamically Generated Hyperlink
You write an EL expression that uses the Excel T function to evaluate the output of the Excel HYERLINK function. The following task illustrates how you configure an ADF Output Text component to display a hyperlink that, when clicked, invokes a search operation on the Oracle OTN Discussion Forum for Developer Tools using the value of the ProductName binding as the search term.
To configure a cell to display a dynamically generated hyperlink:
-
Insert an ADF Output Text component into the Excel worksheet.
-
Write an EL expression for the
Valueproperty of the ADF Output Text component.The EL expression that you write invokes the Excel
HYPERLINKfunction and uses the ExcelTfunction to evaluate the output. In our example, we entered the following EL expression for theValueproperty:=T("=HYPERLINK(""http://forums.oracle.com/forums/search.jspa?objID=c19&q=#{bindings.ProductName}"", ""#{bindings.ProductName}"")")Note:
Excel requires that you write double quotes (for example,""#{bindings.ProductName}"") in the EL expression so that it can evaluate the expression correctly. -
Click OK.
8.9.2 What Happens at Runtime When a Cell Displays Dynamically Generated Hyperlink
The Oracle ADF Desktop Integration module evaluates the EL expression that you write at runtime. In the following example, the Oracle ADF Desktop Integration module:
-
Retrieves the value of the
ProductNamebinding -
Inserts the value of the
ProductNamebinding into a URL -
Inserts the result into a hyerlinked cell that a user can click to invoke a search
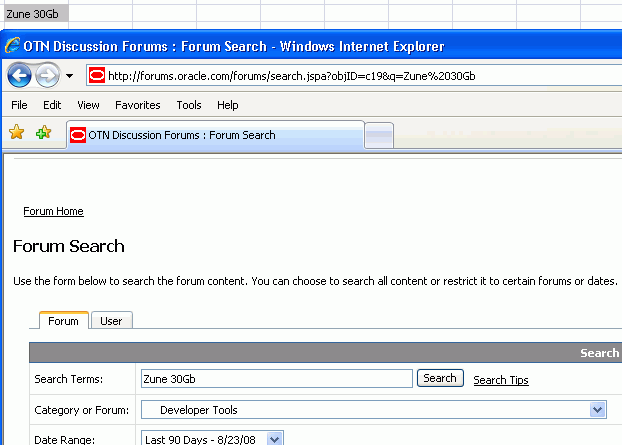
Figure 8-28 shows the runtime view of the example configured in Section 8.9.1, "How to Configure a Cell to Display a Dynamically Generated Hyperlink", where Zune 30GB is the retrieved value of the ProductName binding. When an end user clicks the cell that hosts the ADF Output Text component, he or she invokes a search operation for Zune 30GB on the Oracle OTN Discussion Forum for Developer Tools.
8.10 Using Calculated Cells in an Integrated Excel Workbook
You can write Excel formulas that perform calculations on values in an integrated Excel workbook. Before you write an Excel formula that calculates values in an integrated Excel workbook, note the following points:
-
Formulas can be entered in cells that reference Oracle ADF bindings and cells that do not reference Oracle ADF bindings
-
End users of an integrated Excel workbook can enter formulas at runtime
-
You (author of an integrated Excel workbook) can enter formulas at design time
-
During invocation, the ADF Table component actions
UploadandRowUpSyncsend the results of a formula calculation to the Fusion web application and not the formula itself -
Excel recalculates formulas in cells that reference Oracle ADF bindings when these cells are modified by:
-
Invocation of the ADF Table component
RowDownSyncandDownloadactions -
Rendering of Oracle ADF components
-
-
The ADF Table and ADF Read-only Table components insert or remove rows as they expand or contract to accommodate data downloaded from the Fusion web application. Formulas are replicated according to Excel's own rules.
-
You can enter formulas above or below a cell that references an ADF Table or ADF Read-only Table component. A formula that you enter below one of these components maintains its position relative to the component as the component expands or contracts to accommodate the number of rows displayed.
For more information about Excel functions, see the Function reference section in Excel's online help documentation.
8.10.1 How to Create a Column That Displays Values Generated by an Excel Formula
You insert a column that displays values calculated by an Excel formula directly into a worksheet using the menu options on Excel's Ribbon. You cannot add a column that displays calculated values using the collection editor that manages columns for an ADF Table or ADF Read-only Table component.
To create a column that displays values generated by an Excel formula:
-
In design mode in the Excel worksheet, select the cell in which you want the column that displays the values generated by the Excel formula to appear at runtime.
For example, the H13 cell of
EditPriceList-DT.xlsxcontains a formula:=G13-F13Cell
G13is the design time reference for the ADF Table component column labeled List Price at runtime, andF13is the design time cell reference for the ADF Table component column labeled Cost Price at runtime.The
H12cell marks the header for the formula. It contains an ADF Label component with itsLabelproperty set to the following EL expression:#{res['excel.difference.label']}The EL expression retrieves the value of the
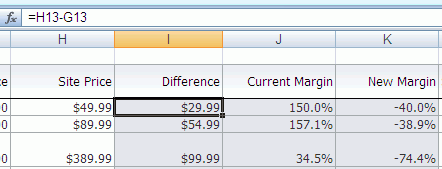
excel.difference.labelstring key at runtime.Figure 8-29 shows the design time view of the manually inserted column, with the Excel formula appearing in the formula bar, and the ADF Label component that retrieves the string key value from the resource bundle at runtime.
-
Save your changes using Excel's Save button.
8.10.2 What Happens at Runtime When a Column Displays Values Generated by an Excel Formula
At runtime, Excel replicates and adjusts its formula as the ADF Table and ADF Read-only components expand or contract so that the correct value appears in each row of a manually inserted column. Figure 8-30 shows an extract of the runtime view of the example that appears in Figure 8-29 where Excel adjusted the formula so that it evaluates each corresponding row.
8.10.3 How to Calculate the Sum of a Table-Type Component Column
The following task illustrates how you use the Excel functions SUM and OFFSET to calculate the total of the column labeled Difference in the EditPriceList-DT.xlsx of the Master Price List module at runtime. You use the OFFSET function in an Excel formula that you write where you want to reference a range of cells that expands or contracts based on the number of rows that an ADF Table or ADF Read-only Table component downloads. The SUM function calculates the total in a range of Excel cells.
To calculate the sum of a column in an ADF Table component:
-
In design mode in the Excel worksheet, select the cell in which you will write the Excel formula. In
EditPriceList-DT.xlsx, this is the cell with the reference, H14. -
Write the Excel formula that performs a calculation on a range of cells at runtime. For example:
=SUM(OFFSET(G12,1,0):OFFSET(G13,-1,0))where
SUMcalculates the total of values in the range of cells currently referenced byG12andG13.Figure 8-31 shows the design time view of the Excel formula in the integrated Excel workbook.
-
Save your changes and switch to runtime mode to test that the Excel formula you entered evaluates correctly.
8.10.4 What Happens at Runtime When Excel Calculates the Sum of a Table-Type Component Column
Figure 8-32 shows the runtime view in the integrated Excel workbook when the Excel formula shown in Figure 8-31 is evaluated. The Excel formula calculates the total of the values in the range of cells that you specified in design mode. The cell references that appear in Excel's formula bar at runtime (H12 and H59) differ from those that appear in the formula bar at design time (G12 and G13) because the ADF Table component has moved and expanded to include the rows of data that it downloads.
8.11 Using Macros in an Integrated Excel Workbook
You can define and execute macros based on Excel events in an integrated Excel workbook.
Note the following points:
-
Macros triggered by an Excel event do not get triggered if the Excel event is invoked by the Oracle ADF Desktop Integration module.
-
Oracle ADF Desktop Integration module code invoked by an Excel event is executed when the Excel event is triggered by a macro.
