| Oracle® WebLogic Communication Services Developer's Guide 11g Release 1 (11.1.1) Part Number E13807-02 |
|
|
View PDF |
| Oracle® WebLogic Communication Services Developer's Guide 11g Release 1 (11.1.1) Part Number E13807-02 |
|
|
View PDF |
This appendix describes how to create your own Oracle User Messaging Service applications using the procedures and code provided.
This chapter includes the following sections:
Section A.2, "Send Email with Attachments"
Note:
For more information, and for code samples, refer to Oracle Technology Network (http://otn.oracle.com).This chapter describes how to build and run the Send Message to User Specified Channel application provided with Oracle User Messaging Service.
Note:
To learn about the architecture and components of Oracle User Messaging Service, see Oracle Fusion Middleware Getting Started with Oracle SOA Suite.This chapter contains the following sections:
Section A.1.2, "Installing and Configuring SOA and User Messaging Service"
Section A.1.4, "Creating a New Application Server Connection"
The "Send Message to User Specified Channel" application demonstrates a BPEL process that allows a message to be sent to a user through a messaging channel specified in User Messaging Preferences. After you have configured a device and messaging channel addresses for each supported channel and the default device, Oracle User Messaging Service routes the message to the user based on the preferred channel setting that you configured.
The installation of SOA and User Messaging Service has already been performed on your hosted instance, and the sample users have already been seeded. Perform the following steps to enable notifications in soa-infra, if not already done:
Using Enterprise Manager, go to "soa-infra" > (Menu) > Workflow Notification Properties, and set Notification Mode to ALL.
Configure the User Messaging drivers if required as described in "Configuring Drivers" in the Oracle Fusion Middleware SOA Administrator's Guide.
Set the email address for user "weblogic" by using the JXplorer LDAP browser. Refer to "Updating Addresses in Your LDAP User Profile".
Restart the server.
Perform the following steps to set the email address for user "weblogic" by using the JXplorer LDAP browser:
Set the embedded LDAP server admin password as follows:
Login to the WLS Admin Console.
Click on the domain name link > Security > Embedded LDAP.
Enter a new "Credential" and "Confirm Credential" (for example, "weblogic").
Click Save.
Connect from JXplorer by specifying the fields in Table A-1:
The following example uses the user "weblogic". You may create and use additional users.
Expand the LDAP tree as follows: domain > myrealm > people > weblogic.
Click on the user entry.
Select the HTML view tab on the right.
Enter the desired Email Address and Mobile Phone Number.
Click Submit.
Performing the following procedure of building the sample from scratch allows you to learn how to add messaging to your SOA Composite Applications, and use User Messaging Preferences.
Open Oracle JDeveloper 11g.
Create a new application by selecting File, New, General, Applications, and SOA Applications. Click OK.
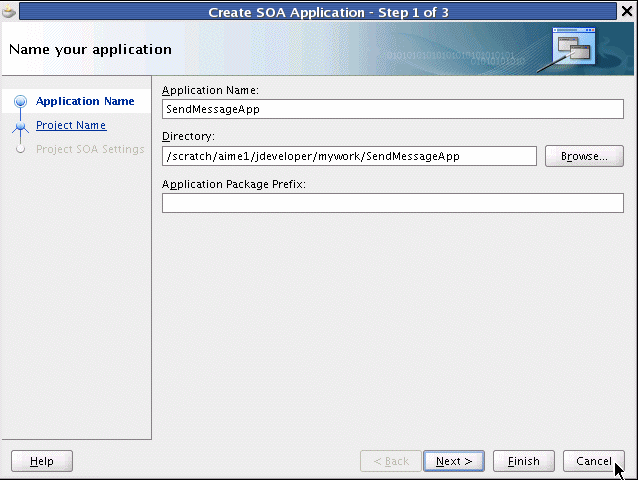
Enter the Application Name and click Next (Figure A-1).
Figure A-1 Creating a New Application and Project (1 of 3)
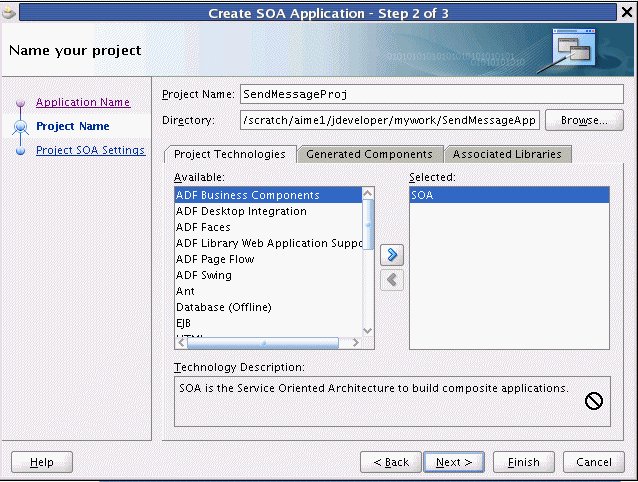
Enter the name for the project and click Next (Figure A-2).
Figure A-2 Creating a New Application and Project (2 of 3)
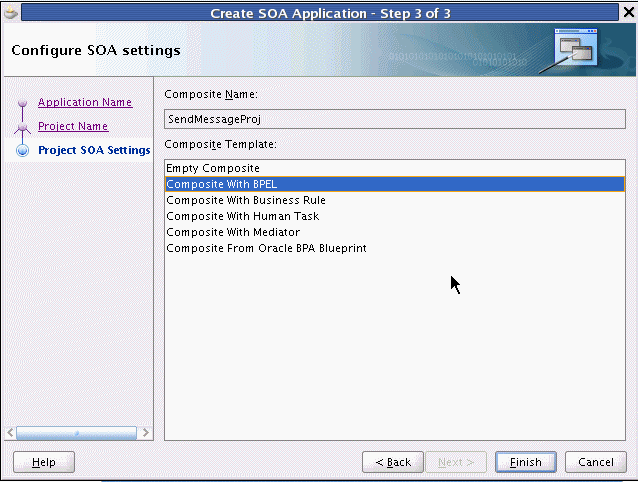
Select the Composite With BPEL composite template (Figure A-3). Click Finish.
Figure A-3 Creating a New Application and Project (3 of 3)
In the Create BPEL Process window, enter the BPEL process name as "SendMessage" (Figure A-4). Click OK.
Verify that "Expose as a SOAP service" is checked. Click OK.
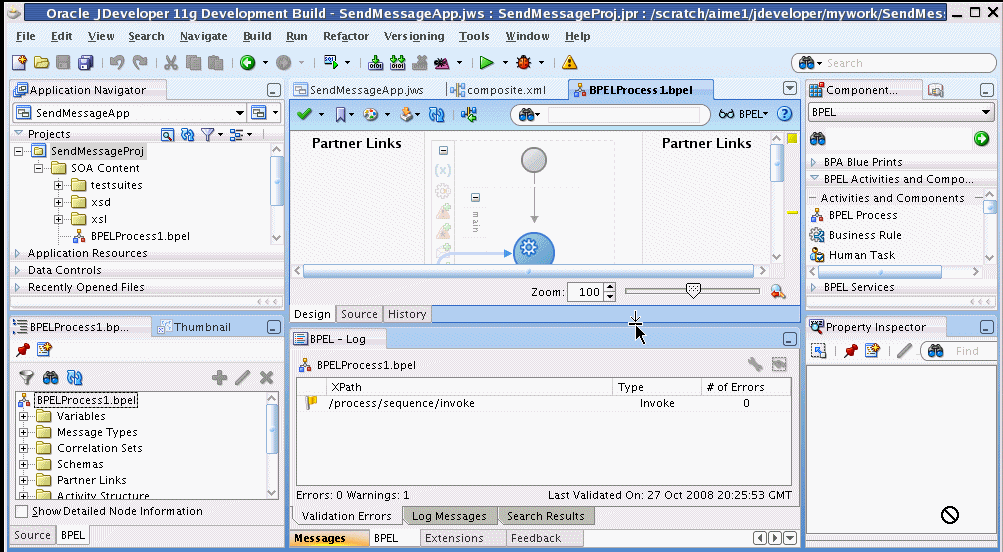
You have now created an empty and default BPEL application (Figure A-5).
In the Oracle JDeveloper main window you can view the following components of the application under the Composite.xml tab.
The left box is the definition of a Web Service client that is used to initiate an application.
The middle box is a BPEL process that creates and formats the message and calls the messaging service.
Note:
You must later create the messaging service resource that is used to send the message when you create the User Notification BPEL process (steps 13-19).Figure A-5 Empty and Default BPEL Application
Expand the xsd folder in the Application Navigator and open BPELProcess1.xsd by double-clicking it (Figure A-6).
Figure A-6 Accessing the BPELProcess1.xsd File
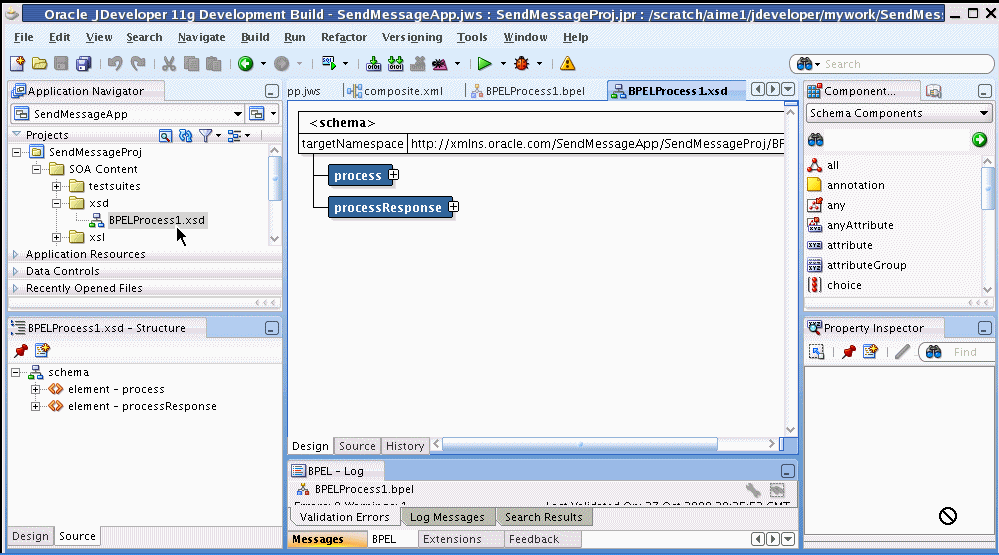
Click on the Source tab (Figure A-7).
Perform the following modifications to the inputs of this BPEL application:
In the generated file, SendMessage.xsd, in the xsd folder in the application navigator under projects, the following element definition is created by default:
<element name="input" type="string"/>
This xsd element defines the input for the BPEL process.
Select the Source tab (Figure A-7), and replace the line above with the following three lines:
<element name="to" type="string"/>
<element name="subject" type="string"/>
<element name="body" type="string"/>
Figure A-7 Modifying the Inputs in the BPELProcess1.xsd File
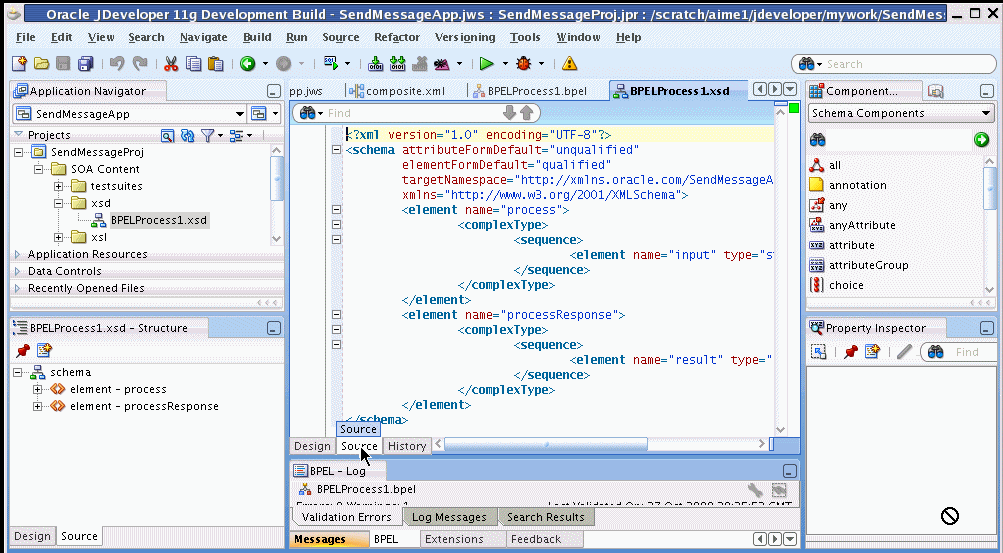
Perform a File, Save All.
View the expanded process element (Figure A-8).
Figure A-8 Viewing the Expanded Process Element
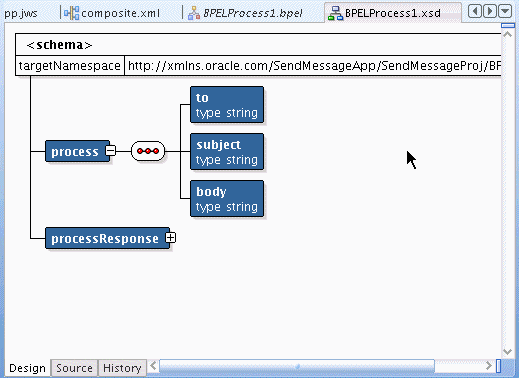
To enable messaging in this process, drag and drop User Notification from BPEL Activities and Components located in the Component Palette between the receiveInput and callbackClient activities.
The User Notification activity appears (Figure A-9).
Figure A-9 User Notification Activity Before Configuring the Inputs
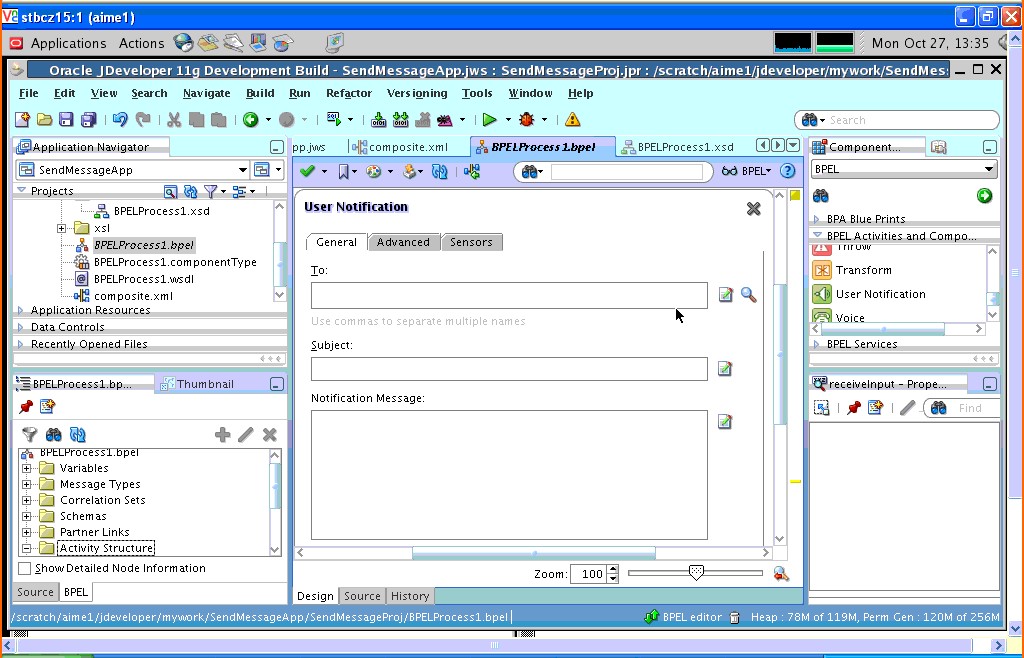
Click the XPath Expression Builder icon to the right of the "To:" input box.
Modify the expression for the recipient, "to", as follows:
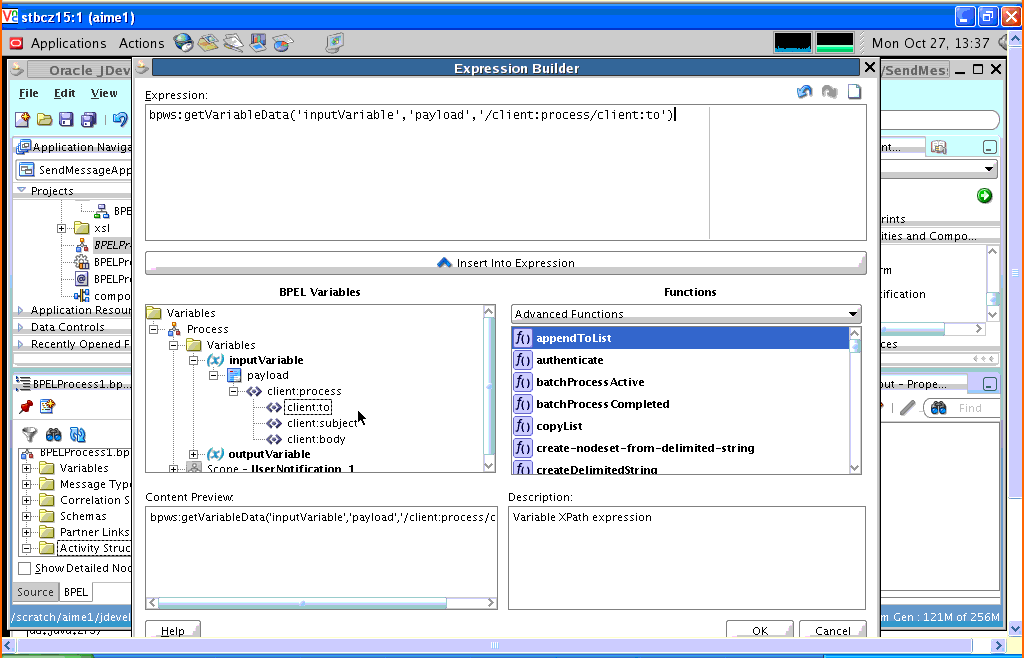
In the BPEL Variables pane, select Variables, inputVariable, Payload, clientprocess, and client:to (Figure A-10).
Click Insert Into Expression.
Click OK.
Figure A-10 Defining the Recipient ("to") Expression
Click the XPath Expression Builder icon to the right of the "subject:" input box.
Modify the expression for the subject as follows:
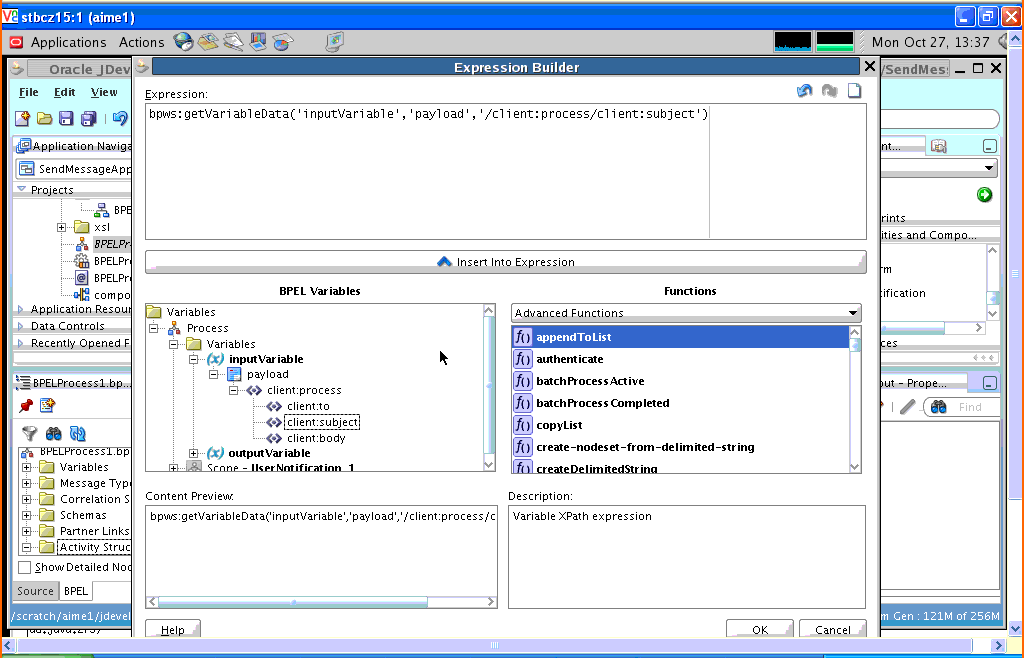
In the BPEL Variables pane, select Variables, InputVariable, Payload, clientprocess, and client:subject (Figure A-11).
Click Insert Into Expression.
Click OK.
Figure A-11 Defining the Subject Expression
Click the XPath Expression Builder icon to the right of the "body:" input box.
Modify the expression for the body as follows:
In the BPEL Variables pane, select Variables, InputVariable, Payload, clientprocess, and client:body (Figure A-12).
Click Insert Into Expression.
Click OK.
Click Apply and then OK to apply the changes (Figure A-13).
Figure A-13 Confirming the Changes to the Inputs
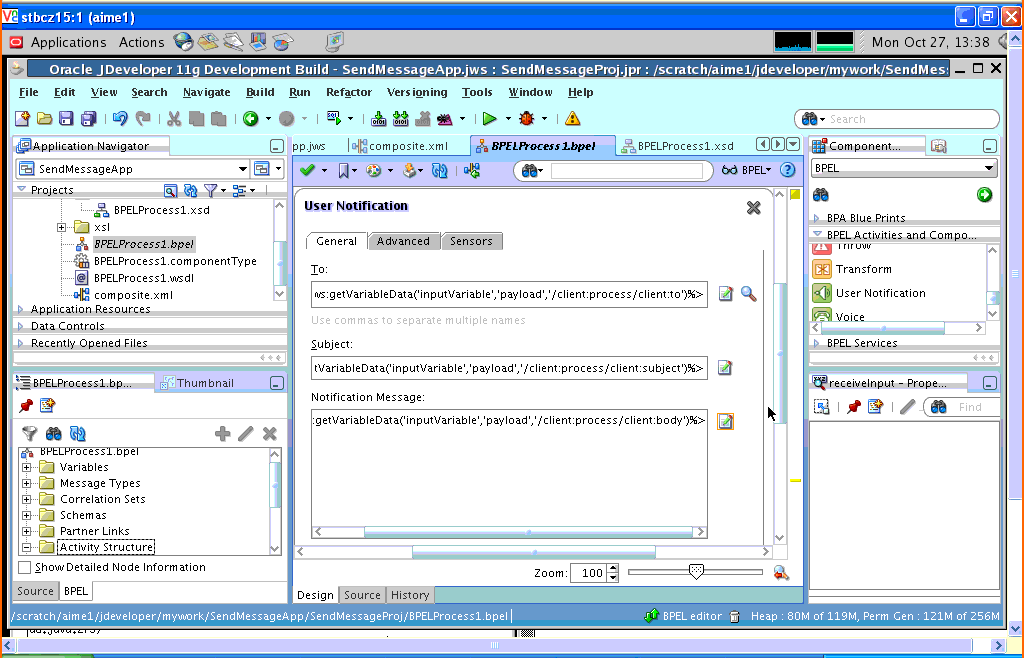
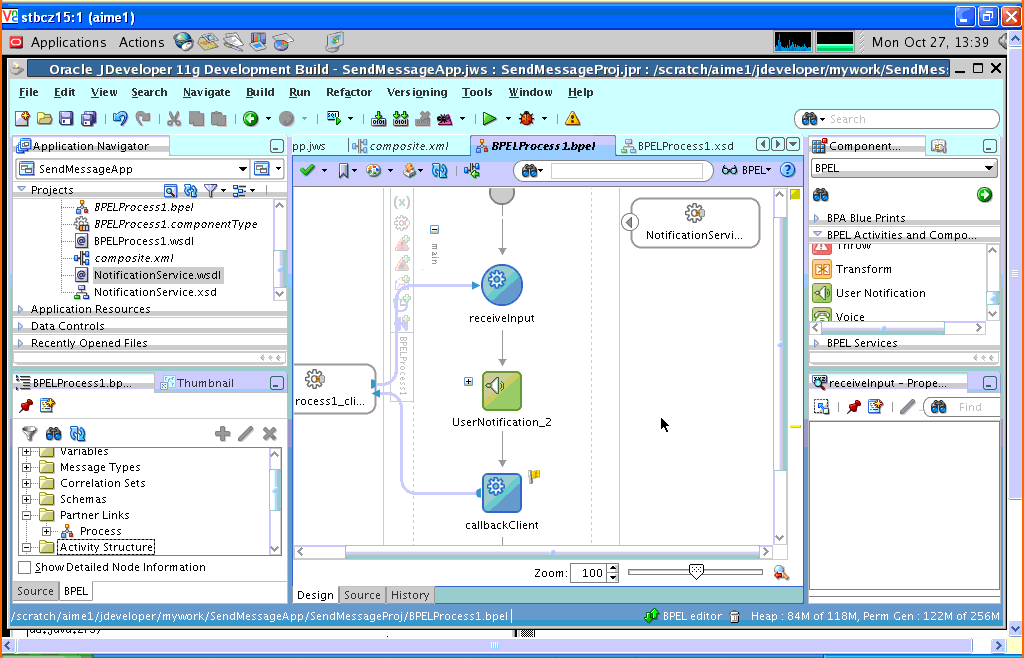
The changes to the inputs are saved and the configuration of the User Notification Activity is complete. You can now see the User Notification Activity in the BPEL application (Figure A-14). The SOA Composite is complete.
Figure A-14 User Notification Activity After Configuration of Inputs
Perform the following steps to create a new Application Server Connection.
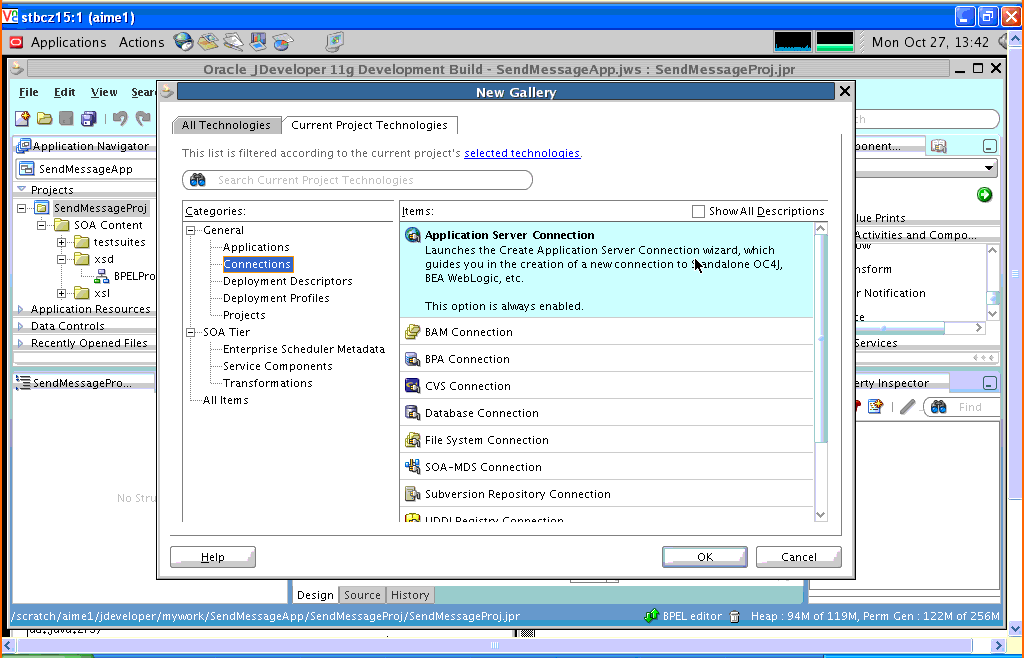
Create a new Application Server Connection by right-clicking the project and selecting New, Connections, and Application Server Connection (Figure A-15).
Figure A-15 New Application Server Connection
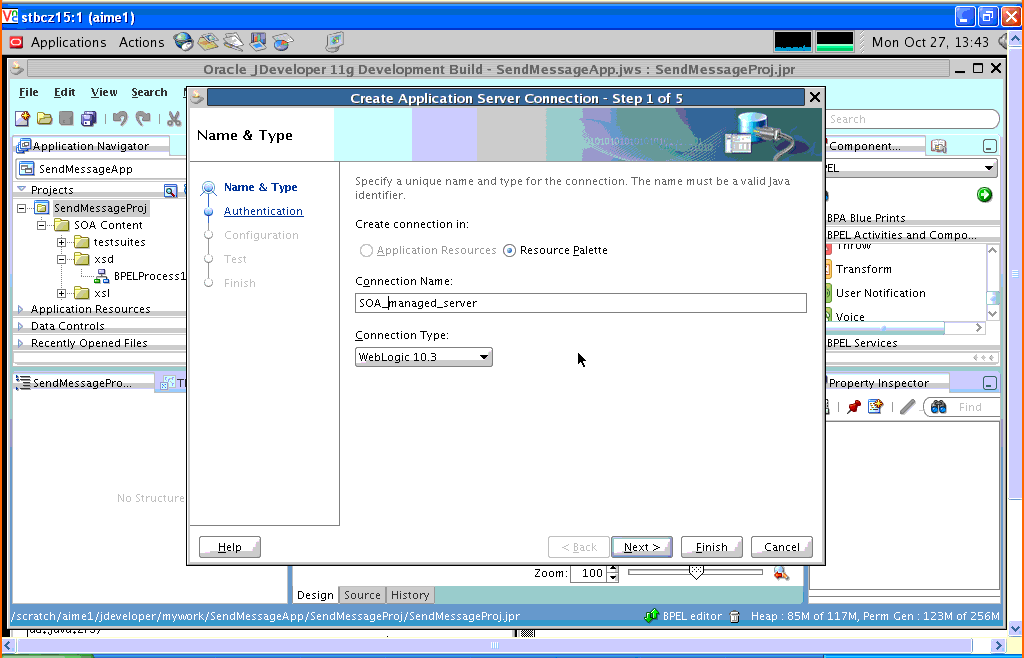
Name the connection “SOA_server” and click Next (Figure A-16).
Select "WebLogic 10.3" as the Connection Type.
Figure A-16 New Application Server Connection
Enter the authentication information. The typical values are:
Username: weblogicPassword: weblogic
On the Connection screen, enter the hostname, port and SSL port for the SOA admin server, and enter the name of the domain for WLS Domain.
Click Next.
On the Test screen click Test Connection.
Verify that the message “Success!” appears.
The Application Server Connection has been created.
Perform the following steps to deploy the project:
Deploy the project by selecting the SendMessage project, Deploy, SendMessageProj, to, and SOA_server (Figure A-17).
Verify that the message "Build Successful" appears in the log.
Enter the default revision and click OK.
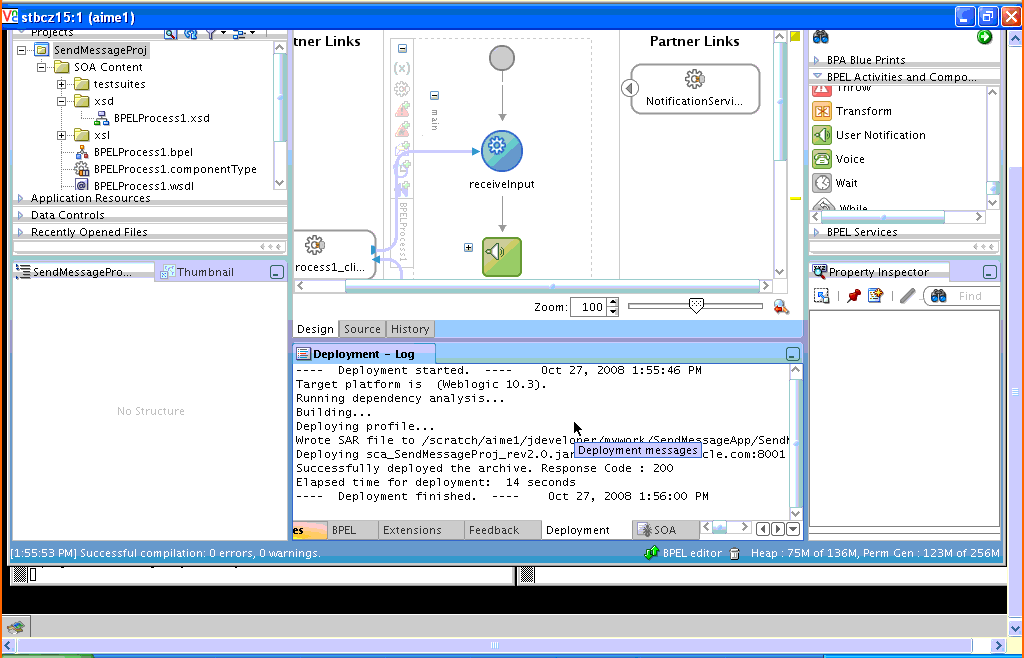
Verify that the message "Deployment Finished" appears in the deployment log (Figure A-18).
Figure A-18 Verifying that the Deployment is Successful
You have successfully deployed the application.
Before you can run the sample you must configure any additional drivers in Oracle User Messaging Service and configure a default device for the user receiving the message in User Messaging Preferences, as described in the following sections.
Note:
Refer to "Configuring Notifications" in the Oracle Fusion Middleware SOA Developer's Guide for more information.For users to receive the notifications, they must register the devices that they use to access messages through User Messaging Preferences. Perform the following steps:
Log into the User Messaging Preferences application at one of the following URLs:
Directly at http://<server>:<port>/sdpmessaging/userprefs-ui
Through the Worklist application's Preferences > Notification tab at: http://<server>:<port>/integration/worklistapp
The User Messaging Preferences application appears.
Click on the Messaging Channels tab (Figure A-19).
You are prompted for login credentials.
In the Messaging Channels tab, select a channel.
Set a channel as the default by expanding the device folder, and then clicking Set as Default adjacent to the selected channel.
A checkmark appears next to the selected channel, designating it as the default means of receiving notifications. All messages sent to that user are sent to that channel.
The following steps describe how to perform a test message transmission through Enterprise Manager.
Perform the following steps to run and test the sample:
Open a Web browser window and login to Enterprise Manager for the SOA domain. For example, http://<host>:<port>/em .
In Enterprise Manager, expand the SOA folder in the navigation tree, and click the deployed SendMessageProj composite application. Click the Test button to launch the test client page.
In the Input Arguments section provide the input values for invoking SendMessageProj.
Enter the following values:
to: weblogic (the user)
subject: notification test (the subject)
body: the message content
Click Test Web Service.
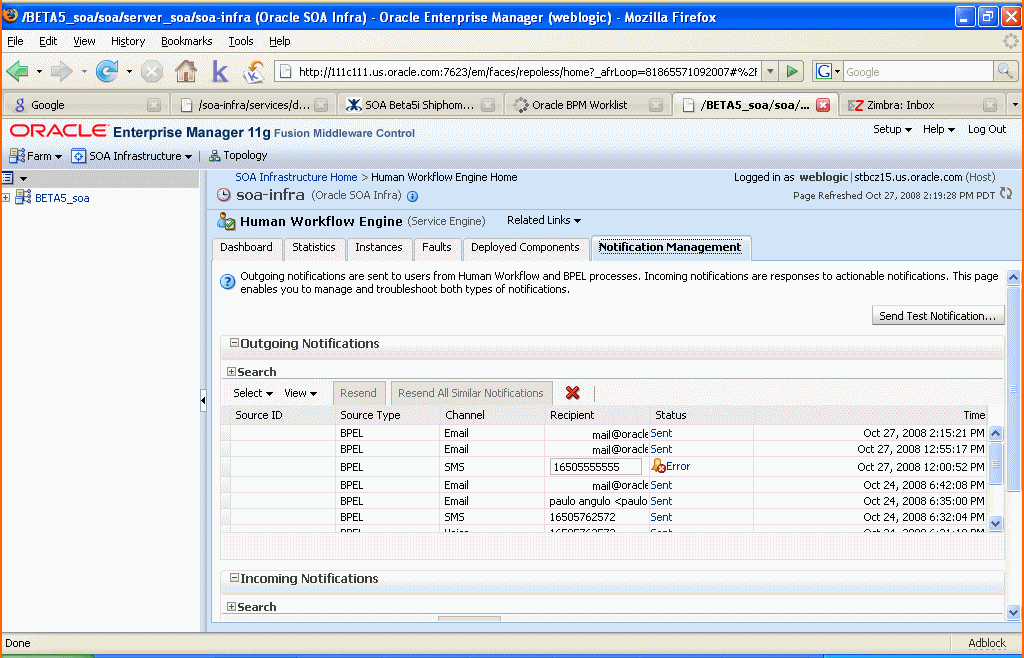
Log in to the Human Workflow Engine. Verify the outgoing notifications and their statuses from the Notification Manager tab. (Figure A-20).
Figure A-20 Viewing Outgoing Notifications
This chapter describes how to build and run the Send Email with Attachments application provided with Oracle User Messaging Service.
Note:
To learn about the architecture and components of Oracle User Messaging Service, see Oracle Fusion Middleware Getting Started with Oracle SOA Suite.This chapter contains the following sections:
Section A.2.2, "Installing and Configuring SOA and User Messaging Service"
Section A.2.6, "Creating a New Application Server Connection"
The "Send Email With Attachment" application demonstrates a BPEL process that sends an e-mail with an attached file. A BPEL process looks up a user's e-mail address from the identity store, reads a file from the file system, creates e-mail content and then sends an email to the user.Section A.2.5, "Building the Sample" shows you how to add an e-mail with attachments to your SOA composite application, allowing your applications to be enabled with messaging.If you want to model the application from scratch, go to the section titled Building the Sample. Or, you can directly use the pre-built project provided with this tutorial.Before you run the pre-built sample or build the application from scratch, you must install and configure the server as described in Section A.2.2, "Installing and Configuring SOA and User Messaging Service". By default, soa-infra does not send out notifications. The following steps describe installing and configuring the e-mail drivers needed to communicate with the e-mail server.
The installation of SOA and User Messaging Service has already been performed on your hosted instance, and the sample user, "weblogic", has already been created. Perform the following steps to enable notifications in soa-infra, if not already done:
Using Enterprise Manager, go to "soa-infra" > (Menu) > Workflow Notification Properties, and set Notification Mode to ALL.
Configure the User Messaging drivers if required as described in "Configuring Drivers" in the Oracle Fusion Middleware SOA Administrator's Guide.
Set the email address for user "weblogic" by using the JXplorer LDAP browser. Refer to "Updating Addresses in Your LDAP User Profile".
Restart the server.
Perform the following steps to set the email address for user "weblogic" by using the JXplorer LDAP browser:
Set the embedded LDAP server admin password as follows:
Login to the WLS Admin Console.
Click on the domain name link > Security > Embedded LDAP.
Enter a new "Credential" and "Confirm Credential" (for example, "weblogic").
Click Save.
Connect from JXplorer by specifying the fields in Table A-2:
The following example uses the user "weblogic". You may create and use additional users.
Expand the LDAP tree as follows: domain > myrealm > people > weblogic.
Click on the user entry.
Select the HTML view tab on the right.
Enter the desired Email Address and Mobile Phone Number.
Click Submit.
Perform the following steps to run and deploy the pre-built sample application:
Open SendEmailWithAttachmentsApp.jws (contained in the .zip file) in Oracle JDeveloper.
In the Oracle JDeveloper main window you can view the following components of the sample application under the Composite.xml tab.
Figure A-21 Oracle JDeveloper Main Window
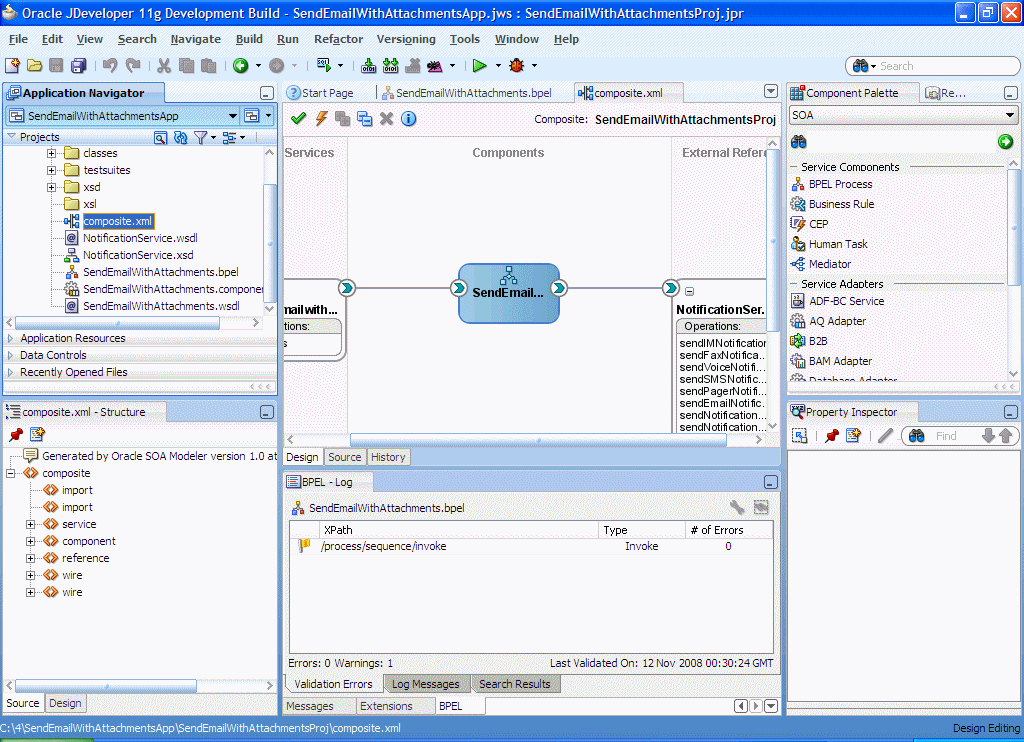
The left box is the definition of a Web Service client that is used to initiate an application.
The middle box is a BPEL process that creates and formats the message and calls the messaging service.
The right box is the messaging service resource that is used to send the message.
Create an Application Server Connection by right-clicking the project in the navigation pane and selecting New. Follow the instructions in Section A.2.6, "Creating a New Application Server Connection".
Deploy the project by selecting the SendEmail project, Deploy, SendEmailProj, to, and SOA_server (Figure A-22).
Verify that the message "Build Successful" appears in the log.
Enter the default revision and click OK.
Verify that the message "Deployment Finished" appears in the deployment log.
You have successfully deployed the application.
Before you can run the sample you must configure any additional drivers in Oracle User Messaging Service and configure a default device for the user receiving the message in User Messaging Preferences, as described in the following sections.
Note:
Refer to "Configuring Notifications" in the Oracle Fusion Middleware SOA Developer's Guide for more information.The following steps describe how to perform a test message transmission through Enterprise Manager.
Perform the following steps to run and test the sample:
Open a Web browser window and login to Enterprise Manager for the SOA domain. For example, http://<host>:<port>/em.
In Enterprise Manager, expand the SOA folder in the navigation tree, and click the deployed SendEmailWithAttachmentsProj composite application. Click the Test button to launch the test client page.
In the Input Arguments section provide the input values for invoking SendEmailWithAttachmentsProj.
Enter the following values:
to: weblogic (the user)
subject: notification test (the subject)
body: the message content
attachmentName: the name of the being attached, including extension.
attachmentMimeType: for example, image/gif.
To send files such as pdf, doc, gif or jpeg files, the following values can be used for the attachmentMimeType entry:
file-name.doc – attachmentMimeType: application/msword
file-name.pdf – attachmentMimeType: application/pdf
file-name.jpg – attachmentMimeType: image/jpeg
file-name.gif – attachmentMimeType: image/gif
attachmentURI: the URI for the attachment
Click Test Web Service.
Performing the following procedure of building the sample from scratch allows you to learn how to add messaging to your SOA Composite Applications, and use User Messaging Preferences.
Open Oracle JDeveloper 11g.
Create a new application by selecting File, New, Applications, and SOA Application. Click OK.
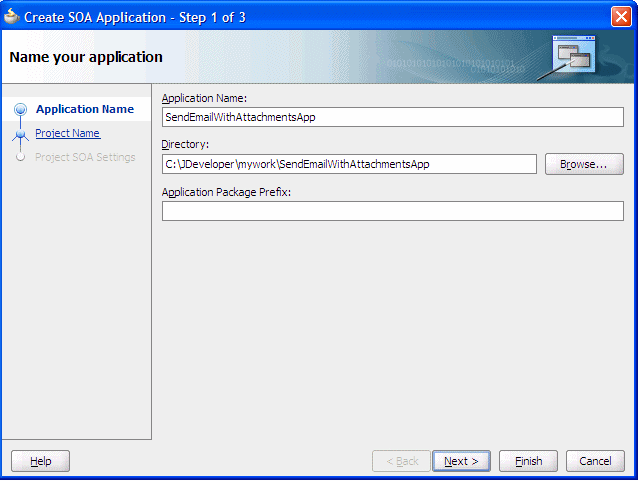
Enter the Application Name and click Next (Figure A-23).
Figure A-23 Creating a New Application and Project (1 of 3)
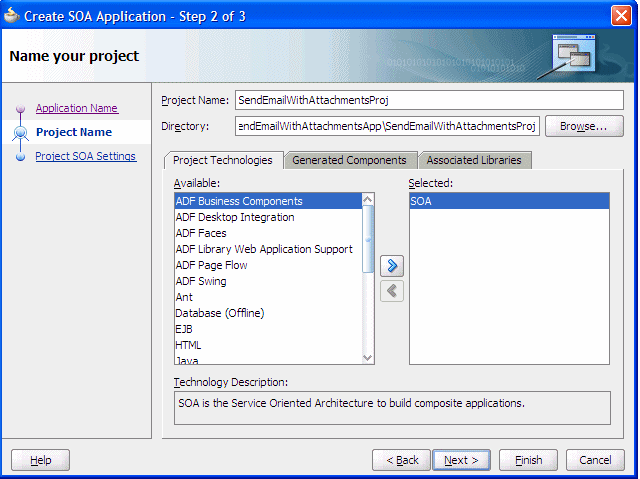
Enter the name for the project and click Next (Figure A-24).
Figure A-24 Creating a New Application and Project (2 of 3)
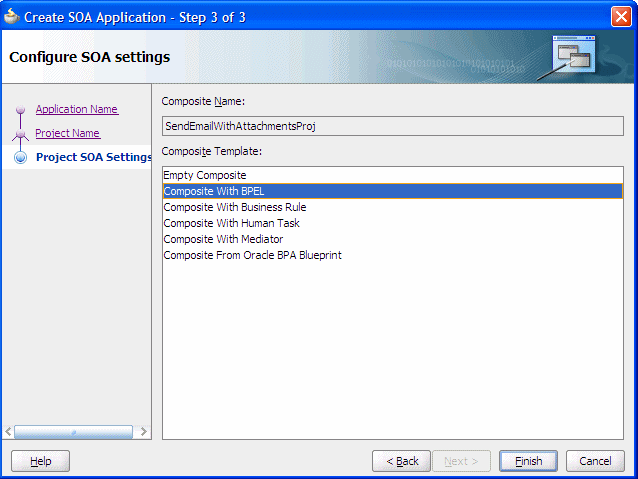
Select the Composite With BPEL composite template (Figure A-25). Click Finish.
Figure A-25 Creating a New Application and Project (3 of 3)
In the Create BPEL Process window, enter the BPEL process name as "SendEmailWithAttachments" (Figure A-26). Click OK.
Verify that "Expose as a SOAP service" is checked. Click OK.
You have now created an empty and default BPEL application.
In the Oracle JDeveloper main window you can view the following components of the sample application under the Composite.xml tab.
The left box is the definition of a Web Service client that is used to initiate an application.
The middle box is a BPEL process that creates and formats the message and calls the messaging service.
Note:
You must later create the messaging service resource that is used to send the message when you create the User Notification BPEL process (steps 13-19).Expand the xsd folder in the Application Navigator and open SendEmailWithAttachments.xsd by double-clicking it (Figure A-27).
Figure A-27 Accessing the SendEmailWithAttachments.xsd File
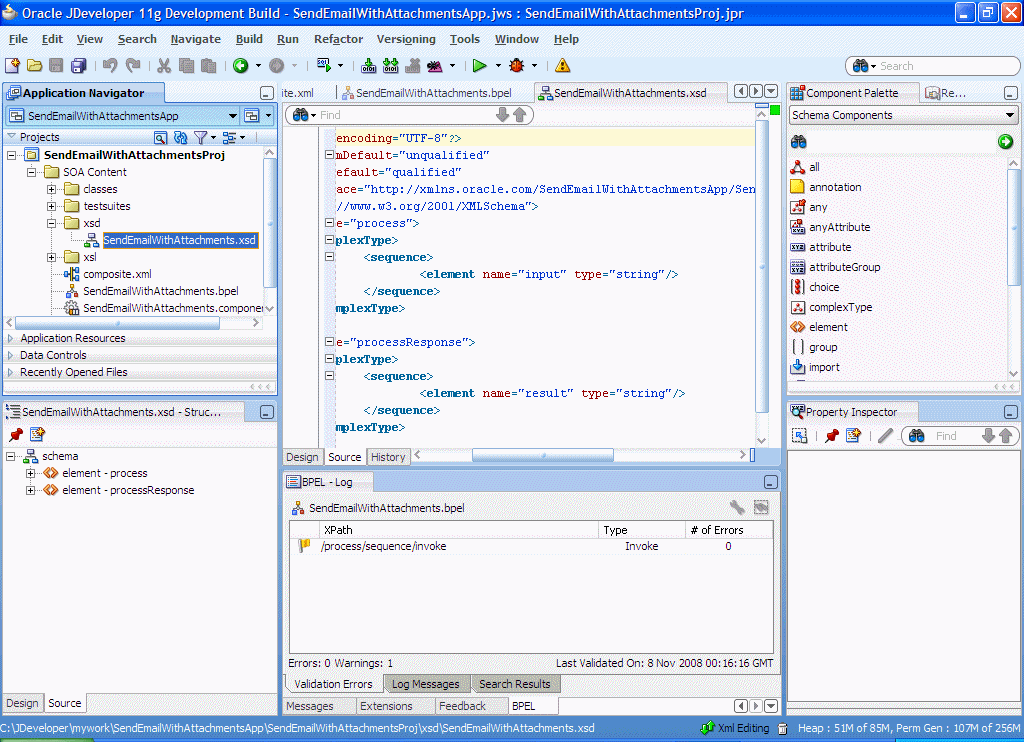
Click on the Source tab (Figure A-27).
Perform the following modifications to the inputs of this BPEL application:
In the generated file, SendEmailWithAttachments.xsd, in the xsd folder in the application navigator under projects, the following element definition is created by default:
<element name="process">
  <complexType>
    <sequence>
      <element name="input" type="string"/>    </sequence>
  </complexType>
</element>
Select the Source tab, and replace the lines above with the following:
<element name="process">
<complexType>
     <sequence>
       <element name="to" type="string"/>
       <element name="subject" type="string"/>
       <element name="body" type="string"/>
       <element name="attachmentName" type="string"/>
       <element name="attachmentMimeType" type="string"/>
       <element name="attachmentURI" type="string"/>
     </sequence>
   </complexType>
 </element>
This xsd element defines the input for the BPEL process.
Save the project.
Select the SendEmailWithAttachments.bpel editor screen.
Drag and drop Email Activity from BPEL Activities and Components located in the Component Palette between the receiveInput and callbackClient activities (Figure A-28).
In the Edit Email window, leave the From account as “Default”.
To create the expression for To, select the Expression Builder (the second icon, Figure A-30) and perform the following steps:
Select Identity Service Functions from the functions drop down list.
Select the getUserProperty() function and select Insert into Expression.
Under BPEL variables select Variables->Process->Variables->inputVariable ->payload-> client:process->client:to.
Click Insert into Expression.
Type the string 'mail' manually.
Correct the parenthesis so they are matched.
Click OK.
This expression (Figure A-30) takes the data from the Web Service and maps it to the business e-mail of the local SOA user.
Figure A-30 Expression Builder for the To Path
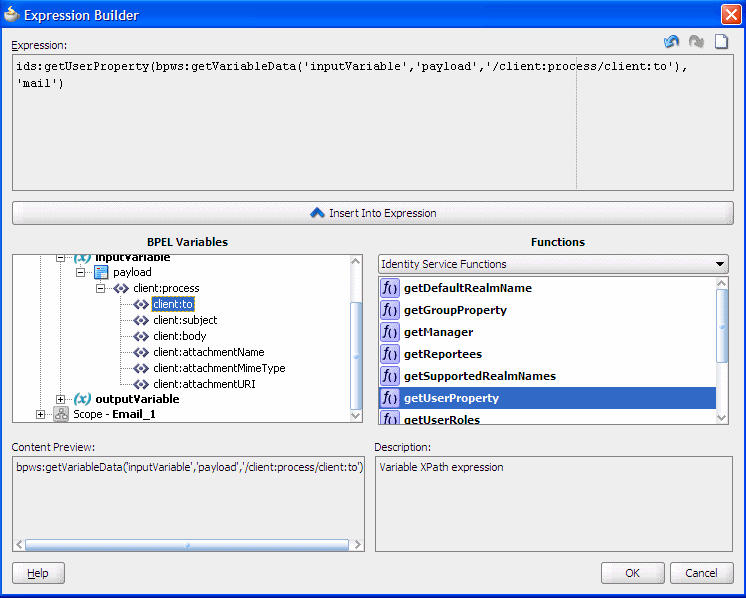
The expression must appear as follows:
ids:getUserProperty( bpws:getVariableData('inputVariable','payload', '/client:process/client:to'),'mail')
For Subject, select the Expression builder. Select getVariableData from Functions and click Insert Into Expression.
Figure A-31 shows the Expression Builder for the Subject.
Figure A-31 Expression Builder for the Subject
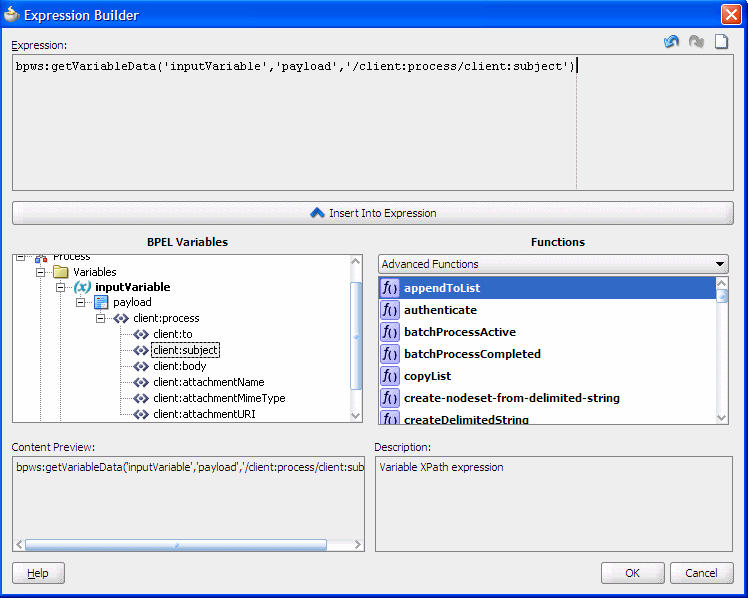
The expression must appear as follows:
bpws:getVariableData( 'inputVariable', 'payload','/client:process/client:subject')
For “Body” select the Expression Builder and set the expression as shown in Figure A-32.
Figure A-32 Expression Builder for the Body
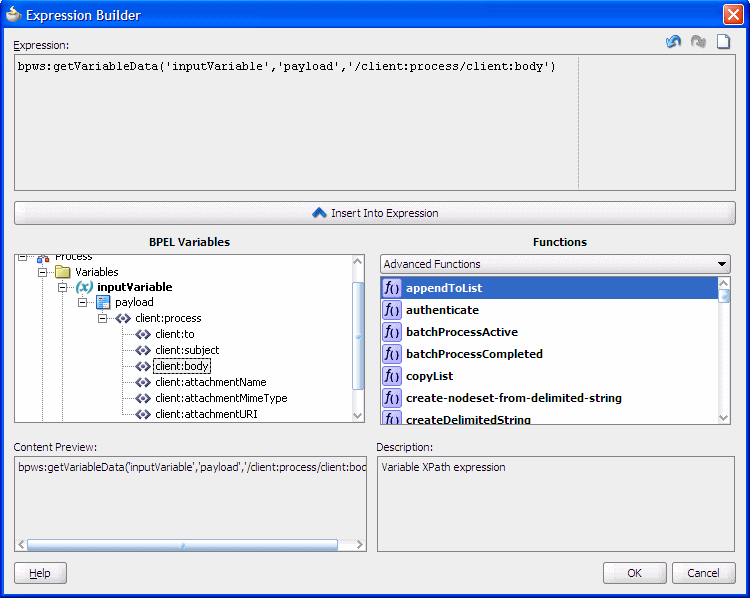
The expression must appear as follows:
bpws:getVariableData('inputVariable','payload','/client:process/client:body')
In the Edit Email window (Figure A-33), ensure that the Multipart Message with attachments box is checked.
When an e-mail has multiple parts, the attachment count includes the body that is set with the Wizard above. The body specified by the Wizard above is set as the first body part. For example, to represent a multipart mail with one (1) attached file, enter “2” as the number of body parts. When there is one attachment, enter '1' as the number of body parts.
Set the attachments:
Each body part has three attributes: MimeType, BodyPartName and ContentBody. By default, the wizard generates default names, MIME types and contents for each of the attachments. The assignment of these body parts has to be changed to set the correct data by modifying the copy rules in the assign activity in the notification scope. The copy rules (specified in the Copy Operation tab) are grouped for each assignment in the following order (the copy-to constructs are also listed):
MimeType - <to variable="varNotificationReq" part="EmailPayload"
 query="/EmailPayload/ns1:Content/ns1:ContentBody/ns1:MultiPart/ns1:BodyPart[2]/
ns1:MimeType"/>

Name - <to variable="varNotificationReq" part="EmailPayload"
 query="/EmailPayload/ns1:Content/ns1:ContentBody/ns1:MultiPart/ns1:BodyPart[2]/
ns1:BodyPartName"/>

Contents - <to variable="varNotificationReq" part="EmailPayload"
 query="/EmailPayload/ns1:Content/ns1:ContentBody/ns1:MultiPart/ns1:BodyPart[2]/
ns1:ContentBody"/>
Expand the Email Node by selecting the plus sign icon (Figure A-34).
Double-click the EmailParamAssign node (Figure A-35).
When making changes in the EmailParamAssign node (for example, editing the XPath variables), perform a Save All from the File menu after making each change. This ensures that the changes are reflected in the .bpel file.
To edit the mimeType of the second body part (the first body part is the contents set in the wizard) select the second body part variable ending with “MimeType” by double-clicking it (Figure A-36).
Figure A-36 Editing the mimeType of the Second Body Part
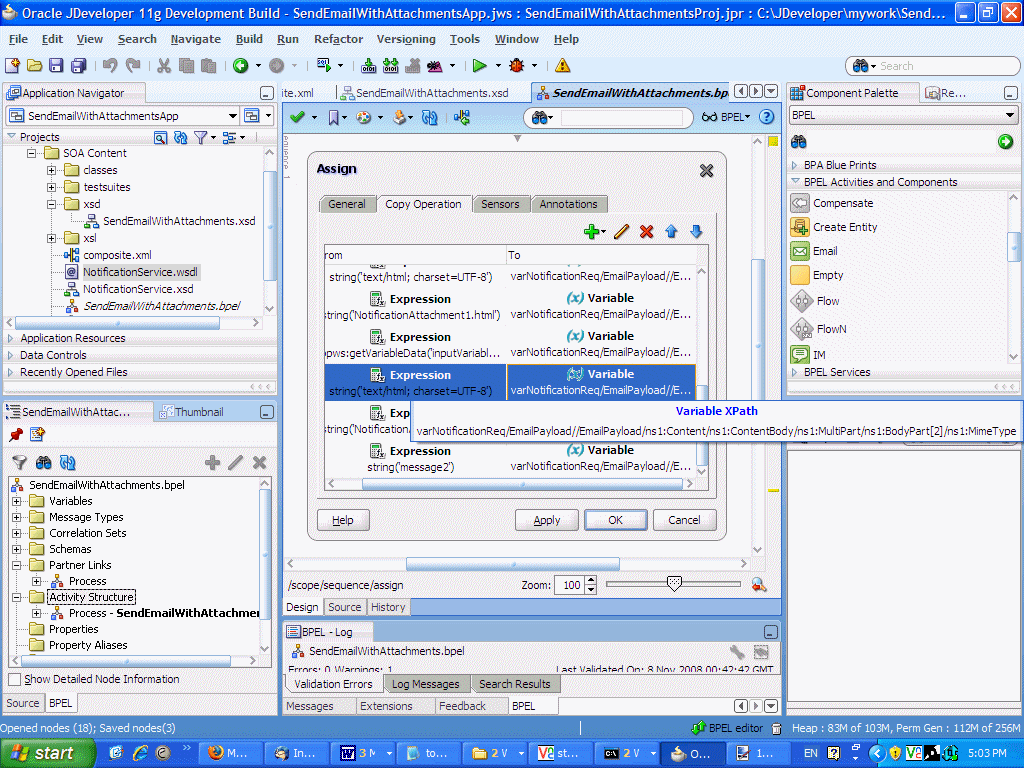
Edit the XPath as shown below (Figure A-37):
From: /client:process/client:attachmentMimeType, To: /EmailPayload/ns1:Content/ns1:ContentBody/ns1:MultiPart/ ns1:BodyPart[2]/ns1:MimeType
Figure A-37 Editing the XPath for mimeType
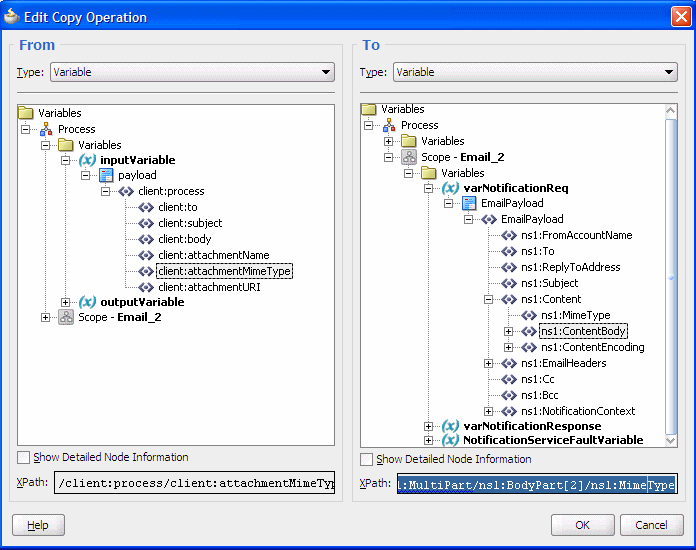
Save the project.
To edit the attachment name for the second attachment, select the second body part variable ending with “BodyPartName” by double-clicking it (Figure A-38).
Figure A-38 Editing the Attachment Name for the Second Attachment
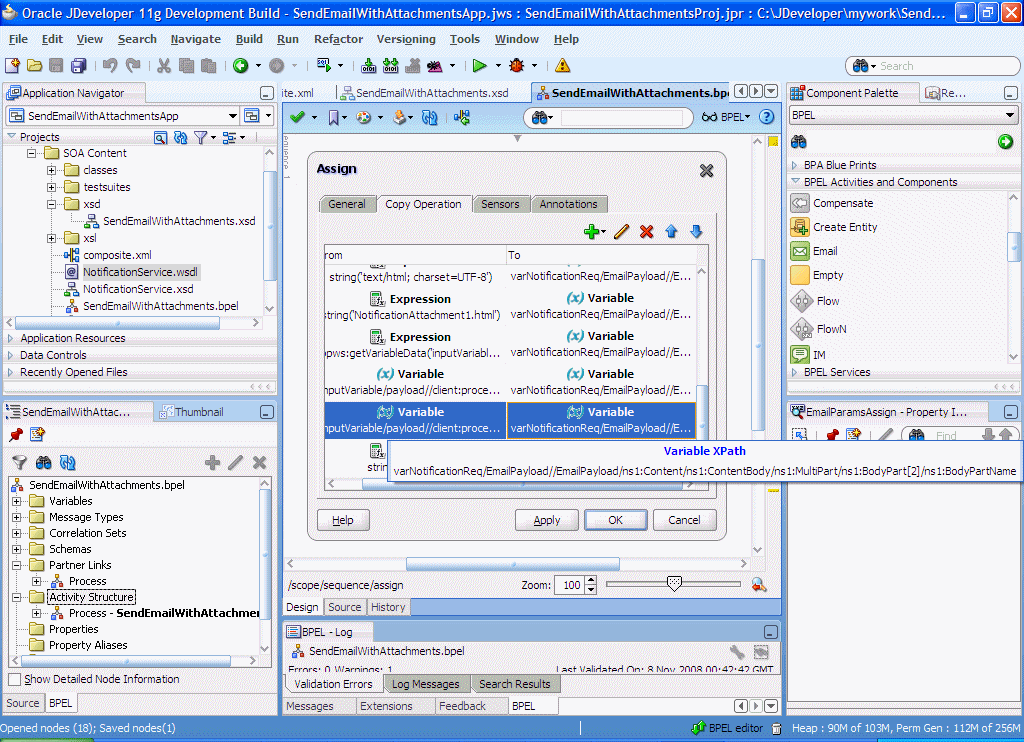
Edit the XPath as shown below:
From: /client:process/client:attachmentName To: /EmailPayload/ns1:Content/ns1:ContentBody/ns1:MultiPart /ns1:BodyPart[2]/ns1:BodyPartName
Figure A-39 Editing the XPath for BodyPartName
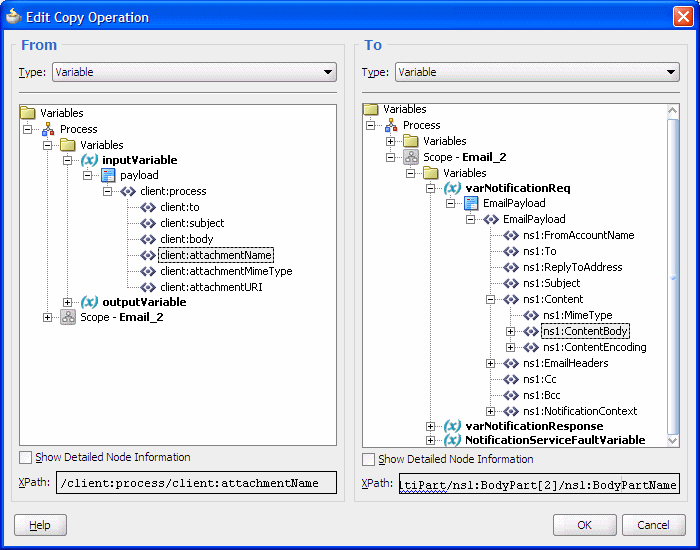
Save the project.
To edit the attachment contents of the second attachment, select the second body part variable ending with “ContentBody” by double-clicking it (Figure A-40).
Figure A-40 Editing the Attachment Contents of the Second Attachment
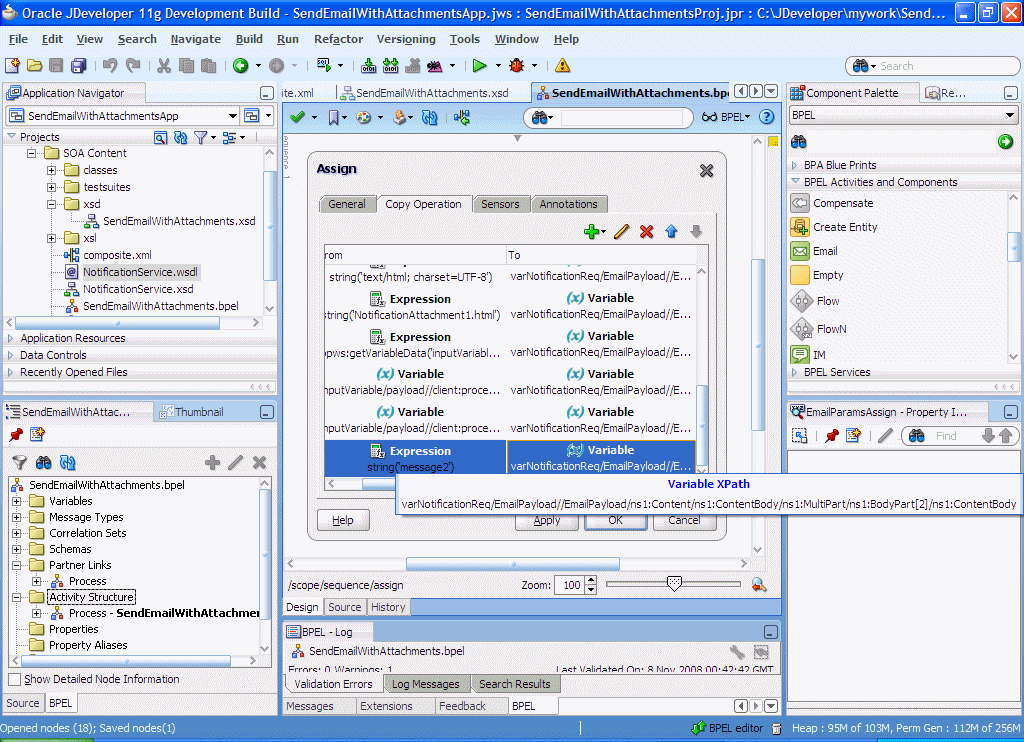
Edit the XPath as shown below (Figure A-41):
From: ora:readFile(bpws:getVariableData('inputVariable','payload','/client: process/client:attachmentURI')) To:/EmailPayload/ns1:Content/ns1:ContentBody/ns1:MultiPart/ ns1:BodyPart[2]/ns1:ContentBody
ora:readFile() xpath function is available under “BPEL Xpath Extension Functions”.
Figure A-41 Editing the XPath from the ContentBody
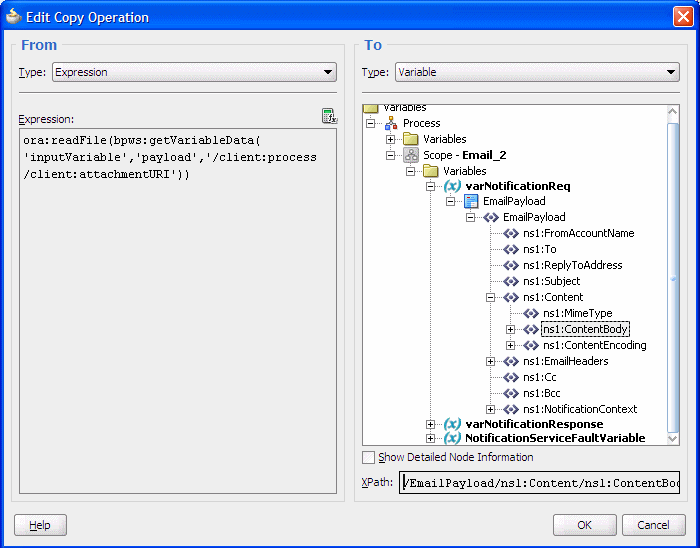
Click OK in the Edit Copy Operation screen.
Click OK in the assign activity. Save the project.
The Process Modeling procedure is complete. You can use the information in this procedure to add notification with attachments to your SOA composite application.You can now deploy and run the application as described in Section A.2.3, "Running the Pre-Built Sample".
Perform the following steps to create a new Application Server Connection.
Create a new Application Server Connection by right-clicking the project and selecting New, Connections, and Application Server Connection (Figure A-43).
Figure A-43 New Application Server Connection

Name the connection “SOA_server” and click Next (Figure A-44).
Select "WebLogic 10.3" as the Connection Type.
Figure A-44 New Application Server Connection

Enter the authentication information. The typical values are:
Username: weblogicPassword: weblogic
On the Connection screen, enter the hostname, port and SSL port for the SOA admin server, and enter the name of the domain for WLS Domain.
Click Next.
On the Test screen click Test Connection.
Verify that the message “Success!” appears.
The Application Server Connection has been created.