| Oracle® Fusion Applications Administrator's Guide 11g Release 1 (11.1.1.5) Part Number E14496-02 |
|
|
View PDF |
| Oracle® Fusion Applications Administrator's Guide 11g Release 1 (11.1.1.5) Part Number E14496-02 |
|
|
View PDF |
This chapter explains the security features available to all Oracle Fusion applications, and it contains the following topics:
The high-level information presented in this chapter includes links to other documents where the topic is explained in detail.
For additional information about application security, see the following documents:
For a detailed list of administrative tasks and pointers to further documentation, see Oracle Fusion Applications Administrator and Implementor Roadmap.
Oracle Fusion Applications use the services of the Oracle Platform Security Services (OPSS) to secure applications.
OPSS is a security platform that provides enterprise product development teams, systems integrators, and independent software vendors with a standards-based enterprise-grade security framework for Java SE and Java EE applications. Using OPSS, Oracle Fusion Applications benefit from the same, uniform security, identity management, and audit services across the enterprise.
The intended audience for this chapter are application security administrators and system security administrators.
Oracle Fusion Applications provisioning sets up the security infrastructure, including:
the identity store
authorization policies
enterprise roles
SSL wiring and its support structure including keystores and certificates
data masking
setting protected URIs for the infrastructure to work as expected
For instructions about protected URIs and configuring Oracle ADF applications with Oracle Access Manager SSO, see the "Integration with Oracle ADF Applications" section in the Oracle Fusion Middleware Administrator's Guide for Oracle Access Manager with Oracle Security Token Service.
Oracle Fusion applications run within a container in the Oracle WebLogic Server. This container handles authentication automatically for the application running in it by intercepting all requests to the application and ensuring that users are properly authenticated and the security context is propagated, as appropriate, before the request can proceed forward.
Note:
The Subject creation is automatic, but the security context propagation requires application configuration.Fusion Applications use LDAP-based authenticators; Fusion Application identity provisioning sets up and wires WebLogic domains with the appropriate authenticators during the Fusion Application installation.
Important:
Any LDAP-based authenticator, other than the DefaultAuthenticator, requires that the flagUseRetrievedUserNameAsPrincipal be set. During installation, this flag is automatically set in the DefaultAuthenticator.For details about bootstrap identity provisioning, such as super administrators for Fusion pillars, see Section 4.3.
Fusion Applications support the following LDAP identity store types:
Oracle Internet Directory 11g
Active Directory 2008
Multiple LDAP authenticators can be configured in a given context. For the algorithm that selects the identity store to initialize from a stack of authenticators, see the "Configuring the Identity Store Service" section in the Oracle Fusion Middleware Application Security Guide.
Note:
The Oracle WebLogic Server Administration Console is the recommended tool to configure authenticators, but this configuration can also be alternatively carried out with WLST commands. For the list of all available WLST commands, see Oracle Fusion Middleware WebLogic Scripting Tool Command Reference.The specification and configuration of LDAP authenticators is carried out with the Oracle WebLogic Administration Console. For details, see the "Configuring Authentication Providers" chapter in the Oracle Fusion Middleware Securing Oracle WebLogic Server.
It is important to keep the username attribute on the authenticator synchronized with the corresponding identity store property. For details, see note at the end of the table of identity store properties in the "LDAP Identity Store Properties" section in the Oracle Fusion Middleware Application Security Guide.
It is also important that the following two time intervals be equal:
The number of seconds that cached entries stay in the cache. This value is controlled by the WebLogic authenticator parameter Group Hierarchy Cache TTL, which by default is 60 seconds.
The number of seconds after which group membership changes are in effect. This value is controlled by the system property jps.subject.cache.ttl, which by default is 60 seconds.
If the Group Hierarchy Cache TTL value is changed, then that new value must also be set with the system property jps.subject.cache.ttl. For example, if the value of Group Hierarchy Cache TTL is changed to 55,000 (milliseconds), then jps.subject.cache.ttl must be reset as follows:
-Djps.subject.cache.ttl 55000
Provisioning as a whole encompasses all the operations required to install, configure, and deploy applications product offerings. Identity provisioning is a subset of this process which populates the users and groups needed for deployment and ongoing administration.
This section contains the following topics:
During the identity provisioning stage of installation, Oracle Fusion Applications require the existence of certain users with specific privileges. These administrative users reside in a secure, central repository called the identity store. This section explains the phases of identity provisioning, what users or groups are needed for provisioning, and the users and groups that exist at the end of the process.
This section contains the following topics:
The application provisioning process bootstraps the provisioned environment with two administrator groups for each application family.
These two administrator groups are:
A system administrator
A directory group representing the WebLogic Server domain administrators for all the domains.
An application administrator
A directory group with an assigned enterprise role reflecting all the application roles and delegation privileges for all the applications in a given family.
The purpose of creating these "Super Administrators" during provisioning is to enable ongoing administration and/or delegation privileges.
The above process facilitates separation of duties between system administration and application administration responsibilities, but you are free to assign the same user to both hierarchies ("system admin" and "application admin").
Table 4-1 shows the groups that are created for each application family:
Table 4-1 Provisioned Administrator Groups
| Product Family/Product | System Administrator Group | Application Administrator Group |
|---|---|---|
|
Oracle Fusion Supply Chain Management |
|
|
|
Oracle Fusion Customer Relationship Management |
|
|
|
Oracle Fusion Human Capital Management |
|
|
|
Oracle Fusion Financials |
|
|
|
Oracle Fusion Procurement |
|
|
|
Oracle Fusion Project |
|
|
|
Oracle Fusion Incentive Compensation |
|
|
In addition a single user, known as the super user, is set up to belong to all the administrator groups. That user becomes the administrator for all middleware and the application administrator for all product families.
Figure 4-1 shows the relationship between these groups.
It is important to distinguish between the two types of super-administrators that exist in the provisioning process.
Pre-seeded bootstrap user
Designated super-user
In the context of the pre-seeded user, provisioning employs an identity known as the App ID that is required to bootstrap the WebLogic domains. The pre-configuration phase of provisioning automatically generates the credential needed for this App ID user.
In the context of the designated super user, during the interview phase of provisioning, you are asked to specify the user ID of the designated "real" user who will be set up as the Middleware Administrator and Functional Setup Manager.
For example, if you want a "real" user such as "cn=john.doe,cn=users,cn=acme,cn=com" to be the super user, provide "john.doe" as the user ID during provisioning. This user will be set up as the super user in the identity store.
Note:
It should be emphasized that the identity seed data that is used in the LDIF file to configure the WebLogic domains does not use real user DNs.When Oracle WebLogic Server is installed, the default authenticator is based on an embedded LDAP store.
As part of Oracle Fusion Applications provisioning, the default authenticator based on the embedded LDAP is deleted. Upon completion of Oracle Fusion Applications provisioning, the primary and only identity store will be your external LDAP store. The bootstrap identity used to configure the domains during the provisioning process will be pre-seeded in the external LDAP through the LDIF file, as explained in Section 4.3.1.2.
The identity provisioning process consists of distinct phases.
In the interview phase, Flow Designer collects the following information:
The DN of the user designated as the super user. This user must already exist in the identity store.
Whether the system administrators group exists or must be created.
If the group exists, the DN of the group.
The LDAP authenticator, either Oracle Internet Directory (OIDAuthenticator) or Oracle Virtual Directory (OVDAuthenticator) that will serve as the LDAP identity store.
The next step of the process verifies that the designated super-user exists in the identity store.
The system administrator group is created if needed, and the super user is made a member of the group.
Next, the application domains are created, the LDAP authenticator is enabled, and the WebLogic domain is started up.
Following configuration, the system administrator groups are assigned the appropriate family-level enterprise roles.
At the end of this process, the super user has:
Administrator privileges for all WebLogic domains and all middleware.
Function setup privileges for all Oracle Fusion applications.
Administration privileges to Oracle Fusion Applications. These do not include transactional privileges.
For more information about identity provisioning and using the interview wizard to create a provisioning plan, see the Oracle Fusion Applications Installation Guide.
While there are logical sets of "super" administrative groups (a set of two per application family, consisting of the super-user administrator and the application administrator) you can choose to distribute these functions among fewer individuals. The recommended best practice is to carefully plan the separation of duties, taking into account the real-world operational needs of your site.
Oracle Identity Manager is the best-in-class user provisioning and administration component in Oracle Fusion Middleware.
Oracle Identity Manager automates the process of adding, updating, and deleting user accounts from applications and directories.
Identities can be created and managed when user records are created through activities such as employee hiring and creation of contacts through CRM.
In addition, identities can also be created and managed administratively through the Oracle Identity Manager Administrative Console.
For more information about provisioning and managing identities, see:
Oracle Fusion Middleware User's Guide for Oracle Identity Manager
Oracle Fusion Middleware Administrator's Guide for Oracle Identity Manager
"User, Account, and Entitlement Provisioning" section in Oracle Fusion Middleware Integration Overview for Oracle Identity Management Suite.
Authorization is the most sensitive and application-specific security concept. At its very core, authorization protects access to application resources through the enforcement of policies, which are stored in the domain policy store. Authorization determines what types of actions, tasks, or services a user can access.
In most cases, the definition of application policies begins during the design of the application. This definition includes identifying application privileges and application roles, the hierarchical relationships between application roles, and categorizing them into products and Java EE applications.
The policy model is based on a number of logical entities, such as resource types, resource instances, entitlements (also known as permission sets), application roles, and enterprise roles. For details about these entities and the logical model of a policy, see the "Terminology" section in the Oracle Fusion Middleware Application Security Guide.
This section includes the following topics:
An Oracle Fusion application policy is either a functional policy or a data security policy. Both these policies define who can do what on a resource.
A data security policy includes a condition, while a functional policy does not. The condition identifies a row or a set of rows in a business object, and the privileges the data security grants are for only the data that meets the condition. A functional policy, instead, assigns permissions to resources or code artifacts (such as task flows, pages, Java methods, or UI components) and grants a specific set of actions on each resource.
Data security policies are stored in the transactional database; functional policies are stored in the domain policy store.
Oracle Authorization Policy Manager is the recommended tool to administer application policies once the application has been deployed. This graphical interface tool allows application security administrators to provision, search, and modify application functional and data security policies. Using this tool they can, for example, remove a resource from an entitlement or change the actions granted to a resource in an entitlement.
For details about some of the most frequently uses of Oracle Authorization Policy Manager, see the "Some Frequently Used Operations" section in the Oracle Fusion Middleware Oracle Authorization Policy Manager Administrator's Guide (Oracle Fusion Applications Edition) where the following typical administrative tasks are described:
Managing application roles
Managing application resource types
Managing application resources
Managing application entitlements
Creating and modifying an application policy
Viewing the enterprise role hierarchy
Managing the application role hierarchy
Mapping application roles to an enterprise role
Mapping enterprise roles to an application role
For details about configuring application roles, see Section 4.5.1.
Oracle Enterprise Manager Fusion Middleware Control is the recommended tool to administer system policies. These are policies that pertain to the whole domain, as opposed to application policies, which pertain a particular application.
A principal policy is a system policy that grants permissions to a list of users or enterprise groups. A codebase policy is a system policy that grants permissions to a piece of code or a URL (typically represented by an EAR or a JAR file); for example, an application using the Credential Store Framework requires an appropriate codebase policy.
Fusion Middleware Control allows the creation and modification of both these types of system policies. For details about the procedure to follow, see the "Managing System Policies" section in the Oracle Fusion Middleware Application Security Guide.
An alternative way to administer policies (both system and application policies), although not as convenient but occasionally useful, is using WLST commands. For a complete list of security-related commands, see the "WLST Security Commands" section in the Oracle Fusion Middleware Application Security Guide.
The recipient of a grant can be either an application role or an enterprise role. In Oracle Fusion Data Security and policy grants this recipient is identified by a GUID, and it is crucial for the security system to work as expected that these GUIDs be consistent. Since GUIDs are not preserved by migration, the GUIDs in the Oracle Fusion Data Security policies and in the policy store policies must be reconciled when, for instance, migrating to a staging or a production environment.
The java utility program DSDataMigrator reconciles GUIDs by modifying GUIDs in Oracle Fusion Data Security so that the GUIDs of the role entries in the identity and policy stores are consistent with those in Oracle Fusion Data Security.
DSDataMigrator needs not be run when:
The user interface is used to create new policies or to modify existing ones.
The system is provisioned for the first time (GUID reconciliation happens automatically in this case).
A patch containing Grants Seed Data is applied to the environment (GUID reconciliation happens automatically in this case).
DSDataMigrator must be run when:
A policy stripe was dropped or recreated.
A role was dropped or recreated.
An SQL script was used to upload grants data.
Patching the infrastructure fails, such as, when the LDAP server went down.
The LDAP server was swapped out.
FndGrantsSD.xml data was loaded to the database using SDF programs directly bypassing the patching infrastructure.
The file jps-config-jse.xml contains invalid or incorrect configurations.
Security data was migrated to a staging or to a production environment.
Enterprise roles in the identity store were dropped and imported again using a migration tool.
This section includes the following topics:
Before an administrator runs this command, it is assumed that:
The Fusion Application has been installed (so that Oracle Fusion Data Security has been loaded).
The XML policies (jazn-data.xml) have been migrated to an Oracle Internet Directory server.
The FND_GRANTS table has been backed up, as illustrated in the following invocation:
>sqlplus sys as sysdba
create table FUSION.FND_GRANTS_OLD as select * from FUSION.FND_GRANTS;
The classpath in the shell where the command is to be run contains the following JAR files:
MW_HOME/atgpf/atgpf/modules/oracle.applcore.model_11.1.1/Common-Model.jar.
MW_HOME/atgpf/atgpf/modules/oracle.applcore.model_11.1.1/DataSecurity-Model.jar.
MW_HOME/oracle_common/modules/oracle.adf.model_11.1.1/adfm.jar.
MW_HOME/oracle_common/modules/oracle.adf.share_11.1.1/adf-share-support.jar.
MW_HOME/oracle_common/modules/oracle.adf.share.ca_11.1.1/adf-share-ca.jar.
MW_HOME/oracle_common/modules/oracle.adf.share.ca_11.1.1/adf-share-base.jar.
MW_HOME/oracle_common/modules/oracle.adf.share_11.1.1/jsp-el-api.jar.
MW_HOME/oracle_common/modules/oracle.adf.businesseditor_11.1.1/adf-businesseditor.jar.
MW_HOME/oracle_common/modules/oracle.adf.share_11.1.1/adflogginghandler.jar.
MW_HOME/oracle_common/modules/oracle.jps_11.1.1/jps-manifest.jar.
MW_HOME/modules/javax.jsp_1.2.0.0_2-1.jar.
MW_HOME/oracle_common/modules/oracle.mds_11.1.1/mdsrt.jar.
MW_HOME/oracle_common/modules/oracle.javatools_11.1.1/resourcebundle.jar.
MW_HOME/oracle_common/modules/oracle.javatools_11.1.1/javatools-nodeps.jar.
MW_HOME/wlserver_10.3/server/ext/jdbc/oracle/11g/ojdbc5.jar.
Optionally, the identity store has been seeded.
Note 1:
The filesCommon-Model.jar and DataSecurity-Model.jar are expected to be in the paths indicated above, but, depending on the environment, the could be installed in some other location. To find out the location of those files in your environment, invoke the following commands at the top of the MW_HOME directory:
>find . -name "Common-Model.jar"
>find . -name "DataSecurity-Model.jar"
Note 2:
DSDataMigrator is executed automatically when (and only when) a patch containing the data security grants seed data file FndGrantsSD.xml is applied to the environment. In particular, the script is not executed automatically if the seed data file is applied manually.DSDataMigrator is located in the directory oracle.apps.fnd.applcore.dataSecurity.util, and it has the following syntax (arguments are written in separate lines for the sake of clarity only):
java -classpath $CLASSPATH
-Doracle.security.jps.config=<path to the jps-config-jse.xml file>
-DFND_DS_GUID_RECON_LOG_DIR=<path to the log output directory>
DSDataMigrator -dsdburl <dsdbURL>
                       -dsdbuser <dsdbUser>
                               -silentMode <true_or_false>
                               -forceProcessAllRows <true_or_false>
                               -policyStripe <FA policy stripe name>
                       -idStoreOnly <true_or_false>
                                               -validationMode <true_or_false>
When run and before processing security data, the command prompts the administrator for the database password.
The meaning of the arguments is as follows:
oracle.security.jps.config specifies the location of the configuration file jps-config-jse.xml where the policy store and identity store are configured. This file must include the appropriate bootstrap credentials to access the policy store. The following fragment of a configuration file illustrates the specification of credentials for a policy store instance:
<serviceInstance provider="ldap.policystore.provider" name="policystore.ldap">
  <property value="OID" name="policystore.type"/>
  <property value="bootstrap_123456" name="bootstrap.security.principal.key"/>
  <property value="cn=st2_d8b3" name="oracle.security.jps.farm.name"/>
  <property value="cn=FusionAppsPolicies" name="oracle.security.jps.ldap.root.name"/>
  <property value="ldap://adc2110301.us.oracle.com:33060" name="ldap.url"/>
</serviceInstance>

<serviceInstance location="./bootstrap" provider="credstoressp" name="bootstrap.cred">
  <property value="./bootstrap" name="location"/>
</serviceInstance>
dsdburl specifies the URL of the data base where Oracle Fusion Data Security is stored.
dsdbuser specifies the name of the user that can access the data base.
silentMode specifies whether the command should raise exceptions when an entry is not found in the OID server. Set to TRUE to prevent raising these kind of exceptions; otherwise, set to FALSE. Default value: FALSE.
forceProcessAllRows specifies whether all rows in the FND_GRANTS table should be processed. Set to TRUE to process all rows in that table; otherwise, set to FALSE. The default behavior is FALSE and processes just those rows with the compile_flag is set to Y.
policyStripe specifies the name of the Oracle Fusion application stripe in the policy store. Typical values are fscm, crm, and hcm.
idStoreOnly specifies whether only data security grants granting to enterprise roles should be processed. Set to TRUE to process only grants granting to enterprise roles; otherwise, set to FALSE to process all grants. When set to TRUE, the value of the argument policyStripe is ignored. Default value: FALSE.
validationMode specifies to run the script in read only mode (validation mode). Set to TRUE to run the script without updating the database data. Set to FALSE to run the script and update database data. Default value: FALSE. A validation run of the script is useful to find out if any reconciliation is needed between the database and the LDAP store.
For details on topics related to data security management, see the following documents:
For details about creating data role templates, see the "Oracle Fusion Applications Data Role Templates" chapter in the Oracle Fusion Middleware Oracle Authorization Policy Manager Administrator's Guide (Oracle Fusion Applications Edition).
An enterprise role or enterprise group is a collection of users and other enterprise roles, and it is stored in the domain identity store. An application role is a collection of users, enterprise roles, and application roles, and it is stored in the domain policy store.
In the Oracle Authorization Policy Manager environment, enterprise roles are referred to as external roles. In the Oracle WebLogic Administration Console, enterprise roles are referred to as enterprise groups.
Roles can be structured in a hierarchy by the relation "inherits." If a parent role inherits a child role, then the parent role can do anything that the child role can do (in addition to what the parent role can do).
Mapping an enterprise role to an application role establishes that the enterprise role inherits the application role, thus, the privileges of the enterprise role become the union of its privileges and those of the application roles to which it is mapped.
For details about managing the role mapping after the application has been deployed, see the following topics in Oracle Fusion Middleware Oracle Authorization Policy Manager Administrator's Guide (Oracle Fusion Applications Edition):
For details about managing data security policies in Oracle Fusion applications, see the "Managing Oracle Fusion Applications Data Security Policies" section in the Oracle Fusion Middleware Oracle Authorization Policy Manager Administrator's Guide (Oracle Fusion Applications Edition).
For details about generating data roles with data role templates, see the "Oracle Fusion Applications Data Role Templates" section in the Oracle Fusion Middleware Oracle Authorization Policy Manager Administrator's Guide (Oracle Fusion Applications Edition).
This section includes the following topics:
Oracle Fusion applications use the following enterprise and application roles in their application policies and data security policies:
Data role, an enterprise role used exclusively in data security policies. It can inherit Job, Duty, and Abstract roles. A number of data roles are provisioned with each Oracle Fusion application.
Job role, or Business role, is an enterprise role that corresponds with a job or business occupation. A Job role must inherit at least a Duty role.
Duty role, or Task role, is an application role that corresponds with the duties of a job.
Abstract role is an enterprise role that can be associated with any user, irrespective of his job or duties. Typical examples of this role are Employee, Manager, Customer, and Supplier. Several job roles are provisioned with each Oracle Fusion application. An Abstract role must inherit at least a Duty role.
Oracle Authorization Policy Manager is the recommended tool to manage application roles once the application has been deployed. Using this tool an administrator can, for example, create, remove, or modify an application role; or modify the hierarchy of application roles; or create, remove, or modify the application role category. For details about the tool, see the "Managing Application Security Artifacts" section in the Oracle Fusion Middleware Oracle Authorization Policy Manager Administrator's Guide (Oracle Fusion Applications Edition).
Table 4-2 lists the equivalent terms used in the physical and reference implementations. The terminology in the physical implementation follows the one used in Oracle Fusion applications; the terminology in the reference implementation follows the one used in the Oracle Authorization Policy Manager graphic interface.
Table 4-2 Equivalent Terminology
| Physical Implementation | Reference Implementation |
|---|---|
|
Data role |
Enterprise role used only in data security policies. Typically, the name of a data role has the suffix _DATA. |
|
Job |
Enterprise role mapped to application role. Typically, the name of this role has the suffix _JOB. |
|
Abstract role |
Enterprise role, which are persisted as LDAP groups and can be managed with Oracle Authorization Policy Manager and Oracle Identity Management. |
|
Duty |
Application role used only in application policies. |
|
Privilege |
Entitlement (or permission set). |
|
FND Grant (or Foundation Grant) |
Data security policy, which ties a data role or job role to a specific set of data. |
For definitions and details about the terms in the reference implementation, see the "Basic Security Artifacts" section in the Oracle Fusion Middleware Oracle Authorization Policy Manager Administrator's Guide (Oracle Fusion Applications Edition).
A security administrator uses integrated Oracle Identity Management pages to create and manage enterprise (job) roles in Oracle Fusion applications. For details, see the "Organization and Role Management" section in the Oracle Fusion Middleware User's Guide for Oracle Identity Manager.
Auditing features are provided through Audit Trail, a history of the changes that have been made to data in Oracle Fusion Applications. Audit Trail enables you to track who made changes to data, at what time, and how the value changed.
For more information and configuration details, see the "Implementing Audit Trail Reporting" chapter in Oracle Fusion Applications Developer's Guide.
Note:
Oracle Fusion Middleware Audit Framework is a separate service that provides a centralized audit framework for the middleware family of products. For details about this feature, see "Configuring and Managing Auditing" in the Oracle Fusion Middleware Application Security Guide.SSL provides secure communication between the paths that connect endpoints. For example, the path between Oracle WebLogic Server and an LDAP directory server is secured through SSL.
This section contains the following topics:
Oracle Fusion Middleware provides SSL configuration features across the three tiers of the enterprise stack (Web, Middle, and Data tiers). SSL configuration is consistent and uniform across all Oracle Fusion Middleware system components and applications.
This section contains the following topics:
SSL-enabling communication paths is one element in a hardening process whose aim is to ensure that all appropriate security features are activated and configured correctly in the various major systems and subsystems that comprise Oracle Fusion Middleware.
The discussion in this document is limited to SSL features available to Oracle Fusion applications. For information about other elements of hardening, see the Oracle Fusion Applications Security Hardening Guide.
Oracle Fusion Middleware supports a three-tier structure: the Web tier contains load balancers and other components outside the firewall, the middle tier hosts Oracle WebLogic Server and its applications, and the Data tier contains databases and directories. Different administration tools are shown at the top of the figure.
Figure 4-2 shows the location of key elements in this architecture:
Figure 4-2 Oracle Fusion Middleware and the Three-Tier Model
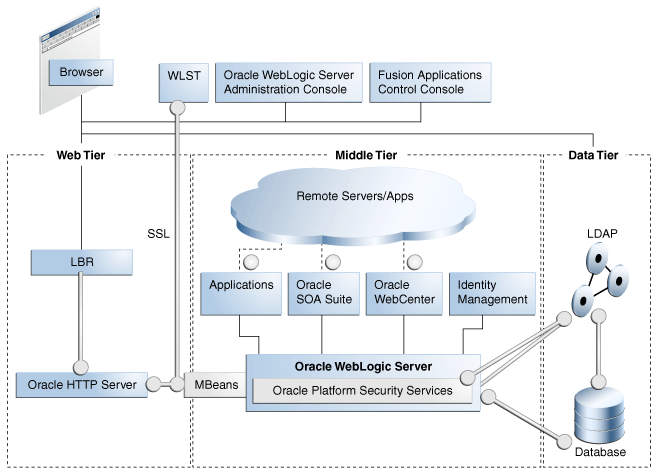
In the figure, the vertical broken lines represent firewalls. The circles represents listeners that can be SSL-enabled for secure communication. As the figure shows, all critical communication paths can be protected with SSL regardless of the tier(s) involved.
For more information, see the "About SSL in Oracle Fusion Middleware" section in the Oracle Fusion Middleware Administrator's Guide.
Key connections in Oracle Fusion Applications can be secured either during provisioning or post-provisioning.
This section contains the following topics:
Figure 4-3 shows a high-level representation of a three-tier network topology in the typical Oracle Fusion Applications environment:
Figure 4-3 SSL Connections for Basic Network Topology
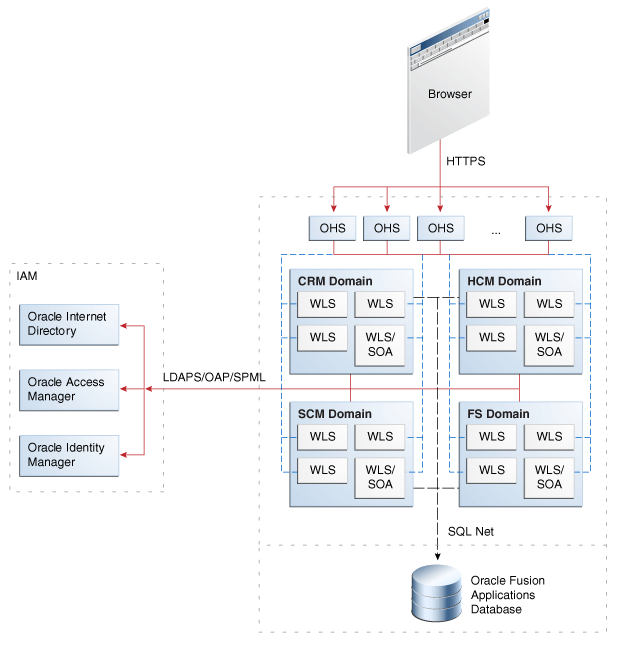
Notes:
The diagram shows some representative domains.
OAP is the Oracle Access Protocol used by Oracle Access Manager. LDAPS is the LDAP-over-SSL protocol.
Several approaches to configuring SSL are available in the Oracle Fusion Applications environment:
You can choose not to enable SSL connections during provisioning.
You can choose to SSL-enable connections to certain components during provisioning.
These connections are shown as solid lines (red) in the diagram and include IdM components like Oracle Access Manager and Oracle Internet Directory. Table 4-3 lists these connections.
You can SSL-enable connections post-provisioning.
If you started with Option 2, you can now protect service-to-service connections like those shown in dotted lines (blue) in the diagram; this includes, for example, connections to Oracle Business Intelligence, ECSF, and external Web services. For details about this wiring, see Section 4.7.4.
If you started with Option 1, you would SSL-enable Oracle Identity Management first (see Section 4.7.3), followed by the service-to-service connections (see Section 4.7.4).
Note the following assumptions about this topology:
In most environments, the Fusion Applications middleware servers operate on an isolated network within the larger corporate network.
This means that such components as Oracle HTTP Server (OHS), Oracle WebLogic Server, Oracle Business Intelligence, and others required for the Oracle Fusion Applications instance all run within a single isolated network.
Likewise, the Oracle Fusion Applications database runs in either the same isolated network or on its own isolated network that can only be reached by means of the application's private network.
Because most business applications do not face the extranet, the HTTP server (OHS) tier is typically not segregated into its own DMZ.
External dependencies for Oracle Identity Management components, represented in the figure by Oracle Access Manager and Oracle Internet Directory servers, are assumed to reside outside this isolated network.
As mentioned earlier, Oracle Fusion applications are configured with SSL for client traffic inbound to OHS and traffic to and from the identity management zone. Table 4-3 shows the connections that are SSL-enabled at provisioning:
Table 4-3 Provisioned SSL Connections
| Connection Path | Protocol | Default SSL Connection |
|---|---|---|
|
Incoming HTTP Traffic (client to HTTP server) |
HTTPS |
One-way SSL (trust in server) |
|
|
OAP |
One-way SSL (trust in server) |
|
Oracle WebLogic Server to LDAP server (Oracle Internet Directory/Oracle Virtual Directory) |
LDAPS |
One-way SSL (trust in server) |
SSL can also be enabled for these connections post-provisioning by following the instructions in Section 4.7.3.
As mentioned, you can SSL-enable the connections shown in Table 4-3 during Oracle Fusion Applications provisioning.
You can also SSL-enable these connections post-provisioning, by following the instructions provided in this section.
These instructions rely on the fact that, during the provisioning process, self-signed server certificates are created and configured for all Oracle Fusion Applications domain Weblogic Server instances. Thus:
Each self-signed certificate is associated with an Oracle WebLogic Server instance through its identity store, located at:
fusionapps/wlserver_10.3/server/lib/hostname_fusion_identity.jks
The self-signed certificates are imported as trusted certificates into a common trust store named fusion_trust.jks, located at:
fusionapps/wlserver_10.3/server/lib
This common trust store also contains the identity management trust CA certificates provided during provisioning's configuration steps.
The common trust store is ready for all outbound SSL connections to external web services deployed with the same trusted certificates.
Using the common trust store fusion_trust.jks and the identity key store hostname_fusion_identity.jks, you can configure SSL between the Oracle HTTP Server instances and the related Oracle Fusion Applications domain Weblogic Server instances as follows:
Enable outbound SSL for the Web tier. For each OHS instance:
Locate the configuration file FusionVirtualHost_fs.xml, which resides in the following directory:
ohs_instance/CommondDomain_webtier/config/OHS/ohs1/moduleconf/FusionVirtualHost_fs.xml
Check Enable SSL in the configuration file FusionVirtualHost_fs.xml.
Change the current (non-SSL http) ports to point to the Oracle Fusion Applications Weblogic instance SSL ports.
All OHS virtual hosts are now configured for HTTPS.
Enable SSL for inbound connections to the middle tier. For each Oracle WebLogic Server instance in the Oracle Fusion Applications domain:
Enable SSL for the configured SSL port. You can use the Oracle WebLogic Server administrative console or a WLST command.
For Oracle WebCenter, change all connections specified in the connections.xml file to use HTTPS instead of HTTP. Change all ports to SSL ports. As an alternative, the internal virtual host can be configured to route all incoming traffic to use HTTPS.
For an example of connections.xml, see Oracle Fusion Middleware Developer's Guide for Oracle WebCenter.
For Oracle SOA Suite composite deployment connections, all composites must be rewired and redeployed.
Since all composites are already wired to the internal virtual host, a simpler approach is to redirect all HTTP traffic coming in to the internal virtual host to use HTTPS.
If the topology includes a load balancer (LBR), since LBR and OHS are both SSL endpoints, you must SSL-enable all internal virtual IP's, and import the CA certificates from the Web tier (Oracle HTTP Server or Oracle Web Cache) cwallet.sso to the LBR trust store:
Export all the trusted certificates to PEM (text format) using the orapki utility.
Import the PEM format certificates to the load balancer. Refer to the LBR documentation for SSL trust configuration.
Besides the connections that are SSL-enabled during provisioning, there are additional connections in the Oracle Fusion Applications environment that can be SSL-enabled. For example, you can secure traffic to Oracle Database.
This section contains the following topics:
Oracle Identity Management components reside in either the middle tier or the data tier of Oracle Fusion Middleware and can be individually configured for SSL.
Table 4-4 lists the components and references for configuration details.
Table 4-4 SSL for Oracle Identity Management Components
| Task | Reference |
|---|---|
|
SSL-enable Oracle Internet Directory |
"Enabling SSL on Oracle Internet Directory Listeners" section in the Oracle Fusion Middleware Administrator's Guide |
|
SSL-enable Oracle Virtual Directory |
"Enabling SSL on Oracle Virtual Directory Listeners" section in the Oracle Fusion Middleware Administrator's Guide |
|
Enable SSL Between Oracle Internet Directory and the Database |
"Enabling Outbound SSL from Oracle Internet Directory to Oracle Database" section in the Oracle Fusion Middleware Administrator's Guide |
|
Enable SSL Between Oracle Internet Directory and Oracle Virtual Directory |
"Creating LDAP Adapters" section in the Oracle Fusion Middleware Administrator's Guide for Oracle Virtual Directory |
|
Enable SSL for data source |
"SSL-Enable a Data Source" section in the Oracle Fusion Middleware Administrator's Guide |
You can configure the components of Oracle Business Intelligence to communicate over SSL.
For configuration details, see SSL Configuration in Oracle Business Intelligence in the Oracle Fusion Middleware Security Guide for Oracle Business Intelligence Enterprise Edition.
To locate the guide:
Point your browser to the Oracle Business Intelligence site at http://www.oracle.com/technology/documentation/bi_ee.html.
Locate your version of Oracle Business Intelligence Enterprise Edition, and click View Library.
At the Documentation Library page, select the Documentation tab.
Select the Security Guide.
You can configure SSL for Oracle ECM applications running in a production or development environment.
For configuration details, see the "Configuring SSL for Oracle ECM Applications" section in the Oracle Fusion Middleware Installation Guide for Oracle Enterprise Content Management Suite.
For information about securing Oracle Fusion Web Services, see the following:
"Locking Down Web Services: Points to Consider" section in the Oracle Fusion Applications Security Hardening Guide
"Hardening Web Services" section in the Oracle Fusion Applications Security Hardening Guide
Enable Secure Sockets Layer (SSL) on ECSF to secure all connections that transmit passwords. These include connections to Oracle WebLogic Server, the ECSF servlet, and the Oracle SES server.
To enable SSL for ECSF, perform the following tasks:
Task 1, "Generate a Certificate for the Oracle WebLogic Server Instance"
Task 3, "Add the Oracle WebLogic Server's Certificate to Oracle SES's Trust Store"
A certificate that contains the public key of the Oracle WebLogic Server instance hosting ECSF must be generated. This can be either a CA-signed certificate or a self-signed server certificate.
For information about how to generate the certificate, see Oracle Fusion Middleware Securing Oracle WebLogic Server.
As described later (Task 3), if this is a self-signed certificate, then it must be imported to Oracle SES's truststore. If it is a CA-signed certificate, it likely already exists in the truststore; if not, you must import the CA certificate into Oracle SES's truststore.
Enabling SSL connections on the Oracle WebLogic Server instance, on which the ECSF application is running, secures the ECSF servlet connections used to access the feeds and the security service. For more information, see the "Configuring SSL" chapter in Oracle Fusion Middleware Securing Oracle WebLogic Server.
To enable SSL on Oracle WebLogic Server:
Configure SSL.
Select the server on which the ECSF application is running.
Make sure that the Allow Unencrypted Null Cipher checkbox is deselected (default).
Configure the listen ports to enable the SSL listen port (check the SSL Listen Port Enabled checkbox).
Note:
The SSL Listen Port is usually set as7002. You can use this port number to access the ECSF servlet through SSL (for example https://mywlsserver.oracle.com:7002/approot/searchfeedservlet/ConfigFeed). Also note that the protocol in the URL must be https.Save your changes.
When Oracle SES initiates SSL connections to ECSF, the Oracle WebLogic Server instance on which the ECSF Servlet is running sends a digital certificate containing its public key to Oracle SES. If this certificate is a self-signed certificate, then the certificate must be extracted from Oracle WebLogic Server and added to Oracle SES's trust store. (If a CA certificate, ensure that it exists in the SES trust store.) For more information about adding the certificate to the trust store, see the Oracle Secure Enterprise Search Administrator's Guide.
To add the Oracle WebLogic Server certificate to the Oracle SES trust store:
Use the keytool utility (located in ORACLE_HOME/jdk/bin) to export the Oracle WebLogic Server's certificate from the keystore, for example:
keytool -export -alias weblogic -keystore JAVA_HOME/jre/lib/security/cacerts -file /temp/weblogic.cer
where Oracle WebLogic Server's certificate, located in the keystore at JAVA_HOME/jre/lib/security/cacerts, is exported to the weblogic.cer file in the /temp directory; this file now contains the server's certificate.
Navigate to the Oracle SES installation directory, and use keytool to import the Oracle WebLogic Server's certificate into the Oracle SES keystore, for example:
keytool -import -alias weblogic -file weblogic.cer -keystore ORACLE_HOME/jdk/jre/lib/security/cacerts
where Oracle WebLogic Server's certificate in the weblogic.cer file is imported into the Oracle SES keystore at ORACLE_HOME/jdk/jre/lib/security/cacerts.
You must also enable SSL on Oracle SES Query and Admin Services. For more information about how to enable SSL, see Oracle Secure Enterprise Search Administrator's Guide.
Since the Oracle SES server's certificate has not been signed by a reputable certificate authority (CA) but instead is a self-signed certificate, you must extract the certificate from Oracle SES and add it to both Oracle WebLogic Server's trust store and ECSF Command Line Administration Utility's trust store using these steps:
Use keytool to add the extracted Oracle SES server's certificate to the trust store that Oracle WebLogic Server is configured to use, for example:
keytool -import -alias oses -file oses.cer -keystore WLS_keystore
where Oracle SES server's certificate in the oses.cer file is imported into WLS_keystore, which is the keystore that Oracle WebLogic Server is configured to use.
Add the extracted Oracle SES server's certificate to ECSF Command Line Administration Utility's trust store by modifying the runCmdLineAdmin.bat and runCmdLineAdmin.sh scripts, located in ORACLE_HOME/jdeveloper/ecsf, so that JAVA_HOME points to the path of the keystore that Oracle WebLogic Server is using.
After SSL is enabled, you must reconfigure the search engine instance parameters that contain URLs that point to the ECSF server. These parameters are ECSF_DATA_SERVICE, ECSF_SECURITY_SERVICE, and ECSF_REDIRECT_SERVICE.
The protocol must change from http to https, and the http port must change from 7101 to 7002, the SSL port. For example, you need to change http://wlsserver.com:7101/approot/searchfeedservlet to https://wlsserver.com:7002/approot/searchfeedservlet.
You must also reconfigure the search engine instance parameters that contain URLs that point to the Oracle SES server. These parameters are SES_ADMIN_SERVICE and SES_QUERY_SERVICE.
The protocol must change from http to https. For example, you need to change http://sesserver.com:7777/search/api/admin/AdminService to https://sesserver.com:7777/search/api/admin/AdminService. You do not need to change the port number because the instructions will switch the current port to be an SSL port instead of adding a separate SSL port.
You can use Fusion Applications Control to configure the engine instance parameters. For information, see Section 7.5.3.2.
Enabling SSL requires the use of a number of security artifacts such as certificates and keys, as well as the containers (keystores) where they are stored. Oracle Fusion Middleware provides a number of tools to create and maintain these artifacts.
This section contains the following topics:
Oracle Fusion Middleware provides two types of repositories (keystores) for keys and certificates:
For more information about wallets and keystores, see Section 4.7.2.
A JKS keystore is the default JDK implementation of Java keystores. In 11g Release 1 (11.1.1), all Java components and Java EE applications use the JKS-based keystore and truststore.
While creating a keystore, you can pre-populate it with a keypair wrapped in a self-signed certificate. Such a keystore is typically used in development and testing phases.
You can also generate a certificate signing request for a keypair and request a signed certificate back from a Certificate Authority (CA). Once the CA sends the certificate back, it is imported into the keystore. The keystore now contains a trusted certificate since it comes from a trusted third-party. Such a keystore is typically used in production.
For more information about creating and managing keystores, see the"JKS Keystore and Truststore" section in the Oracle Fusion Middleware Administrator's Guide.
An Oracle wallet is a type of keystore or container that stores your credentials, such as certificates, trusted certificates, certificate requests, and private keys. You can store Oracle wallets on the file system or in LDAP directories such as Oracle Internet Directory.
In the Oracle Fusion Applications environment, Oracle wallets are used by Oracle HTTP Server, LDAP clients, and SQL*net clients.
When creating a wallet, you can pre-populate it with a self-signed certificate. Such a wallet is called a test wallet and is typically used in development and testing phases.
You can also create a certificate request and request a signed certificate back from a Certificate Authority (CA). Once the CA sends the certificate back it is imported into the wallet. Such a wallet is called a third-party wallet.
For more information about creating and managing wallets, see the "Oracle Wallet" section in the Oracle Fusion Middleware Administrator's Guide.
Table 4-5 shows the type of keystore, either Oracle wallet or JKS keystore, used by various products:
Table 4-5 Keystore Types for Products
| Product | Type of Keystore Used |
|---|---|
|
Oracle HTTP Server |
Oracle Wallet |
|
Oracle Internet Directory |
Oracle Wallet |
|
Oracle Virtual Directory |
JKS-based Keystore |
|
Oracle WebLogic Server |
JKS-based Keystore |
|
Oracle SES Services |
JKS-based Keystore |
|
Oracle ECM |
JKS-based Keystore |
|
Oracle Business Intelligence |
JKS-based Keystore |
See Section 4.8.2 for a survey of common tools used to create and manage keystores. See the SSL references in Section 4.7 for the keystore management tools used by individual products.
Oracle Fusion Middleware provides these tools for keystore operations:
WLST, a command-line interface for JKS keystores and wallets
orapki, a command-line tool for wallets
Fusion Middleware Control, a graphical user interface
Oracle Wallet Manager, a stand-alone GUI tool for wallets, recommended for managing PKCS#11 wallets
the keytool utility
For more information about these management tools, see the "Keystore Management Tools" section in the Oracle Fusion Middleware Administrator's Guide.
When working with certificates and the wallets in which they are stored, you must be aware of the operations that can be performed on these objects in the course of routine administration:
Typical life cycle events for an Oracle wallet are as follows:
The wallet is created. Wallets can be created directly, or by importing a wallet file from the file system.
The list of available wallets is viewed and specific wallets are selected for update.
Wallets are updated or deleted. Update operations for password-protected wallets require that you enter the wallet password.
The wallet password can be changed for password-protected wallets.
The wallet can be deleted.
Wallets can be exported and imported.
Typical operations for the Oracle Wallet include the following:
Creating wallets, including auto-login, self-signed, and password-protected wallets
Changing a self-signed wallet to a third-party wallet
Note:
Third-party wallets contains certificates signed by a trusted Certificate Authority (CA).Exporting and importing wallets to and from the file system
Deleting a wallet.
The following provides a summary of the steps in a certificate's lifecycle:
Create an empty wallet (that is, a wallet that does not contain a certificate request).
Add a certificate request to the wallet.
Export the certificate request.
Use the certificate request to obtain the corresponding certificate.
Import trusted certificates.
Import the certificate.
Common certificate operations include:
Creating a certificate request
Exporting a Certificate, Certificate Request, or a Trusted Certificate
Importing a Certificate or a Trusted Certificate
Deleting a Certificate Request, a Certificate, or a Trusted Certificate
Converting a Self-Signed Certificate into a Third-Party Certificate.
Note:
Third-party certificates are signed by a trusted Certificate Authority (CA).When working with JKS certificates and the keystores in which they are stored, you must be aware of the operations that can be performed on these objects in the course of routine administration:
Typical life cycle events for a JKS keystore are as follows:
The keystore is created. Keystores can be created directly, or by importing a keystore file from the file system.
The list of available keystores are viewed and specific keystores selected for update.
Keystores are updated or deleted. Update operations require that the keystore password be entered.
The keystore password can be changed.
The keystore can be deleted.
Keystores can be exported and imported.
Typical keystore operations include the following:
Creating or updating a keystore.
Exporting and importing keystores.
Deleting a keystore.
Changing the keystore password.
Typical life cycle events for a certificate residing in a keystore are as follows:
A self-signed certificate is automatically created for the keypair.
A certificate signing request (CSR) is generated, and can then be exported to a file.
Certificates are imported into the keystore. You can import both user certificates and trusted certificates (also known as CA certificates) in this way.
Certificates or trusted certificates are exported from the keystore out to a file.
Certificates or trusted certificates are deleted from the keystore.
Common operations on JKS certificates include the following:
Generating a new key (that is, a new self-signed certificate) for a keystore.
Generating a certificate signing request.
Importing/exporting a certificate or trusted certificate into/from a keystore.
Deleting a certificate or trusted certificate from a keystore.
In Oracle Fusion Applications, user and role information such as passwords are maintained in a domain credential store. The tools you use to update existing passwords (for routine administration or regulatory compliance), depend on the type of credentials:
WebLogic data sources
These objects contain properties such as the URL or user name and password. Application components use data sources to obtain connections to a relational database.
You can create and manage JDBC data sources using the administration tools provided with Oracle WebLogic Server. For more information about managing data sources, see Oracle Fusion Middleware Configuring and Managing JDBC Data Sources for Oracle WebLogic Server and the "Configure JDBC data sources" topic in Oracle Fusion Middleware Oracle WebLogic Server Administration Console Online Help.
Application-specific credentials
These credentials provide access to different components of your application. An example is the credential associated with the designated super-user.
Application credentials are maintained through Fusion Middleware Control or Oracle Weblogic Scripting Tool (WLST). For details, see the "Configuring the Credential Store" topic in the Oracle Fusion Middleware Application Security Guide.
This section contains the following topics:
When invoking Web services, Oracle Fusion Applications must rely on a type of credential known as the App ID. Each application has its own App ID which is initially provisioned for the application. For information about resetting App ID passwords (a task typically done during scheduled downtime), see the Oracle Fusion Applications Security Hardening Guide.
During the Oracle Fusion Applications installation, you must provide a password for the Oracle Fusion Middleware administration user. By default, this administrator takes the Super User value you specified on the Identity Management page when creating the provisioning plan. The password is the one specified when adding the user to the identity store.
Then, you can use this account to log in to Fusion Applications Control and the Oracle WebLogic Server Administration Console for the first time. You can create additional administrative accounts using the WLST command line or the Oracle WebLogic Server Administration Console.
You can change the password of the administrative user using the Oracle WebLogic Server Administration Console or the WLST command line.
This section contains the following topics:
Changing the Oracle Fusion Middleware Administrative User Password Using the Command Line
Changing the Oracle Fusion Middleware Administrative User Password Using the Administration Console
To change the Oracle Fusion Middleware administrative user password or other user passwords using the command line, you invoke the UserPasswordEditorMBean.changeUserPassword method, which is extended by the security realm's AuthenticationProvider MBean.
For more information, see the changeUserPassword method in the Oracle Fusion Middleware Oracle WebLogic Server MBean Reference.
To change the password of the Oracle Fusion Middleware administrative user using the Oracle WebLogic Server Administration Console:
Navigate to the Oracle WebLogic Server Administration Console. (For example, from the home page of the domain in Fusion Applications Control, select To configure and managed this WebLogic Domain, use the Oracle WebLogic Server Administration Console.)
From the target navigation pane, select Security Realms.
The Summary of Security Realms page is displayed.
Select a realm, such as myrealm.
The Settings for the realm page is displayed.
Select the Users and Groups tab, then the Users tab. Select the user.
The Settings for user page is displayed.
Select the Passwords tab.
Enter the new password, then enter it again to confirm it.
Click Save.
Data masking is the ability to replace sensitive data with realistic but false data on test and development databases. Features include:
the ability to keep data properties (data type, width, and so on) intact and provide realistic data sets for analysis and testing.
ensuring various constraints like (Primary Keys, Uniqueness, Foreign keys) are maintained, preserving relational integrity.
using user specified formatting rules that ensure custom and packaged applications continue to work after the data is masked.
This section contains the following topics:
Data masking is an on-going activity for the Oracle Fusion Applications administrator. It requires an understanding of masking concepts, methodology, and the implementation tools:
Key terms used in data masking are as follows:
Pre Masking script - A SQL script that runs prior to the start of masking.
Post masking script - A SQL script that executes after all masking completes. For example, such a script can be used to recompute aggregated columns after the detailed data is masked. This ensures that aggregated and masked columns are consistent and the totals match.
User-Defined Function (UDF) - A user-defined function takes the original value, the row id, and column name to generate the mask value. A single column format can be a combination of one of more formats including UDF.
Post-processing function - This is a special case of a user-defined function. A post processing function (PPF) is called after the mask value is generated using the specified format. The function takes the generated mask value and further modifies it to produce the actual mask value.
For example if the format used Random Number (1000,10000) and Post Processing Function (checksum) a number between 1000 and 10000 is generated and this value is fed into the PPF. The PPF computes the checksum and appends it to the original number and returns the new mask value.
There can be only one PPF to a column. A PPF cannot be the only format for a column. There has to be some other format preceding the function.
Examples of sensitive data include:
Salary information
Government IDs like drivers' license numbers and social security numbers
Geographical data such as GPS coordinates
Each product family has its own set of sensitive data types.
For details about sensitive data types, see the Oracle Fusion Applications Security Guide.
Data masking requires the user to implement the FAST (Find, Assess, Secure, Test) methodology:
Find
The first step is to identify sensitive data that should be subject to data masking. This includes personally identifiable data or information that could be misused. Examples include:
Salary Information
Driver's License Number
Military Service ID
Biometrics Data
Another aspect of this effort is to determine where this data is located. The recommended procedure involves:
Defining pattern-matching rules against sensitive tables and columns. Examples of such rules include a column name like "*SSN*" or column format "###-##-####".
For database independence, applications typically do not store the primary key-foreign key relationships in the database itself; rather, the relationships are enforced in the application. To support this, the Data Masking Pack provides administrators with the ability to register these relationships so that columns in related tables, such as EMPLOYEE_ID, MGR_ID, are masked identically using the same masking rules.
Searching Oracle databases to find these patterns.
Importing the relevant database fields into a data privacy catalog.
Maintaining the catalog as new fields are identified.
Assess
In this phase you specify how each sensitive field is to be masked, that is, transformed into a non-sensitive representation while maintaining the field's structure. This is typically accomplished through a data masking definition, which associates tables and columns in a schema with appropriate masking formats. An example is a mask format that converts the name "John" in the Employee table to "Andy".
The Data Masking definition contains a list of sensitive columns in the application tables, such as employee social security numbers, and its corresponding association with data masking formats, such as a fictitious social security number generator.
Note:
Oracle Fusion Applications provide a set of default mask templates for basic sensitive fields; administrators can update these definitions according to application requirements.Secure
This phase enables the masks to be executed securely to generate the masked data. Notable aspects of this phase include:
Production database cloned in restricted mode for the execution
Privilege delegation allowing the mask to be executed with tools like sudo or PowerBroker
Generation of test database
Test
The test phase involves comparing before and after values for verification. Redo logs are available to restore data to pre-mask state.
Data masks and masking definitions are created and managed with Oracle Enterprise Manager Grid Control.
The Oracle Fusion Applications administrator must take certain considerations into account when implementing data masking for an application. For example, free space requirements must be evaluated to ensure that adequate resources are available to the masking job. The following instructions provide guidelines:
You should be aware of certain background information, prerequisites, and requirements before undertaking data masking operations in your environment.
This section contains the following topics:
You must understand the data model for your application data when deciding how and what to mask. For data model descriptions, see the product-specific documentation from Oracle Enterprise Repository for Oracle Fusion Applications.
Data masking requires the following:
Oracle Database 10g Release 2 or Oracle Database 11g Release 1
Oracle Enterprise Manager Grid Control 10g Release 4
The Oracle Data Masking Pack
You must perform certain steps, such as installing a format library and configuring temp spaces, before using data masking in an Oracle Fusion Applications environment:
Install the FMTLIB package, which contains functions needed to perform data masking.
Locate these scripts in your Oracle Enterprise Manager installation:
$ORACLE_HOME/sysman/admin/emdrep/sql/db/latest/masking/dm_fmtlib_pkgdef.sql
$ORACLE_HOME/sysman/admin/emdrep/sql/db/latest/masking/dm_fmtlib_pkgbody.plb
Copy these scripts to a directory in your target database installation.
Execute the scripts using SQL*Plus, connected as a user that can create packages in the DBSNMP schema.
Apply any required patches. Data masking requires a specific Oracle Database version and patch set. Refer to the Oracle Fusion Applications system requirements and supported platforms documentation for details.
Change the temp spaces used for data masking to "Auto Extend" from Grid Control:
Click the Targets tab.
Click the Databases secondary tab.
Select the database, and click the Server tab.
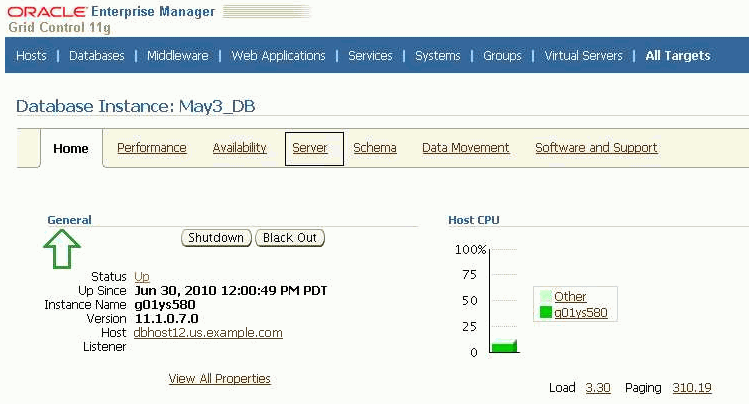
Click Datafiles.
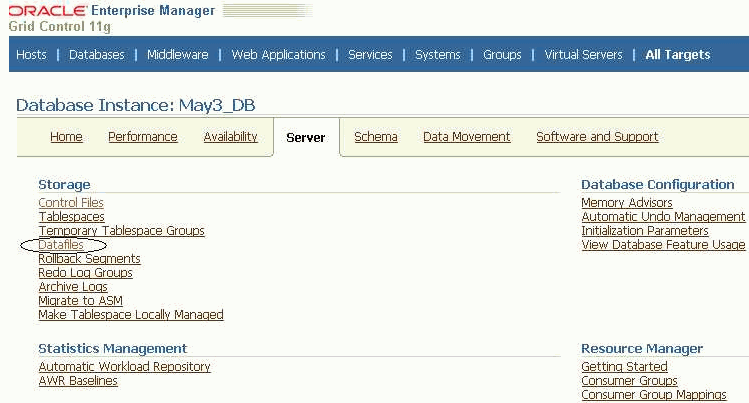
On the Datafiles page, enter temp in the Object Name search box. Press Go. Two temp spaces are displayed:
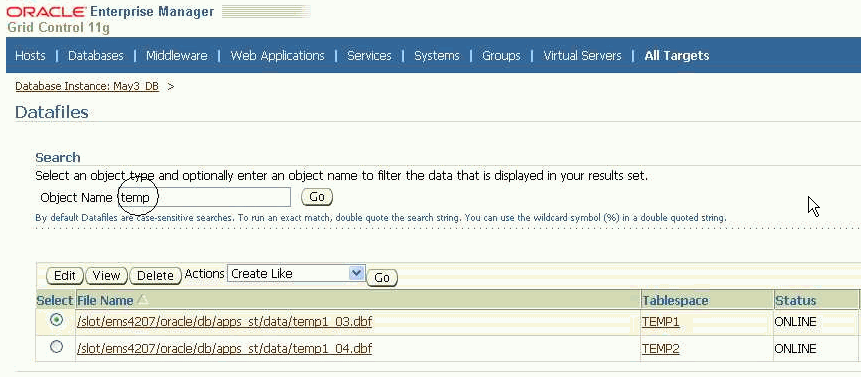
Edit each temp space in turn by selecting its radio button and clicking Edit. Change the value for each space as shown here:
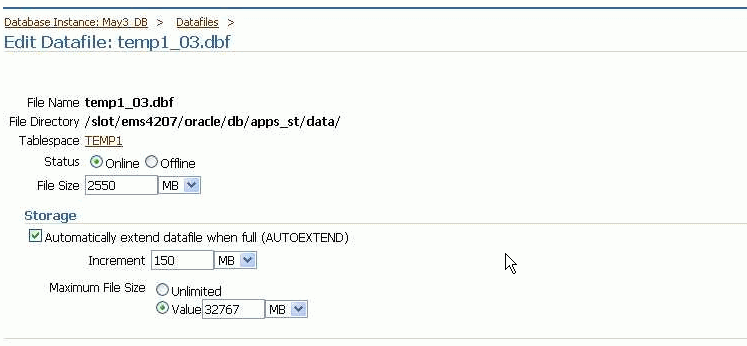
As shown in Step 3 of Section 4.9.2.1.3 it is recommended that you autoextend your temp files as masking requires additional space for processing. The amount of additional space you need depends on your data. Broadly speaking, masking takes up approximately two times the size of the largest table being masked.
The temp space is needed for two reasons:
To perform sort and join operations during masking.
The space requirement is not straightforward to estimate as it depends on whether sorts and joins go to disk, which in turn depends on how much memory is available on the machine. Try to keep at least as much space as the size of your biggest masked table for sort and join processing.
For space taken up in the default user tablespace for temporary masking tables.
The size of the temp tables is twice the size of all the columns being masked. Since these tables are dropped after processing, the space is released after masking completes.
Ensure that sufficient free space is available to the database before executing the masking job.
Calculate the free space requirements as follows:
largest table being masked +
total size of mapping tables for all columns in that table +
temporary tablespace (roughly twice the size of the largest mapping table, as
stated under Temporary Space Requirements above)
The user executing the data masking script must have the dba role. If Virtual Private Database (VPD) security policies are used or Oracle Database Vault is enabled for the database, the user must be SYS.
Additionally, the user may need to have direct grants to objects for any PL/SQL objects provided to user-defined functions or post-processing scripts.
Oracle Fusion Applications include a set of out-of-the-box masking definitions to mask common sensitive data like employee information and credit card numbers. However, these default mask templates cannot account for custom data such as flex fields since these are specific to your application.
You can update the standard masking definitions to include additional flex fields and custom data. For details about viewing and updating masking templates, see Section 4.9.3.
Note:
Be aware that certain sensitive custom attributes may depend on tables in other product families. For example, Procurement masking is dependent on CRM (for Suppliers and related entities, and for Procurement Contract terms and deliverables), on SCM (for Items), on HCM (for Workers and Organizations), on FIN (for Ledgers), and on Projects (for Projects and related entities).During the production-to-test process, you must replace the production user names with dummy user names. This mandatory step is needed to avoid breaking anonymization.
Oracle Fusion Applications identify the common sensitive data types for each product family.
You can use Oracle Enterprise Manager Grid Control to view the sensitive attributes specified in the masking definitions. You can update the definitions with any additional desired sensitive attributes, such as flex fields or other customized fields.
For details about how to view and update masking templates, see Section 4.9.3.
For additional information about data masking, see the Oracle Fusion Applications Security Guide.
A masking definition specifies the columns to be masked and the format of the masked data. Out-of-the-box "template" masking definitions are provided for each family of Oracle Fusion Applications.
Masking definitions in XML format masks enable the data masking utility to identify the database tables, columns, and column formats of the data being masked.
For details, see the Oracle Fusion Applications Security Guide.
You can modify the default masks provided with Oracle Fusion Applications, and create your own masking definitions. Use Oracle Enterprise Manager Grid Control (Grid Control) to manage and maintain the data masking definitions.
This section contains the following topics:
Oracle Enterprise Manager Grid Control online help provides more details on these topics.
Note:
You must follow the instructions in Section 4.9.2.1 before you can perform the operations described here.You can view and modify out-of-the-box data masking definitions as follows with Grid Control:
Click the Targets tab.
Click the Databases secondary tab.
Select the database whose mask definition you are configuring from the list of databases, and log in.
Click the Schema tab.
On the database instance page, scroll down to the Data Masking menu. The options include:
Definitions: Manage masking definitions.
Format Library: Manage masking formats.
Select Definitions. The Data Masking Definitions page lists the current masks for the database:
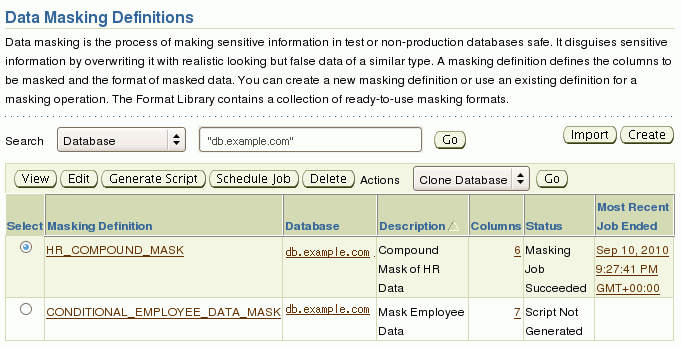
Select the mask definition you wish to view or update and click Edit.
The Edit Mask Definition page appears. It lists the columns included in the mask definition.
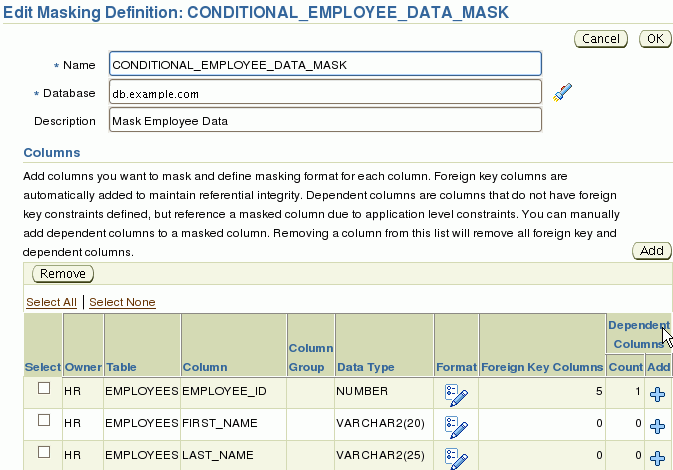
A number of operations are available on this page:
To add another column to the definition, click Add.
To modify a column format, click the Format icon.
To remove a column from the mask definition, check the box and click Remove.
To introduce a new column into the definition, for example, click Add. The Add Columns page appears.
To locate the column, enter the schema and table name and click Search.
In this example, we search the EMPLOYEES table in the HR01 schema:
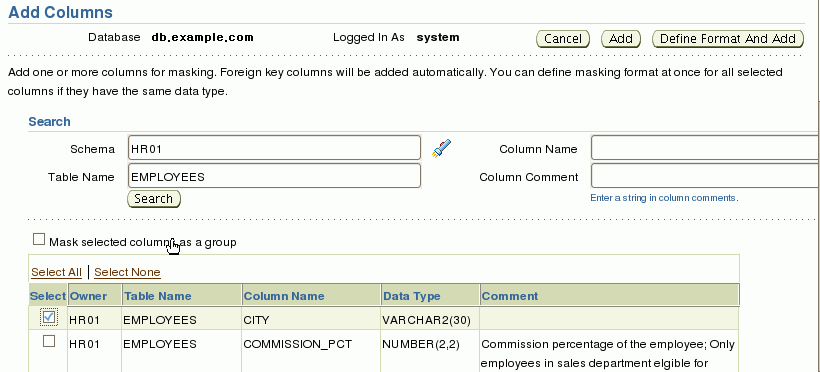
Select the checkbox for the CITY column and click Add.
The Edit Masking Definition page reappears, with CITY added to the column list.
Unlike the other columns, the format for CITY is displayed as a toolbox icon, which means that no mask format has yet been defined for the column. You must specify a format for this column to complete the definition.
Click on the toolbox icon. The Define Column Mask page appears.
You can now specify a mask format entry for CITY using the drop-down box. Click Add to complete the process.
In this example we select a random string format and specify the start and end lengths. To see how the masked data will appear in this format, click the Sample icon.
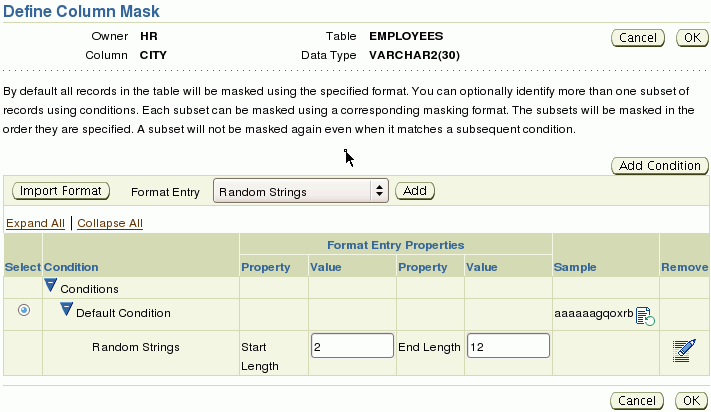
Note:
You can use the Import Format button to import an existing format entry.Click OK. Grid Control checks that the entry is valid for the column's datatype. The Edit Masking Definition page reappears, and the CITY column now has a valid mask format.
Click OK to save the masking definition.
Likewise, starting at the Edit Mask Definition page (Step 8 above) you can modify the definition of an existing column by clicking its Format icon. This is useful, for example, when you wish to customize the properties of a column's format entry, or specify a different format entry for the column.
When you modify a data masking definition by adding or removing columns, or by modifying an existing column's mask format, you must regenerate the SQL masking script to incorporate your changes. To generate the script:
Follow steps 1 through 6 of Section 4.9.3.1 to display the data masking definitions for the database.
After a masking definition is modified, its status is listed as "Script Not Generated."
Select the definition and click Generate Script.
After processing is complete, you can:
Integrate the masking script with the clone database process
Schedule execution of the script to perform the masking operation.
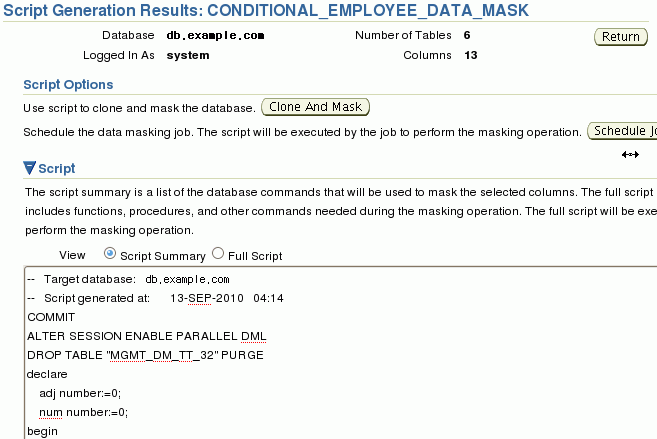
Note:
The results page also displays the generated SQL script, which can be modified as well.The format library is a collection of common, ready-to-use masking formats you can use in masking definitions. Oracle Data Masking enables you to extend the default mask format library by tailoring the existing formats, or creating new formats to meet your own business needs.
Take these steps to add a new format:
Follow steps 1 through 5 of Section 4.9.3.1 to display the database instance.
Select Format Library.
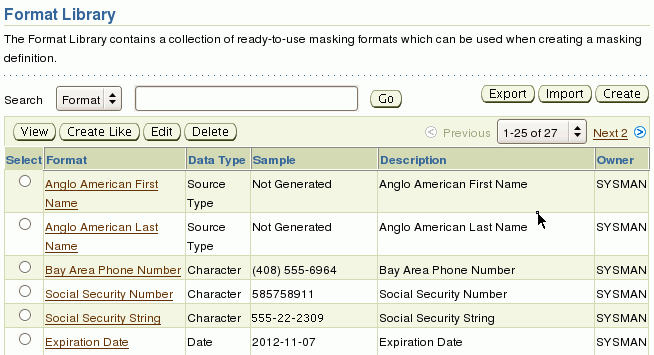
When adding a new format, you can take an existing format as a starting point. For example, to create a new format for credit card number fields, you can select an existing credit card format and click Create Like.
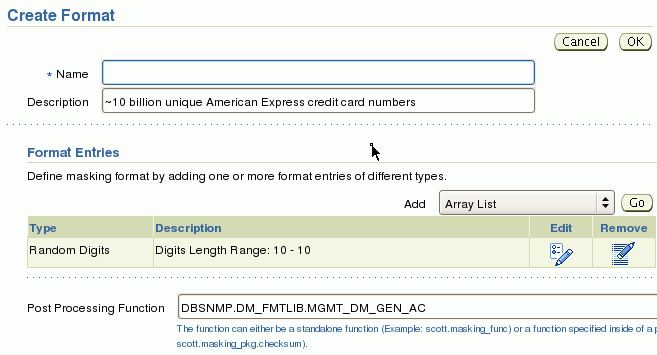
Enter a descriptive name for the new format, and use the format entry drop-down list to select a masking format. You may also specify a different post-processing function if desired.
Similarly, you can modify existing formats or create new formats on the Format Library page.
Identity data can reside in a number of repositories: the Oracle Database, the production identity store (an LDAP store), and the Oracle Identity Manager database.
In the current release, when you implement data masking, the identity attributes are only masked (anonymized) in the Oracle Fusion Applications database. To preserve masked values, ensure that these best practices are followed when using the masked data for a test database:
Do not run the Enterprise Scheduler Service (ESS) job to synchronize the LDAP identity store and the Oracle Fusion Applications database, since doing so would reset the identity attributes in the database to their unmasked values.
Set up "dummy" test users to perform the testing.
Do not:
Log in to the test database as a real user.
Update a user's attributes in either the LDAP identity store or the Oracle Identity Manager database.
Doing so will reset that user's attributes to their unmasked values, allowing them to see their own masked record in employee self-service, deduce other people's identities by following the hierarchy, and so on.
In short, it is essential that you maintain close access control to databases holding live cloned data, and make testers aware of their obligations and responsibilities regarding the data. As far as is possible, the processes around test data based on live data should mirror the processes around the live data itself. In particular, testers must not use privileged access to look beyond what they need to perform the required tests. For example, they must not try to work out to whom the data pertains, or try and find private information to satisfy their own curiosity.
For a detailed tutorial of data masking, see "Replacing Sensitive Data Using the Data Masking Pack" at:
http://www.oracle.com/technology/obe/11gr1_db/security/datamask/datamask.htm
Oracle Web Services Manager (WSM) provides a policy framework to manage and secure Web services consistently across your organization. Oracle WSM is available to the following users:
Developers, at design time through Oracle JDeveloper
System administrators in production environments by means of Fusion Middleware Control and command-line tools
The Oracle WSM policy framework secures Web services with policies, which describe capabilities and requirements such as whether and how a message must be secured, whether and how a message must be delivered reliably, and so on.
This section contains the following topics:
For more information about the Oracle WSM policy framework, see the "Understanding Oracle WSM Policy Framework" section in the Oracle Fusion Middleware Security and Administrator's Guide for Web Services.
A policy subject is the target resource to which the policies are attached. Examples include Web services endpoints, Web service clients, SOA service endpoints, SOA clients, and SOA components.
Directly attaching one or more policies to a policy subject is referred to as "Local Policy Attachment" (LPA). Table 4-6 lists key tasks related to LPAs.
Table 4-6 Common LPA Operations
| Operation | Reference |
|---|---|
|
Configure LPA using Fusion Middleware Control and WLST |
"Attaching a Policy to a Single Subject" section in the Oracle Fusion Middleware Security and Administrator's Guide for Web Services |
|
Attach "no behavior" policies for Web Services and Web Service Clients |
"Disabling a Globally Attached Policy" section in the Oracle Fusion Middleware Security and Administrator's Guide for Web Services |
|
Remove LPAs for all Web services |
"Attaching a Policy to a Single Subject" section, subsection titled Attaching a Policy to a Web Service Using WLST (Step 4) in the Oracle Fusion Middleware Security and Administrator's Guide for Web Services |
|
Troubleshoot Web service security |
"Diagnosing Problems" chapter in the Oracle Fusion Middleware Security and Administrator's Guide for Web Services |
A policy set, which can contain multiple policy references, enables you to attach policies globally to a range of endpoints of the same type. By attaching policies globally in this way, referred to as Global Policy Attachment (GPA), you can ensure that all subjects are secured by default. Table 4-7 lists key tasks related to GPAs.
Table 4-7 Common GPA Operations
| Operation | Reference |
|---|---|
|
GPA concepts and usage; determining if a Web service or client is security-enabled |
"Attaching Policies Globally Using Policy Sets" section in the Oracle Fusion Middleware Security and Administrator's Guide for Web Services |
|
Create GPAs using Fusion Middleware Control and WLST |
"Creating and Managing Policy Sets" section in the Oracle Fusion Middleware Security and Administrator's Guide for Web Services |
|
Disable GPAs |
"Enabling and Disabling a Policy Set" section in the Oracle Fusion Middleware Security and Administrator's Guide for Web Services |
|
Determine what policies are enforced when both LPA and GPA are defined |
"Calculating the Effective Set of Policies" section in the Oracle Fusion Middleware Security and Administrator's Guide for Web Services |
|
View policies attached to a Web service |
"Viewing the Policies That are Attached to a Web Service" section in the Oracle Fusion Middleware Security and Administrator's Guide for Web Services |
|
Validate a policy set |
"Validating a Policy Set" section in the Oracle Fusion Middleware Security and Administrator's Guide for Web Services |
Oracle Web Services Manager supports three Web services security profiles:
AuthN Profile
SSL Profile - provides transport-level security
Message Security Profile - provides message-level security
Out-of-the box, Oracle Fusion applications are provisioned with the AuthN profile. You can move your deployment to a different profile if needed.
During provisioning, all Oracle Fusion Applications domains are set up to use a common keystore and credential store, whereas the Oracle Identity Management domain (which includes Oracle Identity Manager) uses a separate keystore, and stores credentials in a logical domain. Provisioning does not set up trust between these keystores. This section explains how to exchange trust with the Oracle Identity Manager domain, enabling Web services security when this domain is involved.
For additional background and information on the certificate exchange needed to set up Web services security trust, see the Oracle Fusion Applications Security Hardening Guide.
Exporting a Keystore Alias from Application Domain
Take these steps to export the keystore alias:
Navigate to the DOMAIN_HOME/config/fmwconfig directory of the domain.
Run the keytool command to export the alias into a file called orakey.cert using syntax like in this example:
JAVAHOME/bin/keytool -exportcert -alias orakey -file orakey.cert -keystore default-keystore.jks -storepass keystore-password
This command creates a file called orakey.cert containing the exported orakey alias.
When using this command, specify the alias name and keystore password applicable to your environment.
Importing a Keystore Alias into Oracle Identity Manager Domain
Take these steps to import the keystore alias:
Copy the file generated by the export procedure (orakey.cert in the export example) into the DOMAIN_HOME/config/fmwconfig directory of the Oracle Identity Manager domain where you wish to import the alias.
Run the keytool command using the following syntax to import the certificate:
JAVA_HOME/bin/keytool -importcert -alias orakey -file orakey.cert -keystore default-keystore.jks -storepass keystore-password
This command imports the alias into the Oracle Identity Manager domain's keystore.
Similar steps are used to export the Oracle Identity Manager key and import it into the other domain.
For detailed instructions about Web Services Security hardening, see the "Locking Down Web Services: Points to Consider" section in the Oracle Fusion Applications Security Hardening Guide.
This section describes security guidelines recommended for Oracle Fusion Middleware products in the context of Fusion Applications. These administrative tasks, typically carried out with Oracle Authorization Policy Manager, Oracle Enterprise Manager Fusion Middleware Control, or WLST scripts, apply only to a specific product.
This section describes administrative tasks and features specific to Oracle Universal Content Management (UCM) in the IDCSS stripe of the policy store, and they do not apply to any other stripe.
The grants specified in the stripe IDCCS must conform to one of the grants described in Section 4.11.1.1.
Section 4.11.1.2 explains why not to delete groups or accounts in that stripe.
Oracle Authorization Policy Manager allows an administrator to specify grants to accounts and groups in a number of combinations, but not all these combinations are supported by UCM. The following list identifies the grants in the IDCSS stripe that are supported and unsupported.
Grants to Accounts
User to account resource: supported.
Enterprise role to account resource: supported.
Application role to account resource: supported.
Grants to Security Group Resources
User to security group resource: not supported.
Enterprise role to security group resource: not supported.
Application role to security group resource: supported.
Grants to Entitlements
None supported.
Even though Oracle Authorization Policy Manager allows an administrator to define a non-supported grant in for UCM, such grants are ignored at runtime.
Oracle Authorization Policy Manager allows deleting a security group or account associated with a document; but UCM does not allow deleting such artifacts.
Security administrators should be cautious never to delete a security group or account associated with a document stored in the Oracle Content Server. If, however, such deletion takes place accidentally, the deleted artifact will automatically reappear.
This section describes the use of the OPSS script migrateSecurityStore to extract the contents of one stripe and save it in an XML file.
To extract the policies in a given application stripe from an LDAP-based store, proceed as follows:
Create a file with the following content and save it as, for example, exported-jazn-data.xml in the same directory where your jps-config.xml file is located:
<?xml version = '1.0' encoding = 'UTF-8' standalone = 'yes'?>
<jazn-data xmlns:xsi="http://www.w3.org/2001/XMLSchema-instance"
           xsi:noNamespaceSchemaLocation="http://xmlns.oracle.com/oracleas/schema/jazn-data-11_0.xsd">
  <jazn-realm default="jazn.com">
    <realm>
      <name>jazn.com</name>
    </realm>
  </jazn-realm>
</jazn-data>
Copy of your jps-config.xml file to, for example, copy-jps-config.xml.
Edit the file copy-jps-config.xml to contain an instance and two contexts like the following:
<serviceInstance location="./exported-jazn-data.xml"
                 provider="policystore.xml.provider"
                 name="export.xml"/>

<jpsContext name="ldap_source">
  <serviceInstanceRef ref="policystore.ldap"/>
 </jpsContext>

<jpsContext name="xml_target">
  <serviceInstanceRef ref="export.xml"/>
</jpsContext>
Run the script migrateSecurityStore as in the following invocation (the arguments are written in separate lines for the sake of clarity only):
migrateSecurityStore(type="appPolicies",
                     configFile="./copy-jps-config.xml",
                     src="ldap_source",
                     dst="xml_target",
                     srcApp="hcm")
The above illustrates the extraction of the contents of the application stripe hcm to the XML file exported-jazn-data.xml. To extract the contents of any other stripe, specify the appropriate stripe name in the argument srcApp. No more than one stripe can be extracted at a time.
Note that in the above example, both copy-jps-config.xml and exported-jazn-data.xml are assumed to be located in the same directory.
This section describes the typical flow of application security data from the application installation to the application deployment to a production environment, and, in particular, how to handle GUIDs in application policies throughout that flow; its phases, performed by developers and administrators, are explained in the following sections:
In this phase, an administrator installs a new Oracle Fusion environment whereby the following application-specific artifacts are installed and provisioned:
An identity store, containing users and security enterprise roles.
An LDAP-based policy store, containing functional policies.
An Oracle Fusion Data Security policy store, containing database resources and data security policies.
In this phase, a developer uses Oracle JDeveloper to customize and test functional security artifacts in the installed application. First, the developer needs an XML version of the application stripe in the installed LDAP-based store, the XML format been required by JDeveloper.
The obtain this file, the administrator perform the following steps:
Run the OPSS script migrateSecurityStore with the argument preserveAppRoleGuid set to True to export the contents of the application stripe in the LDAP-based policy store to the XML file (called jazn-data.xml throughout this section). For details on this procedure, see Section 4.12.
Important Note:
The use of the argumentpreserveAppRoleGuid is strictly restricted to the scenario described above; in particular, that argument should not be used with migrateSecurityStore in a production environment or when migrating from a staging to a production environment.Edit the generated file jazn-data.xml to replace the group principal for enterprise roles with the group principal required by Oracle JDeveloper. Specifically, it runs a command that replaces, in that file, every instance of the string weblogic.security.WLSGroupImpl with the string oracle.security.jps.internal.core.principals.JpsXmlEnterpriseRoleImpl.
Deliver the edited jazn-data.xml to the developer, who copies it to the directory <jdevapphome>/src/META-INF.
Then, within Oracle JDeveloper, the developer perform the following steps:
Define a data source to point to the installed database security policy store.
Use the security policy overview editor to customize function security (in the XML-based policy store), as documented in the "Implementing Function Security" chapter of the Oracle Fusion Applications Developer's Guide.
Create test users and test groups, and run the application within Oracle JDeveloper. When the application is run, the WebLogic Server integrated in Oracle JDeveloper, merges jazn-data.xml with the domain file-based store system-jazn-data.xml.
Once customization and testing with Oracle JDeveloper are completed, the developer hands the file jazn-data.xml back to the system administrator.
In this phase, the administrator performs the following steps:
Reconcile GUIDs in the Oracle Fusion Data Security policy store with GUIDs in the file jazn-data.xml by running the command DSDataMigrator as described in Section 4.4.3. This operation does not modify the file jazn-data.xml but updates GUIDs in data security policies.
Note:
This step is needed only if the developer has customized data security.If the staging environment already has a stripe for the application and that stripe is to be preserved, merge the file jazn-data.xml with the staging application policy store, using Oracle Authorization Policy Manager as described in the "Upgrading Oracle Fusion Applications Policies" chapter of the Oracle Fusion Middleware Oracle Authorization Policy Manager Administrator's Guide (Oracle Fusion Applications Edition). The relevant artifacts involved in this merge are the baseline store, represented by the original XML file jazn-data.xml; the production store, represented by the staging policy store stripe; and the patch store, represented by the new, customizedjazn-data.xml file
Otherwise, if the application stripe is not present or is present but need not be preserved, the administrator uses the OPSS script migrateSecurityStore with the argument overWrite set to TRUE to migrate application policies in the file jazn-data.xml to the staging policy store.
Pack the file jazn-data.xml with the application and deploy the application to the staging environment.
Note:
Typically, the application deployment is set so that users and groups are not migrated during deployment. For details about this setting within Oracle JDeveloper, see the "Implementing Function Security" chapter in the Oracle Fusion Applications Developer's Guide.In this phase, the administrator performs the following steps:
Migrate the staging policy store to the new environment policy store. It is assumed that the store has undergone some changes since the customization was tested in the staging environment, and that those changes must be preserved. The administrator merges the customized, pillar-level jazn-data.xml with the new policy store using Oracle Authorization Policy Manager as described in the "Upgrading Oracle FusionAuthorization Policy Manager" chapter of the Oracle Fusion Middleware Authorization Policy Manager Administrator's Guide.
Reconcile GUIDs in the Oracle Fusion Data Security policy store with GUIDs in the OID LDAP-based policy store by running the command DSDataMigrator as described in Section 4.4.3.
Deploy the application with the customized jazn-data.xml to the new environment.