| Oracle® Fusion Applications Installation Guide 11g Release 1 (11.1.1.5) Part Number E16600-02 |
|
|
View PDF |
| Oracle® Fusion Applications Installation Guide 11g Release 1 (11.1.1.5) Part Number E16600-02 |
|
|
View PDF |
This appendix contains descriptions of the interview screens in the Create a New Applications Environment Provisioning Plan option. These screens include:

No action is necessary on this read-only screen.
Click Next to continue.
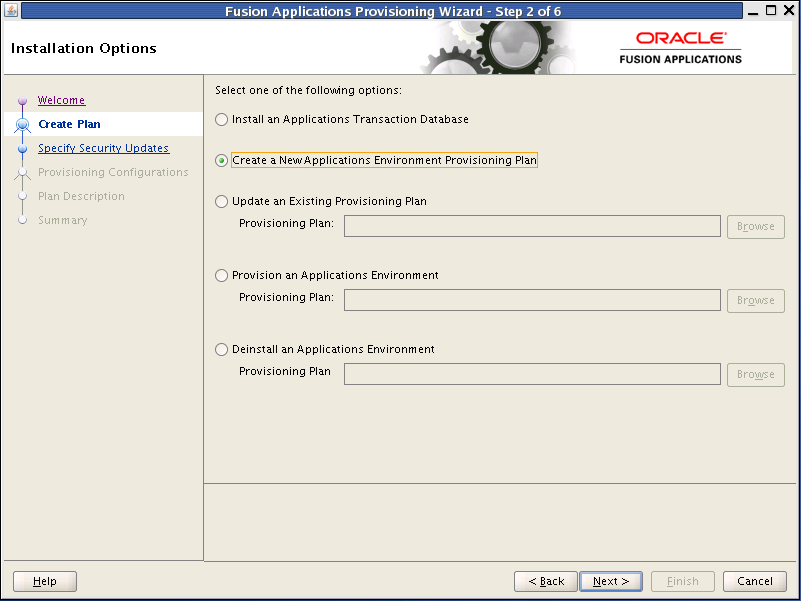
Select the task that you want to perform from the list of options. When prompted, enter a directory path in the Provisioning Plan field to access a completed plan to use as a base for one of the actions. Or, click Browse to navigate to the plan location.
Install an Applications Transaction Database: Install an empty, single-instance Oracle Database Enterprise Edition using the nonseeded database template shipped with this release.
Create a New Applications Environment Provisioning Plan: Create a provisioning plan for a new Oracle Fusion Applications environment.
Update an Existing Provisioning Plan: Add or change details in a completed plan that has not yet been implemented or in a partially completed provisioning plan.
Provision an Applications Environment: Initiate and track the processes that install, configure, and deploy product offerings in a new Oracle Fusion Applications environment.
Deinstall an Applications Environment: Remove applications and middleware components from an existing applications environment.
Click Next to continue.

Set up a notification preference for security-related updates and installation-related information from My Oracle Support. This information is optional.
Email: Specify your email address to have updates sent by this method.
I wish to receive security updates via My Oracle Support: Select this option to have updates sent directly to your My Oracle Support account. You must enter your My Oracle Support Password if you select this option.
Click Next to continue.
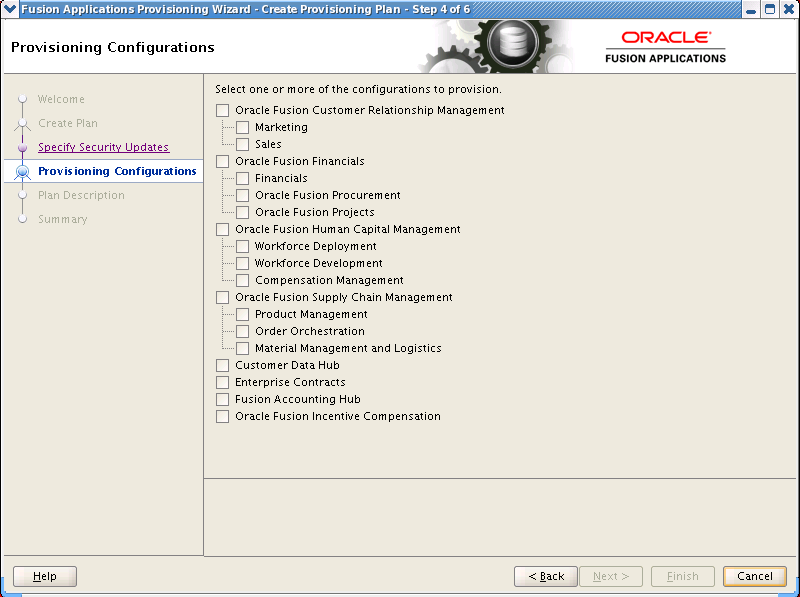
Select one or more offerings, either within a configuration, or from the list of standalone product offerings.
You can select individual product offerings within a configuration, without selecting all available offerings. When you do, provisioning starts the Managed Servers only for the offerings that you selected. However, because you have specified interdependent details for the entire configuration, you can "turn on" additional functionality later by using the Oracle Fusion Applications Functional Setup Manager to start the other Managed Servers.
Click Details in the message pane to see a breakdown of servers for each offering.
Once you click Next, you cannot change the selections on this screen. To make changes, click Cancel, open a new wizard session, and create a new plan.
Click Next to continue.

Enter descriptive information for this plan. This description is not associated in any way with the executable plan file, or the summary file, that you save at the end of the provisioning plan creation process.
Plan Name: Specify a name to identify this plan.
Plan Version: Assign a version number to keep track of changes that you made to a plan. This information is for documentation only.
Created By: Defaults to the operating system user who invoked the wizard. Set when the plan is initially created and cannot be modified for the current plan.
Created Date: Defaults to the date that the plan was originally created and saved. Set when the plan was originally created and cannot be modified for the current plan.
Plan Description: Provide a description of this plan.
To stop creating this plan and resume later, click Save. This action creates a partial plan. A partial plan cannot be used to provision an environment.
Click Next to continue.
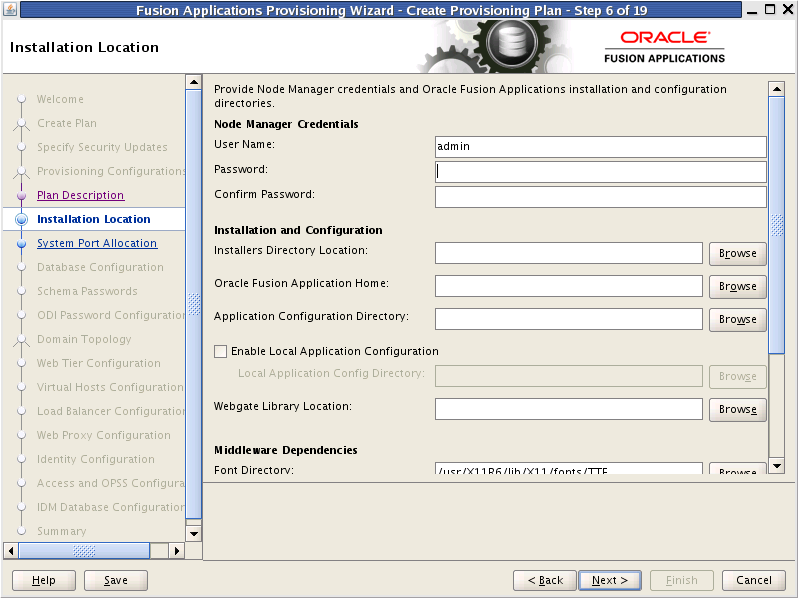
Specify credentials for the Node Manager and supply the location of the various directories required for installation and configuration actions.
Node Manager Credentials
User Name: Specify a user name for the Node Manager role.
Password: Specify a password for the Node Manager and retype it in the Confirm Password field.
Provide locations of various directories that the administrator needs access to.
Installation and Configuration
Installers Directory Location: Enter the path to the repository_location directory you created when you downloaded the provisioning repository. For Windows, the location must be a symbolically linked directory. See "Set Up the Server and the shared Area Permissions" in Oracle Fusion Applications Installation Guide. Note that a symbolic link is not necessary if the repository and the database are on the same node.
Oracle Fusion Application Home: Enter the directory path to the Oracle home that you specified when you installed the provisioning framework. This is the Fusion Applications Oracle home. It is the root directory for all Oracle Fusion Applications and Oracle Fusion Middleware products.
In a Windows environment, this name cannot exceed eight characters, and must be a symbolically linked directory. See "Set Up the Server and the shared Area Permissions" in Oracle Fusion Applications Installation Guide.
Application Configuration Directory: This directory is automatically populated based on the value you specify in the Oracle Fusion Applications Home field. It is the path to the directory where the configuration files for the domain will be written. For Windows, the location must be a symbolically linked directory. See "Set Up the Server and the shared Area Permissions" in Oracle Fusion Applications Installation Guide.
Enable Local Application Configuration: Select this check box if you want Managed Servers to run from a non-networked (local) disk on the host, visible only to the processes running on that host. If you enable this option, the wizard copies the domain configuration from the shared location and places it on the local disk you specify. This configures all Managed Servers to run from the non-networked location.
Local Application Config Directory: Specify the location for the local domain directory that you want to set up. This field is required if you selected Enable Local Application Configuration. The specified directory must initially be empty.
WebGate Library Location: Oracle Fusion Applications (WebGate component) requires special versions of gcc libraries to be installed. These library files must exist somewhere on the Linux system. To make these libraries available, download them from http://gcc.gnu.org, as described in "Installing Third-Party GCC Libraries (Linux and Solaris Operating Systems Only)" in Oracle Fusion Applications Middleware Installation Guide for Oracle Identity Management.
In Linux x86-64 (64-Bit) and Oracle Solaris environments, enter the location where you installed the libraries. This field does not appear for Microsoft Windows x64 (64-Bit) or IBM AIX on POWER Systems (64-Bit).
Middleware Dependencies
Font Directory: Appears only if you have selected Oracle Sales, Oracle Marketing, or Oracle Financials offerings. Enter the directory where the TrueType fonts are installed. The location varies on different operating systems, but is typically found here:
Microsoft Windows x64 (64-Bit): C:\WINDOWS\Fonts
Linux x86-64: /usr/X11R6/lib/X11/fonts/TTF
Oracle Solaris: /usr/X11R6/lib/X11/fonts/TrueType
IBM AIX on POWER Systems (64-Bit): /usr/X11R6/lib/X11/fonts/TrueType
Some systems may not have TrueType fonts installed. If you cannot locate the fonts on your system, verify that they have been installed. In addition, you can use the fonts directory shipped as part of the JRE installed in the repository. Regardless of which path you specify, you must have access to .ttf (.TTF) files.
Default IDM Configuration Using IDM Properties File: Select this check box if you want the values on the Identity Management Configuration screen and the Access and Policy Management Configuration screen to default to the values in the IDM properties file (idmDomainConfig.param). See "Creating a Properties File" in Oracle Fusion Applications Installation Guide for details.
IDM Properties file: Enter the location of the (idmDomainConfig.param) file, for example, IDM_ORACLE_HOME/idmtools/bin/idmDomainDonfig.param.
Oracle Business Intelligence Repository Password
RPD Password: Specify and Confirm a password to allow access to the metadata repository (RPD) for both Oracle Business Intelligence Applications and Oracle Transactional Business Intelligence. The password must be between 8 and 30 characters and contain at least one digit. It can include letters, numbers, pound sign (#), dollar sign ($), or underscore (_).
In addition, if you are provisioning an environment that is pointed to an existing seeded identity management infrastructure, the RPD password must match the one that you specified when identity management was seeded. Provisioning sets up this password, but does not actually access the repository.
If the environment created is Windows-based, the wizard prompts for these values:
Windows Domain\Windows User Name: Specify a user name to use for running provisioning.
Windows Domain Password: Specify a password for running provisioning. Retype the password to Confirm it.
Click Next to continue.
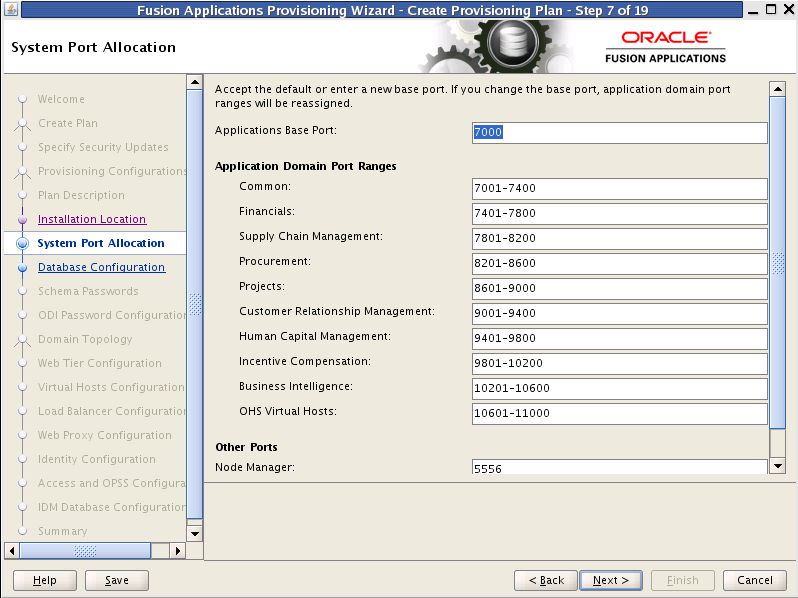
Accept the default values or set a custom value for the Applications Base Port. The application domain port ranges are derived from this value. If you change the base port value, the domain port ranges adjust accordingly. Ranges must not overlap and must be set in ascending order.
High and low port ranges are assigned by default to each domain in the Application Domain Port Ranges list. The default range allotment is 399. Each range is arranged sequentially in ascending order; for example, 11601 – 12000 is a valid range.
The values entered on any of the common domain or product domain screens are validated against the ports ranges that you set up on this screen.
Validation rules for port ranges are as follows:
The number of ports per domain varies according to the number of applications and middleware components installed. You can calculate the minimum port range (sum of standard and secure ports required for all components), or you can set the range to the upper boundary for the largest domain.
Port ranges must not overlap. Gaps between the ranges are acceptable.
Port ranges must be in ascending order. For example, 11601 – 12000 is a valid order.
The lowest port value must be less than the highest port value of each domain.
The value must be unique within a domain.
If you create multiple plans for the same IP subnet, you could introduce port conflicts in the multicasting addresses set for clusters across plans. Examine and resolve such port conflicts before you execute a provisioning plan.
Ephemeral or dynamic ports for the operating system must be set to a port range between 32768 and 61000.
Ports listed under Other Ports are not derived from the Applications Base Port value. These "individual" ports can be defined using custom port values.
To stop creating this plan and resume later, click Save. This action creates a partial plan. A partial plan cannot be used to provision an environment.
Click Next to continue.
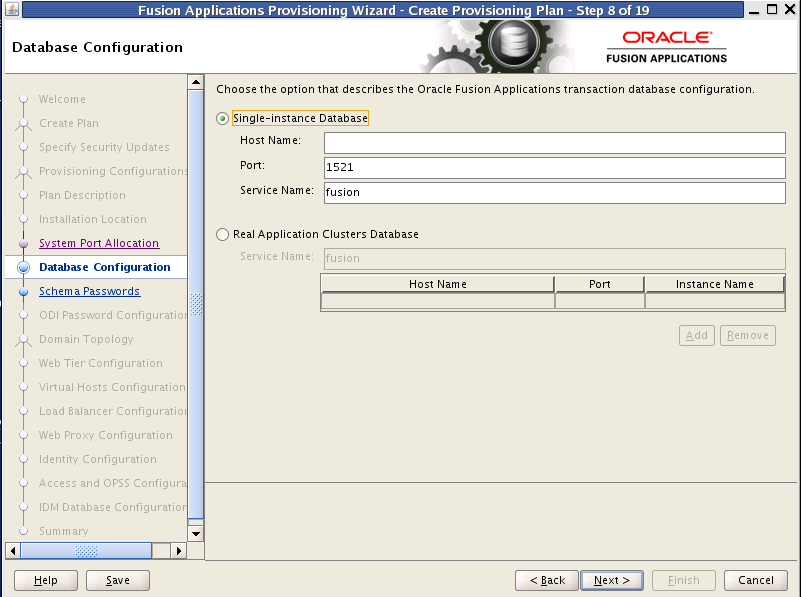
Enter the database parameters that you established when you installed Oracle Database. The wizard validates whether the database you installed is a single-instance or Oracle Real Application Clusters (Oracle RAC). If a Single Instance Database, enter:
Host Name: The name of the host where the database is installed.
Port: The listening port for the database.
Service Name: The global database name for the transaction database that you installed. Used to distinguish this database instance from other instances of Oracle Database running on the same host.
If you have installed a multi-instance database based on Oracle RAC, select Real Application Clusters Database and enter the Service Name that you specified when you installed this database.
Click Add to create a new row for each instance. Select a row and click Remove to delete it. Enter the following values for the previously installed database:
Host Name: The name of the host for each Oracle RAC instance.
Port: The listening port of the database.
Instance Name - the name of the Oracle RAC instance used to manage this database.
To stop creating this plan and resume later, click Save. This action creates a partial plan. A partial plan cannot be used to provision an environment.
Click Next to continue.
Note: The wizard warns if it cannot connect to the database. If this warning represents an exception, you can ignore it and continue creating the plan. However, you must fix all issues before you start to provision an environment. You cannot successfully run provisioning until all validation have passed.
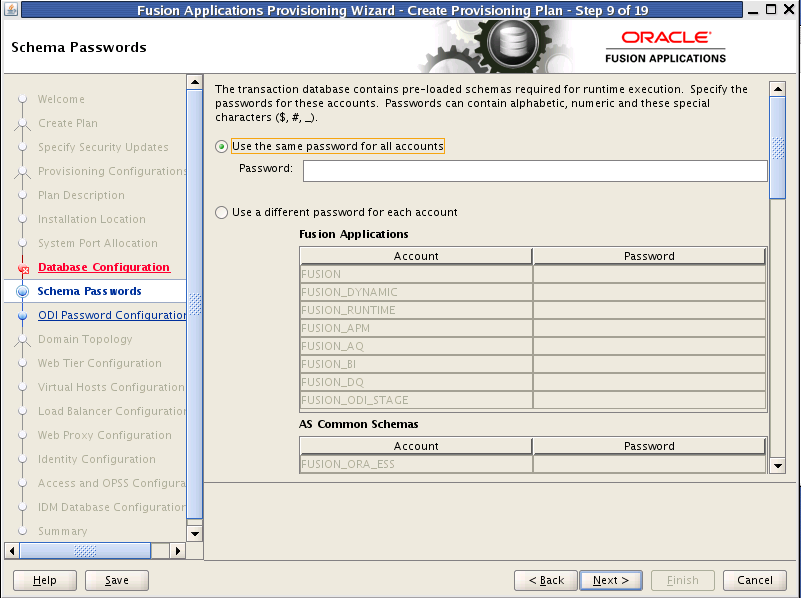
The database that you installed contains preloaded schemas required for runtime execution. Select one of the following options and enter the database schema passwords that you set up when you installed the database:
Use the same password for all accounts: Select this option if you set up a single password for all accounts. Enter the value in the Password field. This option is the default.
Use a different password for each account: Select this option if you set up individual passwords or each Account. Password values were set up for Fusion Applications and AS Common Schemas. Enter those values in the Password field.
To stop creating this plan and resume later, click Save. This action creates a partial plan. A partial plan cannot be used to provision an environment.
Click Next to continue.
Note: The wizard warns if the passwords are not valid and do not allow a connection to the database. If this warning represents an exception, you can ignore it and continue creating the plan. However, you must fix all issues before you start to provision an environment. You cannot successfully run provisioning until all validation have passed.
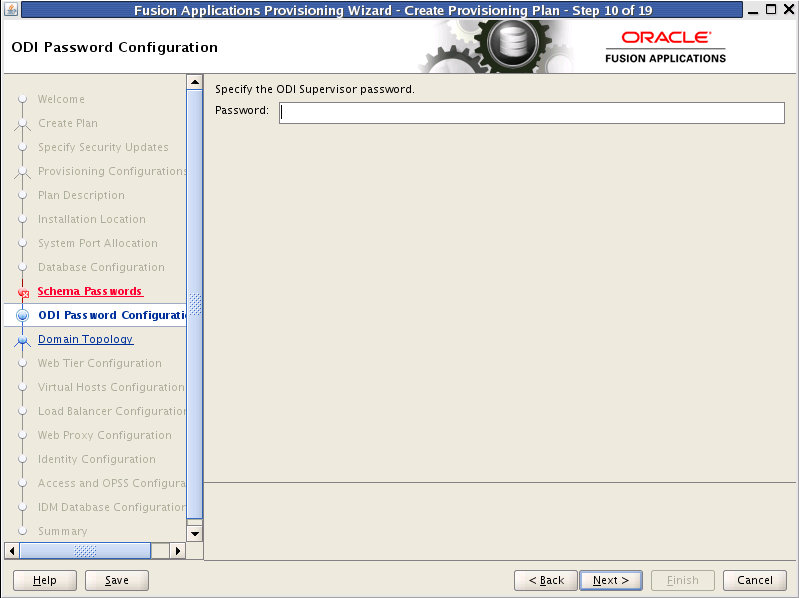
Enter the ODI Supervisor Password that you created when you installed Oracle Data Integrator. This screen does not appear if you selected Oracle Fusion Financials or Financial Control and Reporting as product offerings.
To stop creating this plan and resume later, click Save. This action creates a partial plan. A partial plan cannot be used to provision an environment.
Click Next to continue.
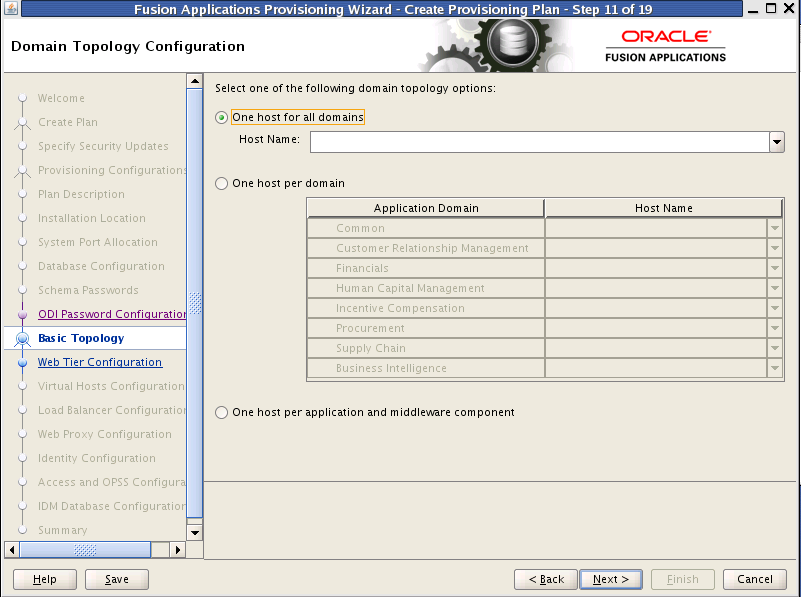
To determine the flow for the remaining wizard interview screens, choose one of the following options. Note that all hosts must use the same operating system. You cannot install "domain1" on Windows and "domain2" on Linux.
One host for all domains: Select this option to specify the Host Name to provision all applications domains and their middleware dependencies on a single host. The wizard continues the interview at the Web Tier Configuration screen when you click Next.
One host per domain: Select this option and then select a Host Name for each domain to be created. Provisioning installs and configures the Managed Servers for each Application Domain and the middleware dependencies on the host that you specify. The wizard continues the interview at the Web Tier Configuration screen when you click Next.
One host per application and middleware component: Select this option to specify the host for each application and middleware component individually. The wizard displays the Common Domain screen when you click Next, and includes all domain-specific screens in the interview.
If you select the last option, you cannot change the selections on this screen once you click Next. You must click Cancel, open a new wizard session, and create a new plan to change the configuration domain topology later.
To stop creating this plan and resume later, click Save. This action creates a partial plan. A partial plan cannot be used to provision an environment.
Click Next to continue.
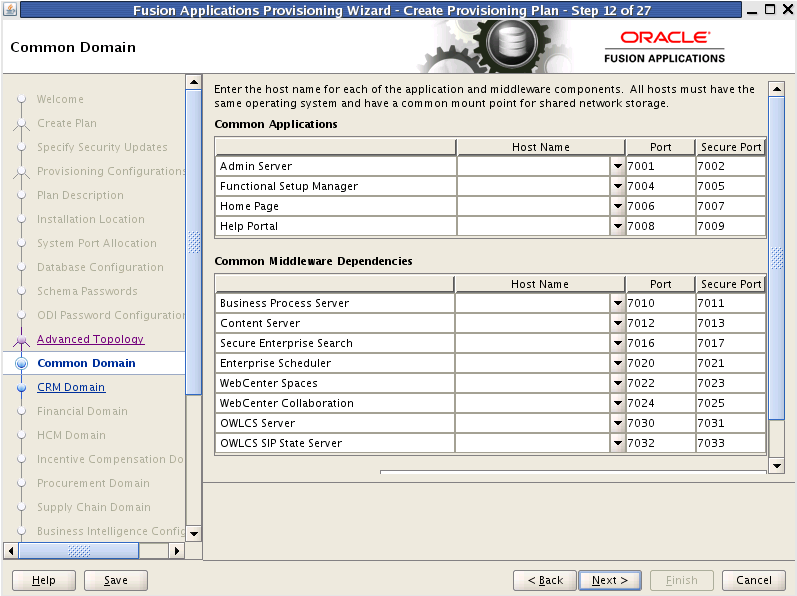
Specify values for this domain and its middleware dependencies. All hosts must use the same operating system and share a common mount point for network storage. The host specified for the Admin Server is the default for all servers. You can change the default.
Host Name: Specify the host where you want to install and configure the Managed Servers for this domain.
Port: Port for internal communications only. The wizard assigns values based on values on the System Port Allocation screen. You can edit port values. However, they must be unique within the domain and fall within the range previously specified. For example, in a range of 7401 to 7800, a value of 8444 generates an error.
Secure Port: The SSL port for internal communications. You can edit individual port values if a conflict occurs.
UCM Intradoc Server Port: Port where the Universal Content Management Server listens.
InBound Refinery Server Port: Used for calling top-level services.
To stop creating this plan and resume later, click Save. This action creates a partial plan. A partial plan cannot be used to provision an environment.
Click Next to continue.
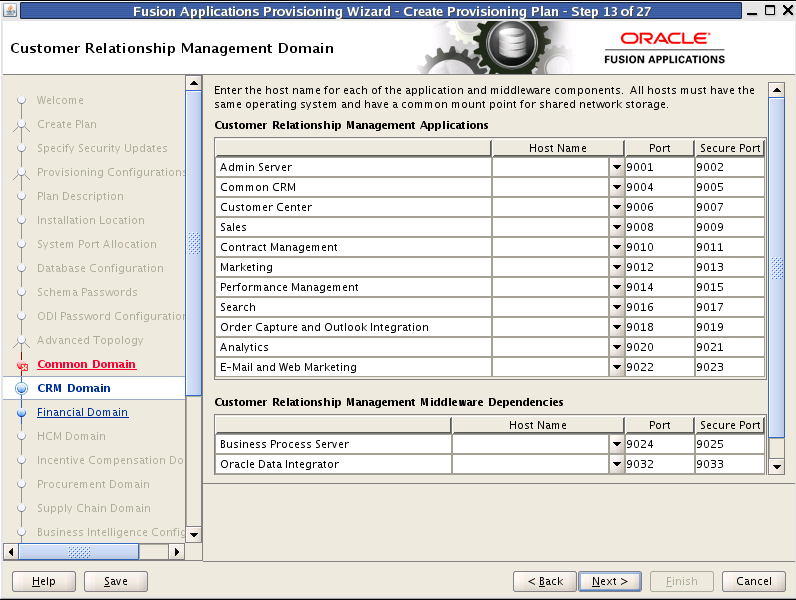
Specify values for this domain and its middleware dependencies. All hosts must use the same operating system and share a common mount point for network storage. The host specified for the Admin Server is the default for all servers. You can change the default.
Host Name: Specify the host where you want to install and configure the Managed Servers for this domain.
Port: Port for internal communications only. The wizard assigns values based on values on the System Port Allocation screen. You can edit port values. However, they must be unique within the domain and fall within the range previously specified. For example, in a range of 7401 to 7800, a value of 8444 generates an error.
Secure Port: The SSL port for internal communications. You can edit individual port values if a conflict occurs.
To stop creating this plan and resume later, click Save. This action creates a partial plan. A partial plan cannot be used to provision an environment.
Click Next to continue.
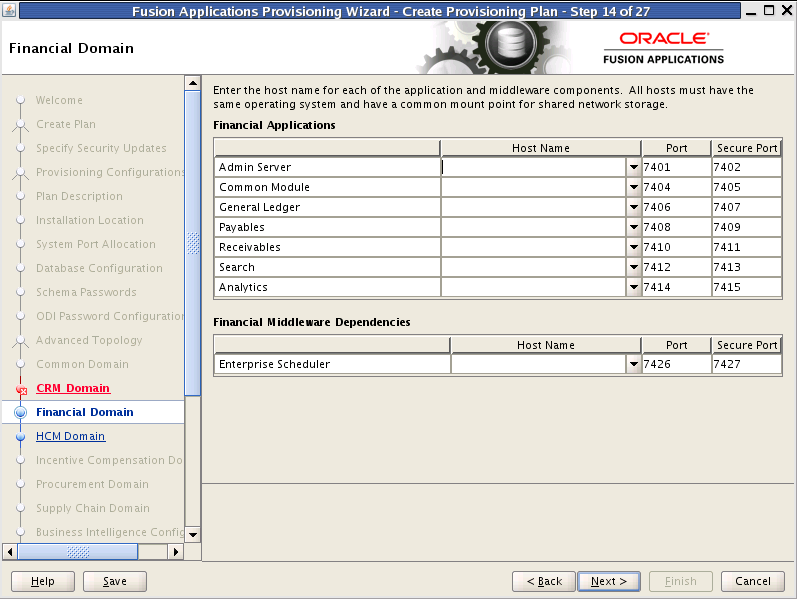
Specify values for this domain and its middleware dependencies. All hosts must use the same operating system and share a common mount point for network storage. The host specified for the Admin Server is the default for all servers. You can change the default.
Host Name: Specify the host where you want to install and configure the Managed Servers for this domain.
Port: Port for internal communications only. The wizard assigns values based on values on the System Port Allocation screen. You can edit port values. However, they must be unique within the domain and fall within the range previously specified. For example, in a range of 7401 to 7800, a value of 8444 generates an error.
Secure Port: The SSL port for internal communications. You can edit individual port values if a conflict occurs.
To stop creating this plan and resume later, click Save. This action creates a partial plan. A partial plan cannot be used to provision an environment.
Click Next to continue.
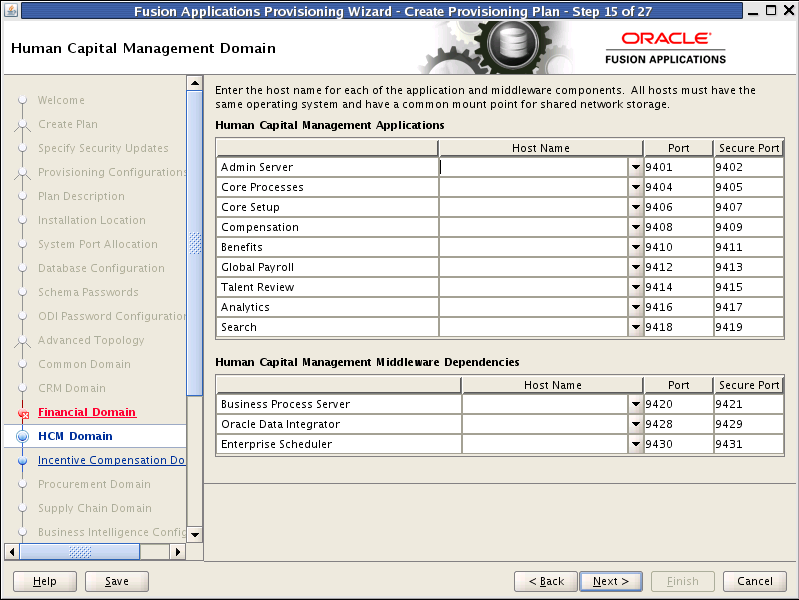
Specify values for this domain and its middleware dependencies. All hosts must use the same operating system and share a common mount point for network storage. The host specified for the Admin Server is the default for all servers. You can change the default.
Host Name: Specify the host where you want to install and configure the Managed Servers for this domain.
Port: Port for internal communications only. The wizard assigns values based on values on the System Port Allocation screen. You can edit port values. However, they must be unique within the domain and fall within the range previously specified. For example, in a range of 7401 to 7800, a value of 8444 generates an error.
Secure Port: The SSL port for internal communications. You can edit individual port values if a conflict occurs.
To stop creating this plan and resume later, click Save. This action creates a partial plan. A partial plan cannot be used to provision an environment.
Click Next to continue.
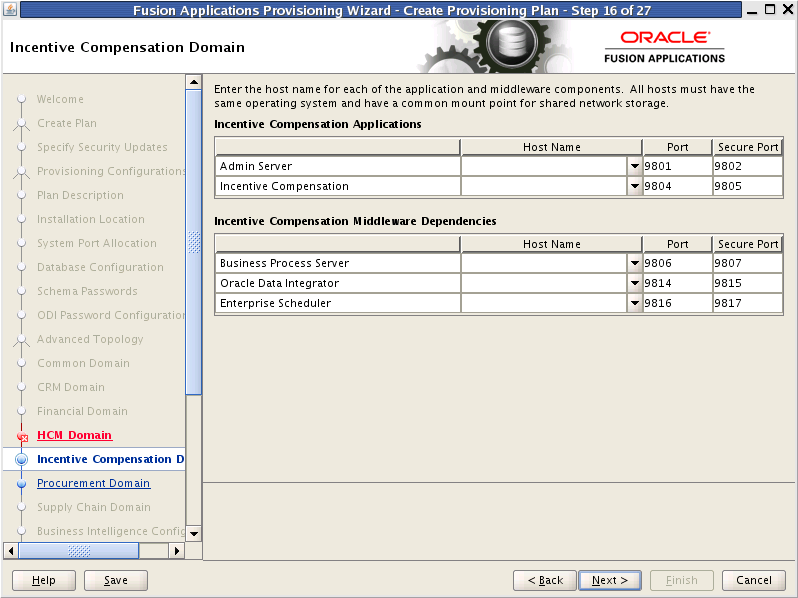
Specify values for this domain and its middleware dependencies. All hosts must use the same operating system and share a common mount point for network storage. The host specified for the Admin Server is the default for all servers. You can change the default.
Host Name: Specify the host where you want to install and configure the Managed Servers for this domain.
Port: Port for internal communications only. The wizard assigns values based on values on the System Port Allocation screen. You can edit port values. However, they must be unique within the domain and fall within the range previously specified. For example, in a range of 7401 to 7800, a value of 8444 generates an error.
Secure Port: The SSL port for internal communications. You can edit individual port values if a conflict occurs.
To stop creating this plan and resume later, click Save. This action creates a partial plan. A partial plan cannot be used to provision an environment.
Click Next to continue.
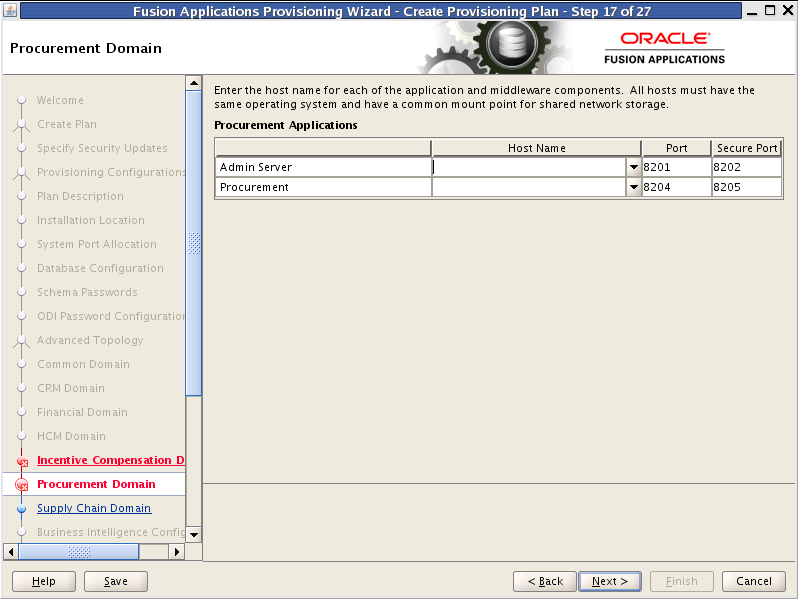
Specify values for this domain and its middleware dependencies. All hosts must use the same operating system and share a common mount point for network storage. The host specified for the Admin Server is the default for all servers. You can change the default.
Host Name: Specify the host where you want to install and configure the Managed Servers for this domain.
Port: Port for internal communications only. The wizard assigns values based on values on the System Port Allocation screen. You can edit port values. However, they must be unique within the domain and fall within the range previously specified. For example, in a range of 7401 to 7800, a value of 8444 generates an error.
Secure Port: The SSL port for internal communications. You can edit individual port values if a conflict occurs.
To stop creating this plan and resume later, click Save. This action creates a partial plan. A partial plan cannot be used to provision an environment.
Click Next to continue.
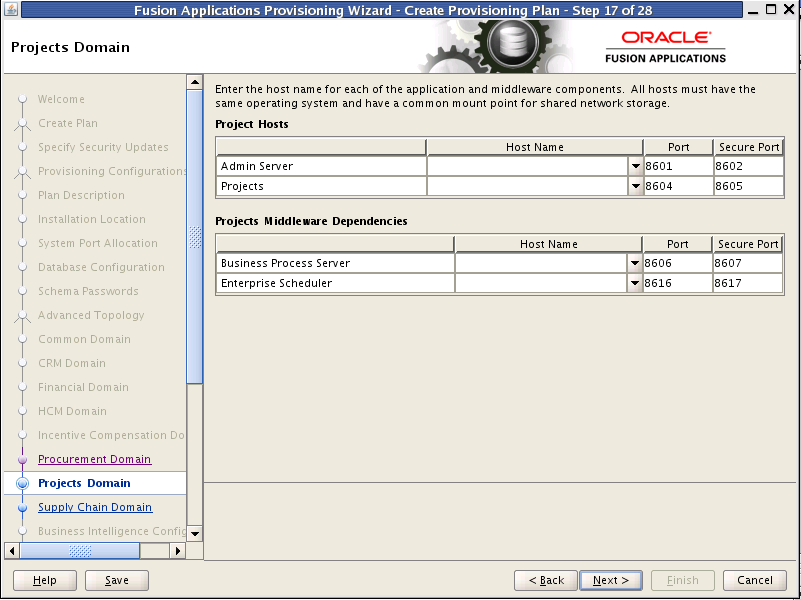
Specify values for this domain and its middleware dependencies. All hosts must use the same operating system and share a common mount point for network storage. The host specified for the Admin Server is the default for all servers. You can change the default.
Host Name: Specify the host where you want to install and configure the Managed Servers for this domain.
Port: Port for internal communications only. The wizard assigns values based on values on the System Port Allocation screen. You can edit port values. However, they must be unique within the domain and fall within the range previously specified. For example, in a range of 7401 to 7800, a value of 8444 generates an error.
Secure Port: The SSL port for internal communications. You can edit individual port values if a conflict occurs.
To stop creating this plan and resume later, click Save. This action creates a partial plan. A partial plan cannot be used to provision an environment.
Click Next to continue.
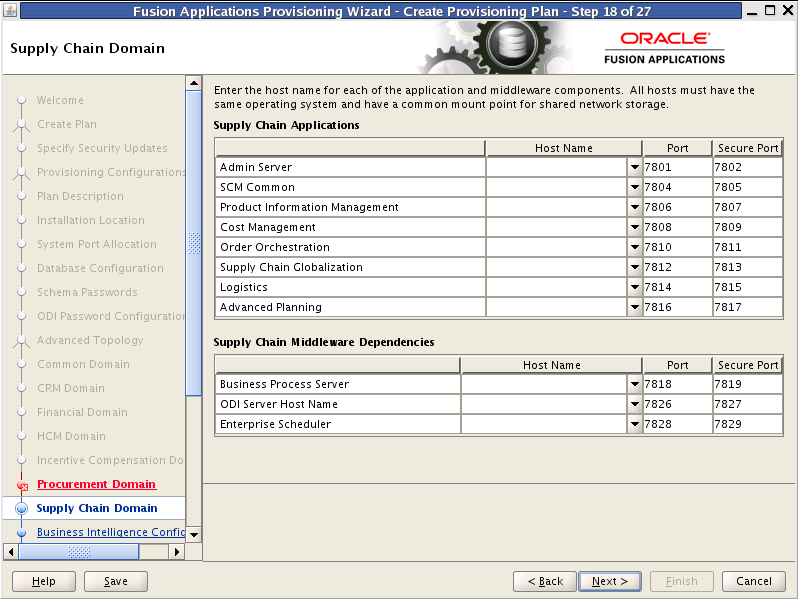
Specify values for this domain and its middleware dependencies. All hosts must use the same operating system and share a common mount point for network storage. The host specified for the Admin Server is the default for all servers. You can change the default.
Host Name: Specify the host where you want to install and configure the Managed Servers for this domain.
Port: Port for internal communications only. The wizard assigns values based on values on the System Port Allocation screen. You can edit port values. However, they must be unique within the domain and fall within the range previously specified. For example, in a range of 7401 to 7800, a value of 8444 generates an error.
Secure Port: The SSL port for internal communications. You can edit individual port values if a conflict occurs.
To stop creating this plan and resume later, click Save. This action creates a partial plan. A partial plan cannot be used to provision an environment.
Click Next to continue.
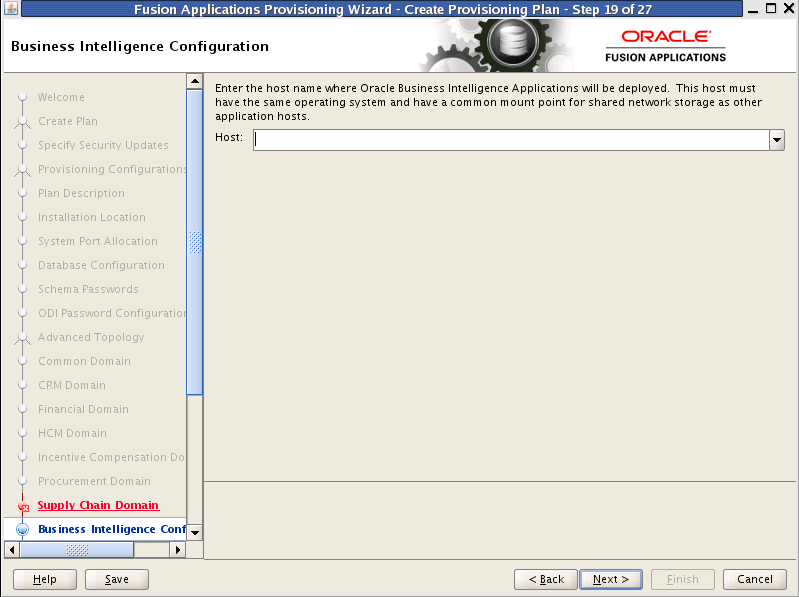
Oracle Business Intelligence products are integrated with, and accessible from, Oracle Fusion Applications. Products include:
Oracle Business Intelligence Enterprise Edition
Oracle Business Intelligence Applications
Oracle Transactional Business Intelligence
Oracle Essbase
Oracle Business Intelligence Publisher
Oracle Real-Time Decisions
Enter the Host where you want Oracle Business Intelligence products to be installed. You specified an RPD password on the Installation Location screen. Provisioning creates this password and makes it available so that Oracle Business Intelligence Applications and Oracle Transactional Business Intelligence can access the metadata repository in your new environment.
To stop creating this plan and resume later, click Save. This action creates a partial plan. A partial plan cannot be used to provision an environment.
Click Next to continue.
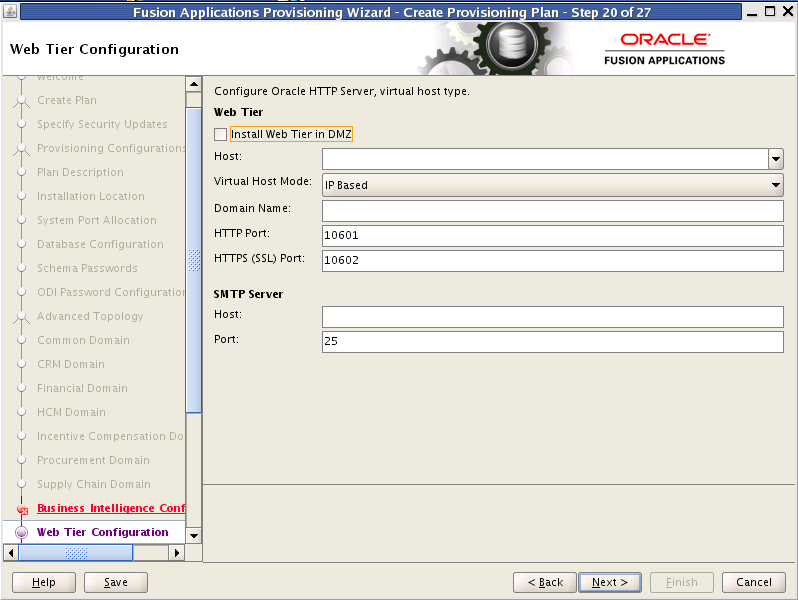
Use this screen to configure Oracle HTTP Server and choose a virtual host type. You can deploy the web tier to a host inside the firewall, or outside the firewall (demilitarized zone, known as DMZ).
You can create virtual hosts on a single web tier. There are three options (IP-based, name-based, and port-based) for each domain that is created during installation. The values assigned during installation are derived from the default HTTP port that you name on this screen.
Web Tier
Install Web Tier in DMZ: Select this option if you set up a separate host for web tier installation as a demilitarized zone (DMZ). This host does not have access to the shared file system. It cannot be used for any other host deployed, regardless of domain. See "Setting Up a Demilitarized Zone (DMZ) for the Web Tier" in Oracle Fusion Applications Installation Guide.
Host: Enter the name of the host where the Oracle HTTP Server will be installed and configured.
Virtual Host Mode: Select one of the following:
IP Based: Created on the basis of an IP or IP:host combination.
Name Based: Create new DNS entries, such as fin.example.com and crm.example.com to use as virtual hosts.
Port Based: Created based on the internal and external port for each domain.
The default is to create an IP-based host.
Domain Name: Specify a domain name (using the format my.example.com) to configure the domain in which Oracle Fusion Applications will receive requests. This value is also used as the default domain name for name-based virtual hosts.
HTTP Port: The default port for the web tier. Should not require operating system administrator privileges.
HTTPS (SSL) Port: Secure port for the web tier. Should not require operating system administrator privileges.
SMTP Server
Host: Specify the host for email marketing. This field appears only if you selected the Oracle Fusion Customer Relationship Management offering.
Port: Default port for the SMTP server.
To stop creating this plan and resume later, click Save. This action creates a partial plan. A partial plan cannot be used to provision an environment.
Click Next to continue.
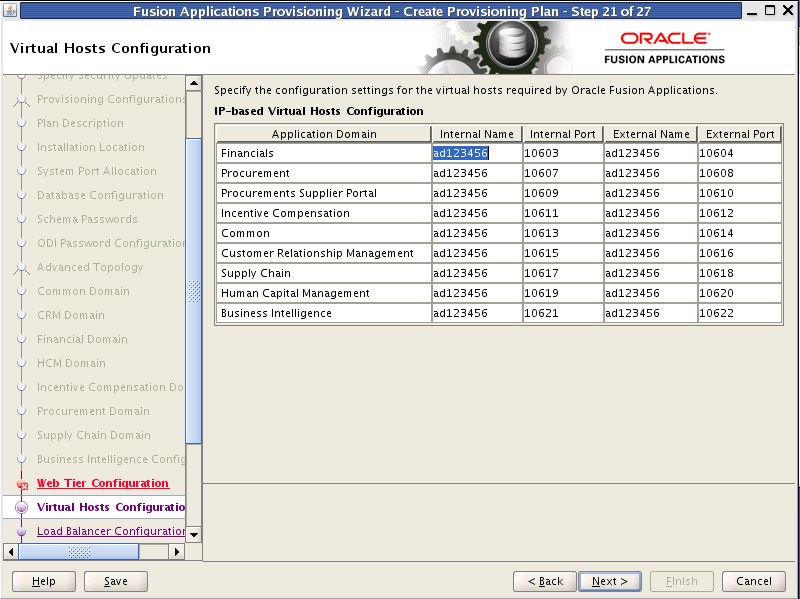
Specify the configuration parameters for the domains to be installed on the virtual hosts that you selected on the Web Tier Configuration screen.
If you selected IP Based, specify the following information for each application domain listed:
Internal Name: The host name or IP address where the web tier listens on the internal virtual host for this domain.
Internal Port: Port for this internal virtual host. Visible only from inside the firewall.
External Name: The host name or IP address for the external virtual host for this domain or middleware dependency. The host:port should be visible from outside the firewall.
External Port: Port to be used for this external virtual host. The host:port should be visible from outside the firewall.
If you selected Name Based, specify the following information for each domain listed:
Internal.Name: The DNS name for this internal virtual host. For example, for Oracle Fusion Financials, the name might be fin-internal.
External.Name: The DNS name for this external virtual host. For example, for Oracle Fusion Financials, the name might be fin.
If you selected Port Based, specify the following information for each domain listed:
Internal Port: The port that is visible only from inside the firewall for this domain.
External Port: The port that is visible from outside the firewall for this domain.
To stop creating this plan and resume later, click Save. This action creates a partial plan. A partial plan cannot be used to provision an environment.
Click Next to continue.
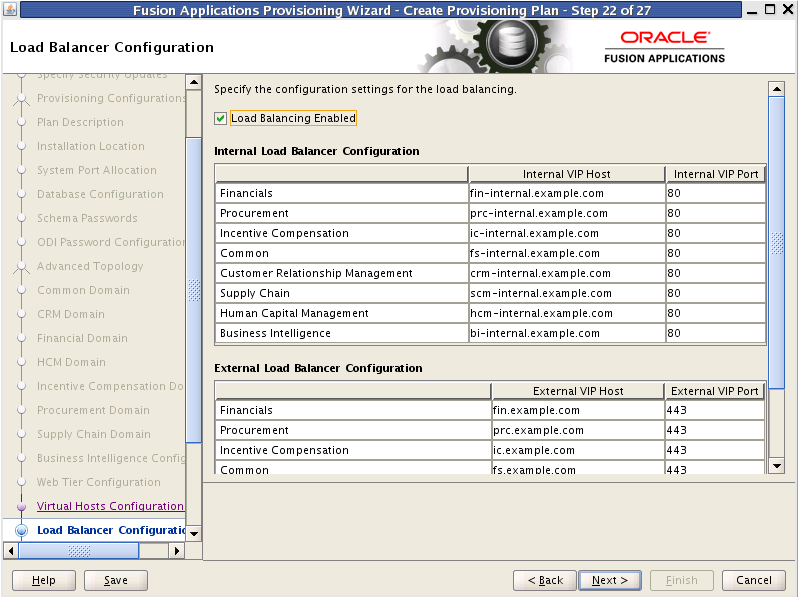
Load balancing enables you to distribute a workload evenly across two or more hosts, network links, CPUs, hard drives, or other resources. Check Load Balancing Enabled to take advantage of this feature, and specify:
Internal Load Balancer Configuration: The host and port for the internal Virtual IP (VIP).
External Load Balancer Configuration: The host and port for external Virtual IP (VIP). It must have a publicly available address to be usable.
To stop creating this plan and resume later, click Save. This action creates a partial plan. A partial plan cannot be used to provision an environment.
Click Next to continue.
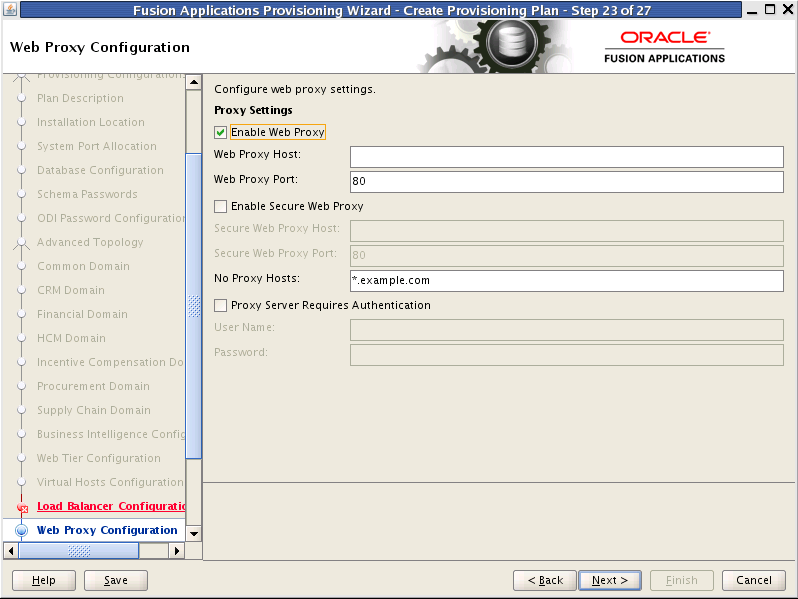
Create Proxy Settings to enable users who want to use a proxy server to connect to the Internet.
Enable Web Proxy: Select to enable proxy-related values to set up access to the Internet. Note: If you are a CRM customer and have a web proxy for external HTTP(S) traffic, you must select Enable Web Proxy on this screen and specify your web proxy configuration.
Web Proxy Host: Enter the name of the host where the proxy server is installed.
Web Proxy Port: The listening port assigned to the proxy server.
Enable Secure Web Proxy: Select to have the proxy server SSL-enabled. If you select this check box, the Secure Web Proxy Host and Secure Web Proxy Port fields are enabled and become mandatory.
Secure Web Proxy Host: Enter the SSL host used for secure communications.
Secure Web Proxy Port: Enter the SSL port used for internal communications.
No Proxy Hosts: Defaults to hosts that are connected directly. If there are multiple hosts, they are listed and separated by a vertical bar (|). You can use a wildcard character (*) to specify hosts that should be bypassed. For example, *.example.com would bypass all hosts whose name ends with .example.com.
Proxy Server Requires Authentication: To enable authentication for the proxy server, select this option.
User Name: Enter the user name that you set up for accessing the proxy server.
Password: Enter the password that you set up for accessing the proxy server.
To stop creating this plan and resume later, click Save. This action creates a partial plan. A partial plan cannot be used to provision an environment.
Click Next to continue.
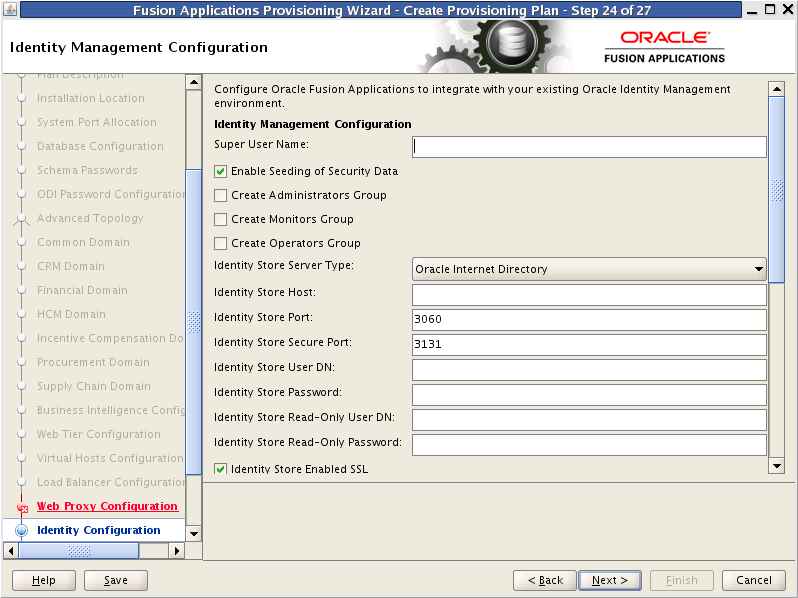
Provisioning loads the roles, policies, and application IDs that you created when you installed and configured the Oracle Identity Management environment. To share the identity management environment across multiple Oracle Fusion Applications installations and make the policies and roles accessible to all environments, populate identity management configuration details during the first installation.
If you chose to use the values in the IDM properties file (idmDomainConfig.param) on the Installation Location screen, they appear as defaults in the corresponding fields.
Super User Name: Enter the name of an existing user that should be granted administrator and functional setup privileges. The uid attribute must be set to be the same as the cn attribute.
Enable Seeding of Security Data: Controls the uploading of Oracle Fusion Applications security policies and user credentials into the Lightweight Directory Access Protocol (LDAP) as a part of provisioning. This option is selected by default. Deselecting it disables this action during provisioning.
Create Administrators Group: Indicate whether you created an "Administrators" group, whose members have specialized privileges for all Oracle Fusion Middleware components.
Create Monitors Group: Indicate whether you created a "Monitors" group, whose members have read-only administrative privileges to Oracle WebLogic Server domains.
Create Operators Group: Indicate whether you created an "Operators" group, whose members have Monitors privileges to Oracle WebLogic Server domains.
Identity Store Server Type: Indicate the type of identity store that you set up: OID (Oracle Internet Directory) or OVD (Oracle Virtual Directory).
Identity Store Host: Enter the host or DNS name for your identity store LDAP service.
Identity Store Port: The port assigned to the identity store.
Identity Store Secure Port: The SSL port assigned to the identity store.
Identity Store User DN: Enter the Distinguished Name of the user that you set up with read-write access to the LDAP.
Identity Store Password: Enter the password that you set up for the user with read-write access to the LDAP.
Identity Store Read-only User DN: Enter the Distinguished Name (DN) of the user that you set up with read-only access to the Identity Store LDAP.
Identity Store Read-only Password: Enter the password that you set up for the identity store read-only user.
Identity Store Enabled SSL: Select this option if your identity store is SSL-enabled and if the required certificates are provided in the IDM keystore file.
Identity Store User Name Attribute: Choose the type of user name attribute that you configured in the identity store. Valid values are: user ID (uid), common name (CN), or email address.
Identity Store User Base DN: Enter the root Distinguished Name assigned to the upload of applications user data. This is the root for all the user data in your identity store.
Identity Store Group Base DN: Enter the root Distinguished Name for all the group data in your identity store.
OIM Admin Server Host: Enter the name of the host where the OIM Administration Server is installed.
OIM Admin Server Port: The port where the OIM Administration Server listens.
OIM Administrator User Name: Enter the name you set up as the OIM administrator.
OIM Administrator Password: Enter the password you set up for the OIM administrator.
OIM Managed Server Host: Enter the virtual or real host name of the Oracle Identity Manager Managed Server where SPML callback and other OIM services are running.
OIM Managed Server Port: Enter the virtual or real port where the Oracle Identity Manager Managed Server listens.
OIM Endpoint Host: The access point on the Oracle HTTP Server for Oracle Identity Manager services in an Oracle Identity Management enterprise deployment, or the Oracle Identity Manager Managed Server access point for a non-enterprise deployment.
Enter the HTTP termination address of Oracle Access Manager. Terminates at either a load balancer or the Oracle HTTP Server.
OIM Endpoint Port: The port where the endpoint host listens.
OIM Endpoint Enabled SSL: Select this option if the endpoint host is SSl-enabled.
IDM Keystore File: Enter the location of the JKS keystore containing the certificates for the Oracle Identity Management components. If SSL is not enabled, you can supply a "dummy" .jks file name. The file can be of any type, with or without content. Validation is only for the existence of the file.
IDM Keystore Password: Enter the password that you set up for the IDM Keystore File. If you set up a "dummy" file, enter a "dummy" password. It can be of any format, as there is no validation other than for its existence.
To stop creating this plan and resume later, click Save. This action creates a partial plan. A partial plan cannot be used to provision an environment.
Click Next to continue.
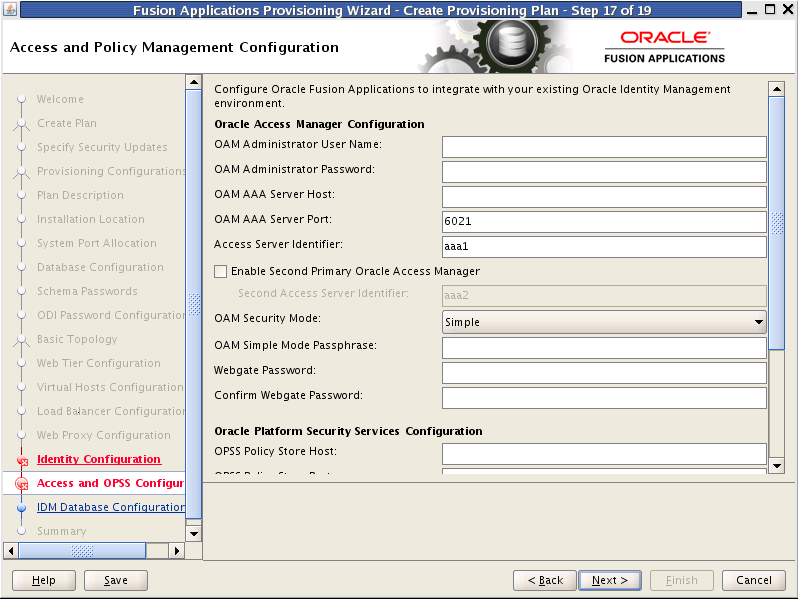
Enter the parameters for integrating Oracle Fusion Applications with a previously installed Oracle Identity Management infrastructure. If you chose to use the values in the IDM properties file (idmDomainConfig.param) on the Installation Location screen, they appear as defaults in the corresponding fields. You can replace the defaults if your original configuration has changed.
Oracle Access Manager Configuration
OAM Administrator User Name: Enter the name you assigned this user when you installed OAM.
OAM Administrator Password: Enter the password you assigned this user when you installed OAM.
OAM AAA Server Host: Enter the name of the proxy host where the Oracle Access Manager is installed.
OAM AAA Server Port: The port number for the Oracle Access Manager listener on the OAM proxy host.
Access Server Identifier: Name used to identify the Oracle Access Server.
Enable Second Primary Oracle Access Manager: Select this check box to name a second Primary Oracle Access Manager for high availability.
Second Access Server Identifier: Enter the name of the second Primary Oracle Access Manager Server.
OAM Security Mode: Enter the OAM transport security mode that you set up for this access server when you installed OAM. Values are Simple or Open. For IBM AIX on POWER Systems (64-Bit), you must use the Open mode for setup.
OAM Simple Mode Passphrase: Enter the passphrase that you set up to secure the communication with the OAM Server. Required only if the mode is specified as Simple.
Webgate Password: Specify a password for the Resource WebGate. It must contain at least eight alphanumeric characters and at least one digit or punctuation mark. Retype to Confirm the password. If seeding of security data is disabled, the password must be the existing WebGate password.
Oracle Platform Security Services
OPSS Policy Store Host: Enter the host name for OID where Oracle Platform Security Services (OPSS) policies are to be seeded.
OPSS Policy Store Port: Number of the OID port for the OPSS policy store.
OPSS Policy Store Secure Port: The secure port for OID.
OPSS Policy Store Read-Write User Name: Enter the Distinguished Name of the user that you set up with write privileges to the OPSS policy store.
OPSS Policy Store Password: Enter the password that you set up for the OPSS policy store user with read-write privileges.
OPSS Policy Store JPS Root Node: Enter the Distinguished Name of the node that you set up to be used as the OPSS policy root.
Create OPSS Policy Store JPS Root Node: Enabled only if the Enable Seeding of Security Data check box on the Identity Management Configuration screen is selected. Select this option to create the OPSS JPS Root Node.
OPSS Policy Store SSL Enabled: Select this option if the OID used for storing OPSS policies is SSL-enabled and the required certificates are provided in the IDM keystore.
To stop creating this plan and resume later, click Save. This action creates a partial plan. A partial plan cannot be used to provision an environment.
Click Next to continue.
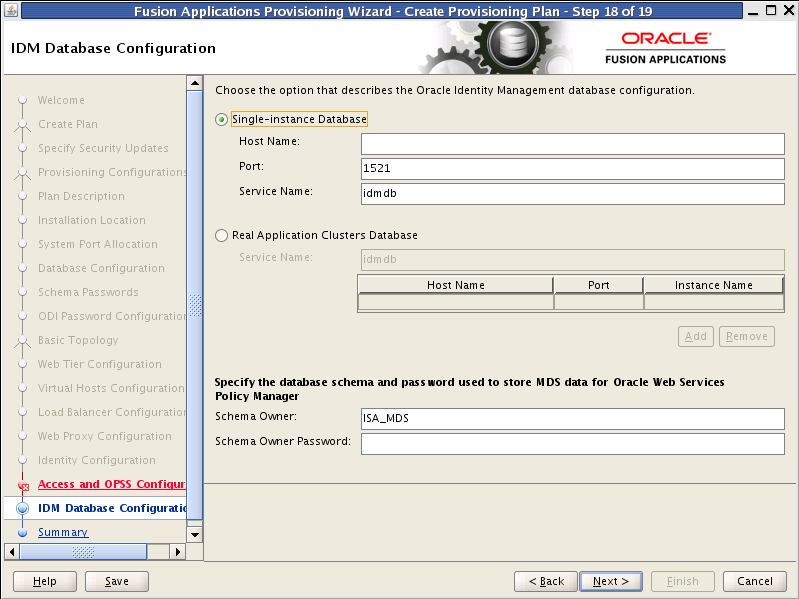
Enter the database parameters you established when you installed Oracle Database for the Oracle Identity Manager (OIM). The wizard validates whether the database you installed is a single-instance or Oracle Real Application Clusters (Oracle RAC). If a Single Instance Database, enter:
Host Name: The name of the host where the OIM database is installed.
Port: The listening port for the database.
Service Name: The unique name for the OIM database.
If you have installed a multi-instance database based on Oracle RAC, select Real Application Clusters Database and enter the Service Name that you specified when you installed this database.
Click Add to create a new row for each instance. Select a row and click Remove to delete the row. Enter the following information for each instance:
Host Name: The name of the host for each Oracle RAC instance.
Port: The listening port of the database.
Instance Name: The name of the Oracle RAC instance used to manage this database.
Enter the database schema and password that you set up to store the Oracle Metadata Services (MDS) Repository data for Oracle Web Services Policy Manager.
Schema Owner: The owner of the MDS schema in the OIM database that is to be used by the Oracle Web Services Policy Manager.
Schema Owner Password: The password for the MDS schema.
To stop creating this plan and resume later, click Save. This action creates a partial plan. A partial plan cannot be used to provision an environment.
Click Next to continue.
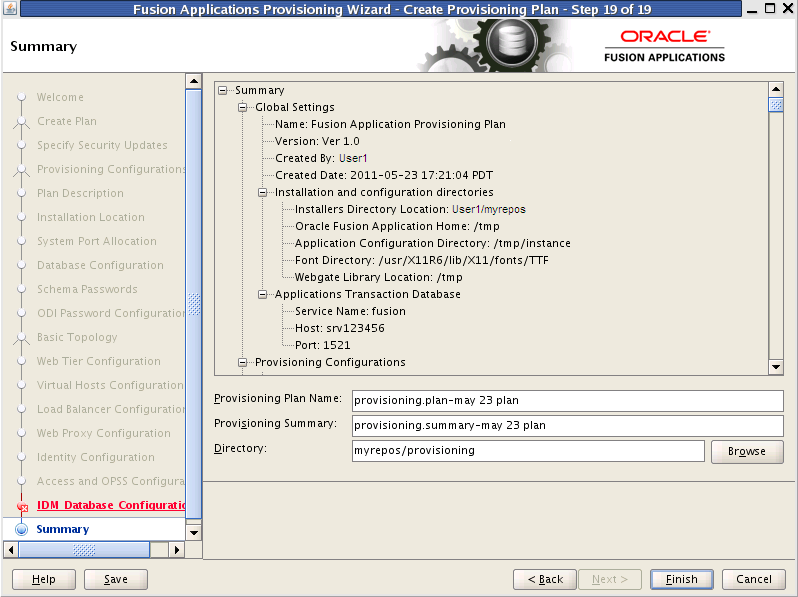
Verify that the installation represented on this screen is what you expected. Click Back to return to the interview screens that require changes. If you are satisfied with the details presented here, complete the following information:
Provisioning Plan Name: Specify a unique file name for this plan. This is the executable file that you supply to the wizard when prompted for other options.
Provisioning Summary: Specify a unique name for the summary details file. You cannot use this file to execute the plan.
Directory: Enter the directory path where you want to save this plan and the summary file. Choose a location that is visible to all servers accessing shared storage. Make sure the location is not read-only.
Record the name of the plan and its location. You may want to supply it to your system administrator to use when performing system maintenance tasks.
Click Finish to save the plan and the summary.