11g Release 1 (11.1.1.5.0)
Part Number E20383-01
Contents
Previous
Next
|
Oracle® Fusion
Applications
Procurement Implementation Guide 11g Release 1 (11.1.1.5.0) Part Number E20383-01 |
Contents |
Previous |
Next |
This chapter contains the following:
Define Transaction Account Rules
Define Corporate Procurement Cards
Define Common Payables and Procurement Options
A catalog is a collection of categories that you use to classify items. You can organize the categories into a hierarchy the represents a taxonomy. You create new categories only in the context of a catalog. You can add existing categories to one or more catalogs, either from another catalog or as shared categories from a source catalog.
You can set the Catalog Content value to Items at all levels which allows items to be assigned to any level within the category hierarchy, not only to the leaf levels.
The following diagram shows the relationships of the catalog components.
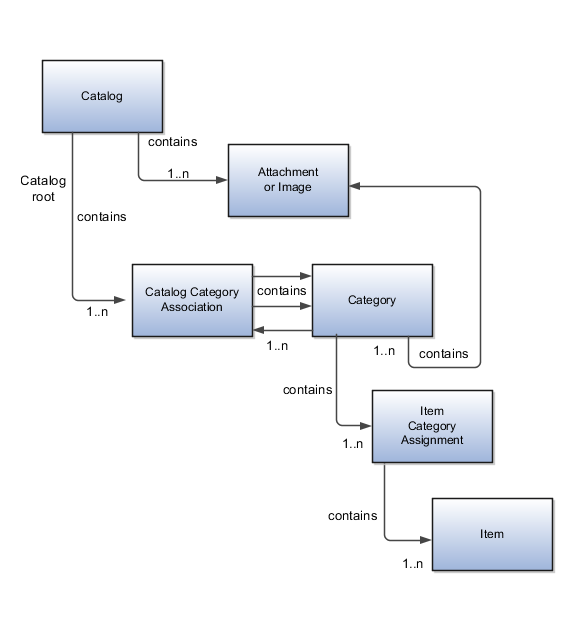
A catalog is a collection of categories that are organized to define a classification of items. The top most level of a catalog is the catalog root. All categories for the first level in the category hierarchy are associated with the catalog root through the catalog category association component.
A category is a component of a catalog that represents a portion of the classification defined by the categories and category hierarchy in the catalog. You can associate a category to a catalog through the catalog category association. Both the shared category and the native category are associated thorough the catalog category association.
Catalog category association represents the relationship between a catalog and a category, or a parent category and a child category. Each catalog category association represents one relationship between the catalog and a category or one relationship between a parent category and a child category.
Item category assignment represents the assignment of the item to a category in a catalog. Each item category assignment represents the relationship between a category and an item.
An item represents objects such as a product, service or template. An item is assigned through the item category assignment component.
Information is associated to the catalog and/or category, or both, through the attachment framework. Multiple attachments are supported but you can associate only a single attachment or attachment type image with a catalog or category.
The format of a catalog is defined at the time the catalog is created and controls the behavior of the catalog at runtime.
When you format a catalog the layout controls three main areas and includes the following tasks, some fields are required, and others are optional.
Catalog configuration
Date enablement
Category sharing
You can configure the catalog, and this affects how the content behaves. The catalog configuration contains a set of attributes that define the catalog configuration. These attributes interact to define the runtime behavior of the catalog.
The configuration functions are:
Catalog code: A unique identifier that is used.
Catalog structure: The key flexfield structure used to define the catalog.
Controlled at: Controls how items are assigned to categories and has two values. The first value is master level, which enables the automatic assignment of items to all child organizations associated with the master organization, if the current context is a master organization. The second value is organization level, which assigns the item only to the organization in the current context.
Default category: Applies any time a new item is created. The newly created item is assigned to this category within the catalog automatically. The automatic assigned is controlled by the functional area.
Catalog content: Controls what content can be added to the catalog and where the content can be added. This attribute has three values:
The Item at leaf levels allows items to be added only to the bottom level categories in the hierarchy.
The Items at all levels allows items to be assigned to any category in the hierarchy regardless of level.
Categories only allows categories to be added only to the catalog.
Allow multiple item category assignment: When this option is selected, you can assign an item to one or more categories in the catalog. The default is deselected, which means that each item can be assigned to only one category in the catalog.
Enable hierarchies for categories: When this option is selected, you can create a hierarchy for the catalog. The default is deselected, which means that the catalog cannot have a hierarchy and categories are associated with the catalog root.
Enable automatic assignment of categories: When this option is selected, the catalog is built by automatically associating all categories, based on matching the catalog structure value to the category structure value.
The date enablement function controls when the catalog is in an active state or inactive state by using the start date and end date attributes.
The category sharing function enables sharing by reference to categories from a designated source catalog.
The sharing function has these attributes:
Source catalog: A catalog that does not have sharing enabled from which categories, category hierarchies, and assigned items can be added to the catalog.
Sharing content: Controls what content can be added from the source catalog. This attribute has three values:
Categories only: Only categories without assigned items can be shared.
Items only: Only categories with assigned items can be shared.
Items and categories: All categories can be shared.
You can change a default category so that you can use it for item creation, or modify the inactive date so that the category is no longer used as you update a catalog. You can correct mistakes or reclassify the category due to shifting relationships within the category hierarchy.
You can view and edit a catalog on the Edit Catalog page when you have editing rights. For users that do not have rights to edit, the page is in read only mode.
The following aspects are important regarding managing and editing catalog details:
Catalog header region
Catalog detail tab
Category hierarchy tab
This region contains the catalog name and description, the selection of the default category and the start and end date for the catalog.
The Detail tab contains:
The configuration attributes for the catalog that controls the runtime behavior for the catalog.
The sharing attributes for the catalog which controls the source catalog that will be used for sharing from and what content can be shared.
The additional information which contains the descriptive flexfields defined for the catalog.
This contains the category hierarchy region in which the category hierarchy can be created and maintained. In addition, items can be assigned, and the usage of the category in other catalog can be viewed, and the attributes for the category and catalog category association can be edited.
The automatic assignment catalog feature enables you to reduce the cost of creating and maintaining a catalog. It is a simple way to create a nonhierarchical catalog because you do not have to add categories manually to the catalog.
All categories that have the same category structure value as the catalog are automatically assigned and associated to the catalog when you create a catalog category association for each category. Note that if you create a category in another catalog with the same structure value as the automatic assignment catalog, the category is added to your catalog. The categories displayed for auto assignment catalogs are refreshed only at startup and after you save.
The automatic assignment feature is enabled during catalog creation when you select the Enable automatic assignment of category check box. When you open a new catalog, any categories that have the same category structure value as the catalog structure value for the catalog are automatically assigned to the catalog.
For example, Purchasing may maintain a master catalog containing all categories that represent commodities. Each commodity team can create categories for their commodity in their own catalog.
The master catalog for Purchasing is named Purchasing and is configured during creation to support the automatic assignment of categories.
The Electronic commodity team creates a catalog named Electronics and proceeds to create categories that represent the classification of their commodity. The Electronic commodity team creates the categories televisions, computers, and home theaters.
The other commodity teams create and maintain separate catalogs.
Because you enabled automatic assignments for the Purchasing catalog, any categories created by the commodity teams are added to the catalog automatically. The Purchasing managers can view the collection of all commodities represented as categories in the Purchasing catalog.
The Edit Catalog dialog is a shared page that has two modes, view and update. The view mode displays the selected catalog in a read-only file. The update mode displays the selected catalog in an editable file. You must have edit catalog privileges to access the catalog in update mode. You can edit only an active or future-dated catalog.
The following fields are editable in the catalog:
Catalog Name
Description
Start Date
End Date
Default Category
Allow multiple item category assignment
Addition Information
Category Hierarchy
Category Details
Items assigned to category
You can edit this field to select another category as the default category for item creation. You cannot remove the default category if the catalog is assigned to a functional area that requires a default category to be specified.
This check box is editable only until you assign an item to a category in the catalog.
You can edit the values of the descriptive flexfields attributes.
After you make changes, clicking the Save button saves the changes to the database but will does not close the Edit Catalog page. Clicking the Save and Close button saves the changes to the database and closes the Edit Catalog page.
Catalogs are used to organize and classify collections of items by associating categories to the catalog. The categories are organized to form a taxonomy and items are assigned to the categories. When a category is associated with the catalog a catalog category association is created which specifies the relationship of the association. The catalog category association may also represent the relationship between two categories, for example a relationship between a parent category and a child category.
The following aspect is important regarding catalog category association:
Date enablement attribute value
The catalog category association is date enabled providing the control of when the catalog category association is active in the catalog and when the catalog category association is inactive. The catalog category association has two attributes to support date enablement; the start date and the end date. The start date is value is the first day that the catalog category association is available or active for use and the end date is the last day the catalog category association can be used, after this date the catalog category association is inactive. The date enablement attribute values are also used to control the visibility of content and the behavior of the category in the catalog. If a category association is inactive or end dated, having the value of the end date attribute past the current date, then the items cannot be assigned to the category.
A catalog category association will be set to inactive state when the category referenced by the catalog category association is set to an inactive state automatically, but the display will not be refreshed automatically.
The catalog, categories, and catalog category association use date enablement to determine if the object specified is active or inactive based on the start date and end date. The following are date enablement definitions:
Active An object is active when the current date is later than or equal to the value of the start date, but earlier than or equal to value of the end date.
Inactive An object is inactive when the current date is later than the value of the end date.
Future dated An object is future dated when the current date is earlier than the value of the start date.
You set the date enablement attributes are used to determine when a catalog, category, or catalog category association is used or visible.
On the Manage Catalog page, a table filter determines which catalogs appear. The default value for the choice list is Active, indicating that only active catalogs will be displayed. You can select the value All to view both active and inactive catalogs.
On the Edit Catalog page, on the category hierarchy tab, two table filters determine what categories and catalog category associations appear. The default values for the two choice lists are Active, indicating that only active categories and active catalog category associations will be displayed. You can select the value All to view both active and inactive categories and catalog categories associations.
Other applications also use the date enablement attributes to filter information retrieved through application programming interfaces or services for catalogs.
The following illustration provides the date enablement attributes for these objects. The catalog, category, or the catalog category association has an internal state that is active or inactive.

The following aspects are important regarding date enablement for catalogs and categories:
Start date
End date
Catalog and category objects
Catalog category association
Catalog and category rules
The start date is defined as the first date that the object can be active. The start date can be future dated by setting the value to a date later than the current date. The start date value defaults to the system date if no date is entered during catalog or category creation.
The end date is defined as the last date that the object can be active. The object is end dated one second after the date specified by the value of End Date, that is the next day at 12:00:01 a.m. You cannot set the end date in the past. Also, you can change the end date from a condition when the object is ended to a new end date greater than or equal to the system date, causing the object to go from inactive to active. The end date value is optional during catalog or category creation.
The start and end dates have been added for the catalog and catalog category association. The inactive date for categories has been renamed as the end date and the start date has been added.
The catalog category association is used to specify the parent and child relationships between catalogs and categories and for category to category relationships. The catalog category association date enablement is independent of the category data enablement, except for the case where the category is end dated; the association is ended automatically as well. The catalog category association dates represents the state of the category for the catalog in which the category is associated.
When a catalog is inactive the following rules apply:
All operations for the catalog are disabled; the catalog is not editable.
The catalog cannot be used in other processes.
The catalog can be viewed only if you set filters on the Manage Catalog page to a value of All, enabling you to view active and inactive catalogs.
When a category is inactive the following rules apply:
All operations for the category are disabled; the category is not editable.
The category cannot be added to other catalogs.
The category can be viewed only if you set the filters on the Edit Catalog page to a value of All, enabling you to view active and inactive catalogs.
The system sets the catalog category association for the inactive category to inactive.
When a catalog category association is inactive the following rules apply:
The category may be inactive or active; if the category is active it can be edited.
The catalog category associations and related category can be viewed only if you set the association filter on the Edit Catalog page to a value of All, enabling you to view active and inactive catalogs.
When a catalog is future dated the following rules apply:
All the operations of the catalog are enabled and the catalog is editable.
The catalog can be used in other processes, if allowed.
The catalog can be viewed only if the you set the filters on the Manage Catalog page to value of All.
You use catalogs to organize and classify collections of items by associating categories with the catalog. You organize the categories to form a taxonomy and assign items to the categories. When you associate a category with the catalog, a catalog category association is created which specifies the relationship of the association. The catalog category association may also represent the relationship between two categories, for example, a relationship between a parent category and a child category.
The following diagram shows the relationships of the category hierarchy components:
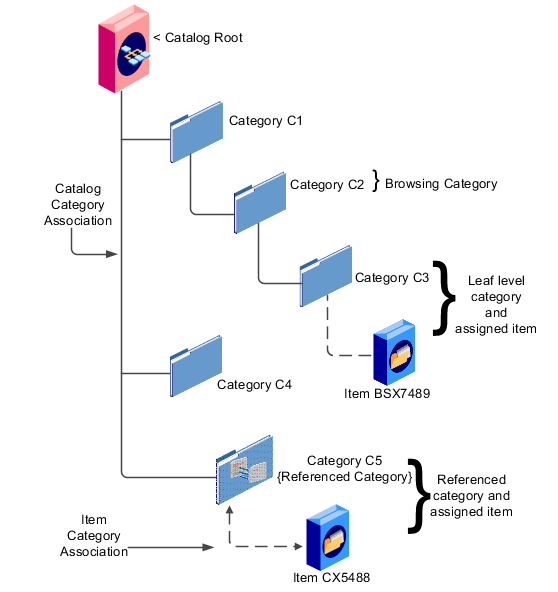
The components of a category hierarchy are:
Catalog root: The topmost node in category hierarchy that represents the object called catalog.
Category: The catalog component that is used to represent the classification structure.
Catalog category association: The line in the diagram represents the relationship between a catalog and category or between a parent category and child category.
Item category assignment: The dotted line in the dialog represents the relationship between a category and an item.
Reference category: The category C5 in this diagram is shared as a reference category from a source catalog.
Leaf level category: The lowest or bottom-level category in a category hierarchy. You can assign items to all levels in a category hierarchy if you configure the catalog to support this.
Browsing category: The category C2 in this diagram is a browsing category. Browsing categories are categories that you add to the category hierarchy for the purpose of classification and do not have items assigned to them.
The category hierarchy does not have a limit on how many levels can be represented. The category hierarchy can have multiple hierarchies within a single category hierarchy.
Categories can be edited only from within an Edit Catalog page, the category hierarchy tab. The category can be edited by selecting row for the category in the category hierarchy table and editing the category information in the category detail panel. The category can only be edited if the category is active and the catalog is active or future dated.
The category information can be edited in both the details and items tabs.
The following fields are editable in the category:
Category name
Description
Attachments
Category start date
Category end date
Items assigned to category
After changes are made the Save button will save the changes to the database but will not close the Edit Catalog page. The Save and Close button will save the changes to the database and close the Edit Catalog page.
The catalog category association can be edited only within the Edit Catalog page, in the category hierarchy tab. The catalog category association start date and end date attributes can be edited in the details region.
You select the category in the category hierarchy table for the catalog category association that is being edited, the category details are displayed in the right hand panel. The association start date and association end date are the only editable fields.
After completing the edits, click on the Save button to save your changes to the database, the Edit Catalog page will not close. The Save and Close button will save the changes to the database and close the Edit Catalog page.
You can update category details when you select the row with the category in the category hierarchy table, the category details are displayed in the right hand panel in the user interface in an edit mode for all native categories. The category detail region contains information about the category that is associated to the catalog. It also contains the association start and end dates.
You can view and edit a catalog on the category details tab when you have editing rights. For users that do not have rights to edit, the page is in read only mode.
The following aspects are important regarding managing and editing category details:
Category details tab
Items tab
Where used tab
The details tab contains information about the category that has been associated to the catalog. This information appears in all catalogs, since a category can be associated to one or more catalogs. The details tab contains the category configuration, category date enablement, association date enablement, and the additional attributes for the category.
The details tab contains attributes that define a category. Unstructured information is added through attachments. Images are added to a category and are displayed in the category details tab.
The item assignments are specific to the catalog where the category is associated.
The Where used tab contains a list of catalogs that the category is associated with.
You can create categories only in the context of a catalog, on the Edit Catalog page, Category hierarchy tab. When you select the Create icon in the category hierarchy table, it launches the Create Category dialog.
Consider the following important aspects when creating categories for catalogs:
Create category region
Configuration region
Date enablement region
Additional information region
Enter a name and a meaningful description of the category in the create category region. Optionally, you can add an image and an attachment to this category.
The key flexfield is determined during creation based on the catalog structure of the catalog. Enter the key flexfield segment values for the category. The number of key flexfield segment values depends on how you define the key flexfield at setup time. The category structure is the key flexfield structure instance that you create as part of the setup. When you define the key flexfield structure instance, you define the segments for the structure instance. For example, the family group and class group are segments. The segments appear in the Create Category dialog based on the key flexfield structure instance that you select.
The default value of the category content selection value is Items and Categories, but you can change the value. The values in the category content choice list vary based on the catalog content value.
The category content attribute value controls the content that you can add to this category.
Items Only: Select to add only items to the category
Categories Only: Select to add only categories to the category
Items and Categories: Select to add both items and categories to the category
Date enablement determines if an object is active or inactive based on the start date and end date. When categories are created, the default start date value is the current date. You can move the category start date beyond the current date to a future date within the category. The end date value is optional.
The additional information region contains all descriptive flexfield attributes that you set up for categories. You can edit the values of the descriptive flexfield attributes at the time of category creation.
After you complete the required fields for the catalog, clicking OK creates the category in the database, adds the category to the point of selection in the category hierarchy, and closes the dialog.
You use the move category function in the category tree table region of the Edit Catalog page. This is a table row action. The dialog is launched when you select an active or future dated category within the catalog and select this action. The move category function is disabled when the Enable hierarchies for categories check box is not checked or left unchecked.
Consider the following important aspects when moving categories within catalogs:
Indentifying the new parent
The dialog provides the current category parent and allows you to pick a new category parent. Only the legal category parents are displayed in the choice list.
The category list within the New Parent choice list is filtered by based on a set of rules:
The new parent category must be an active or future dated category; the end date value of the category must be later than the current system date.
The value of the category content for the new parent category must allow the selected category to be added; the legal values are items and categories and categories only.
A selected category associated with the catalog at a level below the categories at the root categories can be moved to the root of the catalog.
The new parent category catalog category association must be active; the end date value of the catalog category association must be later than the current system date.
Category hierarchy can be created and maintained through a spreadsheet interface reducing the amount of time to create and maintain catalogs. Existing catalog content can be exported and the content used in other catalogs for catalog category hierarchies.
The following aspects are important regarding category hierarchy import used in catalogs:
Spreadsheet interface
Export category hierarchy
You can manage the catalog category hierarchy to use the spreadsheet interface that is available in the Edit Catalog page by using the Export Hierarchy button to download existing catalog content, modify this content in a spreadsheet, and upload the content back into the Product Information Management application.
You use export category hierarchy for example, when you need to provide the category hierarchy to a partner. Your partner has the capability to import the catalog file using an Excel spreadsheet.
You can export the category hierarchy from our catalog and it can be used by partners. If your partner has the Oracle Product Information Management solution, they can directly import the category hierarchy into their catalog.
Catalogs and categories support attachments and use a common component for managing attachment content. You can add attachments on both the Create Catalog and Edit Catalog pages.
The attachment component displays a green plus sign icon indicating that no attachments are available for the object. The Attachment dialog appears when you click the green plus sign icon. You define the attachment by selecting the attachment type, file name or Uniform Resource Locator (URL), title, description, and by indicating whether the attachment can be shared with other objects. Once you define the attachments and click the OK button, that attachment title appears in the attachment component region of the page along with a red X icon that you can click to delete the attachment.
The attachment file types are:
File
Repository File/Folder
Text
URL
You must provide a title for the file and create a description for the attachment. You select a file to upload from your desktop.
You click the Browse button to attach a repository file/folder from the document repository to a catalog. The attachment repository contains existing attachments and is organized as a set of folders. The Browse button launches the Attachment Repository dialog to enable you to select an attachment. You must provide a title for the repository file/folder and create a description for the attachment.
Enter the text string in the field that you want to appear as an attachment. You must provide a title for the text and create a description for the text attachment.
Enter the URL address to a web page that you want to attach to the catalog. You must provide a title for the URL attachment and create a description for it.
The Share check box alerts users that you added an attachment and the date that you performed the task.
You can assign items to categories on the Edit Catalog page, category hierarchy tab, on the category detail item tab. You can assign items only to active categories and categories where the Category Content field value is Items and Categories or Items Only. In addition, you can configure catalogs to control item assignment to categories within the catalog by selecting the Allow multiple item category assignment check box, which allows items to be added to all levels of the category hierarchy.
You select items from a choice list and add them to the category. The choice list is filtered based on a set of rules:
Item data level security: Displays only the items that the user has permission to view and assign.
Organization context: Based on the organization context that is controlled by a choice list in the item table header, only the items assigned to organizations are displayed.
You also control item assignment by selecting the value of the Controlled at check box. If you select the Master Level value and the organization context is a master organization, the items are automatically assigned to all child organizations that are associated with the master organization.
Other applications can use catalog data if you export the catalog content. For example, you may want to export catalog content to use as a monthly report of all items assigned to a specific catalog. You can use the default publish template provided in hyper text markup language (HTML). You can specify the content and layout of the catalog information. When the catalog is published, you select the format and initiate the creation of the content in the file.
The following aspects are important regarding catalog data to be published:
Publish a catalog
Type of catalog content that can be published
You initiate a search for a catalog from the Manage Catalogs page, select the row corresponding to the catalog that you want to publish and select the Publish action. The application generates the report based on the default template in HTML format, and the locale prior to creation of the file. You can select a new template or format from the report window. The content displayed for items, categories, catalog categories, and catalog is based on the publish template.
The default catalog publish template allows the publication of the catalog header details, category hierarchy, category details, and category item assignments. The order of a published report begins with the catalog header and the catalog category details. If the category has a child relationship then the catalog category association details for the child category follows. If the child category has a hierarchy, then the complete hierarchy under the category is published with the catalog category association details and categories details.
Categories can be shared across multiple catalogs allowing catalog content to be reused and saving the work needed to maintain multiple copies of the categories. In the case of category sharing, the category structure in the source catalog can be different than the native catalog.
Categories can be shared using two methods; the first method is directly associating the category to the catalog. The category is added to the catalog and can be edited in the catalog or any catalog the category is associated to. The items assigned to the category are not shared, but are assigned to the category in context with the catalog the category is associated. For example if the category name or description is changed in one catalog, the change will be reflected in all catalogs where the category is associated, but if items are assigned to a category, the assignment will be for that single catalog.
The second method of sharing categories is adding a category by reference into the catalog. During the creation of the catalog, sharing can be enabled by specifying a single source catalog that will be used for sharing by reference and setting the value of the sharing content to control what content will be shared from the source catalog. The advantage of using sharing by reference is source catalog content can be shared to multiple catalogs and maintained in a single place, the source catalog. In addition, the referenced content can be more than one category, for example a complete category hierarchy and any assigned items to categories in shared content can also be reference within the catalog.
Categories can be organized to represent classification taxonomies. The hierarchy organizations for categories have parent and child relationships that form a tree structure. The category hierarchy is created and maintained within the Edit Catalog page, category hierarchy tab. The category hierarchy is shown in true relationship to the way it is defined.
The category hierarchy can be created using two methods: the first is manually creating the hierarchy by adding referenced categories, duplicating categories or creating category for the catalog.
The second method for creating the hierarchy is by importing the category hierarchy through the spreadsheet interface. The category hierarchy can be exported from other catalog or other sources, edited and imported into a new catalog, additionally it can be added manually to the spreadsheet.
The category hierarchy can be edited using Move Category. The catalog category association cannot be deleted, but can be end dated to make the catalog category association inactive. The category hierarchy table provides a choice list filter that controls what catalog category associations and categories area displayed based on the date enablement. The category hierarchy can also be edited by exporting the complete hierarchy, editing it and importing the category hierarchy back into the catalog.
You can select and duplicate a category as a quick way to create a similar category configuration. Selecting the Duplicate icon action launches a Create Category dialog that has attribute fields populated based on the selected category attribute values. The category name is prefixed with Copy_ followed by the name of the selected category. You fill in the required field information in the key flexfield segment values which are blank. Once the category attributes are updated and the key flexfield segments values are entered, the OK button adds the newly created category into the category hierarchy of the selected category you have configured.
Categories are catalog components that are associated to a catalog for purpose of classification of items. You can add existing categories to the point of selection which can be a category in the hierarchy or the root of the catalog. If no category is selected, the default is the root of the catalog.
You can add categories by selecting the Add Category field and selecting the value Add Category. You can then search for existing categories based on the value of the catalog structure for the catalog. You can narrow the search for existing categories by using the Advance Search region in the dialog. You can add each selected category by selecting the Apply button and the add category region remains open. The OK button adds a category if a category is selected and then closes the dialog.
Adding a shared category is similar to adding an existing category except the category is selected from the catalog that has been designated as a source catalog. The sharing content attribute value determines what content is shared from the source catalog. A category within a source catalog that has been added to a native catalog is also known as a referenced category. You use the drop list menu from the Add Categories menu, and the Shared Category option will be disabled if the catalog has not been configured for category sharing.
You can attach an image from your desktop or from a configured repository to a catalog or a category, or both. The image is displayed in the catalog detail and the category detail section of the catalog page. Only one image can be associated with a catalog or category. To attach an image, select the green plus icon to launch the Manage Attachment dialog. The image attachment type can have values of File or Repository File/Folder and is selected in this dialog. The title you provide for the image attachment will appear under the image that is displayed in the catalog. The description you provide is not displayed. Browse will allow you to select the file to be used as the image for the catalog or category. After the information is entered in to the dialog, you click the OK button to load the image and the image attachment title will be displayed under the image. The image will not initially be displayed until the catalog is saved. The image can be replaced with another image by selecting the red X to delete the existing image and entering a new image.
You use Catalog Category mapping to map categories of different catalogs to the reporting categories in other catalogs. This feature allows one or more categories within a catalog to be mapped to category in a second catalog. For example, suppose that you want to roll up the costs associated with allow items assigned to a set of categories in catalog. Catalog mapping allows you to select a category in a catalog, and map all the categories in the set to that category. When you use this feature you are required to write code to do the roll up as identified in the example.
You can map a catalog to be assigned to a functional area such as Purchasing. When a catalog is assigned to a functional area, the catalog will behave based on the rules you defined for that functional area. Only one catalog can be assigned to a functional area.
The Procurement Application Administrator is responsible for supplier numbering setup. Suppliers created through the Create Supplier task flow, through the supplier registration process, or supplier import are automatically numbered using a numeric sequence. The starting supplier number is defined in the Specify Supplier Numbering setup page (the seeded default number is 1). The supplier number then increments automatically as numbers are assigned during supplier creation.
Additionally, the next supplier number can be updated at any time, not just during initial setup, if for example there's ever a need to skip a range of supplier numbers. The application will validate that the number is not already used.
Business classifications support the tracking of supplier certifications that are important to companies for different reasons, such as for supplier diversity programs. Since classification requirements can vary by country or region the seeded classifications can be changed. The application allows you to capture certification details for each classification such as Certificate Number, Certifying Agency, and Expiration Date.
The following seeded classifications are provided for tracking suppliers.
Hub Zone
Minority Owned
Subclassification: (African American, American Indian, Asian, Hispanic)
Service-disabled Veteran Owned
Small Business
Veteran Owned
Woman Owned
The Business Classifications subtab displays an alert if there are certificates that are expired or about to expire. The alert is only raised if a certificate expired in the past 30 days or about to expire in the next 30 days.
Content under development
Oracle Fusion Tax provides a single-point solution for managing your transaction-based tax requirements. In the Define Transaction Taxes activity, set up your entire tax configuration.
Oracle Fusion Tax:
Uniformly delivers tax services to all Oracle Fusion application business flows through one application interface
Provides a single integration point for third-party tax products and services
Is configurable and scalable for adding and maintaining country-specific tax content
With Oracle Fusion Tax, you can model your taxes according to the needs of the following local and international tax requirements:
Both simple and complex country-specific tax legislation
Cross-border transactions, including exports and Intra-European Community transactions
Intercompany transactions
Local compliance requirements for recording and reporting
Continual changes to tax legislation, such as new taxes, local law changes, special tax rates, and special exceptions for products and customers
You can manage the entire configuration and maintenance of tax content from the one Oracle Fusion Tax application. Using one application ensures a uniform tax setup across applications, with a centrally managed system of automated tax services and control over manual intervention and update.
The Define Transaction Taxes activity is logically defined with prerequisite tasks, core tax configuration tasks, optional setup tasks, and validate configuration tasks. The activity categories include:
Define Tax Geographies: Configure tax geographies to define geographical regions that share the same tax requirement. These prerequisite tasks are required for core tax configuration but they might not have been defined in the previous steps of the Financials offering.
Define Tax Regimes: Configure tax regimes for the taxes in each country and geographic region where a separate tax applies. These tasks are most commonly used by all the implementations. You should be able to calculate taxes on the transactions based on this configuration.
Define First Party Tax Profiles: Configure tax profile details that control the transaction tax activities for your first party legal entities, legal reporting units, and business units.
Define Third Party Tax Profiles: Configure tax profile details that control the transaction tax activities for your third party customer, customer sites, supplier, and supplier sites.
Define Occasional Implementation Setups: Configure initial tax setup that impacts tax calculation and reporting. These tasks either are predefined and you do not have to configure them unless the predefined data needs to be extended or these are tasks required only for certain implementations.
Verify Tax Configuration: Verify the transaction tax configuration by simulating transaction data and reviewing tax calculation results.
With Oracle Fusion Tax, you can model your tax requirements according to the needs of local and international tax requirements. These requirements include:
Both simple and complex country-specific tax legislation
Cross-border transactions
Local compliance requirements for recording and reporting
Continual changes to tax legislation, such as new taxes, local law changes, special tax rates, and special exceptions for products and customers
In order to determine how to set up your tax configuration, you must first analyze your tax requirements.
The following table represents key decisions that you must make when you analyze your tax requirements and use Oracle Fusion Tax and other Oracle Fusion applications to implement a solution
|
Question |
Consideration |
Impact to Tax Configuration |
|---|---|---|
|
Who am I? |
You must first answer questions about yourself and your relationship to the legal and regulatory agencies that enable you to operate in one or more counties. |
|
|
Where do I have operations and businesses? |
Identify the countries in which you operate. You will need to identify the country where you are legally registered and the countries where you have subsidiary companies that are legally registered or have a legal presence. |
Use Oracle Fusion Legal Entity Configurator to capture information about your legal entities and legal registration. |
|
What taxes am I subject to? |
Analyze your tax environment for each of the countries in which you operate. |
Set up your tax regimes, taxes, and tax jurisdictions according to the tax requirements for each country. |
|
What are the operations and businesses that I have? |
Consider the types of operations and businesses in which you are engaged and the countries where you have legal entities or reporting units. The type of industries that you work under (for example, mining, telecommunications, and pharmaceuticals), the kind of operations in which you engage (for example, trading, manufacturing, and services), and the scale of your operations (for example, your turnover, company size, and growth) may all impact your taxability. |
Use the classifications feature to categorize or classify your first parties under various classification schemes. In analyzing your operations, you can associate the three main classifications of a transaction to:
|
|
What do I do? |
Identify and classify the transactions that you enter into. For example, do you primarily sell physical goods? If you do, do you manufacture them, or do you buy and sell them without additional manufacturing? Do you sell these goods in another state or province? Do you export these goods? Do you provide or use services? |
Use Oracle Fusion Tax to create fiscal classifications to classify and categorize your transactions in a common manner across your organization. Use these fiscal classifications in tax rules to obtain the appropriate tax result. |
|
What products do I buy or sell? |
Determine the products that you buy and sell as they impact the taxes to which you are subject. For example, you must register for, and therefore collect and remit, service taxes only if you provide taxable services. If you manufacture goods for export, you may not be subject to taxes on the purchases that go into the manufacture of such goods. |
Where Oracle Fusion Inventory is installed use the Inventory Catalog feature with Oracle Fusion Tax product fiscal classifications and intended use functionality to classify the taxable nature and intended use of the items. You can then define tax rules using these classifications to obtain the appropriate tax result. Define product category and noninventory-based intended use fiscal classifications to address classification needs for transactions that do not use inventory items. |
|
Who are my customers and suppliers? |
Determine the types of customers and suppliers with whom you do business, as they can impact the taxes to which you are subject or the tax status or tax rate that applies. For example, let's say that you are a company in the UK that supplies physical goods to another country that is also a member of the European Union. The transaction rate for UK VAT is dependant on whether the customer is registered for VAT in the country to which the supply is made. |
Use the party classifications feature to categorize or classify your customers and suppliers. You can use these classifications in your tax rules to derive the appropriate tax result. You create a party fiscal classification by assigning an Oracle Fusion Trading Community Model class category to a party fiscal classification type code that you define. The Trading Community Model class codes defined under the class category become fiscal classification codes belonging to the party fiscal classification type. You can create a hierarchy of party fiscal classification types to reflect the levels of codes and subcodes within the Trading Community Model classification. |
The purpose of scope is to define the parameters of your implementation project by setting the context of a task list during initial configuration. The foundation tax setup is an incremental setup where each step of the foundation configuration builds on the previous step. The task list is organized sequentially to ensure that you perform setup tasks in the order required. You can define scope values at incremental steps in the implementation project to pass to subsequent tasks to ensure continuity and ease of setup. Additionally, when exporting setup data based on setup migration services, the scope values serve as parameters to control the data selected for export to the respective configuration package. It is important to note that while scope is a valuable tool when implementing, tax scope values are not a required element of the implementation and you do not need to define them.
When implementing tax the foundation setup task of Define Tax Regimes prompts you to Select and Add or Create New the scope value for the implementation project. You can select an existing tax regime value or define a new tax regime value to set the scope. You can also Select and Add multiple scope values to the implementation. When you select the tax regime value to define the scope of an implementation project the feature selection is available to further define the constructs of the implementation.
As you continue the incremental setup, the next task is to define a tax. You are prompted to Select and Add or Create New the tax value. The tax regime scope value already associated to the implementation project filters existing taxes and assigns the tax regime value to any newly defined taxes. This controls the parameters of the implementation to be within the context of the tax regime. When there are multiple scope values passed, it is referred to as a composite scope.
The same logic applies to the next step in the foundation setup when you define a tax status. The tax status, either new or existing, is in the context of the tax regime and tax scope values. Tax regime, tax, tax status, and tax rate are all scope values defined within the implementation project.
The following table identifies where you define the scope value in the implementation project and what tasks the scope value is passed to:
|
Scope |
Where Scope Is Defined |
Tasks Impacted by Scope |
|---|---|---|
|
Tax Regime |
Define Tax Regimes |
|
|
Tax |
Define Taxes |
|
|
Tax Status |
Define Tax Statuses |
|
|
Tax Rate |
Define Tax Rates |
Manage Tax Rates |
Use Oracle Fusion Tax to set up and maintain your transaction tax requirements in all geographic locations where you do business. Foundation tax configuration refers to a set of tax setup components that you will use to satisfy your tax requirements. At transaction time, Oracle Fusion Tax uses your tax configuration to determine the taxes that apply to each transaction and to calculate the tax amounts.
Foundation tax configuration components consist of:
Tax regimes
Taxes
Tax jurisdictions
Tax statuses
Tax rates
Complete the setup tasks to create a basic tax configuration for each of your tax regimes. A foundation tax configuration contains the data applicable to the taxes belonging to a tax regime. The following table describes the appropriate levels of specifying setup options for foundation tax components and provides a Canada Goods and Services Tax (GST) and Harmonized Sales Tax (HST) example for each component.
|
Component |
Appropriate Level to: |
Typically, Not Appropriate Level to: |
Canada GST and HST Example |
|---|---|---|---|
|
Tax Regime |
|
|
CA GST & HST |
|
Tax |
|
|
|
|
Tax Jurisdictions |
|
Specify tax rule defaults. |
|
|
Tax Status |
|
|
|
|
Tax Rates |
|
|
|
Create a simple tax model using tax rule defaults that you define in setting up your foundation tax configuration. You can also create tax rules for your complex tax requirements that consider each tax requirement related to a transaction before making the final tax calculation. When running the tax determination process, Oracle Fusion Tax evaluates, in order of priority, the tax rules that you have defined against the foundation tax configuration setup and the details on the transactions. If the first rule is successfully evaluated, the result associated with the rule is used. If that tax rule is not successful, the next rule is evaluated until either a successful evaluation or a default value is found.
Advanced tax configuration consists of tax rules to define exceptions to the default results.
The complexity of tax rule setup falls into three general categories: no tax rules required, simple tax rule regimes, and complex tax regimes. This table presents the scenarios and actions associated with each of these categories.
|
Category |
Scenario |
Action |
|---|---|---|
|
No tax rules required |
The tax authority levies tax on all sales and purchase transactions at the same rate. Neither tax applicability nor the tax rates and recovery rates vary by the parties to the transaction, the products or services in the transaction, or the business processes involved in the transaction. |
For the tax, define tax rule defaults for the tax status, tax rate, and tax recovery rate. The tax determination process uses the tax rule defaults to determine the tax. |
|
Simple tax rule regimes |
The tax authority levies tax on your transactions at the same rate, with a simple set of identifiable exceptions. The exceptions either apply to one part of the transaction only, such as to certain parties, or to a combination of parties, products, and transaction processes that you can summarize in a simple way. |
Create a simple set of rules, for example, to identify place of supply and tax registration, and use the tax rule default values for the other processes. The tax determination process uses the tax rules and the tax rule defaults to determine the tax. |
|
Complex tax regimes |
Tax regimes in certain countries require a complex logic to determine the applicable taxes and rates on a transaction. Both tax applicability and tax rates can vary, for example, by place of origin and place of destination, party registration, tax status, service, or a combination of factors. In some cases, the taxable amount of one tax may depend upon the amount of another tax on the same transaction. And in rare cases, the tax amount itself may depend on the tax amount of another tax. |
Set up tax rule to define the logic necessary to identify each step of the tax determination process. The tax determination process uses the tax rules to determine the tax. |
Set a tax rule default value to the most commonly used value for tax determination. In the case of tax registration the default or most commonly used value for registration party is ship-from party. However, you can set up a rule to provide additional logic to use the registration of the bill-to party if the registration status is Not Registered for the ship-from party for purchase transactions. Create a determining factor set with the registration status and transaction business category determining factors along with condition sets to provide values for the respective determining factors.
For this example, the following setup exists for the Determine Tax Registration tax rule:
Tax rule default: The default for tax registration is ship-from party.
Tax rule: If the supplier is not registered, then you should consider the tax registration of the bill-to party.
When the following conditions are true, then the tax registration is the same as that defined for the bill-to party:
|
Tax Determining Factor Class |
Tax Class Qualifier |
Tax Determining Factor |
Operator |
Value |
|---|---|---|---|---|
|
Registration |
Ship-from party |
Registration status |
Equal to |
Not registered |
|
Transaction Generic Classification |
Level 1 |
Transaction business category |
Equal to |
Purchase transaction |
The tax determination process determines the tax registration by first considering the Determine Tax Registration tax rule and then the default party registration. As a result of this rule, the tax determination process determines that for a purchase transaction, if the supplier is not registered, the tax registration of the bill-to party is considered.
All tax regimes need information about place or geography.
Information is required to determine:
Where the tax is applicable
The tax rules that can identify when a transaction is an export, or delivered to another country, or deliveries inside or outside an economic region such as, the European Community (EC).
Specific regions such as, city, country, and states for US Sales and Use Tax or provinces in Canada.
To support these requirements, Oracle Fusion Tax allows you to define and use geography regions and tax zones. Geography regions and tax zones provide a conceptual model to use place information on transactions and information related to the transaction.
The following types of places are supported for tax purposes in Oracle Fusion Tax:
Country information: Use country as a specific geography element in tax rules to define tax regimes, taxes, and tax jurisdictions.
Geography elements: Use geography elements or levels defined in the Oracle Fusion Trading Community Model geography functionality in tax rules to define tax regimes, taxes, and tax jurisdictions.
Tax zones: Use geography elements or levels defined in Trading Community Model geography in tax rules to define tax regimes, taxes, and tax jurisdictions.
Use place information for determining factors within tax rules in the tax determination process. Also, use place information while defining tax regimes, tax geography, and tax jurisdictions.
Country is a required field in all of the tax-related address locations. The country fields are supported by a predefined ISO 3166 country name and two-character country code. For more information on country names and codes, see http://www.iso.org/iso/english_country_names_and_code_elements.
You do not set up a country as a specific geography level in Trading Community Model geography because country is an inherent part of all tax-related address locations.
Tip
Use the highest level of geography, typically country, wherever possible.
Define geography elements as part of Trading Community Model geography. They control the use of geography and addresses throughout Oracle Fusion. Oracle Fusion Tax commonly uses the following features: geography or tax zones, geography levels, address controls, and geoname referencing.
Use geography levels to define the levels of geography that are used within a country. For example, addresses in the US comprise of state, county, city, street, and postal code. Addresses in the UK comprise of county, city or town, street, and postal code. There may be other geography elements as well, such as building. From a tax perspective it is only those elements of the address that are referenced for tax purposes. For example, state, county, and city are important for US Sales and Use Tax while county in UK is not relevant from a tax perspective and therefore, you do not need to set it up.
Tip
When address elements are needed for tax purposes, such as country and city for US Sales and Use Tax, set these address levels as mandatory within Trading Community Model geography. This ensures that these elements are always present on all applicable addresses.
Setting address levels as mandatory ensures that amended or newly applicable addresses are validated and that the level is either derived or entered. When you are setting up migrated addresses ensure that they are also compliant with the mandatory levels being present. This should be validated and any address levels added as part of the migration process.
The geoname referencing process within Trading Community Model geography links specific addresses to the levels defined in the geography setup. This process is typically automatic. However, when you encounter issues, you may need to trigger this process to ensure that all addresses are correctly linked to their applicable levels.
Use the tax zone functionality when you need to identify a group of geography elements while calculating tax. Tax zones are defined as part of Trading Community Model geography.
For example, in the EC it is important to know whether goods and services are being delivered within the EC. Use the tax zone functionality to create a tax zone, which defines the membership to the EC as well as, the dates on which a country became the member.
Tip
Create a generic tax zone so that you create a tax zone type that can be used in multiple situations. For example, for a tax zone type needed to identify EC, create a generic tax zone type for all economic communities, which can later be used in other situations where economic communities or trade agreements affect tax determination.
You can also use the tax zone functionality to group postal codes to provide useful groupings that can identify some higher-level tax regions such as, cities or counties.
Geography determination factors allow you to use country information in the tax rules. A combination of determination factor class, class qualifier, and determining factor represent these determination factors. Specify the taxation country at transaction time which is used, along with the tax rules, during the tax determination process.
Use geography as the determining factor class, location type on the transaction as the class qualifier, and country as the determining factor. You can also use country as a tax rule qualifier.
The tax determining factors for locations are given generic names such as ship-to and bill-from, depending on the transaction types. The transaction types are Order-to-cash, for example, Oracle Fusion Order Management and Oracle Fusion Receivables, and Procure-to-pay, for example Oracle Fusion Purchasing and Oracle Fusion Payables.
Oracle Fusion Tax translates these generic locations into specific locations based on the transaction as shown in the following table:
|
Generic Party |
Order-to-Cash Party |
Procure-to-Pay Party |
|---|---|---|
|
Bill-from party |
Location assigned to the business unit for the transactions |
Supplier |
|
Bill-to party |
Customer |
Location assigned to the business unit for the transactions |
|
Ship-to party |
Customer (ship-to) party site |
Ship-to location on the line |
|
Ship-from party |
Warehouse on the line. If there is no warehouse on the line, such as with services, the default location assigned in the Receivables system parameters is used. |
Supplier (ship-from) party site |
|
Point of acceptance party |
Customer point of acceptance party |
Not applicable |
|
Point of origin party |
Customer point of origin party |
Not applicable |
Specify the taxation country on the transaction to identify the country in which the transaction is deemed to have taken place for taxation purposes. The default value is the country of the legal entity. Use the country name to search for country defaults, which control the fiscal classification defaults, party tax profile defaults, and tax regime and tax defaults. Use the country name to select the following fiscal classifications associated with that specific country:
User-defined fiscal classifications
Product categories
Intended use fiscal classifications
Transaction business categories
For many regimes, it is important to know if the supply of goods is exported. The easiest way of doing this is to ensure that the ship-from location is from the country in question and the ship-to location is a different country.
The following scenario illustrates setting up tax rule components to identify if the goods are exported from the United States.
Use geography as the determining factor class, country as the class qualifier for ship-from and ship-to locations, and country as the determining factor as shown in the following table:
|
Determining Factor Class |
Class Qualifier |
Determining Factor Name |
|---|---|---|
|
Geography |
Ship-from |
Country |
|
Geography |
Ship-to |
Country |
Create a condition set that refers to this geography determining factor as follows:
|
Determining Factor Class |
Class Qualifier |
Determining Factor Name |
Operator |
Value |
|---|---|---|---|---|
|
Geography |
Ship-from |
Country |
Equal to |
United States |
|
Geography |
Ship-to |
Country |
Not equal to |
United States |
Use this combination of determining factors in any situation where you need to identify exports from the United States.
Geography determination factors allow you to use geography elements in tax rules. A combination of determination factor class, class qualifier, and determining factor represent these determination factors.
Use geography as the determining factor class, location type on the transaction as the class qualifier, and geography level such as county, province, or city, as the tax determining factor.
The tax determining factors for locations are given generic names such as ship-to and bill-from, depending on the transaction types. The transaction types are Order-to-cash, for example, Oracle Fusion Order Management and Oracle Fusion Receivables, and Procure-to-pay, for example Oracle Fusion Purchasing and Oracle Fusion Payables.
These generic locations are mapped to the specific location, based on the transaction as shown in the following table:
|
Generic Party |
Order-to-Cash Party |
Procure-to-Pay Party |
|---|---|---|
|
Bill-from party |
First party legal entity |
Supplier |
|
Bill-to party |
Customer |
First party legal entity |
|
Ship-to party |
Customer (ship-to) party site |
First party legal entity |
|
Ship-from party |
First party legal reporting unit |
Supplier (ship-from) party site |
|
Point of acceptance party |
Customer point of acceptance party |
Not applicable |
|
Point of origin party |
Customer point of origin party |
Not applicable |
You can also use the geography level as a tax rule qualifier.
Use the geography element in tax rules to identify a specific geography region when taxes in a specific country need to identify specific geography elements below the country level. For example, in US Sales and Use Tax for county taxes, there may be specific rules for a specific state.
The following scenario describes how you can set up tax rule components to identify when goods are being delivered to a specific state, such as Ohio.
Use geography as the determining factor class, ship-to as the class qualifier, and state as the determining factor as shown in the following table:
|
Determining Factor Class |
Class Qualifier |
Determining Factor Name |
|---|---|---|
|
Geography |
Ship-to |
State |
Create a condition set that refers to a specific state value as follows:
|
Determining Factor Class |
Class Qualifier |
Determining Factor Name |
Operator |
Value |
|---|---|---|---|---|
|
Geography |
Ship-to |
State |
Equal to |
Ohio |
You can use this combination of determining factors in any situation where you need to identify specific deliveries to a specific state.
Geography determination factors allow you to use geography elements in the tax rules. A combination of determination factor class, class qualifier, and determining factor represent these determination factors.
Use geography as the determining factor class, location type on the transaction as the class qualifier, and tax zone type such as county, as the determining factor.
The tax determining factors for locations are given generic names such as ship-to and bill-from, depending on the transaction types. The transaction types are Order-to-cash, for example, Oracle Fusion Order Management and Oracle Fusion Receivables, and Procure-to-pay, for example Oracle Fusion Purchasing and Oracle Fusion Payables.
These generic locations are mapped to the specific location based on the transaction as shown in the following table:
|
Generic Party |
Order-to-Cash Party |
Procure-to-Pay Party |
|---|---|---|
|
Bill-from party |
First party legal entity |
Supplier |
|
Bill-to party |
Customer |
First party legal entity |
|
Ship-to party |
Customer (ship-to) party site |
First party legal entity |
|
Ship-from party |
First party legal reporting unit |
Supplier (ship-from) party site |
|
Point of acceptance party |
Customer point of acceptance party |
Not applicable |
|
Point of origin party |
Customer point of origin party |
Not applicable |
You can also use tax zones as tax rule qualifiers.
For the European Community (EC) or the Economic Union (EU) it is important to know whether goods and services are being delivered within the EC. Use the tax zone functionality to create a tax zone that defines the membership of the EC as well as the dates on which a country became a member.
The following scenario describes the use of a partial condition set that you can use within tax rules to define when a delivery is being made to an EC from the United Kingdom.
Use geography as the determining factor class, ship-to as the class qualifier, and all economic communities and country as the determining factors of the tax zone type as shown in the following table:
|
Determining Factor Class |
Class Qualifier |
Determining Factor Name |
|---|---|---|
|
Geography |
Ship-to |
All Economic Communities |
|
Geography |
Ship-to |
Country |
|
Geography |
Ship-from |
Country |
Create the condition set as follows:
|
Determining Factor Class |
Class Qualifier |
Determining Factor Name |
Operator |
Value |
|---|---|---|---|---|
|
Geography |
Ship-to |
All Economic Communities |
Equal to |
European Community |
|
Geography |
Ship-to |
Country |
Not equal to |
United Kingdom |
|
Geography |
Ship-from |
Country |
Equal to |
United Kingdom |
You can use this combination of determining factors in any situation where you need to identify the deliveries that are made from the UK to other EU countries.
Streamline your implementation by selecting the features that are applicable to the tax regime in scope. Features are used in rendering the task lists and tasks in the context of the features applicable to the tax regime in scope.
The following table displays each feature and the impact of not selecting that feature.
Warning
Once you select a feature for a tax regime, you cannot disable it. You can enable the feature later if you do not enable it initially for a tax regime.
|
Feature |
Description |
Impact of Not Selecting Feature |
|---|---|---|
|
Multiple Tax Jurisdictions |
Create tax jurisdictions for a particular tax in more than one geographic region. |
The Allow multiple jurisdictions option is not available to taxes within this tax regime. |
|
Offset Taxes |
Create offset taxes for tax calculation and recording of third party payables tax liabilities for reverse charges, self-assessments, and in the United States, Consumer's Use tax. |
The Set as offset tax option is not available to taxes within this tax regime. |
|
Tax Exemptions |
Create tax exemptions to apply to a specific customer or to a combination of customer and specific product. |
The Allow tax exemptions option is not available to taxes within this tax regime. |
|
Tax Rate Exceptions |
Create tax exceptions to apply a special tax rate to products. |
The Allow tax exceptions option is not available to taxes within this tax regime. |
|
Tax Recovery |
Create tax recovery rates for full or partial recovery of taxes paid on purchases. |
The Allow tax recovery option is not available to taxes within this tax regime. |
|
Tax Registration Statuses |
Manage tax registration statuses to be used as determining factors in tax rules. |
The Tax Registration Status field is not available for party tax profiles. You cannot use the tax registration status of Agent, Registered, or Not Registered in tax rules. |
|
Party Fiscal Classifications |
Manage tax classifications used by a tax authority to categorize a party and which are applicable in the tax determination process. |
The Classifications tab is not available for party tax profiles. You cannot use party fiscal classifications in tax rules. |
|
Legal Fiscal Classifications |
Manage classifications associated with a legal entity that represents its legal status within a country and which also guide the tax determination process. |
The Legal Classification pages and Associated Legal Classifications region are not available for party tax profiles. You cannot use legal classifications in tax rules. |
|
Product Category Classifications |
Manage tax classifications for a noninventory-based product category that is used for tax determination or tax reporting purposes. |
The Manage Product Category Fiscal Classification Codes page is not available. You cannot use product category classification codes in tax rules. |
|
Product Fiscal Classifications |
Manage tax classifications used by a tax authority to categorize a product for a tax and which are applicable in the tax determination process. |
The Product Fiscal Classification pages are not available. You cannot use product fiscal classifications in tax rules. |
|
Transaction Business Categories |
Manage tax classifications to identify and categorize an external transaction into an Oracle Fusion Tax transaction and which are applicable in the tax determination process. |
The Manage Transaction Business Category Codes page is not available. You cannot use transaction business category codes in tax rules. |
|
Transaction Fiscal Classifications |
Manage tax classifications used by a tax authority to categorize a transaction for a tax and which are applicable in the tax determination and tax reporting processes. |
The Transaction Fiscal Classification pages are not available. You cannot use transaction fiscal classifications in tax rules. |
|
Document Fiscal Classifications |
Manage tax classifications used by a tax authority to categorize a document associated with a transaction for a tax and which are applicable in the tax determination and tax reporting processes. |
The Manage Document Fiscal Classification Codes page is not available. You cannot use document fiscal classification codes in tax rules. |
|
Intended Use Fiscal Classifications |
Manage tax classifications based on the purpose for which a product is used and which are applicable in the tax determination process. |
The Intended Use Fiscal Classification pages are not available. You cannot use intended use fiscal classifications in tax rules. |
|
User-Defined Fiscal Classifications |
Manage tax classifications for any tax requirement that you cannot define using the existing fiscal classification types. |
The User-Defined Fiscal Classification pages are not available. You cannot use user-defined fiscal classifications in tax rules. |
Regime to rate setup contains the details of a tax regime, including all taxes, tax jurisdictions, tax statuses, and tax rates. You can update existing records or create new records at any point in the tax regime hierarchy.
Regime to rate setup tasks include:
Tax regimes
Taxes
Tax jurisdictions
Tax statuses
Tax rates
Set up tax regimes in each country and geographical region where you do business and where a separate tax applies. A tax regime associates a common set of default information, regulations, fiscal classifications, and optionally, registrations, to one or more taxes. For example, in the United States create a Sales and Use Tax tax regime to group taxes levied at the state, county, and district levels.
The tax regime provides these functions:
Groups similar taxes together
Designates the geography within which taxes apply
Applies as defaults the settings and values that you define for each tax in the tax regime
Defines for which taxes the configuration options apply and a specific subscription option applies
Provides a single registration for all taxes associated with the tax regime
Defines the use of fiscal classifications as follows:
Transaction fiscal classifications
Product fiscal classifications
Party fiscal classifications
The common tax regime setup is one tax regime per country per tax type, with the tax requirements administered by a government tax authority for the entire country. There are also cases where tax regimes are defined for standard geographical types or subdivisions within a country, such as a state, province, country, or city. In these cases, you base the tax regime on the Oracle Fusion Trading Community Model standard geography.
There are more rare cases where a tax regime is based on disparate parts of a country or more than one country. In these cases, you can create one or more tax zones and set up tax regimes for these tax zones. You can also set up a tax regime as a parent tax regime to group related tax regimes together for reporting purposes.
You must set up a tax regime before you set up the taxes in the tax regime. Some tax regime values appear as defaults on the taxes that belong to the tax regime in order to help minimize tax setup.
You must associate a tax regime with all of the first party legal entities and business units that are subject to the tax regulations of the tax regime. You can set up tax configuration options when you create or edit a tax regime or when you create or edit a first party legal entity tax profile. Both setup flows appear and maintain the same party and tax regime configuration options.
Set up details for the taxes of a tax regime. Each separate tax in a tax regimes includes records for the tax statuses, tax rates, and tax rules that are used to calculate and report on the tax. Oracle Fusion Tax applies as defaults tax information from the tax regime to each tax that you create under a tax regime. You can modify this information at the tax level according to your needs, as well as add additional defaults and overrides. For tax rule defaults, specify values that apply to the majority of your transactions. Use tax rules to configure exceptions to the tax rule defaults.
Identify what taxes you must define. Each tax appears as a single tax line on a transaction. If you need to show or report more than one tax line per transaction line on a transaction, then you should set up more than one tax. For example, for US Sales and Use Tax you would define a tax for each state, county, and city.
You can create a new tax, or create a tax that is based on an existing tax within the tax regime. You do this to minimize setup by sharing tax jurisdictions and tax registrations. When you create a new tax based on an existing tax, the attributes that remain constant for all taxes derived from the source tax are not available for update. Attributes that are copied and are display only include:
Tax regime
Tax
Geography information
Tax jurisdiction settings
Note
The enable tax settings are not selected, in the same way that they are not selected when you access the Create Tax page.
You can enable a tax for simulation or for transactions only after you have completed all of the required setup.
Set up tax jurisdictions for geographic regions or tax zones where a specific tax authority levies a tax. A tax jurisdiction specifies the association between a tax and a geographic location. At transaction time, Oracle Fusion Tax derives the jurisdiction or jurisdictions that apply to a transaction line based on the place of supply. You must set up at least one tax jurisdiction for a tax before you can make the tax available on transactions.
You also use tax jurisdictions to define jurisdiction-based tax rates. A tax jurisdiction tax rate is a rate that is distinct to a specific geographic region or tax zone for a specific tax. You can also create multiple jurisdictions at once using the mass create functionality for taxes that relate to specific Trading Community Model geographic hierarchies. For example, create a county jurisdiction for every county in the parent geography type of State and in the parent geography name of California.
The tax within a tax jurisdiction can have different rates for the parent and child geographies. For example, a city sales tax rate can override a county rate for the same tax. In this case, you can set up an override geography type for the city and apply a precedence level to the city and county tax jurisdictions to indicate which tax jurisdiction takes precedence.
In addition, in some cities a different city rate applies to the incorporated area of the city, called the inner city. In these cases, you can set up an inner city tax jurisdiction with its own tax rate for the applicable customers and receivables tax. Inner city tax jurisdictions are often based on postal code groupings.
Set up the tax statuses that you need for each tax that you create for a combination of tax regime, tax, and configuration owner. A tax status is the taxable nature of a product in the context of a transaction and specific tax on the transaction. You define a tax status to group one or more tax rates that are the same or similar in nature.
For example, one tax can have separate tax statuses for standard, zero, exemptions, and reduced rates. A zero rate tax status may have multiple zero rates associated with it, such as Intra-EU, zero-rated products, or zero-rated exports.
You define a tax status under a tax and a configuration owner, and define all applicable tax rates and their effective periods under the tax status. The tax status controls the defaulting of values to its tax rates.
Set up tax rates for your tax statuses and tax jurisdictions. For tax statuses, set up a tax rate record for each applicable tax rate that a tax status identifies. For tax jurisdictions, set up tax rate records to identify the tax rate variations for a specific tax within different tax jurisdictions. For example, a city sales tax for a state or province may contain separate city tax jurisdictions, each with a specific tax rate for the same tax.
You can also define tax recovery rates to claim full or partial recovery of taxes paid.
You can define tax jurisdiction and tax status rates as a percentage or as a value per unit of measure. For example, a city may charge sales tax at a rate of 8 percent on most goods, but may levy a duty tax with a special rate of 0.55 USD per US gallon on fuel. Values per unit of measure are in the tax currency defined for the tax.
You define tax rate codes and rate detail information per rate period. Rate periods account for changes in tax rates over time. A tax rate code can also identify a corresponding General Ledger taxable journal entry.
Set up tax recovery rate codes for the recovery types identified on the taxes within a tax regime. A tax recovery rate code identifies the percentage of recovery designated by the tax authority for a specific transaction. In Canada, where more than one type of recovery is possible for a given tax, you must set up the applicable tax recovery rate codes for both the primary and secondary recovery types that can apply to a transaction.
If you set the Allow tax recovery option for a tax within a tax regime, then you must set up at least one recovery rate for the tax in order to make the tax available on transactions. If the recovery rate can vary based on one or more factors, including the parties, locations, product or product purpose, then set up tax rules to determine the appropriate recovery rate to use on specific transactions. At transaction time, Oracle Fusion Tax uses the recovery rate derived from the recovery tax rules, or uses instead the default recovery rate that you define, if no recovery rate rules are defined or if no existing recovery rate rule applies to the transaction.
Oracle Fusion Tax provides you with a single interface for defining and maintaining the taxes that are applicable in each country where you do business.
The minimum tax configuration path to meet the basic tax requirements of transactions in a given regime is a 2-step configuration process:
Define tax regime: This step includes the tax regime definition as well as the subscription by the appropriate legal entity or business unit.
Define transaction taxes: This step includes the basic tax definition, controls and defaults, direct and indirect tax rule defaults, and tax accounts.
The following prerequisite setups must be completed for minimum tax configuration:
First parties, such as legal entities and business units
Tax geographies and zones
Ledger and accounts
Currency codes and exchange rates
A legal entity tax profile is automatically created when a legal entity is defined in the implementation. Similarly, a business unit tax profile is automatically created when a business unit is defined. For the business unit, you need to indicate whether it will use the subscription of the legal entity instead of creating its own.
In addition, there are seeded event class mappings that describe the mapping between an application event class and the corresponding tax event class. For example, the tax determination process for a sales debit memo and sales invoice are essentially the same. These two application event classes correspond to the same tax event class namely, a sales transaction. Although you cannot update the event class mappings, you can set up configuration specific event class mappings.
The first step includes the tax regime definition and subscription by an appropriate legal entity or business unit. While creating your tax regime, you can minimize configuration and maintenance costs by creating content that can be shared by more than one entity. For example, legal entities can subscribe to the shared reference data instead of creating separate and repetitive data. If the subscribing legal entities have some variations in their setup, you can create override data to meet the specific exceptions that are applicable to these organizations.
Use Oracle Fusion Tax features to enable only those features that are relevant to taxes in the tax regime. Based on the features you select, the subsequent setup pages and task lists for the tax regime are rendered or hidden.
The second step includes basic tax definition, such as geographic information, controls and defaults, direct and indirect tax rule defaults, and tax accounts.
The basic tax definition includes controls that you can set to provide the override capability at transaction time. For example, if you want to allow users to make manual updates on transaction tax lines, select the Allow override for calculated tax lines and the Allow entry of manual tax lines options. However, if you want to enforce automatic tax calculation on transaction tax lines, do not enable these options.
Use the direct and indirect tax rule defaults to specify the values that apply to the majority of your transactions. Create tax rules to address the exceptions or variations to the defaults. For example, for the Goods and Services Tax (GST) that applies to the supply of most goods and services in Canada, set the Tax Applicability direct tax rule default to Applicable. A luxury tax, on the other hand, is a tax on luxury goods or products not considered essential. As it would not apply to most goods and services, set the Tax Applicability direct tax rule default to Not Applicable, and create a tax rule to make the tax applicable when the product in the transaction satisfies the luxury requirement.
Assign your default tax accounts for the taxes in a tax regime to post the tax amounts derived from your transactions. The tax accounts you associate serve as default accounting information for taxes, tax rates, tax jurisdictions, and tax recovery rates. The tax accounts you define at the tax level, default to either the tax rate accounts or tax jurisdiction accounts for the same tax and operating unit, depending upon the tax accounts precedence level of the tax regime. You can update these default tax accounts in the tax rate or tax jurisdiction setup.
The minimum tax configuration setup must be designed to handle the majority of tax requirements. As part of defining transaction taxes, decide the direct and indirect tax rule defaults for the tax and set up the associated tax accounts.
For complex tax requirements, create tax rules that consider each tax requirement related to a transaction before making the final tax calculation. During the execution of the tax determination process, Oracle Fusion Tax evaluates, in order of priority, the tax rules that are defined against the foundation tax configuration setup and the details on the transactions. If the first rule is successfully evaluated, the result associated with the rule is used. If not, the next rule is evaluated until either a successful evaluation or default value is found.
The direct tax rule defaults are the default values for the direct tax rule types, which include:
Place of supply
Tax applicability
Tax registration
Tax calculation formula
Taxable basis formula
Use the Place of Supply direct tax rule default to indicate the specific tax jurisdiction where the supply of goods or services is deemed to have taken place. For example, in Canada, the place of supply for GST is typically the ship-to location. To handle the majority of Goods and Services Tax (GST) transactions, select Ship to as your default place of supply.
Note
The corresponding place of supply differs based on the type of transaction. For example, a place of supply of Ship to corresponds to the location of your first party legal entity for Payables transactions. For Receivables transactions, Ship to corresponds to the location of your customer site. For exceptions to this default, create Determine Place of Supply rules.
Use the Tax Applicability direct tax rule default to indicate whether the tax is typically applicable or not applicable on transactions. For example, the GST in Canada is a tax that applies to the supply of most property and services in Canada. When you create the GST tax, select Applicable as your default tax applicability. For exceptions to this default, create Determine Tax Applicability rules.
Use the Tax Registration direct tax rule default to determine the party whose tax registration status is considered for an applicable tax on the transaction. For example, with a direct default of bill-to party, Oracle Fusion Tax considers the tax registration of the bill-to party and stamps their tax registration number onto the transaction, along with the tax registration number of the first party legal reporting unit. For exceptions to this default, create Determine Tax Registration rules.
Use the Tax Calculation Formula direct tax rule default to select the formula that represents the typical calculation of tax for a transaction line. A common formula, STANDARD_TC, is predefined, where the tax amount is equal to the tax rate multiplied by the taxable basis. For exceptions to this default, create Calculate Tax Amounts rules.
Use the Taxable Basis Formula direct tax rule default to select the formula that represents the amount on which the tax rate is applied. The following common formulas are predefined:
STANDARD_TB: The taxable basis is equal to the line amount of the transaction line.
STANDARD_QUANTITY: The taxable basis is equal to the quantity of the transaction line.
STANDARD_TB_DISCOUNT: The taxable basis is the line amount of the transaction line less the cash discount.
For exceptions to this default, create Determine Taxable Basis rules.
The indirect tax rule defaults for a tax include:
Tax jurisdiction
Tax status
Tax recovery rate
Tax rate
Use the Tax Jurisdiction indirect tax rule default to indicate the most common geographic area where a tax is levied by a specific tax authority. For example, value-added tax (VAT) is applicable to the supply of most goods and services in Portugal. For the tax PT VAT, create the default tax jurisdiction as the country of Portugal. To address specific tax regions such as Azores and Madeira, which have lower VAT rates than Portugal, define jurisdiction rates with different VAT rates.
Use the Tax Status indirect tax rule default to indicate the taxable nature of the majority of your transactions. For example, if your operations primarily include zero-rated transactions, select the default tax status as Zero instead of Standard. This setting facilitates tax determination when multiple zero rates are defined to handle different reporting requirements for zero rate usage, such as intra-EU, zero-rated products, or zero-rated exports. For exceptions to this default, create Determine Tax Status rules.
Use the Tax Recovery rate indirect tax rule default to indicate the recovery rate to apply to each recovery type for each applicable tax on a purchase transaction. For example, in Canada, both federal and provincial components of Harmonized Sales Tax (HST) are 100% recoverable on goods bought for resale. In this case, with two recovery types, you can set up two recovery rate defaults for the HST tax. For exceptions to this default, such as when the recovery rate determination is based on one or more transaction factors, create Determine Recovery Rate rules.
Use the Tax Rate indirect tax rule default to specify the default tax rate that is applicable to the majority of your transactions associated with this tax. You can create additional tax setup, such as jurisdiction rates, or create tax rules to set alternate values as required. For example, HST in Canada is applied at a 13% rate in most provinces that have adopted HST, except for British Columbia where the rate is 12% and Nova Scotia where the rate is 15%. To satisfy this requirement a single rate of 13% can be defined with no jurisdiction and then a 12% rate can be defined and associated with the British Columbia jurisdiction (15% rate assigned to Nova Scotia). This minimizes the setup required by creating an exception based setup. For exceptions to this default, create Determine Tax Rate rules.
Set up tax accounts at the tax level. The application automatically copies the tax account combination to the tax rates that you subsequently create for the tax for the same ledger and optionally, the same business unit.
Define tax accounts at any of the following levels. The defaulting option is only available at the tax level.
Tax
Tax jurisdiction
Tax rate
Tax recovery rate
Note
This is a one-time defaulting opportunity. Any subsequent changes at the account level are not copied to the tax rate level nor are they used during the AutoAccounting process. Changes at the tax level do impact tax account defaulting when you create new tax rates.
Setting up tax accounts comprise of specifying the following:
Ledger and Business Unit: The ledger and business unit for which you are creating the tax accounts.
Interim Tax: An account that records tax recovery or liability until the event prescribed by the statute is complete. Generally, the payment of the invoice is the event that triggers the generation of the tax recovery or liability. You must set up an interim tax account for taxes and tax rates that have a deferred recovery settlement. Once you set up an interim tax account for this tax rate, you cannot change the recovery settlement to Immediate.
Tax Recoverable or Liability Account: An account that records tax recovery amounts or relieves tax liability amounts. If you set up recovery rates for a tax that you also intend to self-assess, then define a tax recovery account for the associated recovery rates and a tax liability account for the associated tax rates.
Finance Charge Tax Liability: An account that records the tax liability associated with finance charges that is used as a deduction against overall tax liability.
Nonrecoverable Tax Accounts: Accounts that record tax amounts on earned and unearned discounts and adjustments that you cannot claim as a deduction against tax liability.
Expense and Revenue Accounts. Accounts that record net changes generated by adjustments, earned and unearned discounts, and finance charges. Receivables activities such as discounts and adjustments reduce the receivable amount, and are therefore considered an expense.
The following example illustrates the minimum tax configuration setup to meet the basic requirements in Canada for the Goods and Services Tax (GST). You set up a tax regime for both GST and Harmonized Sales Tax (HST). One recovery type is created for the fully recoverable status of the transaction.
In Canada, GST is a tax that applies to the supply of most property and services in Canada. The provinces of British Columbia, Ontario, New Brunswick, Nova Scotia, and Newfoundland and Labrador, referred to as the participating provinces, combine their provincial sales tax with GST to create HST. Generally, HST applies to the same base of property and services as the GST. Every province in Canada except Alberta has implemented either provincial sales tax or the HST. In countries like Canada, some or all taxes on business transactions for registered companies are recoverable taxes.
ABC Corporation is a business with a chain of bookstores across Canada. It intends to implement the Oracle Fusion Tax solution at its store in the province of Alberta. The GST rate of 5% is applicable for sales in Alberta. Input Tax Credit is available for GST included in purchases. ABC Corporation's primary ledger is CA Ledger, and the business unit is CA Operations. The tax account 0001-1500-1100-1000 is reserved for the Tax Recoverable or Liability account.
The tax implications in this scenario are:
Five percent (5%) GST is applicable on the sale of goods in Alberta
Neither the HST nor provincial sales tax applies in Alberta
Place of supply for GST tax is generally based on the place of delivery or ship-to location.
To determine the GST tax in Alberta, perform the following steps:
Define tax regime
Define transaction taxes
Create the direct tax rule defaults
Create the indirect tax rule defaults
Enable tax
Note
Use a coding convention to indicate both the country and the type of tax that belongs to this regime. For example, CA GST and HST.
Note
Consider your tax planning carefully before entering the start date. This date must accommodate the oldest transaction that you want to process within this tax regime. After you create the tax regime, you can only update this date with an earlier date. If you enter an end date, you cannot update this date after you save the record.
Tax currency is the currency required by the tax authority. Use the tax currency to pay the tax authority and to report on all tax transactions.
For example, in Quebec, the provincial sales tax is applied to both the selling price and GST. Enter a value as the compounding precedence to indicate the order of cross regime compounding. A lower number indicates that the tax regime will be processed first. Allowing gaps between numbers provide flexibility in the event that another higher priority tax regime is introduced in the future.
This selection also defines whether any shared content can be overridden by the subscribing party to allow unique, separate setup for certain tax content.
For ABC's transactions in the province of Alberta, the following is determined by default:
GST tax is applicable and will be calculated at a percentage rate of 5%.
100% of the GST can be recovered.
When you create a tax regime, you specify the options and defaults available to the taxes associated with the tax regime. You also enable the features that are applicable to the tax regime and its taxes.
The options appearing in the Associated Taxes Setup Information region on the Edit Tax Regime page are a result of the features enabled and the options you selected at the tax level. These options include:
Allow multiple jurisdictions
Allow tax recovery
Allow tax exceptions
Allow tax exemptions
The preceding options always appear as read-only check boxes in the Associated Taxes Setup Information region. The option appears as selected if you selected the option in one of the taxes within this tax regime. If you did not select the option in one of the taxes, then the option appears as not selected.
For example, suppose you have a California county sales tax that applies to all counties, so you need a tax with multiple jurisdictions. In this case, you must enable the Multiple Jurisdictions feature at the tax regime level and then select the Allow multiple jurisdictions option at the tax level. When you access the Edit Tax Regime page, Associated Taxes Setup Information region for this tax regime, the Allow multiple jurisdictions option appears as selected.
A tax regime associates a common set of default information, regulations, fiscal classifications, and optionally, registrations, to one or more taxes. Set up tax regimes in each country and geographical region where you do business and where a separate tax applies.
The tax regime setup details include:
Designating the geography to which taxes within a tax regime apply
Defining the controls and defaults that apply to taxes and associated lower level information
Specifying configuration options and service subscriptions
The common tax regime setup is one tax regime per country per tax type, but you can also have tax regimes based on parts of a country or more than one country. Select the regime level as:
Country: The tax regime is applicable to a specific country.
Tax zone: The tax regime is applicable to parts of a country or more than one country. Enter the tax geography type and tax geography name associate with the group of countries or the tax zone that you want. The tax geography type and tax geography name correspond to the tax zone type and tax zone respectively.
If applicable, designate the tax regime as a parent regime or indicate the parent regime name if the tax regime belongs to a parent regime. Use a tax regime defined as a parent tax regime to group other nonparent tax regimes for reporting purposes.
Set tax-level controls to enable the options that you want to make available to the taxes in this tax regime. If necessary, you can disable the options that you enable here for individual taxes within the tax regime. Enter default values for the taxes in this tax regime. You can update the default values at the tax level. If you disable a controlled option at the tax regime level it is not available as an option at the tax level.
The following table describes the defaults and controls available at the tax regime level.
Defaults Region
|
Field |
Description |
Default Derived from |
Default Appears on |
Controls |
|---|---|---|---|---|
|
Tax Currency |
The default currency of the taxes within this tax regime |
None |
Tax |
None |
|
Minimal Accountable Unit |
The minimal unit of currency that is reported to the tax authority, for example, 0.05 GBP indicates that 5 pence is the minimal unit |
None |
Tax |
None |
|
Tax Precision |
A one digit whole number to indicate the decimal place for tax rounding |
None |
Tax |
None |
|
Tax Inclusion Method |
A method that describes whether the line amount includes tax or excludes tax |
None |
Tax |
None |
|
Conversion Rate Type |
The specific exchange rate table that is used to convert one currency into another, for example, the Association of British Travel Agents exchange rate used in the travel industry |
None |
Tax |
None |
|
Rounding Rule |
The rule that defines how rounding is performed on a value, for example, up to the next highest value, down to the next lower value, or to the nearest value |
None |
Tax |
None |
|
Allow tax rounding override |
Allow the override of the rounding defined on the tax registration records |
None |
Tax |
None |
|
Reporting Tax Authority |
The default tax authority to whom the tax reports are sent |
None |
|
None |
|
Collecting Tax Authority |
The default tax authority to whom the tax is remitted |
None |
|
None |
|
Default Settlement Option |
A lookup code to indicate whether an input tax is recovered when an invoice is recorded or only when the invoice is paid and whether an output tax is due for settlement when the invoice is issued or only when the payment is received against it |
None |
Tax |
None |
|
Use legal registration number |
Option that controls whether the tax registration number is the same as the legal registration number of the party |
None |
Tax |
None |
General Controls Region
|
Field |
Description |
Default Derived from |
Default Appears on |
Controls |
|---|---|---|---|---|
|
Allow override and entry of inclusive tax lines |
Option that controls whether you can override and enter inclusive or exclusive line amounts |
None |
Tax |
None |
|
Use tax reporting configuration |
Option that controls whether the tax reporting details are available on the first party tax registration record for this tax regime |
None |
None |
Controls whether you can enter tax reporting configuration details on the tax registration for this tax regime for your first parties |
Compounding Level Controls Region
|
Field |
Description |
Default Derived from |
Default Appears on |
Controls |
|---|---|---|---|---|
|
Allow cross regime compounding |
Option that controls whether cross regime compounding is needed for this tax regime |
None |
None |
Controls whether this tax regime is compounded based on the tax calculated from another tax regime |
|
Compounding Precedence |
Defines the order in which taxes within the compound tax regimes need to be calculated. A tax within a tax regime with a lower value is calculated first. |
None |
None |
Controls the order in which taxes within tax regimes are calculated |
Important
Oracle Fusion Tax provides features at the tax regime level to streamline your implementation by selecting the features that are applicable to the tax regime in scope. You must enable the features to use that functionality for the tax regime and related taxes.
Set up configuration options to associate tax regimes with the parties in your company that have a tax requirement under these tax regimes. You can set up tax configuration options when you create a tax regime or when you create a party tax profile for a first party legal entity or business unit. Both tax regime and party tax profile setup flows appear and maintain the same party and tax regime association. Configuration options only apply to tax regimes directly linked to taxes and not to tax regimes that are used to group other tax regimes.
Oracle Fusion Tax lets you use the tax services of external service providers for tax calculation of US Sales and Use Tax on receivables transactions. The setup for provider services is called a service subscription. A service subscription applies to the transactions of one configuration option setup for a combination of tax regime and legal entity or business unit.
Note
The level of detail of tax rounding definitions for the taxes in the tax regime must equal or exceed the level of detail of the service provider tax rounding definitions.
Calculating tax on a transaction as inclusive of the line amount is generally a business decision. This decision is based on the relationship between the transacting parties and the items or taxes involved.
Taxes applicable on a transaction are made inclusive of the item line amount either:
Manually
Automatically
In the manual approach, you access the calculated tax lines on a transaction and select the Inclusive option. This action includes the calculated tax amount with the item value.
However, this option is controlled through two factors:
Privileges are assigned to the users for accessing and editing the calculated tax lines.
Setup restrictions are applied to edit the Inclusive option on the calculated tax lines.
In the automatic approach, you can configure the tax setup and calculate the tax on a transaction as inclusive of the item line amount. Since this requirement is primarily driven by the tax legislation and the business relationship between the transacting parties, the option for configuring the inclusiveness is made available on the tax and tax rate definition and the third party and legal reporting unit tax profiles on the tax registration and general data tabs. The tax determination process uses a hierarchy approach to evaluate the defined setup and applies the inclusiveness option on the transaction.
In tax setup there are options to choose for applying the inclusiveness on a transaction. They are:
Standard noninclusive handling: This option calculates the taxes as exclusive of the given transaction line amount.
Standard inclusive handling: This option calculates the taxes as inclusive of the given transaction line amount.
Special inclusive handling: This option calculates the taxes as inclusive of the given transaction line amount, but the calculation methodology differs from the standard inclusive process.
The following table illustrates the calculation methodology used with each of these options when a transaction line amount is 1000 USD and the applicable tax rate is 10% of the taxable basis amount, for example, line amount:
|
Method |
Calculation |
Taxable Basis Amount |
Tax Amount |
Transaction Line Amount |
|---|---|---|---|---|
|
Standard Noninclusive |
1000 USD * 10/100 |
1000 USD |
100 USD |
1100 USD |
|
Standard Inclusive |
1000 USD * 10/110 |
909.09 USD |
90.91 USD |
1000 USD |
|
Special Inclusive |
1000 USD * 10/100 |
900 USD |
100 USD |
1000 USD |
Taxes applicable on a transaction are generally calculated as the taxable basis multiplied by the tax rate equals the tax amount. This calculated amount can result in an odd value or with a large number of decimal place. You can configure the tax setup to adjust or round the tax calculation according to the specific requirements of the transacting parties and tax authority or to the accepted currency denominations.
Key parameters that influence the rounding of calculated tax amount are:
Tax precision: The number of decimal places to which to calculate the tax amount.
Minimum accountable unit: The smallest currency unit that a tax amount can have.
Rounding level: The transaction level at which the rounding is to be performed. The available options are Header and Line.
Rounding rule: The method that is used to round off the calculated taxes to the minimum accountable unit. The available options are Up, Down, and Nearest.
Define the key parameters at various places within Oracle Fusion Tax. The rounding process derives the tax precision and minimum accountable unit details from the tax setup. The rounding process derives the rounding rule and rounding level details through the predefined processing hierarchy involving:
Configuration owner tax options defined for the configuration owner and event class
Event class options for the event class
Party tax profiles of the parties or party sites as given in the rounding precedence of the configuration owner tax options or in the derived registration party
Tax
Note
If you plan to use a third party service provider then you must define tax rounding information that is at least as detailed as the rounding information of the service provider.
Set up configuration options to associate tax regimes with the parties in your company that have a tax requirement under these tax regimes.
There are two fundamentally different approaches to tax configuration options namely:
Using tax configuration setup defined within Oracle Fusion Tax.
Using an external tax service provider.
Use the tax configuration setup in Oracle Fusion Tax to calculate, record, and account for transaction taxes on transaction taxable transactions.
The following concepts control how this setup is managed, used, and shared:
Tax configuration owner
Tax content subscription
Existing tax option
The tax configuration owner is a business unit, legal entity, or the global configuration owner that owns the data. The global configuration owner is an abstract owner which is used to define the owner of content that can be shared by any business units and first party legal entities.
Identify a specific first party legal entity as a parent first party organization to allow the configuration to be owned by a specific first party and shared by other parties. You can then share this setup with another first party legal entity or business unit for their transactions. Use a parent first party organization tax configuration to share among a group of first party organizations but you still have the tax setup managed by a single first party organization.
In the case of global configuration owner, if you are assigned the Create Tax Regime privilege, you have update rights to all tax configuration data maintained by the global configuration owner.
Use tax content subscriptions to define which configuration owner's setup is used for transactions for a specific first party legal entity or business unit for a specific tax regime. Also, use tax content subscriptions to specify whether any shared content can be overridden by the subscribing party to allow unique, separate setup for certain tax content.
Party override is permitted for the following setup:
Tax
Tax status
Tax rate
Tax recovery rate
Tax rules
Do this indirectly by adding higher priority rules specific to the subscribing first party legal entity or business unit.
The content subscription options are:
|
Tax Content Subscription |
Description |
|---|---|
|
Common configuration |
For tax processing, the tax determination process uses the shared tax content defined and maintained by the global configuration owner. |
|
Party-specific configuration |
The specified first party organization defines and maintains its own tax content. For tax processing, the tax determination process uses only the tax content owned by the specific first party legal entity or business unit. |
|
Common configuration with party overrides |
This option is similar to the common configuration in that it allows you to use tax content owned by the global configuration owner. However, you can also maintain party-specific content which is used in preference to the common configuration content. In the absence of tax content owned by the specific first party organization, the tax determination process uses the tax content owned by the global configuration owner. |
|
Parent first party organization with party overrides |
This option is similar to the common configuration with party override subscription except instead of the tax content being owned by the global configuration owner it is owned by a specific first party legal entity. You can override the specific first party setup. |
A similar concept is used to define where you use tax exceptions for a specific tax configuration. The tax subscription option available for product exceptions is dictated to some extent by the main tax content subscription as follows:
|
Options Defined for Tax Content Subscription |
Content Subscription Options Available for Product Exceptions |
Description |
|---|---|---|
|
Common configuration |
Common configuration |
For tax processing, the tax determination process uses tax exceptions defined and maintained by the global configuration owner. |
|
Party-specific configuration |
Party-specific configuration |
The specified first party organization defines and maintains its own tax exceptions. For tax processing, the tax determination process uses only the tax exceptions owned by the specific first party organization. |
|
Common configuration with party overrides |
Common configuration |
For tax processing, the tax determination process uses tax exceptions defined and maintained by the global configuration owner. |
|
Common configuration with party overrides |
Party-specific configuration |
The specified first party organization defines and maintains its own tax exceptions. For tax processing, the tax determination process uses only the tax exceptions owned by the specific first party organization. |
|
Parent first party organization with party overrides |
Party-specific configuration |
The specified first party organization defines and maintains its own tax exceptions. For tax processing, the tax determination process uses only the tax exceptions owned by the specific first party organization. |
Set up tax configuration options when you create a tax regime or when you create a party tax profile for a first party legal entity or business unit. Both setup flows display and maintain the same party or regime definitions. Specify effective start and end dates to identify which configuration should be used based on the transaction date. You can enable the business unit so that Oracle Fusion Tax automatically uses the configuration of the legal entity. Once you set this option the application records the date it occurred as the start date. This date is used and compared to the transaction dates to identify if the application uses the legal entity subscription in preference to the subscription of the business unit. The specific first party legal entity that is used is defined by the legal entity associated with the transaction.
Copy a tax from an existing tax in the Manage Taxes page to share tax registrations and tax jurisdictions while maintaining two versions of the same tax, owned by two different tax configuration owners each with their own tax statuses, tax rates, and tax rules. For example, this is useful when you set up US sales and use tax that requires a significant number of tax registrations and tax jurisdictions.
Oracle Fusion Tax lets you use the tax services of external service providers for tax calculation of US Sales and Use Tax on Receivables transactions. Oracle Fusion Tax provides transparent integration between the external provide tax service and Oracle Fusion Receivables.
You can use the tax services of these external service providers:
Taxware, LP: a First Data Company
Vertex, Inc.
The setup for provider services is called a service subscription. A service subscription applies to the transactions of one configuration option setup for a combination of tax regime and legal entity or business unit. Set up service subscriptions when you create a tax regime or when you create a party tax profile for a first party legal entity or business unit. Specify effective start and end dates to identify which configuration should be used based on the transaction date.
Choose which of the following tax content subscription options to use to optimize your tax setup:
Whether to use service subscriptions versus Oracle Fusion tax content.
What type of tax configuration options to use.
When to change from business unit to using tax configuration at the first party legal entity.
When to use create from an existing tax option.
Use the tax services of external service providers where tax content is required for Receivables transactions for a significant number of tax jurisdictions. You should not use a service provider if their use is not needed to support US Sales and Use Tax regimes or you need to create and maintain tax regimes outside of the Unites States.
You can use the tax services of these external service providers:
Taxware, LP: a First Data Company
Vertex, Inc.
If you decide not to use an external service provider or you need to create tax content for tax regimes outside the US then create and maintain your tax content in Oracle Fusion Tax.
Once the decision is made to use Oracle Fusion Tax you need to choose the level of tax configuration options. Sharing tax content prevents the need for duplicate maintenance with its inefficiencies and potential inconsistencies. Consider these scenarios and options:
|
Scenario |
Option |
|---|---|
|
You have a single central corporate tax center responsible for maintenance of tax setup for all legal entities and business units. |
Use the common configuration with party override option. This allows a single tax setup to be created and maintained by the corporate tax center. |
|
You need to have strict control of who can maintain the tax content. |
Use the common configuration option. By not allowing party override you restrict the access to the global configuration owner to an authorized user who can maintain all of the tax content. |
|
You have regional centers responsible for tax content. |
Use the parent first party configuration with party override option. This permits a regional setup with an actual or logical parent legal entity to be created and maintained by each regional center. |
Even if there is no obvious need to share tax configuration, for example, there is only a single first party legal entity operating in each tax regime, significant business events such as takeovers or mergers may mean that there could be a future need to share content. In this case the original first party legal entity can act as the configuration owner and then any subsequent first party can subscribe to the first party's content using the parent first party configuration with party override. Alternatively, set up the original tax content using global configuration owner in preparation for any future business event that requires tax content to be shared.
If you can standardize your tax setup across all business units for a given legal entity then consider moving to configuring and using tax setup at the legal entity level. Set the Use subscription of the legal entity option on the business unit tax profile. Oracle Fusion Tax records the date this occurs and compares it to the transaction date to identify if the legal entity subscription should be used in preference to the subscription to the business unit.
Create a tax from an existing tax when you have a need to share tax jurisdictions and tax registrations. You maintain the tax jurisdictions and tax registrations once for taxes with the same name within the same tax regime owned by different configuration owners.
At transaction time the owner of the transaction derives the configuration options that are used. When you enter a transaction for a given first party organization, the tax data applied to that transaction is determined by the configurations defined for the combination of that first party organization (business unit or first party legal entity) and the tax regime derived from the addresses or from the tax classification codes used on the transaction.
Use tax content subscriptions to define which configuration owner's setup is used for transactions for a specific first party legal entity or business unit for a specific tax regime. Also, use tax content subscriptions to specify whether any shared content can be overridden by the subscribing party to allow unique, separate setup for certain tax content.
Tax content subscription options are:
Common configuration
Party-specific configuration
Common configuration with party overrides
Parent first party organization with party overrides
Based on the defaults and tax rules you have defined, tax data is applied to transactions as follows:
|
Configuration for Taxes and Rules Option |
Tax Content Available |
|---|---|
|
Common configuration |
|
|
Party-specific configuration |
Note For the first party organization it can be the business unit owning the tax content or the first party legal entity-owned setup depending on the specific subscription being used. |
|
Common configuration with party overrides |
|
|
Parent first party organization with party overrides |
|
If you are using product exceptions, those exceptions are applied to the transactions as shown in the following table:
|
Configuration for Product Exceptions |
Tax Exceptions Available |
|---|---|
|
Common configuration |
The tax determination process uses only the tax exceptions defined and maintained by the global configuration owner. |
|
Party-specific configuration |
The tax determination process uses only the tax exceptions owned by the specific first party organization |
This example demonstrates how you set up the appropriate tax configuration options for your company that has three regional centers. These centers are responsible for tax setup and maintenance among other corporate activities. Each of these regional corporate centers is associated with a first party legal entity and business unit.
Your company has their regional centers in:
North America (NAM), based in Redwood City, California, US
Asian and Pacific (APAC), based in Melbourne, Australia
Europe, Middle East, and Africa (EMEA), based in London, UK
Each country has a single first party legal entity with a single business unit, except for:
Countries which have the regional corporate centers have a first party legal entity and business unit for each corporate center.
Sales, marketing, and manufacturing organization has a first party legal entity and business unit.
Create tax regimes for each country and the appropriate tax configuration options.
To create the appropriate tax configurations, you must set up the following:
|
First Party Legal Entity |
Country |
|---|---|
|
EMEA LE |
UK |
|
GB LE |
UK |
|
FR LE |
FR |
|
DE LE |
DE |
|
APAC LE |
AU |
|
AU LE |
AU |
|
SI LE |
SI |
|
NZ LE |
NZ |
|
NAM LE |
US |
|
US LE |
US |
|
CA LE |
CA |
|
Region |
Country |
Tax Regime |
Tax |
|---|---|---|---|
|
EMEA |
United Kingdom |
GB VAT |
GB VAT |
|
EMEA |
France |
FR VAT |
FR VAT |
|
EMEA |
Germany |
DE VAT |
DE VAT |
|
APAC |
Australia |
AU GST |
AU GST |
|
APAC |
Singapore |
SI VAT |
SI VAT |
|
APAC |
New Zealand |
NZ VAT |
NZ VAT |
|
NAM |
United States |
US SALES TAX |
|
|
NAM |
Canada |
CA HST & GST |
|
|
Field |
Value |
|---|---|
|
Tax Regime Code |
GB VAT |
|
Configuration for Taxes and Rules |
Party-specific configuration |
|
Configuration for Product Exceptions |
Party-specific configuration |
|
Parent First Party Organization |
Blank |
|
Effective Start Date |
01-Jan-01 |
Click Save and Create Another.
|
Field |
Value |
|---|---|
|
Tax Regime Code |
GB VAT |
|
Configuration for Taxes and Rules |
Parent first party with party overrides |
|
Configuration for Product Exceptions |
Parent first party organization |
|
Parent First Party Organization |
EMEA LE |
|
Effective Start Date |
01-Jan-01 |
Click Save and Create Another.
|
Field |
Value |
|---|---|
|
Tax Regime Code |
FR VAT |
|
Configuration for Taxes and Rules |
Parent first party with party overrides |
|
Configuration for Product Exceptions |
Parent first party organization |
|
Parent First Party Organization |
EMEA LE |
|
Effective Start Date |
01-Jan-01 |
Click Save and Create Another.
|
Field |
Value |
|---|---|
|
Tax Regime Code |
DE VAT |
|
Configuration for Taxes and Rules |
Parent first party with party overrides |
|
Configuration for Product Exceptions |
Parent first party organization |
|
Parent First Party Organization |
EMEA LE |
|
Effective Start Date |
01-Jan-01 |
Click Save and Create Another.
|
Field |
Value |
|---|---|
|
Tax Regime Code |
AU GST |
|
Configuration for Taxes and Rules |
Party-specific configuration |
|
Configuration for Product Exceptions |
Party-specific configuration |
|
Parent First Party Organization |
Blank |
|
Effective Start Date |
01-Jan-01 |
Click Save and Create Another.
|
Field |
Value |
|---|---|
|
Tax Regime Code |
AU GST |
|
Configuration for Taxes and Rules |
Parent first party with party overrides |
|
Configuration for Product Exceptions |
Parent first party organization |
|
Parent First Party Organization |
APAC LE |
|
Effective Start Date |
01-Jan-01 |
Click Save and Create Another.
|
Field |
Value |
|---|---|
|
Tax Regime Code |
SI VAT |
|
Configuration for Taxes and Rules |
Parent first party with party overrides |
|
Configuration for Product Exceptions |
Parent first party organization |
|
Parent First Party Organization |
APAC LE |
|
Effective Start Date |
01-Jan-01 |
Click Save and Create Another.
|
Field |
Value |
|---|---|
|
Tax Regime Code |
NZ VAT |
|
Configuration for Taxes and Rules |
Parent first party with party overrides |
|
Configuration for Product Exceptions |
Parent first party organization |
|
Parent First Party Organization |
APAC LE |
|
Effective Start Date |
01-Jan-01 |
Click Save and Create Another.
|
Field |
Value |
|---|---|
|
Tax Regime Code |
US SALES TAX |
|
Configuration for Taxes and Rules |
Party-specific configuration |
|
Configuration for Product Exceptions |
Party-specific configuration |
|
Parent First Party Organization |
Blank |
|
Effective Start Date |
01-Jan-01 |
Click Save and Create Another.
|
Field |
Value |
|---|---|
|
Tax Regime Code |
US SALES TAX |
|
Configuration for Taxes and Rules |
Parent first party with party overrides |
|
Configuration for Product Exceptions |
Parent first party organization |
|
Parent First Party Organization |
NAM LE |
|
Effective Start Date |
01-Jan-01 |
Click Save and Create Another.
|
Field |
Value |
|---|---|
|
Tax Regime Code |
CA GST & PST |
|
Configuration for Taxes and Rules |
Parent first party with party overrides |
|
Configuration for Product Exceptions |
Parent first party organization |
|
Parent First Party Organization |
NAM LE |
|
Effective Start Date |
01-Jan-01 |
Click Save and Close.
A service subscription is the setup for provider services. It applies to the transactions of one configuration option setup for a combination of tax regime and legal entity or business unit. Oracle Fusion Tax lets you use the tax services of external service providers for tax calculation of US Sales and Use Tax on Oracle Fusion Receivables transactions.
You can use the tax services of these external service providers:
Taxware, LP: a First Data Company
Vertex, Inc.
If you integrate with a tax service provider, these actions are not required for Receivables transactions:
Entering tax classification codes on transaction lines.
Entering transaction line attributes in the Additional Tax Determining Factors region.
Tax service provider integration returns the calculated tax lines to Oracle Fusion Tax. The tax lines for Receivables transactions returned by tax service providers are stored in Oracle Fusion Tax similar to the way tax lines calculated by the application itself are stored.
Throughout Oracle Fusion Tax care is taken to minimize your effort in creating setup. One way of doing this is the extensive use of defaulting so that you can enter your data once and use the defaults that appear on the subordinate or child records where applicable. For example, many values you enter on the tax regime appear as defaults on each tax that is associated to that tax regime. Generally, you can override the data where necessary if the defaulted value is not correct.
Also, to ensure maximum flexibility, as well as to ensure that the accuracy and integrity of the data and transactions are maintained, Oracle Fusion Use Tax makes extensive use of data-driven controls that enable and control how tax functionality works. For example, you have the requirement to set up tax recovery for value-added tax (VAT) processing. Enable the Allow tax recovery option on the tax record so you can set up tax recovery rates for this type of tax.
Payment terms are used to automatically create installments on an invoice with up to three levels of discount. You can define payment terms to create multiple installments and multiple levels of discounts. Share payment terms across business units through set assignment.
Payment terms consist of one or more lines, each of which creates one invoice installment. Each payment term line and corresponding installment have a due date and up to three discount dates. Each payment term line and corresponding installment also have due or discount amounts. When you define payment terms, you specify either percentages or fixed amounts.
This figure shows the components of a payment term. Each payment term consists of one or more lines, and each line can have up to three discounts. Assign payment terms to one or more sets to share them across business units.
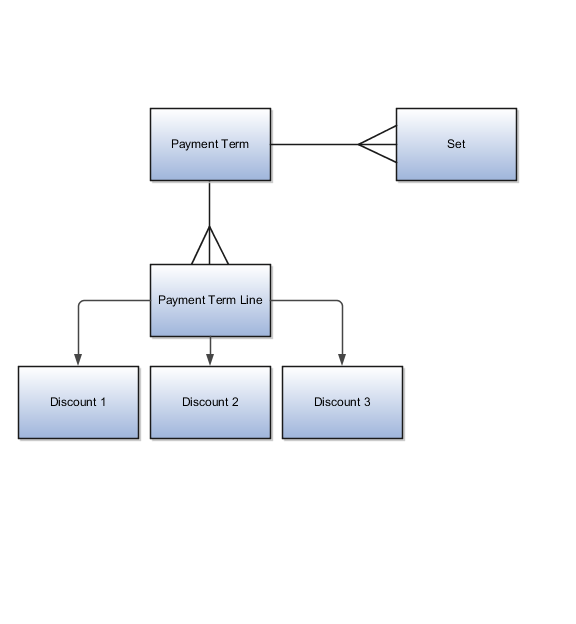
Important
If you update the payment terms on an invoice, Oracle Fusion Payables immediately recalculates the installments for the invoice. You must re-enter any manual adjustments you made to the previous installment.
Payment terms due dates and discount dates are based on one of the following:
Fixed Date: A specific day, month, and year when an installment is due for payment.
Days: A number of days added to the invoice terms date.
Calendar: A Payables calendar that is divided into periods. Assign a due date to the period that includes the invoice terms date. You can assign due dates to avoid weekends, holidays, and so on. You cannot assign calendar-based terms to an invoice if a period is not defined for the terms date.
Day of Month: A type of payment term with the following attributes:
Day of Month: A specific day of the month when an installment is due for payment. For example, enter 15 to schedule payment on the fifteenth day of the month. Enter 31 to schedule payment for the last day of the month, including months with less than 31 days.
Cutoff Day: The day of the month after which the installment due dates and discount dates advance to a future month. If you do not specify a cutoff day, the current accounting month is used to determine due dates and discount dates.
Months Ahead: If you enter 0 and the invoice terms date is the same as, or later than, the cutoff day, Payables uses the day of the month in the next month to set the installment due date.
For example, if the Cutoff Day is 11, Day of Month is 15, and Months Ahead is 0, and you enter an invoice with a terms date of January 12, the installment due date is February 15. If Months Ahead is 1, the installment due date is March 15. If the Cutoff Day is 11, Day of Month is 15, and Months Ahead is 0, and you enter an invoice with a terms date of January 10, the installment due date is January 15.
Note
Only due dates, not discount dates, can be based on a calendar.
If you enter an Identifying PO on an invoice, the purchase order provides the default payment terms. If you do not enter an Identifying PO, the supplier site provides the default payment terms. If there are no payment terms for the supplier site, the payment terms from the Manage Invoice Options page are used. You can override the default payment terms on any invoice.
This figure shows the payment term defaulting flow during invoice entry.

Define units of measure, unit of measure classes, and base units of measure for tracking, moving, storing, and counting items.
The Quantity unit of measure class contains the units of measure Box of 8, Box of 4, and Each. The unit of measure Each is assigned as the base unit of measure.

Unit of measure classes represent groups of units of measure with similar characteristics such as area, weight, or volume.
Units of measure are used by a variety of functions and transactions to express the quantity of items. Each unit of measure you define must belong to a unit of measure class.
Each unit of measure class has a base unit of measure. The base unit of measure is used to perform conversions between units of measure in the class. For this reason, the base unit of measure should be representative of the other units of measure in the class, and should generally be one of the smaller units. For example, you could use CU (cubic feet) as the base unit of measure for a unit of measure class called Volume.
Each unit of measure class must have a base unit of measure.
This table lists examples of unit of measure classes, the units of measure in each unit of measure class, and the unit of measure assigned as the base unit of measure for each unit of measure class. Note that each base unit of measure is the smallest unit of measure in its unit of measure class.
|
Unit of Measure Class |
Units of Measure |
Base Unit of Measure |
|---|---|---|
|
Quantity |
dozen box each |
each |
|
Weight |
pound kilogram gram |
gram |
|
Time |
hour minute second |
second |
|
Volume |
cubic feet cubic centimeters cubic inches |
cubic inches |
A unit of measure standard conversion specifies the conversion factor by which the unit of measure is equivalent to the base unit of measure.
This table lists examples of unit of measure classes, one unit of measure included in each class, the base unit of measure for the unit of measure class, and the conversion factor defined for the unit of measure.
|
Unit of Measure Class |
Unit of Measure |
Base Unit of Measure |
Conversion Factor |
|---|---|---|---|
|
Quantity |
dozen |
each |
12 (1 dozen = 12 each) |
|
Weight |
pound |
gram |
454 (1 pound = 454 grams) |
|
Time |
minute |
second |
60 (1 minute = 60 seconds) |
A unit of measure standard conversion defines the conversion factor by which the unit of measure is equivalent to the base unit of measure that you defined for the unit of measure class. Defining a unit of measure standard conversion allows you to perform transactions in units other than the primary unit of measure of the item being transacted. The standard unit of measure conversion is used for an item if an item-specific unit of measure conversion has not been defined.
A UOM interclass conversion defines the conversion between the source base unit of measure ("From Base UOM") in one unit of measure class ("From Class") and the destination base unit of measure ("To Base UOM") in a different unit of measure class ("To Class").
For example, the item is gasoline. The From Base UOM (of the From Class called "volume") is liters. The To Base UOM (of the To Class called "quantity") is Barrels. The conversion is 158.76 liters (volume) to 1 barrel of oil (quantity).
A UOM intraclass conversion specifies the conversion between a unit of measure (the "From UOM") and the base unit of measure of the same class.
For example, the item is soda pop. The unit of measure class is Quantity. The From UOM is Case (CS). The base unit of measure is Each (EA). The conversion is 24, to specify that 1 CS = 24 EA.
There are two ways to create corporate cards. You can choose either of the following options at different points in time or you can perform both simultaneously.
Automatic corporate card creation
Manual corporate card creation
Automatic corporate card creation applies only to travel cards. Travel cards are corporate cards that are used for travel. New employees are typically handed new corporate cards, but the information on the cards is not manually entered into the application at that time. You can create corporate cards automatically by selecting an employee matching rule for new cards on the Upload Rules tab on the Create Corporate Card Program page. Then, when the corporate card transaction file containing transactions for the new card is uploaded for the first time to the application, the corporate card transaction upload and validation process uses the matching rule to uniquely match the new corporate card to the new employee. The application automatically enters the transaction data for the new corporate card and associates it with the applicable employee using the specified rule. If the rule fails to identify a unique match, the application leaves the corporate card unassigned. If desirable, each corporate card program can have a different matching rule.
Note
To reduce or eliminate manual effort, automatic corporate card creation is recommended.
You can manually create corporate cards for employees in the Create Corporate Card popup where you enter the following data:
Corporate card program
Company account number
Corporate card number
Employee name and number
Expiration date
Maximum amount per transaction (applicable only for procurement cards)
Maximum amount per billing period (applicable only for procurement cards)
Note
Manual creation of corporate cards is the exception, rather than the rule.
Corporate cards are company account-specific. For example, if an employee transfers to another organization within your company and the organization belongs to another company account, then you must create the corporate card again with the applicable company account number.
Common Options for Payables and Procurement are setup options that are used by features throughout the procure-to-pay business flow, such as default accounts, additional legal entity information, accounting options, and self-billed invoices.
Set options for the following:
Default distributions
Offset segments
Currency conversion
Expense accruals
Self-billed invoices
Legal entity information
Default distributions are used to define the various accounts applicable for accounting for payables transactions. Invoices may get some distributions from supplier site assignments and others from the common options setup.
If you enter invoices for expenses or asset purchases for more than one primary balancing segment value, you might want to use automatic offsets to keep your Oracle Fusion Payables transaction accounting entries balanced. If you do not use automatic offsets, Payables creates a single liability accounting entry for invoice transactions and a single cash type accounting entry for payment transactions.
This tables lists the options you can set for currency conversion.
|
Option |
Description |
|---|---|
|
Require conversion rate entry |
Require a conversion rate whenever you enter an invoice or a payment in a currency other than your ledger currency. If you maintain daily rates, Payables populates the rate automatically based on the date and the rate type you enter. If daily rates do not exist for the date and rate type, and if this option is enabled, you cannot enter or save the transaction. If the conversion rate type is User, then Payables always requires that you enter the conversion rate. You cannot create accounting entries for, or pay foreign currency invoices without conversion rates. If you do not enable this option, after you have entered invoices or created payments, you can enter conversion rates manually or by using the Apply Missing Conversion Rates program. When you create a bills payable, you are required to enter a maturity rate, rate type, and date. |
|
Conversion rate type |
Default conversion rate type when you enter invoices or create payments. You can change it at invoice entry or payment creation time. |
|
Realized Gain or Loss Distributions |
Default realized gain and loss accounts for payments from each of your bank accounts. If the conversion rate changes between invoice entry and payment, the application automatically calculates the realized gain or loss and records it in these accounts. |
Determine when to accrue for expense items.
This tables lists the options you can set for self-billed invoices.
|
Option |
Description |
|---|---|
|
Gapless invoice numbering |
Enable gapless, that is, no breaks in numbering, invoice number generation for your buying organization during pay on receipt processing. You can enable gapless numbering for the entire business unit with this setting or limit it to a supplier site. |
|
Buying Company Identifier |
A unique identifier for the business unit that is included in the invoice number created by the pay on receipt process and in the debit memo number resulting from return receipts. |
This tables lists the options you can set for legal entity information.
|
Option |
Description |
|---|---|
|
VAT Registration Member State |
If your company operates in a member state of the European Union, select the name of the country. |
|
VAT Registration Number |
If your company operates in a member state of the European Union, enter the value-added tax (VAT) registration number for your organization. Your organization is assigned a VAT Registration Number if you register to pay VAT. The first two characters of a VAT registration number are the country code for the country or state where the registered company or organization is located. |
|
Bill-to Location |
Enter the bill-to location to provide default values. The application uses the Bill-to Location to derive legal entity information. |
|
Copyright © 2011, Oracle and/or its affiliates. All rights reserved. Legal Notices |
|