11g Release 1 (11.1.1.5.0)
Part Number E20385-01
Contents
Previous
Next
|
Oracle® Fusion
Applications Materials Management and Logistics Implementation Guide 11g Release 1 (11.1.1.5.0) Part Number E20385-01 |
Contents |
Previous |
Next |
This chapter contains the following:
Manage Subinventories and Locators
Manage Interorganization Parameters
Manage Inventory Transaction Sources and Types
Manage Inventory Transaction Reasons
Manage Item Transaction Defaults
Manage Pick Slip Grouping Rules
Manage Picking Rule Assignments
You can structure the relationship of inventory organizations, subinventories, and locators to match the physical structure of your warehouse.
One inventory organization contains two subinventories. One subinventory contain no locators, and the other subinventory contains two locators.
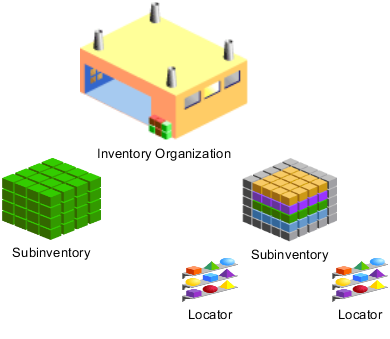
An inventory organization can contain one or more subinventories.
Define at least one subinventory for each inventory organization that you want to transact items into, from, or within.
If desired, a subinventory can contain one or more locators.
Define at least one subinventory for each inventory organization of item and inventory management usage.
You can create the following kinds of subinventories:
Storage subinventories
Receiving subinventories
A storage subinventory is used to store material in the warehouse. Material in a storage subinventory is reflected in on-hand quantity.
A receiving subinventory is used to temporarily store material before it is placed in a storage subinventory. Material in a receiving subinventory is not reflected in on-hand quantity. An inventory organization does not need to contain a receiving subinventory.
You should take into account the following when planning to create subinventories and locators:
Subinventory-locator hierarchy
Considerations for creating subinventories
Considerations for creating locators
You should consider the following when planning the hierarchy of subinventories and their corresponding locators:
The importance, for your organization, of creating a subinventory and locator hierarchy that represents the physical layout of your warehouse.
Your organization's plan for the movement of item and labor, and utilization of labor and equipment, for putaway and picking.
You should refer to these plans when sequencing the picking order of subinventories and locators.
You should consider the following when planning to create subinventories:
How many storage and receiving subinventories are required in your warehouse.
Whether you need to distinguish between receiving and storage subinventories.
Use storage subinventories for tracking on-hand quantities.
Whether you want to associate items to subinventories and their locators by creating item subinventories.
You should consider the following when planning to create locators:
Whether you want to allow users to dynamically create locators.
Whether you want to add items to locators.
Whether it is necessary to implement locator control.
If you decide to implement locator control, consider whether you need to implement locator control for the organization, for individual subinventories, or at the item level.
The level of granularity required for locators, such as row/rack or row/rack/bin.
A locator is a physical area within a subinventory where you store material, such as a row, aisle, bin, or shelf. You can transact items into and out of a locator.
You can assign locator control to the subinventory only if an inventory organization's locator control parameter is set to assign locator control at the subinventory level.
Select Dynamic Entry to require entry of a locator for each item; the user can choose a valid predefined locator, or define a locator dynamically at the time of transaction. Select Item Level to define locator information for specific items. Select Prespecified to require entry of one of the predefined locators for each item.
If the item is associated with one or more subinventories (as one or more item subinventories), you can only select the subinventories with which the item is associated.
Interorganization transfers enable you to transfer particular items between organizations.
You are charged with performing the prerequisites that are necessary for your users to perform interorganization transfers of a particular item.
To enable interorganization transfers, you perform the following:
Ensure that you have created the inventory organization from which the item will be transferred, in addition to the inventory organization to which the item will be transferred.
In the item's attributes, ensure that the item is assigned to the inventory organization from which the item will be transferred, in addition to the inventory organization to which the item will be transferred.
Manage interorganization parameters to define the relationships that exist between the inventory organizations.
Ensure that the item has the same unit of measure in each inventory organization.
Interorganization parameters define the relationships that exist between source and destination inventory organizations. Define these relationships to enable users to create interorganization transfers. One interorganization parameter enables a one-way interorganization transfer from a source inventory organization to a destination inventory organization. To enable two-way interorganization transfers between two inventory organizations, create two interorganization transfers, with each inventory organization functioning as a source inventory organization and a destination inventory organization.
Select Receipt to specify that the shipment organization owns the shipment until the destination organization receives it.
Select Shipment to specify that the destination organization owns the shipment when the source organization ships it, and while the shipment is in transit.
Select Direct to deliver this item directly to its location at receipt. Select Inspection to receive this item first, inspect it, then deliver. Select Standard to receive this item first, then deliver without inspection.
There are multiple situations for which you might want to create an account alias. The following scenario illustrates an example of one such situation.
Your company has a temporary project for which costs need to be tracked to a particular account. You create an easily-recognizable account alias for the account and have your employees cost the project's transactions to this account alias. You set the account alias to expire when the project ends, so that users cannot cost transactions to this particular project after the project ends.
An account alias is an alternate name for an account number, and is used to more easily identify an account when performing a transaction. You can select an account alias as a demand source when performing a reservation; you can also select an account alias as a transaction source when performing a miscellaneous transaction.
The following scenario illustrates how you would define a transaction source and transaction type for a particular business need:
Your organization frequently donates items that you manufacture to charity. You might want to define a transaction source called "Charity" and a transaction type called "Issue to Charity", using the "Issue from Stores" transaction action. When you donate an item to charity, you create a miscellaneous transaction using the Issue to Charity transaction type.
A transaction type is used to classify transactions. Examples of transaction types are Purchase Order Receipt, Sales Order Issue, and Inventory Subinventory Transfer.
Transaction types are combinations of:
Transaction sources
Transaction actions
A transaction source is the type of entity against which a transaction is charged. Along with a transaction action, a transaction source uniquely identifies a transaction type. Examples of transaction sources are Purchase Order, Sales Order, and Inventory.
A transaction action is a system-defined type of material movement or cost update. Examples of transaction actions are Receipt into Stores, Issue from Stores, and Subinventory Transfer.
The transaction type for which you enable status control becomes an allowed transaction type for new material statuses that you create. When material status control is enabled for a transaction type and you are creating or editing a material status, you can choose to leave transactions of that transaction type as allowed, or disallow transactions of that transaction type.
If you do not enable status control for a particular transaction type, transactions of that transaction type are always allowed.
An inventory transaction reason is a standard means of classifying or explaining the reason for a transaction, and can be used when performing any type of material transaction. For example, you could define the inventory transaction reasons Theft, Misplaced Items, and Damaged Items for classifying adjustment transactions when performing a cycle count or physical inventory count.
The transaction reason will only be selectable when you perform an inventory transaction in the reason type and reason context that you select. For example, if you create an inventory transaction reason with a reason type of Receiving and a reason context of Change Subinventory/Locator, the user will only be able to select that transaction reason when the user is in Receiving and moving material to a different subinventory and locator combination.
An item transaction default specifies the default subinventory or locator for a specified item when the specified shipping or receiving transaction is performed on that item. The default subinventory or locator is included in the item's default shipping or receiving information. Note that for movement requests, if a user does not specify a locator when transacting an item into a locator-controlled subinventory that you specify as the item transaction default, the application determines the put-away locator.
Material status control restricts the movement and usage of portions of on-hand inventory.
Using material status control enables you to control whether you can pick or ship a sales order, or issue material for a sales order or account. You can also specify whether material needs to be quarantined until you inspect it. In addition, you can determine whether products with a particular status can be reserved, included in available to promise calculations, or netted in production planning.
This topic discusses:
Material status control levels
Material status transactions
Cumulative effective status
You assign material statuses at the subinventory, locator, lot, and serial number levels.
When you assign a material status to a subinventory or locator, items are not assigned the material status of the subinventory or locator. Instead, items take on the behavior indicated by the material status that is assigned to the subinventory or locator.
To assign a material status to a lot or serial number, you must first enable the item attributes Lot Status Enabled and Serial Status Enabled on the item in the item master organization.
You can optionally assign a default lot or serial number status to an item in the item master organization. When you do so, the item retains the lot or serial number status through all inventory transactions, including interorganization transfers.
When you create a material status, you select the allowed and disallowed transaction types for that material status. Note that you must enable status control for transaction types to make them available to allow and disallow. Transactions types for which you do not enable status control are always allowed.
A cumulative effective status is the combination of all disallowed transactions. If a transaction is disallowed at the serial number, lot, locator, or subinventory level, the transaction fails. For example, if you have a locator whose status disallows miscellaneous issues, and that locator is in a subinventory whose status disallows sales order issues, you cannot perform transactions of either transaction type for material in that locator.
Material statuses provide more flexible control of transacting material. For example, you can create a Damaged material status to disable damaged material from being shipped to a customer.
Before creating material statuses, you should plan:
Determine if material statuses are necessary
Determine allowed and disallowed transaction types
Determine material statuses to define
Consider the needs of your organization, and whether it is necessary to create material statuses.
For example, if your organization operates on a small scale or you want to manage the statuses or items manually, it might not be necessary to create material statuses. By default, all the material is in Active status, which allows transactions with no restrictions.
Consider the needs of your organization, and the transaction types that should be allowed.
For example, damage to your warehouse's racks is making locations in the racks, and the material in those locations, inaccessible. You can create a material status to disallow transactions on the inaccessible material. Once the damaged racks have been repaired, you can create a material status to allow transactions on the material that is once again accessible.
Consider the needs of your organization, and the material statuses that are necessary to define for your organization.
Following are examples of questions that you can ask when determining material statuses for your organization:
What are the kinds of items that are handled in the warehouse?
Does the consumption of material needs to be restricted when it needs to inspected for quality assurance?
Should users be allowed to ship material, such as food or pharmaceuticals, to customers if the refrigerator storing the material is broken?
By creating pick slip grouping rules, you organize how picking lines for released sales orders are grouped on to pick slips. For example, if you select Shipment as a grouping criterion, then all picking lines on a pick slip are for the same shipment.
The following aspects of a pick slip grouping rule can reduce time spent on planning and organizing:
Group pick slips based on criteria
Specify effective date for the grouping rule
Enables you to specify more than one grouping criteria for picking. For example, if you select Shipment and Ship-to Location as grouping criteria, then all the picking lines grouped together on a pick slip are for the same shipment and ship-to location.
Enables you to specify the date from which you want the pick slip grouping rule to come into effect.
Picking Rule enables you to define the criteria that determines how material is consumed. For example, LIFO, FIFO, Lot Ascending, Locator Ascending. After you create a picking rule, it can be enabled for usage in various organizations.
A group of picking rules with different criteria can address the various needs of consuming material in an organization. The following criteria determine how material should be consumed:
Material restriction
Allow partial picking
Material sort
The material restriction criteria you to specify:
Shelf Life Days: Indicates the minimum number of days prior to expiry that the material can be consumed. For example, if an item with an expiration date of June 30 is assigned to a picking rule that dictates a 60-day shelf life restriction, then that item must be picked no later than May 1, which is 60 days before its expiration date.
Enforce Single Lot: The enforcement of a single lot for the specific picking rule. If not, multiple lots may be picked.
Enables you to specify if the demand line can be partially picked if the total quantity for the order lines is not available. For example, the requested quantity is 100 and the quantity available using the picking rule is 60. In this case, allow partial picking determines if the available quantity of 60 is picked or nothing is picked at all.
The sort attributes that you can assign priorities to are Lot, Locator, Subinventory, and Revision. You can have only one priority based on a sort attribute and type such as Locator Ascending, Locator Descending, Revision Ascending, or Revision Descending. For example, if you assign the sort attribute and type Lot Ascending to priority 1, then you cannot assign the same sort attribute to another priority in the same picking rule regardless of the sort type being Ascending or Descending.
Material sort criteria enable you to specify a priority to the sorting criteria. You can do this by assigning priority levels, with priority 1 being of highest priority and priority 3 being of lowest priority. The sort criteria can be based on four different attributes; Lot, Locator, Subinventory, and Revision. Before assigning material sort criteria priorities, consider:
What sort criteria is relevant to the picking rule you are creating?
Consider the relevance of the sort criteria to the picking rule you are creating. For example, if the picking rule you are creating is primarily aimed at lots, then select sort criteria that will assist you in sorting by lots; Lot number ascending or lot number descending.
Picking rule assignment enables you assign an organization and sequence to a picking rule. It provides mechanisms to:
Indicate if a picking rule can be used in an organization.
Prioritize the various rules available to be used in an organization.
Define set of criteria when a rule should be activated.
You can then assign certain criteria to the picking rule assignment based on which the material will be picked. Note that the same picking rule can have multiple rule assignments in an organization. The following example demonstrates how picking rule assignments work for an item that is lot controlled and expiration enabled.
|
Picking Rule name |
Rule details |
|---|---|
|
Rule 1 |
LOT FIFO |
|
Rule 2 |
LOT LIFO |
The facility usually follows the FIFO rule and ships the oldest material first. However, for their loyal customers, for example, Loyal, they would like to follow the LIFO rule and ship the newest material first. The loyal customers are given priority over their other customers. In order to achieve this, the facility needs to have two picking rule assignments in order of priority.
|
Picking Rule name |
Picking Rule Assignment criteria |
|---|---|
|
Rule 2 |
Item is specified and customer is specified as "Loyal" as part of the criteria. |
|
Rule 1 |
Item is specified but customer is not specified as part of the criteria. |
According to the way the picking rules are assigned above, the application will first look at the high priority assignment and apply the picking rule assignment in the following manner:
|
Scenario |
Result |
|---|---|
|
Demand line for specified item and from customer specified as "Loyal." |
Rule 2 is applied and newest material is supplied following LIFO. |
|
Demand line is for specified item and customer is not "Loyal." |
Rule 1 is applied and oldest material is supplied following FIFO. |
Picking rule assignment provides you the flexibility to:
Assign sequence to the rule assignment
Define criteria for the assigned picking rule
Enables you to prioritize the rule assignment with respect to the other rule assignments.
Enables you to specify the details when a rule on a particular picking rule assignment is activated. For example, if you create a picking rule that picks lots based on FIFO and select a specific customer in the criteria, then according to the picking rule assignment, the item is picked for that customer based on FIFO.
You can select any combination of criteria after assigning a picking rule. Selecting the criteria enables you to specify when the rule assignment is used. For example, if a picking rule, which allocates lots based on FIFO, is assigned to a particular customer, then the material picked for that customer is allocated based on FIFO.
Before selecting criteria for picking rule usage consider:
Which combination of picking rule and criteria will help achieve optimum material selection for your organization?
What is your organization's preference for picking based on the available criteria?
You must consider the combination of picking rule and criteria that will meet your requirements on material consumption in your organization. For example, you have a picking rule that ships material based on Lot FIFO. You can assign that rule to a particular customer so that material for that customer is shipped based on FIFO.
Before selecting the criteria, you must consider your organization's preference for picking based on the available criteria.
Customer
Consider your organization's picking order preference on what material to ship to which customer. For example, if certain kind of material should be picked based on customer requirements, then the rule assignments with customer as criteria are effective.
Carrier
Consider your organization's preference on what material to ship based on carrier. For example, if the demand line is to be shipped via a specific carrier, then the carrier-based rule assignment will be effective.
UOM class
Consider your organization's preference on what material to ship based on UOM class. For example, if the demand line to be shipped specifies a UOM that belongs to a particular UOM class, then the UOM class-based rule assignment will be effective
UOM
Consider your organization's preference on what material to ship to based on UOM. For example, you have the following rules. Rule 1 sorts the subinventories in such a way that the item is stored by UOM 'Case' in the top subinventories. Rule 2 sorts the subinventories in such a way that the item is stored by UOM 'Each' in the top subinventories. You can sequence the rule assignments such that the correct demand lines with appropriate UOMs are picked using the appropriate rules.
Source subinventory
Consider your organization's preference on what material to ship to from which source subinventory.
Destination subinventory
Consider your organization's preference on what material to ship to which destination subinventory.
Item
Consider your organization's preference for particular items. For example, if the material needs to be consumed in a certain way because of the characteristics of the item, then the appropriate picking rule should be assigned to the item criteria. Take the case of milk products that should be consumed within the expiration date. In that case, a picking rule that has shelf life material restriction and assigned to item criteria "milk products" can work best in optimizing material selection.
Item type
Consider your organization's preference to ship material that belong to particular item types. You can select the best possible combination of a picking rule and item type that will help make selection efficient.
ABC Assignment Group and Class
Consider your organization's preference on material to ship based on a particular ABC assignment group and class.
Transaction source type
Consider your organization's preference on material to ship based on a particular transaction source type.
Transaction type
Consider your organization's preference on material to ship based on a particular transaction type.
Transaction action
Consider your organization's preference on material to ship based on a particular transaction action.
You can enter different values into the Start Date and End Date fields. For example, if you select Week, you can enter 1 to represent the first week of the year, and 52 to represent the last week of the year. If you select Day of the Month, you can enter 1 to represent the first day of the month, and 31 to represent the last day of the month.
|
Copyright © 2011, Oracle and/or its affiliates. All rights reserved. Legal Notices |
|