| Oracle® Fusion Middleware User's Guide for Oracle WebCenter Spaces 11g Release 1 (11.1.1.5.0) Part Number E10149-08 |
|
|
View PDF |
| Oracle® Fusion Middleware User's Guide for Oracle WebCenter Spaces 11g Release 1 (11.1.1.5.0) Part Number E10149-08 |
|
|
View PDF |
WebCenter Spaces enables you to create wiki documents that authorized users can use to collaborate to create content that is relevant, useful, and up-to-date.
This chapter describes how to create and manage wiki documents. It includes the following sections:
Note:
The tasks described in this chapter are available only if Oracle Content Server 11g is configured as the content repository.Audience
This chapter is intended for WebCenter Spaces users interested in creating and managing wiki documents. Much of this information applies to any WebCenter Portal application, though it is written with WebCenter Spaces users in mind.
Wikis epitomize the concepts of community and collaboration by allowing all authorized community members to contribute their information to the greater body of knowledge. Wiki pages are web pages that offer in-place editing using HTML or a simple mark-up language called wiki mark-up. Users with sufficient permissions on a wiki page can add, revise, or delete content. Wikipedia is an excellent example of a wiki (http://www.wikipedia.com). Users from all over the world collaborate to create and edit Wikipedia pages, resulting in a rich, dynamic knowledge base for everyone's benefit.
This section includes the following subsections:
Section 47.1.1, "Prerequisites for Enabling the Wiki Functionality"
Section 47.1.2, "Permissions Required for Working with Wiki Documents"
In WebCenter Spaces, you create and manage wiki documents by using the Documents service. To support the wiki functionality, the Documents service relies on Oracle Content Server. All wiki documents are stored on Oracle Content Server.
For the wiki functionality to become available in a Home Space or a Space, the following prerequisites must be met:
Oracle Content Server 11g must be configured as the content repository for WebCenter Spaces. The wiki functionality is not available with Oracle Content Server 10g. For information about setting up a connection to Oracle Content Server, see "Registering Content Repositories" section in Oracle Fusion Middleware Administrator's Guide for Oracle WebCenter.
The Documents service must be enabled for the required Home Space or the Space in which you plan to create wiki documents. For information, see Section 51.10.1, "Enabling and Disabling Services Available to a Space."
Users can create wiki documents by using either of the two methods: the Wiki page style method or the New Wiki Document method available in Documents service task flows.
To create a wiki document using the New Wiki Document method and edit such wiki documents, users must be granted the Create and Edit Documents permission for the Documents service (Figure 47-1). To be able to delete wiki documents, users require the Delete Documents permission. These permissions are available to the Moderator and Participant roles by default.
Figure 47-1 Documents Service Permissions

When using the Wiki page style method, users require Page service permissions in addition to the Documents service permissions. To be able to create and edit wiki documents by using the Wiki page style, users require the following permissions:
Standard permission model: If this permission model is used, users require:
Create and Edit Documents permission for the Documents service (Figure 47-1)
Edit Page Access, Structure, and Content permission for Basic Services
Advanced permission model: If this permission model is used, users require:
Create and Edit Documents permission for the Documents service
Create Pages or Create, Edit, and Delete Pages permission for the Pages service (Figure 47-2)
This section describes the different ways in which you can create wiki documents. It includes the following subsections:
Section 47.2.2, "Creating a Wiki Document Using Documents Service Task Flows"
Section 47.2.3, "Creating a Wiki Document Using the Wiki Page Style"
Section 47.2.4, "Creating a Wiki Document Within a Wiki Page Style-Based Page"
You can create wiki documents by using either of the two methods:
Use the New Wiki Document option in any of the following Documents service task flows: Document Manager, Folder Viewer, or Document Explorer. Out-of-the-box, the Document Explorer is the task flow configured to display folders and files on the Documents page in your WebCenter Spaces application. (Figure 47-3).
Use the Wiki page style to create a dedicated wiki-related WebCenter page (Figure 47-4).
This creates a Wiki page with a default wiki document. Users can create additional wiki documents by using the New Wiki Document button. All wiki documents created using New Wiki Document will appear as siblings to the default wiki document, all stored in the dedicated folder created for the Wiki page.
Wiki documents created using any of the two methods offer the same in-place editing features. However, the two methods differ in the certain aspects. Table 47-1 describes these differences.
Table 47-1 Distinguishing Between Methods of Creating Wiki Documents
| Feature | Wiki Page Style Method | New Wiki Document Method |
|---|---|---|
|
Exposure |
Exposes wiki documents within a dedicated page on the left or top navigation bar of a Space (depending on the page template used). The figure shows a Wiki page style-based page in a Space using a side-navigation page template. 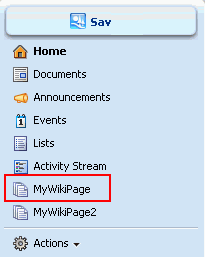
The wiki page style offers a simplified UI that provides a dedicated wiki experience. |
Does not display wiki document as a separate page on the navigation bar. Out-of-the-box, a wiki document is available on the Documents page and any page that contains Documents service task flows. |
|
Document storage |
Automatically creates a new folder (with the same name as the new page name) under the root folder in the document hierarchy, and creates a default wiki document underneath, with the same name as the page name. This method restricts the navigation to start at this folder. The graphic shows the folder named MyWikiPage. It contains a default wiki document named MyWikiPage. The folder and the wiki document got automatically created when the Wiki page style method was used for creating a page named MyWikiPage. 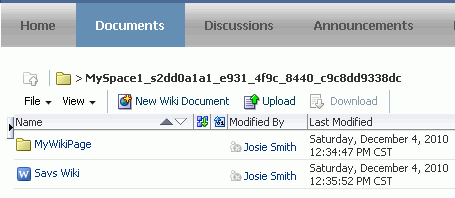 |
Does not create a separate folder to store a wiki document, and the navigation is not constrained. The graphic shows Savs Wiki as the wiki document created in the document hierarchy. |
|
Permissions inherited by a wiki document |
In a Space, the newly created wiki page inherits Space permissions (where Moderators and Participants have the create, edit, and delete permissions, and Viewers have only the view permission). In the Home Space, a newly created wiki page inherits the same permissions as a public folder - the owner is granted the Administer, Read, Write, and Delete permissions, whereas public users are granted only the Read access. |
Inherits permissions from the folder in which it is created. |
|
Permissions required to create wiki documents |
To be able to create a page based upon the Wiki page style and then be able to create wiki documents within the page, users require:
|
Users require the |
Note:
The root folder where a Space is stored on Oracle Content Server is/spaces/space_name; a Home Space is stored in /spaces/user_name.Choosing a Wiki Creation Method
The method you choose for creating wiki documents really depends on your preferences. The Wiki page style creates a dedicated folder, a default wiki document within the folder, and restricts the navigation to start at that folder. Users can create additional wiki documents, which are stored in the same folder. So, if you want to expose a wiki document within a separate page on the navigation bar, and want users to feel that there is a dedicated area for wikis, use the Wiki page style method. If you do not require these features, and just want to create a wiki document (among other types of documents) in your Space's document hierarchy, you can use the New Wiki Document method.
To create a wiki document in the document hierarchy in WebCenter Spaces, you can use any of the following Documents service task flows: Document Manager, Folder Viewer, or Document Explorer.
While creating a wiki document using a Documents service task flow, you can add and edit the wiki content in-place by using the Rich Text Editor (RTE), which is a fully integrated HTML text editor.
To create a wiki document using a Documents service task flow:
Navigate to the Documents page or the page that contain the Document Manager, Folder Viewer, or Document Explorer task flow. Browse to the folder under which you want to create a wiki document.
Click New Wiki Document.
The Create Wiki Document page opens, with the Rich Text Editor (RTE) displayed (Figure 47-5).
In the Title field, enter a name for the wiki document.
Note:
For naming wiki documents, you must not use the following characters:\ / : [ ] * ' " |
You can use character spaces and periods (.).
In the RTE, from the Mode list, choose the desired editing mode, described in Table 47-2.
Add the text, formatting, styling, and links using the methods available in the selected mode in the RTE. Table 47-2 describes the RTE toolbar icons and controls.
Note:
Instead of adding the content while creating a wiki document, you can choose to add the content later after the document has been created. For information, see Section 47.3, "Editing a Wiki Document."Click Create to save your changes and exit the editor.
The wiki document is listed under the current folder, as shown in Figure 47-6.
Figure 47-6 Wiki Document Created Using the New Wiki Document Option

The Wiki page style enables you to create a page that focuses more on providing a wiki experience and allows you to readily access related wiki documents.
To create a wiki document using the Wiki page style:
Navigate to the Space in which you want to create a wiki document.
From the Actions menu, choose Create, and then Page.
In the Page Name field, enter a display name for the dedicated Wiki page (for example, MyWiki).
The name that you enter here is also shown as the name of dedicated folder that gets created, and also as the name of the first, default wiki document created within the folder.
Note:
For naming wiki documents, you must not use the following characters:\ / : [ ] * ' " |
You can use character spaces and periods (.).
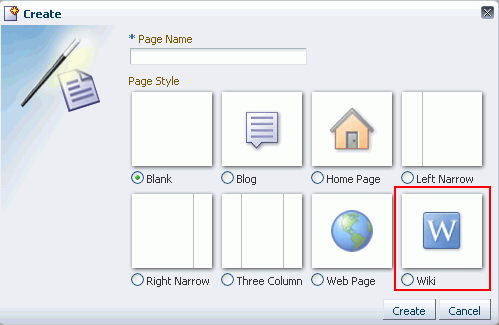
From the Page Style options, select Wiki (Figure 47-7).
Figure 47-7 Creating a Wiki Document Using the Wiki Page Style
Note:
The Wiki page style becomes available in the Create Page dialog in a Space only if WebCenter Spaces is integrated with Oracle Content Server, and the Documents service is enabled for the Space.For information about setting up a connection to Oracle Content Server, see "Registering Content Repositories" section in Oracle Fusion Middleware Administrator's Guide for Oracle WebCenter. For information about enabling the Documents service, see Section 51.10.1, "Enabling and Disabling Services Available to a Space."
Click Create.
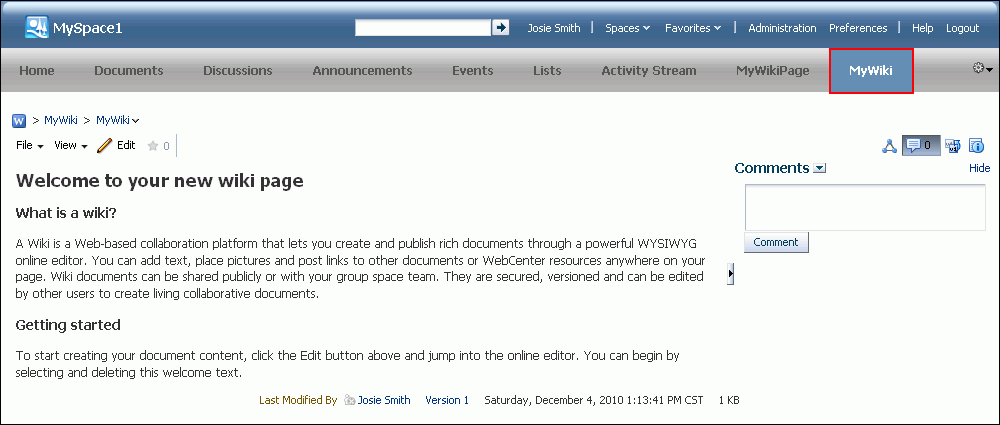
The newly created Wiki page style-based page displays, containing a default wiki document with some default text (Figure 47-8). The breadcrumb at the top displays the path where the wiki document is created in the document hierarchy. In the wiki document, you can replace the default text with the desired content. For information, see Section 47.3, "Editing a Wiki Document."
Figure 47-8 A Newly Created Wiki Page Containing a Default Wiki Document
If you navigate to the Documents page, you can find the newly created wiki document (MyWiki) stored in a separate folder (MyWiki) under the root folder, as shown in Figure 47-9. Both the folder and the default wiki document share the same name.
Figure 47-9 A Newly Created Wiki Document in the Document Hierarchy

Note:
By default, for a Wiki page style-based page, theauthenticated-role role is granted the view permission. So, all authenticated users can view the page listed in the Activity Stream. However, the actual access to the page is determined by the security set on the page through the Security Settings dialog, as described in Section 41.25, "Setting Security Options on a Folder or File."A Wiki page style-based page contain a default wiki document. You can create additional wiki documents within that page.
To create an additional wiki document within a Wiki page style-based page:
Navigate to the Wiki page style-based page, for example MyWikiPage, within which you want to expose a new wiki document.
The way you access your wiki document depends on the page template used in your Space.
Access the New Wiki Document option available for your Wiki page style-based page.
The way you access this option depends on the page template used in your Space.
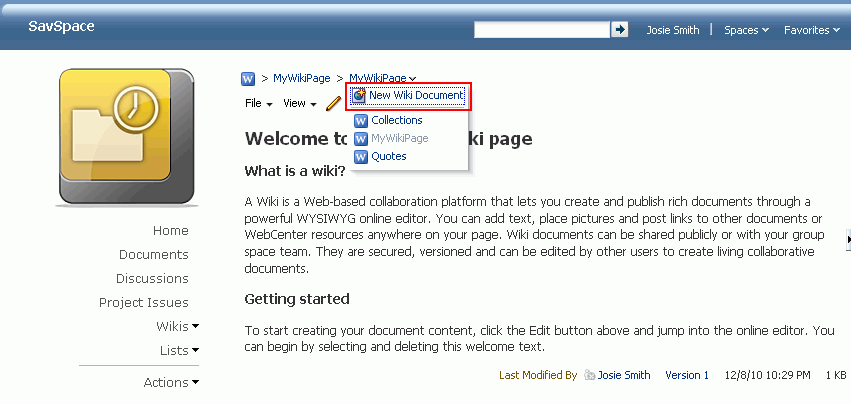
Figure 47-10 shows a Wiki page style-based page open in a Space that uses a side navigation page template. Clicking the page name on the breadcrumb or the dropdown arrow next to the page name displays a menu that contains the New Wiki Document option.
Figure 47-10 The New Wiki Document Option Available for a Wiki Page Style-Based Page
In the RTE, in the Title field, enter a name for the new wiki document (for example, Popular Quotes)
From the Mode list, choose the desired editing mode, described in Table 47-2.
Add the text, formatting, styling, and links using the methods available in the selected mode in the RTE. Table 47-2 describes the RTE toolbar icons and controls.
Note:
Instead of adding the content while creating a wiki document, you can choose to add the content later after the document has been created. For information, see Section 47.3, "Editing a Wiki Document."Click Create to save your changes and exit the editor.
The new wiki document is listed under the dedicated folder of your Wiki page.
Figure 47-11 shows the document hierarchy of the folder named MyWikiPage, which contains MyWikiPage—the default wiki document that was automatically created when the Wiki page style-based wiki page was created. The newly created wiki document, Popular Quotes, is also stored under the same folder.
Figure 47-11 Wiki Document Created Using the New Wiki Document Option

When you now open the dropdown menu for the MyWikiPage Wiki page, Popular Quotes is also listed as the wiki documents exposed through the Wiki page (Figure 47-12).
You use the RTE to add or revise the content of your wiki documents.
While working with documents in WebCenter Spaces, you must check out a file if you want to edit it, and check it in when you are ready to release the file. However, you do not need to worry about manually checking out or checking in a wiki document as this is automatically handled for wiki documents. When you open a wiki document for editing, the file is automatically checked out. If another user is already editing a wiki document and you try to open the same wiki document, the Documents service displays a message that the wiki document has already been checked out. On the Documents page or in a Documents service task flow, a lock icon appears next to a wiki document that has been checked out. When you hover the mouse over the lock icon, the name of the user who has checked out the wiki document is displayed.
Whenever a user saves changes, a new version of the wiki document gets created. So, effectively the last saved wiki document appears as the current version.
To edit a wiki document:
Open your wiki document in edit mode. Depending on your view, perform one of the following actions:
On the Documents page or in a Documents service task flow, click in the row of the file you want to edit. From the File menu, choose Edit, or right-click the file to display the file's context menu and choose Edit.
You can also click your wiki document in the document hierarchy to open the document. Then, click Edit.
To open the default wiki document created within a dedicated Wiki page based on the Wiki page style, click the required Wiki page on the side or top navigation bar, depending on the page template in use in your Space. Then, click the Edit action.
To open any other wiki document created within a dedicated Wiki page, click the required Wiki page or the dropdown arrow next to it on the navigation bar, select the required wiki document from the list (Figure 47-13). Then, click Edit.
Figure 47-13 Opening a Wiki Documented Created within a Dedicated Wiki Page

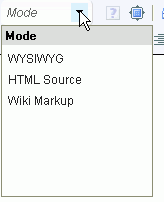
From the Mode list in the RTE, choose the desired editing mode (Figure 47-14). Table 47-2 describes all editing modes.
Figure 47-14 Selecting the Editing Mode in the RTE
Add or revise text, formatting, styling, and links using the icons and controls available in the selected mode in the RTE.
Table 47-2 describes the icons available in the RTE.
Table 47-2 Rich Text Editor Toolbar Icons and Controls
| Control | Description |
|---|---|
|
|
Print or Preview. Click to print the file or preview it in your default browser. |
|
|
Spell Check As You Type. Click to enable the SCAYT spelling checker, and set options, languages, and dictionaries for checking spelling in the document. |
|
|
Undo or Redo. Click to back out or restore the previous change. Change history is cleared when you click Create or Save. |
|
|
Cut, Copy, or Paste. Select text, then click the desired icon to cut or copy selected text, or paste text in the buffer at the current cursor location. |
|
|
Paste as plain text. Click to open a text box where you can press Ctrl+V to paste any text currently in the buffer, then click OK to insert the text, unformatted, into the RTE at the current cursor location. |
|
|
Paste from Word. Click to open a text box where you can press Ctrl+V to paste text from Microsoft Word, then click OK to insert the text, with formatting maintained, into the RTE at the current cursor location. |
|
|
Select mode. Select an editing mode:
|
|
|
Wiki Markup Help. Active only in Wiki Markup mode, click to view examples of wiki markup. |
|
|
Maximize/Minimize. Click to expand the RTE to fill the entire screen, or reduce the RTE to display inside the WebCenter Spaces application. |
|
|
Find. Click to open the Find and Replace dialog, where you can search for a string, or replace a given string with specified text. |
|
|
Image. Click to open the Image Properties dialog:
Note: To insert an image saved in the content repository, use the Embed Image icon. |
|
|
Table. Click to open the Table Properties dialog, where you can specify the number of rows and columns, sizing, spacing, alignment, caption, and summary for a table. Click OK to insert the table into the document. |
|
|
Insert Horizontal Line Click to insert a horizontal line at the current cursor location. |
|
|
Link. Select text to convert into a link, then click this icon to open the Link dialog:
Unlink. Select the linked text, then click this icon to remove the link from the text. |
|
|
Select Resource. Select text to link to an existing WebCenter resource, then click this icon to open the Select Resource dialog. Select a resource (for example, a document or an announcement) in the current Space to be linked from the selected text. Clicking the linked text in the document opens the selected resource in the Document Viewer preview pane. New Resource. Select text to link to a new WebCenter resource, then click this icon to open the New Resource dialog. Select a resource to be linked from the selected text, then create the resource (for example, a note or announcement), specify the external location of the resource (for example, a URL), specify the name of the resource (for example, a wiki document), or upload the resource from your local file system or a connected network drive (for example, a document). For information about creating links to resources in WebCenter Spaces, see Chapter 63, "Working with the Links Service." Note: If you create a new wiki document in this manner, WebCenter Spaces creates a placeholder for the new wiki document in the current folder. To add content to the new wiki document, you must navigate to it and open it in the RTE. Embed Image. Click to open the Embed Image dialog:
Note: To insert an image available at a URL location, use the Image icon. |
|
|
Paragraph Format. Select a format, then enter text; or highlight text, then select a format. |
|
|
Font Name. Select a font, then enter text; or highlight text, then select a font. |
|
|
Font Size. Select a size, then enter text; or highlight text, then select a size. |
|
|
Bold, Italic, Underline, and Strike Through. Select text, and click the desired font style icon; or click an icon, and enter text. Click the icon again to exit the font style. |
|
|
Left Justify, Right Justify, Center Justify, and Block Justify. Select text, and click to apply the desired text alignment; or click an icon, and enter text. |
|
|
Numbered List and Bulleted List. Start a new line, click the desired list type icon, and enter text. Or, select lines of text and click an icon. Click the icon again to remove the list formatting. Alternately, end list mode by pressing Enter twice after the last item. |
|
|
Decrease Indent and Increase Indent. Select text, and click the desired indent icon to move text left or right. |
|
|
Snippet. In a blog post, select a portion of text, then click this icon to display that portion as a summary of the blog post on the blog summary page (or digest page), with a Read More link to allow users to view the full blog. In a wiki document, this functionality is not available. |
|
|
Text Color or Background Color. Select text, and click to the desired text or background color icon, then select a color. Or, click an icon and select a color, then enter text.. |
|
|
Remove Format. Select text, and click this icon to remove all font styling, such as font types, sizes, weights, and colors. Lists and indents are not affected. |
|
Ctrl-x |
Use this key combination to cut highlighted selections to the clipboard. |
|
Ctrl-c |
Use this key combination to copy highlighted selections to the clipboard. |
|
Ctrl-v |
Use this key combination to paste the content on the clipboard at the current cursor location. |
Click the Major Edit? checkbox to update the Activity Stream and send a notification of your updates to other Space members who have access to the wiki document and have subscribed. The notification is sent after you save your changes.
Click Save to save your changes and continue editing, or click Save and Close to save your changes and exit the editor.
This section includes the following subsections:
Section 47.4.1, "Exposing an Existing Wiki Document Using the Wiki Page Style"
Section 47.4.2, "Exposing an Existing Wiki Document Using Content Presenter"
When you create a wiki page using the Wiki page style, it is listed in the document hierarchy, and is exposed as a separate page on the navigation bar, depending on the page template used in your Space. However, when you create a wiki document using the New Wiki Document option in a task flow, the wiki document is listed in only in the document hierarchy. For easy accessibility of such a wiki document, you can publish it to appear as a separate page on the navigation bar by using the Wiki page style.
To publish an existing wiki document as a separate page on the navigation bar by using the Wiki page style:
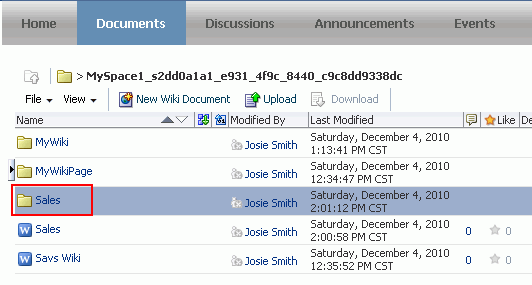
At the Space root level, create a folder with the same name as the existing wiki document. For example, if your existing wiki is named Sales, create a folder named Sales (Figure 47-15).
Figure 47-15 Folder Created at the Space Root Level
Move the existing wiki document to the newly created folder.
Note:
Note that it should be a wiki document that you created using the New Wiki Document option.From the Actions menu, select Create, and then Page.
In the Page Name field, enter the display name of the existing wiki document that you want to expose, for example Sales.
Note:
Document names are case sensitive.From the Page Style options, select Wiki.
Click Create.
The wiki document is listed in the document hierarchy. It is also listed on the navigation bar; the actual location depends on the page template used in your Space. Figure 47-16 shows the Sales wiki document listed in the document hierarchy and on the navigation bar in a Space using a top navigation template.
Figure 47-16 A Wiki Document Exposed Under the Wiki Category

The Content Presenter task flow allows you to select a wiki document, and render its content in a specific template on a page. For information, see Section 40, "Publishing Content Using Content Presenter."
When editing a wiki document, whenever you save the document, WebCenter Spaces creates a new version of the document. WebCenter Spaces tracks every version of the document, including its authors and creation dates.
Using the History pane, you can view, delete, or compare different versions (Figure 47-17). For information about viewing and deleting a document version, see Section 41.21, "Viewing and Deleting File Version History."
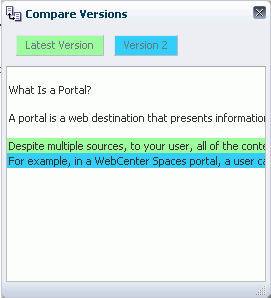
The History pane lists all the versions of a wiki document. You can compare an older version of a document with its latest version. Changes are highlighted in different colors, showing the new and the old content (Figure 47-18).
Figure 47-18 Comparing Versions of a Wiki Document
Note:
The Documents service does not allow you to upload a new version of a wiki document. Also, it does not enable you to restore an older version of a wiki document.To compare versions of a wiki document:
Open the History pane in any of the following ways:
On the Documents page or in a Documents service task flow, select the wiki document from the document hierarchy. Then, from the View menu, choose Version History.
A preview of the file opens, showing the History pane on the right.
If your wiki document is already open, click the History icon (Figure 47-19) to view the version history of the document.
In the History pane, select the older version that you want to compare with the latest version.
Click Compare.
The Compare Versions dialog shows a comparison of the selected version and the latest version of the wiki document, as shown in Figure 47-18.
The Documents service provides various features to help you manage your wiki documents. Table 47-3 lists the tasks that you can perform to manage wiki documents. It also lists the documentation links you can visit to know more about each task.
Note:
If your wiki document is based on the Wiki page style, you can perform some of the tasks listed in Table 47-3 by accessing the required options from the File or the View menu available in the wiki document.Table 47-3 Tasks Involved in Managing Wiki Documents
| Task | Description | Documentation |
|---|---|---|
|
You can open a wiki document using the Documents page or a Documents service task flow. If your wiki document is exposed through a Wiki page style-based page, you can open the Wiki page by using the navigation bar, and can then access the wiki document from the Wiki page's dropdown menu, for example as shown in Figure 47-12. |
||
|
You can download a wiki document from the content repository to your local system. The Download action is not available when you open a wiki document based on the Wiki page style. But you can download such a wiki document from the document hierarchy. Note: WebCenter does not support uploading a new wiki document or a new version of a wiki document from the file system. If you upload an HTML file, it is not possible to convert it to a wiki document. |
||
|
Users can directly access a wiki document by using its URL. You can share the link by publishing it to the Activity Stream or sending the link through e-mail. |
||
|
You can secure a wiki document. This includes setting custom access permissions or choosing to inherit the permissions of the parent folder. The option to set security for wiki documents is available if item level security has been enabled on Oracle Content Server. |
Section 41.25, "Setting Security Options on a Folder or File" |
|
|
You can subscribe to a wiki document to receive notifications for activities such as when it gets updated or when a user posts comments or likes it. You are notified through your selected messaging channel. |
||
|
To indicate that a wiki document is of particular interest to you, you can "like" it. If a wiki document is already liked, you can "unlike" it if you no longer wish to highlight your preference. To like or unlike a wiki document, use the Like icon. The icon is available when you open a wiki document. The icon is also displayed for a file on the Documents page and Documents service task flows. |
||
|
You can delete a wiki document from the Documents page or from a Documents service task flow. |
||
|
You can rename a wiki document as desired. |
||
|
You can associate keywords with a wiki document, and add links to other documents. |
Section 41.19, "Working with Related Items (Tags, Links, and Recommendations)" |
|
|
You can view the basic and advanced properties associated with a wiki document. However, you can modify only the name and description of a wiki document. |
Section 41.22, "Viewing and Modifying Folder and File Properties" |
|
|
You can associate comments with a wiki document to provide additional information that you may want to convey to other users about it. |
Section 41.20, "Viewing, Entering, and Deleting Comments on a File" |
|
|
Every time you save a wiki document, a version is saved. You can view and delete the various versions. However, you cannot restore an older version of a wiki document. |
||
|
You can open or save the PDF version of the currently open wiki document. This choice is available if Oracle Content Server is configured to convert wiki documents to the PDF format. |