3 Creating Cache Groups
A cache group defines the set of Oracle data to cache in the TimesTen database. When you create a cache group, cache tables are created in the TimesTen database that correspond to the Oracle tables being cached.
Create a cache group
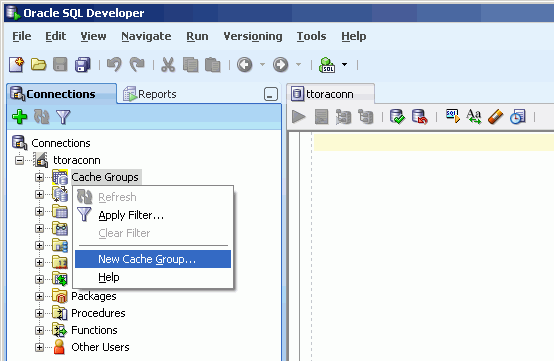
To create a cache group, right-click the Cache Groups node under the node that corresponds to the name of your database connection and select New Cache Group.
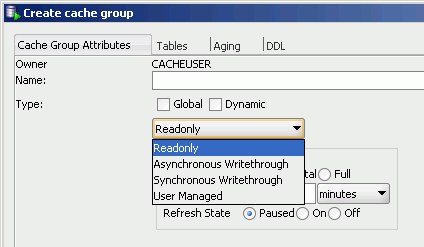
In the Create cache group dialog box, specify a name for the cache group in the Name field within the Cache Group Attributes tab. In the Type pull-down menu, select the desired cache group type (read-only, asynchronous writethrough, synchronous writethrough or user managed).
Cache groups are categorized as either explicitly loaded or dynamic. If you are creating a dynamic cache group, check the Dynamic check box in the Type section. Otherwise, leave the check box unchecked if you are creating an explicitly loaded cache group.
In an explicitly loaded cache group, data is loaded manually into its cache tables from its corresponding Oracle tables using a load or refresh operation, or automatically using an automatic refresh operation. In a dynamic cache group, data is loaded into its cache tables on demand from its corresponding Oracle tables using a dynamic load operation, or manually using a load operation.
A read-only, asynchronous writethrough (AWT) or synchronous writethrough (SWT) cache group can be defined as a dynamic cache group. A user managed cache group can be defined as a dynamic cache group unless it contains all of the following characteristics:
-
Automatic refresh is defined
-
One of more of its cache tables are updatable
-
Committed updates on at least one of its updatable cache tables will be propagated to its corresponding Oracle tables
For more information about explicitly loaded and dynamic cache groups, see "Loading data into a cache group: Explicitly loaded and dynamic cache groups" and "Dynamic cache groups" in the Oracle In-Memory Database Cache User's Guide.
Cache groups are also classified as either local or global. If you are creating a global cache group, check the Global check box in the Type section. Otherwise, leave the check box unchecked if you are creating a local cache group.
In a local cache group, data in its cache tables are not shared across TimesTen databases even if the databases are members of the same cache grid. In a global cache group, data in its cache tables are shared across TimesTen databases that are members of the same cache grid.
Only a dynamic AWT cache group can be defined as global cache group.
For more information about local and global cache groups, see "Sharing data across a cache grid: Local and global cache groups" and "Global cache groups" in the Oracle In-Memory Database Cache User's Guide.
Note:
Dynamic and global cache groups are supported in TimesTen 11g and later.All cache groups in TimesTen 7.0 are categorized as explicitly loaded and classified as local. However, you can load data into the cache tables of a cache group from its corresponding Oracle tables on demand using a transparent or dynamic load operation. Transparent load applies to all cache group types except for read-only cache groups and user managed cache groups that have automatic refresh defined. See "Using transparent loading" in the TimesTen Cache Connect to Oracle Guide for more information.
Define cache group and cache table attributes
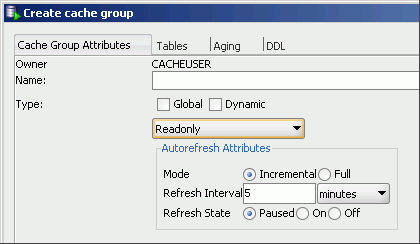
Within the Cache Group Attributes tab of the Create cache group dialog box, if you are creating a read-only cache group, or a user managed cache group and you put a check in the Autorefresh check box within the Table Attributes section to enable automatic refresh when either the All tables readonly or Propagate all tables button is selected, fill in the following automatic refresh characteristics:
-
Set the automatic refresh mode in the Mode field by selecting either the Incremental or Full button. The default automatic refresh mode is Incremental.
-
Set the automatic refresh interval in the Refresh Interval field by specifying a numeric value, followed by a unit of time in minutes, seconds or milliseconds from the pull-down menu. The default automatic refresh interval is 5 minutes.
-
Set the automatic refresh state in the Refresh State field by selecting either the Paused, On or Off button. The default automatic refresh state is Paused.
For more information about automatic refresh of cache groups, see "AUTOREFRESH cache group attribute" in the Oracle In-Memory Database Cache User's Guide or the TimesTen Cache Connect to Oracle Guide.
For more information about read-only cache groups, see "Read-only cache group" in the Oracle In-Memory Database Cache User's Guide or "READONLY cache groups" in the TimesTen Cache Connect to Oracle Guide.
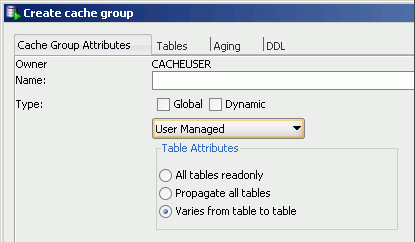
If you are creating a user managed cache group, select one of the following buttons from the Table Attributes section in the Cache Group Attributes tab within the Create cache group dialog box:
-
All tables readonly: All cache tables will be read-only
-
Propagate all tables: All cache tables will be updatable, and committed updates on the cache tables will be propagated to its corresponding Oracle tables
-
Varies from table to table: Some cache tables will be read-only, and other cache tables will be updatable where committed updates on the cache tables may or may not be propagated to its corresponding Oracle tables
For more information about user managed cache groups, see "User managed cache group" in the Oracle In-Memory Database Cache User's Guide or "USERMANAGED cache groups" in the TimesTen Cache Connect to Oracle Guide.
Define the root table
Click the Tables tab in the Create cache group dialog box. Right-click in the Tables panel and select Add root table.
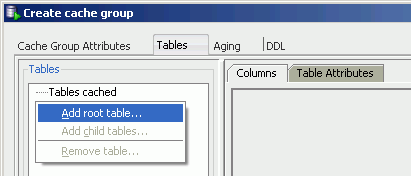
In the list of Oracle tables shown within the Select the root table dialog box, select the table that you want to designate as the root table for your cache group and then click the OK button.
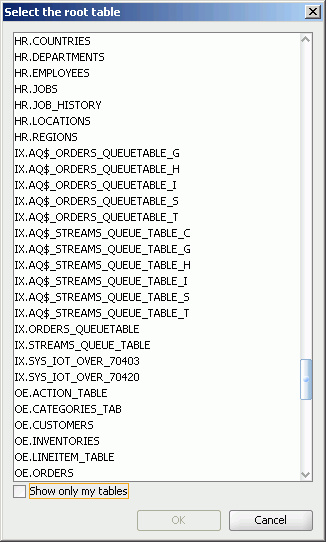
To show only tables owned by the Oracle user who has the same name as the TimesTen cache manager user, put a check in the Show only my tables check box.
Select the columns to cache
In the Columns tab within the Tables tab of the Create cache group dialog box, put a check in the check boxes under the Allow null values field for each cached column that you want null values to be accepted in. By default, the nullability of a cache table's column is identical to that of the corresponding Oracle table's column. The Oracle table's unique identifying columns cannot accept null values.
Put a check in the check boxes under the Cached field for each column that you want to cache. By default, all columns of the table are selected and will be cached. The Oracle table's unique identifying columns (primary key, unique index or unique constraint) for each row must be included in the TimesTen cache table and will constitute the cache table's primary key.
To select all columns, or deselect all columns except for the Oracle table's unique identifying columns, to accept null values or to cache, put (or do not put) a check in the check boxes that appear to the left of the Allow null values and Cached fields, respectively.

For more information about the characteristics of cache tables and cache groups, see "Cache groups and cache tables" in the Oracle In-Memory Database Cache User's Guide or "Defining cache group tables" in the TimesTen Cache Connect to Oracle Guide.
Some Oracle data types have more than one compatible TimesTen data type. For columns in the Oracle table with one of these Oracle data types, a pull-down menu appears under the Data type in TimesTen field for those columns. The pull-down menu allows you to select the desired data type for the column in the cache table. The non-default compatible or mapped data types appear in italics.
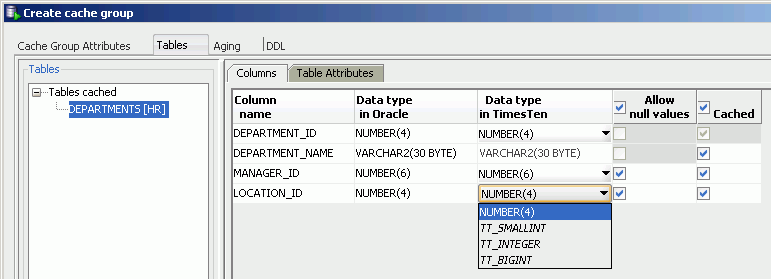
For more information about data type mappings between an Oracle and TimesTen database, see "Mapping between Oracle and TimesTen data types" in the Oracle In-Memory Database Cache User's Guide or "Data type mappings for Cache Connect to Oracle" in the TimesTen Cache Connect to Oracle Guide.
For updatable cache tables, you can specify a default column value under the Default Value field for each cached column that you want a default value defined.

Specify the table attributes
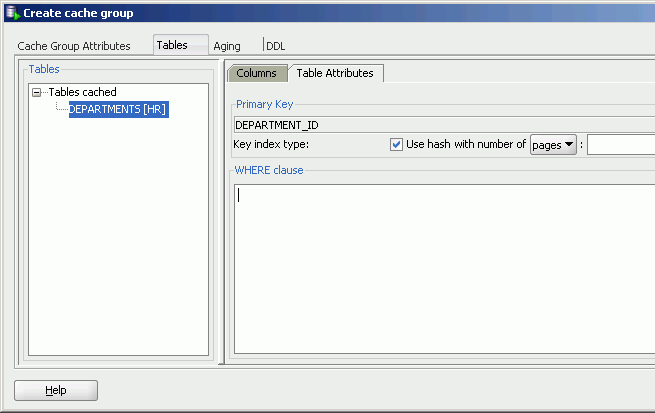
By default, TimesTen creates a range index (called a T-tree index in TimesTen 7.0) on the cache table's primary key columns. To create a hash index instead of a range index on the primary key columns, in the Primary Key section of the Table Attributes tab within the Tables tab of the Create cache group dialog box, put a check in the Use hash check box. You will then need to size the hash index. Specify either the number of pages to allocate to the index or the maximum number of rows the underlying cache table is anticipated to have in the with number of pull-down menu and the adjacent field after the colon (:) which requires a numeric value.

For more information about the index that is automatically created on a cache table's primary key columns, see "CREATE CACHE GROUP" in the Oracle TimesTen In-Memory Database SQL Reference.
For more information about properly sizing a hash index, see "CREATE TABLE" in the Oracle TimesTen In-Memory Database SQL Reference.
By default, the primary key columns of a cache table is the same as the primary key columns of the corresponding Oracle table. You can define a different column or set of columns as the primary key of the cache table.
In the Manual table management section of the Table Attributes tab within the Tables tab of the Create cache group dialog box, click the Redefine primary key button.
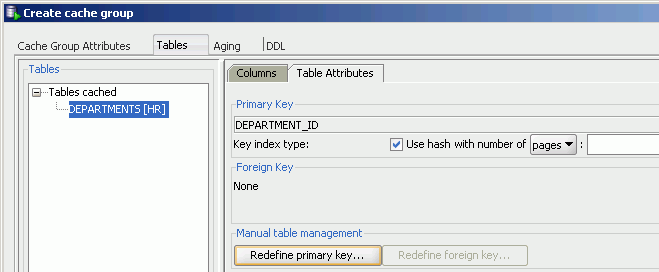
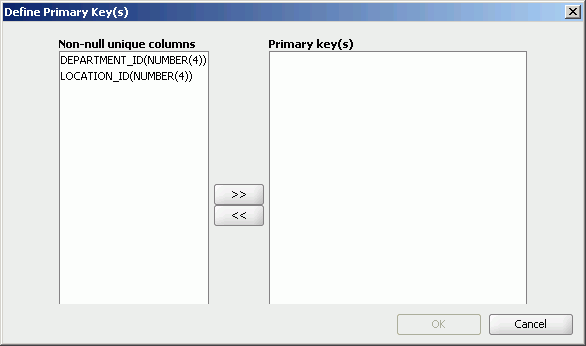
In the Define Primary Key(s) dialog box, the non-nullable unique columns of the corresponding Oracle table is shown in the Non-null unique columns list. Select the columns that you want the primary key to consist of and then click the >> button to move those columns into the Primary key(s) list. The order of a composite primary key's columns is significant if a range index is to be created on the columns. Click the OK button to define the new set of primary key columns.
If the primary key of the TimesTen cache table is defined on a different set of columns than the primary key of the corresponding cached Oracle table, the tables may become unsynchronized when committed updates are made on the cache table or the corresponding Oracle table. Unique constraint violations can occur when:
-
Committed updates on the cache table are propagated to the corresponding Oracle table
-
Committed updates on the cached Oracle table are refreshed to the corresponding TimesTen cache table
You can specify an optional WHERE clause for the table in the WHERE clause field of the Table Attributes tab within the Tables tab of the Create cache group dialog box. A WHERE clause is only allowed for table definitions in a read-only cache group or a user managed cache group that has automatic refresh defined.
For more information about specifying a WHERE clause in the table definition of a cache group, see "Using a WHERE clause" in the Oracle In-Memory Database Cache User's Guide or "Using WHERE clauses" in the TimesTen Cache Connect to Oracle Guide.
If the cache table is in a user managed cache group that has selected the Varies from table to table button in the Table attributes section within the Cache Group Attributes tab of the Create cache group dialog box, you need to specify the attribute for the table.
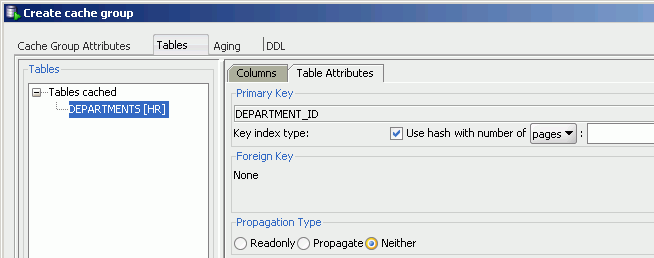
In the Propagation Type section of the Table Attributes tab within the Tables tab of the Create cache group dialog box, select the Readonly button to make the cache table read-only, the Propagate button to make the cache table updatable and updates on the table be propagated to its corresponding Oracle table, and the Neither button to make the cache table updatable and updates on the table not be propagated to its corresponding Oracle table.
By default, cache tables in a user managed cache group are updatable and updates on the table are not propagated to its corresponding Oracle table.
Specify an aging policy
You can specify an optional aging policy for the cache table in the Aging tab of the Create cache group dialog box. An aging policy is explicitly defined on the root table of a cache group but it implicitly applies to all its child tables as well.
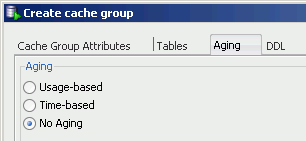
Select the Usage-based button to define a least recently used (LRU) aging policy, the Time-based button to define a time-based aging policy, or the No aging button to define no aging policy.
An LRU aging policy can only be defined for tables in an explicitly loaded AWT, SWT or user managed cache group that does not have automatic refresh defined. LRU aging is defined by default for tables in a dynamic cache group.
The TimesTen database memory usage thresholds that determine when data starts and stops being removed from the tables are shown when the Usage-based button is selected. The default usage threshold that determines when data starts being removed from the tables is 90%. The default usage threshold that determines when data stops being removed from the tables is 80%. The default LRU aging cycle is 1 minute.
For information about how to change the memory usage thresholds and LRU aging cycle, see "Change the memory usage thresholds and LRU aging cycle".
Specify an aging state by selecting either the on or off button. The default aging state is on.
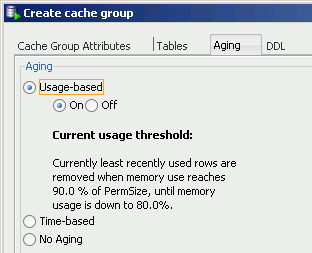
For more information about defining an LRU aging policy on cache tables, see "LRU aging" in the Oracle In-Memory Database Cache User's Guide or "Usage-based aging" in the TimesTen Cache Connect to Oracle Guide.
A time-based aging policy can only be defined on a cache table that contains a non-nullable DATE or TIMESTAMP column. Columns of these data types for the table will appear in the Column pull-down menu within the Aging tab of the Create cache group dialog box when the Time-based button is selected. Select the column that you want to store the timestamp value indicating when each row was inserted or most recently updated.
Indicate the length of time in which data that has not been updated is to be kept in the table by specifying, in the Life-time field, a numeric value followed by a unit of minutes, hours or days in the pull-down menu.
Indicate the frequency at which data is to be aged out of the table by specifying, in the Cycle field, a numeric value followed by a unit of minutes, hours or days in the pull-down menu. The default time-based aging cycle is 5 minutes.
Specify an aging state by selecting either the on or off button. The default aging state is on.
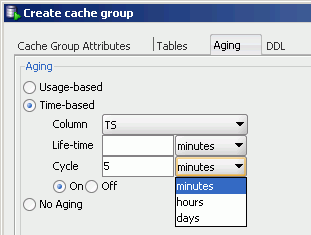
For more information about defining a time-based aging policy on cache tables, see "Time-based aging" in the Oracle In-Memory Database Cache User's Guide or the TimesTen Cache Connect to Oracle Guide.
Verify the root table definition
After you have defined the tables and columns to cache, type of index to create on the primary key columns, the table attributes including an optional WHERE clause, and an optional aging policy for the root table, you can view the CREATE CACHE GROUP statement in the DDL tab of the Create cache group dialog box that will be used to create the cache group and its cache table.
Click the Apply button to create the cache group and its cache table if you are not going to include any child tables in the cache group.
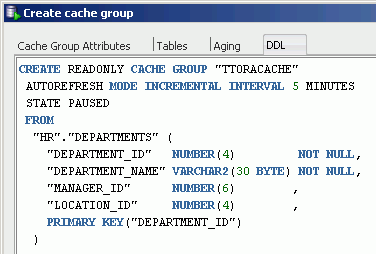
For information about the syntax and semantics of the CREATE CACHE GROUP statement, see "CREATE CACHE GROUP" in the Oracle TimesTen In-Memory Database SQL Reference.
Define the child tables
Within the Tables tab of the Create cache group dialog box, right-click in the Tables panel and select Add child tables.

In the list of Oracle tables shown within the Select one or more child tables dialog box, select the tables that you want to designate as the child tables for your cache group and then click the OK button.
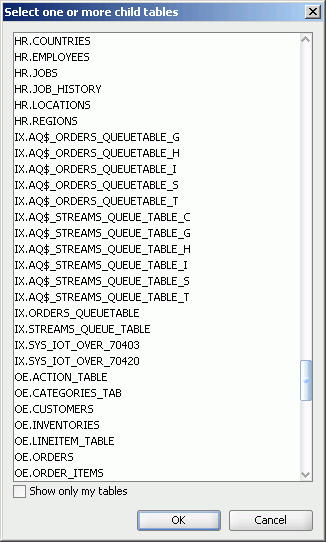
To select more than one child table, press and hold the CTRL key, and click the desired tables. The child tables will appear under their appropriate parent table.
Select the columns to cache
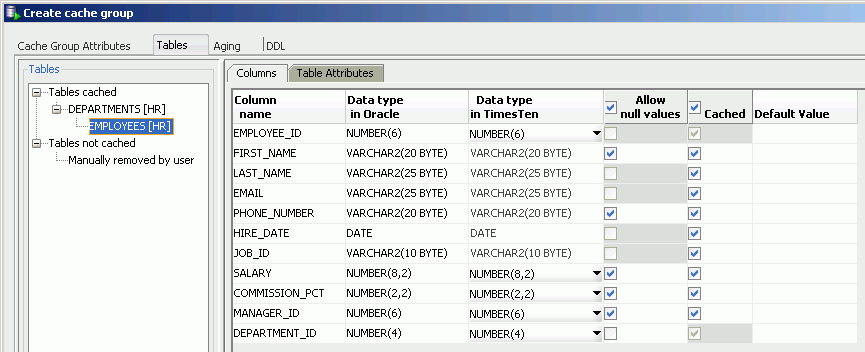
Click a child table and in the Columns tab within the Tables tab of the Create cache group dialog box, put a check in the check boxes under the Allow null values field for each cached column that you want null values to be accepted in. By default, the nullability of a cache table's column is identical to that of the corresponding Oracle table's column. The Oracle table's unique identifying columns cannot accept null values.
Put a check in the check boxes under the Cached field for each column that you want to cache. By default, all columns of the table are selected and will be cached. The Oracle table's unique identifying columns for each row must be included in the TimesTen cache table and will constitute the cache table's primary key. The Oracle table's foreign key columns that reference its parent table must also be included in the cache table.
To select all columns, or deselect all columns except for the Oracle table's unique identifying columns and the foreign key columns that reference its parent table, to accept null values or to cache, put (or do not put) a check in the check boxes that appear to the left of the Allow null values and Cached fields, respectively.
For columns in the Oracle table with more than one compatible TimesTen data type, select the desired data type for the columns in the cache table from the pull-down menu that appears under the Data Type in TimesTen field for those columns in a similar fashion as was specified for the root table.
For updatable cache tables, you can specify a default column value under the Default Value field for each cached column that you want a default value defined in a similar fashion as was specified for the root table.
Specify the table attributes
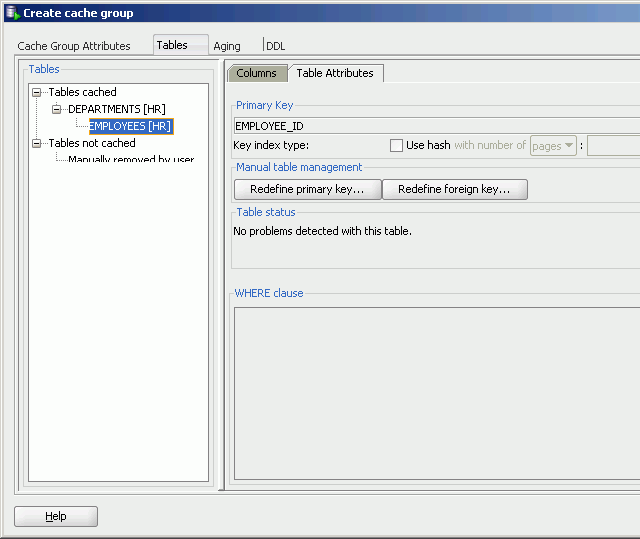
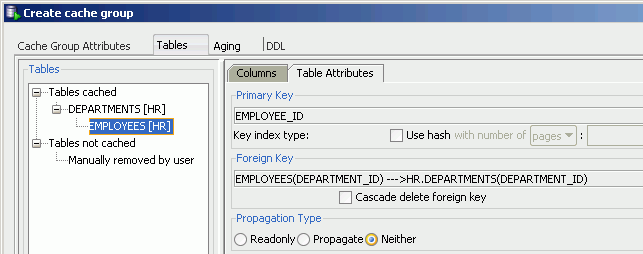
In the Table Attributes tab within the Tables tab of the Create cache group dialog box, specify whether to create a range index or a hash index on the child cache table's primary key columns, and define a different column or set of columns as the primary key of the cache table than the corresponding Oracle table in a similar fashion as was specified for the root table. Also, you can specify an optional WHERE clause in a similar fashion as was specified for the root table. A WHERE clause is only allowed for table definitions in a read-only cache group or a user managed cache group that has automatic refresh defined.
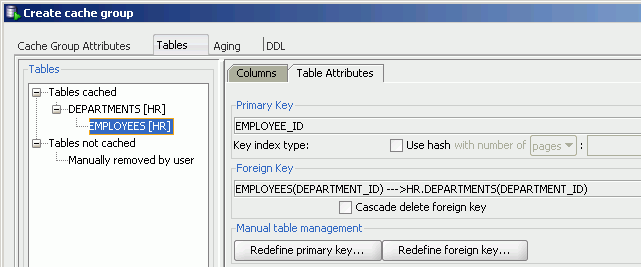
If you would like the foreign key columns of the child table to have cascade delete enabled such that when rows containing referenced key values are deleted from its parent table, rows in the child table with dependent foreign key values are also deleted, put a check in the Cascade delete foreign key check box.
By default, the foreign key columns of a child cache table is the same as the foreign key columns of the corresponding Oracle table. You can define a different column or set of columns as the foreign key of the cache table.
In the Manual table management section of the Table Attributes tab within the Tables tab of the Create cache group dialog box, click the Redefine foreign key button.
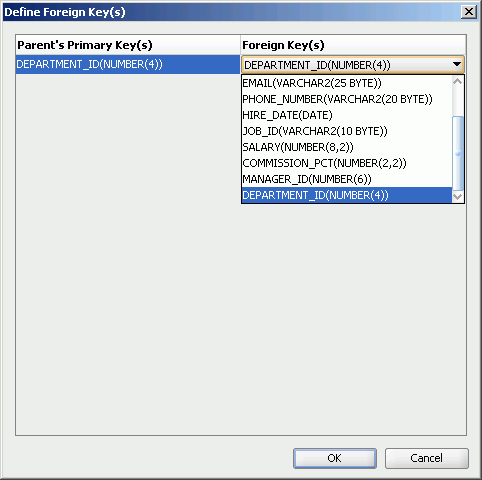
In the Define Foreign Key(s) dialog box, the list of columns in the child table whose data types are compatible with the primary key columns of the root table are shown in the Foreign Key(s) pull-down menu. Select the columns that you want the foreign key to consist of. Click the OK button to define the new set of foreign key columns.
For more information about the hierarchy and relationship of cache tables in a multiple-table cache group, see "Multiple-table cache group" in the Oracle In-Memory Database Cache User's Guide or "Defining multiple cache group tables" in the TimesTen Cache Connect to Oracle Guide.
If the cache table is in a user managed cache group that has selected the Varies from table to table button in the Table attributes section within the Cache Group Attributes tab of the Create cache group dialog box, select whether the cache table is read-only or updatable in a similar fashion as was specified for the root table. If the table is updatable, specify whether updates on the table are to be or not to be propagated to its corresponding Oracle table.
Complete the definitions of the child tables
Define the columns to cache, type of index to create on the primary key columns, cascade delete setting for the foreign key columns, and the table attributes including an optional WHERE clause for any remaining child tables.
Verify the cache group definition
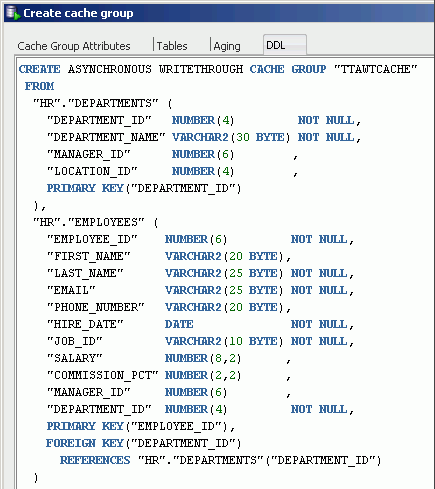
In the DDL tab of the Create cache group dialog box, you can view the CREATE CACHE GROUP statement that will be used to create the cache group and its cache tables.
Click the Apply button to create the cache group and its cache tables.
If you created an AWT cache group, you must start the replication agent in order for committed updates on its cache tables to be asynchronously propagated to its corresponding Oracle tables. See "Start the replication agent" for information on how to start the replication agent.
If you created a global cache group, you must attach the TimesTen database to the cache grid in order for data in its cache tables to maintain consistency among the TimesTen databases within the grid. This task must be performed outside of SQL Developer using a command-line interface such as the ttIsql utility, or within SQL Developer using SQL Worksheet. See "Attaching a TimesTen database to a cache grid" in the Oracle In-Memory Database Cache User's Guide for information.
Note:
Global cache groups and cache grids are supported in TimesTen 11g and later.Create an index on a table
You can create a range index or a bitmap index on a regular table or on a cache table.
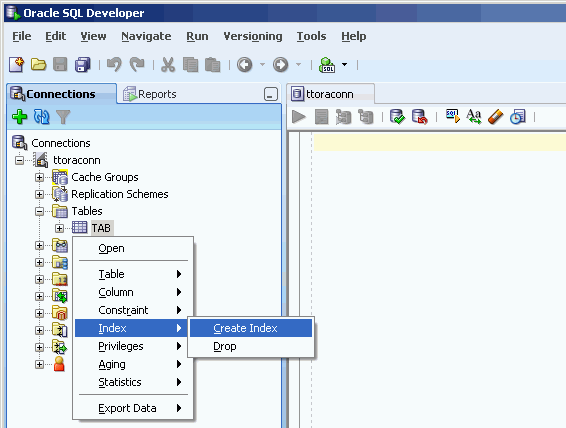
To create an index, click the + to the left of the Tables node to view the list of tables. Then right-click the name of the table that you want to create an index on and select Index > Create Index.
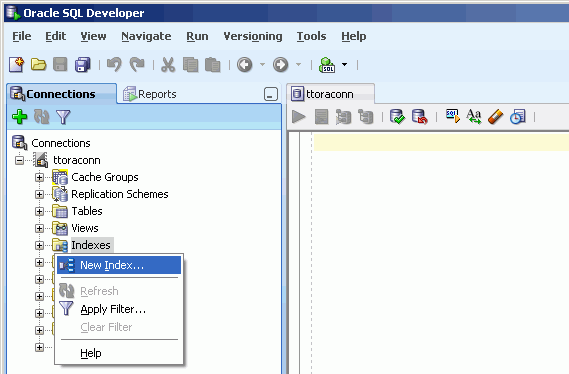
You can also right-click the Indexes node and select New Index.
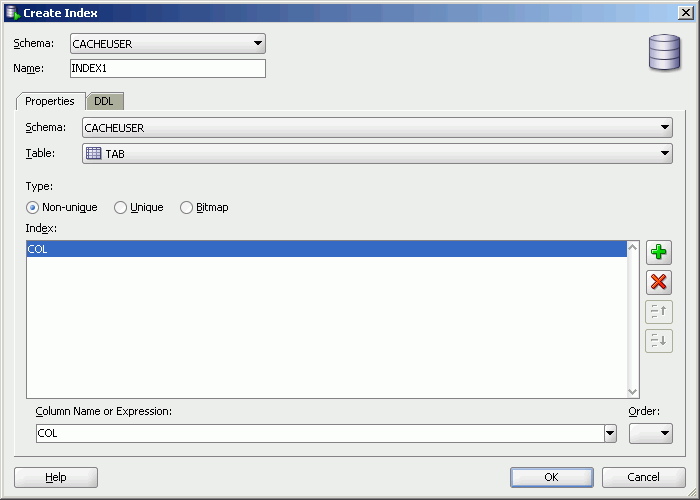
In the Properties tab of the Create Index dialog box, select the table that you want to create an index on from the Table pull-down menu.
In the Type section, select the:
-
Non-unique button to create a non-unique range index,
-
Unique button to create a unique range index, or
-
Bitmap button to create a bitmap index
See "CREATE INDEX" in the Oracle TimesTen In-Memory Database SQL Reference for information about the different types of indexes supported in TimesTen.
Note:
Bitmap indexes are supported in TimesTen 11g and later.In TimesTen 7.0, a range index is called a T-tree index.
In the Index section, specify the columns that the index is to be defined on. The columns can be selected from the Column Name or Expression pull-down menu. For each indexed column, you can specify whether the column is to be sorted in ascending or descending order from the Order pull-down menu. The default sort order is ascending.
To create a composite index, click the + button to add columns to the index. Click the X button to remove columns from the index.
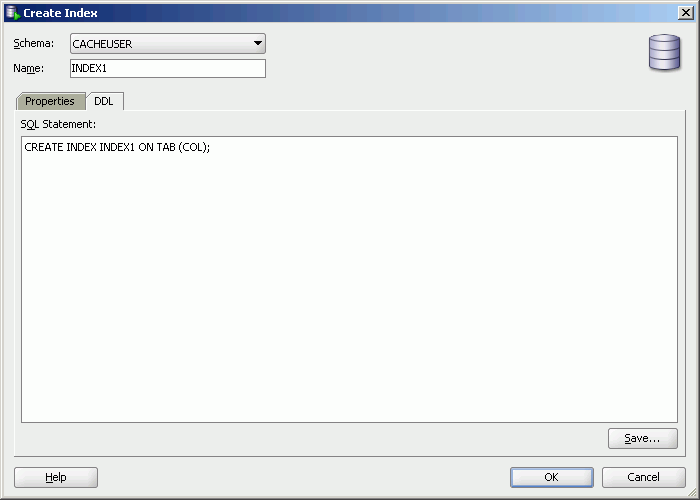
In the DDL tab of the Create Index dialog box, you can view the CREATE INDEX statement that will be used to create the index.
Click the OK button to create the index.
Grant and revoke object privileges to and from database elements
You can grant privileges to and revoke privileges from the following database elements:
-
Regular and cache tables
-
Regular and materialized views
-
Sequences
-
PL/SQL packages, procedures and functions (applies only to TimesTen 11g and later)
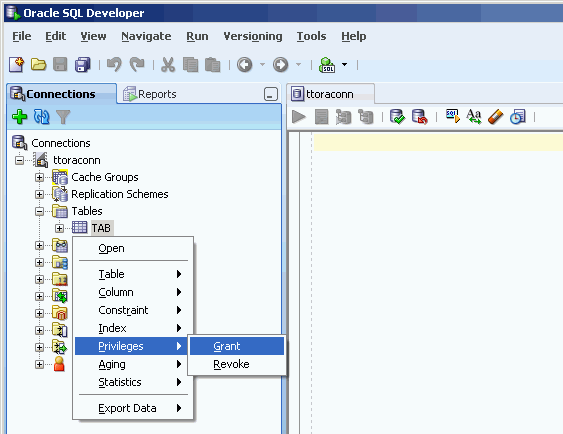
To grant privileges on a particular element, right-click the name of the element and select Privileges > Grant.
In the Users pull-down menu of the Grant dialog box, select the user that you want to grant object privileges to that element. In the Privileges section, put a check in the All check box or click the >> button if you want to grant all available object privileges on the element to the selected user. Otherwise, select the individual privileges from the Available Privileges list that you want to grant to the selected user and then click the > button to move those privileges into the Selected Privileges list. To select more than one privilege, press and hold the CTRL key, and click the desired privileges. Click the Apply button to grant the selected object privileges on the element to the selected user.
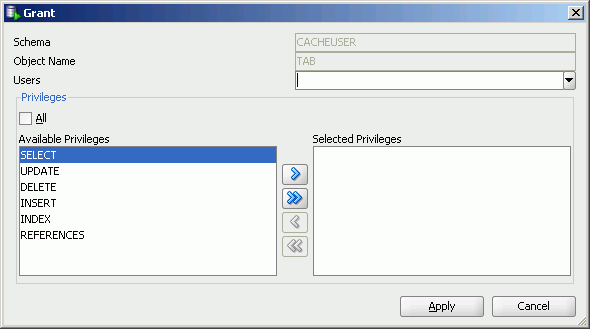
For a particular element type, only the available object privileges are shown. For example, DELETE, INDEX, INSERT, REFERENCES, SELECT and UPDATE privileges can be granted on a table. However, only INDEX, REFERENCES and SELECT privileges can be granted on a materialized view.
Only users with the ADMIN system privilege or the owner of the particular element can grant object privileges on that element.
See "Object privileges" in the Oracle TimesTen In-Memory Database SQL Reference for more information on the set of privileges available to each element type.
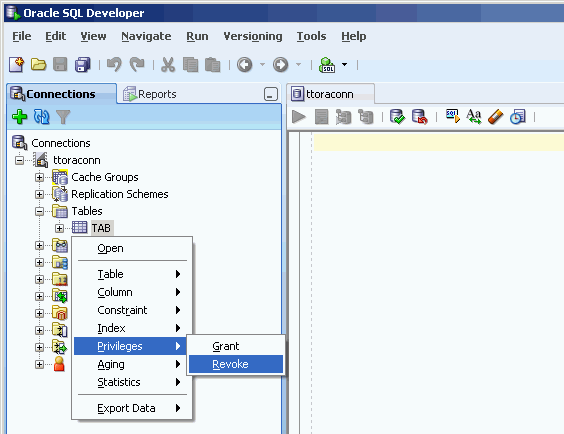
To revoke privileges from a particular element, right-click the name of the element and select Privileges > Revoke.
In the Users pull-down menu of the Revoke dialog box, select the user that you want to revoke object privileges from that element. In the Privileges section, put a check in the All check box or click the >> button if you want to revoke all granted object privileges on the element from the selected user. Otherwise, select the individual privileges from the Available Privileges list that you want to revoke from the selected user and then click the > button to move those privileges into the Selected Privileges list. To select more than one privilege, press and hold the CTRL key, and click the desired privileges. Click the Apply button to revoke the selected object privileges on the element from the selected user.
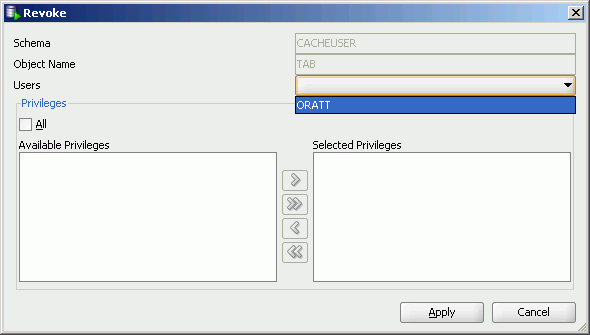
The Users pull-down menu only shows users who have been granted object privileges on the element. For a particular user, only the object privileges that they have been granted are shown.
Only users with the ADMIN system privilege or the owner of the particular element can revoke object privileges from that element.
Drop a cache group
When you drop a cache group, its corresponding cache tables are also dropped.
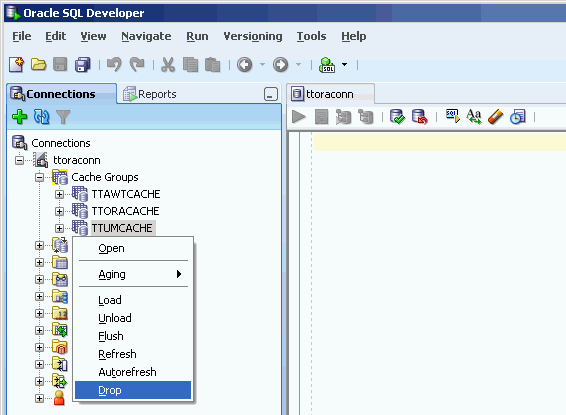
Under the Cache Groups node within the node that contains the name of your database connection, right-click the name of the cache group that you want to drop and select Drop.
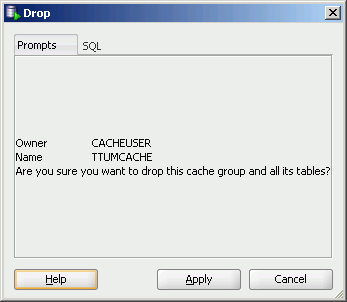
In the Prompts tab of the Drop dialog box, verify that you want to drop the cache group. Then click the Apply button to drop the cache group.
For more information about dropping a cache group, see "Dropping a cache group" in the Oracle In-Memory Database Cache User's Guide or the TimesTen Cache Connect to Oracle Guide.