 Understanding Resume Management
This chapter provides an overview of resume management and discusses how to:
Load resumes.
Manage resumes.
Understanding Resume Management
This section discusses:
Channels.
Resume extraction process.
Resume statuses.
 Channels
Applicant resumes can come into the Recruiting Solutions system from one of these channels:
Email.
Resume Load Process Application Engine process (HRS_RESLOAD).
Job boards and service providers.
Apply online.
Add New Applicant (HRS_ADD_APPLICANT) component.
Resume Management supports all resume document formats and will accept HR-XML resumes from all channels. However, only OIF uses the data within the HR-XML document to directly write data to Recruiting Solutions tables. The other processes route the document to a resume extractor for processing. Not all resume extractors support all resume document formats. If the resume extractor doesn't support the resume document format, the resume extraction process fails.
Applicants and staffing suppliers can email resumes to a designated email address that you set up.
See Setting Up Resume Email Accounts.
Resume Load Process Application Engine Process (HRS_RESLOAD)
The Resume Load Process enables organizations to load resumes that it receives.
See Loading Resumes.
OIF is used to receive web services from staffing suppliers (job boards, recruitment agencies, and services procurement providers) which may contain either a candidate HR-XML or an unstructured resume as an attachment. For example, a recruitment agency that your organization integrates with can send XML resumes through the OIF. Because the agency sends an XML resume file, the system does not need to perform any extraction. Instead, the system uses the data directly from the XML resume file to process through Recruiting Solutions. Although no extraction is performed on the XML resumes, the resumes still go through data mapping and any other business process that you have set up for the staffing supplier.
When a staffing supplier submits a resume, it is common not to contact the applicant to whom the resume belongs. Instead, all communication with the applicant, up until the interview with the applicant, is done through the staffing supplier. The person at the staffing supplier organization who handles this duty is referred to as a proxy. The proxy takes on all responsibilities of the applicant and is both responsible and expected to act in the best interest of the applicant. On system pages that show applicant contact information, the contact information for the proxy is also included. When you send correspondence to an applicant that uses a proxy, the system sends the correspondence to the proxy, not the applicant.
To use OIF to receive resumes, the staffing supplier organization must set up web services and deliver the configuration file that you will use to set up the vendor.
To set up OIF to receive incoming candidates in Talent Acquisition Manager:
Set up the vendor.
Set up a recruitment source and link the vendor to the source.
The system determines how to process the resumes based on the settings that you specify for the recruitment source on the Vendor page in the Source Setup (HRS_SOURCE_SETUP) component. For example, the system checks the Vendor page for the source from which it receives a resume to determine which status to assign to the resume.
When you set up contacts for the source, you can specify which contact to use as the proxy. If you do not specify a contact to use as a proxy, the contact setup is used only for informational purposes.
Apply Online
Internal and external applicants can use PeopleSoft Enterprise Candidate Gateway to apply for job openings online.
See Applying for Jobs.
Add New Applicant Component
Recruiters and hiring managers can enter applicant data manually by using the Add New Applicant component.
When recruiters and hiring managers manually enter data for an applicant, they have the option to attach a resume. The data in the resume is not extracted or used to automatically populate fields in the Add New Applicant component. However, the creation of these applicants is tracked in the Manage Resumes component.
Understanding the Resume Extraction Process
Resume extractors extract data from applicant resumes and move the data into Recruiting Solutions tables. Organizations can use multiple resume extractors. For example, you can use a different resume extractor for each country in the organization, or you can use different resume extractors for each recruitment source from which you receive resumes.
The resume extractor that the system selects to use depends on the resume extractor that you specify for a recruitment source, a site, or the extractor that you specify when you run the Resume Load Process or run an extraction from the Manage Resumes (HRS_AL_LOG) component. If an applicant attaches their resume to their online application in Candidate Gateway, the system uses the resume extractor that is specified on the Site - Setup Site page for that online application site. If the resume comes from a specific recruitment source; for example, a recruiting agency, the system uses the resume extractor that you specified in the Source Setup component when you set up the recruitment source. When you load resumes by using the Resume Load Process, you select which extractor to use when you run the process.
Resume extractors extract data from an applicant's resume. Not all extractors extract the same data. PeopleSoft software supports the following data from the extractors:
Contact information: applicant name, home address, telephone numbers, and email address.
Prior work experience.
Secondary education.
Qualifications including licenses and certificates, languages, memberships, honors and awards, and competencies.
Referrals.
Full resume text.
Upon successful extraction, the system creates a record for the applicant in the Manage Applicant component, and populates fields in the Manage Applicant component for the applicant. The system also assigns the applicant an applicant ID, a status, a resume name, adds the original resume as an attachment, and associates any job openings that might be applicable. If the applicant attaches a resume when they apply online through Candidate Gateway, the resume extractor populates fields in the applicant's online application and referrals. Of course, this presumes that the extractor actually extracted this data.
Note. The resume extraction process isn't required for applicants to apply for job openings online by using Candidate Gateway.
This process flow shows the resume extraction process starting with receipt of an unstructured resume and ending when the results of the successful or failed extraction are saved to the resume management tables in PeopleSoft Recruiting Solutions.
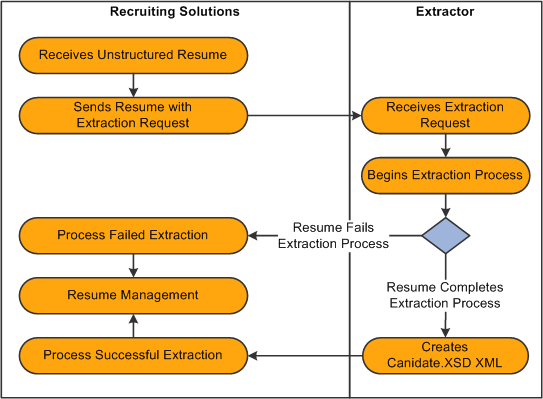
Resume extraction process showing tasks performed within PeopleSoft Recruiting Solutions and tasks performed by the extractor
Understanding Resume Statuses
The system assigns a status, or resolution state, to each resume that it receives. For resumes from recruitment sources that are a Vendor type, the system uses the settings that you define on the Vendor page in the Source Setup component to determine which status to assign to the resume. For the Resume Load Process, the system uses the run parameters that you set up to determine what statuses to assign.
The resume status of a resume is different than the extraction status of the resume. The extraction status of a resume can be either Success or Fail. In general, a resume that fails an extraction process is automatically set to either a Rejected or Unresolved resume status, and resumes that are successfully extracted are set to either a Success or Draft resume status, depending on the business rules that you set up for the recruitment source or the parameters that you select when you run the Resume Load Process.
When the system receives a resume through OIF, the resume extraction process might not be involved. However, the resume status is still applicable. For example, if the system receives a Candidate-XML message directly from a recruiting agency through OIF that is already parsed (extracted), the system does not send it to a resume extractor. However, the system does run the resume through the autoscreening rules that an organization sets up for the recruitment source.
This table describes resume statuses:
|
Resume Status |
Description |
Default Applicant Status |
|
Awaiting Resolution |
Indicates that the resume is in the database but has not yet been processed through a resume extractor. |
Not applicable. Applicant data is not created until the resume is extracted. |
|
Unresolved |
Indicates that the resume requires an administrators attention to move the resume into a Rejected or a Success resume status. Resumes in the Unresolved state can be reprocessed through an extractor, the associated applicant data for these resumes can be manually modified, and then the administrator can set the resume to a Success or Reject status. |
Queued |
|
Rejected |
Indicates that the system rejected the resume and has set the associated applicant's status to Inactive if the system created an applicant. A resume can be rejected for several reasons. PeopleSoft software supports two types of automatic rejection. First, resumes that are not successfully extracted can automatically be set to the Rejected status. Second, the autoscreening setup for the recruitment source can determine that a resume/applicant fails the Rejected status autoscreening definition and automatically set the resume status to Rejected. Finally, a user can manually set the resume status to Rejected from the Manage Resumes component. |
Inactive |
|
Draft |
Indicates that the resume requires the associated applicant's attention to move the resume into a Success state. The associated applicant's status is set to Queued. Resumes in the Draft state can be reprocessed through an extractor, the associated applicant data for these resumes can be manually modified, and then the administrator can set the resume to a Success or Reject status. Assigning a Draft status typically requires that the applicant validate their extracted resume data via the online application pages in Candidate Gateway. When the applicant submits the corresponding resume online, the status is updated to Success. If applicants do not validate their resume data, the resume stays in Draft status unless an administrator intervenes. |
Queued |
|
Success |
Indicates that the resume is successfully extracted and the resume's associated applicant has been set to Active and is ready to continue through the recruitment business processes. When an applicant uses the resume extraction process through Candidate Gateway when they apply for jobs online, the resume status for that resume defaults to Success. |
Active |
See Defining Settings for Vendor Recruitment Sources.
Loading Resumes
This section provides an overview of the Resume Load Process, lists prerequisites, and discusses how to load resumes.
Understanding the Resume Load Process (HRS_RESLOAD)The Resume Load Process enables organizations to load resumes that it receives in electronic formats. The electronic formats that the system can accept are limited only by the resume extractor that you select to use for the process. You can also use the Resume Load Process to upload paper resumes that you receive, after you transform the paper resumes into an electronic format.
When you set up the process you can specify the resume extractor that you want the system to use, parameters for the resume extractor, the site ID to which you want to redirect applicants, the source to which you want to associate resumes, the statuses that you want to assign to the resumes upon a failed or successful extraction, and the job openings that you want to associate to the applicants. You must browse for and upload the resumes that you want to use in the process. You can upload individual resume documents, or you can upload a zip file that contains multiple resumes.
When you run the process, the system sends the resumes to the resume extractor to parse. After the Resume Load Process completes, you can use the Manage Resumes component to view the status of each of the resumes.
See Managing Resumes.
This diagram shows the Resume Load Process from the time a recruiting administrator gathers resumes in electronic form and ending when the results of the successful or failed extraction are saved to the resume management tables in PeopleSoft Recruiting Solutions.
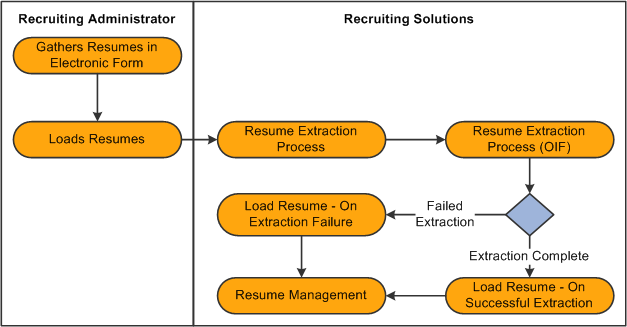
Resume Load Process for loading electronic resumes into resume management tables
PrerequisitesBefore you can load resumes using the Resume Load Process, you must:
Set up resume extractor vendors.
See link to resume extractor vendor setup in TAM
Set up site IDs.
See Setting Up Sites.
Set up sources and subsources if you want to associate the resumes with a source.
Create job openings if you want to associate applicants with a job opening.
Page Used to Load Resumes|
Page Name |
Definition Name |
Navigation |
Usage |
|
HRS_RESLOAD |
Recruiting, Administration, Load Resume, Load Resume - Prepare Load Parameters |
Load resumes. |
Loading Resumes
Access the Load Resume - Prepare Load Parameters page (Recruiting, Administration, Load Resume, Load Resume - Prepare Load Parameters).
Basic Information
Use this group box to specify basic load parameters for the Resume Load Process. The system remembers the settings that you specify in this group and uses the settings for the next process, except for the value in the Resume Load Description field, which is dynamic, and the Comments field. You can change the defaulted load parameters each time that you run process.
|
Resume Load Description |
The system populates this field with the user ID of the person logged in to the system along with the current date and time. You can edit the description if needed. |
|
Displays the status of the Resume Load Process. Values are: In Preparation: Indicates that the process has not started. The system displays this status until you click the Load Resumes button. Load in Progress: Indicates that the process is in progress. The system displays this status after you click the Load Resumes button and before the process completes. Loaded: Indicates that the process is complete. The system displays this status after all resumes are processed. |
|
|
Comments |
Enter comments. These comments appear only on this page and are used only for informational purposes. |
|
Select the resume extractor that you want the system to use. Only active vendors from the ResumeExtractor transaction group appear in this prompt. Define vendors by using the Vendor Setup (HRS_VENDOR_SETUP) component. |
|
|
Select a site ID where you want to redirect applicants. Define sites on the Site - Site Setup page. |
|
|
Country |
Select a country. Some resume extractors require a country to begin the extraction process. |
|
Language |
Select the language in which the resumes are written. This is an optional field. Some resume extractors use this language for the extraction process, however, other extractors ignore this field. |
|
Select the status that you want the system to assign to the resume upon successful extraction. You can view the status of resumes by using the Manage Resumes (HRS_AL_LOG) component. Values are: Set to Draft: Select to set the status of successfully extracted resumes to Draft. Set to Success: Select to set the status of successfully extracted resumes to Success. |
|
|
Select the status that you want the system to assign to the resume upon a failed extraction. You can view the status of resumes by using the Manage Resumes component. Values are: Reject Resume: Select to set the status of resumes that failed to extract to Rejected. Set to Unresolved: Select to set the status of resumes that failed to extract to Unresolved. |
|
|
Run Control ID |
Displays the run control ID. The system generates the run control ID after you click the Load Resumes button. |
|
Process Monitor |
Click to access the Process List page, where you can monitor the process request. |
|
Source and SubSource |
Select a source and subsource to assign to the resumes. The values that appear in the Source field are active recruitment sources with a source type of Marketing. After you select a source, the system populates the SubSource field with the subsources for that source. Define sources and subsources by using the Source Setup (HRS_SOURCE_SETUP) component. |
Job Openings
|
Job Opening ID and Posting Title |
Select a job opening ID to link the applicants to the job opening. When you select a job opening, the system populates the Posting Title field automatically. If you specify more than one job opening, the system creates one application, but links the applicants to all job openings. When you link a job opening to an applicant, the disposition is set to Applied. |
Resumes
Use this group box to view the resumes that you have uploaded.
|
Resumes |
Displays the file name for each resume that you have uploaded as a link. Click the file name link to open and view the resume in a separate browser window. To successfully open the file, you must have the application that the resume was created in installed on your computer. |
|
Displays the status of each resume. Values are: Awaiting Load, Draft, Success, Rejected, and Unresolved. Awaiting Load appears for all resumes until the Resume Load Resume process completes. When the process completes the system assigns a status to each resume based on the status values that you specify in the On Successful Extraction and On Extraction Failure fields. Click a status link to access the Resume Management - Select Resume page, where you can view details for that resume. The statuses appear as links only after the process completes. |
Additional Page Elements
|
Add Multiple Resumes |
Click to browse for a zip file and upload all resumes from that zip file. You must have network access to where the zip file is located. The system removes this button from the page after you initiate the Resume Load Process. |
|
Add Resume |
Click to browse for and select a single file to upload. The system removes this button from the page after the process completes. |
|
Load Resumes |
Click to run the Load Resume process. After you click this button, all options on this page become display-only. |
|
View Log for All Resumes |
Click to access the Resume Management - Select Resume page, where you can view details for all resumes that were processed. This link appears only after the Load Resume process completes. |
Managing Resumes
This section provides an overview of Resume Management, lists a prerequisite, and discusses how to:
Manage resumes.
View details for resumes.
Understanding Resume ManagementUse the Manage Resumes (HRS_AL_LOG) component to view details for all resumes that the system receives via any channel. For each resume, you can view its source, channel, and status.
PrerequisiteBefore you can manage resumes, the system must receive resumes from one of the valid channels.
See Understanding Resume Management.
Pages Used to Manage Resumes|
Page Name |
Definition Name |
Navigation |
Usage |
|
HRS_AL_LOG |
Recruiting, Administration, Manage Resumes, Manage Resumes - Select Resume |
Manage resumes. |
|
|
HRS_AL_LOG_DETAILS |
Click the Details link for an applicant in the Search Results group box on the Manage Resumes - Select Resume page. |
View details for resumes. |
|
|
HRS_HROI_LOG |
Click the Integration Log link on the Resume Management Details page. |
View transactions in the integration log for the applicant. |
|
|
HRS_CANDIDATE_XML |
Click the Candidate XML link on the Resume Management Details page. |
View the final output of the resume extraction. |
Managing Resumes
Access the Resume Management - Select Resume page (Recruiting, Administration, Manage Resumes, Resume Management - Select Resume).
Search Criteria
Use this group box to enter search criteria. Click Search to display the Search Results group box.
|
First Name and Last Name |
Enter the partial or full first or last name of the applicant. |
|
Email Address |
Enter the email address of the applicant. |
|
Source |
Select a source. All sources that you set up by using the Source Setup component appear here. |
|
Channel |
Select a channel. Values are: Apply Online: Displays resumes that applicants attach when they apply for job openings online by using Candidate Gateway Email: Displays resumes that the system receives through an email account. Integration Framework: Displays resumes that the system receives through the OIF. Load Resume: Displays resumes that you uploaded through the Resume Load Process. Manage Entry: Displays resumes that you attach to applicants that you manually enter into the system by using the Add New Applicant component. Refer a Friend: This functionality is not available at this time. |
|
Select a resume status. Values are: Awaiting Resolution, Draft, Rejected, Success, Unresolved with Errors. |
|
|
Date Type, Start Date, and End Date |
Select a date type and enter a start and end date to view resumes between those dates that meet the date type criteria. Date type options include: Notifications: Select to search based on the date a notification was sent. Original Submission: Select to search for resumes based on the date that the resume was originally submitted. Resolution Updates: Select to search for resumes based on the date that the resolution was updated. |
Search Results
Use this group box to view the resumes that meet the search criteria. For each resume the system displays the applicant's name, the source, channel, and resolution state (resume status).
|
Details |
Click to access the Resume Management Details page, where you can view details for the resume. |
|
Action and Go |
Select an action and click Go. The system performs the action for all applicants that you select. For each action, the system logs a new row in the appropriate group box on the Resume Management Details page. Values are:
|
Viewing Details for Resumes
Access the Resume Management Details page (on the Resume Management - Select Resume page, click the Details link for an applicant in the Search Results group box).
|
Name |
Click the applicant's name link to access the Manage Applicant page for that applicant. |
|
Source |
Displays the vendor recruitment source. The system populates this field only when a resume channel is email or OIF. |
|
Click the resume file link to open and view the resume in a separate browser window. To successfully open the file, you must have the application that the resume was created in installed on your computer. |
Extraction History
Use this group box to view resume extraction history details, included the resume extractor vendor, the status of the extraction, and the time in which the extraction took place. This group box appears on this page only if the resume has been extracted.
|
Integration Log |
Click to access the Open Integration Framework - Integration Log, where you can view all transactions for the extraction. |
|
Candidate XML |
Click to access the View Candidate XML page, where you can view the final output of the resume extraction. |
Notification Log
Use this group box to view the notifications that the system sends to the applicant. Each time you send a notification to the applicant, the system adds a new row that describes which template was used and to whom the notification was sent. This group box does not appear on the page unless the system has sent a notification to the applicant.
Source History
Use this grid to view details about the marketing recruitment sources and subsources that are associated to this resume.
Resolution History
Use this grid to view resolution history for the resume.
|
Action and Go |
Select an action and click Go. Values are: Edit Applicant: Select to access the Manage Applicant page, where you can view and modify the applicant's information. Refresh: Select to refresh the page. Send Notification: The system sends a notification (HRS_HROI_DRAFT, HRS_HROI_REJECT, HRS_HROI_SUCCESS, or HRS_HROI_UNRESOLVED) to the applicant. The notification that the system sends depends on the status of the resume. If the resume is from a specific source, the system looks at the setup in the Notifications group box on the Vendor page to determine which notification to send. Use the message catalog to modify the message text. When the system sends the notification, it also adds a row to the Notification Log group box that describes details about the notification. |