 Understanding the Time Administration Process Flow
This chapter provides an overview of the Time Administration batch process and discusses how to:
View time reporter status.
Start the Time Administration process.
Generate and view runtime statistics.
Use batch processing tips.
Understanding the Time Administration Process Flow
The batch process in Time Administration converts reported and scheduled time into payable time. It executes the rules you defined using Time and Labor’s online tools, selects time reporters for processing, combines time reporters into batches, determines the period to process, and calculates prior period adjustments before passing time reporter data to your payroll system or other applications.
The programs that make up the batch process are listed in the following table in the order in which they are run:
|
Program Name (Technical) |
Function |
|
TL_TA000200 |
Step 1: Determining Time Reporters to Process |
|
TL_TA000300 |
Step 2: Combining Time Reporters into Batches |
|
TL_EXC_RESL |
Step 3: Cleaning Up Pending Time Reporting Exceptions |
|
TL_TA000400 |
Step 4: Building the Rule Map |
|
TL_TA000500 |
Step 5: Building Time Reporter Profiles |
|
TL_TA000410 |
Step 6: Time Administration Main Batch Loop driver |
|
TL_TA000420 |
Step 7: Batch driver calls other libraries of Time Administration |
|
TL_ABS_RSVL |
Resolve Absence Data |
|
TL_TA000600 |
Step 8: Matching Punches |
|
TL_SCHRES_AE |
Schedule resolve callable routine. |
|
TL_TA000700 |
Step 9: Creating Intermediate Payable Time |
|
TL_TA000750 |
Step 10: Tracking Attendance |
|
TL_TA000800 |
Step 11: Processing Rules |
|
TL_TA000900 |
Step 12: Validate Data and Perform Estimated Gross |
|
TL_VALID_MAIN |
Step 13: Time Validation |
|
TL_TA001000 |
Step 14: Processing Adjustments |
|
TL_TA001100 |
Step 15: Updating Payable Time |
|
TL_TA001300 |
Step 16: Updating TR Status |
The following sections present detailed information about each of these steps.
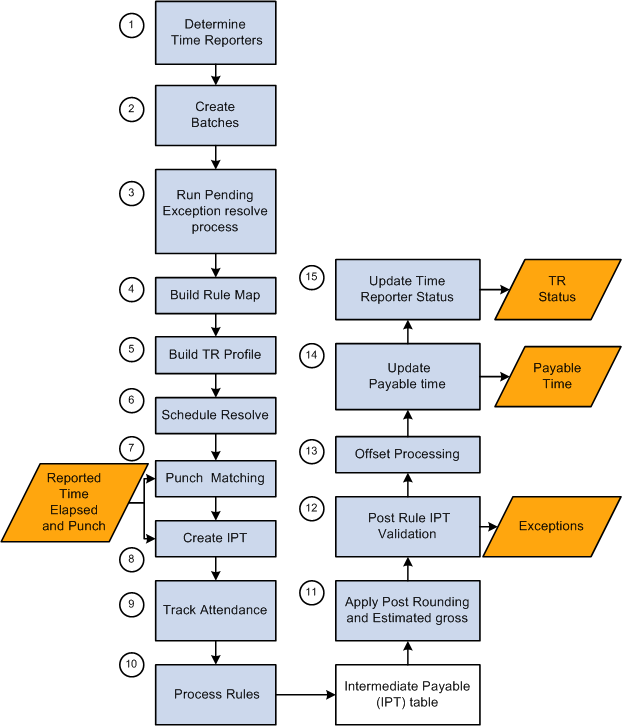
Time Administration process flow
 Overview of the Time Administration Application Engine Processes
Time Administration, the core process in Time and Labor, produces payable time that is passed to other applications such as Payroll and Project Costing. It is critical that this process produces accurate results and successfully completes within a certain processing window. Time Administration is an iterative process that only processes records that need processing. Depending on the size of the population at your installation, you may need to configure Time Administration to run concurrently to reduce clock time in order to fit your processing window.
Time Administration is a complex process comprised of many Application Engine (AE) programs. The main driver for the Time Administration process is TL_TIMEADMIN. When invoked, TL_TIMEADMIN calls other Application Engine processes to perform various tasks. Most of these subprograms contain the prefix of TL_TA followed by a six-digit number starting from 000200 to 001300. Subprograms that do not contain a number have been added to increase performance.
The following diagram illustrates the subprograms called by TL_TIMEADMIN:
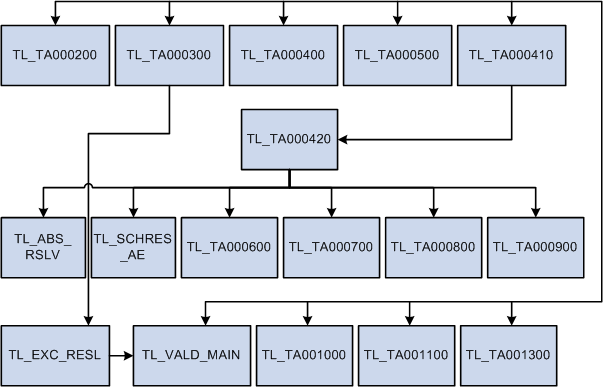
TL_TIMEADMIN Application Engine processes
The following table lists the Application Engine processes associated with Time Administration and describes:
The function of each Application Engine.
Tables accessed during the Application Engine process.
Tables updated during the Application Engine process.
|
Application Engine |
Function |
Tables Accessed/Updated |
|
TL_TIMEADMIN |
This is the main Time Administration driver program. It performs initialization tasks, calls other AE programs to perform various tasks, and performs finalization tasks. |
Note. The following table names listed ending with XX are temporary tables. You will need to replace XX with the correct temp table instance number before accessing them. Temp table instance number can be found in your AET log file or the Temp Tables tab of the Process Monitor while the process is running. |
|
TL_TA000200 |
|
Tables Accessed: TL_TR_STATUS – selects records with TA_STATUS of Y or X and EARLIEST_CHGDT <= Process Date. Tables Updated: TL_TA_TRLISTXX – contains a list of time reporters to be processed in subsequent steps of Time Administration. |
|
TL_TA000300 |
|
Tables Accessed:
Note. You can adjust the batch size (Max Employees In Rules
Run) on the Installation Options page to increase or decrease the number of
batches. TL_TA_BATCH%XX – contains batches of time reporters.
Note. There are many temp tables with the prefix TL_TA_BATCH
that hold batch related data. Note. The Time Administration process deletes a batch when there is no reason to process the employees in the batch. The rows that are deleted from TL_TA_BATCH result in gaps in the table. |
|
TL_EXC_RESL |
Resolves pending time reporting exceptions. This code (TL_EXC_RESL) runs as part of the TL_TA000300 step, as noted in section f in the previous row of this table. After it is runs, the TA_STATUS is set to 'X' in the current batch if there are no more exceptions, or if theContinue with Exceptions check box is selected in the Time Administration Options group box on the TL Installation page. |
If there still are high severity exceptions that are not resolved (from source TVP / TVE) and if theContinue with Exceptions check box is cleared in the Time Administration Options group box on the TL Installation page, TimeAdmin will remove those employees from the current batch. |
|
TL_TA000400 |
Creates rule maps – contains rules to be executed in priority order for each batch. |
Tables Accessed: TL_TA_BATCHXX – contains batches of time reporters. Tables Updated:
|
|
TL_TA000500 |
Calls TL_TRPROFILE – to create time reporter profiles. If Time and Labor is integrated with Global Payroll or Payroll for North America using Absence Management, or both, this step loads the Workgroup, PNA pay group and GP pay group attributes, including holiday configurations. |
Tables Accessed: TL_TA_BATCHXX – contains batches of time reporters. Tables Updated:
Note. TL_PROF_WRKXX can be used in custom rules to improve performance. |
|
TL_TA000410 |
|
Tables Accessed:
Tables Updated: None |
|
TL_TA000420 |
|
Tables Accessed: TL_TA_BATCH%XX – contains batches of time reporters. Tables Updated: TL_TA_BATCH%XX – contains batches of time reporters. Start date and end date get adjusted when there are changes. |
|
TL_SCHRES_AE |
Tables Accessed: TL_PROF_WRK – contains time reporter data. Tables Updated: WRK_ADHOC_TAOXX |
|
|
TL_ABS_RSLV |
Tables Accessed:
Tables Updated:
|
|
|
TL_TA000600 |
Converts punch time into elapsed time by calculating duration between two consecutive punches. Applies day breaker options and applies pre-rule punch rounding. Before inserting schedule punch time into the punch match table, the system checks for absence data for the days. |
Tables Accessed:
Tables Updated: TL_MTCHD_1XX – contains matched punches. |
|
TL_TA000700 |
Load absences (if integrated). Creates intermediate payable time (IPT) from matched punches (created by TL_TA000600), and reported elapsed time. Scheduled time is only created for workgroups with exceptions. |
Tables Accessed:
Tables Updated: TL_IPT1XX– contains intermediate payable time data for all time reporters in the current batch. |
|
TL_TA000750 |
Processes attendance data. |
Tables Accessed:
Tables Updated:
|
|
TL_TA000800 |
Calls TL_TA_RULES to apply rules in the order specified on the rule program for each batch. |
Tables Accessed:
Tables Updated: TL_IPT1XX– contains intermediate payable time data for all time reporters in the current batch. |
|
TL_TA000900 |
|
Tables Accessed:
Tables Updated: TL_IPT1XX– contains intermediate payable time data for all time reporters in the current batch. |
|
TL_VALD_MAIN |
Post rule validation
|
Tables Accessed:
|
|
TL_TA001000 |
Creates offsets. Creates offsets for absence rows that are from Global Payroll only. Note. Payroll for North America processes create offsets for absences and passes negative absence rows into TL_PAYABLE_TIME. |
Tables Accessed:
Tables Updated:
|
|
TL_TA001100 |
|
Tables Accessed:
Tables Updated:
|
|
TL_TA001300 |
|
Tables Accessed:
Tables Updated: TL_TR_STATUS – contains an updated row for each time reporter enrolled in Time and Labor. |
Understanding the Time Administration Control Table (TL_TR_STATUS)
TL_TR_STATUS is a control table in Time and Labor that is regularly updated by Time Administration and other processes. It is important to understand how and when this record gets created and updated, since it essentially controls the behavior of Time Administration.
When time reporters are enrolled in Time and Labor, the system creates a TL_TR_STATUS control record for each distinct time reporter. This control table is updated when certain changes are made to time related data. Specifically, there are two fields that tell Time Administration how much data to process for each time reporter:
TA_STATUS
EARLIEST_CHGDT
For exception and positive time reporters, TA_STATUS is initially set to Y and EARLIEST_CHGDT is set to the Time and Labor enrollment date.
When changes are made to reported time, EARLIEST_CHGDT gets updated if EARLIEST_CHGDT is later than the change date and TA_STATUS is set to Y.
Time Administration selects records with TA_STATUS = Y or X and EARLIEST_CHGDT is earlier or equal to the Process Date specified on the run control to be processed.
At the beginning of Time Administration (TL_TA000300), TA_STATUS gets set to X to indicate to other processes that it is being processed.
At the end of Time Administration (TL_TA001300), TA_STATUS and EARLIEST_CHGDT get updated as follows:
For positive time reporters without exceptions, TA_STATUS gets set to N and EARLIEST_CHGDT gets set to the latest date of payable time. If no changes are made to reported time, positive time reporters will not be selected for processing in subsequent Time Administration runs.
For exception time reporters without exceptions, TA_STATUS gets set to Y and EARLIEST_CHGDT gets set to the first day of the next time period (specified on work group). Exception time reporters will always be selected for processing in subsequent Time Administration.
For all time reporters with exceptions, TA_STATUS gets set toY and EARLIEST_CHGDT gets set to the first day of the exception. This way, exceptions will be processed and resolved.
Batch Processing Terms and ConceptsThe following terms and concepts are used throughout the documentation on batch processing, and are defined:
|
Date Under Report (DUR) |
The actual date of the time being reported for a shift as defined by the Day Breaker Options and Day Breaker Range. |
|
Earliest Change Date (EARLIEST_CHGDT) |
The date-under-report of the earliest addition or update to time-related data for a time reporter since the last Time Administration run. The earliest change date helps determine both the range of dates and the amount of data that will be processed for each time reporter. |
|
TA Status (TA_STATUS) |
This field is used to determine whether a time reporter should be processed through Time Administration. Valid values are Y (the time reporter should be processed) and N (the time reporter should not be processed). |
|
Process Instance |
Has a process instance value when the TL_TR_STATUS was last updated by a batch process, such as Time Admin or Submit Time. |
Step 1: Determining Time Reporters to Process
This process can be divided into two phases.
|
Phase 1: Select Time Reporters for Processing |
This process is initiated when you select groups or individuals to process on the Time Administration run control page. Among the groups or individuals you select, Time Administration processes those meeting the following criteria: If you are creating Payable Time, the system processes only time reporters whose TA_STATUS is Y and whose EARLIEST_CHGDT (earliest change date) is less than or equal to the current date or process date specified on the Time Administration run control page. All multiple jobs are loaded even if not specified on the run control page, irrespective of TL installation option. The TL installation option is used later on in the TL_TA000300 routine. Note. If you are forecasting Payable Time, the system does not use TA_STATUS or EARLIEST_CHGDT to select time reporters for processing. The only time it uses these fields to select time reporters is when creating actual Payable Time. After the system has applied its selection criteria to the time reporters you entered on the Time Administration run control page, Time Administration populates the TL_TA_TRLIST Table with a final list of time reporters to be processed (it only processes time reporters in this list). Note. Even though TA_STATUS is permanently set to Y for exception reporters, Time Administration does not automatically process all exception reporters. Only exception reporters whose EARLIEST_CHGDT is less than or equal to the current or process date selected on the Time Administration Run Control page are processed. |
|
Phase 2: Define Initial Period of Interest |
This step determines the start (START_DT) and end dates (END_DT) of the initial period of interest for batch processing. The initial period of interest represents the minimum amount of time that must be processed for each time reporter you run through Time Administration. This data is stored in the TL_TA_TRLIST Table along with each time reporter’s EMPLID and EMPL_RCD. Regardless of whether you are creating Payable Time or Forecasting Payable Time, the initial period of interest is defined (for each time reporter) as the workgroup period intersected by the EARLIEST_CHGDT. The end date of this period can extend beyond the workgroup period (as far out as the last date of reported time) if time is reported for future dates (that is, dates following the workgroup period). The initial period of interest start (START_DT) and end (END_DT) dates contained in the TL_TA_TRLIST table are referenced in Step 2—Combining Time Reporters into Batches, and are used to help group the population you are processing into batches. |
In what follows we discuss:
How Time Administration uses the TA_STATUS and EARLIEST_CHGDT fields to narrow the time reporters you’ve entered on the Time Administration run control page to those who actually meet the criteria for processing.
The TL_TA_TRLIST Table, which contains the final list of time reporters for processing and the start and end dates of the initial period of interest—information that is used in Step 2—Combining Time Reporters Into Batches.
How Time Administration defines the initial period of interest.
See Also
Launching the Time Administration Process
Understanding General Rules for Building Periods and Calendars
Using Time Reporter Status in the Selection Process
To understand how the system selects time reporters for processing, you must know how the application uses the TA_STATUS and EARLIEST_CHGDT fields on the TL_TR_STATUS table. This table stores information about who is eligible for processing and what the earliest addition or update to time-related data is for each time reporter since the last Time Administration run.
The structure of the TL_TR_STATUS table is as follows:
TL_TR_STATUS Record
|
Field Name |
Description |
|
EMPLID |
The time reporter’s employee ID number. |
|
EMPL_RCD |
The time reporter’s employee record number. |
|
TA_STATUS |
Indicates whether the time reporter should be run through Time Administration. Valid values are Y (the time reporter should be run) and N (the time reporter should not be run). |
|
EARLIEST_CHGDT |
The date-under-report of the earliest addition or update to time-related data for a time reporter since the last Time Administration run. The earliest change date helps determine both the range of dates and the amount of data that will be processed for each time reporter. |
|
LASTUPDDTTM |
A timestamp indicating when the last transaction affecting a time reporter’s payable time has been entered. Note that this is the time the transaction occurred—not the date under report (DUR). |
Note. When forecasting Payable Time, the system does not check TA_STATUS. It also uses the date you enter in the Process Period with this Date field on the Starting the Time Administration Process as the EARLIEST_CHGDT for all selected time reporters.
As a rule, the system processes only time reporters whose TA_STATUS is Y and whose EARLIEST_CHGDT is less than or equal to the current or process date specified on the TA Run Control page. You set the run control date to either the current date or another date (the process date) depending on who you want to process and what periods you want to process.
Even though TA_STATUS is permanently set to Y for exception reporters, Time Administration does not automatically process all exception reporters. Only exception reporters whose EARLIEST_CHGDT is less than or equal to the date selected on the Time Administration Run Control page are processed.
The TA_STATUS and EARLIEST_CHGDT fields in the TL_TR_STATUS table are updated at different times and for different reasons:
Updating TL_TR_STATUS When There Are New Enrollments
When a time reporter is enrolled in Time and Labor, the system inserts a new row in the TL_TR_STATUS record.
For newly hired time reporters, the system sets TA_STATUS to Y and the EARLIEST_CHGDT to the date entered as the Payable Time Start Date on the Create Time Reporter Data page. If this date field is not completed, then the EARLIEST_CHGDT is set to the TL enrollment date.
Updating TL_TR_STATUS When There Is New or Modified Data
In the case of positive time reporters, when data is changed or new data is added that might affect payable time, TA_STATUS is set to Y (if it was previously set to N) and the EARLIEST_CHGDT is set to reflect the earliest date for which new time was reported or the earliest date for which existing time data was modified—even if the modification extends into prior periods.
In the case of exception time reporters, TA_STATUS always equals Y, and the EARLIEST_CHGDT is automatically reset, after processing, to the first day of the next workgroup period (this is the period immediately following the one intersected by the current date or process date used in the current Time Administration run). This enables the system to know which period to process in the subsequent run (the period to be processed is the one intersected by the earliest change date).
Note. After a time reporter has been processed, the time reporter is not reprocessed unless new data is entered that causes the EARLIEST_CHGT field to be reset in the period that was just processed or in a prior period.
There are three sources of new or modified data that can cause the TL_TR_STATUS record to be updated:
The report by Time Period or Week views on the Timesheet page (for punch and elapsed time), and the Web Clock – Enter Punch page can cause the EARLIEST_CHGDT to be set to the earliest date of reported time and the TA_STATUS to be set to Y.
Batch time entered through the TCD Interface, Rapid Time pages, or Mass Time pages goes through Submit Time and starts the Validation process, which causes TL_TR_STATUS to be updated.
Changes to effective-dated rows of information using the online system initiates Referential Integrity and starts the Validation process. The Validation process updates TL_TR_STATUS.
Note. The Validation process resets the EARLIEST_CHGDT to reflect retroactive changes in data. If a time reporter is affected by these changes, but does not have data going back as far as the earliest change date, the system recognizes this and sets the EARLIEST_CHGDT to coincide with the first actual instance of reported or scheduled time. For example, suppose that employee A has time data going back to 5 January 2002. This is also the day he joined Workgroup A. Now suppose that the Time and Labor administrator finds that all time reporters in Workgroup A should have been in Workgroup B beginning on 1 January 2000. Because time reporter A only has time date going back to 5 January 2002, his earliest change date will be set to 5 January 2002.
The following table describes the conditions that update the Earliest Change Data and TA Status:
|
Condition |
ECD (Earliest Change Date) |
TA Status |
|
1. Upgrade: When Payable time exists |
Maximum Date of Payable Time + 1 date in Payable Time |
Y |
|
2. Upgrade: When no payable time exists |
Current Datetime |
Y |
|
3. When Employee Enrolled in T&L |
Either TL Enrollment Date or Date > Effective Date entered in (Payable Time Start field on Create Time Reporter Data) |
Y |
|
4. When Employee changes from Positive to Exception Workgroup, or Workgroup type is changed from Positive to Exception |
All Employees impacted are determined, and ECD becomes the Effective date of the change, if current ECD > Effective date of the change |
Y (Changed from N to Y) |
|
5. Positive Workgroup: When Out Punch is missing for Max Date processing |
ECD will remain on missing out punch date |
N |
|
6. Positive Workgroup: When Out Punches are reported or time for Elapsed Reporter is processed |
Next Period Begin Date |
N |
|
7. Positive Workgroup: When Exceptions are generated |
Minimum date of Exception Generated |
Y |
|
8. Exception Workgroup: When time is processed for the current period |
Next Period Begin Date |
Y |
|
9. Exception Workgroup: Exceptions are generated |
Minimum date of Exception Generated |
Y |
|
10. In case of Holiday: If the maximum date of payable time generated, is less than the End date of the Period of Interest (POI). ECD will be adjusted to the holiday date to trigger holiday template rules. |
To the date of Holiday date. |
TA Status will depend on positive or exception workgroup |
Resetting TL_TR_STATUS at the End of a Time Administration Run
At the end of a Time Administration run, the system resets the values in the TL_TR_STATUS record as described in step 16, Updating TR Status.
Updating Status as a Result of a Processing Exception
When an exception of high severity is generated (one that prevents a time reporter from being fully processed), the time reporter’s TA_STATUS and EARLIEST_CHGDT is not reset in the usual way. Instead, TA_STATUS will remain Y and the EARLIEST_CHGDT is changed to the earliest Exception date, so that the time reporter can be processed again after the exception is resolved. For example, suppose that time is originally reported for September 7, 2004 through September 21, 2004, where TA_STATUS = Y and EARLIEST_CHGDT = September 7, 2004. After Time Administration is run, an exception is created for September 15, 2004. TA_STATUS remains Y and EARLIEST_CHGDT is reset from September 7 to September 15.
See Also
Launching the Time Administration Process
Defining the Initial Period of Interest
After you have specified the population you want to process, Time Administration determines the start (START_DT) and end dates (END_DT) of the initial period of interest for batch creation. This initial period represents the minimum amount of time that must be processed for each time reporter you run through Time Administration. This data is stored in the TL_TA_TRLIST table along with each time reporter’s EMPLID and EMPL_RCD.
Important! The explanation of the initial period of interest above, assumes that the Use Reported Time for POI check box on the Process Time Admin page is selected. For an explanation of what happens when the check box is cleared, see the Process Time Admin page.
Note. The initial period of interest start (START_DT) and end (END_DT) dates contained in the TL_TA_TRLIST Table are referenced in Step 2, Combining Time Reporters into Batches, and are used to help group the population you are processing into batches.
The TL_TA_TRLIST table has the following structure:
|
Field |
Use |
|
BATCH_NUM |
This number represents the initial assignment of time reporters to a batch for processing. |
|
EMPLID |
Identifies the time reporter to be processed. |
|
EMPL_RCD |
Identifies a specific job or position. |
|
START_DT |
This is the start of the initial period of interest. |
|
END_DT |
This is the end of the initial period of interest. |
|
EARLIEST_CHGDT |
This is the earliest date of reported time for the time reporter. |
|
RUN_CNTL_ID |
This is the run control ID entered on the run control page for Time Administration processing. |
To determine the START_DT and END_DT contained in this table (the initial period of interest for batch creation), the selection process does the following:
It determines the EARLIEST_CHGDT for the time reporter being processed.
It identifies the time reporting period (based on the Time Period ID in the workgroup table) intersected by the EARLIEST_CHGDT.
It uses the begin and end dates of the time reporting period intersected by the earliest change date as the begin and end dates of the initial period of interest. The selection process then queries the reported time tables (both punch and reported) to see if time has been reported for a future date (that is, a date following the time reporting period). If so, the end date of the initial period of interest is set to the last date of reported time.
The start and end date information in this table is used in Step 2—Combining Time Reporters into Batches.
Example: Determining the Initial Period of Interest
Suppose that the EARLIEST_CHGDT for the time reporter you are processing is 2 February 2000, and you run Time Administration on 7 February 2000 (the current date). Assume that the time reporting period associated with this time reporter’s workgroup is weekly, and that the week is defined to begin on Monday and end on Sunday. The timeline for this time reporter would look like this:
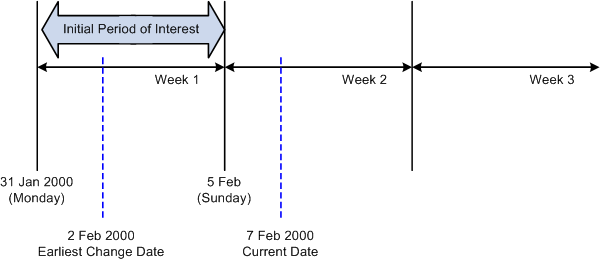
Determining the initial period of interest
As you can see from the timeline, the EARLIEST_CHGDT for the time reporter intersects a weekly calendar period that begins on January 31, 2000 (Monday) and ends on February 5, 2000 (Sunday). The system uses the begin and end dates of this week to establish the initial period of interest: January 31 − February 5.
Step
2: Combining Time Reporters Into Batches
This process takes the time reporters listed in the TL_TA_TRLIST Table and their initial period of interest begin and end dates and organizes them into batches based on workgroup affiliation.
To create batches:
Define Workgroup Affiliation.
The system determines the workgroup affiliation of the selected time reporters and organizes them into batches by workgroup. This ensures that all time reporters processed as part of the same batch share a common rule program (because each workgroup is associated with one rule program).
If a time reporter switches workgroups during the initial period of interest stored in the TL_TA_TRLIST Table, the system detects the transfer when it reads the time reporter’s TL_EMPL_DATA record. The transfer causes Time Administration to process the time reporter in more than one batch. The same thing occurs when there are changes to Rule Program effective dates or TL_EMPL_DATA effective dates during the initial period of interest—effective dates associated with employee hires, inactivation, or job transfers. For example, if the rule program associated with a workgroup changes in mid period, time reporters are processed in separate batches on either side of the change date. Similarly, because a time reporter could have more than one row in TL_EMPL_DATA with different effective dates, multiple rows per time reporter can be pushed into the batch creation process. In this case, start dates and end dates for each batch must be adjusted for such things as the TL_EMPL_DATA.EFFDT falling within the initial period of interest. For example, if the EFFDT of a time reporter is greater than the START_DT of the initial period of interest defined in the TL_TA_TRLIST Table, the START_DT of the new batch will be set equal to the EFFDT.
Send batches to Rule Map.
The resulting batches are then sent to the Determine Period of Interest function for time reporters described in the Building the Rule Map section. The batches contain a record for each of the time reporters to be processed, the time reporter’s workgroup, workgroup effective date, rule program, and rule program effective date.
Note. The system separates time reporters into batches for efficient processing by grouping time reporters with the same Rule Program and common dates. However, it is possible that the resulting batch size may be too large to ensure rapid processing. If so, you can reduce the size of batches by completing the Max Employees in Rules Run field on the TL Installation page.
See Also
Making Changes to a Rule Program of a Workgroup
Step 3: Resolving Pending Time Reporting ExceptionsThe TL_EXC_RESL process validates reported time for the days where there are unresolved exceptions. This process calls validation application engine sections for only those exceptions which are still unresolved. It does not call all the validations as defined in the validation set.
This process clears exceptions if exceptions are not recreated.
This process also recreates exceptions if they are still unresolved.
The Clean Up Exception process (run by clicking the Clean Up Exceptions button) on the Manage Exceptions page, doesn't have to be run as Time Admin cleans up exceptions. However if a user would like to be proactive about exceptions, this process can be run.
If exceptions are recreated, Time Admin will not process data for the days of the exceptions for that time reporter.
In addition, the process excludes employees from further processing when there are exceptions, if, on the Time and Labor installation page, the Continue with Exceptions field is not selected.
Step 4: Building the Rule Map
The initial period of interest used to create batches of time reporters in Step 2 represents only the minimum amount of data (or time) that must be processed in Time Administration. This initial period does not necessarily include all the time needed to process the rules in a time reporter’s rule program. To determine both how far back into the past and forward into the future Time Administration must go to retrieve, for each batch, 1) the data needed to run each individual rule in a time reporter’s Rule Program, and 2) the maximum amount of data encompassing the entire group of rules in the Rule Program, Time Administration must define a second period of interest. In the following section, we refer to the maximum period of time containing the data needed to run all the rules in a rule program as the final period of interest. In addition to defining this period, the Build Rule Map process generates an output table (TL_RULE_MAP) identifying the rules to process for each batch, the priority of the rules, the AE Section containing each rule in the rule program, the effective dates of both the workgroup and the rule program, and other data.
After the rule map is complete, Time Administration sends the correct amount of time to the Intermediate Payable Time tables for processing and identify the AE section for each rule and period of interest.
Determining the Final Period of InterestAs noted earlier, the initial period of interest constitutes only the first step in the definition of a period for rules processing.
Important! The following explanation of the final period of interest assumes that the Use Reported Time for POI check box on the Process Time Admin page is selected. For an explanation of what happens when the check box is cleared, see Process Time Admin page.
The final rule map may need to be extended beyond this initial period:
If a rule you are processing requires data from before the time reporting period intersected by the EARLIEST_CHGDT, the initial period of interest must be expanded back in time. For example, suppose that the time reporting period associated with the workgroup you are processing is weekly, and that the initial period of interest is the third week of the current month. If you are processing a monthly rule in connection with this workgroup, the final rule map will need to extend past the initial period of interest to capture data going back at least to the beginning of the month.
The rules you are processing may require data from periods following the period intersected by the earliest change date. The data required may extend to the end of a rule period that both includes and goes past the initial period of interest end date.
The following example illustrates how the system determines the maximum date range for the final period of interest:
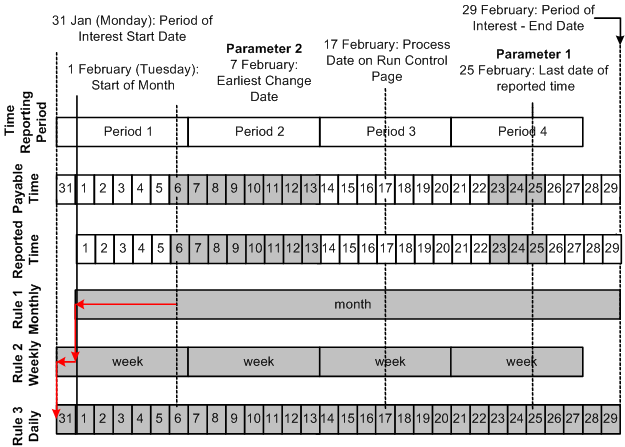
Example: Determining the Final Period of Interest
Assume that the following is true:
The time reporter you are processing is a positive time reporter.
The time reporting period on the time reporter’s workgroup is weekly, and the week is defined to begin on Monday and end on Sunday.
The initial period of interest—the weekly time reporting period intersected by the earliest change date--extends from February 7 to February 13 (Monday through Sunday).
The last period processed for the payee is the week of January 31 (Monday) through February 6 (Sunday).
The current week (the week to be processed) begins on February 7.
The payee has 3 rules in his rule program as represented in the following diagram: a weekly rule, a monthly rule, and a daily rule. Each of these rules is assigned a priority from one to three.
The Earliest Change Date is February 7.
The Process Date on the run control page is February 17.
The latest date of reported time is 25 February (in this example, the employee has reported a future vacation from February 23 to February 25).
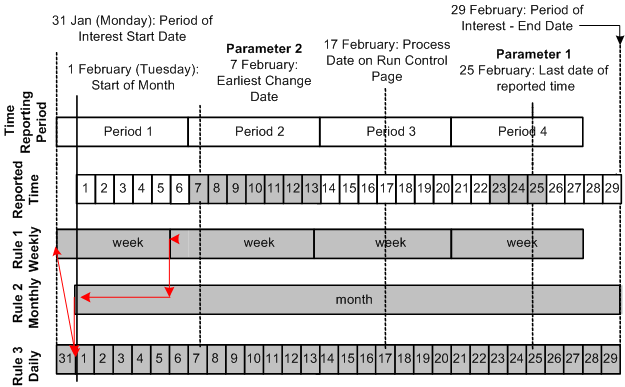
Determining the period of interest
Time Administration determines the maximum date range for the period of interest through a process called pyramiding (represented in the diagram by a series of lines leading in stair-step fashion from the beginning of one rule period to the next in order of priority). The algorithm that Time Administration uses to define the begin and end dates of this period can be broken down into the following steps:
Time Administration determines the latest date of reported time. In the preceding example, this date is February 25. This date—identified as Parameter 1 in the diagram—is used to determine the final period of interest end date.
Note. If no time is reported for future periods—that is, periods outside the period intersected by the earliest change date—the date of Parameter 1 is the last day of the time period intersected by the earliest change date (the end of Period 2 in our example). This date is used in the following step.
Using the date of Parameter 1, the system selects the latest date from all of the rule periods intersected by Parameter 1. In the diagram, the rule period with the maximum end date intersected by Parameter 1 is the monthly rule (rule number 1). Because the end date of this rule period is February 29, this is the date the system uses as the final period of interest end date.
The system then determines the earliest date that an instance of Payable Time has not been passed to Payroll for the set (that is, the EARLIEST_CHGDT). This includes any adjustments that have been made to reported time since the previous update to payroll. This date, identified as Parameter 2 in the diagram, is used to determine the final period of interest start date.
To determine the period of interest start date, the Rule Map process:
Locates where the earliest change date (EARLIEST_CHGDT) intersects the rule period corresponding to rule 1 in the rule program. It expands the period of interest to the start of this rule period (February 7).
Locates where the start of rule period 1 intersects the next rule in order of priority—rule 2—and expands the period of interest back to the beginning of rule period 2 (February 1).
It starts the process over again by locating where the start date of rule period 2 intersect the next rule in the priority list—rule 3—and expands the period of interest start date back to the beginning of rule period 3 (because rule 3 in this example is a daily rule, the period of interest stays at February 1).
The rule mapping program then moves back up through each rule period to capture additional time that may be needed to process any rule that could influence Payable Time. Consider the example: The weekly rule period that begins January 31 and ends February 6 overlaps with the monthly rule period. Because the weekly rule has priority and can therefore influence time (alter a TCD, create new rows in TL_IPT1, and so forth) that will later be processed by the monthly rule, the rule map pyramids backwards not just to the start of the monthly rule (February 1), but to the start of the first weekly rule period that could potentially affect the monthly rule: this is the weekly rule period that begins on January 31.
Note. The purpose of going back up through the rule program can be explained as follows: Suppose that the weekly rule in the example is an overtime rule that states that all time reporters should be paid at the overtime rate of 1.5 x Regular for each hour over 40. If the Rule Map process does not move back up through the rules to include the data for January 31, the system won’t know if or when the condition for this rule was fully satisfied, and incorrect time data could then be passed to the monthly rule. Consider this scenario: Your time reporters all work ten hours a day for 5 days during the week beginning January 31. If the weekly overtime rule does not include the first day of the workweek— January 31—it will appear that no one worked overtime during the week. But in fact, the condition needed to initiate overtime pay was met at the end of the fourth day of work (x 10 hours per day). This means that the last day of the week must be paid at the overtime rate. This information can then be made available to the monthly rule, because there are dependencies between the rule periods.
Understanding How Time Administration Uses the Final Period of Interest
After the system has defined the range of dates that make up the final period of interest, Time Administration:
Transfers the data for this range of dates to Intermediate Payable Time.
After Intermediate Payable Time has been processed, Time Administration passes all or part of this time to Payable Time.
In this section we discuss the difference between the final period of interest, Intermediate Payable Time, and Payable Time, and then describe how Time Administration calculates Payable Time.
Understanding the Relationship between the Final Period of Interest, Intermediate Payable Time, and Payable Time
The range of dates transferred to Intermediate Payable Time is exactly equivalent to the final period of interest. This period includes all the data needed to process each rule in your rule program. However, the amount of data in Intermediate Payable Time can differ from the time data that Time Administration transfers to Payable Time. This is because the function of Payable Time is to supply time data to external systems, for example, Payroll or Project Costing, while the function of the period of interest Rule Map is to supply Intermediate Payable Time with the data needed to run Time and Labor rules. The range of dates needed to process these rules may be considerably larger than the range of dates needed by Payroll or Project Costing. For example, suppose you are processing a workgroup whose period type is weekly, and that the week you are processing falls in the middle of the month. The rule program for this workgroup contains several monthly rules. Your payroll system may only be interested in data for the week you are currently processing, but your Time and Labor rules need data going back at least to the beginning of the current month (to satisfy the needs of your monthly rules).
Let’s examine the following rules for how Time Administration creates Payable Time for positive time reporters, and then review what occurs in the case of an exception reporter.
Rules for Positive Time Reporters
To create Payable Time for positive time reporters, Time Administration transfers to Payable Time all dates within the current time reporting period for which time has been reported positively.
In addition, Payable Time includes:
Any positively reported time for dates before the current workgroup period.
Any positively reported time for dates following the current workgroup period.
Payable Time also includes days for which time has been created using rules processing.
Example: Payable Time for Positive Time Reporters
Let’s use a slightly modified version of the example we used earlier to illustrate the Building the Rule Map Process to show the type and extent of the data that can be passed from Intermediate Payable Time to Payable Time. Assume the following:
The time reporter we are processing is a positive time reporter.
The time reporting period on the time reporter’s workgroup is weekly, and the week is defined to begin on Monday and end on Sunday.
The last period processed for the payee is the week of 31 January (Monday) through 6 February (Sunday).
The current week (the week to be processed) begins on 7 February.
The payee has 3 rules in his rule program as represented in the following diagram: a monthly rule, a weekly rule, and a daily rule. Each of these rules is assigned a priority from one to three.
The Process Date on the run control page is 17 February.
The latest date of reported time is 25 February (in this example, the employee has reported a future vacation from 23 February to 25 February).
The time reporter enters new time data for 6 February, a day that has already been processed and sent to payroll: He originally reported working 8 hours on 6 February when he actually worked 12, and has now corrected the mistake.
The earliest change date is 6 February—the day for which the time reporter has entered new data.
Determining Payable Time
This diagram illustrates the different sources of time data that can be transferred to Payable Time.
Source 1: Positively Reported Time within the Current Workgroup Period
In this example, the time reporter has reported time for each of the days in the time reporting period that begins on February 7 and ends on February 13. The data for these dates is therefore passed to Payable Time.
Source 2: Positively Reported Time for Dates Prior to the Current Workgroup Period
As illustrated in the preceding diagram, the time reporter reports new time data for June 6—a day that falls within a previously processed period (he originally reported working 8 hours on February 6 when he actually worked 12).
Source 3: Positively Reported Time for Dates Following the Current Workgroup Period
In this example the time reporter reports three future vacation days: February 23, 24 and 25 . This data must be passed to Payable Time.
Source 4: Time Created Using Rules Processing
To illustrate this last source of data, we need to make a small modification to our example. Let’s assume that the monthly rule in the diagram states that as soon as a time reporter works more than 10 hours of overtime in a given month, any overtime hours paid at the normal rate must be recalculated and paid at twice the normal rate. Let’s also assume that the new data our time reporter has entered for February 6 (see Source 2) increases the total number of overtime hours worked for the month to 11 hours. Because of this, the condition for the monthly rule is satisfied, and all previously reported overtime hours must be recalculated using the new rate (2 x normal rate). Assuming that our time reporter logged overtime hours on February 1-5 at the normal rate, these days (marked by cross-hatching in the diagram) are recalculated, offsets generated, and new data sent to Payable Time.
Note. The Process Date, Use Current Date or Use Reported Time for POI fields on the run control page, have no direct affect on what is sent to Payable Time in the case of positive time reporters—its primary function is to select time reporters for processing. Time Administration processes only time reporters whose earliest change date is less than or equal to (<=) the Process Date. However, in addition to selecting time reporters for processing, it also aids in determining the end date to process. The end date equates to the time period end date based on the field selected: Process Date, Use Current Date or the maximum date reported for Use Reported Time for POI field.
Rules for Exception Reporters
To create Payable Time for exception reporters:
Time Administration creates Payable Time from the time reporters’ schedules for all dates within the current time reporting period (as long as the current period falls within the period of interest). If any day within this period has positive time reported for it, the positive time takes precedence over scheduled time—that is, Time Administration does not use the scheduled hours for that day.
In addition to the dates within the current time reporting period, Payable Time includes:
Any positively reported time for dates before the current workgroup period.
Any positively reported time for dates following the current workgroup period.
Payable Time also includes days for which time has been created using rules processing.
In the case of exception reporters, you can also use the Process Date on the run control page to send additional data to Payable Time according to the following criteria:
If any rule period you are processing is greater than or equal to the current workgroup period length, you can create Payable Time outside the current workgroup period by placing the Process Date outside the workgroup period but within the date range of the rule period that extends into the future. When you do this, you’ll create Payable Time from the start of the current workgroup period up to the end of the time reporting period in which you set the Process Date—as long as the rule period extends at least to the end of this time reporting period. If the rule period ends before the time reporting period, then the last date for which time data will be passed to Payable Time is the end date of the rule period.
If all rule period lengths are less than or equal to the current workgroup period length, then Payable Time will be created from the time reporters’ schedules for the current workgroup period (time reporting period) only—regardless of the Process Date.
Regardless of how far past the current workgroup period a rule period extends, if you use a Process Date that is within the date range of the current workgroup Time Period ID, Time Administration creates time for exception reporters for the current workgroup period only (regardless of the date ranges for the rule periods).
Note. Because of the widely differing results you can get, we do not recommend that you set the Process Date after the current workgroup period. This ensures that all exception reporters will have time created for them within the current period.
Example 1: Expanding Payable Time to the End of a Future Workgroup Period
Let’s view an example in which we use the Process Date to expand Payable Time from the current workgroup period to the end of a future period.
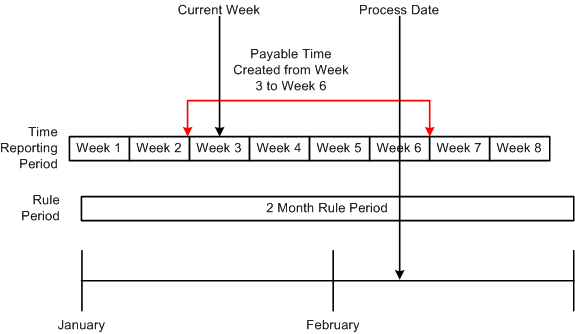
Payable Time extends to future period
Assume the following:
Week 3 is the current workgroup period (the week to be processed).
There is a two-month rule associated with the workgroup.
The Process Date is set to Week 6.
Because the two month rule period that begins in January extends past the current workgroup period (Week 3) to the end of February, when we set the Process Date to Week 6, Payable Time will be created from schedules to the end of Week 6.
Example 2: End of Rule Period Limits Extension of Payable Time
This is an example in which the end of rule period limits the extension of payable time.
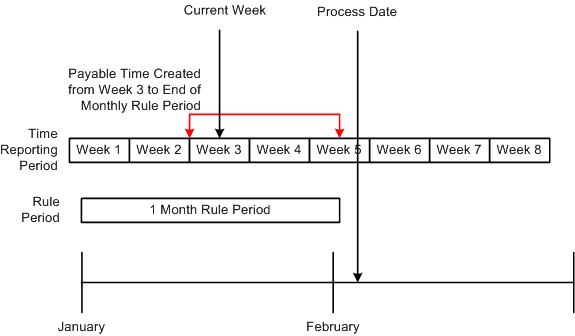
Expansion of Payable Time limited by rule period end date
Assume the following:
Week 3 is the current workgroup period (the week to be processed).
There is a one-month rule associated with the workgroup.
The Process Date is set to the end of Week 5; however, the one month rule period ends before this—in the middle of Week 5.
Because the one month rule period in this example extends past the current workgroup period (Week 3), when we set the Process Date to the end of Week 5, Payable Time will be created into the future. However, Payable Time will not be created past the last day of January, even though the Process Date is in February. This is because Payable Time extends either to the end of the time reporting period intersected by the Process Date, or to the end of the rule period—whichever comes first.
Note. In this example, if we had set the Process Date to the first day of Week 5, Payable Time would still only be created to the end of January. Again, this is because Payable Time extends either to the end of the time reporting period intersected by the Process Date, or to the end of the rule period—whichever is first.
Understanding the Sources of Payable Time
We’ve reviewed several examples of how to use the Process Date on the run control panel to extend Payable Time past the current workgroup period. Let’s examine a more comprehensive example that illustrates all the sources of time data that can be transferred to Payable Time in the case of an exception reporter:
Example 3: Determining Payable Time for Exception Reporters
Assume that the following is true:
The time reporter you are processing is an exception time reporter.
The time reporting period on the time reporter’s workgroup is weekly, and the week is defined to begin on Monday and end on Sunday.
The last period processed for the payee is the week of January 31 (Monday) through February 6 (Sunday).
The current week (the week to be processed) begins on February 7.
The payee has 3 rules in his rule program as represented in the following diagram: a monthly rule, a weekly rule, and a daily rule. Each of these rules is assigned a priority from one to three.
The earliest change date is February 6.
The Process Date on the run control page is February 15.
The latest date of reported time is February 25 (in this example, the employee has reported a future vacation from February 23 to February 25).
The time reporter enters new time data for 6 June, a day that has already been processed and sent to payroll: He originally reported working 8 hours on 6 June when he actually worked 12, and has now corrected the mistake.
The earliest change date is February 6—the day for which the time reporter has entered new time data.
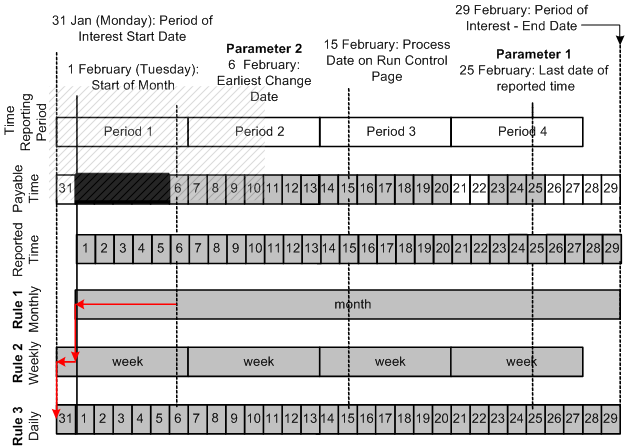
Determining Payable Time
Using this diagram, we can illustrate the different sources of time data that can be transferred to Payable Time.
Source 1: Time within the Current Workgroup Period
In this example, the current workgroup period begins on February 7 and ends on February 13. The data for these dates is therefore passed to Payable Time.
Source 2: Time Created by Setting the Process Date after the Current Workgroup Period
Because the monthly rule period in this example extends past the current workgroup period, and the Process Date (February 15) has been set outside the workgroup period, Payable Time is created into the future—as far out as the end of Period 3 (the time reporting period intersected by the Process Date).
Source 3: Positively Reported Time for Dates Prior to the Current Workgroup Period
As illustrated in the preceding diagram, our exception reporter positively reports new time data for June 6—a day that falls within a previously processed period (he was scheduled to work 8 hours on June 6 when he actually worked 12).
Source 4: Positively Reported Time for Dates Following the Current Workgroup Period
In this example the time reporter reports three future vacation days: February 23, 24 and 25 . This data must be passed to Payable Time.
Source 5: Time Created Using Rules Processing
To illustrate this last source of data, we must make a small modification to our example. Let’s assume that the monthly rule in the diagram states that as soon as a time reporter works more than 10 hours of overtime in a given month, any overtime hours paid at the normal rate must be recalculated and paid at twice the normal rate. Let’s also assume that the exception reporter in our example positively reports new time for February 6 (see Source 3), and that the newly reported hours increase the total number of overtime hours worked for the month to 11 hours. Because of this, the condition for the monthly rule is satisfied, and all previously reported overtime hours must be recalculated using the new rate (2 x normal rate). Assuming that our time reporter logged overtime hours on February 1-5 at the normal rate, these days (marked by cross-hatching in the diagram) will be recalculated, offsets generated, and new data will be sent to Payable Time.
See Also
Launching the Time Administration Process
Step 5: Building Time Reporter Profiles
This process extracts time reporter data for each batch of time reporters from different tables in the HRMS system and loads it into a single working table, TL_PROF_WRK, that you can refer to each time you need basic time reporter data within a rule. Thus, rather than having to refer to multiple tables, you can check a single table containing data on the time reporters in each of your batches for the period of interest defined by the Building the Rule Map process. When you create rules in SQL, you can define a join to this table to retrieve common information relating to all the time reporters you must process.
See Also
Creating Rules in Time Administration
Step 6: Explaining the Time Administration Main Batch Loop DriverTL_TA000410 checks that there are time reporters to process. If there are time reporters to process, TL_TA000410 calls TL_TA000420 for each batch.
TL_TA000410 also ensures that the PSTZOFFSET table is appropriately loaded for the POI that Time Admin is processing and allocates the Payable Time Sequence Number.
Step 7: Explaining Batch Driver Calls of Time AdministrationTL_TA000420 truncates all tables used within the TL_TA000420 loop. It then checks if reported time exists for positive time reporters. If no reported time exists it executes TL_TA0001300 to set the ECD to the next period begin date.
It then checks if reported punch time exists and conditionally calls TL_TA000600 when either reported time exits or scheduled time has punch schedules.
It then calls the TL_TA000800 rules engine driver program and then calls the TL_TA000900 process which distributes task and post rules rounding.
If Paybill is installed the Paybillstaffing process FO_TL_OVR_RT is called to update the override rate. The Comp Time process is called to validate comp time balances for each batch. All the intermediate payable time is accumulated into the TL_VALID_DATAxx table.
Step 8: Matching Punches
The Punch Matching process transforms raw punches into a first cut of Intermediate Payable Time. It does this by first selecting punches that fall within the date range specified by the Building the Rule Map process. The Punch Matching process calls the schedule resolution process to resolve the time reporters’ schedules.
To match punches:
Select all appropriate punches for processing.
The system gathers punches from either the time reporter’s scheduling table (WRK_ADHOC_TAO) if Forecast Payable Time was chosen on the Time Administration Run Control page (or the time reporter is of the exception type), or the reported Punch Time Table (TL_RPTD_TIME).
To select the appropriate punches for processing, the system checks the TL TA Batch file which contains the list of time reporters to select from and the start/end date for each time reporter. The system identifies the first punch to process by looking for the last out punch that occurred before the start date in the TL TA Batch file, no matter how far back in the calendar it must go. If it locates an out punch before the start date, it knows that it must use the first in punch on the start date as the initial punch for processing. Otherwise, it begins processing with the last in punch that occurred before the start date. This ensures that the system begins processing with the correct first punch, even if that punch was entered before the initial start date.
If the last punch selected using the end date is not an out punch, the system checks the future for the next out punch and stores all punches up to and including the next out punch.
Apply pre-rules rounding.
Time Administration checks the rounding options you selected on the Workgroup page to determine whether it should round punches. There are three options for rounding on this page: Round Punches Before Rules (Punch Rounding), Segment Rounding, and Day Rounding.
Each rounding option can have a different effect on how time is processed and the amount of time that is converted to Payable Time. In other words, two time reporters could each record the same in and out punches for a day or a week, but depending on the rounding options you select, the amount of time sent to Payable Time could be different for each time reporter.
The Punch Matching process is only concerned with the first option: Round Punches. The other two types of rounding are applied as part of the Round Punches subprocess described in Step 11 − Performing Post-Rules Rounding.
Note. The Round Punches process is skipped if Forecast Payable Time is chosen on the run control page, because scheduled punches are already rounded.
Apply daybreaker logic.
This subprocess is initiated only when the Split By Day Breaker option is selected on the Workgroup page. Depending on the day breaker logic you select, you can apply all the time worked in a shift to the day on which the shift begins; split the time using a day breaker; apply all the time to the day on which the shift ends; or assign the time to the day in which the majority of the time falls. So for example, if a time reporter works a shift that begins at 8:00 p.m. and continues until 5:00 a.m. of the next day, and you select 12 midnight as the day breaker, 4 hours would accrue to the day on which the time reporter began work, and 5 hours would go to the subsequent day.
Calculate the duration of punches.
When the system encounters a series of punches, it converts punch time into output that resembles elapsed time. It does this by matching a punch with the next corresponding punch and then calculating the difference between them (the amount in TL_QUANTITY). The resulting in and out segments, as indicated in the following table, are then sent to Intermediate Payable Time for use in rules processing.
|
Punches |
Begin |
End |
TL_QUANTITY |
|
In |
8:00 |
10:00 |
2.00 |
|
Break |
10:00 |
10:15 |
.25 |
|
In |
10:15 |
12:00 |
1.75 |
|
Meal |
12:00 |
13:00 |
1.00 |
|
In |
13:00 |
15:00 |
2.00 |
|
Break |
15:00 |
15:15 |
.25 |
|
In |
15:15 |
17:00 |
1.75 |
|
Out |
17:00 |
|
|
Note. The Calculate Duration process is skipped if Forecast Payable Time is selected on the Run Control page. This is because time reporter schedules already contain the calculated duration between punches.
See Also
Setting Up Day Breaker Options
Step 9: Creating Intermediate Payable Time
Before Time Administration can execute a rule, it moves the data needed to run the rule from scheduled and reported time into a data store known as Intermediate Payable Time. The system then applies the rule to information in the data store for the appropriate period of interest (as defined by the Build Rule Map process).
This section discusses the structure of the Intermediate Payable Time data store, and the type and source of the data it contains.
Understanding the Data Store
The Intermediate Payable Time data store is made up of the following five tables:
TL_IPT1
TL_IPT2
TL_IPT3
TL_IPT4
TL_IPT5
Initially, Time Administration loads all reported and scheduled time data for all time reporters who must be processed into TL_IPT1. In your rules, you can move data back and forth between TL_IPT1 and the other Intermediate Payable Time Tables, or to other working tables in the system. For example, your rule could move time data from TL_IPT1 to TL_IPT2, apply a specific TRC to this time, and then update the original row of data in TL_IPT1 with the new TRC associated data.
Note. Only processed data in TL_IPT1 is transferred to Payable Time at the end of the Time Administration run. Therefore, after your rules work on the data in other tables, you must return any processed data you want to send to Payable Time back to TL_IPT1.
Warning! Never truncate or delete the data in TL_IPT1; it contains time data in raw form that is needed to execute your rules. If you delete this data, your rules will be left with nothing to process.
The movement of data from scheduled and reported time to Intermediate Payable Time, and from Intermediate Payable Time to Payable Time, is illustrated in the following diagram:
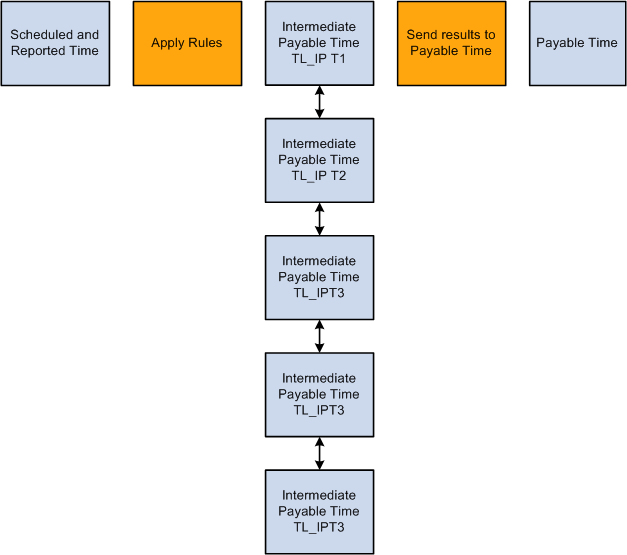
Processing Intermediate Payable Time
Loading the IPT Tables
For each batch of time reporters it processes (in CREATE_IPT), Time Administration loads data into TL_IPT1 from the following sources, This information is used later by the Create Payable Time process.
Reported Time
The following applies to reported time:
For elapsed time reporters, the system retrieves reported elapsed time from the Elapsed Time Table (TL_RPTD_TIME).
For punch time reporters, the system retrieves rounded punches created by the Rounding Punches process that runs before the Create IPT process.
For exception time reporters, the system pulls time from the schedule table (WRK_ADHOC_TAO) for days the time reporter was scheduled to work. (If an exception time reporter positively reports time on a particular day, the reported time takes precedence over the scheduled time.)
If a person reports both elapsed and punch time on the same day, Time Administration retrieves both sets of time.
If creating Forecasted Payable Time and reported time is not available, Time Administration fetches scheduled time for positive time reporters from the WRK_ADHOC_TAO Table.
Absences
If your Time and Labor system is integrated with Global Payroll, Payroll for North America with Absence Management, or both, this step loads absence rows to TL_IPT1. Approved absences are loaded to the TL_AM_WRK table from the GP_ABS_EVENT table, which contains absence events reported in Global Payroll or Absence Management. The system resolved the rows for holiday configurations, time reporting codes and schedules.
Task Information
The following applies to tasks:
If a taskgroup was positively reported, its value populates the TL_IPT1 Table. If no taskgroup was reported, Time Administration populates TL_IPT1 with the taskgroup assigned to the time reporter on the Employee Data Table (TL_EMPL_DATA) through the Create Time Reporter Data page or Maintain Time Reporter Data page.
If a task profile ID was positively reported, its value populates the TL_IPT1 Table. If no task profile was reported, Time Administration populates TL_IPT1 with the task profile assigned to the time reporter on the Employee Data Table (TL_EMPL_DATA) through the Create Time Reporter Data page or Maintain Time Reporter Data page. If it does not find a task profile on the Employee Data Table, it populates TL_IPT1 with the default task profile associated with the time reporter’s taskgroup in the Taskgroup Table (TL_TASKGRP_TBL).
Task template IDs are always retrieved from the Taskgroup Table (TL_TASKGRP_TBL) to populate TL_IPT1. Task template IDs are not positively reported.
If task data was positively reported, the values of the task entities populate TL_IPT1.
Rules Override Transactions
If rule overrides have been entered through the Override Rules page, the Time Administration process extracts the overridden records from TL_IPT1 and places them into the working table, TL_TA_RUL_OVR, before applying rules to the data stored on TL_IPT1.
Time Administration applies rules to all records stored on TL_IPT1 and proceeds to update Payable Time as it normally does. But, as a final step, Time Administration uses data stored in the TL_TA_RUL_OVR Table (preserved − untouched by rules) to replace records found on the TL_PAYABLE_TIME Table.
See Also
Defining Task Reporting Requirements
Creating Rules in Time Administration
The IPT Table Structure
The fields that make up the Intermediate Payable Time Tables are listed in the following table.
|
Field Name |
Description |
|
EMPLID |
Employee Identification Number |
|
EMPL_RCD |
Employee Record Number - to process multiple jobs. |
|
DUR |
Date Under Report (Date in which time is reported for) |
|
SEQ_NBR |
Sequence Number |
|
PUNCH_TYPE |
Punch Type (In, Out, Break, Meal, and so on) |
|
PUNCH_BEGIN |
Punch Begin Date Time |
|
PUNCH_BEGIN_R |
Punch Begin Date Time Rounded |
|
TIME_IN_MIN1 |
Punch Begin Time In Minutes (to be used in rules where Begin Time and End Time need to be compared) |
|
PUNCH_END |
Punch End Date Time |
|
PUNCH_END_R |
Punch End Date Time Rounded |
|
TIME_IN_MIN2 |
Punch End Time In Minutes (to be used in rules where Begin Time and End Time need to be compared) |
|
TIMEZONE |
Time Zone |
|
TCD_ID |
Time Collection Device Identification Number |
|
BADGE_ID |
Badge Identification Number |
|
EST_GROSS |
Estimated Gross Amount |
|
LBR_DIST_AMT |
Labor Distributed Amount |
|
DILUTED_GROSS |
Diluted Gross Amount |
|
CURRENCY_CD1 |
Currency Code 1 |
|
CURRENCY_CD2 |
Currency Code 2 |
|
RULE_ELEMENT_1 |
Rule Element 1 - to be used in custom rules |
|
RULE_ELEMENT_2 |
Rule Element 2 - to be used in custom rules |
|
RULE_ELEMENT_3 |
Rule Element 3 - to be used in custom rules |
|
RULE_ELEMENT_4 |
Rule Element 4 - to be used in custom rules |
|
RULE_ELEMENT_5 |
Rule Element 5 - to be used in custom rules |
|
RULE_FLAG1 |
Rule Flag 1 - to be used in rules |
|
RULE_FLAG2 |
Rule Flag 2 - to be used in rules |
|
RULE_FLAG3 |
Rule Flag 3 - to be used in rules |
|
RULE_FLAG4 |
Rule Flag 4 - to be used in rules |
|
RULE_FLAG5 |
Rule Flag 5 - to be used in rules |
|
TASKGROUP |
Task Group |
|
DFLT_TASKGROUP |
Default Task Group |
|
TASK_PROFILE_ID |
Task Profile ID |
|
DFLT_TASK_PROF_ID |
Default Task Profile ID |
|
DFLT_TASKTMPL_ID |
Default Task Template ID |
|
PERIOD_INSTANCE |
Period Instance - to be used in rules |
|
PERIOD_SEQUENCE |
Period Sequence - to be used in rules |
|
PAYABLE_STATUS |
Payable Status |
|
IN_BATCH |
In Batch (only records with IN_BATCH = Y will be written to TL_PAYABLE_TIME) |
|
OFFDAY_IND |
Off Day Indicator |
|
TRC |
Time Reporting Code |
|
TL_QUANTITY |
Quantity (can be hours, amount, or units) |
|
CURRENCY_CD |
Currency Code |
|
COUNTRY |
Country |
|
STATE |
State |
|
LOCALITY |
Locality |
|
COMP_RATECD |
Compensation Rate Code |
|
BILLABLE_IND |
Billable Indicator |
|
OVERRIDE_RATE |
Override Rate |
|
COMPANY |
Company |
|
BUSINESS_UNIT |
Business Unit |
|
SETID_LOCATION |
Set ID Location |
|
LOCATION |
Location |
|
SETID_DEPT |
Set ID Department |
|
DEPTID |
Department ID |
|
SETID_JOBCODE |
Set ID Job Code |
|
JOBCODE |
Job Code |
|
POSITION_NBR |
Position Number |
|
PRODUCT |
Product |
|
CUSTOMER |
Customer |
|
ACCT_CD |
Account Code |
|
BUSINESS_UNIT_PC |
Business Unit Project Costing |
|
BUSINESS_UNIT_PF |
Business Unit Project Performance Measurement |
|
PROJECT_ID |
Project ID |
|
SETID_ACTIVITY |
Set ID Activity |
|
ACTIVITY_ID |
Activity ID |
|
RESOURCE_TYPE |
Resource Type |
|
SETID_RESOURCE |
Set ID Resource |
|
RESOURCE_CATEGORY |
Resource Category |
|
RESOURCE_SUB_CAT |
Resource Subcategory |
|
TASK |
Task |
|
USER_FIELD_1 |
User Defined Field 1 - additional task field defined by the user |
|
USER_FIELD_2 |
User Defined Field 1 - additional task field defined by the user |
|
USER_FIELD_3 |
User Defined Field 1 - additional task field defined by the user |
|
USER_FIELD_4 |
User Defined Field 1 - additional task field defined by the user |
|
USER_FIELD_5 |
User Defined Field 1 - additional task field defined by the user |
|
TL_RULE_ID |
Rule ID - to indicate that the record has been updated or inserted by a rule |
|
ORIG_TRC |
Original Time Reporting Code (TRC can be changed by rules) |
|
ORIG_TL_QTY |
Original Quantity (Quantity can be updated by rules) |
Step 10: Tracking Attendance
The Track Attendance process tracks attendance violations committed by punch time reporters including tardies, long lunches, early outs, and long breaks. It prompts you to take one of the recommended actions you defined on the Attendance Actions page. This process catches violations by comparing actual punch times logged by punch time reporters to their schedules. If a time reporter punches in late, leaves early, or takes a long meal or break, the Attendance process can recognize the infraction. Each infraction receives a certain user defined point value and point values exceeding the threshold you established on the Attendance Program page will trigger a user-defined action. You can view the recommended actions for each time reporter on the Recommended Actions page.
See Also
Creating Rules in Time Administration
Step 11: Processing Rules
When you create a rule in Time Administration you must assign the rule to an Application Engine section. When it is time to execute the rule, Process Rules uses the Rule Map created in Step 4 − Building the Rule Map, to call the AE section for the appropriate rule and period of interest. Each rule in a Rule Program is processed for every time reporter to whom the rule applies at the same time.
Note. To protect the integrity of the source data, you should always run rules that change or manipulate time against the data in the Intermediate Payable Time tables rather than against the scheduled or reported time tables.
See Also
Adding Rules to a Rule Program
Step 12: Performing Rounding, Task Distribution and Estimated Gross
This process performs the following functions:
Calculates and validates leave and comp time balances.
Updates each time reporter’s task profile.
Applies post rules rounding to processed time data.
Calculates estimated gross amounts.
Check Leave and Comp Time Balances
This subprocess ensures that leave and comp time hours recorded in the Intermediate Payable Time Table (TL_IPT1) do not exceed the available balance. If reported hours exceed the available balance, an exception is written to the Exceptions Table. If the comp time balance or leave time balance is sufficient, Time Administration updates Payable Time.
Check Leave Balance
This subprocess checks to see if there is sufficient balance to cover the leave time contained on the IPT Table for each time reporter. If there is insufficient balance, the system writes an exception to the Exceptions Table.
For the setup to be valid for leave processing to occur, the following conditions must apply:
The TRC must be active and the Comp/Leave Indicator must be for Leave Taken (Leave Tkn).
The Leave TRC must be of the Hours TRC Type.
The TRC must be in the Time Reporter’s TRC Program.
The TRC must be mapped to a NA Payroll Earnings Code, which is mapped to a Leave Plan type and has the Taken Flag selected on the Add to Accrual Balance section of the NA Earnings code.
The Time Reporter must be associated to a Leave Plan of the Leave Plan Type to which the NA Earnings Code is associated.
The Leave Plan for the time reporter should specify if it allows a negative balance, and if so, how many hours the balance for the time reporter can go negative.
Note. Leave balances are maintained by PeopleSoft Benefits. Time and Labor does not update Benefits Tables with balance information; however, it uses the Leave Plan Table (LEAVE_PLAN_TBL) and Leave Accrual Table (LEAVE_ACCRUAL) of the Benefits system to validate time reported against TRCs of leave, for the availability of leave. To allow leave balances to go negative, you must select the Allow Negative Balance check box on the Leave Plan Table, which is part of the Benefits system. The Maximum Negative Hours Allowed (MAX_NEG_HRS) field then becomes available for data entry, and you can specify the maximum negative hours allowed under the Leave Plan. This field remains hidden if the Time and Labor application is not selected on the Installation Table.
This sub-process can be broken down as follows:
To calculate leave balance:
Check Time and Labor Installation Table.
The system checks the Time and Labor Installation Table to see whether leave balance validation has been selected. The user can select Online Only validation, Batch Only validation, Both Online and Batch validation, or None. If Both or Batch Only has been selected, Time Administration validates leave time.
Check TRCs on IPT Table against settings on TRC Table.
The system checks the TRC on the Intermediate Payable Time Table TL_IPT1 against the TRC Table TL_TRCPGELE_TBL for valid TRCs for the workgroup, and for the Comp Leave Indicator on TL_TRC_TBL. This subprocess runs for those TRCs you have defined as having an affect on comp/leave of Leave Taken on the TRC Setup page.
Check Leave Accrual Table to calculate available hours.
The system checks the Leave Accrual Table to calculate available hours using the following formula:
|
Available Hours = |
Hours carried over from previous year + Earned year-to-date - Taken year-to-date + Adjusted year-to-date + Bought year-to-date - Sold year-to-date - Unprocessed hours taken - Unprocessed hours adjusted - Unprocessed hours sold |
Check reported leave against available balance.
The system checks reported leave against the available balance as follows:
If available hours + negative hours allowed is less than reported comp time taken, the system writes a high severity exception to the Exceptions Table. If this is not the case, the system continues processing.
Check Comp Time Balance
This subprocess determines whether there is a sufficient balance to cover the comp time hours recorded on the TL_IPT1 Table for each time reporter. If there is an insufficient balance, the system writes an exception to the Exceptions Table. If the balance is sufficient, the system updates the Payable Time Table.
For the setup to be valid for comp time processing to occur, note the following:
The Comp TRC must be active and have a Comp/Leave Indicator of either Comp Earned (CT Earned) or Comp Taken (CT Taken).
The Comp TRC must be of an Hours TRC Type.
The Comp Time TRC must be in the time reporter’s TRC Program.
The Comp Time TRC must be associated to the time reporter’s Compensatory Time Off Plan.
You must have defined the appropriate limits on the time reporter’s Compensatory Time Off Plan.
This sub-process can be broken down as follows:
To calculate comp time balance:
Check Time and Labor Installation Table.
The system checks the TL Installation Table (TL_INSTALLATION) to see if Comp Balance validation has been selected. The user can select Online Only validation, Batch Only validation, Both Online and Batch validation, or None. If either Batch Only or Both is selected, Time Administration validates comp time.
Check TRCs on IPT Table against settings on TRC Table.
The system checks TRCs on the Intermediate Payable Time Table TL_IPT1 against TL_TRCPGELE_TBL for valid TRCs in the TRC Program, and TL_TRC_TBL for the Comp Leave Indicator on the TRC Table. For those TRCs defined as affecting CT Earned (Comp Time Earned) or CT Taken (Comp Time Taken) on the TRC Setup page, Time Administration processes them against the Time Reporter’s comp plan.
Calculate available hours.
Load Compensatory Time Off rows into Comp Leave table (TL_COMPLEAV_TBL). The system summarizes the time for each day for Comp Time Earned and Taken , calculates the expiration dates for the earned rows, and loads the time into the TL_COMPLEAV_TBL with the End Balance=0.
Calculate the end balance for each day.
The system calculates the end balance for each day by taking into consideration the comp time hours earned, hours taken, and hours expired for each day and then updates the end balance on the TL_COMPLEAV_TBL.
Check comp time taken against available balance.
The system then checks to see if the reported Comp Time Taken is more than the available hours:
If reported Comp Time Taken is greater than the available hours plus negative hours allowed, the system writes a high-severity exception to the Exceptions Table. If the balance is sufficient to cover comp hours earned, and Payable Time is not yet updated, the system inserts a new row of data into TL_PAYABLE_TIME for the applicable TRCs.
Calculate comp time earned.
Check comp time earned against available balance.
The system checks to see if the reported Comp Time earned is more than the available hours:
If reported Comp Time Earned is greater than the available hours, the system writes a high-severity exception to the Exceptions Table. If the balance is sufficient to cover comp hours earned, and Payable Time is not yet updated, the system inserts a new row of data into TL_PAYABLE_TIME.
Important! Comp Time exception TLX00001 must be set to 'high' severity. A 'low' or 'medium' severity exception can create payable time. However, if the time reporter is reporting a comp TRC that is not in his comp plan, this is still an exception. Although the system can create the payable time, it cannot update the comp time balance. Therefore keep the severity of this exception as "High."
See Also
Expand Task Profiles
When a task profile is reported positively or has been updated by the system during Step 9--Creating Intermediate Payable Time, the Expand Task Profiles subprocess expands the corresponding Intermediate payable time records with proper detailed task data after rules have been applied.
For example, a time reporter may have reported the Task Profile “AB,” which contains 50% of Project A and 50% of Project B. If the time reported is 8 hours, this process splits these 8 hours into 4 hours each for Projects A and B.
Apply Post Rules RoundingTime Administration checks the Rounding Option you selected on the Workgroup page to determine whether it should apply Segment Rounding or Day Rounding. If you have selected one of these rounding types, the system applies the specific rounding rules you defined on the Workgroup page.
Note. There are two types of rounding in Time and Labor: pre-rules rounding and post rules rounding. Pre-rules rounding applies only to punch time data. Segment Rounding and Day Rounding apply after rules have been processed, but before time is transferred to Payable Time.
See Also
Calculate Estimated Gross
The Calculate Estimated Gross process determines the estimated gross for each row contained in the Intermediate Payable Time Table when you set the Calc Estimated Gross field on the TL Installation page to Y (yes).
The system uses the following formula to calculate the gross:
TL_QUANTITY X (COMPRATE + FACTOR_RATE_ADJ) X FACTOR_MULT
The components of this formula are defined as follows:
|
Components/Fields |
Definition |
|
TL_QUANTITY |
The quantity entered by the time reporter or taken from the time reporter’s schedule. |
|
COMPRATE |
Either a rate or a compensation rate code. The derivation of the rate code is explained in Step 1 under Calculate Estimated Gross. |
|
FACTOR_RATE_ADJ |
The Rate Adjustment Factor defined for the TRC on the TRC 1 page. |
|
FACTOR_MULT |
The Multiplication Factor defined for the TRC on the TRC 1 page. |
To calculate estimated gross:
Derive the Comp Rate.
The Time Administration process derives the Rate in the Comp Rate variable as follows:
When a time reporter enters an override rate on the time reporting pages, the system uses this rate. This rate resides in the Intermediate Payable Time Table TL_IPT1.
When a time reporter enters a comp rate code on the time reporting pages, the system attempts to derive the rate in the Comp Rate Code (CRC) from the following locations in this order:
The Comp Rate Code Table (PS_COMP_RATECD_TBL). If the comp rate is not there, it then checks:
The Compensation Table (PS_COMPENSATION); if the comp rate is not there, it then checks:
The Job Code Table (more specifically, the PS_JOBCD_COMP_RATE field on PS_JOB).
If no rate or comp rate code is reported, the system checks for a rate on the TRC Table.
Note. If the Comp Rate Code (CRC) is HF (hourly + flat), the reported rates are added to the amount on the CRC and then inserted into the basic formula. If the CRC is PH (percent of hourly), the percent is calculated against the reported rate before inserting into the basic formula.
If the system finds nothing in these locations, it uses the hourly rate associated with the TRC in the Intermediate Payable Time Table TL_IPT1.
Note. When a TRC is of type Amount, the Quantity (QTY) is placed into the Estimated Gross field in Intermediate Payable Time. Other calculations are bypassed. If the TRC is of type Amount and is mapped to a NA Payroll Earnings Code where Mult Factor = 0, then the amount passed to IPT for Est Gross will be 0.
If the system cannot find the information in the previous locations, it takes the hourly rate from the JOB Table to use in the calculation.
Calculate Estimated Gross.
If Reported Hours is not zero, the Estimated Gross amount is calculated using this formula:
TL_QUANTITY X (COMPRATE + FACTOR_RATE_ADJ) X FACTOR_MULT
The Estimated Gross amount is written to the Estimated Gross work Table (TL_W2_EST_GRS) to be used in the final step.
Note. If a reported amount is populated in the Intermediate Payable Time Table, this amount automatically becomes the Estimated Gross amount. No further calculation is needed.
Update IPT Estimated Gross.
This step populates the Estimated Gross field on the TL_IPT1 record with the Estimated Gross amount contained on the Estimated Gross Work Table.
Step 13: Post Rule Validation
This step validates the data generated as a result of rules processing of task data and TRC data. Numerous validations are run during post rules processing. All the exceptions generated by these validations are delivered with Time and Labor and have a severity level of high. They are written to the TL_EXCEPTION table. Payable Time is not created for time reporters on the days for which there are medium and high level exceptions.
Post Rules time validation in Time Administration applies to the TRC and task data created by rules processing. For example, you might create a rule that sets all time reported without a TRC to a TRC of Reg. In another rule, you might specify that all Reg hours over eight in a day should be paid at the overtime rate of 1.5 using the TRC “OVT1.5.” Suppose, however, that the overtime rate represented by “OVT1.5” is no longer in the TRC program for the workgroup you are processing; instead, it has been replaced by a different TRC called OVTPay. In a case like this, Time Validation would generate an exception noting that the TRC “OVT1.5” was no longer valid for this workgroup.
Note. Customers should configure and use a validation set rather than enabling all validations to run.
This process updates the Exceptions Table (TL_EXCEPTION) to include any new exceptions generated during the current batch run. When this table has been updated, go to the Manage Exceptions page to approve or clear out exceptions.
This process does the following:
Compares new exceptions created in the current run to the unresolved exceptions that exist in the TL_EXCEPTIONS Table.
Sets the ACTION_DTTM field on the TL_EXCEPTIONS Table to CurrentDateTime for the exceptions that exist in both tables and deletes these exceptions from the working table.
Updates the TL_EXCEPTIONS Table by adding any new exceptions.
Sets the status of resolved exceptions to resolved. After Time Administration has updated the status of an exception to resolved, it refers to the SAVE_IND flag (save indicator) on the TL_EXCEPT_DEFN Table for the Exception ID. If the save indicator for that exception is Y (Yes), Time Administration archives the exception. If the save indicator is N (No), Time Administration deletes it.
Note. Time Administration does not process exceptions when it creates forecasted Payable Time.
See Also
Step 14: Processing Adjustments
Time and Labor supports two types of adjustments: normal and record-only.
Changes you make to reported time through the weekly and elapsed time reporting pages are considered normal adjustments. The frozen flag associated with a payable time entry determines how these adjustments are processed. (The frozen flag is set when time is approved, closed, or sent to payroll). Before the frozen flag is set, any changes you make will replace existing payable time entries. Changes made after the frozen flag is set will create offsetting entries that are sent to your payroll system.
Changes you make through the Record Only Adjustment page are considered record-only adjustments. You typically enter record-only adjustments when you cut a manual check for a time reporter and then want to go back and enter the time history for that check. In record-only mode, the system does not create payable time, run the adjusted time through Time Administration, or send record-only adjustments to payroll.
This section discusses the process that generates offsets for normal adjustments.
See Also
Understanding the Adjustment ProcessAn offset is the negative image of a current earnings for a given Date Under Report. (Date Under Report, or DUR, is the date for which time was reported.) The system creates offsets automatically when a DUR is adjusted. For example, suppose someone reports 8 hours of regular time for a given day, as the manager, you need to adjust this to 6 hours of regular time. If this 6 hours has already been processed by payroll, the adjustment you make creates an earnings row to offset the original amount of 8 hours regular (-8 hours) and creates a new earnings row containing the positive 6 hours of regular.
Offset records are created for every earnings for the day, regardless of whether earnings are modified or not. This implies that if a time reporter reported 8 hours of Regular, and 2 hours of OT, and the manager adjusts the Overtime amount, offsets are created for the Regular (-8) and the OT (-2) hours. Positive entries are also created for all earnings in the amount of the final snapshot of that day.
Making Multiple Adjustments
If you adjust Time for a date under report several times, the process only checks the most recent set of adjustments. For instance, in the previous example, if the user makes another adjustment to the Date Under Report, the process uses the 6 hours of Regular to generate the offset (-6 hours), not the original 8 and the offset -8 earnings rows. Only the latest adjustments are processed.
Determining When to Create Offsets
Adjustment processing occurs after rules and post-rules processes have been executed. Time Administration uses the following criteria to determine whether to create offsets for the data in an existing Payable Time record:
The original time data for which the system is creating an offset or adjustment must have previously been closed or approved by the user, or processed by an external system such as payroll or project costing.
You can determine whether an adjustment will create an offsetting entry by checking the payable status (PAYABLE_STATUS). Note that Time and Labor does not create offsets when the payable status is estimated or needs approval.
|
Payable Status |
Create Offsets? |
|
AP–Approved |
Y |
|
CL – Closed |
Y |
|
SP – Sent to Payroll |
Y |
|
RP – Rejected by Payroll |
Y |
|
TP – Taken by Payroll |
Y |
|
PD – Distributed |
Y |
|
DL – Diluted |
Y |
|
ES – Estimated |
N |
|
NA – Needs Approval |
N |
|
OE − Online Estimate |
N |
|
NP – No Pay |
N |
|
IG – Ignore |
Y |
|
RV – Reversed Check |
Y |
The system must be able to match the new Intermediate Payable Time record (the record that contains the new, adjusted data) with the original Payable Time record. In other words, the EmplID, Empl_Rec#, and Duration (DUR) associated with the new record and old record must match.
If these conditions are met, the system creates two new entries in Payable Time: one to reverse or offset (multiply by negative one) the original entry and the second to insert new data.
Note. This step creates offsets for absence rows that are from Global Payroll only. Payroll for North America process create offsets for absences and updates payable time with negative absence rows.
Example
The following example illustrates how this process works.
Original Payable Time data (TL_PAYABLE_TIME) that was reported, processed, and paid:
|
# |
DUR |
TRC |
QTY |
Est_Gross |
Lbr_Dist_Amt |
Diluted_Gross |
|
1 |
1/2/00 |
Reg |
4 |
40 |
40 |
40 |
|
2 |
1/2/00 |
Vac |
4 |
40 |
40 |
40 |
New Data in Intermediate Payable Time (TL_IPT1):
|
# |
DUR |
TRC |
QTY |
|
1 |
1/2/00 |
REG |
8 |
Offsets to Payable Time data (TL_PAYABLE_TIME) that were reported, processed, and paid:
|
# |
DUR |
TRC |
QTY |
Est_Gross |
Lbr_Dist_Amt |
Diluted_Gross |
|
1 |
1/2/00 |
Reg |
-4 |
-40 |
-40 |
-40 |
|
2 |
1/2/00 |
Vac |
-4 |
-40 |
-40 |
-40 |
See Also
Step 15: Updating Payable Time
This process takes the final results of Intermediate Payable Time processing and inserts them into the Payable Time table, at which point the data becomes available to payroll or other subscribers to Time and Labor.
Understanding the Difference between Payable Time and Intermediate
Payable TimePayable Time supplies time data to external systems like Payroll or Project Costing, while the function of Intermediate Payable Time is to make time data available internally for rules processing. The dates needed for rules processing may be considerably larger than the range of dates needed by your Payroll system or Project Costing. For this reason, the range of dates transferred to Payable Time may not be identical to the range of dates originally loaded in the Intermediate Payable Time Table.
See Also
Understanding How Time Administration Formats Payable Time
The Payable Time and Intermediate Payable Time (TL_ITP1) tables organize and format data differently. In contrast to Intermediate Payable Time, Payable Time attempts to sum data with the same attributes (TRC and Task) to create consolidated lines of data. For example, if two punch segments created for a single day have the same TRC in Intermediate Payable Time, Time Administration adds them to create a single row in Payable Time. The same is true of task data, whether tasks are reported positively or derived from task profiles. However, if there are separate TRCs or tasks for the rows of data in Intermediate Payable Time, the system preserves separate rows in Payable Time. If we look at how punch time is formatted in these tables, we can see the difference.
Intermediate Payable Time Versus Payable Time
As illustrated in the following table, when Time and Labor transfers punch data to Intermediate Payable Time, it arranges the data into separate rows of in and out punches, calculates the duration between each in and out punch, and stores the resulting durations or time segments in TL_QUANTITY. Because each duration has a separate row in the table, you can write rules that act differently on different time segments based on punch type, task assignment, and so forth.
In the following example, assume that detailed task information has been reported positively (time has already been assigned to Dept. A or B). We’ll then look at a second example in which task assignments are derived from a task profile.
Example 1: Tasks Are Positively Reported
Assuming that tasks are positively reported, rows in TL_IPT1 before rules have been executed would appear as shown in the following table, where there is a record for each segment of time. Rules may later delete or add rows:
|
PUNCH_TYPE |
PUNCH_BEGIN |
PUNCH_END |
TL_QUANTITY |
TASK |
|
In |
8:00 |
10:00 |
2.00 |
Dept. A |
|
Break |
10:00 |
10:15 |
.25 |
Dept. A |
|
In |
10:15 |
12:00 |
1.75 |
Dept. A |
|
Meal |
12:00 |
13:00 |
1.00 |
Dept. A |
|
In |
13:00 |
15:00 |
2.00 |
Dept. B |
|
Break |
15:00 |
15:15 |
.25 |
Dept. B |
|
In |
15:15 |
17:00 |
1.75 |
Dept. B |
|
Out |
17:00 |
|
|
|
After rules have been executed to assign TRCs to each time segment, TL_IPT1 would look like this:
|
PUNCH_TYPE |
PUNCH_BEGIN |
PUNCH_END |
TL_QUANTITY |
TRC |
TASK |
|
In |
8:00 |
10:00 |
2.00 |
Reg |
Dept. A |
|
Break |
10:00 |
10:15 |
.25 |
Reg |
Dept. A |
|
In |
10:15 |
12:00 |
1.75 |
Reg |
Dept. A |
|
Meal |
12:00 |
13:00 |
1.00 |
Reg |
Dept. A |
|
In |
13:00 |
15:00 |
2.00 |
Reg |
Dept. B |
|
Break |
15:00 |
15:15 |
.25 |
Reg |
Dept. B |
|
In |
15:15 |
17:00 |
1.75 |
Reg |
Dept. B |
|
Out |
17:00 |
|
|
|
|
After rules have been run, all similar rows (those with the same TRC and task elements) for the same employee and date are summarized and passed to Payable Time. Assuming that the meals and breaks in this example are paid, Payable Time would look like this:
|
TL_QUANTITY |
TRC |
TASK |
|
5.00 |
Reg |
Dept. A |
|
4.00 |
Reg |
Dept. B |
Note. In this example Payable Time creates two separate rows in TL_QUANTITY. This is because each is associated with a different task and cannot be summed.
Example 2: Task Data Derived From a Task Profile
Assume that task data has been generated through the use of a task profile, rather than positively reported, and that 25% of time is to be charged to Dept. A and 75% to Dept. B. Prior to running rules, TL_IPT1 appears as follows:
|
PUNCH_TYPE |
PUNCH_BEGIN |
PUNCH_END |
TL_QUANTITY |
|
In |
08:00 |
10:00 |
2.00 |
|
Break |
10:00 |
10:15 |
.25 |
|
In |
10:15 |
12:00 |
1.75 |
|
Meal |
12:00 |
13:00 |
1.00 |
|
In |
13:00 |
15:00 |
2.00 |
|
Break |
15:00 |
15:15 |
.25 |
|
In |
15:15 |
17:00 |
1.75 |
|
Out |
17:00 |
|
|
Note. When using task profiles, Time Administration refers to the instructions defined for the task profile to determine the correct allocation of time to tasks.
After rules have been executed, TL_IPT1 appears as follows:
|
PUNCH_TYPE |
PUNCH_BEGIN |
PUNCH_END |
TL_QUANTITY |
TRC |
TASK |
|
In |
08:00 |
10:00 |
1.875 (7.5 total “In” hrs x .25) |
Reg |
Dept. A |
|
Break |
10:00 |
10:15 |
.125 (.5 hrs of total break time x .25) |
Reg |
Dept. A |
|
Meal |
12:00 |
13:00 |
.250 (1 “meal” hr x .25) |
Reg |
Dept. A |
|
In |
08:00 |
10:00 |
5.625 (7.5 total “In” hrs x .75) |
Reg |
Dept. B |
|
Break |
10:00 |
10:15 |
.375 ( .5 hrs of total break time x .75) |
Reg |
Dept. B |
|
Meal |
12:00 |
13:00 |
.750 (1 “meal” hr x .75) |
Reg |
Dept. B |
Assuming that breaks and meals are paid, Payable Time appears as follows:
|
TL_QUANTITY |
TRC |
TASK |
|
2.25 |
Reg |
Dept. A |
|
6.75 |
Reg |
Dept. B |
Note. Although these examples include meals and breaks in the total time for the day, they would not typically be included in the TL_QUANTITY column used to determine the allocation of time to tasks. For example, if you were to use a “Default TRC” rule template to assign TRCs to reported time, you could specify which punches should get the default TRC (Punch Types = IN, ML (meal), BRK (break), OUT, and so on). Normally, you would only assign the default TRC to IN or XFER punch types, but not to ML or BRK. If ML or BRK do not get a TRC, then they do not get included in calculations in Intermediate Payable Time or Payable Time, but they could still be used to evaluate other miscellaneous rules.
Note. Even though Intermediate Payable Time contains a separate row for each time segment, this does not, for example, prevent you from writing a weekly overtime rule that sums all the segments in TL_QUANTITY for each day of the week to determine if a time reporter has met the requirement for overtime pay. You could even write a rule that sums all the hours in TL_QUANTITY for each segment in the week, deletes rows for individual segments, and writes the daily sum of hours back into TL_QUANTITY. However, you probably want to maintain separate rows for each segment, because you may have other rules that process different segments of time differently depending on their punch type or task association.
See Also
Creating Rules from A Template
Step 16: Updating Time Reporter Status
In this final step of the Time Administration run, the system resets the values in the TL_TR_STATUS record.
Note. Time Administration does not update TR status when it creates forecasted Payable Time.
For each fully processed positive time reporter, the system sets the status (TA_STATUS) to N and the EARLIEST_CHGDT to the latest date of payable time in the TL_PAYABLE_TIME table. If, after Time Administration has been run, time data is altered, or new time data is entered for a time reporter that affects the period just processed (or a prior period), the system updates TA_STATUS to Y and updates EARLIEST_CHGDT to reflect the earliest date of reported time. The time reporter can then be reprocessed.
For exception reporters, the system resets the status (TA_STATUS) to Y rather than to N (TA_STATUS is always set to Y for exception reporters) and automatically moves the EARLIEST_CHGDT to the beginning of the next processing period. The time reporter is not reprocessed unless new data is entered that causes the EARLIEST_CHGT field to be reset in the period that was just processed or in a prior period.
Viewing Time Reporter StatusThis section discusses how to view time reporter status.
Understanding Time Reporter StatusBefore or after you run the Time Administration process, you may want to use the View TR Status page to check the status of a time reporter or a group of time reporters.
For example, before running Time Administration, you can review a group of time reporters to see which members have the appropriate status settings to be processed in the run. Or during system implementation, you may want to check status information after you run Time Administration to verify that the process is updating time reporters as you expect. For exception time reporters, the Earliest Change Date should display the beginning of the next time period for the workgroup, and TA_STATUS should be set to Y (yes). For positive time reporters, the Earliest Change Date should be updated to the latest date of payable time, and the TA_Status should be set to N (No).
See Also
Understanding Time Reporter Data
Page Used to View Time Reporter Status|
Page Name |
Definition Name |
Navigation |
Usage |
|
TL_TR_STATUS |
Time and Labor, View Time, Time Reporter Status |
View the TR status and earliest change date for the time reporter or group of time reporters you specify. |
Viewing Time Reporter Status
Access the Time Reporter Status page (Time and Labor, View Time, Time Reporter Status).
|
Earliest Change Date |
The earliest addition or update to time-related data for a time reporter since the last Time Administration run. No entry indicates a null value. This date is a trigger for Time Administration’s determination of a time reporter’s period of interest. |
|
Run Time Admin? |
Indicates whether the time reporter will be processed the next time the person is selected for the Time Administration process. Displays the value of TA_STATUS: Y (Yes), the time reporter is ready for processing; or N (No), the time reporter is not ready for processing. |
See Also
Understanding Time Reporter Data
Launching the Time Administration Process
This section explains how to launch the Time Administration process.
Understanding When the Process is CalledTo start the batch process, use the Process Time Admin page (Time Administration run control page). If you have selected the Automatic Rules Run option on the TL Installation page, the batch process is also called automatically when you:
Invoke the Submit process after entering time on the Rapid Entry page.
Start the GP Absence process from the GP Absence Request page, if Time and Labor is integrated with Global Payroll. The GP Absence process calls Time Administration immediately after it retrieves absence data from Global Payroll.
Page Used to Start the Time Administration Process|
Page Name |
Definition Name |
Navigation |
Usage |
|
TL_TA_RUNCTL |
Time and Labor, Process Time, Request Time Administration, Request Time Administration |
Select the time reporters and/or groups of time reporters to process. If you do not want to pass data to payroll, and only want to forecast payable time, select the Forecast Payable Time option. |
Starting the Time Administration ProcessAccess the Request Time Administration page (Time and Labor, Process Time, Request Time Administration, Request Time Administration).
If you would like the system to generate runtime statistics for the current run, use the Time Administration Options page to select the statistics you would like it to produce.
|
Forecast Payable Time |
Select if you do not want to send the results of the Time Administration Batch run to Payable Time, but want to use the results for budgeting or other business purposes. You might also use this feature to test new rules associated with a new contract. You can forecast payable time repeatedly without having to reset TA Status until results are accurate. If you select this check box, the Process Period with this Date field becomes available. For the system to forecast time for current and future periods accurately, the Use Reported Time for POI check box must be selected. Note. Forecasting Payable Time does everything that creating Payable Time does, except process exceptions (TL_TA001200) and update time reporter status (TL_TA001300). It also ignores the EARLIEST_CHGDT and TA_STATUS. |
|
Use Reported Time for POI |
This check box enables you to determine dynamically if Time Administration should consider dates related to newly reported punch or elapsed time when creating the period of interest. If this check box is selected (default setting), the system will consider all reported time when creating the Period of Interest. Consequently, if the time reporter has reported time for a date that is greater than the initial Period of Interest end date, the greatest date from reported time becomes the initial POI end date. However, if this check box is cleared, the system will only use the earliest change date and current workgroup period to determine the period of interest, and will not consider time from future periods. For example, suppose that on 28 February you are processing time for the months of January and February and a time reporter has reported future vacation time for March. If you want the system to include the future reported time in its calculations, you would make sure that this check box is selected. Or, if you want the system to ignore the future reported time and only process the current and previous month’s time, you would clear this check box. |
|
Use Current Date |
Select to create Payable Time if you want the system to use the current (system) date to select time reporters for processing. Any time reporters with an Earliest Change Date (from the TR Status Table) that is equal to or less than the current date or system date. Selecting this option deactivates the Process Date field. |
|
Process Date |
Use this field if you are creating Payable Time, and you want to use a date other than the current (system) date to select time reporters for processing. For example, if you enter a new period before processing the previous calendar period, you could change the date on the run control to the last day of the previous pay period, and the run control would select the appropriate time reporters for that period. That is, only time reporters whose status (TA_STATUS) is Y and who have data to process in the previous period (whose EARLIEST_CHGDT is equal to or less than the last day of the previous period) will be selected. Time reporters who have unprocessed time in the current period only will be not selected. You can have time processed through the period that intersects with the process date for both exception and positive time reporters. Note. The system date is automatically set by default into the Process Date field, but can be modified. |
|
Process Period with this Date |
This field becomes available only when you select Forecast Payable Time. Enter the date you want to use to select a period for processing. The system determines the correct period to process as follows: For any time reporters you select for processing in the Employees to Process scroll area, the system locates the workgroup (or time reporting) period intersected by the Process Period date, and processes time for that period only (it does not select or exclude time reporters based on whether their earliest change date is less than or equal to this date. It processes any time reporter with time in this period). Note. If a time reporter in the period for which you are forecasting payable time is an exception reporter, the system uses scheduled time in its calculations—unless the exception reporter has entered time positively. In this case the positively reported time takes priority over the scheduled time. If a time reporter in the period for which you are forecasting payable time is a positive time reporter, the only time the system can process is positively reported time—unless the time reporter has a schedule. |
Employees To Process
Use this group box to select the time reporters that you want to process or exclude from the Time Administration run. You can enter Group IDs for entire workgroups, exclude certain individuals from those workgroups while processing everyone else, or select individuals from one or more workgroups to avoid processing large numbers of time reporters.
|
EmplID |
Select the Employee ID for the time reporter that you want to include or exclude from the run. |
|
Empl Rcd Nbr |
Select the Employee Record Number for the time reporter’s job that you want to include or exclude from the run. |
|
Group ID |
If you want to include or exclude an entire group of time reporters, select the Group ID in this field. |
|
Include/Exclude Indicator |
Select Include to include the time reporters you identified in the fields to the left. Select Exclude to exclude the time reporters you identified in the fields to the left. |
|
Run |
Click to run this request. PeopleSoft Process Scheduler runs the TL_TA process at user-defined intervals. |
See Also
Step 1: Determining Time Reporters to Process
Restarting Batch Processes in Time and Labor
Occasionally, an error may prevent a batch process, such as Time Administration, from completing successfully. When the error is caused by a change to a SQL statement or PeopleCode steps, you can usually fix the error and resume processing directly from the Process Monitor by selecting the Restart Request option and clicking OK.
Do not use the Restart option when:
A rule that you created causes an abend.
The error results from a change to the application engine structure, such as the addition, deletion, or modification of a step.
In these cases, create a new run control to ensure that the corrected rule components are brought into the buffer for processing.
See Also
Enterprise PeopleTools PeopleBook: Process Scheduler, Viewing the Status of Your Process
Generating and Viewing Runtime Statistics
This section provides an overview of generating and viewing runtime statistics and discusses how to:
Select the runtime statistics, batch data, and rule information you want the system to generate during each Time Administration run.
View the macro runtime statistics for the Time Administration process.
View the run time, start and end dates of the period of interest covered by the batch, and the number of time reporters in the batch.
View the Application Engine statistics.
View archived batch data.
View archived batch details.
View archived rule maps.
View the archived rule maps details.
Understanding Runtime StatisticsUse the Time Administration Options page to select the runtime statistics and other data you want the system to generate when you run the Time Administration process. After a batch run, you can view the data for troubleshooting purposes. For example, you could use the statistics generated during a run to see how much time it took to load the Intermediate Payable Time Tables, and then determine whether you’re loading an excessive amount of data.
Pages Used to Generate and View Runtime Statistics|
Page Name |
Definition Name |
Navigation |
Usage |
|
TL_TA_OPTIONS |
Set Up HRMS, System Administration, Utilities, Analyze Time and Labor, Time Administration Options, Time Administration Options |
Select the runtime statistics, batch data, and rule information you want the system to generate during each Time Administration run. You also specify the number of runs for which you want to store data. |
|
|
TL_TA_RSL_MAINT |
Set Up HRMS, System Administration, Utilities, Analyze Time and Labor, Time Administration Statistics, Time Administration Statistics |
View the macro runtime statistics for the Time Administration process. |
|
|
TL_TA_RSL_BATCH |
Click the Batch Stats link on the Time Administration Statistics page. |
View the run time, start and end dates of the period of interest covered by the batch, and the number of time reporters in the batch. The Store Batch Stats or Store Section Stats option on the Time Administration Options page must be selected. Statistics are generated when you run the Time Administration process. |
|
|
TL_TA_RSL_SECT |
Click the AE Section Stats link on the Time Administration Statistics page. |
View the Application Engine statistics. |
|
|
TL_TA_ARCH_BAT |
Set Up HRMS, System Administration, Utilities, Analyze Time and Labor, Archived Batches, Archived Batches |
View archived batch data. |
|
|
TL_TA_ARCH_BAT_SEC |
Click View Details on the Archived Batches page. |
View archived batch details. |
|
|
TL_TA_ARCH_RMAP |
Set Up HRMS, System Administration, Utilities, Analyze Time and Labor, Archived Rule Maps, Archived Rule Maps |
View archived rule maps. |
|
|
TL_TA_ARCH_RMP_SEC |
Click the View Details button on the Archive Rule Map page. |
View the archived rule maps details. |
Selecting the Runtime Statistics and Date to GenerateAccess the Time Administration Options page (Set Up HRMS, System Administration, Utilities, Analyze Time and Labor, Time Administration Options, Time Administration Options).
Time Admin Runtime Statistics
Use the following three options to define the runtime statistics you want the Time Administration process to generate:
Note. If you elect to store information at the detail level, the system automatically stores information at all higher levels. For example, if you select Store Batch Stats, you can also access macro level Time Administration statistics for the current run. You cannot, however, access detailed, section level statistics.
|
Store Macro Time Admin Stats |
Select to generate high level statistics for the current run as a whole, information about when the Time Administration process started and stopped, how may many rows were processed, and so forth. |
|
Store Batch Stats |
Select to generate more detailed statistics on a batch by batch basis. For instance, the time taken to process each batch, and the start and end date of the period of interest for the batch. |
|
Store Section Stats |
Select to generate detailed information for each batch at the section level, in other words, at the level of each of the steps or Application Engine subprocesses that make up the Time Administration process. For example, selecting this option enables you to generate and view statistics on such subprocesses as Punch Matching, Generate Intermediate Payable Time, and so forth. |
Note. If you elect to generate runtime statistics on your batch runs, you can view the statistics using the RSL Maintenance page and the linked Batch Stats page and AE Section Stats page.
Time Admin Save Options
Use the fields in this group box to specify if you want to generate information about the batches and rules processed during the run. You can also specify how many previous runs of statistics, batch data, and rules data you want to store.
|
Store Copies of the Batches |
Select to generate data for each batch of data processed. |
|
Store Copies of the Rule Map |
Select to store the Rule Map and see what rules you ran, the order in which they ran, and so forth. |
|
Keep Last (n) Time Admin Runs |
Enter the number of previous Time Administration runs for which you want to store runtime statistics, batch and rules data. For example, if you enter a 3 in this field, the system keeps the data for the last three runs. |
Note. If you elect to store copies of the batches or rule map, you can view the information using the Archived Batches page and the Archived Rule Maps page.
Viewing Runtime StatisticsAccess the Time Administration Statistics page (Set Up HRMS, System Administration, Utilities, Analyze Time and Labor, Time Administration Statistics, Time Administration Statistics).
|
Process Instance |
The order assigned to the run in the processing queue. The number is generated automatically by the Process Scheduler. |
|
Forecast Payable Time |
This check box is selected if you chose the Forecast Payable Time option on the Time Administration run control page. |
|
IPT Row Count |
The number of rows created in Intermediate Payable Time. |
|
Payable Time Row Count |
The number of rows created in Payable Time. |
|
Forecasted Time Row Count |
The number of rows created in Forecasted Payable Time. |
|
Exceptions Row Count |
The number of exceptions generated when Time Administration was run. |
|
Batch Stats |
Click this link to access the Batch Stats page, where you can see additional information about the batch. |
|
AE Section Stats |
Click this link to access the AE Section Stats page, where you can see the runtime for each section in the batch. |
|
Remove All |
Click this button to delete all statistics that appear on this page and the linked Batch Stats page and AE Section Stats page. |
|
Remove Selected |
To delete selected rows of statistics and the corresponding Batch Stats and AE Section Stats pages, select the Delete Row check box next to each row you want to delete, then click this button. |
Viewing Batch StatisticsAccess the TA Run-Time Stats: Batches page (click the Batch Stats link on the Time Administration Statistics page).
|
Time Reporter Count |
This is the number of time reporters processed in the batch. |
Viewing Application Engine StatisticsAccess the TA Run-Time Stats: AE Sections page (click the AE Section Stats link on the Time Administration Statistics page).
|
Process Instance |
The order assigned to the run in the processing queue. The number is generated automatically by the Process Scheduler. |
|
Section Name |
This is the section name, that is, the name of the subprocess for which you have generated statistics. |
Viewing Batch Data
Access the Archived Batches page (Set Up HRMS, System Administration, Utilities, Analyze Time and Labor, Archived Batches, Archived Batches).
You can view detailed information about the batches processed during a Time Administration run through the Archived Batches page and the linked Archive Batch Details page.
Filter Options
|
Process Instance |
Select appropriate search logic and enter the process information to filter by this variable. |
|
Run Control ID |
Select appropriate search logic and enter the run control ID information to filter by this variable. |
|
Get Rows |
Click this button to populate the grid based on filtering criteria, if entered, or for all batches, if no filtering criteria is entered. |
Batch Archives
|
Workgroup |
The name of the workgroup for which the statistics were generated. |
|
Rule Program ID |
The rule program associated with the batch. |
|
View Details |
Click this link to access the Archive Batch Detail page. |
|
Remove All |
Click this button to delete all statistics that appear on this page and the linked detail page. |
|
Remove Selected |
To delete selected rows of statistics and the corresponding detail pages, select the Delete Row check box next to each row you want to delete, then click this button. |
Viewing Batch Details
Access the Archive Batch Detail page (Set Up HRMS, System Administration, Utilities, Analyze Time and Labor, Archived Batches, Archived Batches, click View Details on the Archived Batches page).
Many of the fields on the Archive Batch Details page also appear on the Archive Batch Detail page. Additional fields include:
|
Empl Effdt (employee effective date) |
The date on which the time reporter was enrolled in Time and Labor. |
|
Orig End Dt (original end date) |
The original end date represents the end date of the initial period of interest the Time Administration process identified for the time reporter. For payable time, the system refers to the period ID associated with the time reporter’s workgroup. It then identifies the start and end dates of the period in which the earliest change date falls. This end date becomes the original end date. For forecasted payable time, the system follows a similar process to determine the original end date, but substitutes the earliest change date with the date entered in the Process Date field on the Time Administration run control page. |
|
Wrkgrp Effdt (workgroup effective date) |
The effective date of the workgroup row that was effective for this run and for this time reporter. |
|
Rulepgm Effdt (rule program effective date) |
The effective date of the rule program row that was effective for this run and for this time reporter. |
Viewing Archived Rule Maps
Access the Archived Rule Maps page (Set Up HRMS, System Administration, Utilities, Analyze Time and Labor, Archived Rule Maps, Archived Rule Maps).
You can view detailed information about the rules processed during a Time Administration run through the Archived Rule Maps page and the linked Archive Rule Map Detail page.
|
Priority |
The priority of the rule within the rule program. |
|
Rule ID |
The rule that was executed. |
|
Start Date |
The Period of Interest start date. |
|
End Date |
The Period of Interest end date. |
|
Rule Program ID |
The rule program associated with the rule. |
|
Time Period ID |
The time period applicable to the rule program. The time period ID (associated with the time period calendar) determines the date range for the selection criteria of the rule. |
|
View Details |
Click this link to access the Archive Rule Map Detail page. |
|
Remove All |
Click this button to delete all statistics that appear on this page and the linked detail page. |
|
Remove Selected |
To delete selected rows of statistics and the corresponding detail pages, select the Delete Row check box next to each row you want to delete, then click this button. |
Viewing the Archive Rule Map DetailsAccess the Archive Rule Map Detail page (Set Up HRMS, System Administration, Utilities, Analyze Time and Labor, Archived Rule Maps, Archived Rule Maps, click the View Details button on the Archive Rule Map page).
Many of the fields on the Archived Batch Details pages also appear on the Rule Map Archives page. Additional fields include:
|
Workgroup |
The workgroup for which the rule was executed. |
|
Wrkgrp Effdt (workgroup effective date) |
The effective date of the workgroup for which the rule was executed. |
|
Section |
The Application Engine (AE) section that contains the code for the rule. |
See Also
Enterprise PeopleTools PeopleBook: PeopleSoft Application Engine
Using Batch Processing Tips
Q. How can I process both a prior period adjustment for an exception reporter and the “current” time reporting period if the current period does not fall within the period of interest for batch processing, and how can I avoid skipping periods when I run Time Administration in a situation like this?
A. Because Payable Time cannot be created for a date or a period that is not contained within the period of interest (and which is therefore not included in Intermediate Payable Time), the current period may need to be processed in a separate run from the prior period adjustment. The following example illustrates why this might occur, and how to avoid skipping a period when you run Time Administration.
Note. The information contained in this topic assumes that you are familiar with the explanation of how Time Administration calculates the period of interest, and the material on the relationship between the period of interest, Intermediate Payable Time, and Payable Time.
Example: Creating Time for an Exception Reporter with a Prior Period Adjustment
Assume the following:
You are processing an exception time reporter.
The time reporter belongs to a workgroup with a monthly rule in the workgroup rule program.
As illustrated in the following diagram, the last period processed for this time reporter is Week 6 (the current week to be processed is Week 7). After Week 6 is processed, the earliest change date is automatically reset to the first day of the next period—that is, Week 7 (after processing an exception time reporter, the earliest change date is automatically reset to the start of the period immediately following the one intersected by the current date or process date used in the current Time Administration run).
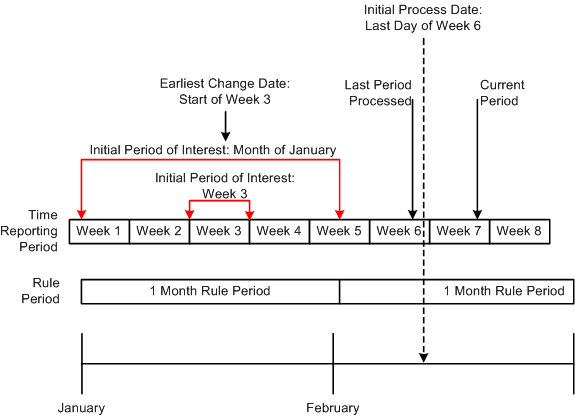
Processing both a past and a current period
After Week 6 is processed, the time reporter makes a change to prior period time—he neglected to report a vacation day at the beginning of Week 3, and then does so during Week 7. Because of this, the earliest change date for the time reporter moves from the beginning of Week 7 to the start of Week 3.
After our time reporter reports new data in the prior period, the system administrator runs Time Administration for Week 7, setting the process date to the end of the week (Week 7). When the process is started, Time Administration defines the initial period of interest as the time reporting period intersected by the earliest change date (Week 3 in our example). The system then expands the period of interest to create time for the monthly rule, giving us a final period of interest that begins on January 1 and ends on January 31. Because there is no positively reported time for periods after January 31, the final period of interest does not extend into the current month or even to the current week (Week 7). This means that Payable Time for the time reporter cannot be created, during this run of Time Administration, for the current period (Week 7), as the data for this period does not fall within the period of interest (and therefore does not exist in Intermediate Payable Time). Payable Time will, however, be created for the month of January.
Problem:
In a situation like this, you may still want to create Payable Time for the time reporter in Week 7, which is the “current” period (the period in the present you want to process.) How can you do this, given that the period of interest does not extend into the current month? (Remember, you cannot move time into Payable Time unless it falls within the period of interest, and is included in Intermediate Payable Time.) And how can you avoid skipping a time reporting period—Week 7 in this example—given that the earliest change date is automatically reset to the start of Week 8 (that is, the start of the period immediately following the one intersected by the current date or process date used in the last Time Administration run)?
Solution:
After processing an exception reporter, Time Administration automatically resets the earliest change date to the first day of the time reporting period following the one intersected by the process date used in the current run. In our example, the earliest change date for our time reporter moves to Week 7 after Week 6 is processed, back to Week 3, and finally to Week 8—but time is not picked up for Week 7. In this situation (in which there is a prior period adjustment, and the period of interest does not include the “current” period), you can ensure that all the time for a time reporter is processed (both prior and current), by initially setting the process date to the last day of the last period processed (the one prior to the current period you want to process). After running Time Administration, the earliest change date will be reset to the start of the current period, and you can then move the process date into this period and process current time. So in this example, you would first set the process date to the end of Week 6 (the last period processed), run Time Administration, and then process Week 7.
See Also
Using Time Reporter Status in the Selection Process