9 Configuring the Appearance of an Integrated Excel Workbook
This chapter describes how you configure the appearance of an integrated Excel workbook using styles that ADF Desktop Integration defined and that you define in Excel. The chapter also discusses how you can use EL expressions to dynamically apply styles to Oracle ADF components in a workbook at runtime.
This chapter includes the following sections:
-
Section 9.1, "About Configuring the Appearance of an Integrated Excel Workbook"
-
Section 9.3, "Applying Styles Dynamically Using EL Expressions"
9.1 About Configuring the Appearance of an Integrated Excel Workbook
You can configure the appearance of an integrated Excel workbook using both Excel functionality and Oracle ADF functionality. Configuring the appearance of a workbook may make the workbook more usable for end users. For example, applying a particular style to cells that render ADF Output Text components at runtime may indicate to end users that the cell is read-only. You may also want to configure the appearance of an integrated Excel workbook so that it aligns with your company's style sheet or the color scheme of the Fusion web application that the Excel workbook integrates with.
Using styles to configure your data in your integrated Excel workbook gives you many benefits. For example, you can use a particular style for ADF Output Text components, and a different style for ADF Input Text components.
ADF Desktop Integration provides several predefined Excel styles to apply to the ADF Desktop Integration components you configure in a workbook. You may want to define additional styles to meet the needs of your desktop integration project. If you do, familiarize yourself with the formats in an Excel workbook that render differently depending on the locale, region, and language.
9.1.1 Integrated Excel Workbook Configuration Use Cases and Examples
You can customize the appearance of ADF Desktop Integration components using styles. For example,Figure 9-1 shows various styles applied to the columns of ADF Table in EditPriceList.xlsx. Note that some styles shown in Figure 9-1 are predefined styles (for example, _ADFDI_TableCellStyle) and others are created by the developer (for example, mplTableCellR0Pctg).
9.1.2 Additional Functionality for Configuring the Appearance of an Integrated Excel Workbook
After you have applied styles to configure the appearance of your integrated Excel workbook, you may find that you need to add additional functionality to configure your workbook. Following are links to other functionalities that you can use:
-
Branding: In addition to styles, ADF Desktop Integration provides a collection of properties (
BrandingItems) that enable you to brand your integrated Excel workbook with application name, application version details, and copyright information. For more information, see Section 9.6, "Branding Your Integrated Excel Workbook." -
Localization: You can customize the integrated Excel workbook as part of the process to internationalize and localize with the Fusion web application. For more information, see Chapter 10, "Internationalizing Your Integrated Excel Workbook."
9.2 Working with Styles
ADF Desktop Integration provides a mechanism to apply Excel-defined styles to some Oracle ADF components at runtime. The Oracle ADF components that support the application of styles have properties with StyleName in their name. For example, the column properties of the ADF Table and ADF Read-only Table components both support the properties HeaderStyleName and CellStyleName that determine styles to apply at runtime.
9.2.1 Predefined Styles in ADF Desktop Integration
Many properties have default values that are drawn from a predefined list of ADF Desktop Integration module styles. For example, the HeaderStyleName property's default value is _ADFDI_HeaderStyle, one of the predefined styles in ADF Desktop Integration. ADF Desktop Integration automatically adds these predefined styles to the Excel workbook once when it is enabled for use with ADF Desktop Integration.
The following is the list of predefined styles:
-
_ADFDI_FormBottomStyle -
_ADFDI_FormDoubleClickCellStyle -
_ADFDI_FormTopStyle -
_ADFDI_HeaderStyle -
_ADFDI_InputTextStyle -
_ADFDI_LabelStyle -
_ADFDI_OutputTextStyle -
_ADFDI_ReadOnlyTableStyle -
_ADFDI_TableCellROStyle -
_ADFDI_TableCellStyle -
_ADFDI_TableChangedColumnStyle -
_ADFDI_TableDoubleClickCellStyle -
_ADFDI_TableFlagColumnStyle -
_ADFDI_TableKeyCellStyle -
_ADFDI_TriangleHeaderStyle
You can merge these styles and other styles that you define yourself from an integrated Excel workbook into another Excel workbook that you intend to integrate with a Fusion web application. You may create additional styles for use in your Excel workbook. For example, to add a date-specific formatting, you can duplicate _ADFDI_TableCellStyle, call it MyTableCellDateStyle, and add your date-specific formatting.
Once you have decided what styles to apply to the ADF Desktop Integration components at runtime, you can write EL expressions to associate a style with a component. The ADF Desktop Integration component properties that include StyleName in their name take an EL expression as a value. The ADF Label component and the Label property of other ADF components also support EL expressions. These EL expressions can retrieve the values of string keys defined in resource bundles or the values of attribute control hints defined in your Fusion web application.
For more information about creating new styles and merging styles into a workbook, see Excel's documentation.
9.2.2 Excel's Date Formats and Microsoft Windows' Regional and Language Options
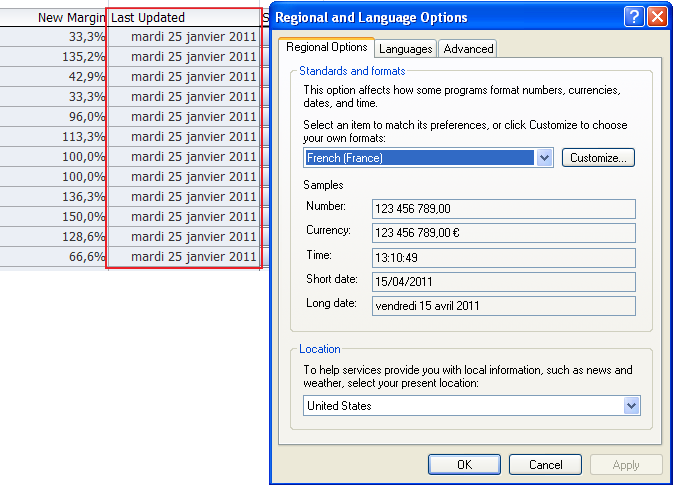
Some formats in the Date category of the Number styles that Excel can apply to cells change if a user changes the locale of the local system using the Regional and Language Options dialog that is accessible from the Microsoft Windows Control Panel. The * character precedes these formats in the Type list. Figure 9-2 shows an example of a Date type that formats dates in a cell using French (France) conventions.
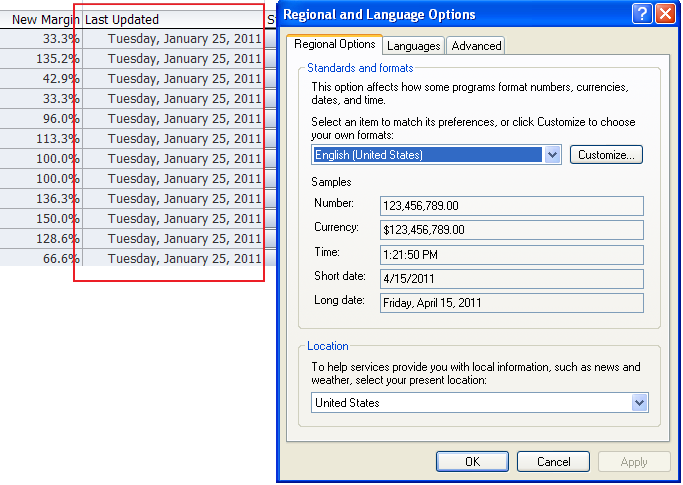
If the end user changes the regional options of a system to use English (United States), as illustrated in Figure 9-3, the cells that are formatted with the style in Figure 9-2 use the English (United States) conventions.
9.2.3 How to Apply a Style to an Oracle ADF Component
To apply a style to an Oracle ADF component, use the property inspector to set values for properties with StyleName in their name.
It may be helpful to have an understanding of styles. For more information, see Section 9.2, "Working with Styles."
You may also find it helpful to understand functionality that can be added using other ADF Desktop Integration features. For more information, see Section 9.1.2, "Additional Functionality for Configuring the Appearance of an Integrated Excel Workbook."
-
In the integrated Excel workbook, select the cell that references the Oracle ADF component you want to modify and then click the Edit Properties button in the Oracle ADF tab.
For example, select a cell that references an ADF Table component.
-
Click Columns and then the value for the column in the array of columns where you want to modify the format of cells at runtime.
-
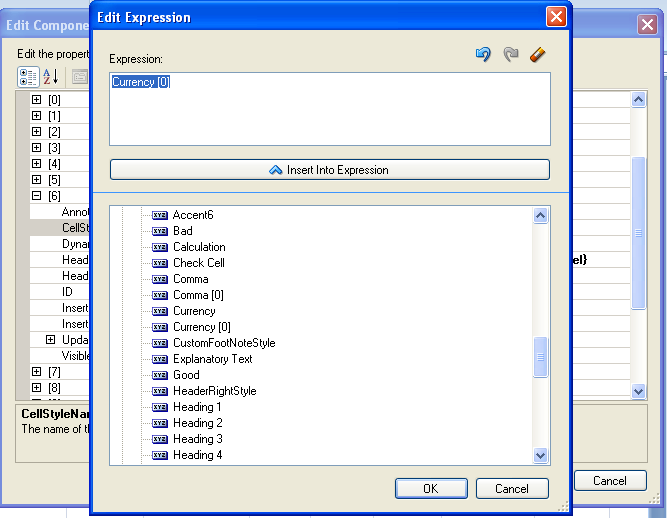
Select the CellStyleName property and click the ellipsis button (...) to display the Edit Expression dialog.
-
Expand the Styles node and select the style to apply to cells in the column at runtime.
For example, apply a currency-based style (
Currency[0]style) to the List Price databound column of Currency type. Applying theCurrency[0]style rather than a general style to a databound column of Currency type results in runtime data (price values) appearing as values rounded off to zero decimal places rather than a regular value (with two decimal places). -
Click Insert Into Expression to insert
Currency[0]into the Expression field.Figure 9-4 shows the Edit Expression dialog.
-
Click OK.
9.2.4 What Happens at Runtime: How Style Is Applied to an ADF Component
The EL expression that you entered as a value for the property with StyleName in its name is evaluated at runtime. If it corresponds to one of the predefined styles or one that you defined, the style is applied to the ADF component that you set the property for.
If a cell that references an ADF component has a style applied to it that differs from the style defined in the properties of the ADF component, the ADF component overwrites the existing style at runtime and applies the style defined by its properties.
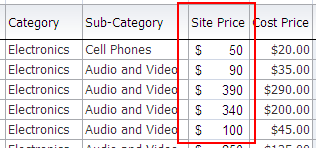
For example, Figure 9-5 shows the runtime values of the Site Price column after the Currency[0] style is applied, overriding the default TableCellCurrency style.
9.3 Applying Styles Dynamically Using EL Expressions
Oracle ADF component properties that include StyleName in their name can take an EL expression as a value. The EL expressions that you write can resolve to a named Excel style at runtime that is applied to the ADF component. The EL expressions that you write are Excel formulas that may include ADF data binding expressions. ADF Desktop Integration does not evaluate or apply results when a user navigates between cells or during upload.
The following examples show different contexts where you can use EL expressions to determine the behavior and appearance of ADF components at runtime. Example 9-1 applies a style dynamically during download. If the status value for binding is Closed, apply a read-only style (MyReadOnlyStyle). Otherwise apply another style (MyReadWriteStyle).
Example 9-1 Applying a Style Dynamically During Download
=IF("#{bindings.Status}" = "Closed", "MyReadOnlyStyle", "MyReadWriteStyle")
Example 9-2 uses a mixture of Excel formulas and ADF binding expressions to handle errors and type conversion.
Example 9-2 EL Expressions to Handle Errors and Type Conversion
=IF(ISERROR(VALUE("#{bindings.DealSize}")), "BlackStyle", IF(VALUE("#{bindings.DealSize}") > 300, "RedStyle", "BlackStyle"))
9.3.1 What Happens at Runtime: How an EL Expression Is Evaluated
When evaluating EL expressions at runtime, ADF Desktop Integration determines the value that the EL expression references. It then replaces the EL expression in the Excel formula with the value. In Example 9-1, ADF Desktop Integration first determines that value of the EL expression, #{bindings.Status}, in the following Excel formula:
=IF("#{bindings.Status}" = "Closed", "MyReadOnlyStyle", "MyReadWriteStyle")
It then replaces the EL expression with the runtime value, as in the following example, where the expression evaluated to Closed:
=IF("Closed" = "Closed", "MyReadOnlyStyle", "MyReadWriteStyle")
Excel evaluates the formula and, in this example, applies the MyReadOnlyStyle style.
9.3.2 How to Write an EL Expression That Applies a Style at Runtime
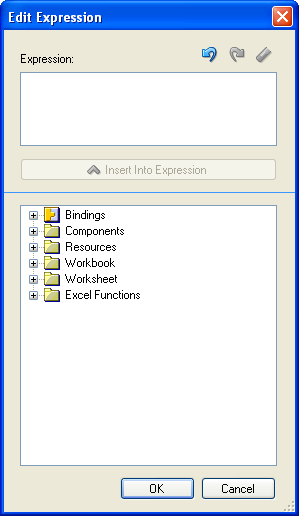
You write EL expressions for the Oracle ADF component properties that support EL expressions in the Edit Expression dialog that is accessible from the Oracle ADF component's property inspector. Figure 9-6 displays an Edit Expression dialog launched from the property inspector window of an ADF Button component.
It may be helpful to have an understanding of how to apply styles dynamically. For more information, see Section 9.3, "Applying Styles Dynamically Using EL Expressions."
You may also find it helpful to understand functionality that can be added using other ADF Desktop Integration features. For more information, see Section 9.1.2, "Additional Functionality for Configuring the Appearance of an Integrated Excel Workbook."
To write an EL expression that applies a style at runtime:
-
Open the integrated Excel workbook.
-
Select a cell in the Excel worksheet that references the Oracle ADF component for which you want to write an EL expression.
-
Click the Edit Properties button in the Oracle ADF tab to display the property inspector.
-
Select the property in the property inspector with which you want to associate an EL expression and click the ellipsis button (...) to display the Edit Expression dialog.
Note:
The Edit Expression dialog appears only if the Oracle ADF component that you selected in Step 2 supports EL expressions. Depending on the context, the ellipsis button (...) can launch other editors such as the Edit Action dialog.The Edit Expression dialog, as illustrated in Figure 9-6, displays a hierarchical list of the Oracle ADF components, bindings, styles, resources, and Excel functions that you can reference in EL expressions. For more information about the syntax of EL expressions that you enter in this dialog, see Appendix B, "ADF Desktop Integration EL Expressions."
9.3.3 What You May Need to Know About EL Expressions That Apply Styles
EL expressions that evaluate to styles are applied when:
-
An ADF Table component invokes its
DownloadorDownloadForInsertactions -
Rows are inserted into an ADF Table component
-
A worksheet invokes its
DownSyncaction
EL expressions that evaluate to styles are not applied when:
-
An ADF Table component invokes its
RowDownSyncaction -
The end user edits the format properties of a cell
Note also that an EL expression that evaluates to a style is not reevaluated when the end user edits a cell's value.
-
The runtime value of an EL expression does not match a style defined in the end user's integrated Excel workbook
In this scenario the style formats of the targeted cells do not change. Instead, they retain their existing style formats. If you configured client-side logging, ADF Desktop Integration generates an entry in the log file when an EL expression evaluates to a style that is not defined in the end user's integrated Excel workbook. For more information about client-side logging, see Section C.3, "Generating Log Files for an Integrated Excel Workbook."
9.4 Using Labels in an Integrated Excel Workbook
Use labels to provide end users with information about how they use the functionality in an integrated Excel workbook. You can write EL expressions that retrieve the value of string keys defined in a resource bundle or that retrieve the values of attribute control hints. An integrated Excel workbook evaluates the value of a Label property only when the workbook is initialized.
9.4.1 Retrieving the Values of String Keys from a Resource Bundle
Figure 9-7 shows a portion of the design time view of the EditPriceList-DT.xlsx workbook in the Master Price List module. It shows examples of ADF Label components and ADF Button components that have EL expressions specified for their Label properties.
Figure 9-7 Design Time View of an ADF Label Component and an ADF Button Component with Label Property

At runtime, these EL expressions resolve to string keys defined in the res resource bundle that is registered with the Master Price List module. You define resource bundles in the workbook properties dialog. For information about referencing string keys from a resource bundle, see Section 10.2, "Using Resource Bundles in an Integrated Excel Workbook."
Figure 9-8 shows the corresponding runtime view of the ADF Label component and ADF Button component illustrated in design mode in Figure 9-7.
9.4.2 Retrieving the Values of Attribute Control Hints
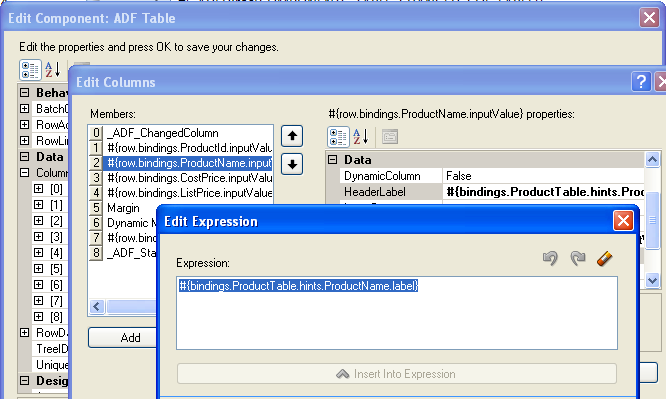
In addition to string keys from resource bundles, the ADF Label component and the Label property of other ADF components can reference attribute control hints that you define for entity objects and view objects in your JDeveloper project. Figure 9-9 shows the expression builder for the Product Name column in the EditPriceList-DT.xlsx workbook's ADF Table component. The expression builder contains an EL expression for the HeaderLabel property of the ProductName column that retrieves the value (Product Name) defined for an attribute control hint at runtime.
Attribute control hints can be configured for both view objects and entity objects. Information about how to add an attribute control hint to an entity object can be found in the "Defining Attribute Control Hints for Entity Objects" section of the Oracle Fusion Middleware Fusion Developer's Guide for Oracle Application Development Framework. Information about how to add an attribute control hint to a view object can be found in the "Defining Attribute Control Hints for View Objects" section of the Oracle Fusion Middleware Fusion Developer's Guide for Oracle Application Development Framework.
9.4.3 How an Integrated Excel Workbook Evaluates a Label Property
An integrated Excel workbook evaluates the Label properties of ADF components when the workbook is initialized after you or the end user opens the workbook for the first time. The integrated Excel workbook saves the retrieved values for the Label properties when the workbook itself is saved to a directory on the system.
The retrieved values for the Label properties do not get refreshed during invocation of actions such as the worksheet's DownSync action or the ADF Table component's Download action. You indirectly refresh the retrieved values of the Label properties if you invoke the workbook actions ClearAllData or EditOptions described in Table A-17.
9.5 Using Styles to Improve the User Experience
It is good practice to provide end users of integrated Excel workbooks with information that helps them understand how to use the ADF components that you provide to integrate with a Fusion web application. You can do this by:
-
Providing end users with instructions on how to use Oracle ADF components such as ADF Button and ADF Input Text components.
The ADF Label component and the
Labelproperty of other ADF components is useful for this task, as you can write labels that instruct the end user on how to use the component. -
Apply styles that indicate if an ADF component is read-only or read-write.
9.5.1 Using ADF Label Components to improve the User Experience
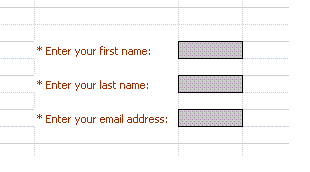
You can use ADF Label components to provide end users of an integrated Excel workbook information about how to use other ADF components in the workbook. For example, many forms, by convention, use an * to indicate to end users that they must enter a value in an input field. Figure 9-10 shows three ADF Input Text components with ADF Label components in adjoining cells. Each ADF Label component references an EL expression that retrieves the value of a string key from a resource bundle at runtime. Each string key includes the * character to indicate to end users that they must supply a value.
For information about using resource bundles, see Section 10.2, "Using Resource Bundles in an Integrated Excel Workbook."
9.5.2 What You May Need to Know About the Read-Only Property in an Integrated Excel Workbook
Note the following points about the read-only property in an integrated Excel workbook:
-
ADF Output Text, ADF Label, and ADF Table header row do not have read-only properties. However, these components have implied read-only behavior. In addition, end users can enter values in the cells that host these components and temporarily change the values that appear in these cells. ADF Desktop Integration ignores these changes when uploading from the worksheet and overwrites them when it downloads data from the Fusion web application.
-
The ADF Input Text component, ADF List of Values component, and TreeNodeList subcomponent each have a read-only property (
ReadOnly).Note:
If you specify an Excel formula in theValueproperty of an ADF Input Text component, the component behaves as if itsReadOnlyproperty wereTrue. The component ignores the actual value of theReadOnlyproperty. -
To protect the values of read-only cells at runtime, set the worksheet protection to automatic. When an attempt is made to edit a read-only cell after enabling worksheet protection, Excel displays a warning message and the edit is blocked. For more information about worksheet protection, see Section 9.7, "Using Worksheet Protection."
-
Do not use the Excel's Protect Sheet or Protect Workbook features directly in an integrated Excel workbook. Also, ensure that end users do not use these features.
To prevent end-user confusion, apply styles to components, such as the ADF Output Text component, that indicate to end users whether a component is read-only or can be edited. By default, the ADF Output Text component uses the predefined style, _ADFDI_OutputTextStyle. You can define your own styles and apply them to components as described in this chapter.
For more information about the properties that ADF Desktop Integration components support, see Appendix A, "ADF Desktop Integration Component Properties and Actions."
9.6 Branding Your Integrated Excel Workbook
ADF Desktop Integration provides several features that you can configure to brand your integrated Excel workbook with information such as application name, version information, and copyright information. You can use the workbook BrandingItems group of properties to associate this information with an integrated Excel workbook. You must configure a Ribbon tab as described in Section 8.3, "Configuring the Runtime Ribbon Tab" so that the end user can view this branding information by clicking a ribbon button that invokes the ViewAboutDialog workbook action at runtime. For more information about workbook actions, see Table A-17.
You can also define string keys in a resource bundle to define information, such as titles, in one location that can then be used in multiple locations in an integrated Excel workbook at runtime when EL expressions retrieve the values of these string keys. For information about defining string keys, see Section 10.2, "Using Resource Bundles in an Integrated Excel Workbook."
9.6.1 How to Brand an Integrated Excel Workbook
You define values for the workbook BrandingItems group of properties.
It may be helpful to have an understanding of how to customize brand of your integrated Excel workbook. For more information, see Section 9.6, "Branding Your Integrated Excel Workbook."
You may also find it helpful to understand functionality that can be added using other ADF Desktop Integration features. For more information, see Section 9.1.2, "Additional Functionality for Configuring the Appearance of an Integrated Excel Workbook."
To brand an integrated Excel workbook:
-
Open the integrated Excel workbook.
-
In the Workbook group of the Oracle ADF tab, click Workbook Properties.
-
In the Edit Workbook Properties dialog, click the ellipsis button (...) beside the input field for BrandingItems.
-
In the Edit BrandingItems dialog, click Add and specify values for the new element as follows:
-
NameSpecify the name, or the EL expression, of the branding item to define.
-
ValueSpecify a literal string or click the ellipsis button (...) to invoke the expression builder and write an EL expression that retrieves a value at runtime.
BrandingItemsmust use literal strings or resource expressions, and must not contain any binding expression.
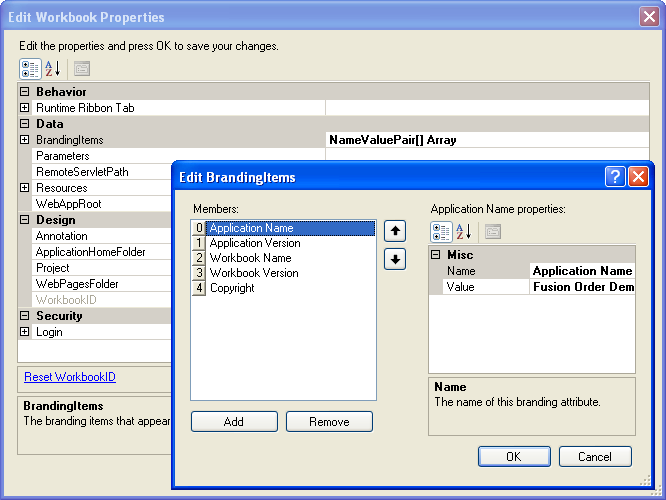
Figure 9-11 shows the design time view of branding items in the Master Price List module.
-
-
Click OK.
9.6.2 What Happens at Runtime: the BrandingItems Group of Properties
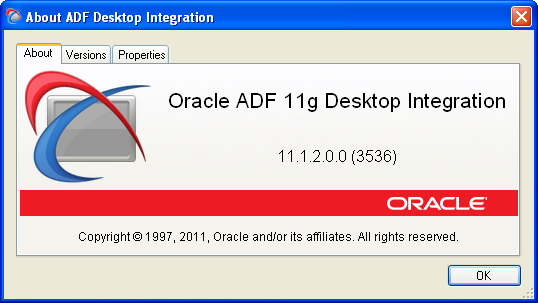
At runtime, the name-value pairs that you define for the BrandingItems group of properties appear in a dialog that the end user invokes from the About button of the Oracle ADF tab, which you configured to appear, as described in Section 8.3, "Configuring the Runtime Ribbon Tab." Figure 9-12 shows the runtime view of branding items in the Master Price List module's EditPriceList.xlsx workbook.
9.7 Using Worksheet Protection
By default, the end user can edit the values of locked cells and ADF Desktop Integration read-only components, such as ADF Label and ADF Output Text, at runtime. While uploading data, ADF Desktop Integration ignores these changes and overwrites them when it downloads data from the Fusion web application.
To prevent editing of locked cells at runtime, you must enable worksheet protection. Optionally, you can also provide a password to prevent the end user from turning off worksheet protection.
9.7.1 How to Enable Worksheet Protection
Worksheet protection enables true read-only mode for locked and read-only cells, and prevents any editing at runtime.
It may be helpful to have an understanding worksheet protection. For more information, see Section 9.7, "Using Worksheet Protection."
You may also find it helpful to understand functionality that can be added using other ADF Desktop Integration features. For more information, see Section 9.1.2, "Additional Functionality for Configuring the Appearance of an Integrated Excel Workbook."
To enable Worksheet Protection:
-
Open the integrated Excel workbook.
-
In the Workbook group of the Oracle ADF tab, click Workbook Properties.
-
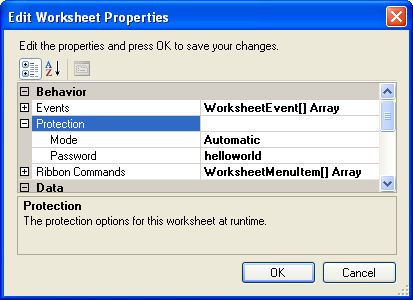
In the Edit Worksheet Properties dialog, expand the Protection property and configure values as follows:
-
To enable worksheet protection at runtime, set the Mode to Automatic.
-
If desired, provide a value in the Password field. The end user cannot turn off sheet protection at runtime without knowing this value.
Note that the password is not encrypted and that the maximum password length allowed by Excel is 255 characters. If you specify a longer password, it will be truncated silently at runtime when sheet protection is toggled.
Figure 9-13 shows the design time view of worksheet protection in the Master Price List module.
-
-
Click OK.
9.7.2 What Happens at Runtime: How the Locked Property Works
At runtime, if the end user tries to edit a read-only cell or a ADF Desktop Integration read-only component, Excel displays the warning message, as shown in Figure 9-14.
When worksheet protection is enabled, ADF Desktop Integration controls the Locked property for cells that are within the bounds of ADF Desktop Integration components. The Locked property of cells outside the bounds of ADF Desktop Integration components is not affected.
At runtime, ADF Desktop Integration evaluates the read-only behavior of its components. Some components such as ADF Label and ADF Output Text, are always read-only, and other components, such as ADF Input Text, have a read-only property. At runtime, the Locked property is set to true when read-only for the component evaluates to true. The header labels of ADF Table components are always read-only, but column subcomponents might be ADF Output Text or ADF Input Text. At runtime, each components read-only behavior is evaluated and the corresponding cell's Locked property is set to the appropriate value.
9.7.3 What You May Need to Know About Worksheet Protection
Worksheet protection is not enabled by default, you need to enable it at design time if you want to use it for a particular worksheet. Also, after worksheet protection is enabled, the Locked property for cells is set at runtime, not at design time.
It is important to note that the password used for worksheet protection is itself not encrypted or stored in a safe location. Worksheet protection is used to improve worksheet usability, not to protect sensitive data.
After worksheet protection is enabled, Excel behaves differently. Here are some differences that you can expect:
-
The ADF Table components cannot be sorted, as they include read-only cells in the Key column.
-
The end user can insert a full row or column. However, once inserted, they cannot be deleted.
-
The end user cannot insert partial rows or columns.

