 Understanding Material Return Processing
This chapter provides an overview of material return processing and discusses how to:
Set up material return processing.
Create RMA transactions.
Understanding Material Return Processing
If you integrate PeopleSoft Support with PeopleSoft Inventory and PeopleSoft Purchasing or a third-party inventory and purchasing system, call center agents can generate RMAs for customers returning stock for replacement, repair, or stock that was shipped in error.
This section discusses:
RMA process flows.
RMA notifications.
We discuss this information in the documentation for understanding requisitions and understanding purchase orders.
See PeopleSoft Enterprise Purchasing PeopleBook.
Note. This chapter is relevant to PeopleSoft Support only; PeopleSoft HelpDesk applications do not incorporate RMA functionality.
 RMA Process Flows
Agents using PeopleSoft Support can create four types of RMAs:
Advanced exchange
Return-and-replace
Repair-and-return
Return-to-stock
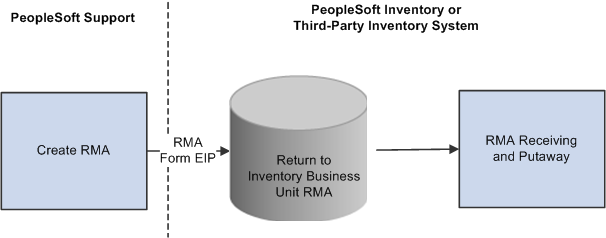
Regardless of RMA type, some processing steps are shared by all RMAs that are created in PeopleSoft Support:
A customer calls the agent and requests an RMA.
The agent opens a new or existing case for the customer and creates an RMA in PeopleSoft Support.
When the agent saves the RMA, the system uses the Return Material Authorization EIP (referred to as RMA Form EIP in the diagram) to stage the RMA for processing in the inventory business unit that has been defined on the RMA as the location to send the returned material.
The customer physically returns the material to the inventory business unit.
In PeopleSoft Inventory, or your third-party inventory system, receipt of the returned material is recorded and the RMA is closed in the inventory system.
Your inventory system handles the receipt status management for RMAs.
This diagram illustrates the basic RMA processing flow from PeopleSoft Support through PeopleSoft Inventory or a third-party inventory system:
We discuss this information in more detail in the Financials/Supply Chain Management documentation for defining general options.
See PeopleSoft Enterprise Application Fundamentals PeopleBook (Financials).
With the advanced exchange RMA type, you can create a replacement order for the customer at the time that you create the RMA. Specify the replacement item or items on the RMA line.
The replacement order can include any of the active items in your system. When you save the RMA form, the system stages the RMA in your inventory system using the Return Material Authorization EIP and creates a requisition request for the replacement order in your purchasing system using the Purchase Order Requisition EIP (referred to as PO Requisition EIP in the diagram).
The system obtains the ship to address for the customer's replacement order from the RMA form.
We discuss this information in more detail in the documentation for enterprise integration points, understanding the EIP catalog.
See Enterprise PeopleTools 8.50 PeopleBook: PeopleSoft Integration Broker Testing Utilities and Tools
This diagram illustrates the advanced exchange RMA processing flow:
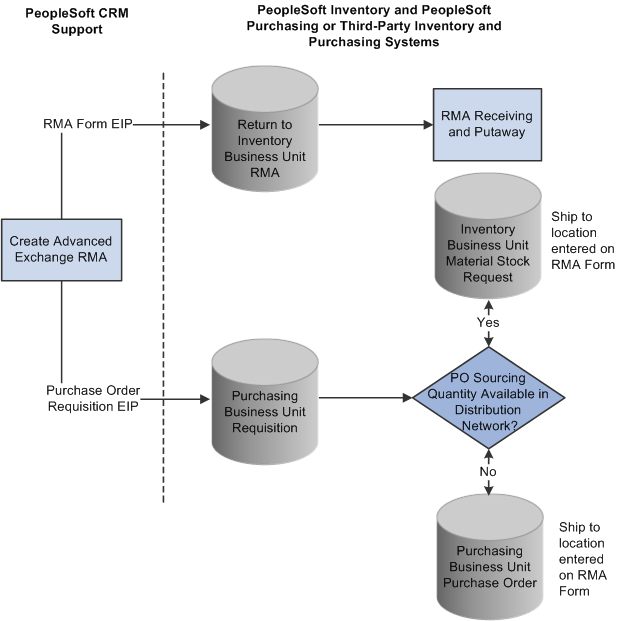
Advanced exchange RMA processing flow
The Purchase Order Requisition EIP enables you to requisition a replacement for the customer at the time that the advanced exchange RMA is created.
Note. PeopleSoft Purchasing, or your third-party purchasing system, handles the processing of the requisitions that are staged by the Purchase Order Requisition EIP. In your purchasing system, you must set processing defaults for the staged requisitions and perform any required actions to complete the ordering process.
Unlike the advanced exchange RMA, orders for return-and-replace RMAs are not created until the returned material has been physically received in the location specified as the return-to business unit. Follow these steps to process a return-and-replace RMA:
When a person records receipt of material on a return-and-replace RMA in your inventory system, the inventory system displays a message indicating that a replacement order is required.
Depending on your business process rules, the person manually enters a material stock request in your inventory system or a requisition in your purchasing system to replace the customer's returned material.
The person receiving the returned material uses the information on the RMA, such as the customer's address, information about the item, and quantity returned, to create the replacement order.
To facilitate tracking of the replacement order in your inventory or purchasing systems, the same ID as the RMA should be used when the person manually creates replacement requisitions or material stock requests.
This diagram illustrates the return-and-replace RMA processing flow:
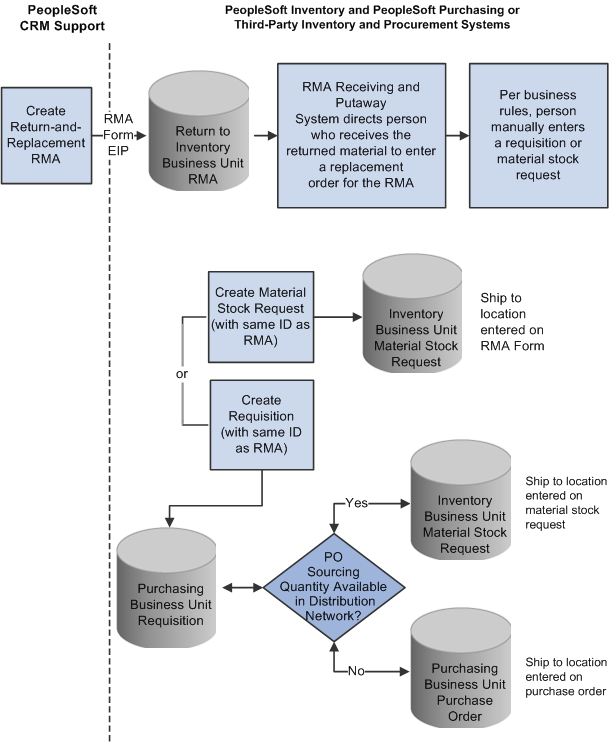
Return-and-replace RMA processing flow
For return-and-replace RMAs, replacement orders are manually created in your inventory or purchasing systems after the returned material has been physically received from the customer.
You create repair-and-return RMAs when a customer sends an item back to you for repair. As delivered, PeopleSoft CRM does not offer repair depot functions. However, if your business includes repair services, you can use the repair-and-return RMA option in conjunction with your business process rules. The repair-and-return RMA processing is similar to return-and-replace RMA processing:
A person creates an RMA for a customer in the specified return-to business unit in your inventory system.
A staff member, in the facility where the item needing repairs is sent, records the receipt of the RMA in your inventory system.
The staff member creates a work order for the repairs, according to your business rules, and delivers the item to the appropriate staff for repair work.
The work order should include the ship to address for the customer who appears on the RMA form and the RMA number (to facilitate RMA tracking across your enterprise).
The material is shipped back to the customer using the address information from the RMA when the repair work is complete.
This diagram illustrates the repair-and-return RMA processing flow:
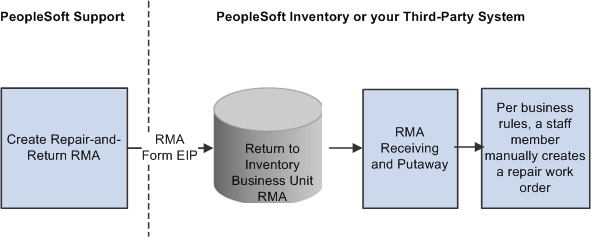
Repair-and-return RMA processing flow
For repair-and-return RMAs, repair work orders are manually created per your business rules when the returned material is physically received from the customer.
You create a return-to-stock RMA for a customer who is returning material with no need for a replacement. Typically, the customer has received the wrong shipment or been shipped too much quantity. The process flow for a return-to-stock RMA is identical to the basic RMA processing flow.
We discuss this information in more detail in the documentation for receiving and putting away stock and transferring stock between business units.
See PeopleSoft Enterprise Inventory PeopleBook.
Note. You can create RMAs for customers who return stock for orders that they placed but then changed their minds about the order at the time of receipt. For billing purposes, use the RMA processes of your order management system to handle these cases.
RMA Notifications
As delivered, PeopleSoft Support offers the RMA receipt notification workflow. You can use this workflow to notify the receiving manager and receiving agent when an RMA shipment is expected from a customer. Once the workflow is set up, the system sends your receiving managers and receiving agents a notification each time that a new RMA is saved in PeopleSoft Support.
RMA Receipt Workflow Notifications Setup
To enable RMA notifications, you must define people in your system with receiving manager and receiving agent roles and establish their routing preferences and email addresses.
To set up RMA notification workflow:
Assign the receiving manager and receiving agent roles to the appropriate employees in your system.
When an RMA is created, the receiving managers and receiving agents receive notification that a receipt for returned material is expected. You associate the receiving manager or receiving agent role to a person in your system on the Roles page under User Profiles.
We discuss this procedure in the documentation for setting up user profiles.
Define notification routing preferences for the people assigned the receiving manager and receiving agent roles.
When an RMA is created, the notification is published as a worklist entry, an email, or both, depending on the routing preferences defined for the group member on the Workflow page accessible through User Profiles. On that page, indicate whether the person is a worklist user, an email user, or both.
Note. Note that if you select both the Worklist User and Email User check boxes for the person, two notices—an email and a worklist entry—are published each time the workflow process is triggered for an RMA that is created. Define an email address for each person with an email notification preference.
Define valid email addresses for the people who receive email notifications.
For each person with an email routing preference for RMA notifications, define a primary email address in the Worker component.
Note. Person IDs defined for the worker are associated with user IDs on the User Profile page under Workforce, Search Worker or the User Profile component under PeopleTools, Security, User Profiles. For workflow notifications to work as designed, link each person in your system to one user ID only.
(Optional) Associate worklist groups with the people who are assigned receiving manager and receiving agent roles.
When an RMA is created, a worklist entry can be created for the worklist group that is established for the people who are assigned receiving manager and receiving agent roles in your system. A worklist group must first be defined on the Group Worklist Setup page.
See Also
Enterprise PeopleTools 8.50 PeopleBook: Security Administration
Pages Used to Maintain Worker Information
Setting Up Material Return Processing
Successful implementation of the RMA creation functionality depends on several setup steps:
Define inventory business units.
Define business units in your inventory system that represent the warehouses that are to receive returned material. Activate the Business Unit EIP to insert the business units that are defined in your inventory system in the BUSINESS_UNIT_FS table in the PeopleSoft CRM system automatically. This enables you to select the appropriate inventory business unit on the RMA Form.
We discuss this procedure in more detail in the documentation for transferring stock between business units.
See PeopleSoft Enterprise Inventory PeopleBook.
Synchronize item, product, and customer masters between PeopleSoft CRM and your purchasing and inventory systems.
Activate the Item Master EIP, the Product EIP, and the Customer EIP to populate your PeopleSoft CRM tables with the master data in your inventory and purchasing systems. Alternatively, you can manually enter item, product, and customer information in both PeopleSoft CRM and your inventory system.
Define requisition processing defaults in your purchasing system.
Call center business units in PeopleSoft CRM that can create RMAs must be defined as a valid source of requisitions in your purchasing system. If you are integrating with PeopleSoft Purchasing, use the Requisition Loader Defaults component in PeopleSoft Supply Chain Management to define each call center business unit as a Loader BU. Using the same component, establish processing defaults for requisitions that are staged by the call center business unit, including the purchasing business unit in PeopleSoft Purchasing that is used to process the requisitions.
When you define procurement options in PeopleSoft Supply Chain Management, you can associate the call center business unit with an appropriate distribution network on the Ship To Locations page. You can configure sourcing processes in PeopleSoft Purchasing to verify the available quantity in the distribution network before creating a purchase order with an external vendor. If the quantity exists in one of the inventory business units in the defined distribution network, the system creates a material stock request to fulfill the requisition.
See PeopleSoft Enterprise Application Fundamentals PeopleBook (Financials)
Define requesters in PeopleSoft CRM and your purchasing system.
The requester ID represents a person or an entity that initiates a requisition request. For advanced exchange RMA lines, the system populates the Requester field with the default requester ID that is defined on the User Preferences - Overall Preferences page. You can modify the requester ID as necessary. However, if you integrate with PeopleSoft Purchasing, the requester ID that you select for the RMA line created in PeopleSoft Support must be a valid user ID and requisition requester in PeopleSoft Purchasing.
Activate the associated service operation queues.
In your PeopleSoft Support and Inventory systems, activate the Return Material Authorization service operation. For advanced exchange RMAs, activate the Purchase Order Requisition service operation in PeopleSoft Support and in your purchasing system.
Define problem codes in PeopleSoft CRM and reason codes in PeopleSoft Inventory.
When you create an RMA in PeopleSoft Support, you must specify a problem code. You set up problem codes for RMAs on the Problem Codes page under Set Up CRM, Common Definitions, Codes and Auto Numbering, Problem Codes. If you are integrating with PeopleSoft Inventory, the problem codes that you select for RMAs in PeopleSoft Support must match the reason codes that are established on the Reason Code page in PeopleSoft Inventory. Also, the matching reason codes in PeopleSoft Inventory must be defined with a reason type of Return Material Authorization. When the RMA form is created in PeopleSoft Inventory, the problem code is used as the reason code. If the reason code on the RMA form does not exist in PeopleSoft Inventory, the system logs an error when the RMA service operation is processed.
Create a case for a customer.
Create a case using the Case component in PeopleSoft Support. RMAs must be associated with a case in your system. You cannot create an RMA without first creating a case.
See Also
Defining Call Center Business Units and Display Template Options
Integrating with PeopleSoft Applications
Understanding Business Object Relationship Model Components
Creating RMA Transactions
This section discusses how to:
Create and view an RMA transaction.
View the installed product hierarchy.
Add notes.
If PeopleSoft Support is integrated with PeopleSoft Inventory and PeopleSoft Purchasing or a third-party inventory and purchasing system, you can create RMAs for customer returns using the pages in the RMA Form component or the Related Actions page in cases. You must save a case to save an RMA. Typically, an RMA is created from a case.
See Also
Pages Used to Create RMA TransactionsCreating and Viewing an RMA TransactionAccess the Return Material Authorization page (Support, Returns).
If your implementation includes PeopleSoft Inventory, and you logged in to the portal using the single sign-on feature, you can click the View Status link to access the RMA Form page in PeopleSoft Inventory. The View Status link is disabled in Add mode. Similarly, the Requisition Workbench link appears if your implementation includes PeopleSoft Purchasing, and you logged in to the portal using the single sign-on feature. This link is active only in Update/Display mode when at least one RMA line has the RMA type Advanced Exchange. The Requisition Workbench link is disabled in Add mode.
|
RMA Number |
Displays Next until you click Save. Then the system issues the RMA a number. |
|
Case ID |
The unique identifier of a case. |
|
Customer |
Displays the name of the customer who is returning the material. The customer name is populated from the case and cannot be changed. Customer records are established in your system using the Add Company or Search Company components under Customers CRM. Note. Before you create and save an RMA, a case must be created and a ship-to role must be defined for the customer defined on that case. |
|
Customer Value |
If you have purchased PeopleSoft Enterprise Strategic Account Management, this indicator reflects the standing of the customer within your organization's customer portfolio. |
|
Contact |
The system populates this field with the contact name that was entered on the case, if available, or with the name of the primary contact who is associated with the customer. You can modify this value. Note. A contact is required if the specified customer is a company, but optional if the customer is a consumer. |
|
Unit |
Displays the business unit that is associated with the RMA. |
Contact Information
This section displays information about the customer who is returning the material:
|
Case ID |
The unique identifier of a case. When you create a new RMA, you must specify an existing case ID before you save the RMA. You cannot change the Case ID on an existing RMA. |
|
Phone |
Select the phone number that is associated with the contact or customer. |
|
Contact |
Enter the name of the person who requested the RMA on behalf of the customer. The system populates this field with the contact name that was entered on the case, if available, or with the name of the primary contact who is associated with the customer. You can modify this value. Note. A contact is required if the specified customer is a company, but optional if the customer is a consumer. |
|
|
From the Email drop-down list box, select an email address that is associated with the customer, contact, or site. |
Return Product Information
This section provides default information for each RMA line that you add. You can modify the information that is defined using these fields for each RMA line.
If you choose Return to Stock for the RMA Line Type field, at the top of the page or click the Add Return Product button, the system displays information about the product being returned to stock. If you do this, enter the appropriate information in these fields.
|
Delete |
Click this button to delete the row of data that is displayed. |
|
Select the inventory business unit where the customer ships the returned material. In PeopleSoft Support, a default value for this field is specified for the call center business unit on the Call Center BU page. If PeopleSoft Inventory is installed, this is a PeopleSoft Inventory business unit. |
|
|
RMA Line Type |
Displays the type of processing that is used for the returned material. Values are: Advanced Exchange: Immediately creates a replacement order for the item that the customer is returning. The replacement order can be for the same item or for a different item. You can specify the replacement in the Replacement Item(s) grid. The system populates the replacement item and requested quantity using the values defined for the return item and returned quantity. Repair and Return: The customer is returning an item for repair. Return and Replace: The item that the customer is returning must be received before a replacement order can be created. Return to Stock: The customer is returning material that was originally requested on a case that was not needed. |
|
Site |
Displays the identification of the customer site from which material is being returned. |
|
Serial ID |
Displays the serial number or ship-serial number of the item that the customer is returning. If the item is serial-controlled, a serial number is required for the RMA. If necessary, a different serial number can be entered at the time of receipt. Ship-serial IDs are optional for ship-serial-controlled items. Note. If you enter a value for an item that is not serial controlled or ship-serial controlled in your system, the value is removed when you save the information. |
|
Product ID and Product Name |
Displays the identification information for the product that the customer is returning. Note. If more than one installed product record for an item ID, serial number, or product is found, the system displays the Installed Product List page, where you can select the applicable installed product record. |
|
Item ID and Item Name |
Displays the identification of the item that the customer is returning. |
|
Qty Returned (quantity returned) |
Displays the amount of the item that the customer is returning. For serial-controlled items, this quantity must be 1. |
|
Displays the ID of the person or entity that is associated with the requisition request. The system populates this value with the default requester ID that is defined on the User Preferences - Overall Preferences page. You can modify the requester ID, as necessary. If you have implemented PeopleSoft Purchasing, you can use the requester ID to view the status of all the requisitions that have been entered by a specific person using the Requisition Workbench. We discuss this procedure in the documentation for reviewing requisition information. PeopleSoft Enterprise Purchasing PeopleBook. Important! If you integrate with PeopleSoft Purchasing, the requester ID must be a valid user ID and requisition requester in PeopleSoft Purchasing. Requesters are established on the Requester Setup page in PeopleSoft Supply Chain Management under Structure Procurement Options. |
|
|
Comments |
Enter notes about the RMA (optional). |
|
Displays the date that the returned item is expected to be received at the inventory business unit defined as the Return To IBU. When you add a new RMA, you can specify an estimated return date for informational purposes only. The current date is the default value for this field. |
|
|
Problem Code |
Select the entry that best describes the problem you are having with the product. |
|
Address |
Displays the ship-to address that is specified for the customer or customer site. The system populates primary ship to address that is defined for the site, if entered, or the primary ship-to address that is defined for the customer. Displays the address associated with one of the ship-to addresses specified for the customer or customer site. When entering a new RMA, click the Override Address link to modify the address on the RMA Header Return From Address page. When viewing an existing RMA, click the Display Address link to view the address information. |
|
Lot ID |
Displays the lot number of the item that the customer is returning. Lot IDs are optional for lot-controlled items. Note. If a value is entered for an item that is not lot-controlled in your system, the value is removed when you save the information. |
|
UOM (unit of measure) |
Displays the unit by which the replacement item is measured. In most cases this will be EA for each. |
Viewing the Installed Product HierarchyAccess the Returns - Installed Product Hierarchy page (click the View Inst Product Hierarchy button on the Return Material Authorization page).
See Viewing Installed Product Hierarchies.
Adding NotesAccess the Return Material Authorization - Notes page (select the Notes page on the Return Material Authorization component).
See Working with Notes and Attachments.