 Understanding Partner Registration
This chapter provides an overview of partner registration and discusses how to:
Set up partner registration.
Register a partner.
Understanding Partner Registration
In order to allow potential partners to apply for partnership online, your enterprise can provide a self-service registration process. The prospective partners can then access a public web site for your enterprise and enter their company information, answer questions, and submit an application.
The partner registration feature allows potential partners to apply for partnership online and receive email notification after submitting the application. The enterprise administrator can configure the partner registration process, partner profile attributes, and email notifications. The Enterprise Channel Manager can receive email notification of new applications, review registration history, and send email to the prospective Partner Relationship Manager automatically.
Using partner registration you can:
Enable partner companies' applications for partnership and registration via an online self-service registration process.
Maintain a history of partner status, including application and registration outcomes.
Configure the partner registration process to define your own partner registration process flow, profile attributes to track, registration documents, and Email templates.
PRM self-service registration is totally configurable, so you will use the PeopleSoft Online Marketing dialog feature to define your own partner registration process, including setting up registration confirmation/notification email documents. Dialogs will also be used for designing and rendering registration web pages at run time. PRM comes with a limited license to the dialog feature of PeopleSoft Online Marketing; an additional license of PeopleSoft Online Marketing is not required.
Partner Registration Setup Flow
The following diagram illustrates the registration setup flow, including partner program setup, dialog creation, and linking the partner program to the dialog:
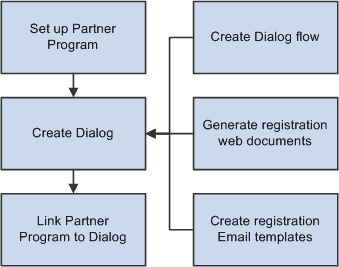
Registration Setup Flow
The setup includes setting up partner programs , defining customized profile attributes in Marketing Profile (optional), creating a dialog using the PeopleSoft Online Marketing dialog functionality, associating the dialog to the partner program, and creating a dialog flow, registration Web Documents and Email notification templates. You will need to follow through this flow and complete each task to create your self-service registration process.
Partner Registration Process Flow
The following diagram illustrates a typical partner registration process flow used during online registration. PeopleSoft delivers this sample dialog that you may wish to use and modify to suit your business requirements.
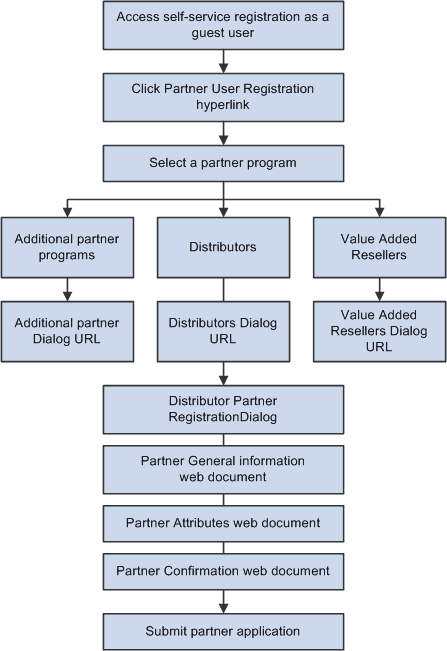
Partner registration process flow
Setting Up Partner RegistrationTo set up partner registration, use the Add Partner Program (RD_PR_PROG) component.
This section discusses how to:
Set up partner programs.
Create dialogs.
Link partner programs to dialogs.
 Pages Used to Set Up Partner Registration
|
Page Name |
Definition Name |
Navigation |
Usage |
|
Partner Program |
RD_PR_PROG |
Partners CRM, Add Partner Program, Partner Program |
Set up a partner program. |
|
Dialog Designer |
RY_DIALOG |
Marketing, Dialog Designer, Dialog Designer |
Create a dialog flow. |
|
Document |
RY_EDOC |
Marketing, Document Designer, Document |
Generate registration web documents. |
|
Document |
RY_EDOC |
Marketing, Document Designer, Document |
Create registration confirmation and notification email templates. |
Setting Up Partner Programs
Access the Partner Program page (Partners CRM, Add Partner Program, Partner Program).
See Setting Up the Partner Program Environment.
Creating Dialogs
This section discusses how to:
Create dialog flow.
Generate registration web documents.
Create registration confirmation and notification email templates.
See Creating Dialogs for Partner Programs.
Access the Dialog Designer page (Marketing, Dialog Designer, Dialog Designer).
Note. When creating a dialog for partner registration, set the value for New Individual Role to Contact for Partner.
Generating Registration Web Documents
Access the Dialog Designer page (Marketing, Dialog Designer, Dialog Designer).
Creating Registration Confirmation and Notification Email Templates
Access the Dialog Designer page (Marketing, Dialog Designer, Dialog Designer).
See Designing Email Documents.
Linking Partner Programs to Dialogs
Access the Partner Program page (Partners CRM, Add Partner Program, Partner Program).
|
Registration Dialog |
Displays the dialog that has been defined through the dialog creation process in PeopleSoft Marketing. |
|
Dialog Entry Point |
Displays the document or trigger point of the dialog that will launch the dialog for the end user. |
Registering a Partner
For partner registration, PeopleSoft delivers a sample dialog and sample documents. They are named Partner Registration XXX and can be found under Marketing, Dialog Designer or Marketing, Document Designer. Because of the data complexities surrounding the publishing of a dialog–Go Live–these are delivered in design mode and must be activated. You can start by cloning and modifying the provided sample data, or use this as a guide to create your own registration dialogs. These dialogs are provided as samples only.
It is recommended that you work through the following steps to activate and test the delivered data before setting up your enterprise partner registration.
Navigate to Marketing, Document Designer. Confirm the following documents exist:
Click the Partner Registration Notification Email link.
Update the <pia server path> portion of the URL in the document text to point to the PIA server, as shown in the example below:
In the email you will now see a link with the company name that you can click on to navigate directly to the partner company.
Click to navigate to the partner test.
Navigate to Marketing, Dialog Designer. Confirm that the following dialog exists:
Navigate to Set Up CRM, Product Related, Online Marketing, MailBox Setup. Set up your own email boxes with valid email addresses.
Validate these mailboxes appear on the two partner email documents, but with the updated email addresses you set up for the mailboxes.
Navigate to Marketing, Document Designer.
Open Partner Registration Notification Email and Partner Registration Confirmation Email to confirm.
Validating the Partner Program
Navigate to Partners CRM, Search Partner Program, Partner Program.
Verify that the Registration Dialog and Entry Point are specified for this dialog.
Note. This is setID driven.
The registration page filters partner programs by setID if it is specified in the user's preferences. Change the setID of the user you will test with to match the setID of the dialog.
Navigate to Set Up CRM, Security, User Preferences, Overall Preferences. These preferences are set up for the guest user that will be used for your enterprise's CUSTOMER portal site in order to bypass signon.
See Setting Up Customer Self-Service.
See Setting Up Security and User Preferences.
Going Live with the Partner Registration Dialog
Navigate to Marketing, Dialog Designer.
Select Partner Registration.
Confirm that Update Partner Program points to the correct partner program.
Click the Check button in the toolbar.
Click the Run All Checks button.
All should pass the consistency check.
Return to Dialog Designer, Dialog page.
Click Go Live. Live status will be confirmed.
Access the customer portal registry. The guest user established in the steps above will automatically be used for guest access to the customer registry.
Navigate to the Partner Registration to launch a partner registration dialog.
Select the partner program you have associated the dialog to. This will launch the dialog as you have configured it. Your partners will be able to fill in this information and register for partnership as you have configured it.
Submit and view the confirmation.
The captured partner registration data is then saved to the Online Marketing Profile tables (organization data is written to the BO_BASIC_ORG table and individual data is written to the BO_BASIC_IND table). The partner organization data is also saved to the partner profile tables in the business object relationship model or BORM tables.
See Creating and Maintaining Partner Profiles.