| Oracle® CEP IDE Developer's Guide for Eclipse Release 11gR1 (11.1.1) E14301-01 |
|
 Previous |
 Next |
| Oracle® CEP IDE Developer's Guide for Eclipse Release 11gR1 (11.1.1) E14301-01 |
|
 Previous |
 Next |
An Oracle CEP project is an Eclipse project that brings together all Oracle CEP artifacts.
This chapter describes:
An Oracle CEP application includes the following artifacts:
Java source files
XML configuration files
OSGi bundle Manifest file
Figure 3-1 shows the Explorer after creating a project.
Table 3-1 summarizes the important files in an Oracle CEP project including their use and location.
Table 3-1 Oracle CEP Project Artifacts
| File Type | Location | Description |
|---|---|---|
|
Java source files |
Any Java source folder. Default: |
Events, adapters, and listeners are implemented in an Oracle CEP application with Java files. All Java files must be in a source folder in order to be compiled. For more information, see Chapter 1, "Overview of Creating Oracle CEP Applications". |
|
EPN assembly file |
|
These are the main files used to wire-up an EPN and to define event types. This is a Spring context file, and is where adapters, channels, processors, and listeners are connected. For more information, see Chapter 1, "EPN Assembly File". |
|
Processor configuration file |
|
The processor configuration file is where the Complex Event Processor (CEP) is defined. In this file you'll find processor rules (defined in the Continuous Query Language - CQL or the Event Processing Language--EPL) and other component configuration settings. For more information, see: |
|
|
|
The manifest file contains metadata about your application including its name, version, and dependencies, among others. For more information, see Chapter 14, "Assembling and Deploying Oracle CEP Applications". |
Development of an Oracle CEP application begins by creating a project to hold all source code and related files.
Projects correspond 1-to-1 with Oracle CEP applications and are the unit of work that is associated with and deployed to a server instance. In concrete terms, the output of a built project is a single OSGi bundle (JAR) containing the Oracle CEP application.
By default new projects are set to use Java 6.0. This section describes how to create an Oracle CEP project using Java 6. For information on configuring an Oracle CEP project to use Java 6, see Section 2.4, "Configuring Eclipse".
To create an Oracle CEP project:
Open the EPN Editor (see Section 5.1, "Opening the EPN Editor")
Select File > New Project.
The New Project - Select a Wizard dialog appears as shown in Figure 3-2.
Figure 3-2 New Project - Select a Wizard Dialog
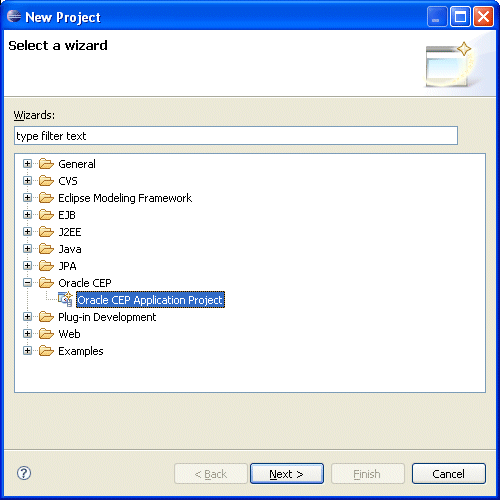
Expand Oracle CEP and select Oracle CEP Application Project.
Click Next.
The New Oracle CEP Application Project wizard appears as shown in Figure 3-3.
Figure 3-3 New Oracle CEP Application Project Wizard: Create an Oracle CEP Application
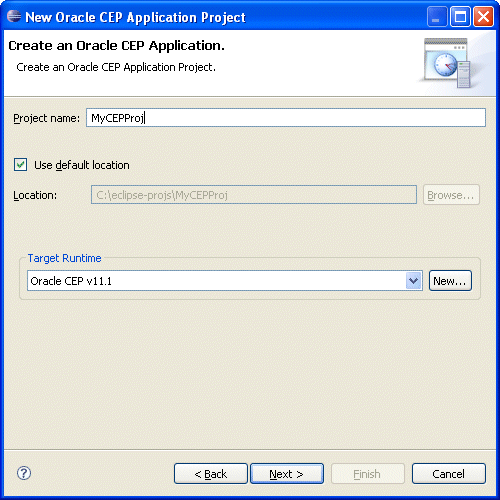
Configure the Create an Oracle CEP Application dialog as shown in Table 3-2.
Table 3-2 Create an Oracle CEP Application Dialog
| Attribute | Description |
|---|---|
|
Project name |
The name of your Oracle CEP project. This name will be used as the default name of your application when it is deployed to the Oracle CEP server. |
|
Location |
The directory in which your project is stored. By default your project is located inside the Eclipse workspace directory. To keep your workspace and source code control directories separate, uncheck Use default location and click Browse to place the project in a directory outside of your workspace. |
|
Target Runtime |
The Oracle CEP server you will deploy your project to. |
Click Next.
The Oracle CEP Application Content dialog appears as shown in Figure 3-4.
Figure 3-4 New Oracle CEP Application Project Wizard: Oracle CEP Application Content
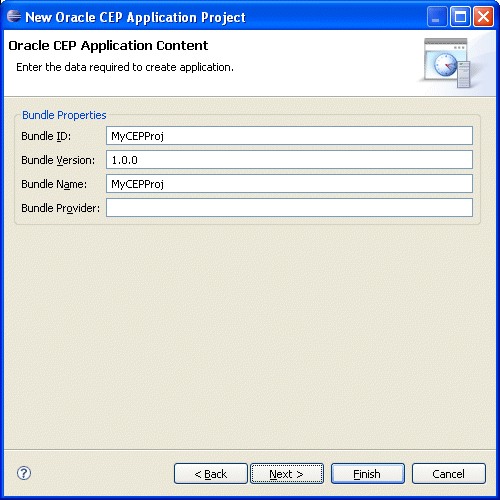
Optionally, configure the Oracle CEP Application Content dialog as shown in Table 3-3.
Table 3-3 Oracle CEP Application Content Dialog
| Attribute | Description |
|---|---|
|
Bundle ID |
The unique ID that distinguishes this application's OSGi bundle from those deployed to the target runtime. |
|
Bundle Version |
The version of this instance of this OSGi bundle. |
|
Bundle Name |
The name of this application's OSGi bundle. |
|
Bundle Provider |
The name of the provider for this application's OSGi bundle (optional). |
Click Next.
The Template dialog appears as shown in Figure 3-5.
Figure 3-5 New Oracle CEP Application Project Wizard: Template Dialog
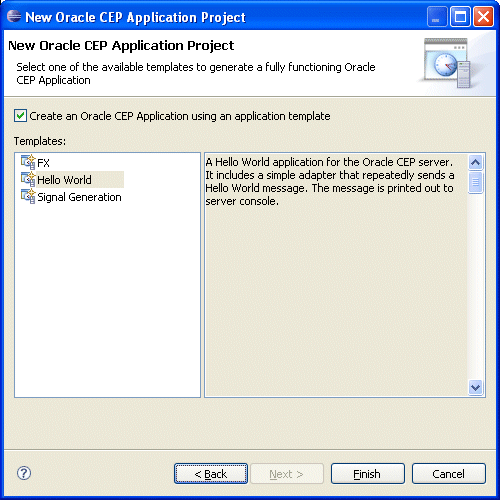
Optionally, select an Oracle CEP application template to pre-populate your project with the content that the template specifies.
Click Finish.
The Oracle CEP IDE for Eclipse creates the Oracle CEP project.
Exporting an Oracle CEP project builds the project into an OSGi bundle that can be deployed to a production Oracle CEP server.
This section describes how to export an Oracle CEP project into an OSGi bundle.
To export an Oracle CEP project:
Start the Oracle CEP IDE for Eclipse and open your Oracle CEP project.
The Oracle CEP IDE for Eclipse compiles and adds Java resources to the exported JAR automatically. If your project contains other resources (such as a manifest file or images), configure your project to export them:
Locate the build.properties file in the Project Explorer and double-click this file to edit it.
The build.properties file opens as shown in Figure 3-6.
Figure 3-6 Oracle CEP Project build.properties File
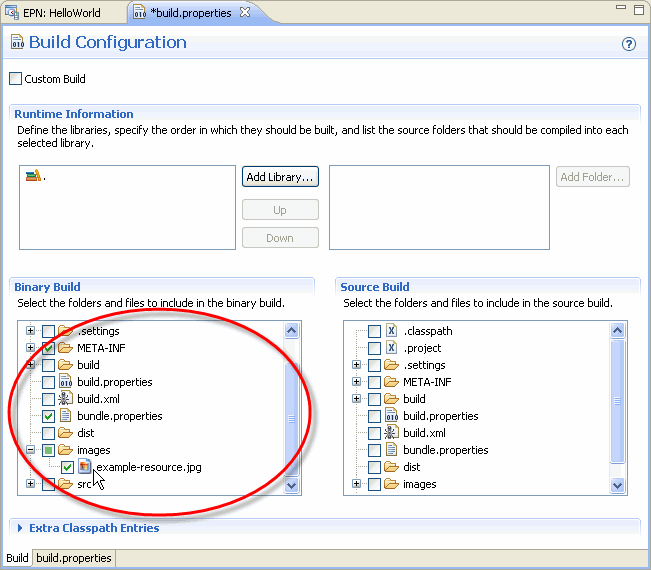
In the Binary Build area, check the resources you want exported with your application.
Select File > Export.
The Export dialog appears as shown in Figure 3-7.
Expand the Oracle CEP option and select Oracle CEP Applications.
Click Next.
The Oracle CEP Applications Export: Select Project dialog appears as shown in Figure 3-8.
Figure 3-8 Oracle CEP Applications Export: Select Project Dialog
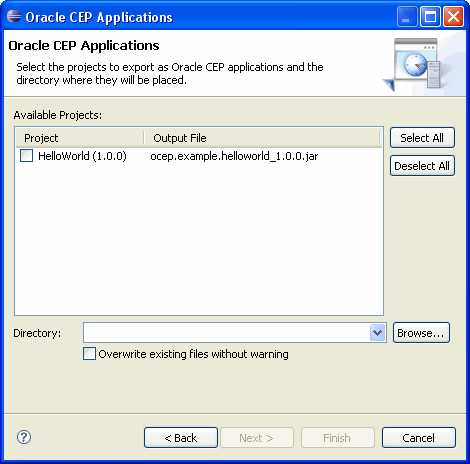
Configure the Oracle CEP Applications Export: Select Project dialog as shown in Table 3-4.
Table 3-4 Oracle CEP Application Content Dialog
| Attribute | Description |
|---|---|
|
Available Projects |
The list of Oracle CEP projects available for export. Check the project or projects you want to export. Each project will be exported to a JAR file with the name given in the Output File column. The name of the bundle that will be exported conforms to the OSGi bundle naming conventions, using the bundle ID and the bundle version in the JAR name. |
|
Directory |
The directory in which Oracle CEP project JAR files are exported. Click Browse to choose this directory. |
|
Overwrite existing files without warning |
Check this option to overwrite existing JAR files with the same name in the selected directory. |
Click Finish.
Your project, its Java resources, and any binary resources you selected are exported to the project JAR file.
Deploy the JAR file to your Oracle CEP server.
See Section 4.3.5, "How to Deploy an Application to an Oracle CEP Server".
Deploy other dependent resources, if any, to your Oracle CEP server.
For example:
Other OSGi bundles your application depends on.
Deploy these bundles on the Oracle CEP server using the Oracle CEP Visualizer or command line deployment tools.
Any entries in config.xml for datasources that are referenced from within the application.
Add these entries to the target server's config.xml file.
When upgrading Oracle CEP from one version to another, it may be necessary to make changes to your existing Oracle CEP projects.
This section describes:
Section 3.4.1, "How to Upgrade Projects from Oracle CEP 2.1 to 10.3"
Section 3.4.2, "How to Upgrade Projects from Oracle CEP 10.3 to Release 11gR1 (11.1.1)"
For more information, see:
While project structure has stayed the same since 2.1, the data stored in Oracle CEP Projects has changed significantly. It is therefore necessary to take steps to upgrade 2.1 projects manually before continuing their development in 10.3.
The following outlines the steps necessary to upgrade 2.1 projects to 10.3
To upgrade projects from Oracle CEP 2.1 to 10.3:
Open your Oracle CEP 2.1 project in Oracle CEP IDE for Eclipse.
Select File > Switch Workspace > Other.
The Workspace Launcher dialog appears as shown in Figure 3-9.
|
Note: Do not choose to copy settings from the current workspace. |
Click Browse and select a new workspace directory.
Eclipse exits and restarts using the new workspace.
Select File > Import.
The Import Dialog appears as shown in Figure 3-10.
Expand the General option and select Existing Projects into Workspace.
Click Next.
The Import Projects dialog appears as shown in Figure 3-11.
Use the Import Projects dialog to import your 2.1 projects into the new workspace. Optionally, choose to copy the project files into your new workspace.
For each project, change the project facet version as follows:
Right-click your project and select Properties.
The Project Properties dialog appears as shown in Figure 3-12.
Select the Project Facets option.
The Project Facet properties are displayed as Figure 3-12 shows.
Click Modify Project.
The Modify Faceted Project dialog appears shown in Figure 3-13.
For the Oracle CEP facet, select 10.3 from the Version pull-down menu.
Click Finish.
Click OK.
Repeat for the next project.
Create a new Oracle CEP server runtime:
Select Window > Preferences.
The Preferences dialog appears as shown in Figure 3-14.
Expand the Server option and select Installed Runtimes.
Add a new 10.3 Oracle CEP server runtime as Section 4.2.1, "How to Create an Oracle CEP Server Runtime" describes.
Click OK.
For each project, specify the new 10.3 Oracle CEP server runtime you created:
Right-click your project and select Properties.
The Project Properties dialog appears as shown in Figure 3-15.
Select the Targeted Runtimes option.
The Targeted Runtimes properties are displayed as Figure 3-15 shows.
Check the new Oracle CEP 10.3 targeted runtime you created.
Click OK.
Repeat for the next project.
For each project update the project builders:
Right-click the project and select Open EPN Editor.
If the EPN diagram opens without error, proceed to step 12.
If the EPN diagram opens with the error shown in Figure 3-16, click the Configure Builder button.
The EPN diagram is displayed.
Repeat for the next project.
Validate build inclusions:
If your application bundle is using bundle localization and has substitution variables in its MANIFEST.MF file such as:
Bundle-Name: %project.name
Then your project root directory's build.properties file element bin.include must contain a reference to your bundle.properties file such as:
bin.includes = META-INF/,\
               bundle.properties,\
               .
Perform source changes, if necessary.
For more information, see:
"Upgrading a WebLogic Event Server 2.0 Application to Run on Oracle CEP 10.3" in the Oracle CEP Getting Started
Oracle CEP Release Notes for 10.3 (http://download.oracle.com/docs/cd/E13157_01/wlevs/docs30/notes/notes.html)
After performing these steps, you should do a clean build of your project.
While project structure has stayed the same since 10.3, the data stored in Oracle CEP Projects has changed significantly. It is therefore necessary to take steps to upgrade 10.3 projects manually before continuing their development in Release 11gR1 (11.1.1).
The following outlines the steps necessary to upgrade 10.3 projects to Release 11gR1 (11.1.1)
To upgrade projects from Oracle CEP 10.3 to Release 11gR1 (11.1.1)
Open your Oracle CEP 10.3 project in Oracle CEP IDE for Eclipse.
Select File > Switch Workspace > Other.
The Workspace Launcher dialog apperas as shown in Figure 3-17.
Click Browse and select a new workspace directory.
|
Note: Do not choose to copy settings from the current workspace. |
Eclipse exits and restarts using the new workspace.
Select File > Import.
The Import Dialog appears as shown in Figure 3-10.
Expand the General option and select Existing Projects into Workspace.
Click Next.
The Import Projects dialog appears as shown in Figure 3-11.
Use the Import Projects dialog to import your 10.3 projects into the new workspace. Optionally, choose to copy the project files into your new workspace.
For each project, change the project facet version as follows:
Right-click your project and select Properties.
The Project Properties dialog appears as shown in Figure 3-12.
Select the Project Facets option.
The Project Facet properties are displayed as Figure 3-12 shows.
Click Modify Project.
The Modify Faceted Project dialog appears shown in Figure 3-13.
For the Java facet, select 6.0 from the Version pull-down menu.
For the Oracle CEP facet, select 11.1 from the Version pull-down menu.
Click Finish.
Click OK.
Repeat for the next project.
Create a new Oracle CEP server runtime:
Select Window > Preferences.
The Prefences dialog appears as shown in Figure 3-14.
Expand the Server option and select Installed Runtimes.
Add a new 11.0 Oracle CEP server runtime as Section 4.2.1, "How to Create an Oracle CEP Server Runtime" describes.
Click OK.
For each project, specify the new 11.0 Oracle CEP server runtime you created:
Right-click your project and select Properties.
The Project Properties dialog appears as shown in Figure 3-15.
Figure 3-23 Project Properties Dialog: Targeted Runtimes
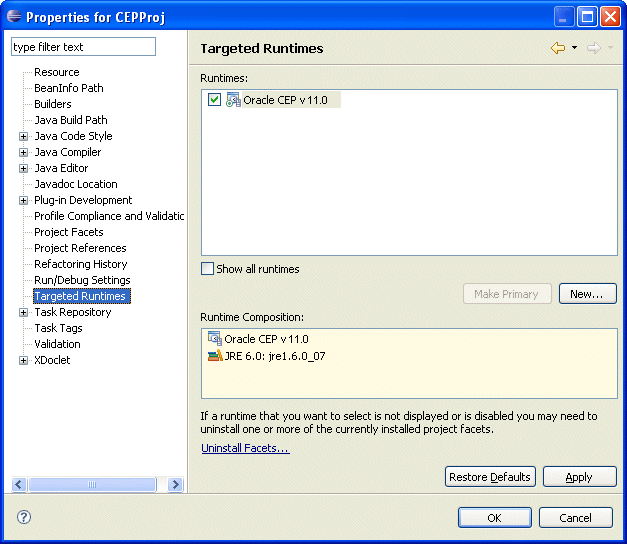
Select the Targeted Runtimes option.
The Targeted Runtimes properties are displayed as Figure 3-15 shows.
Check the new Oracle CEP 11.0 targeted runtime you created.
Click OK.
Repeat for the next project.
For each project update the project builders:
Right-click the project and select Open EPN Editor.
If the EPN diagram opens without error, proceed to step 12.
If the EPN diagram opens with the error shown in Figure 3-16, click the Configure Builder button.
The EPN diagram is displayed.
Repeat for the next project.
Select Window > Preferences.
The Preferences dialog appears as shown in Figure 3-25.
Select the Validaion option.
Ensure that the following validation options are checked:
CQL Validator
EPL Validator
EPN Validator
XML Validator
Unselect all other options.
Click OK.
Validate build inclusions:
If your application bundle is using bundle localization and has substitution variables in its MANIFEST.MF file such as:
Bundle-Name: %project.name
Then your project root directory's build.properties file element bin.include must contain a reference to your bundle.properties file such as:
bin.includes = META-INF/,\
               bundle.properties,\
               .
Perform source changes, if necessary.
For more information, see:
"Upgrading an Oracle CEP 10.3 Application to Run on Oracle CEP Release 11gR1 (11.1.1)" in the Oracle CEP Getting Started
Many projects require use of libraries that were obtained from a source other than the project itself, whether that be third party libraries, internal libraries created in other projects, or otherwise.
You can use two types of library in Oracle CEP projects, each with its own packaging and deployment characteristics:
Standard JAR Files: Adding a standard JAR file to a project makes for the easiest management of the library. The library is packaged directly with the project by the Oracle CEP IDE for Eclipse and you can check the library into a source code control system as part of the project.
For more information, see Section 3.5.1, "How to Add an Oracle CEP Project Library as a Standard JAR File"
OSGi Bundles: If your library is already a packaged as an OSGi bundle and you would like to deploy it to the server once (allowing multiple applications to reference it), you can use the OSGi bundle library option. Note that this leaves some parts of deployment to the user since the OSGi bundle is not automatically packaged with the application. It can also make working in team environments a little more difficult because each developer must have the bundle in the user_projects/modules directory of their machine, rather than have it source controlled with the rest of the project.
For more information, see Section 3.5.2, "How to Add an Oracle CEP Project Library as an OSGi Bundle"
If the library you need to use is a standard JAR file, you can add it to your Oracle CEP project. Alternatively, you can add a library as an OSGi bundle (see Section 3.5.2, "How to Add an Oracle CEP Project Library as an OSGi Bundle").
To add an Oracle CEP project library as a standard JAR file:
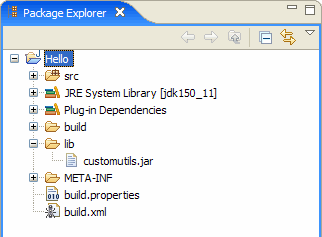
Place the JAR file in your Oracle CEP IDE for Eclipse project.
Oracle recommends that you create a folder to put them in such as lib as Figure 3-26 shows.
Figure 3-26 Oracle CEP IDE for Eclipse lib Directory
Right-click the META-INF/MANIFEST.MF file and select Open With > Plug-in Manifest Editor.
The Manifest Editor opens as Figure 3-27 shows.
Click the Runtime tab.
In the Classpath area, click the Add button.
The JAR Selection dialog appears as shown in Figure 3-28.
Select the JAR you want to add to the bundle.
Check Update the build path.
Click OK.
Select File > Save All.
You will see the JAR listed in the Bundle-Classpath section of the MANIFEST.MF file, in the bin.includes section of the build.properties file, and on the build path in your explorer as Figure 3-29 shows.
The JAR file will no longer appear in the lib folder in the Package and Project explorers after you add it to the build path. The JAR will now be included in builds, packaged with the bundle when it is deployed to the Oracle CEP server, and when exporting the application.
If the library you need to use is an OSGi bundle, you can add it to your Oracle CEP project. Alternatively, you can add a library as a standard JAR file (see Section 3.5.1, "How to Add an Oracle CEP Project Library as a Standard JAR File").
To add an Oracle CEP project library as an OSGi bundle, you add the bundle to that bundle's dependencies definition.
To add an Oracle CEP project library as an OSGi bundle:
Place the OSGi bundle in the user_projects/modules directory of your Oracle CEP server installation directory. For example:
c:\bea\user_projects\modules
Start the Oracle CEP IDE for Eclipse.
refresh the target platform. Navigate to Window > Preferences... > Plug-in Development > Target Platform. On this page, simply hit the "Reload" button. Make sure your bundle now shows in the list then close the preferences dialog.
Right-click the META-INF/MANIFEST.MF file and select Open With > Plug-in Manifest Editor.
The Manifest Editor opens as Figure 3-30 shows.
Figure 3-30 Manifest Editor: Dependencies Tab
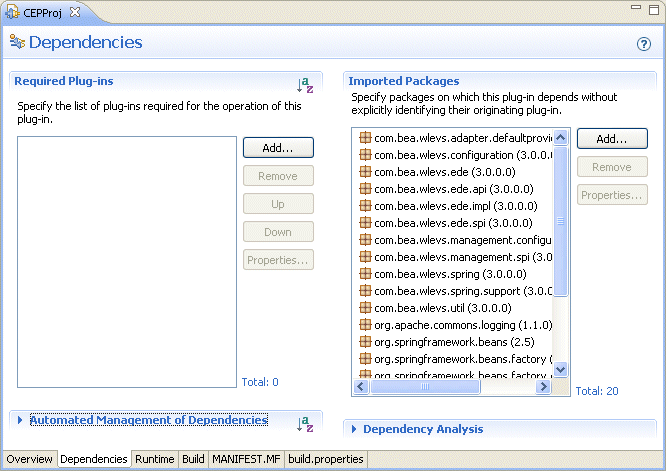
Click the Dependencies tab.
In the Required Plug-ins area, click Add.
The Plug-in Selection dialog appears as shown in Figure 3-31.
Select the bundle you added to the user_projects/modules directory of your Oracle CEP server installation directory in step 1 and click OK.
The selected bundle appears in the Require-Bundle section of the MANIFEST.MF file.
|
Note: This process only makes the referenced bundle available to your project at build time. It does not package the bundle directly with your application when it is deployed or exported. Instead, this bundle must be deployed to the Oracle CEP server manually. |
You can configure various preferences to customize Oracle CEP IDE for Eclipse to suit your needs, including:
Section 3.6.1, "How to Configure Problem Severity Preferences for a Workspace"
Section 3.6.2, "How to Configure Problem Severity Properties for a Project"
You can assign a severity to the various problems that Oracle CEP IDE for Eclipse can detect in your Oracle CEP project and application.
To configure problem severity preferences for a Workspace:
Open the EPN Editor (see Section 5.1, "Opening the EPN Editor")
Select Window > Preferences.
The Preferences dialog appears as shown in Figure 3-32.
Figure 3-32 Preferences Dialog: Workspace
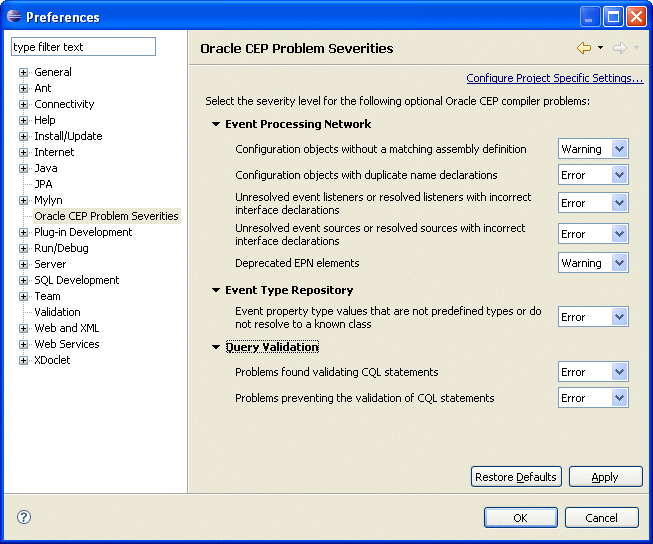
Select Oracle CEP Problem Severities.
Select a severity for each type of problem. You can select one of:
Error: treat the problem as an error.
Warning: treat the problem as a warning.
Ignore: ignore the problem.
Table 3-5 describes each of the problem areas you can configure.
Table 3-5 Oracle CEP Problem Severities
| Problem | Description |
|---|---|
|
Configuration objects without a matching assembly definition |
EPN configuration elements are linked to assembly definitions by name and ID, respectively. Validate that a configuration element has a name that exactly matches an assembly element by ID within the same application. |
|
Configuration objects with duplicate name declarations. |
Configuration elements in Oracle CEP configuration files are identified by a name. Validate that no two configuration elements in an application have the same name. |
|
Unresolved event listeners or resolved listeners with incorrect interface declarations |
An event processing network is built by defining how elements in the network pull or push to events to other elements in the application. Validate that the target of an event push, a listener declaration on an EPN assembly element, implements the interfaces required to receive pushed events. |
|
Unresolved event sources or resolved sources with incorrect interface declarations |
An event processing network is built by defining how elements in the network pull or push to events to other elements in the application. Validate that the source of an event pull, a source declaration on an EPN assembly element, implements the interfaces required to provide pulled events. |
|
Deprecated EPN elements |
Oracle CEP provides backwards compatibility with applications built for previous versions. Validate an application's use of deprecated XML elements. |
|
Event property type values that are not predefined types or do not resolve to a known class. |
Event types may be defined using dynamic Spring Beans through the For more information, see Section 1.1.2, "Event Types". |
|
Problems found validating CQL Statements |
Validate that the Oracle CQL statement in a processor configuration is correct given the current application. Verify property names, event types, syntax, and other assembly-to-Oracle CQL references. |
|
Problems preventing the validation of CQL statements |
Some fundamental application errors will keep a Oracle CQL statement from being validated. For example, a processor configuration must have a matching processor assembly definition before any Oracle CQL requirements can be met. Verify that the minimum requirements are met to validate a processor's Oracle CQL statements. |
Click Apply.
Click OK.
You can assign a severity to the various problems that Oracle CEP IDE for Eclipse can detect in your Oracle CEP project and application.
To configure problem severity properties for a project:
Open the EPN Editor (see Section 5.1, "Opening the EPN Editor").
Right-click a project and select Properties.
The Preferences dialog appears as shown in Figure 3-33.
Select Oracle CEP Problem Severities.
Check the Enable project specific settings check box.
|
Note: These properties settings are saved with the project (in the .settings directory) and can be checked into a source code management system. |
Select a severity for each type of problem. You can select one of:
Error: treat the problem as an error.
Warning: treat the problem as a warning.
Ignore: ignore the problem.
Table 3-6 describes each of the problem areas you can configure.
Table 3-6 Oracle CEP Problem Severities
| Problem | Description |
|---|---|
|
Configuration objects without a matching assembly definition |
EPN configuration elements are linked to assembly definitions by name and ID, respectively. Validate that a configuration element has a name that exactly matches an assembly element by ID within the same application. |
|
Configuration objects with duplicate name declarations. |
Configuration elements in Oracle CEP configuration files are identified by a name. Validate that no two configuration elements in an application have the same name. |
|
Unresolved event listeners or resolved listeners with incorrect interface declarations |
An event processing network is built by defining how elements in the network pull or push to events to other elements in the application. Validate that the target of an event push, a listener declaration on an EPN assembly element, implements the interfaces required to receive pushed events. |
|
Unresolved event sources or resolved sources with incorrect interface declarations |
An event processing network is built by defining how elements in the network pull or push to events to other elements in the application. Validate that the source of an event pull, a source declaration on an EPN assembly element, implements the interfaces required to provide pulled events. |
|
Deprecated EPN elements |
Oracle CEP provides backwards compatibility with applications built for previous versions. Validate an application's use of deprecated XML elements. |
|
Event property type values that are not predefined types or do not resolve to a known class. |
Event types may be defined using dynamic Spring Beans through the For more information, see Section 1.1.2, "Event Types". |
|
Problems found validating CQL Statements |
Validate that the Oracle CQL statement in a processor configuration is correct given the current application. Verify property names, event types, syntax, and other assembly-to-Oracle CQL references. |
|
Problems preventing the validation of CQL statements |
Some fundamental application errors will keep a Oracle CQL statement from being validated. For example, a processor configuration must have a matching processor assembly definition before any Oracle CQL requirements can be met. Verify that the minimum requirements are met to validate a processor's Oracle CQL statements. |
Click Apply.
Click OK.