| Oracle® Fusion Middleware User's Guide for Oracle WebCenter 11g Release 1 (11.1.1) E10149-01 |
|
 Previous |
 Next |
| Oracle® Fusion Middleware User's Guide for Oracle WebCenter 11g Release 1 (11.1.1) E10149-01 |
|
 Previous |
 Next |
The WebCenter Spaces Manage Pages dialog box (Figure 5-1) provides easy access to a wide variety of page-related actions. For example, use the dialog box to personalize the display order of personal or group space pages; set page creation defaults (personal space pages only); apply page security; hide or show pages in your application view; and create, copy, and delete pages.
This chapter includes the following sections:
Audience
This chapter is intended for WebCenter Spaces users who intend to manage application pages. By default, every authenticated user can perform the actions described in this chapter on the pages they create in their own personal spaces. Note, however that your application administrator may alter default page access permissions. In group spaces, users must have sufficient access privileges on the group space to manage its pages.
The Manage Pages dialog box (Figure 5-2) is a WebCenter Spaces feature that provides quick access to pages and page-management controls.
These include:
Creating, editing, copying, and deleting pages
Hiding and showing pages in your view
Exposing a group space page in your personal space
Rearranging your view of page display order
Setting page security (including making a page public)
Setting page creation defaults (personal space pages only)
Viewing information about a page, including its direct URL
Viewing a print preview of a page
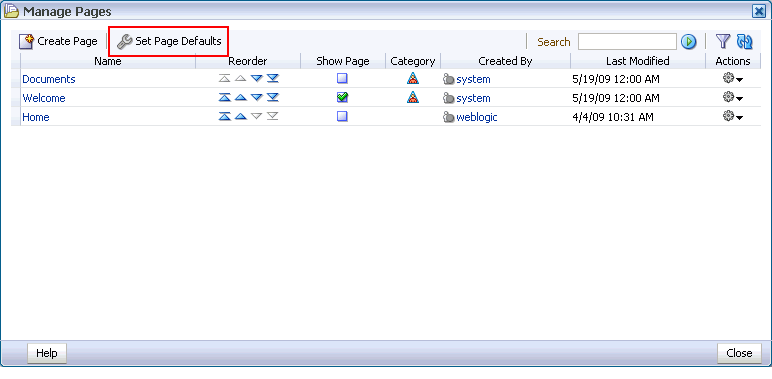
The Manage Pages dialog box is context-aware. When you open it, the dialog box renders according to your location in the application. For example, in a group space, the Manage Pages dialog box displays all of the pages in that group space. In your personal space, it displays all of the pages in your personal space; additionally, it provides a control for setting page creation defaults for the pages you create in your personal space (Figure 5-3).
Figure 5-3 The Set Page Defaults Button in the Manage Pages Dialog Box
The Manage Pages dialog box provides access to the actions you can perform on a given page in its Actions column (Figure 5-4).
Figure 5-4 The Actions Column and Menu in the Manage Pages Dialog Box
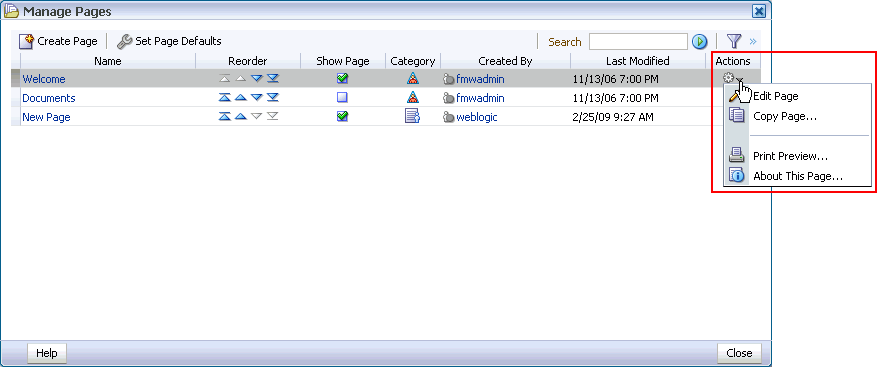
Each page row includes an Actions icon that provides access to page-related menu commands (Figure 5-5).
|
Tip: Actions performed from the Manage Pages dialog box take effect when you close the dialog box. |
The actions that appear on this menu depend upon the page, where it came from, and the permissions you have on it.
|
Note: Most of the commands available on the Actions menu are also available on the pages themselves. An active page—that is, the page currently on view—includes a menu icon with similar controls. You can open this menu from inactive pages by right-clicking their tabs. For more information, see Section 2.5, "Initiating Actions from Tabs". Section 2.5 covers tasks not covered in this chapter, including renaming a page, adding a group space page to a personal space, opening a print preview of a page, and obtaining information about a page. |
You can also open pages from the Manage Pages dialog box. Simply click the page name in the Name column, and the page opens in WebCenter Spaces. The Manage Pages dialog box closes automatically.
After you have logged on to WebCenter Spaces, you can access the Manage Pages dialog box by selecting the Manage Pages command from the Page Actions menu (Figure 5-6).
The Manage Pages dialog box opens (Figure 5-7).
Click the Close button to exit the dialog box.
The Manage Pages dialog box includes two features for locating a page or group of pages in a personal or group space: search and filter. Both features render lists of pages that match your search or filter criteria.
This section describes how to use the search and filter features in the Manage Pages dialog box. It contains the following subsections:
The Manage Pages dialog box provides a search feature for quickly locating one or more pages of interest. Search results display in the dialog box; click a result to open its associated page in WebCenter Spaces.
When you close the Manage Pages dialog box, your search terms are automatically cleared. You can also clear them explicitly by clicking the Clear Search button.
To search for a page in the Manage Pages dialog box:
Log in to Oracle WebCenter Spaces.
For information on how to log in, see Section 2.2.1, "Logging In to a WebCenter Application."
Go to your personal space or the group space where you want to locate a page.
For information about navigating to a personal or group space, see Section 2.4, "Hiding, Showing, Opening, and Closing Pages."
Select the Manage Pages command from the Page Actions menu (Figure 5-8).
The Manage Pages dialog box opens (Figure 5-9).
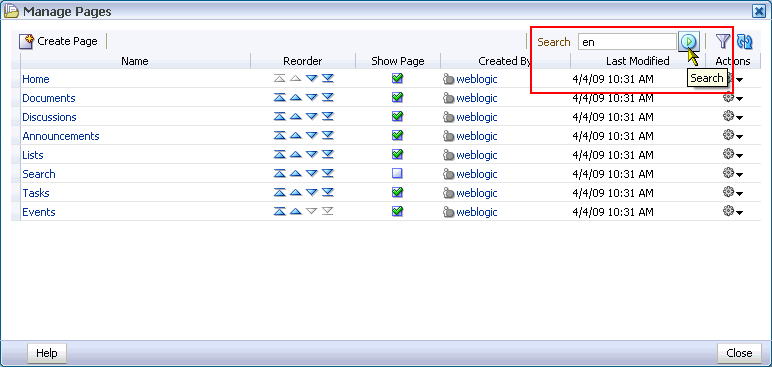
Enter a full or partial search term in the search field, and then click the search icon (Figure 5-10).
Figure 5-10 The Search Field and Search Button in the Manage Pages Dialog Box
|
Note: Search terms are not case sensitive. |
The Manage Pages dialog box refreshes with all pages matching the search term (Figure 5-11).
Figure 5-11 Search Results in the Manage Pages Dialog Box
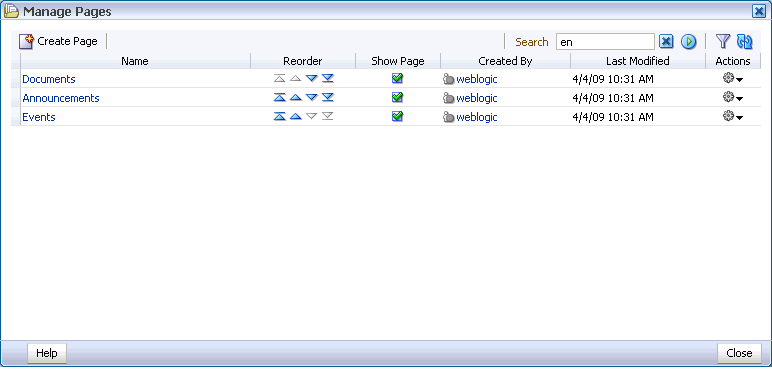
Click the Clear Search button next to the search field to exit search and restore the dialog box to its default view (Figure 5-12).
Filtering enables you to locate pages by name and by the user name of the person who created them. In the Manage Pages dialog box, the Show or Hide Filter Panel icon (Figure 5-13) is a toggle switch you click both to open and close the Filter panel.
When you close the Manage Pages dialog box, your filtering terms are automatically cleared. You can also clear them explicitly by deleting your terms from the Filter panel and pressing Enter.
To locate a page by filtering the list of pages in the Manage Pages dialog box:
Log in to Oracle WebCenter Spaces.
For information on how to log in, see Section 2.2.1, "Logging In to a WebCenter Application."
Go to your personal space or the group space where you want to locate a page.
For information about navigating to a personal or group space, see Section 2.4, "Hiding, Showing, Opening, and Closing Pages."
Select the Manage Pages command from the Page Actions menu (Figure 5-14).
The Manage Pages dialog box opens (Figure 5-15).
Click the Show or Hide Filter Panel icon (Figure 5-16).
In the resulting filter panel (Figure 5-17), enter a full or partial filtering term in either or both fields above the Name and Created By columns, and press Enter.
|
Note: Filtering terms are not case sensitive. |
The Manage Pages dialog box refreshes with all pages matching the filtering term(s).
To return the Manage Pages dialog box to its default display, delete your filtering terms and press the Enter key. To close the Filter panel, click the Show or Hide Filter Panel icon.
By default, pages are arranged in the order they are created. You may want to rearrange the default order, adding emphasis to more critical pages by placing them earlier in the succession of tabs. Such changes are personalizations in that they affect only your view of page order.
|
Note: Group spaces provide controls that enable administrators to reorder group space pages for everyone. For more information, see Section 10.5, "Managing Group Space Pages." |
To change the order of pages through the Manage Pages dialog box:
Log in to Oracle WebCenter Spaces.
For information on how to log in, see Section 2.2.1, "Logging In to a WebCenter Application."
Go to the personal or group space where you want to change the display order of pages.
For information about locating pages, see Section 2.4, "Hiding, Showing, Opening, and Closing Pages."
Select the Manage Pages command from the Page Actions menu (Figure 5-18).
The Manage Pages dialog box opens (Figure 5-19). Notice the current page order in the dialog box and in Figure 5-20.
In the Reorder column, click the up arrow next to a page to move it higher (to the left) in the page order; or click the down arrow next to a page to move it lower (to the right) in the page order.
Alternatively, click and hold a page row, and drag and drop it to the desired position.
Click the Close button when you finish reordering pages.
Pages are rendered in the order you specified (Figure 5-21).
Use create page options to predetermine the values to use in creating pages in your personal space. Normally, when you create a page you are prompted to provide values for the page scheme and page template. Using create page options, you can specify default values for scheme and template and consequently skip making those selections during page creation.
You can set create page options for yourself so that every page you create in your personal space uses the same defaults. An Administrator can set create page options for all users' personal spaces. The settings you establish for yourself override any settings an administrator may provide.
|
Note: For information about setting up personal space page creation options for the application, see Oracle Fusion Middleware Administrator's Guide for Oracle WebCenter. |
The page creation options you set through the Manage Pages dialog box influence all the pages you create in your personal space, whether you create them through the Manage Pages dialog box or through some other page creation mechanism.
To set page creation defaults for your personal space:
Log in to Oracle WebCenter Spaces.
For information on how to log in, see Section 2.2.1, "Logging In to a WebCenter Application."
Go to your personal space.
For information about locating your personal space, see Section 2.4, "Hiding, Showing, Opening, and Closing Pages."
Select the Manage Pages command from the Page Actions menu (Figure 5-22).
The Manage Pages dialog box opens.
In the Manage Pages dialog box, click the Set Page Defaults button (Figure 5-23).
The Set Page Defaults dialog box opens (Figure 5-24).
Set your page defaults:
Select a design scheme for new pages from the Default Scheme pick list (Figure 5-25).
Table 5-1 illustrates how each selection looks on a blank page. Note that each scheme selection also provides font and color styles that are not evident on a blank page.
Table 5-1 Seeded Page Schemes
| Default Scheme | How this Scheme Looks on a Blank Page |
|---|---|
|
Blank |
|
|
Blue |
|
|
Clouds |
|
|
Dunes |
|
|
Egg Shell |
|
|
Paper |
|
|
Stream |
|
|
Sun |
|
|
Wave |
|
|
White |
|
|
Winter |
|
|
Custom |
Provide your own background image by entering the directory path to the image in the Scheme Background Image field that opens when you select Custom. Enter for example: http://mycompany.com/images/chinwig/cologo_small.gif |
Select a layout from the Style pick list (Figure 5-26).
Table 5-2 illustrates and describes each selection.
|
Note: Users with the relevant level of permissions can switch some page layouts at runtime. In addition to illustrating different page layouts, Table 5-2 also indicates which layouts can and cannot be switched at runtime.For information about switching page layouts at runtime, see Section 3.4.2, "Changing Your Page Layout" (personalization) and Section 6.4.3, "Changing Everyone's Page Layout" (customization). |
Table 5-2 Seeded Page Styles
| Name | Illustration | Description |
|---|---|---|
|
Blank |
|
A one-column page with one layout box into which you can add content. When you edit this page, a Change Layout link is provided to enable you to change the number and configuration of layout boxes on the page. For more information, see Section 6.4.3, "Changing Everyone's Page Layout." |
|
Left Narrow |
|
A two-column page with two layout boxes into which you can add content. Layout boxes are positioned side-by-side, with the narrower layout box on the left. When you edit this page, a Change Layout link is provided to enable you to change the number and configuration of layout boxes on the page. For more information, see Section 6.4.3, "Changing Everyone's Page Layout." |
|
Right Narrow |
|
A two-column page with two layout boxes into which you can add content. Layout boxes are positioned side-by-side, with the narrower layout box on the right. When you edit this page, a Change Layout link is provided to enable you to change the number and configuration of layout boxes on the page. For more information, see Section 6.4.3, "Changing Everyone's Page Layout." |
|
Three Column |
|
A three-column page with three layout boxes into which you can add content. Layout boxes are positioned side-by-side, with the narrower layout boxes on the left and right sides. When you edit this page, a Change Layout link is provided to enable you to change the number and configuration of layout boxes on the page. For more information, see Section 6.4.3, "Changing Everyone's Page Layout." |
|
Stretch |
|
A page dedicated to the display of one task flow. Any task flow you place on this page is maximized, taking up all available space. For an example of a page based on the Stretch style, see the Documents page or the Announcements page. This page style cannot be changed when you edit the page. |
|
Text Page |
|
A page with a seeded Text component (that is, a Rich Text Editor), which you can use to enter and apply styles to text. For information about the Rich Text Editor, see Section 14.2.3.2, "Creating and Editing Rich Text Documents." When you edit this page, a Change Layout link is provided to enable you to change the number and configuration of layout boxes on the page. For more information, see Section 6.4.3, "Changing Everyone's Page Layout." |
|
Web Page |
|
A page that takes a URL value, enabling you to expose external Web content in your WebCenter Spaces application. For example, use this page to connect to and expose pages from your wiki or blog server. For more information, see Chapter 23, "Working with Wikis and Blogs" This page style cannot be changed when you edit the page. |
|
Home Page |
|
A preseeded Home page, based on the Right Narrow Column Layout page style. The Home page style comes prepopulated with task flows and other content. When you edit this page, a Change Layout link is provided to enable you to change the number and configuration of layout boxes on the page. For more information, see Section 6.4.3, "Changing Everyone's Page Layout." |
Select a page background color from the Scheme Background Color pick list (Figure 5-27).
If you selected Custom from the Default Scheme pick list, enter the URL to the image to use for the custom scheme in the Scheme Background Image field (Figure 5-28).
Enter for example:
http://mycompany.com/images/chinwig/cologo_small.gif
This field appears only when Custom is selected from the Default Scheme pick list.
Select an option next to Always Use Page Defaults:
Yes—When you create pages in your personal space, skip the Create Page dialog box, and create the page using the defaults you set here.
No—When you create pages in your personal space, have the defaults you set here preselected in the Create Page dialog box.
Click Save to save your changes and exit the dialog box.
Going forward, when you create pages in your personal space, the defaults you set here determine the scheme and style that are preselected for the new page and whether the Create Page dialog box opens.
The Manage Pages dialog box provides a means of creating new pages in personal and group spaces. Page creation through the Manage Pages dialog box can be affected by whether you are creating a page in a personal space or a group space.
When you create a page in a personal space, either a page is instantly created or the Create Page dialog box opens and presents options for determining the page layout and scheme and the scheme background color. What happens is influenced by the Create Page options you select (see Section 5.5, "Setting Page Creation Defaults for Your Personal Pages").
In a group space, the Create Page dialog box always opens.
This section describes page creation as it occurs when the Create Page dialog box opens.
|
Note: The Manage Pages dialog box provides one way to create pages. Learn another way in Chapter 6, "Creating, Editing, and Deleting Pages." |
To create a page through the Manage Pages dialog box:
Log in to Oracle WebCenter Spaces.
For information on how to log in, see Section 2.2.1, "Logging In to a WebCenter Application."
Go to your personal space or the group space where you want to create a page.
For information about navigating to a personal or group space, see Section 2.4, "Hiding, Showing, Opening, and Closing Pages."
Select the Manage Pages command from the Page Actions menu (Figure 5-29).
The Manage Pages dialog box opens (Figure 5-30).
In the Manage Pages dialog box, click the Create Page button.
If your create page options are preset not to prompt you with page creation options, the page is created without further steps (see Section 5.5, "Setting Page Creation Defaults for Your Personal Pages").
Otherwise, the Create Page dialog box opens (Figure 5-31).
In the Create Page dialog box, enter a display name for the page in the Page Name field.
The name you enter here appears on the page's tab and in the Manage Pages dialog box.
Optionally, from the Scheme menu, select a scheme for the page.
The scheme provides a seeded background image or enables you to select your own background image. See Table 5-1 for illustrations of seeded schemes.
The Style selections redraw, using the selected scheme (Figure 5-32).
Figure 5-32 The Create Page Dialog Box Redrawn with the Selected Scheme (Wave)
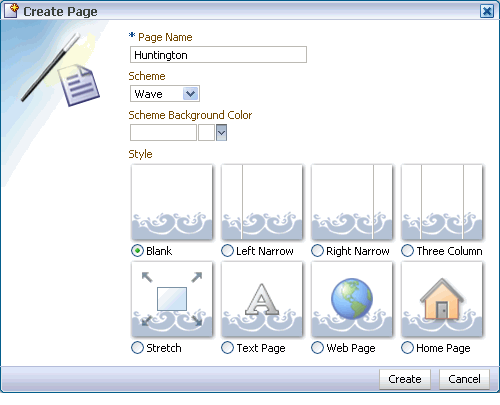
Optionally, pick a background color for the page from the Scheme Background Color pick list.
If you selected Custom from the Scheme pick list, enter the URL to the custom image you want to use for your page background in the Scheme Background Image field (Figure 5-33).
Enter for example:
http://mycompany.com/images/chinwig/cologo_small.gif
This field appears only when Custom is selected from the Default Scheme pick list.
Select the style you want to apply to the new page.
Click the Create button.
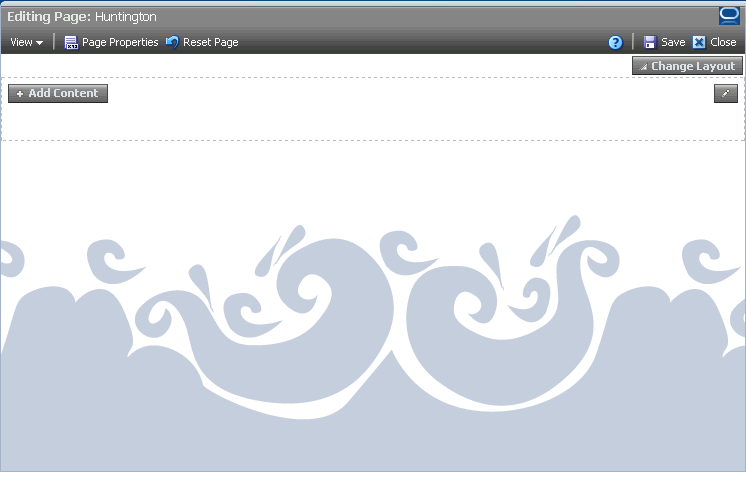
The page is created and immediately displayed in edit mode in Oracle Composer. From here, you can add files, task flows, and other types of content and share your information with others (Figure 5-34).
Figure 5-34 A New, Unpopulated Page Viewed Through Oracle Composer
|
Note: After you create a page, the following sections may be useful to you as you take your next steps:
|
Within a given personal or group space, you can assign different page access privileges to different users or user roles. For example, you can share page management access with a coworker who is jointly leading a particular effort. You may want to give customization access to your team, or editorial access to a colleague who normally would only be able to view the page.
You can use the page access settings available through the Manage Pages dialog box to provide page access to a select list of specified users and user roles. And you can use them to make a page publicly available.
This section describes how to configure custom page access. It contains the following subsections.
|
Note: By default, all group space pages are automatically visible to all group space members. Using the procedure described in this section, you can set explicit access on a group space page to restrict it to a set of users or roles.Making a group space or a group space page publicly accessible is an administrative function. For more information, see Section 10.11.3, "Granting Public Access to a Group Space." |
To configure custom page access through the Manage Pages dialog box:
Log in to Oracle WebCenter Spaces.
For information on how to log in, see Section 2.2.1, "Logging In to a WebCenter Application."
Go to the personal or group space where you want to configure custom page access.
For information about locating pages, see Section 2.4, "Hiding, Showing, Opening, and Closing Pages."
Select the Manage Pages command from the Page Actions menu (Figure 5-35).
The Manage Pages dialog box opens (Figure 5-36).
In the Actions column, click the Actions icon in the row of the page on which to set access and select Set Page Access from the resulting menu (Figure 5-37).
The Set Page Access dialog box opens (Figure 5-38).
For group space pages only, select from:
Use Application Permissions to have page access handled by permissions set at the application level. If you select this option, skip to step 10.
Use Custom Access Settings to set custom access on the current page.
These options are provided for group space pages only. They do not appear in the Set Page Access dialog box for pages in a personal space.
Click the Add Access button (Figure 5-39).
The Add Access dialog box opens (Figure 5-40).
In the Search field, enter the name of the user or role for whom you want to define page security, and click the Search button.
Optionally, enter a search term of at least two characters, and click the Search button.
Select a user name or role by clicking its row.
To make multiple selections:
Ctrl-Click to select multiple rows.
Shift-Click to select a range of rows.
When you select a user name, the permissions you set are granted to that specific user. When you select an enterprise group or application role, the permissions you set are granted to all users who are members of that group or assigned that role.
Click the Select button.
The Add Access dialog box closes, and the Set Page Access dialog box populates with the selected users (Figure 5-41).
Repeat steps 7 through 9 to add all the users and roles of interest to the Set Page Access dialog box.
For each role or user, set custom access by selecting one or more access privileges from the Page Access columns.
By default, all authenticated users and user roles include page view access. The other access privileges require it.
Table 5-3 lists and describes the access privileges available from the Page Access column in the Set Page Access dialog box:
Table 5-3 Page Access Privileges in the Set Page Access Dialog Box
| Icon | Name | Description |
|---|---|---|
|
|
View Page |
User or role can access the page for viewing, but cannot perform any other actions on the page. |
|
|
Edit Page |
User or role can edit the page using Oracle Composer. This includes adding, rearranging, and deleting content; renaming the page; and changing page properties, such as the page Scheme. |
|
|
Delete Page |
User or role can delete the page. |
|
|
Perform All Page Actions |
User or role can perform all actions on the page. |
|
|
Personalize Page |
User or role can rearrange page content and personalize their view of task flows, provided the task flow includes personalization settings. |
Click OK to save your changes and close the Set Page Access dialog box.
Click Close to exit the Manage Pages dialog box.
To make a personal page public:
Log in to Oracle WebCenter Spaces.
For information on how to log in, see Section 2.2.1, "Logging In to a WebCenter Application."
Go to the personal page you want to make public.
For information about locating pages, see Section 2.4, "Hiding, Showing, Opening, and Closing Pages."
Select the Manage Pages command from the Page Actions menu (Figure 5-42).
The Manage Pages dialog box opens (Figure 5-43).
In the Actions column, click the Actions icon in the row of the page to make public and select Set Page Access from the resulting menu (Figure 5-44).
The Set Page Access dialog box opens (Figure 5-38).
Click the Add Access button (Figure 5-46).
The Add Access dialog box opens (Figure 5-47).
In the Search field, enter anonymous-role, and click the Search button.
Select anonymous-role under the Name column, and click the Select button.
The Add Access dialog box closes, and the Set Page Access dialog box populates with your selection (Figure 5-48).
Set custom access by selecting one or more access privileges from the Page Access columns (see Table 5-3).
By default, all authenticated users and user roles include page view access. The other access privileges require it.
Click OK to save your changes and close the Set Page Access dialog box.
Click Close to exit the Manage Pages dialog box.
Copy the URL of the public page, and send it to whomever you want to notify.
Users can access the public page without logging in.
Log in to Oracle WebCenter Spaces.
For information on how to log in, see Section 2.2.1, "Logging In to a WebCenter Application."
Go to the personal or group space where you want to revoke custom page access.
For information about locating pages, see Section 2.4, "Hiding, Showing, Opening, and Closing Pages."
Select the Manage Pages command from the Page Actions menu (Figure 5-49).
The Manage Pages dialog box opens (Figure 5-50).
In the Actions column, click the Actions icon in the row of the page from which to revoke access and select Set Page Access from the resulting menu (Figure 5-37).
The Set Page Access dialog box opens (Figure 5-52).
Select the role or user for which to revoke access, and click the Delete Access button (Figure 5-53).
In the Delete Page Access dialog box, click Delete (Figure 5-54).
The selected user or role is removed from the list of roles and users, and the role or user's page access permissions are revoked.
Click OK to close the Set Page Access dialog box.
Click Close to exit the Manage Pages dialog box.
Copying a page provides a quick, easy way to create multiple pages that use the same scheme and layout and contain the same content with the same customizations. Copying a page is a two-click operation through the Manage Pages dialog box.
|
Note: In a group space, you must have the Pages-Create permission to copy a page. If you have not been granted this permission, then the Copy Page selection is not available to you. To request a change of permission, see your group space moderator. |
To copy a page through the Manage Pages dialog box:
Log in to Oracle WebCenter Spaces.
For information on how to log in, see Section 2.2.1, "Logging In to a WebCenter Application."
Go to the personal or group space where you want to copy a page.
For information about locating pages, see Section 2.4, "Hiding, Showing, Opening, and Closing Pages."
Select the Manage Pages command from the Page Actions menu (Figure 5-55).
The Manage Pages dialog box opens.
In the row of the page you want to copy, click the Actions icon and select Copy Page from the resulting menu (Figure 5-56).
The Copy Page dialog box opens (Figure 5-57).
Provide a new name for the copy, and click OK.
You must provide a new name. You cannot leave this field blank.
The Manage Pages dialog box closes, and the new page opens in edit mode in Oracle Composer. All the task flows, portlets, and other page components are also copied, along with any customizations that were applied to them.
Oracle Composer provides the runtime page editing environment for all WebCenter application pages. One way to access Oracle Composer is through the Manage Pages dialog box. This section describes how.
To enter edit mode through the Manage Pages dialog box:
Log in to Oracle WebCenter Spaces.
For information on how to log in, see Section 2.2.1, "Logging In to a WebCenter Application."
Go to the page you want to edit.
For information about locating pages, see Section 2.4, "Hiding, Showing, Opening, and Closing Pages."
Select the Manage Pages command from the Page Actions menu (Figure 5-58).
The Manage Pages dialog box opens.
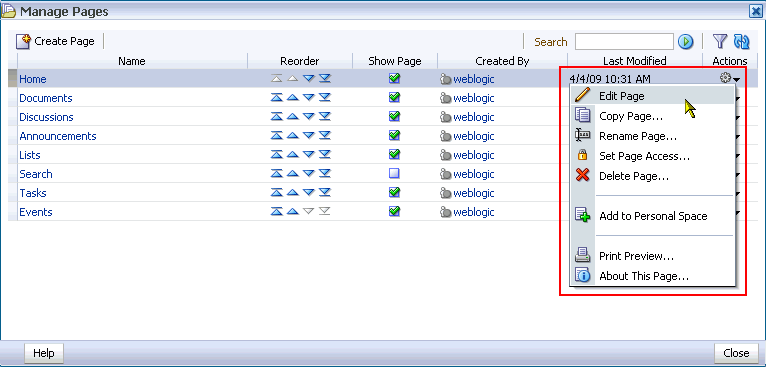
In the Manage Pages dialog box, click the Actions icon (Figure 5-59) in the row of the page you want to edit, and select Edit Page from the resulting menu.
Figure 5-59 The Edit the Page Command on the Actions Menu
The Manage Pages dialog box closes, and page opens in Oracle Composer.
The Manage Pages dialog box provides easy access to controls for deleting pages. Simply open the dialog box, open the Actions menu next to the relevant page, and select Delete Page. This section provides the details.
To delete a page through the Manage Pages dialog box:
Log in to Oracle WebCenter Spaces.
For information on how to log in, see Section 2.2.1, "Logging In to a WebCenter Application."
Go to your personal space or the group space where you want to delete a page.
For information about locating pages, see Section 2.4, "Hiding, Showing, Opening, and Closing Pages."
Select the Manage Pages command from the Page Actions menu (Figure 5-60).
The Manage Pages dialog box opens.
In the Manage Pages dialog box, click the Actions icon in the row of the page you want to delete (Figure 5-61) and select Delete Page from the resulting menu.
The Delete Page dialog box opens (Figure 5-62).
Click Delete to delete the page irrevocably from Oracle WebCenter Spaces.
Click the Close button to close the Manage Pages dialog box.