 Understanding How to Record Deliveries in PeopleSoft Purchasing Using
Mobile Inventory Management
Understanding How to Record Deliveries in PeopleSoft Purchasing Using
Mobile Inventory ManagementThis chapter provides an overview of recording deliveries in PeopleSoft Purchasing using PeopleSoft Mobile Inventory Management and discusses how to:
Set up and use Mobile Delivery in the PeopleSoft system.
Process deliveries using mobile devices.
Understanding How to Record Deliveries in PeopleSoft Purchasing Using
Mobile Inventory ManagementUsing the PeopleSoft Purchasing receiving business process you can receive, inspect, return, and deliver received goods. Receiving and delivery rules are defined in the business processes leading up to the actual receipt. These processes include setting up items and creating requisitions and purchase orders.
When stock arrives at the receiving location, you can receive it using the PeopleSoft Purchasing Receiving component or the Mobile Receiving task flow. After receiving the stock, you can use the Mobile Delivery task flow to record the final destination for delivered items, view location and ship to information relevant to the delivery of the items, and to whom the items were delivered. Delivery information exists at the receipt distribution level and originates from either a requisition or purchase order. The recorded results of deliveries are sent back to the PeopleSoft system using a Component Interface based on the RECV_DELIVERY component.
Mobile deliveries can include purchase receipts, non-inventory receipts that include description only receipts, and inventory receipts. A delivery can include both purchase receipts and material stock requests and their delivery can be to a person or delivery location.
As part of Mobile Delivery, you can create mobile transactions to record:
The delivery of a purchase order receipt.
The delivery of an ad hoc receipt that is not associated with a vendor ID.
The delivery of an ad hoc receipt that is associated with a vendor ID.
The person who delivered the items and the person who accepted the delivery, along with the date and time of delivery.
Delivery feedback for the delivery transaction.
Along with Mobile Delivery task flow transactions, you can use the PeopleSoft system to:
Maintain the Delivery Information PeopleSoft component displays and enter data in fields provided in the Mobile Delivery application.
Perform an inquiry to review complete and incomplete deliveries.
The Mobile Delivery task flow requires the existence of a receipt; the receipt can be either a purchase order or an ad hoc receipt. Delivery information becomes available only after an item has been received.
As part of the receipt process, delivery documents are printed and attached to the received shipments. These shipments are then directed to their appropriate locations, such as an office, storage area, or a person. Upon receiving the shipment, users can select items to be delivered using Mobile Delivery.
Note. Using Mobile Delivery, you cannot deliver items to an inspection area first and then to their final destination. The system assumes that inspections are performed at receipt time or that if inspections take place later than receipt time, then the delivery represents the delivery to the final destination.
 Process Flow for Mobile Delivery
As part of the Mobile Delivery task flow, you begin with a search page that also provides advanced search criteria so you can better define the receipt lines that you want to deliver. The advanced search criteria enables you to enter additional search criteria that refines the search for receipt lines. For example, if you enter a business unit and a delivery document, and then you enter an item ID, the search results provide only receipt distribution lines that match all three criteria.
You can search for deliveries based on:
Receipt number.
Purchase order number.
Tracking number (progressive number) that is stored as a child table of the receipt line (RECV_LN_PRO).
The next example illustrates the beginning of the Mobile Delivery task flow where you perform the search and continues through the process until you save the delivery:
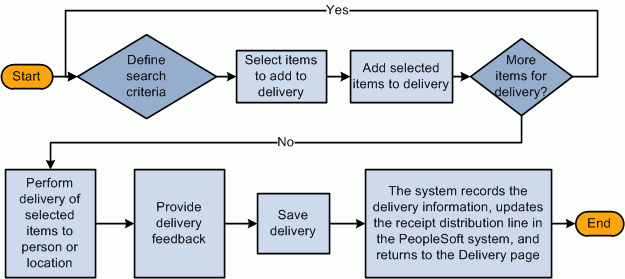
Process flow for Mobile Delivery
Using the Mobile Delivery application, you cannot perform ad hoc deliveries; however, you can create an ad hoc receipt either in the PeopleSoft system or using a Mobile Receiving transaction. And, then perform a delivery using the Mobile Delivery transaction based on that receipt.
The process for the Mobile Delivery task flow is as follows:
Sign into the Mobile Inventory Management application and select Delivery.
Perform a search using the delivery number value, advanced search criteria, or both.
The system provides the default business unit defined for the Mobile Delivery user. Examples of the values that you can use as advanced search criteria are receipt number, item ID, and attention to person. You can also define how information will be displayed on Delivery pages by using the Options table.
Select items to add to the delivery.
After adding receipt line items, you can add additional items.
Perform the delivery of the selected items to the persons or locations.
You can delete items from the delivery at this point.
Record any delivery feedback.
Save the delivery.
After you click the Save button, the system provides a delivery confirmation page. Click OK to access the Delivery page to begin another delivery.
The system updates the PeopleSoft system with the new delivery information by recording the recipient's name, initials, or ID or the location to whom or where the items were delivered.
In addition to providing the default date, the system defaults the time and the user name of the person who performed the delivery.
Note. The Mobile Delivery task flow also supports the business process flow where an employee goes to a location, such as a mail room, to pick up a package that has been received for them.
Setting Up the PeopleSoft System for Use with Mobile DeliveryThis section discusses how to:
Establish Mobile Delivery installation options.
Define Mobile Delivery user preferences.
Set up delivery feedback codes.
Pages Used to Set Up the PeopleSoft System for Mobile Delivery|
Page Name |
Definition Name |
Navigation |
Usage |
|
Installation Options - Mobile Inventory |
INSTALLATION_MIN |
Set Up Financials/Supply Chain, Install, Installation Options |
Establish Mobile Delivery installation options. |
|
User Preferences - Mobile Inventory |
MIN_USER_TASK_OPT |
Set Up Financials/Supply Chain, Common Definitions, User Preferences, Mobile Inventory |
Establish Mobile Delivery user preferences options. You can use this page to default all user preferences to those defined in the installation options. |
|
Delivery Feedback |
MIN_DLV_FEEDBACK |
Set Up Financials/Supply Chain, Product Related, Inventory Mobile, Setup Delivery Feedback |
Set up delivery feedback codes and descriptions. |
Establishing Mobile Delivery Installation OptionsAccess the Installation Options - Mobile Inventory page (Set Up Financials/Supply Chain, Install, Installation Options, Mobile Inventory, and select the Delivery task flow).
You use the installation options to define default values for Mobile Delivery pages in the PeopleSoft system and to define page values available on a mobile device.
Establishing Mobile Delivery User PreferencesAccess the User Preferences - Mobile Inventory page (Set Up Financials/Supply Chain, Common Definitions, User Preferences, Define User Preferences, Mobile Inventory and select the Delivery task flow).
This page uses the same values as the corresponding Installation - Mobile Delivery page. When you are setting up user preferences, you can select the Use Installation Values check box to use installation values instead of defining user preferences. When you select the check box, user preferences values are not longer available.
See Establishing Mobile Delivery Installation Options.
Setting Up Delivery Feedback CodesAccess the Mobile Delivery Feedback page (Set Up Financials/Supply Chain, Product Related, Inventory Mobile, Setup Delivery Feedback).
Use this page to provide delivery feedback codes when you use a mobile device to record the delivery of receipt line items.
The next example is how the mobile device page appears with a code entered:
Processing Deliveries Using Mobile DevicesThis section discusses how to:
Search for items to add to a delivery.
Select items for delivery.
View delivery comments.
Perform delivery of Mobile Inventory Management items.
Provide delivery feedback.
Pages Used to Process Mobile Delivery Using Mobile DevicesUse these pages to process mobile deliveries.
|
Page Name |
Navigation |
Usage |
|
Delivery |
Mobile Inventory, Delivery |
Search for items to add to a delivery. |
|
Select Items for Delivery |
Mobile Inventory, Delivery, and click the Search button on the Select Items for Delivery page |
Select items for delivery. |
|
Select Items for Delivery |
Mobile Inventory, Delivery, and click the Comments icon on the Select Items for Delivery page |
View delivery comments. |
|
Perform Delivery |
Mobile Inventory, Delivery, and click the Perform Delivery link on the Select Items for Delivery page |
Perform delivery of Mobile Inventory items. |
|
Delivery - Delivery Feedback |
Click the Delivery Feedback link on the Delivery page |
Provide delivery feedback. |
Searching for Items to Add to a DeliveryAccess the Select Items for Delivery page (Mobile Inventory, Delivery).
Note. You must select the business unit and it is recommended that you select at least one other search option to retrieve receipt lines for delivery. When searching for only a business unit, it might result in slow performance and result in returning more than 300 rows of data.
|
Unit |
Displays the user's default business unit. Depending on the search criteria that you entered, the unit could be the receiving or purchasing business unit. |
|
Delivery Document |
Enter a delivery document on which to base the search. The document could be, for example, a receipt number, purchase order number, or a pro number, such as a tracking number. |
|
Search |
Click to search for items matching the criteria that you enter. The system displays the matching receipt distribution lines Receipts in a Closed or Cancelled status are not included in the returned lines. |
|
Advanced Search |
Click to enter advanced search criteria for receipt lines. For example you can define specific item IDs, receipt dates, and requesters. See Advanced Search. |
|
Options |
Click to expand the Options table where you can define processing display options for receipt delivery searches. |
Advanced Search
Access the Advanced Search table (click the Advanced Search link on the Delivery page).
Use the Selection Criteria table to define more specific information to find receipts.
Note. Searches are not case sensitive and partial searches are possible for all of the advanced search fields, except for the Unit and PO Unit (purchase order business unit) fields, which must be exact, and the Receipt Date field.
|
Receipt |
Enter a receipt number on which to base a search for receipts. A receipt must exist in order to deliver items. |
|
Item ID |
Select a PeopleSoft system item ID on which to base the receipt search. You can use the Lookup icon to locate and select an item ID. |
|
PO Unit (purchase order unit) |
Enter a purchase order business unit on which to base a receipt search. The business unit and purchase order business unit must be setup as matching. You can use the Lookup icon to locate and select a business unit. |
|
PO ID (purchase order ID) |
Select a purchase order on which to base a search for receipts. The search result will include receipts for the purchase order that you enter. A purchase order unit is required for the PO ID Lookup icon to work. You can use the Lookup icon to locate and select a purchase order ID. |
|
Ship To |
Select a ship to location to reduce the search to just that location and any other selection criteria that you enter. You can use the Lookup icon to locate and select a ship to location. |
|
Receipt Date |
Enter a specific receipt date on which to base the item search. The date must be entered in the correct format. The system only displays the receipts created on or before the date that you enter. |
|
Attention To |
Enter the person on which to base your search for items to deliver. The system retrieves the purchase order receipt lines that match the attention to person you enter. You can also use the Lookup icon to locate and select the attention to user |
|
Location |
Select the location for which you want to search for receipt lines to deliver. You can use the Lookup icon. |
|
Requester |
Select the requester for whom you want to search for receipt lines to deliver. You can use the Lookup icon. |
|
Pro Number (progressive number) |
Select the progressive number on which to base the search for receipt lines to deliver. The system provides the receipt line with that progressive number. It's possible to have multiple Pro numbers on a receipt. If you perform a search based on the Pro number, the Mobile Delivery component retrieves all the receipt distribution lines that have a parent line with that Pro number associated to it. |
Options
Access the Select Items for Delivery - Options page (Mobile Inventory, Delivery, and click the Options link).
Use this page to define processing display options for receipt line searches. The values that you select in this section controls what information appears in the Select Items for Delivery page.
|
Rows to Display |
Enter the number of rows that you want to display for the current session. When you collapse the Options table, the system saves the information you entered and uses it for this session. |
|
Select Items Sort By |
Select how you want to define the ascending order in which items and locations are sorted on the Select Items for Delivery and Advanced Search Results pages in the Mobile Delivery application. Valid values include:
|
|
Perform Delivery Sort By |
Select how you want to define the ascending order in which items and locations are sorted on the Perform Delivery page in the Mobile Delivery application. Valid values include:
|
|
Default Delivered To |
Click to indicate that the Mobile Delivery application should attempt to provide a default value for the Delivered To field that is based on a hard-coded hierarchy of fields. |
|
Display Description |
Select how you want to define the ascending order in which items and locations are sorted on the Select Items for Delivery page in the Mobile Delivery application. Valid values include:
Note. The system ignores this setting when an item is a description only item. |
|
Display Show/Hide in tables |
Select to display the Show and Hide links on the Select Items for Delivery page after you perform the search. These values enable you to expand and collapse additional information sections for items. |
|
Display Filter |
Select to display the Filter field and the Filter and Clear buttons on the Select Items for Delivery page after you perform the search and on the Perform Delivery page. Deselect the check box to remove the filter functionality from the Delivery pages. |
|
Display Lookups |
Select to show Lookup icons on the Delivery pages. |
Selecting Items for DeliveryAccess the Select Items for Delivery page (Mobile Inventory, Delivery, enter one or more search criteria, and click the Search button on the Select Items for Delivery page or tab out of the Delivery Document field).
After loading items from the initial search, you can further limit the contents of this page by entering filtering criteria and then tabbing out of the Filter field or clicking the Filter button. To perform another search, enter a delivery document or click the Advanced Search link to define additional search criteria for the search, or both. Then click Search button or tab out of the Delivery Document field to initiate the search.
Viewing Delivery CommentsAccess the Comments page (Mobile Inventory, Delivery, and click the Comments icon on the Select Items for Delivery page).
When a receipt distribution line with a purchase order or receipt line comment associated with it, you can view the comments using this page. Comments for purchase order lines appear when the Show at Receipt check box is selected on the PO Line Comments page. The page displays all receipt line comments.
When you select an item for which to review comments, the system displays the item information, quantities to be delivered, and the deliver to person.
Click the Return link to navigate to the previous page.
Performing Delivery of Mobile Inventory ItemsAccess the Perform Delivery page (Mobile Inventory, Delivery, and click the Perform Delivery link on the Select Items for Delivery page after adding at least one item to the delivery).
Use this page to define the delivery items and details. You can reduce the list of items awaiting delivery by using the Filter field.
|
Delivered To |
Enter a value to define an employee name, employee ID, employee initials or a location to which the items are being delivered. You can type this information or scan a bar code, such as an employee badge number or a location bar code. Note. The system populates the Delivered To field if the Default Delivered To check box is selected and the lines added to the delivery meet the necessary criteria, such as having the same attention to, requester or location |
|
Delivery Feedback |
Click to enter feedback about the delivery. |
|
Save |
Click to deliver the items that appear in the list at the bottom of this page. As part of saving the delivery, the current date and time are recorded, as is the user ID of the person performing the delivery. When the delivery is complete, the system displays the Delivery Saved page. Click the OK button to return to the Select Items for Delivery page where you can search for another receipt. |
|
Return to Select Items |
Click to return to the Select Items for Delivery page where you can add more items to the delivery. |
|
|
Click Show icon to view additional details about a receipt distribution line. The details include the due date, specific location information, and the stocking unit of measure. |
|
|
Click Hide icon to hide additional details about a receipt distribution line. |
|
Item ID |
Displays the item that was returned from the search. If you selected the Display Description check box, the description also appears with the item. If the item is configured, the configuration code is displayed instead of the description. Also, if the item is a description-only item, such as not having an item ID, then the description is displayed, regardless of the display description option. |
|
Qty (quantity) |
Displays the distribution quantity and the vendor's unit of measure. |
|
Requester |
Displays the requester's name. |
|
|
Click to view any purchase order or receipt comments associated with the receipt line. Comments exist when the icon is displayed. |
|
|
Click to delete the current item from the delivery. |
Providing Delivery FeedbackAccess the Delivery Feedback table (click the Delivery Feedback link on the Perform Delivery page).
Use this section to provide information to the PeopleSoft system about the delivery of the receipt line.
|
Delivery Feedback Code |
Select a code that automatically updates the Delivery Feedback field. Codes are defined in the PeopleSoft system Delivery Feedback component. |
|
Delivery Feedback |
If you selected a feedback code for the delivery, the text appears in this field. You can also enter additional comments that you have related to the delivery of the receipt line items. After you deliver the item, the comments are recorded in the Delivery Feedback field in the Maintain Delivery Component in the PeopleSoft system. To view the comments, select Purchasing, Receipts, Maintain Delivery Information. |
See Also
Working with Delivery Information