10g (10.1.3.5.0)
Part Number E14293-01
Contents
Previous
Next
| Oracle Application Server Adapter for Oracle Applications User's Guide 10g (10.1.3.5.0) Part Number E14293-01 | Contents | Previous | Next |
This appendix covers the following topics:
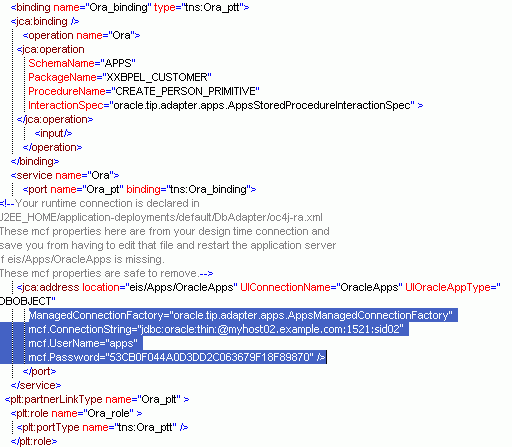
Web Service Definition Language (WSDL) is generated by the JDeveloper BPEL Designer during design time. The WSDL file generated by the Adapter Wizard is the adapter service definition. In addition, it specifies various operations exposed by the service. The operations are based on user input to the Adapter Wizard. An operation either retrieves or inserts data to Oracle Applications and is represented by a JCA activation or interaction spec.
Example of a WSDL File

OracleAS Adapter for Oracle Applications is deployed as J2CA 1.5 resource adapters within the same OC4J container as BPEL Process Manager during installation.
Although OracleAS Adapter for Oracle Applications is physically deployed as J2CA 1.5 resource adapters, the logical deployment of the Adapter involves creating the connection entries for the J2CA 1.0 resource adapter. This connection information is for tying up the database connection information provided when you create a partner link or service and is used by iAS at run time in the background.
Use Enterprise Manager to modify the connection configuration so that the proper information is inserted into oc4j-ra.xml automatically.
Note: The oc4j-ra.xml is the file that is administered through the Enterprise Manager console.
The following example of connection configuration for OracleAS Adapter for Oracle Applications can be used with the Oracle Applications adapter tutorials packaged with the product. For the logical deployment changes to take effect, the OC4J container process must be restarted.
To configure the connection information:
Log in to Enterprise Manager at the URL for your Web server host machine:
http://servername:port/emNote: The default port number is 8888. The default login user ID and password are oc4jadmin and welcome1 respectively.
Create a connection pool and a data source:
Click Home, then Administration.
Click the Go To Task icon for Services/JDBC Resources.
Under Connection Pools, click the Create button.
Accept the defaults, and click Continue.
Enter the following values (leave defaults for the rest):
| Field | Value |
|---|---|
| Name | appsSample_pool |
| JDBC URL | The URL for your database. For example:
|
| Username | apps |
| Password | apps |
Click Finish, then click the Test Connection icon for your new connection pool.
On the page that appears, click Test.
Back on the main page, a successful connection message is displayed. If you see an error message, check the URL and credentials to ensure you've entered the right information.
Click Finish.
Under Data Sources, click Create.
Accept the defaults and click Continue.
Enter the following values (leave defaults for the rest):
| Field | Value |
|---|---|
| Name | appsDemoDS |
| JNDI Location | jdbc/appsSampleDataSource |
| Connection Pool | appsSample_pool |
Click Finish.
Create an Oracle Applications adapter connection:
At the top of the page, click the OC4J:home breadcrumb link, then the Applications link.
In the tree of applications, click the default link.
Under Modules, click the AppsAdapter link, then the Connection Factories link.
Under Connection Factories, click Create.
Note: Use the Create button near the top of the screen, not the one in the Shared Connection Pools section.
Accept all the defaults and click Continue.
For JNDI Location, enter eis/Apps/appsSample.
Under Configuration Properties, for xADataSourceName, enter jdbc/appsSampleDataSource. Keep the default entries for all of the other fields.
Click Finish.
![]()
Copyright © 2005, 2009, Oracle and/or its affiliates. All rights reserved.