4 Setting Up Configurator
This chapter contains the following topics:
-
Section 4.2, "Understanding Setup Prerequisites for Configurator"
-
Section 4.3, "Understanding Configured Item Pricing on a Sales Order"
-
Section 4.4, "Understanding Configured Item Costing on a Purchase Order"
-
Section 4.5, "Understanding Configured Item Pricing and Costing Using Based-on Effectivity Dates"
-
Section 4.9, "Understanding Media Object Attachments for Configured Items"
4.1 Understanding Configurator Setup
You must set up the JD Edwards EnterpriseOne Configurator system before you can enter orders for configured items.
JD Edwards EnterpriseOne Configurator system setup consists of setting up:
-
Configurator constants.
-
Configured item information.
-
Configured item segments.
-
Cross-segment editing rules.
-
Assembly inclusion rules.
-
Configured tables.
-
Media object attachments.
Configurator constants control the JD Edwards EnterpriseOne Configurator system processing by branch/plant for the business. For example, constants control:
-
Sales quote processing.
-
Availability checking.
-
Display of calculated segments.
Configured item information defines the format in which configured item information appears on order paperwork. You define the X assembly inclusion rule based-on dates for sales orders, purchase orders, and work orders. You can also activate non-dynamic, dynamic, and single pass configuration entry (Release 9.1 Update).
Segments are the features and options of a configured item. Segments represent product characteristics such as color, material, or size. For clarification purposes, you assign numbers to each segment of the configured item. Information from the Display Order field determines the order in which you specify the segment value during order entry.
You set up cross-segment editing rules with logic statements to establish the relationship between the segment values. Use these rules to prevent invalid configurations during order entry. You can define custom error messages for a cross-segment editing rule.
Assembly inclusion rules process requested features from order entry into the specific components and routing operations that are necessary to build the configured item. Different types of assembly inclusion rules enable you to define:
-
Components.
-
Price and cost adjustments.
-
Routings.
-
Calculated values.
-
Hot spot values.
You can specify the type of transaction that the component of a configured item generates during order entry. Assembly inclusion rules also offer advanced logic, such as algebraic expressions, smart parts, and external program references.
You can also set up tables for assembly inclusion rules to reference information that is based on segment values. You can define tables for components, prices, and calculated values. Using tables reduces the number of required rules, simplifies rule maintenance, and improves processing time.
You can attach media objects such as text, image, and OLE to configured items. Media object attachments provide additional information about the configured item, components, and configured item segment values. The information could be useful to order entry personnel.
|
Note: You can define segments, rules, and configured items that are specific to a branch/plant or generic across all branch/plants. A blank Branch/Plant field identifies a generic branch/plant. If you do not use the generic branch/plant, then segment, rule, and item information should be the same across branch/plants. If you define generic branch/plant segments, you must also define generic cross-segment editing and assembly inclusion rules. |
4.2 Understanding Setup Prerequisites for Configurator
The JD Edwards EnterpriseOne Configurator system works with other JD Edwards EnterpriseOne systems. Before you set up the JD Edwards EnterpriseOne Configurator system, you should be familiar with these JD Edwards EnterpriseOne systems:
-
JD Edwards EnterpriseOne Inventory Management
-
JD Edwards EnterpriseOne Product Data Management
-
JD Edwards EnterpriseOne Shop Floor Management
-
JD Edwards EnterpriseOne Sales Order Management
-
JD Edwards EnterpriseOne Procurement
-
JD Edwards EnterpriseOne Work Order Management
-
JD Edwards EnterpriseOne Engineer to Order
|
Note: The information that is provided here is specific to setting up the JD Edwards EnterpriseOne Configurator system. For more information regarding setting up these other systems, please refer to the respective implementation guides. |
4.2.1 JD Edwards EnterpriseOne Inventory Management and JD Edwards EnterpriseOne Configurator
The JD Edwards EnterpriseOne Inventory Management system stores item information, sales and purchasing costs, and quantities that are available by location. The JD Edwards EnterpriseOne Inventory Management system is used to set up item information for configured items and their components, and configured subassemblies. Programs in the JD Edwards EnterpriseOne Inventory Management system define the configured item information, such as how the item is identified and stocked.
You enter Item Master information, such as item number, description, stocking type, cost, and price information, that is unique to the item across all branch/plants.
When processing Item Master Revisions, select C for configured item in the Stocking Type field.
If you want the system to automatically generate work order headers at time of order entry, then select the work order line type in the Line Type field. Select the line type for stock item if you do not need work orders.
To gather accurate costs for a configured item, select 3 in the Inventory Cost Level field, which identifies costs of the configured item at the item, branch/plant, location, and lot levels. Because configured items are specific and unique in their configuration, they must be set to this level of cost detail to obtain an accurate cost for configured components and the configured end-item.
The Configurator Costing Method field can also be used to indicate how the cost is calculated for a configured item on purchase orders only.
You have several options for pricing a configured item. You accomplish this pricing by selecting a value in the Kit/Configurator Pricing Method field. Select from these pricing methods:
-
Total the list prices of components to determine the configured item price.
-
Use the list price of the configured item.
-
Use assembly inclusion pricing rules to determine the price.
-
Total the discounted price of components.
Base prices can be established in the system for components and configured items. JD Edwards EnterpriseOne Advanced Pricing can be used with any price method code. You can also use price adjustment, or X assembly inclusion rules, to affect the price for the configured item, regardless of the price method that you chose. The X assembly inclusion rules also support cost adjustments.
Because configured items have the same item number in the Item Master (for example, the forklift is item 6000), the system requires additional information to stock the configured item in inventory. This information enables the system to differentiate one configuration from another. Thus, configured items must be lot controlled. Configured items also need to be stocked in a specific location. Using lot and location control identifies each configured item as unique.
You can have lot numbers automatically assigned to configured items by setting a value in the Lot Process Type field. Instead of turning on lot control, the system can be set up to assign the lot and location automatically during work order completions (by way of the processing options), or the lot and location can be manually entered (at completions). The method that is used to assign lot and location information to a configured item is a business process that you must determine.
In the Item Master program, you can define the level lead time for the configured item on the Additional System Information form. The system uses this value to calculate the start dates for work orders by using fixed lead times. The start dates on a work order header are usually back-scheduled, based on the request date of the order (such as a sales order). Because each configured item is unique and difficult to plan for in the planning system, this field is used to schedule the configured item work orders accurately.
After you enter generic item information, you can enter Item Branch (P41026) information that is unique to an item for a specific branch/plant.
You can define the stocking type, line type, lot process type, and location at the branch/plant level for the configured item, configured subassemblies, and components.
4.2.2 JD Edwards EnterpriseOne Product Data Management and JD Edwards EnterpriseOne Configurator
The JD Edwards EnterpriseOne Product Data Management system enables you to organize and maintain information about each item that you manufacture. The JD Edwards EnterpriseOne Configurator system further defines the relationship between items and how they can be manufactured.
Although you do not need to create a bill of material for a configured item, you can create a bill of material for the manufactured components for the configured item. Use assembly inclusion rules to define component relationships for configured items. The system adds configured components to sales orders and work orders, based on these rules.
During setup, consider creating modular bills of material that group common parts for a specific feature or option. For example, a car might have an interior trim package with two choices: standard and deluxe. Each choice includes specific parts and might represent two different modular bills.
Although planning bills of material are not required for the JD Edwards EnterpriseOne Configurator system, you can use them to help manage demand for specific features and options.
You can define all possible routings for the configured item and define assembly inclusion rules to select which routing to attach to the work order. The routing assembly inclusion rule enables you to specify a complete routing or specific routing operations to attach to a configured item work order. You do not need to enter a routing for the configured item unless you also enter a routing inclusion rule.
4.2.3 JD Edwards EnterpriseOne Shop Floor Management and JD Edwards EnterpriseOne Configurator
The JD Edwards EnterpriseOne Shop Floor Management system enables you to control the flow of materials inside the plant by managing and tracking manufacturing work orders. It provides an effective way to maintain and communicate information that the system requires to complete production requests.
The JD Edwards EnterpriseOne Configurator system integrates with JD Edwards EnterpriseOne Shop Floor Management to manage the work orders for configured items. Before you can process work orders for configured items, you must enter business-specific information in Shop Floor programs within the JD Edwards EnterpriseOne Manufacturing system from Oracle.
The system enables you to generate work order headers at the time of sales order entry. You must ensure that JD Edwards EnterpriseOne Sales Order Management is set up so that the interface exists with the JD Edwards EnterpriseOne Work Order and JD Edwards EnterpriseOne Shop Floor Management systems to support these order types.
The system also enables you to enter work orders for configured items directly through the Manufacturing Work Order Processing program (P48013). This functionality enables you to generate work orders for configured items that you might want to prebuild or stock in inventory to better meet the demands of the business.
After the work orders are created, they move through the JD Edwards EnterpriseOne Shop Floor Management system using Order Processing (R31410) and other shop floor programs as dictated by business processes.
4.2.4 JD Edwards EnterpriseOne Sales Order Management and JD Edwards EnterpriseOne Configurator
The JD Edwards EnterpriseOne Sales Order Management system controls all aspects of processing sales orders. The JD Edwards EnterpriseOne Configurator system works with the JD Edwards EnterpriseOne Sales Order Management system to adapt the way that you enter and process sales orders for configured items.
Besides regular sales orders, the JD Edwards EnterpriseOne Sales Order Management system also supports sales quotes, credit, transfer, direct ship, interbranch, and combination orders for configured items.
Before you can enter orders for configured items, you must enter business-specific information in the JD Edwards EnterpriseOne Sales Order Management programs within the JD Edwards EnterpriseOne Distribution system from Oracle.
You must set up order line types and document types (order types) for the system to use. The order line type tells the system how to process each detail line that you enter for a specific order type (for instance, T is a text line). The document type identifies the origin and purpose of the transaction (for instance, SO is a sales order). The order activity rules are then set up by combination of an order type and a line type. The order activity rules define the specific steps in the order processing cycle for the business.
You set up new line types to generate work orders (in addition to sales orders) for configured items during sales order entry.
A typical sales order cycle includes sales order entry, packing, shipping, and invoicing. For a work-order-generated line type and sales order document type, you can add to the cycle steps for creating the work order parts lists and completing work orders for configured items. Optionally, both of these manufacturing processes can update associated sales order activity.
A work-order-generated line type and sales quote document type are typically used for entering sales quotes for configured items. However, additional system setup prohibits the creation of associated work order headers when a quote order is generated.
A credit order line type and credit order document type are used for entering credit orders for configured items. Because credit orders facilitate receiving product back from a customer, the system must be set up so that the configured item can be put back into inventory.
The appropriate line types, document types, and order activity rules should be set up to support transfer, direct ship, interbranch, and combination orders for configured items. You must also ensure that the Procurement system is set up so that the interface exists with the JD Edwards EnterpriseOne Sales Order Management system to support these order types.
4.2.5 JD Edwards EnterpriseOne Procurement and JD Edwards EnterpriseOne Configurator
The JD Edwards EnterpriseOne Procurement system controls all aspects of purchasing activities. The JD Edwards EnterpriseOne Configurator system works with the JD Edwards EnterpriseOne Procurement system to adapt the way that you enter and process purchase orders for configured items.
Besides regular purchase orders, the JD Edwards EnterpriseOne Procurement system also supports purchase orders that are created at the time of sales order entry for transfer, direct ship, and combination orders for configured items. You can also generate a purchase order for a component of a configured item.
Before you can enter purchase orders for configured items, you must enter business-specific information in the JD Edwards EnterpriseOne Procurement programs within the JD Edwards EnterpriseOne Distribution system.
You must set up order line types and document types (order types) for the system to use. The order line type tells the system how to process each detail line that you enter for a specific order type (for instance, T is a text line). The document type identifies the origin and purpose of the transaction (for instance, OP is a purchase order). The order activity rules are then set up by combination of an order type and a line type. The order activity rules define the specific steps in the order processing cycle.
You set up a line type for configured items and a document type for the purchase order.
You also set up order activity rules to define the specific steps in the purchase order processing cycle. A typical purchase order cycle includes purchase order entry, printing and communicating the order, and receiving goods or services.
The appropriate line types, document types, and order activity rules should be set up to support transfer, direct ship, and combination orders for configured items. You must also ensure that the JD Edwards EnterpriseOne Sales Order Management system is set up so that the interface exists with the JD Edwards EnterpriseOne Procurement system to support these order types.
4.2.6 JD Edwards EnterpriseOne Work Orders and JD Edwards EnterpriseOne Configurator
The JD Edwards EnterpriseOne Work Order Management system controls the processing of work orders. The JD Edwards EnterpriseOne Configurator system works with the JD Edwards EnterpriseOne Work Order Management system to adapt the way that you enter and process work orders for configured items.
Before you can enter work orders for configured items, you must enter business-specific information in the work order programs within the JD Edwards EnterpriseOne Manufacturing system.
The JD Edwards EnterpriseOne Work Order Management system is specifically designed to handle small, short-term tasks that are part of a major project. It is also designed for quick setup, simple cost accounting, and basic scheduling for projects that can be completed quickly.
Generating a work order is the activity that starts the process of completing a task. The work order identifies the work that needs to be done, and the information that is collected captures the history of the work that is performed.
The system enables you to enter work orders for configured items directly through the work order entry process. This process enables you to generate work orders for configured items that you might want to prebuild or stock in inventory to better meet the demands of the business.
To enter work orders for configured items, the Manufacturing Work Order Processing program (P48013) and processing options must be set up appropriately.
After the work orders are created, they move through the JD Edwards EnterpriseOne Shop Floor Management system by way of Order Processing (R31410) and other shop floor programs as dictated by the business processes. Thus, you must ensure that the JD Edwards EnterpriseOne Shop Floor Management system is set up.
The system also enables you to generate work order headers at the time of sales order entry. You must ensure that the JD Edwards EnterpriseOne Sales Order Management system is set up so that the interface can support the order types in the JD Edwards EnterpriseOne Work Order Management and JD Edwards EnterpriseOne Shop Floor Management systems.
4.2.7 JD Edwards EnterpriseOne Engineer to Order and JD Edwards EnterpriseOne Configurator
The JD Edwards EnterpriseOne Engineer to Order (ETO) system controls all aspects of project management, primarily in an engineer-to-order (ETO) environment. The JD Edwards EnterpriseOne Configurator system works with the ETO system to adapt the way that you enter and process various order types for configured items which are part of a project.
The JD Edwards EnterpriseOne ETO system supports sales orders, purchase orders, and work orders for configured items.
You must ensure that the appropriate systems (such as JD Edwards EnterpriseOne Sales Order Management, JD Edwards EnterpriseOne Procurement, and JD Edwards EnterpriseOne Work Order Management) are set up for integration with JD Edwards EnterpriseOne ETO and JD Edwards EnterpriseOne Configurator.
4.3 Understanding Configured Item Pricing on a Sales Order
The first step in pricing configured items is to set the Kit/Configurator Pricing Method field on the Item Master Revisions form. The kit/configurator pricing method is used to specify how the system determines the sales price of a kit or configured item. The price method code determines whether to price components or parent items.
This table describes the types of method codes that are used:
| Method | Description |
|---|---|
| Kit/Configurator Pricing Method 1 | The system totals the list prices of components to determine the price of the configured item. All of the component prices from the Item Base Price File table (F4106) are added to calculate the configured item price. The price of the configured item can then be discounted. The system also checks for any X assembly inclusion rules. Any existing X rules are added to the price of the configured item. The X rules could be used for price add-ons, such as shipping or freight charges. |
| Kit/Configurator Pricing Method 2 | The system retrieves the price of the configured item from table F4106. This price is the price of the configured item on the sales order and cannot be discounted. The system also checks for any X assembly inclusion rules. Any existing X rules are added to the price of the configured item. The X rules could be used for price add-ons, such as shipping or freight charges. |
| Kit/Configurator Pricing Method 3 | The X assembly inclusion rules are the only source of pricing for the configured item. You can pull the base price into the configuration by using the Derived Calculation field in the assembly inclusion rule. The Derived Calculation field should be populated with & BPUPRC to pull in the base price from the F4106 table. Any other X rules are added to the price of the configured item. These X rules could be used for price add-ons, such as shipping or freight charges. |
| Kit/Configurator Pricing Method 4 | The system uses the sum of the components' discounted prices for the price of the configured item. The parent has no discount. Thus, the configured item gets no further discounts. The system also checks for any X assembly inclusion rules. Any existing X rules are added to the price of the configured item. The X rules could be used for price add-ons, such as shipping or freight charges. |
|
Note: If the Item Base Price table (F4106) is used for pricing the configured item and the X assembly inclusion rule contains & BPUPRC in the Derived Calculation field to pull the base price, the price is doubled on the order. If table F4106 is used to pull the base price, the X assembly inclusion rules should be used only for other price adjustments, such as shipping or freight charges. |
After you define the Kit/Configurator Pricing Method on the Item Master Revisions form, you must define base prices for the components and the configured item in the F4106 table. The system uses the base price to price the item. If you define special pricing or discounts for the item, the system bases the calculation of the discounted price on the base price.
Use base pricing to define prices for:
-
An item or group of items.
-
A specific time period.
-
Different units of measure.
-
Different currencies.
Use pricing groups to group items or customers with similar characteristics. This method streamlines the processes of entering and maintaining base prices.
JD Edwards EnterpriseOne Advanced Pricing can also be used with any price method code. JD Edwards EnterpriseOne Advanced Pricing supports placing a new line item on the sales order, such as a line item for free goods.
You can use price adjustment, or X assembly inclusion rules, to affect the price for the configured item, regardless of the price method that you selected. X rules work with base and advanced pricing as well.
4.4 Understanding Configured Item Costing on a Purchase Order
The first step in costing configured items for purchase orders is to set the Configurator Costing Method field on the Item Master Revisions form. The configurator costing method is used to specify how the system determines the cost of a configured item. The cost method code determines whether to cost components or parent items.
This table describes the types of method codes that are used:
| Method | Description |
|---|---|
| Configurator Costing Method 1 | The system accumulates the base costs of the components with the configured cost adjustments, and then discounts the total. |
| Configurator Costing Method 2 | The system accumulates the base cost of the parent item with the configured cost adjustments, and then discounts the total. |
| Configurator Costing Method 3 | The system accumulates the configured cost adjustments, and then discounts the total. |
| Configurator Costing Method 4 | The system accumulates the individually discounted costs of the components with the configured cost adjustments. |
After you define the Configurator Costing Method on the Item Master Revisions form, you must define costs for the components and the configured item in the Item Cost File table (F4105). The system uses the base cost to cost the item. If you define special cost adjustments or discounts for the item, the system bases the calculation of the discounted cost on the base cost.
Additionally, JD Edwards EnterpriseOne Advanced Pricing can also be used with any cost method code. However, no general ledger entries are created.
You can use cost adjustment, or X assembly inclusion rules, to affect the cost for the configured item, regardless of the cost method that you selected. X rules work with base and advanced pricing as well.
4.5 Understanding Configured Item Pricing and Costing Using Based-on Effectivity Dates
You define price and cost information for configured items and components of configured items during item setup. Assembly inclusion rules for price and cost, X rules, further define price and cost adjustments at order entry time. The validation of X rules is based on a user-defined date which is also called the based-on date. The based-on date is defined separately for the sales orders, purchase orders, and work orders of a configured item.
The based-on date codes are setup at the item level on the Configured Item Information form (W3291A). Configured item information must exist before an order is entered for a configured item. The based-on date setting of the parent configured item is inherited by the child configured items.
The following table illustrates the selections for X rule based-on dates:
| Based-on Date | Sales Order | Purchase Order | Work Order |
|---|---|---|---|
| Requested Date (Default) | X | X | X |
| Transaction/Order Date | X | X | X |
| Scheduled Pick Date | X | ||
| Price Effective Date | X | X | |
| System Date | X | X | X |
| Promised Delivery Date | X | ||
| Original Promised Date | X | ||
| Planned Effective Date | X | ||
| Start Date | X |
During assembly inclusion rule setup, effective from and through dates are entered for each rule. The effective from and through dates are then used in conjunction with the based-on date set up on the Configured Item Information form to determine which rules are valid at order entry. All X rules that are effective are applied to the order to calculate price and cost.
For example, a configured item is setup to use the order date as the sales order based-on date and requested date as the work order based-on date. If a sales order is entered for the item on August 15th, with a requested date of October 15th, the system searches for X assembly inclusion rules that are effective on August 15th. Valid X rules apply price adjustments to the sales order. If a work order is entered for the configured item, October 15th is used to validate X rules and apply cost adjustments to the work order
The based-on effectivity date functionality in the JD Edwards EnterpriseOne Configurator system is similar to the functionality in JD Edwards EnterpriseOne Advanced Pricing. JD Edwards EnterpriseOne Advanced Pricing enables the user to specify one or many dates, such as order and required, to use to include price adjustments. The based-on date code of Price Effective Date is used to sync with JD Edwards EnterpriseOne Advanced Pricing so that the system uses the same date as JD Edwards EnterpriseOne Advanced Pricing when validating X rules. This applies to both sales and purchase orders.
See Defining Configured Item Information.
See Understanding Configured Item Price and Cost Adjustments Using Based-on Effectivity Dates.
4.6 Understanding Rules Processing
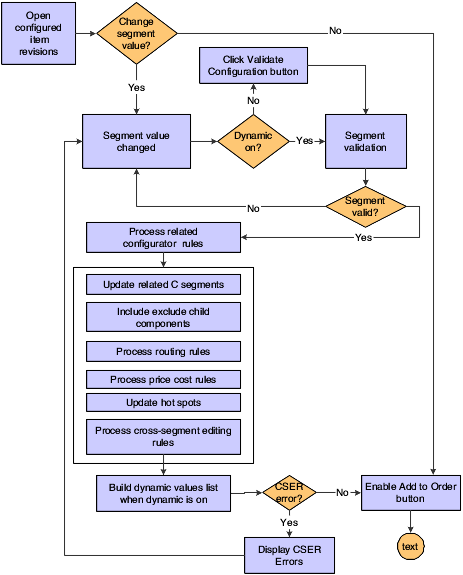
When entering an order for a configured item, the Sales Order Entry (P4210), Purchase Order Entry (P4310), and Manufacturing Work Order Processing (P48013) programs call the Configured Item Revisions program (P3210). The Configure Item form (W3210B) of the Configured Item Revisions program is used to configure an item and perform rules processing.
During order entry, rules for configured items can be processed dynamically or you can select to use the validate configuration feature. The system uses the validate configuration feature for non-dynamic and single pass rules processing (Release 9.1 Update). Non-dynamic, dynamic, and single pass rules processing is enabled or disabled at the item level on the Configured Item Information form (W3291A) (Release 9.1 Update). Child-configured items inherit the rules processing setting of the parent-configured item (Release 9.1 Update).
Regardless of whether non-dynamic or dynamic configuration is enabled, the system processes only the rules associated with a changed segment (Release 9.1 Update). Each time a segment answer is changed and is valid; all of the configuration rules that reference the segment are marked for processing. The rules are then processed based on the setting in the Rules Processing option (Release 9.1 Update).
When dynamic configuration entry is enabled, the system dynamically validates the item configuration as the order is entered. Any time that a segment answer is changed, the entire configuration reflects the impact of the new value. When a segment answer is changed, all allowed values for other segments are updated to include only valid values based on the processed cross-segment editing rules. If there are no valid values left for a segment after the cross-segment editing rules are processed, then the system removes the segment from the configuration.
The processed assembly inclusion rules update components, price adjustments, cost adjustments, and hot spots.
Dynamic configuration entry provides immediate feedback as the product is configured and lessens the possibility of selecting invalid segment values. The configuration is in a state that can immediately be committed to an order.
When non-dynamic configuration entry is enabled, the Validate Configuration button appears on the Configure Item form (Release 9.1 Update). To enter an order for a configured item, you enter values for segments and click the Validate Configuration button. The system validates the item configuration by processing the rules associated with the changed segments.
Single pass processing provides an alternative method to non-dynamic and dynamic configuration for configurator rules processing. Single pass processing may be used as a migration path when upgrading complex rule sets from a release prior to JD Edwards EnterpriseOne 9.0. (Release 9.1 Update)
|
Note: Single pass processing is not intended to be a permanent solution for recursive assembly inclusion rule setup. Single pass processing may be used in the short term when the size and complexity of rules makes revision of assembly inclusion rules prohibitive when upgrading to JD Edwards EnterpriseOne release 9.0 or later. However, you should evaluate assembly inclusion rules and revise them so that you can realize the advantages of dynamic configurator. (Release 9.1 Update) |
When single pass processing is enabled, the system processes all rules when you change any segment and click the Validate Configuration button. The system processes all assembly inclusion rules and cross-segment editing rules only once in top down order. The segment value is set based on the last valid rule that is processed. (Release 9.1 Update)
|
Note: Single pass processing may produce different results from either non-dynamic or dynamic rules processing when configuring an item depending upon assembly inclusion rule setup. (Release 9.1 Update) |
Using the Validate Configuration button with non-dynamic or single pass rules processing provides visibility to cross-segment editing rule error messages (Release 9.1 Update). Viewing the error messages gives you the opportunity to learn the configuration of the configured item. You can also provide an explanation to the consumer as to why their segment selections do not generate a valid configuration.
You click the Add to Order button to accept the configuration if there are no cross-segment editing rule errors.
You enter an order for a configured item once the Configured Item form is rendered and the grid is loaded. As you enter an order, the system verifies JD Edwards EnterpriseOne Configurator processes level by level in this order:
-
Change segment values or click the Add to Order button to accept all default values.
If non-dynamic or dynamic rules processing is enabled, each time a segment answer is changed and is valid; all of the configuration rules that reference the segment are marked for processing. The rules are then processed based on the dynamic configuration entry setting. (Release 9.1 Update)
If single pass processing is enabled, the system marks all segments as changed and marks all assembly inclusion and cross-segment editing rules for processing. The system processes all rules only once in top down order. (Release 9.1 Update)
-
Validate segment agreement.
System processing includes user-defined code (UDC) validation, range checking, alpha versus numeric checking, length checking, and required versus optional checking.
-
Process assembly inclusion rules.
For non-dynamic and dynamic, the system processes rules related to changed segments only. For single pass, the system processes rules for all segments. (Release 9.1 Update)
-
Process C assembly inclusion rules and update C segments.
The system processes C rules first because the calculated segment answer might be required to validate the configuration. The calculated segment answer might also be needed to perform additional calculations for the configured item.
-
Process P assembly inclusion rules.
-
Process Q assembly inclusion rules.
The system processes Q assembly inclusion rules and stores the components in the Configurator Component table (F3215). The components are used by Sales Quotes (P4210) to establish cost and Order Processing (R31410) to create the parts list and establish cost.
-
Process R assembly inclusion rules.
The system processes R assembly inclusion rules and stores the routings in the Configurator Routings table (F3212). The routings are used by Sales Quotes (P4210) to establish cost and Order Processing (R31410) to create the routing and establish cost.
-
Process X assembly inclusion rules.
-
Process H assembly inclusion rules.
-
-
Process cross-segment editing rules.
For non-dynamic and dynamic, the system processes rules related to changed segments only. For single pass, the system processes rules for all segments. (Release 9.1 Update)
If dynamic configuration entry is disabled, the system displays any error messages.
If dynamic configuration entry is enabled, the system:
-
Updates all allowed values for other segments to include only valid values.
-
Sets the valid value if there is only one allowed valid value for a segment.
-
Removes the segment from the configuration if there are no valid values left for a segment.
See Cross-Segment Editing Rules Editing Process for Dynamic Configuration.
-
-
Enable the Add to Order button if no cross-segment editing errors occurred.
-
Click the Add to Order button.
The following diagram illustrates rules processing:
|
Note: The JD Edwards EnterpriseOne Configurator system supports upward and downward referencing within cross-segment editing and assembly inclusion rules for non-dynamic and dynamic rules processing. Upward and downward referencing for non-dynamic and dynamic rules processing has no limitations.The JD Edwards EnterpriseOne Configurator system supports upward referencing only within cross-segment editing and assembly inclusion rules for single pass rules processing. Single pass rules processing does not support downward referencing. Upward referencing for single pass rules processing has no limitations. (Release 9.1 Update) |
4.6.1 Work Order Processing
All components from both P and Q assembly inclusion rules are stored in the F3215 table. The routings, output of the R assembly inclusion rules, are stored in the F3212 table. When the Order Processing program (R31410) runs, the parts list and routing are retrieved from the F3215 and F3212 tables and passed back to the Parts List master business function (MBF) and the Routings MBF. Thus, the R31410 does not process configured item rules.
4.6.2 Error States
When entering orders for configured items, a few circumstances can cause the Configured Item Revisions program (P3210) to display errors.
First, when a segment is not attached to a UDC table, you are able to free-form type into the segment answer field. If a range of values is assigned to that segment, then a violation creates an error.
Second, again assuming that a segment is not attached to a UDC, a cross-segment editing rule can be created that generates an error when violated.
Finally, although perhaps the first to be encountered, multiple errors can be present when first entering the Configured Item Revisions program if the default segment values create an error state.
To minimize error states, attach UDCs to segments when possible. Also, review the default segment answers for a configured item to ensure that the default values represent a valid configuration.
When setting up a configured item, you can design the segment questions in such a way as to avoid errors. For instance, ask the most important questions first. Thus the consumer will not have visibility to choices that make the configuration invalid. For example, the first question should be whether the consumer wants a car or truck and not the color of the vehicle.
You can also use warning messages. Warning messages provide information regarding a choice that may or may not work in the configuration. The system does not remove the selected value, but the warning gives the user the opportunity to make a different selection.
4.7 Understanding Boolean Logic
Boolean logic is based on the binary number system, so it uses the bit system of 1 or 0 (true or false). Boolean logic uses statements that are written in an algebraic format to derive deductions using algebraic operations. The statements define the relationships between sets of ideas or objects. Boolean statements produce precision and control. The logic uses English words to make the statements more intuitive. However, it is not always simple or easy.
Boolean logic uses words that are called operators to determine whether the value of a statement is either true or false. Boolean operators are conjunctions that are used with terms and phrases to create precise conditional statements. Although the most common operators are AND and OR, different systems use various symbols for the Boolean logic operators.
4.7.1 Nesting
Nesting is the method of combining Boolean operators in a logical order when more than one Boolean operator is used in a statement. Parentheses are used to effectively sequence the operators and group variables. The parentheses offer substantial control in limiting and ordering the relationship between the variables.
|
Note: Complex nesting requires additional processing time. |
When writing a nested Boolean logic statement using the operator OR, you must enclose the terms in parentheses. For example:
(Gas or Propane) and (08 or 10)
4.7.2 Conditional Logic
In its simplest form, a conditional statement is an IF-THEN statement and consists of two parts:
-
Hypothesis: The hypothesis is preceded by an IF.
-
Conclusion: The conclusion can be preceded by a THEN.
The IF-THEN statement is typically formatted like this:
IF condition, THEN statement.
IF is the beginning of the IF-THEN statement, and THEN identifies what actions should be taken if the condition in the IF statement is met. For example:
If the power type is not propane, then no propane tank should be selected.
4.7.3 Multiple Variables
If you use nesting, the condition and statement portions of the IF-THEN statement can be compound (several variables). For example:
If the forklift rating is 6000 pounds and the power type is propane, then the propane tank must be 50 pounds.
4.7.4 Conditional Statement with Else
The IF-THEN-ELSE statement is also used. The ELSE portion of the statement identifies what actions should be taken if the condition in the IF statement is not met.
The IF-THEN-ELSE statement is typically formatted like this:
IF condition, THEN statement (ELSE statement).
For example:
If the paint color is standard, then select part number S-200 or else select part number C-100.
4.8 Understanding Duplicate Components
You can add multiple instances of a configured component item to a configured parent item. Each new instance of the component can be configured uniquely or be an exact copy of an instance of the component that you previously configured. You can use a single part number to represent the various configurations of a component item, thus reducing the number of part numbers that you must manage.
To include multiple instances of a configured component item in a parent item, you add the appropriate P-type assembly inclusion rules to the parent item. You can include multiple instances of the configured component item within the configured parent item with unconditional or conditional rules.
Whether multiple instances of the configured component item are included as part of the default configuration (using unconditional rules) or as part of a subsequent configuration (using conditional rules), each instance can be configured differently, but have the same part number. Using a single part number enables you to set up all of the associated segments, assembly inclusion rules, and cross-segment editing rules for a single item, and then create various configurations for that item.
Currently, you can refer to an upper-level configured item in cross-segment editing rules, assembly inclusion rules, and derived calculations. The JD Edwards EnterpriseOne Configurator system correctly processes the rules, based on the upper-level configured item segment selection. With the introduction of duplicate components, referring to an upper-level duplicate configured item adds complexity.
The Configured Item Alias field on the cross-segment editing and assembly inclusion rule forms provides the ability to reference a specific occurrence of an included item. This is not a required field. The Configured Item Alias field is for use with duplicate components. If you do not use this field with duplicate components then the system processes duplicate components based on system logic.
|
Important: You should use the Configured Item Alias field to ensure that the correct duplicate item is used in a configuration. |
A configured item alias may be assigned to an item using an assembly inclusion rule. The system verifies that the configured item alias has not been assigned to another item in the assembly inclusion rules. This prevents two components on any rule from being assigned the same configured item alias.
Once the configured item alias is assigned in an assembly inclusion rule, then the Configured Item Alias Left and Configured Item Alias Right fields in the cross-segment editing and assembly inclusion rules can be set to reference a configured item alias. The system verifies that the configured item alias is assigned to the item in the rule.
4.8.1 Example: Duplicate Components
The cabinet can be configured with two or three drawers, depending on the height of the cabinet:
-
* body (unconditionally add a configurable cabinet body to the configuration).
-
* drawer (unconditionally add a configurable drawer to the configuration).
-
* drawer (unconditionally add a configurable drawer to the configuration).
-
I height = 36 * drawer (if the height of the cabinet is 36 inches, add a third configurable drawer to the configuration).
Each instance of the drawer in this example can be configured differently, but all have the same part number.
4.9 Understanding Media Object Attachments for Configured Items
You can attach media objects to configured Item Master records, segments, and UDCs to use within the JD Edwards EnterpriseOne Configurator system. This feature of the system enables you to include a visual cue of configured items, configured item segments, and UDC values, which can be used for segment answers within order entry. Media objects can be photos, graphics, files, or text documents, including information that might initially exist on a paper document.
|
Note: The media object is attached to the Item Master through the Internal Attachment option on the Row menu, not to the Item Branch/Plant. |
The media objects that you define appear on the Configure Item form at order entry. As you select a configured item from the Item Filter option, the media object displays the image from the Item Master for the related configured item number. The segment or segment-answer user-defined code displays the media object when a row is selected.
The display of media objects at order entry is controlled by the processing options for the Configured Item Revisions program (P3210). The Media Object Display processing option controls whether an attached media object appears on the form during order entry. The Media Object Display Order processing option specifies the order in which media objects appear on the form if more than one media object type is attached to a configured item, configured segment, or UDC segment value.
4.10 Setting Up Configurator Constants
This section provides an overview of configurator constants and discusses how to define configurator constants.
4.10.1 Understanding Configurator Constants
Use configurator constants to control JD Edwards EnterpriseOne Configurator system processing for the branch/plants. For each branch/plant, you can:
-
Define the configured segment (string) delimiter.
-
Define whether the calculated segments appear during order entry.
-
Indicate the configurator error character.
-
Verify parent availability during sales order entry.
-
Determine whether the sales quote cost will include manufacturing labor and overhead.
-
Define which stocked line type to use if the system finds a matching configuration in stock during sales order entry.
-
Indicate sales quote document types.
The system stores configurator constants in the Configurator Constants table (F3209).
4.10.1.1 Sales Quotes
For a sales quote, you set the sales quote document type in the Configurator Constants. The sales quote document type prevents the system from generating the associated work orders if the item has a W line type. Typically, you do not perform all processing for a sales quote. Work order generation occurs when the quote is converted a sales order.
The system costs configured sales quotes at the time of sales order entry. At the time of order entry, the system writes Q rule components to the Configurator Component table (F3215) and R rules to the Configurator Routings File table (F3212). The system uses the P, Q, R, and X rules to calculate a cost for the sales quote.
4.10.2 Form Used to Set Up Configurator Constants
4.10.3 Defining Configurator Constants
Access the Configurator Constants Revision form.
Figure 4-2 Configurator Constants Revision form
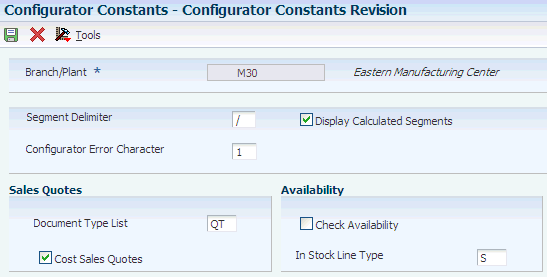
Description of ''Figure 4-2 Configurator Constants Revision form''
You define configurator constants by branch/plant.
- Segment Delimiter
-
Enter a character separator that you use with configured items during order entry. This character must be the same for each branch/plant. The default character is /.
Although you can specify a different character, you should not use an asterisk (*) and you should not change the value of this character after you specify it.
For the segment delimiter, use a character that could never appear within an answer to a segment question.
- Configurator Error Character
-
Enter a code that indicates an error in the calculation, for example !. This code is a single character value. The default value is 1.
- Display Calculated Segments
-
Enter a setting that indicates whether the system displays calculated segments during order entry. Values are:
0: Does not display calculated segments when you enter an order; however, it stores the value of the segment in history. When you enter a multilevel configured item, the system does not display levels that have only calculated segments. The default value is 0.
1: Displays calculated segments.
- Document Type List
-
Enter the document type from the Quote Document Type List UDC (32/QL) that is used to define valid document types for sales quotes. For example, you could define sales quote document types by branch/plant or by type of quote, such as corporate or seasonal quotes.
- Cost Sales Quotes
-
Specify which costs accumulate when the order type matches one of the sales quote document types. If you select this option, the Order Processing program (R31410) calculates the cost of the configured item based on the P, Q, R, and X (cost) assembly inclusion rules. If you clear this check box, the program calculates the cost based only on the P and X assembly inclusion rules.
- Check Availability
-
Enter a code that specifies whether the system verifies that a configured parent item is in stock during sales order entry. The default value is 1.
The system searches inventory for a configuration that matches the parent item during sales order update. If the system locates more than one item, a form displays all matching locations, lots, and their available quantities. From this form, you can select an item to hard-commit during the update. If the system locates only one item, the item is hard-committed to inventory during the update.
The check availability feature might negatively affect system performance.
Note:
Checking the availability of the configured parent item only works for sales order entry. - In Stock Line Type
-
Enter a code that controls how the system processes lines in a transaction. This field controls the systems with which the transaction interacts, such as Oracle's JD Edwards EnterpriseOne General Ledger, Oracle's JD Edwards EnterpriseOne Job Cost, Oracle's JD Edwards EnterpriseOne Accounts Payable, Oracle's JD Edwards EnterpriseOne Accounts Receivable, and JD Edwards EnterpriseOne Inventory Management. It also specifies the conditions under which a line prints on reports, and it is included in calculations. Values are:
S: Stock item
J: Job cost
N: Nonstock item
F: Freight
T: Text information
M: Miscellaneous charges and credits
W: Work order
4.11 Setting Up Configured Item Segments
This section provides overviews of configured item information, configured item segments, and common attributes, lists prerequisites, and discusses how to:
-
Define configured item information.
-
Define a configured item segment.
-
Define configured item segment detail.
-
Set up user-defined segment values.
-
Copy configured items.
-
Locate configured item segment information.
-
Print configured items.
4.11.1 Understanding Configured Item Information
To begin using the JD Edwards EnterpriseOne Configurator system, you must define configured item information and the segments of each configured item.
On the Configured Item Information form, you:
-
Define the format in which configured item information appears on order paperwork.
-
Define the X assembly inclusion rule based-on dates for sales orders, purchase orders, and work orders.
-
Activate dynamic configuration entry.
Configured item information is setup at the item level and stored in the Configured Item Information (F3290) table.
Configured item information must exist before an order is entered for a configured item. If no configured item information is set up for a new configured item, the system generates the information with default values when you define configured item segments in the Configured Item Segments Revision form (W3291L) for the item for the first time. The system sets the based-on date default values for sales orders, purchase orders, and work orders to the requested date.
You can copy configured item information from one configured item to another. When copying configured item information from one item to another, the system copies configured item information from the original (copy-from) item branch to the destination (copy-to) item branch only if a configured item information record does not exist for the destination item branch. If the record already exists for the destination item, then the system does not perform the copy. If the information does not exist for the original item, then the system issues an error.
If you run the Table Conversion for F3290/F3291 program (R893291), the conversion sets the X rule based-on dates to the requested date and disables dynamic configuration entry.
4.11.2 Understanding Configured Item Segments
Segments are the features and options of a configured item. Both cross-segment editing rules and assembly inclusion rules use segments within logic statements. Segments represent product characteristics such as color, material, and size. Segments define the choices that are available within a specific feature or option by using UDCs, ranges of values, or calculations. For clarification purposes, you assign numbers to each segment of the configured item. Information from the Display Order field determines the order in which you specify the segment value during order entry.
When adding new segments to a configured item, enter them at the end of the list of existing segments. This process keeps the configuration information in order, which is important if you will be using the Check Availability functionality.
You assign segments for a configured item in a numeric sequence.
Item 6000 (forklift) contains these segments:
-
10 Forklift Rating
-
20 Power Type
-
30 Boom Height
-
35 Interior
-
40 Paint
-
50 Propane Tank
-
60 Calculated Counterweight
-
65 Additional fork (spare)
You can define three types of segments:
-
Required: During order entry, you must provide this required information. The system performs edit checking against a UDC table of values, a range of values, or numeric validation.
-
Optional: During order entry, this information is optional. The system performs edit checking against a UDC table of values, a range of values, or numeric validation.
-
Calculated: During order entry, the system calculates the value for this segment. You define the calculation with a C (calculation) assembly inclusion rule. Calculated segments do not need a UDC or range of values defined. Calculated segments can be numeric or alphanumeric.
Note:
The segment information for a configured item should be the same across branch/plants to enable transfers to other branches.
During order entry, you can enter a value for each segment. The system restricts this value, using one of these:
-
Numeric or alphabetic checking.
-
Range checking.
-
A UDC table that contains all values.
You can define multilevel configured items with no limit on the number of levels. In addition, no limits exist on the number of segments per level. You use assembly inclusion rules to define item levels and associated work orders.
You use segments to define cross-segment editing rules that ensure valid configurations. During order entry, the system verifies the combination of features and options to ensure that the item can be manufactured. You also use segments to define assembly inclusion rules that determine configuration-specific prices, components, calculated values, and routing steps.
|
Note: The segments can be set up so that a value from a C (calculated) assembly inclusion rule populates the answer field for a non-C segment (a required or optional segment). |
4.11.3 Understanding Common Attributes
A common attribute in the JD Edwards EnterpriseOne Configurator system is a trait or characteristic that is shared by several segments in a configured item. You can set up and define a common attribute in Common Attributes UDC table (32/CA). You then attach the common attribute to a particular segment using the Common Attribute field in Configured Item Segments (P3291).
You enter the value for the common attribute at order entry. When the value is entered in the Attribute Value field on the Configurator Common Attributes form, the value automatically fills the answer field for all of the segments that are associated with that common attribute. This process makes order entry input easier, reduces order entry time, and also reduces potentially costly order entry errors.
4.11.3.1 Example: Common Attributes
The furniture industry often uses common attributes. In a configuration for a sofa, a common attribute might be Color. The Color common attribute is associated with the segments for the sofa frame, bottom sofa cushions, sofa arm covers, and decorative pillows. After the customer picks a color, that value can be entered in the attribute field on the common attribute form. The color is then applied as the answer to all segments that are associated with that particular common attribute.
4.11.4 Prerequisites
Before you enter configured item segments, you must:
-
Verify that the stocking type for a configured item is C (configured).
-
Set the Kit/Configurator Pricing Method on Item Master Revisions.
-
Verify that the manufactured configured components have bills of material.
-
Create routings for the configured item and for the components that are manufactured.
4.11.5 Forms Used to Set Up Configured Item Segments
4.11.6 Defining Configured Item Information
Access the Configured Item Information form.
Figure 4-3 Configured Item Information form (Release 9.1 Update)
Description of ''Figure 4-3 Configured Item Information form (Release 9.1 Update)''
4.11.6.1 Print Related Elements
- Print Components
-
Enter a code that specifies whether the system prints configured item information on the order paperwork. On a sales order, the system prints the pick slip and the invoice. On a work order, the system prints the parts list. Values are:
0: Do not print.
1: Print.
- Text String
-
Enter a code that indicates whether the configured text string format or a user-defined format appears on the sales order (pick slip and invoice print) and work order (print parts list). You define the user-defined format for each segment. You can print the segment number, description, value, or value description in the user-defined format. Values are:
1: Configured text string.
0: User-defined format.
- Display Item
-
Enter a code that indicates whether the system prints the configured item number. If selected, the item number will print before the segment value information either in the text string format or the user-defined format. Values are:
1: Print.
0: Do not print.
4.11.6.2 X Rule Based On Date
- Sales Order Based-on Date
-
Enter a value from UDC 32/SB that specifies the date that the system uses to validate X rules before applying them to the price and cost calculation of a sales order for the configured item. Values are:
Blank: Requested Date
1: Transaction/Order Date
2: Scheduled Pick Date
3: Price Effectivity Date
If you select this value, then the price effective date of the sales order will be used as the X rule based-on date. The price effective date is determined by the JD Edwards EnterpriseOne Sales Order Management system when a sales order is entered, and it could be determined from the pricing constants, preferences, or manual entry.
The price effective date is used to sync with JD Edwards EnterpriseOne Advanced Pricing so that the system uses the same date as JD Edwards EnterpriseOne Advanced Pricing when validating X rules.
4: System Date
- Purchase Order Based-on Date
-
Enter a value from UDC 32/PB that specifies the date that the system uses to validate X rules before applying them to the price and cost calculation of a purchase order for the configured item. Values are:
Blank: Requested Date
1: Transaction Date
2: Promised Delivery Date
3: Original Promised Date
4: Price Effective Date
If you select this value, then the price effective date of the purchase order will be used as the X rule based-on date. The price effective date is determined by the JD Edwards EnterpriseOne Procurement system when a purchase order is entered, and it could be determined from the pricing constants, preferences, or manual entry.
The price effective date is used to sync with JD Edwards EnterpriseOne Advanced Pricing so that the system uses the same date as JD Edwards EnterpriseOne Advanced Pricing when validating X rules.
5: System Date
- Work Order Based-on Date
-
Enter a value from UDC 32/WB that specifies the date that the system uses to validate X rules before applying them to the price and cost calculation of a work order for the configured item. Values are:
Blank: Requested Date
1: Transaction Date
2: Planned Effectivity Date
3: Start Date
4: System Date
|
Note: The based-on date setting of the parent configured item is inherited by the child configured items. |
4.11.6.3 Rules Processing (Release 9.1 Update)
Specify the type of rules processing to use for the configured item.
The UDC 32/RP supports configurator rules processing as the edit rule for data dictionary item DYN.
- Non-Dynamic
-
When you select this option, the system processes rules for segments that are changed and for segments referenced by the changed segment. New values are displayed when you click the Validate Configuration button. Rules are processed iteratively and bi-directionally. Any configured components that are dependent on the segment value are included or excluded. All hot spot values are recalculated. All pricing and costing is recalculated. All segment answers are selectable.
- Dynamic
-
When you select this option, the entire configuration reflects the impact of the new value any time that a segment answer is changed. Rules are processed iteratively and bi-directionally. Any configured components that are dependent on the segment value are included or excluded. All hot spot values are recalculated. All pricing and costing is recalculated. Only valid segment answers are selectable.
- Single Pass
-
When you select this option, the system processes all rules just once and in a top-down manner. New values are displayed when you click the Validate Configuration button. If more than one rule evaluates to TRUE for the same segment, the last rule that evaluates to TRUE determines segment values and which components to include or exclude. All hot spot values are recalculated. All pricing and costing is recalculated. All segment answers are selectable.
Note:
This option is intended to serve as a temporary migration path when upgrading from a previous release until the time at which rule relationships can be properly built to take advantage of dynamic configuration.
4.11.7 Defining a Configured Item Segment
Access the Configured Item Segments Revision form.
Figure 4-4 Configured Item Segments Revision form
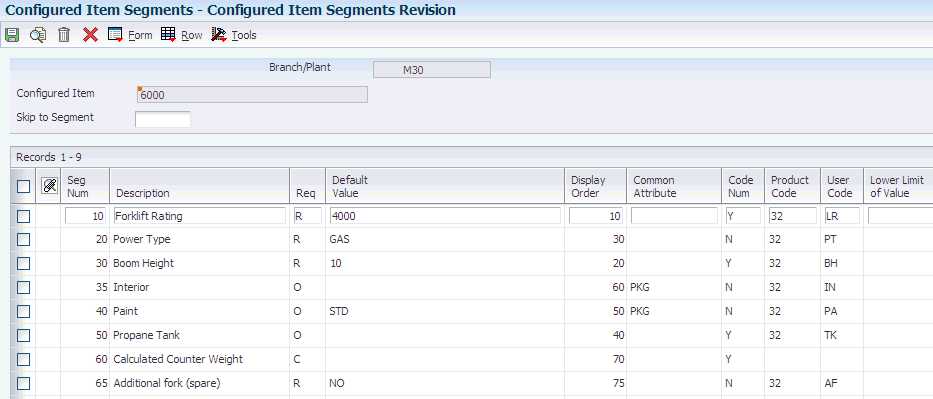
Description of ''Figure 4-4 Configured Item Segments Revision form''
|
Note: You cannot delete a configured item segment if cross-segment editing or assembly inclusion rules exist for that configured item. |
|
Note: When you click OK on the Configured Item Segments Revision form, the system generates the Configured Item Information record for the configured item if the record does not exist. |
- Req (required or optional)
-
Enter a code that specifies whether a segment is required or optional in a configuration, or whether the system must calculate it to specification when you enter an order. Valid codes are:
R: Required.
O: Optional.
C: Calculated. You define the calculation with assembly inclusion rules.
- Default Value
-
Enter an initial value on the data entry screen for the associated data item. Usually, the default values that are set up produce a valid configuration in order entry.
The value that you enter must be the exact same length as the data item size.
Place single quotes around the value if it contains any embedded blanks. The keywords *BLANK and *ZERO can be used as the default value. When you enter a numeric data item with default values, the system suppresses all leading zeros when it redisplays the data item.
Caution:
If a blank entry is allowed, do not use default values. - Display Order
-
Enter a number that establishes the sequence in which the JD Edwards EnterpriseOne Configurator system asks questions about features and options during order entry.
Because new segments should always be entered at the end of the list of existing segments to maintain the integrity of the configuration information, this field is used to reorder the segments that appear on the Configured Item Revisions form at order entry.
- Common Attribute
-
(Optional) Enter a code that specifies a common attribute. A common attribute is a trait or characteristic that is shared by several segments in a configured item. When you enter an attribute value for a common attribute during order entry, the system updates the answer field for all segments that are associated with that common attribute.
- Code Num (code numeric)
-
Enter a value that indicates whether the system edits a segment answer as numeric or alphanumeric during order entry. Values are:
Y: The answer is numeric and should be right-justified.
N: The answer is alphanumeric and should be left-justified.
- Lower Limit of Value
-
Enter the lower allowed value of this specific segment to specify a range of acceptable values. If you enter a value here, then you must also enter an upper allowed value.
- Upper Limit of Value
-
Enter the upper allowed value of this specific segment to specify a range of acceptable values. If you enter a value here, then you must also enter a lower allowed value.
If you define a calculated segment, you do not need to define range checking.
Note:
When using a range of values, the entire range of values from the lower limit to the upper limit is acceptable. You cannot limit the answer to, for instance, even numbers, two decimal places, 1/4 inch, and so on. Any value within the range of values is a valid answer. - D C (derived calculation)
-
(Optional) Specify the number of positions to the right of the decimal that a derived calculation should be rounded.
For example, if the result of a derived calculation is 2190.123456789, enter 0 to round to the whole number 2190.
Enter 4 to round up to 2190.1235.
Leave the Derived Calculation Round field blank to avoid rounding.
The system rounds up by one any digit followed by 5 through 9. The system does not round any digit followed by 0 through 4.
- Save Seg (save segment)
-
Enter a UDC (32/YN) that specifies whether the segment value is significant enough to make the configuration unique. Values are:
0: Not significant.
1: Significant.
If the configuration is unique, you must store the item in a separate location in inventory.
- Updt CC (update category code)
-
(Optional) Enter which work order category code will be populated with the segment value during order entry.
To control the printing of configured item information on sales orders, purchase orders, and work orders, complete these fields.
- SpB Nbr (number of spaces before) and SpA Nbr (number of spaces after)
-
Enter the number of spaces that should print before or after the segment information in the user-defined format.
- Return and Start New Line
-
Enter a UDC (32/YN) that indicates whether the system starts a new line after it prints the segment information. Values are:
1: Start a new line after the segment information.
0: Continue printing on the same line.
If the system does not start a new line, it prints the Configurator segment delimiter from the Configurator constants.
- Print Segment Number, Print Segment Description, Print Segment Value, and Print Segment Value Description
-
Enter a UDC (32/YN) that specifies whether the system prints the segment number, segment description, segment value, or segment value description on the order paperwork. Values are:
0: Do not print.
1: Print.
For a sales order, the system prints the segment number, segment description, segment value, or segment value description on the pick slip and the printed invoice. For a work order, the system prints the segment number, the segment description, the segment value, or the segment value description on the printed parts list.
Note:
You can select the format for displaying configured item text. You can display the system-generated configuration information or use the detail area to create custom text that prints on sales orders, work orders, pick lists, and invoices.
4.11.8 Defining Configured Item Segment Detail
Access the Configured Item Segment Detail form.
Figure 4-5 Configured Item Segment Detail form
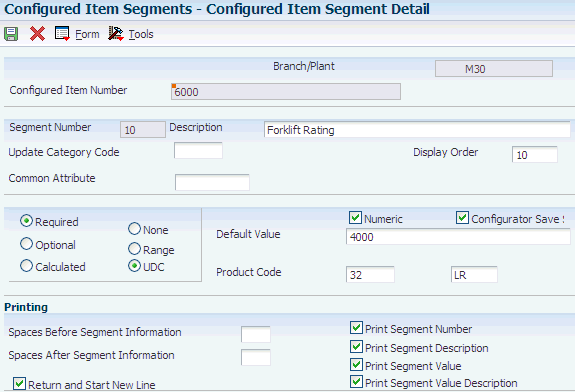
Description of ''Figure 4-5 Configured Item Segment Detail form''
4.11.9 Setting Up User-Defined Segment Values
Access the User Defined Codes form.
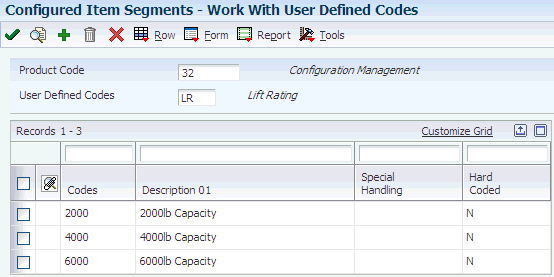
Create a UDC table of segment values for a noncalculated segment. The UDC table that the segment references presents the choices that are available within that particular feature or option.
|
Note: You can use codes 55 through 59 for the UDC types. When you set up custom UDC tables for use with the JD Edwards EnterpriseOne Configurator system, you should use these system codes so that the custom UDCs are not overwritten during a software upgrade. |
|
Note: If you associate a required segment with a UDC table, you must select a value from the table. If you associate an optional segment with a UDC table, do not enter a value or enter a value from the UDC table. |
- Codes
-
Enter the new UDC that you want to add to the UDC table.
- Special Handling
-
Enter a code that indicates special processing requirements for certain UDC values. The value that you enter in this field is unique for each UDC type.
The system uses the special handling code in many ways. For example, special handling codes that are defined for Language Preference specify whether the language is double-byte or does not have uppercase characters. Programming is required to activate this field.
- Hard Coded
-
Enter a code that indicates whether a UDC is hard-coded. Values are:
Y: Hard-coded
N: Not hard-coded
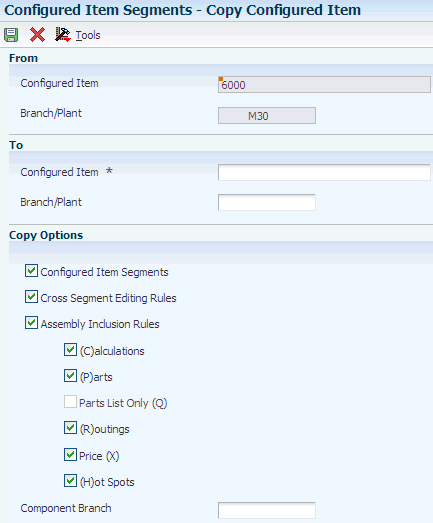
4.11.10 Copying Configured Items
Access the Copy Configured Item form.
|
Note: When you copy a configured item, you can copy any attribute from the original item. However, you cannot copy from one rule type to another. For example, if the original item was set up with a P assembly inclusion rule, you cannot copy it to a Q assembly inclusion rule. |
4.11.10.1 Copy Options
- Configured Item Information, Configured Item Segments, Cross Segment Editing Rules, Assembly Inclusion Rules, (C)alculations, (P)arts, Parts List Only (Q), (R)outings, Price (X), and (H)ot Spots
-
Select attributes in the Copy Options group box to copy the attribute information from the original configured item (in the From group box) to the new configured item (in the To group box). You can copy only the attributes that exist on the configured item that is being copied.
- Component Branch
-
Enter a secondary or lower-level business unit. The system uses the value that you enter to indicate that a branch or plant contains several subordinate departments or jobs. For example, assume that the component branch is named MMCU.
The structure of MMCU might be:
Branch/Plant - (MMCU)
Dept A - (MCU)
Dept B - (MCU)
Job 123 - (MCU)
When the Component Branch field is used while copying a configured item, the system populates every line in the assembly inclusion rules with the specific branch/plant noted in the Component Branch field. Since segments have no branch/plant field, the copied segments are not affected. The specified component branch will be reflected in ALL lines, so any changes to the branch/plant must be made manually if all the components are not expected to come from the specified branch/plant. If a copy is made from one branch/plant (for example, M30 to M10) without specifying a component branch, the system populates the Copy from branch/plant on all the new assembly inclusion rule records.
The specified component branch is only copied to those rules where the rule branch and the component branch are the same. For rules for which the component branch and the rule branch are different, the difference is maintained.
For example, the rules for item 6000 are in branch M30 and the component branch for each item in the rules is also M30. If item 6000 is copied to item M40, then the component branch for all rules is copied to M40 because the rule branch and the component branch for item 6000 are both M30.
If a component of item 6000 is transferred from branch M10 to branch M30, then the rule branch and component branch do not match. Thus, when item 6000 in branch M30 is copied to branch M40, all rules with a matching branch of M30 will be copied to M40. The component rule with a branch of M10 will be copied, but the branch will remain M10 and will not change to M40. This functionality preserves the transfer information set up in the rules. If required, the rule can be changed manually.
To create an order, items must exist in the branch/plant master of the specified component. For instance, you must have M10 records for each component being ordered from the specified order process.
If you create a branch/plant that is different than the demand branch/plant, nothing will populate after running the Multi-Facility MRP Generation program (R3483). You must create the appropriate branch relationships for each item that will be provided from another branch/plant using the Branch Relationships Revisions program (P3403T). Simply adding the designator to the Component Branch field does not drive the planning system.
The Component Branch field allows the user to copy assembly inclusion rule records to any branch/plant, but they will not actually be planned appropriately across branches unless the appropriate multifacility planning relationships are also set up and the Multi-Facility Generation program is run.
A configured item cannot be planned across branch/plants, but the components of the configured item can be planned as supply from various branch/plants.
Configured items can be planned across branch/plants using ST/OT functionality.
4.11.11 Locating Configured Item Segment Information
Access the Segment UDC Where Used form.
For the UDC table that you specify, you can locate all configured items and segments that reference the table. This capability is useful for reviewing the effect of table changes on configured items.
4.11.12 Printing Configured Items
Select Print Segments from the Form menu on the Configured Item Segments Revision form.
Print a hard copy of the configured item segments. Use the hard copy to verify the accuracy of the configured item segment setup.
|
Note: On the Work with Batch Versions form, copy the version XJDE0001 that is delivered with the software to create another version of the program that you can modify. |
4.12 Setting Up Cross-Segment Editing Rules
This section provides overviews of cross-segment editing rule logic and error messages and discusses how to:
-
Define a cross-segment logic statement.
-
Define values for cross-segment logic statements.
-
Define ranges for cross-segment logic statements.
-
Copy a cross-segment editing rule.
-
Set up custom error messages.
-
Review cross-segment editing information.
-
Print cross-segment editing rules.
4.12.1 Understanding Cross-Segment Editing Rule Logic
The JD Edwards EnterpriseOne Configurator system uses cross-segment editing rules (CSERs) to ensure feature and option compatibility during order entry. These rules establish the relationships among the configured item segments with Boolean logic statements. During order entry, the cross-segment editing rules validate that the feature and option values that you select create a valid product configuration. This validation enables you to avoid invalid combinations of segments and prevent invalid orders. Error messages about invalid configurations appear based on segment information from the order and cross-segment editing rules.
For each cross-segment editing rule, you can define an if/then/else logic statement for many conditions. For example, a forklift might require a different value for segment 30 (boom height), depending on the value of segment 10 (lift rating). This cross-segment editing rule illustrates this situation:
If segment 10 equals 6000, then segment 30 must equal 12, else segment 30 must be less than or equal to 10.
See Understanding Boolean Logic.
Each phrase of the conditional logic statement is a separate record (written on a separate line).
The system automatically separates rules by highlighting them with different colors.
The system automatically assigns a rule number that is based on the order in which each rule is entered into the system. The rule number is the order in which the rules will be processed at order entry. You can change the rule number when setting up cross-segment editing rules by using the Insert Before and Insert After options on the Row menu on the Work with Cross Segment Editing Rules form.
The system automatically assigns a sequence number to each line within a rule, based on the order in which each line of each rule is entered into the system. The sequence number is the order in which each line within a rule will be processed during rules processing. You can change the sequence number by using the Insert Before and Insert After options on the Row menu on the Cross Segment Edit Group Revision form.
The system enables you to perform multi-level referencing for non-dynamic and dynamic rules processing (Release 9.1 Update). You can perform upward and downward referencing to access values from segments on various levels of the configured item.
The system supports upward referencing only within cross-segment editing rules for single pass rules processing. Single pass rules processing does not support downward referencing. Upward referencing for single pass rules processing has no limitations. (Release 9.1 Update)
The system also enables you to perform segment to segment comparisons. For example, if segment 10 is greater than segment 20. You can perform comparison across levels as well. For example, if segment 10 (of item 6000 in branch/plant M30) is greater than segment 20 (of item 6100 in branch/plant M30).
You use the Segment Item Left, Segment Branch Left, Configured Item Alias Left, Segment Item Right, Segment Branch Right, and Configured Item Alias Right fields in cross-segment editing rules.
A configured item alias may be assigned to an item using an assembly inclusion rule. The system verifies that the configured item alias has not been assigned to another item in the assembly inclusion rules. This prevents two components on any rule from being assigned the same configured item alias.
Once the configured item alias is assigned in an assembly inclusion rule, then the Configured Item Alias Left and Configured Item Alias Right fields in the cross-segment editing and assembly inclusion rules can be set to reference a configured item alias. The system verifies that the configured item alias is assigned to the item in the rule.
|
Note: No limit exists on the nesting of cross-segment editing rules. However, nesting does affect system performance. The deeper the rules are nested, the slower the processing time. |
When dynamic configuration is enabled and UDC values are used for segments, cross-segment editing rules affect the values listed for a segment during order entry. When a segment answer is changed, all allowed values for other segments are updated to include only valid values based on the processed cross-segment editing rules. If there are no valid values left for a segment after the cross-segment editing rules are processed, then the system removes the segment from the configuration.
|
Note: After upgrading from Xe or 8.0 using the Table Conversion for F3292 from B733x to B9 (R893292) and (In place) Convert Media Objects Table F00165 (R8900165) programs, you must immediately run the Convert media object for F3292 program (R329210) to realign the media objects of the cross-segment editing rules. The R329210 program is a onetime UBE and should be run only once.If you must convert the media objects again, you must first run the R893292 and R8900165 programs, and then run the R329210 program. |
4.12.1.1 Rules Authoring for Dynamic Configuration Entry
When you write rules to use with dynamic configuration entry, you must build the relationships properly by writing complementary rules. In writing complementary rules, you write rules for both sides of the relationship and are explicit about which values can and cannot be in the list of valid values for a segment. If you write a cross-segment editing rule to remove a valid value based on one condition, then you must also write a rule to add the value back into the list of valid values based on the opposite condition.
For example, you may have a home configuration that offers five bedrooms but only one master bedroom is allowed. You write a rule specifying that if segment 10 is a master bedroom, then the value of master bedroom is removed as an allowed value for all other room segments. You also must write a rule specifying that if segment 10 is not a master bedroom then the value of master bedroom is added back into the valid values list for the room segments.
If the value selected for segment 10 is master bedroom, but it is later changed to another value and the second rule shown in the example is not written, then the master bedroom value is not added back into the configuration as a valid segment selection. Thus, you would encounter false processing.
4.12.1.2 Cross-Segment Editing Rules Editing Process for Dynamic Configuration
The cross-segment editing rules editing process for dynamic configuration differs from the cross-segment editing rules processing that occurs during validate configuration (non-dynamic and single pass rules processing) (Release 9.1 Update). The cross-segment editing rules editing process for dynamic configuration:
-
Issues a cross-segment editing rule error when the rule states Segment A Not Equal To *BLANK and Segment A value has not been selected.
-
Uses the values *REQ and *OPT to change the segment attribute so that segments may be conditionally required.
4.12.1.2.1 *BLANK
*BLANK is an existing value in the Values field (ATIV) on the Cross Segment Edit Group Revision form. Dynamic configuration using *BLANK in cross-segment editing rules uses the following rules processing logic:
-
Does not change the segment attribute for Required To Be. Required To Be refers to the Req (required or optional) field (ATRQ) on the Configured Item Segments Revision form (W3291L).
-
If the relationship logic value is set to Equal To (EQ), then:
-
An optional segment is hidden.
-
A required segment is not hidden.
-
The system displays a required segment error in the message center.
-
The system highlights the segment in the grid that has an error state.
-
-
-
If the relationship logic value is set to Not Equal To (NE), then:
-
For optional and required segments:
-
The system displays and populates the valid values list with all user-defined code (UDC) values.
-
The system displays the CSER error in the message center.
-
The system highlights the segment in the grid that has an error state.
-
-
For required segments only:
-
The system always displays the required segment. The required segment is never hidden.
-
The system displays the required segment error in the message center.
-
-
|
Note: A rule that includes EQ *BLANK on a required segment is not appropriate as the segment displays with a required segment error but no valid values from which to select. |
4.12.1.2.2 *REQ and *OPT
*REQ and *OPT are values in the Values field (ATIV) on the Cross Segment Edit Group Revision form. Dynamic configuration using *REQ and *OPT in cross-segment editing rules use the following rules processing logic:
-
Changes the segment attribute for Required To Be. Required To Be refers to the Req (required or optional) field (ATRQ) on the Configured Item Segments Revision form (W3291L).
If the *REQ or *OPT value is set up and dynamic configuration is enabled, then the system changes the attribute of the corresponding segment to either required or optional regardless of how the field is defined in the Configured Item Segments program (P3291). The segment attribute in the Req/Opt field on the Configure Item form changes during configured item order entry, as follows:
-
*REQ: The system displays and evaluates the segment as required.
-
*OPT: The system displays and evaluates the segment as optional.
-
-
Is set up only with a relationship logic value of Equal To (EQ) in the Rel (relationship) field.
-
Is set up only with selection logic value equal to Then (*) or Else (E) in the OP (operand) field.
-
Uses standalone to populate the valid values list in the Select Answer field on the Configure Item form with all UDC values.
-
Is used in conjunction with *VALUES to limit the list of valid values in the Select Answer field on the Configure Item form.
|
Note: The *REQ and *OPT values are valid only in the Cross Segment Editing rules program (P3292). The *REQ and *OPT values are not valid values in the Values field (ATIV) on the Assembly Inclusion Edit Group Revisions form (W3293A). |
4.12.1.2.3 Additional Information
Dynamic configuration also uses the following rules processing logic:
-
The system never hides required segments.
If a segment is conditionally required, then define the segment as optional and use *REQ to change the attribute for the conditions under which a segment answer is required.
-
The value *BLANK does not equate to hide/show functionality for dynamic configurator.
The system hides optional segments if the cross-segment editing rule logic states that optional segments may be equal to *BLANK because there are no values in the list of valid values.
-
The system does not automatically reinstate valid values that have been removed by a previous cross-segment editing rule.
If you use *VALUES to limit or remove valid values for condition A in a cross-segment editing rule, then you must add those values back for condition B if they are valid answers for condition B. You write a separate cross-segment editing rule or add an Else logic selection statement to the existing rule.
|
Note: If dynamic configuration is disabled, then the presence of *REQ and *OPT does not affect rules processing in the case where a configured parent with dynamic configuration disabled includes a configured child with dynamic configuration enabled. |
4.12.2 Understanding Error Messages
As you enter an order using the validate configuration feature, error messages appear for invalid combinations that are defined by cross-segment editing rules.
These error messages might appear:
-
Hard error message: For an invalid combination with a required condition, a hard error message appears. To proceed, you must correct the problem by changing segment values.
-
Soft error message: For an invalid combination with an optional condition, a soft error message appears. You can either correct the segment value, or override the error message and continue configuring the item.
The two types of messages are:
-
When an error occurs, the system automatically generates an error message. System-generated error messages contain the cross-segment editing rule (Boolean logic) that has been violated. The system displays calculated segment values in cross-segment editing rule error messages. For example:
IF Power Type {Seg 020} is not equal to PROPANE, THEN Propane Tank {Seg 050} should be equal to *BLANK. Power Type {Seg 020} is BATTERY. Propane Tank {Seg 050} is 50(Lb)TK.
-
A custom or user-defined message.
You can create error messages for cross-segment editing rules that contain specific or custom information. Custom error messages could include more detail or simplify the content to make the error message easier to understand. For example, a 6000-LB capacity forklift requires a gas or propane engine.
You set up customer error messages by using the media object functionality that you access from the Cross Segment Edit Group Revision form.
You have three options for controlling which error messages appear during order entry. You can display only the system message (cross-segment editing rule), only the custom message, or both the cross-segment editing rule and the custom message. You must select a value from UDC 32/CM in the Custom Message field on the Cross Segment Edit Group Revision form.
|
Important: You should not add the custom message to the first sequence of the cross-segment editing rule. The custom message must be attached to the conclusion portion of a Boolean statement such as would follow the operators then and else. If a message is attached to any other sequence of the rule, it does not appear when the error occurs. |
4.12.3 Forms Used to Set Up Cross-Segment Editing Rules
4.12.4 Defining a Cross-Segment Logic Statement
Access the Cross Segment Edit Group Revision form.
Figure 4-8 Cross Segment Edit Group Revision form
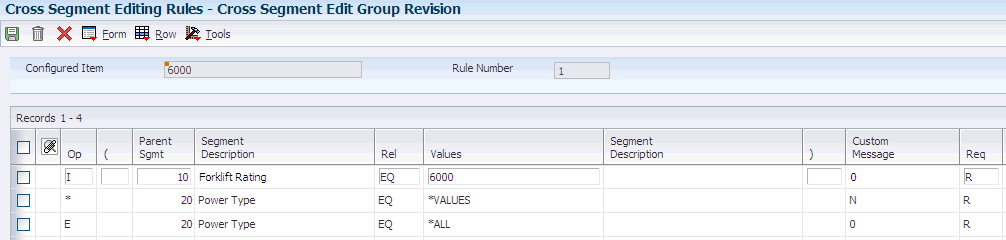
Description of ''Figure 4-8 Cross Segment Edit Group Revision form''
- Parent Sgmt (parent segment number)
-
Enter a number that the system uses to reference the answer to the question. Segment numbers are user-defined.
Cross-segment editing rules reference the segment numbers to ensure that the set of values defines a valid configuration.
Assembly inclusion rules reference segment numbers and their associated values to define prices, component parts, routing, and calculated values for configured items.
If this segment number is used in assembly inclusion rules or cross-segment editing rules, then this is the segment used for the left side of the condition.
- Values
-
Enter an answer that is valid for the segment and rule relationship. You can enter a specific UDC value or one of these values:
*VALUES: Provides multiple values lists for you to use in the logic rule. You can enter up to 45 values.
If you enter *VALUES and press Tab to move out of the field, the system calls the Configured Item Rule Range or Values program (P32921), which enables you to revise values. Values are:
*BLANK: Uses a blank value in the logic rule.
*ZERO: Searches for amounts that are equal to zero as part of the logic rule.
*RANGE: Uses a range of values (for example, 1 to 50) in the logic rule. You enter the range of values. The first value in the range must be less than the second value.
If you enter *RANGE and press Tab to move out of the field, the system calls the Configured Item Rule Range or Values program (P32921), which enables you to revise ranges.
*ALL: Uses all values in the logic rule.
For Dynamic Configurator Only
The following values are valid only in the Cross Segment Editing program (P3292) when the Rules Processing option on the Configured Item Information form is set to Dynamic to enable dynamic configuration (Release 9.1 Update):
*REQ: The system changes the Required To Be attribute (ATRQ) of the defined segment to Required. You may use *REQ standalone to display all valid UDC values in the combo box. Alternatively, you may use *REQ in conjunction with *VALUES to limit the list of valid UDC values that are displayed in the combo box.
*OPT: The system changes the Required To Be attribute (ATRQ) of the defined segment to Optional. You may use *OPT standalone to display all valid UDC values in the combo box. Alternatively, you may use *OPT in conjunction with *VALUES to limit the list of valid UDC values that are displayed in the combo box.
- Child Sgmt (child segment number) (comparison segment number)
-
Reserved by Oracle's JD Edwards EnterpriseOne.
A segment answer that is used for comparison in a cross-segment editing rule.
Enter a number that the system uses to reference the answer to the question. Segment numbers are user-defined.
Cross-segment editing rules reference the segment numbers to ensure that the set of values defines a valid configuration.
Assembly inclusion rules reference segment numbers and their associated values to define prices, component parts, routing, and calculated values for configured items.
If this segment number is used in assembly inclusion rules or cross-segment editing rules, then this is the segment used for the right side of the condition.
- Req (required or optional)
-
Enter a value from UDC 32/AQ that specifies the type of error that the system displays when it validates a cross-segment editing rule. Values are:
O: Optional (issues a warning)
R: Required (issues an error)
- Custom Message
-
Enter a UDC (32/CM) that specifies the cross-segment error message that appears. Values are:
0: Standard cross-segment error message.
1: Custom error message.
2: Cross-segment and custom error messages.
- Segment Item Left
-
Enter a number that represents the item number of the parent configured item for the segment referenced in the left side of the condition. Use this field to reference a previously selected segment from a different configuration level.
- Segment Branch Left
-
Enter the branch/plant associated with the configured item that contains the segment number referenced in the left side of the condition. Use this value to reference a previously selected segment from a different configuration level, and to reference the branch/plant of the item in the Segment Item Left field.
- Configured Item Alias Left
-
Enter a value from UDC 32/CI that specifies a particular instance of a configured item that is referenced in the left side of the condition.
The Configured Item Alias Left field on the cross-segment editing and assembly inclusion rule forms provide the ability to reference a specific occurrence of an included item. This is not a required field. The Configured Item Alias Left field is for use with duplicate components. If you do not use this field with duplicate components then the system processes duplicate components based on the first duplicate item value that is stored in cache.
Important:
It is recommended that you use the Configured Item Alias Left field to ensure that the correct duplicate item is used in a configuration.A configured item alias may be assigned to an item using an assembly inclusion rule. The system verifies that the configured item alias has not been assigned to another item in the assembly inclusion rules. This prevents two components on any rule from being assigned the same configured item alias.
Once the configured item alias is assigned in an assembly inclusion rule, then the Configured Item Alias Left field in the cross-segment editing and assembly inclusion rules can be set to reference a configured item alias. The system verifies that the configured item alias is assigned to the item in the rule.
- Segment Item Right
-
Enter a number that represents the item number of the parent configured item for the segment referenced in the right side of the condition. Use this field to reference a previously chosen segment from a different configuration level.
- Segment Branch Right
-
Enter the branch/plant associated with the configured item that contains the segment number referenced in the right side of the condition. Use this value to reference a previously selected segment from a different configuration level, and to reference the branch/plant of the item in the Segment Item Right field.
- Configured Item Alias Right
-
Enter a value from UDC 32/CI that specifies a particular instance of a configured item that is referenced in the right side of the condition.
The Configured Item Alias Right field on the cross-segment editing and assembly inclusion rule forms provides the ability to reference a specific occurrence of an included item. It is not a required field. The Configured Item Alias Right field is for use with duplicate components. If you do not use this field with duplicate components, then the system processes duplicate components based on the first duplicate item value that is stored in cache.
Important:
You should use the Configured Item Alias Right field to ensure that the correct duplicate item is used in a configuration.A configured item alias may be assigned to an item using an assembly inclusion rule. The system verifies that the configured item alias has not been assigned to another item in the assembly inclusion rules. This prevents two components on any rule from being assigned the same configured item alias.
Once the configured item alias is assigned in an assembly inclusion rule, then the Configured Item Alias Right field in the cross-segment editing and assembly inclusion rules can be set to reference a configured item alias. The system verifies that the configured item alias is assigned to the item in the rule.
4.12.5 Defining Values for Cross-Segment Logic Statements
Access the Values Revision form.
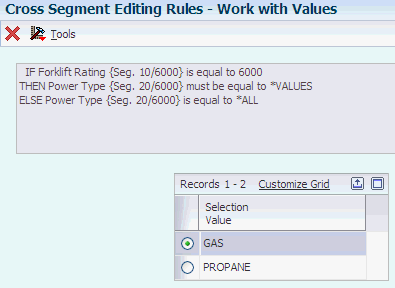
- Values
-
Enter a list of valid answers to the configurator feature and option questions that appear during order entry.
When you define cross-segment editing rules, you compare the segment answers to values to determine invalid configurations. When you define assembly inclusion rules, you create unique configurations by comparing the segment answers to values to assign parts, prices, calculated values, or routing steps.
4.12.6 Defining Ranges for Cross-Segment Logic Statements
Access the Range Revision form.
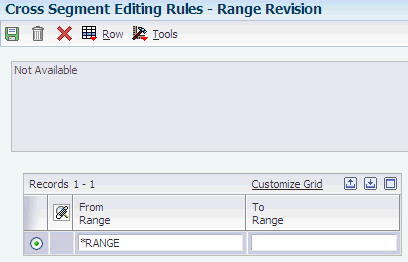
- From Range and To Range
-
Enter the starting value or the ending value of a range of numbers. In the JD Edwards EnterpriseOne Configurator system, the *Range variable is used in the Values field that is associated with the cross-segment editing rules and assembly inclusion rules. The *Range values represent answers to the segment that is referenced by the rule. You can use a UDC table to act as a filter to narrow the possible values that the logic statement will return.
When you are using a range of values, the entire range of values from the lower limit to the upper limit is acceptable. The answer cannot be limited to, for instance, even numbers, two decimal places, 1/4 inch, and so on. Any value within the range of values is a valid answer.
4.12.7 Copying a Cross-Segment Editing Rule
Access the Work with Cross Segment Editing Rules form.
To save time during setup, you can copy a cross-segment editing rule from one configured item to another.
-
On the Work with Cross Segment Editing Rules form, complete the Branch/Plant and Configured Item fields, and click Find to locate a configured item.
-
Select a record, and select Insert Edit Group and then Insert Before or Insert After from the Row menu.
-
On Cross Segment Edit Group Revision, select a blank line, and then select Copy from the Row menu.
-
On Rules Copy Window - Cross Segment Editing Rules, locate the configured item from which you want to copy a rule.
-
Select a record or several records, and click Select.
-
On the Cross Segment Edit Group Revision form, modify the rule as required, and select OK.
4.12.8 Setting Up Custom Error Messages
Access the Cross Segment Edit Group Revision form.
-
Complete the Custom Message field with the appropriate value.
Note:
You should not add the custom message to the first sequence of the cross-segment editing rule. The custom message must be attached to the conclusion portion of a Boolean statement such as would follow the operators then or else. If a message is attached to any other sequence of the rule, it does not appear when the error occurs. -
From the Row menu, select Custom Message.
-
On Media Object Viewer, select Text.
4.12.9 Reviewing Cross-Segment Editing Information
Access the Cross Segment Where Used Inquiry form.
Review cross-segment editing information to help you maintain the rules. For the item number and segment that you specify, you can review rule logic and segment values.
4.13 Setting Up Assembly Inclusion Rules
This section provides overviews of assembly inclusion rules, assembly inclusion rule logic, advanced assembly inclusion rules, derived calculations, external program references, configured tables, smart parts, and hot spot assembly inclusion rules and discusses how to:
-
Define codes for hot spots.
-
Set processing options for Assembly Inclusion Rules (P3293).
-
Define assembly inclusion rule logic.
-
Define advanced assembly inclusion rules.
-
Copy assembly inclusion rules.
-
Test derived calculations.
-
Print assembly inclusion rules.
4.13.1 Understanding Assembly Inclusion Rules
Assembly inclusion rules translate the requested values from order entry into the specific components, routing operations, user display information, and calculated values that are necessary to build, cost, and price the configured item. Assembly inclusion rules also offer advanced logic, such as algebraic expressions, smart parts, and external program references.
The six types of assembly inclusion rules include:
| Rule | Description |
|---|---|
| Component Part (P) Rules | Define the component parts to include on the sales order and work order parts list.
Define the transaction type and supplier number to support the generation of various order types for configured items and components of configured items. You also define multilevel configured items with P type rules. For example, if segment 10 equals 6000 and segment 30 is greater than or equal to 10, then use part F170 or else use part F175. Note: You must have at least one P assembly inclusion rule for the JD Edwards EnterpriseOne Configurator system to function. |
| Work Order Component Part (Q) Rules | Define the components to include on the work order parts list. The Order Processing program (R31410) attaches the parts list.
For example, if segment 10 equals standard, then include part R100 and part R105. |
| Calculation (C) Rules | Define the mathematical calculation for the calculated segments for a configured item. You must first define the segment as calculated on Configured Item Segments. You can use a calculated segment value in derived calculations for other rules. |
| Hot Spot (H) Rules | Define information and messages about a configured item that are processed for display purposes only. This information appears on the order entry form in a Hot Spot field. H rules are calculated similar to C rules. However, the results do not affect the configuration identifier. |
| Pricing (X) Rules | Define the price and cost adjustments. The system processes X rules independently, based on the kit/configurator pricing method that you selected. Typically, you should not set up cost adjustments when you use work-order-generated line types. X rule cost adjustments affect only the sales order. Order Processing (R31410) recalculates the cost without the X rule.
For example, if segment 40 equals CUS, then adjust the price by 650.00 USD. The Line Type for X rules should be one that has the Inventory Interface set to N. You must also be certain that the Edit Item Master for the Non-Stock Item option does not have a check mark on the Line Type Constants Revisions. This situation prevents the Item Number Invalid error at order entry. Based on whether the Price Rollup field is activated, adjustments are either reflected in the price of the parent item or entered in a new extended sales order detail line. Based-on effectivity dates defined on the Configured Item Information form are used in conjunction with the effective from and through dates of X rules to determine which rules are valid at order entry. All X rules that are effective are applied to the order to calculate price and cost. See Understanding Configured Item Pricing and Costing Using Based-on Effectivity Dates. |
| Routing (R) Rules | Define the work order routing and routing operations. The Order Processing program (R31410) attaches work order routings. You must first define the routings on Work With Routing Master (P3003) before you define routing rules.
For example, if segment 40 equals STD, then use the routing for standard paint or else use the routing for custom paint. |
|
Important: You must have at least one P assembly inclusion rule for the JD Edwards EnterpriseOne Configurator system to function. |
You review assembly inclusion rule information to help you maintain these rules. Rules and tables can be very complex. Using inquiry programs can help you identify segments and components within the many rules and tables that you might set up. You can determine the effect of component changes, such as shortages and substitutions, and determine the effect of changes on valid segment values. For example, if a vendor discontinues a paint color, you can determine how many configurations are affected.
4.13.1.1 Business Case: Assembly Inclusion Rules
When sales orders are created, all of the detail information appears on the sales order. In most cases, the customer does not need all of the information, and it crowds the sales order. Also, some detailed information is not appropriate for the customer to see. Only pertinent lines should be printed on the customer sales order.
Use the Assembly Inclusion Rule application in the JD Edwards EnterpriseOne Configurator system to adapt the sales order. Use P assembly inclusion rules to add parts to the sales order and work order parts list, and use Q assembly inclusion rules to add parts to the work order parts list only. These assembly inclusion rules enable you to adapt the sales order and work order parts list to communicate the appropriate information.
4.13.2 Understanding Assembly Inclusion Rule Logic
For each assembly inclusion rule, you can define a logic statement for many conditions. This statement can determine which parts to include or how to price an item. The logic is similar to that used in cross-segment editing rules. The main difference is that assembly inclusion rules logic statements can be either conditional or unconditional.
An unconditional statement is identified by an asterisk (a then condition) in the And/Or Selection field. Use unconditional rules when you want to apply the same rule, regardless of the segment answers. You must define unconditional rules before you define conditional rules. All unconditional rules must be grouped together in the first rule (rule number one). Unconditional rules are used, for example, when a part is always included as a component or when a price adjustment is always performed.
Conditional rules use Boolean logic to control or condition an action, based on segment answers. You can also use and/or operators to create conditional rules that are compound statements of logic. This P assembly inclusion rule is an example of a compound logic statement: If Segment 10 equals 6000, and segment 30 is greater than 10, then include part F170, else include part F175.
See Understanding Boolean Logic.
Each phrase of the conditional logic statement is a separate record (written on a separate line).
The system automatically separates rules by highlighting them with different colors.
The system automatically assigns a rule number, based on the order in which each rule is entered into the system. The rule number is the order in which the rules will be processed at order entry. You can change the rule number when setting up assembly inclusion rules by using the Insert Before and Insert After options on the Row menu on the Work with Assembly Inclusion Rules form.
The system automatically assigns a sequence number to each line within a rule, based on the order in which each line of each rule is entered into the system. The sequence number is the order in which each line within a rule will be processed during rules processing. You can change the sequence number by using the Insert Before and Insert After options on the Row menu on the Assembly Inclusion Edit Group Revisions form.
The system enables you to perform multi-level referencing for non-dynamic and dynamic rules processing (Release 9.1 Update). You can perform upward and downward referencing to access values from segments on various levels of the configured item.
The system supports upward referencing only within assembly inclusion rules for single pass rules processing. Single pass rules processing does not support downward referencing. Upward referencing for single pass rules processing has no limitations. (Release 9.1 Update)
The system also enables you to perform segment to segment comparisons. For example, if segment 10 is greater than segment 20, then include item F125. You can perform comparison across levels as well. For example, if segment 10 (of item 6000 in branch/plant M30) is greater than segment 20 (of item 6100 in branch/plant M30), then include item F250.
You use the Segment Item Left, Segment Branch Left, Configured Item Alias Left, Segment Item Right, Segment Branch Right, and Configured Item Alias Right fields in assembly inclusion rules.
A configured item alias may be assigned to an item using an assembly inclusion rule. The system verifies that the configured item alias has not been assigned to another item in the assembly inclusion rules. This prevents two components on any rule from being assigned the same configured item alias.
Once the configured item alias is assigned in an assembly inclusion rule, then the Configured Item Alias Left and Configured Item Alias Right fields in the cross-segment editing and assembly inclusion rules can be set to reference a configured item alias. The system verifies that the configured item alias is assigned to the item in the rule.
|
Note: No limit exists on the nesting of assembly inclusion rules. However, nesting does have an impact on system performance. The deeper the rules are nested, the slower the processing time. |
4.13.2.1 Rules Processing
You enter an order for a configured item once the Configured Item form is rendered and the grid is loaded. As you enter an order, the system verifies JD Edwards EnterpriseOne Configurator processes level by level in this order:
-
Change segment values or click the Add to Order button to accept all default values.
If non-dynamic or dynamic rules processing is enabled, each time a segment answer is changed and is valid; all of the configuration rules that reference the segment are marked for processing. The rules are then processed based on the dynamic configuration entry setting. (Release 9.1 Update)
If single pass processing is enabled, the system marks all segments as changed and marks all assembly inclusion and cross-segment editing rules for processing. The system processes all rules only once in top down order. (Release 9.1 Update)
-
Validate segment agreement.
System processing includes UDC validation, range checking, alpha versus numeric checking, length checking, and required versus optional checking.
-
Process assembly inclusion rules.
For non-dynamic and dynamic, the system processes rules related to changed segments only. For single pass, the system processes rules for all segments. (Release 9.1 Update)
-
Process C assembly inclusion rules and update C segments.
The system processes C rules first because the calculated segment answer might be required to validate the configuration. The calculated segment answer might also be needed to perform additional calculations for the configured item.
-
Process P assembly inclusion rules.
-
Process Q assembly inclusion rules.
The system processes Q assembly inclusion rules and stores the components in the Configurator Component table (F3215). The components are used by Sales Quotes (P4210) to establish cost and Order Processing (R31410) to create the parts list and establish cost.
-
Process R assembly inclusion rules.
The system processes R assembly inclusion rules and stores the routings in the Configurator Routings table (F3212). The routings are used by Sales Quotes (P4210) to establish cost and Order Processing (R31410) to create the routing and establish cost.
-
Process X assembly inclusion rules.
-
Process H assembly inclusion rules.
-
-
Process cross-segment editing rules.
For non-dynamic and dynamic, the system processes rules related to changed segments only. For single pass, the system processes rules for all segments. (Release 9.1 Update)
If dynamic configuration entry is disabled, the system displays any error messages.
If dynamic configuration entry is enabled, the system:
-
Updates all allowed values for other segments to include only valid values.
-
Sets the valid value if there is only one allowed valid value for a segment.
-
Removes the segment from the configuration if there are no valid values left for a segment.
See Cross-Segment Editing Rules Editing Process for Dynamic Configuration.
-
-
Enable the Add to Order button if no cross-segment editing errors occurred.
-
Click the Add to Order button.
The following diagram illustrates rules processing:
|
Note: The JD Edwards EnterpriseOne Configurator system supports upward and downward referencing within cross-segment editing and assembly inclusion rules for non-dynamic and dynamic rules processing. There is no limitation on upward or downward referencing for non-dynamic and dynamic rules processing.The JD Edwards EnterpriseOne Configurator system supports upward referencing only within cross-segment editing and assembly inclusion rules for single pass rules processing. Single pass rules processing does not support downward referencing. Upward referencing for single pass rules processing has no limitations. (Release 9.1 Update) |
4.13.2.2 Required Fields for Assembly Inclusion Rules
This table lists the information that you have to supply in addition to common fields for each rule in the Assembly Inclusion Rules program:
4.13.3 Understanding Advanced Assembly Inclusion Rules
In addition to the logic statements, you can set up optional advanced assembly-inclusion-rule functionality. You set up advanced assembly inclusion rules on either the Assembly Inclusion Edit Group Revisions form or the Advanced Rule Functions form.
Advanced assembly-inclusion-rule features vary, according to the type of assembly inclusion rule that you set up, as illustrated in the table:
| Description | P Rules | Q Rules | C Rules | H Rules | X Rules | R Rules |
|---|---|---|---|---|---|---|
| Derived Calculations | X | X | X | X | X | X |
| External Program References | X | X | X | X | X | X |
| Configured Tables | X | X | X | X | X | Not Applicable |
| Smart Parts | X | X | Not Applicable | Not Applicable | Not Applicable | Not Applicable |
4.13.4 Understanding Derived Calculations
For each rule type, you can define calculations that refer to the values of one or more segments. You can define a derived calculation on either the Assembly Inclusion Edit Group Revisions form or the Advanced Rule Functions form.
4.13.4.1 Segment References
You can reference any segment within a formula. To reference a segment within the same configured item, enter S and the segment number.
For example, S3 indicates segment three.
To reference a segment from a different configured item, enter S, the segment number, and the configured item name. Enclose the item name within equal signs.
For example, S3=Piston= indicates segment three of item Piston.
4.13.4.2 Algebraic Formulas
Use algebraic formulas to combine different mathematical operations with these operators: +, -, x, and / (division). You can embed calculations by enclosing them in parentheses. You might want to embed segment numbers in the formula to include segment values as part of the calculation.
For example, this formula calculates the counterweight that is necessary to keep the forklift from tipping over when its boom is fully extended with a full load:
Derived Calculation: S10 / (4 x COS(2 x S30 x 3.1416 / 360 x 2 x 3.1416))
4.13.4.3 Trigonometric and Logarithmic Functions
You can use trigonometric and logarithmic functions independently or as part of a complex formula.
These trigonometric functions are available (values expressed in radians):
| Function | Description |
|---|---|
| SIN(1.5) | Indicates the sine of 1.5. |
| COS(S3) | Indicates the cosine of segment three. |
| TAN(S3) | Indicates the tangent of segment three. |
| ARC(S3) | Indicates the arctangent of segment three. |
These logarithmic functions are available:
| Function | Description |
|---|---|
| LOG | Indicates log to base 10. |
| LN | Indicates natural log. |
| ** | Indicates an exponent. 2**5 represents 2 to the fifth power. |
This function is available:
| Function | Description |
|---|---|
| SQR | Indicates square root. |
4.13.4.4 Substrings
You can use the SUBSTR (substring) function to include a portion of a larger string of characters in a formula.
To calculate a substring, you must provide these references:
-
The segment from which you want to take the substring.
-
The starting position within the string where you want to begin referencing values.
-
The length of the string that you want to reference.
For example, if segment 10 is 400012, then these expressions are true:
| Function | Description |
|---|---|
| SUBSTR(S10,1,4) | Indicates that the substring from segment 10 starts at the first position of the string and includes the next four positions. The substring value is 4000. |
| SUBSTR(S10,5,2) | Indicates that the substring from segment 10 starts at the fifth position of the string and includes the next two positions. The substring value is 12. |
4.13.4.5 Concatenations
You can use the CONCAT (concatenate) function to combine the values of two different segments. For example:
| Function | Description |
|---|---|
| CONCAT(S3,S4) | Combines the values of segments 3 and 4. If the segment value of segment 3 is 1001 and the value of segment 4 is WH (white), the concatenated value is 1001WH. |
4.13.4.6 External Field References
You can reference fields that are external to the JD Edwards EnterpriseOne Configurator system to use in derived calculations.
Using the External Files Reference program, you select a field from these tables:
| Table | Description |
|---|---|
| F0101 | Address Book Master |
| F03012 | Customer Master by Line of Business |
| F41002 | Item Units of Measure Conversion Factors |
| F4101 | Item Master |
| F4102 | Item Branch |
| F41021 | Item Location |
| F4105 | Item Cost |
| F4106 | Item Base Price |
After you reference a field value, the information appears in the Derived Calculation field, preceded by an ampersand (&). The ampersand is then followed by the table identifier and then the field alias. You can use the field independently or within a complex expression.
You can also include field values through External Files Reference. For example, a pricing assembly inclusion rule for item 6000 (forklift) uses a field reference to retrieve a base price from the F4106 table. The formula & BPUPRC appears in the Derived Calculation field, where BP is the table identifier for the F4106 table and UPRC is the alias for price.
The system uses the component item number and branch from the rule to retrieve the appropriate tables. It also uses the Address Book number to retrieve data from the address book or billing instructions tables.
To reference a supplemental database field, you must also specify the data type. Enter the data type after the field, in this way:
| Data Type | Description |
|---|---|
| &T2AMTU(WD) | Indicates an amount field on the Item Supplemental Database table and the WD data type. |
When you reference the unit of measure in table F41002, you must specify the unit of measure in the same manner.
4.13.4.7 Literal Text
You can use literal text to provide a user-defined value that is a constant. Literals may be used to add text that might otherwise be substituted by configurator functionality. When you are using literal text, the literal must be placed in single quotes. For example, 'S10' produces the value S10 instead of getting the value of segment 10 and replacing it.
To create smart parts, you combine a literal (constant) with a segment value (variable) to create a formula. In this example, the smart part consists of the literal P and the value of segment 4. Thus, the formula would be'P'S4. If the value of Segment 4 is 2000, then the smart part is P2000.
4.13.5 Understanding External Program References
You can use a program that is external to the software to define a calculation. You refer to an external custom business function for special calculations that are particularly complex or involved.
For R, P, and Q rules, the external business function refers to the component number, component branch, and sold-to number. For H, C, or X rules, the external business function refers to the configured item number, branch/plant, and sold-to number.
Several setups must be completed before an external business function can be called. A business function object must be created for the external program. This business function object must then be added to the Object Librarian.
The Function Use processing option value for the Assembly Inclusion Rules program (P3293) must be equal to the Object Use value on the Object Librarian for the function being called.
You must enter EXTVAR in the Derived Calculation field on the Assembly Inclusion Edit Group Revisions form. Enter the name of the external business function to be called in the External Program field.
After the system runs the external function, it places the results in EXTVAR, a 30-character variable in the inclusion rule.
The external business function can also access and use the values of previously entered segments that are sorted in cache. The system passes the B3200000 data structure to the external business function.
4.13.6 Understanding Configured Tables
You can set up configured tables to simplify assembly inclusion rules. Although they take time to set up, tables reduce the number of rules and reduce processing time. Each table uses an assembly inclusion rule to reference return calculated segment values, prices, parts, and display information to the sales or work order.
4.13.7 Understanding Smart Parts
Depending on the item numbering scheme and the need for reducing assembly inclusion rules, you can set up smart parts, or special item numbers, to derive defined variable segments. Using smart parts is a simplified version of using assembly inclusion rules.
For example, a manufacturer might have 100 different paint options for a configured item. Rather than set up 100 different assembly inclusion rules to account for variations in paint color, the manufacturer might want to set up special item numbers, or smart parts, to keep track of the different paint values. These smart parts combine the segment item and the paint color into one item number, as defined in the smart part field on the Advanced Rule Functions form.
Smart parts work with P and Q rules. You can build smart part numbers by using the segment values from order entry. The system calculates smart parts in a similar manner to derived calculations. However, the resulting smart part is an alphanumeric string. You must define item numbers that are the result of smart part calculations in the Item Master (F4101) and Item Branch File (F4102) tables.
Smart part formulas can define short, second, or third item numbers. Smart parts use the part numbering symbol conventions that are defined in the branch/plant constants. For example, if the smart part formula uses the symbol to identify the third part number, the system places the third part number on the sales order and work order detail line.
You can build a smart part number by using these functions:
| Function | Description |
|---|---|
| Segment referencing | To reference segments that have already been entered on a different level specify the item number of that level with the segment number. For example, the notation for Segment 4 of Piston is Derived Calculation S4=Piston=. |
| Substring | To remove a particular string within a larger string, use the substring function. It removes a string when you define the segment, beginning position, and length. For example, if Segment 4 equals 1234, the last three positions (234) can be used with the notation SUBSTR(S4,2,3), where 2 is the beginning position and 3 is the length of the substring. |
| Concatenation | To combine two fields, use the concatenation function. For example, CONCAT(S3,S1) combines the values of Segment 3 and 1 into one field. |
| Literal text | To combine a literal (constant) with a segment value (variable) to create a formula. When you are using literal text in a smart part calculation, the literal must be placed in single quotes. In this example, the smart part consists of the literal P and the value of segment 4. Thus, the formula would be'P'S4. If the value of Segment 4 is 2000, then the smart part is P2000. |
4.13.7.1 Business Case: Advanced Assembly Inclusion Rules
A business has special calculations to run when a new order is created.
Use the Advanced Assembly Inclusion Rule features in the JD Edwards EnterpriseOne Configurator system to enable order entry to take advantage of segment referencing, algebraic formulas, trigonometric and logarithmic functions, substrings, concatenations, external field references, external business function references, configured tables, and smart parts. This feature enables you to perform calculations when you validate product configuration. Thus, calculated values are available to order entry personnel and the customer.
4.13.8 Understanding Hot Spot Assembly Inclusion Rules
Hot spots are used to provide visual information during order entry. Allowing certain kinds of information to appear during the order entry process can improve the overall effectiveness for the user. Hot spot information enables you to view either predefined (hard-coded) values or user-defined calculated values. Hot spots are for display purposes only.
The hot spot information is available after the successful (no errors) calculation process has been run. The initial hot spot selection values are displayed, based on the processing option settings for the Configured Item Revisions program (P3210). You then can dynamically change the hot spot display. Click a hot spot button and select a different hot spot to display from the UDC 32/HS table.
The UDC contains a list of all valid hot spot entries. It also contains a numeric reference to the hot spot, a description, and an indication of whether the hot spot is hard-coded. Hard-coded entries are not changeable and are numbered descending from 999. Examples of hard-coded hot spot entries include price (as defined by the order entry mode), cost (as defined by the order entry mode), and weight.
4.13.8.1 Hard-Coded Hot Spots
Hard-coded hot spots are predefined and cannot be changed. These hot spots are numbered descending from 999.
| Hot Spot Value | Description |
|---|---|
| 999 | Displays the weight, which is calculated by adding up the weight of all the components that are included in the configuration. The weight of the component is calculated by converting the quantity or unit of measure to the weight unit of measure of the parent item. Any components that are included for a sales quote (Q rule results) are not included in the weight rollup. |
| 998 | Displays Cost (Foreign), which is calculated by adding up the foreign cost of all the nonconfigured components in the configuration, which includes component for a sales quote (Q rule results). Any cost that is included by X rules and User-Added cost with Price Roll Up equal to Y is also accumulated. |
| 997 | Displays Cost (Domestic), which is accumulated in the same way that Foreign 998 is done, except that the domestic amount is accumulated. Both amounts are accumulated separately and are not converted one from the other. |
| 996 | Cost (Order Currency) displays Foreign 998 or Domestic 997, based on the mode that you entered in the sales order. This process enables you to enter both modes of sales order and not have to change the hot spot selection. |
| 995 | Displays Price (Foreign), which is calculated based on the Kit/Configurator Pricing Method on the Item Master record. This method determines which items have their prices accumulated. |
| 994 | Displays Price (Domestic), which is accumulated in the same way Foreign 995 is done, except that the domestic amount is accumulated. Both amounts are accumulated separately and not converted one from the other. |
| 993 | Price (Order Currency) displays Foreign 995 or Domestic 994, based on the mode that you entered in the sales order. This process enables you to enter both modes of sales order and not have to change the hot spot selection. |
| 992 | Displays Price Not Rolled (Foreign), which is accumulating the foreign price that is being extended as independent sales order lines. This process includes all of the prices that are included by X rules and User-Added prices with Price Roll Up equal to N. |
| 991 | Displays Price Not Rolled (Domestic), which is accumulated in the same way as Foreign 992, except that the domestic amount is accumulated. Both amounts are accumulated separately and not converted one from the other. |
| 990 | Price Not Rolled (Order Currency) displays Foreign 992 or Domestic 991, based on the mode that you entered in the sales order. This process enables you to enter both modes of sales order and not have to change the hot spot selection. |
| 989 | Displays Volume, which is calculated by adding up the volume of all the components that are included in the configuration if the items that are set up in the configurator include a volume. |
|
Note: Prices do not include blanket discounting from Oracle's JD Edwards EnterpriseOne Advanced Pricing. |
4.13.8.2 Hot Spot Assembly Inclusion Rule Definitions
Before you can define H (Hot Spot) assembly inclusion rules, you must define the hot spot UDC value in UDC table 32/HS.
User-defined hot spots are determined by using the H assembly inclusion rule. The hot spot rules function similarly to a calculation (C) assembly inclusion rule. This process means that the power of the derived calculation, external program interfaces, and more can be leveraged. Configured tables are also supported for the H rule type.
Hot spots (H rules) are processed in the same way as calculated values (C rules). This means that if the configuration validation fails, the displayed value is the customer-defined error character as defined in the Configurator Constants. The H rule differs from a C rule in that processing is done last for the parent item. In addition, anything from any level can be referenced.
The values from UDC 32/HS are used by the F3293 Evaluate AIR business function (B3200460) to process the hot spot (H Rule) as numeric or nonnumeric. If the result of the rule matches the Numeric Y/N definition, then it is rounded, based on the UDC definition. The second description for UDC 32/HS enables you to enter an edit code that is used to scrub the result before it appears on the form. The edit codes are standard programming edit codes.
|
Note: If a hot spot is defined in UDC 32/HS but a corresponding H assembly inclusion rule has not been defined, the hot spot displays a value of zero on the Configured Item Revisions form at order entry. |
4.13.9 Forms Used to Set Up Assembly Inclusion Rules
4.13.10 Defining Codes for Hot Spots
Access the User Defined Codes form.
You must define UDCs for hot spots in UDC table 32/HS. After you define the hot spot, you can define an assembly inclusion rule with a corresponding calculation.
If the column named Description 02 does not appear in the UDC table, change the setup of UDC 32/HS:
-
Select Code Types from the Form menu on the Work With User Defined Codes form.
-
Type HS in the Code Types QBE (query by example) line and click Find.
-
Click Select to get to the User Defined Code Types form.
-
Type Y in the 2nd Line (Y/N) (second line) field.
This step displays the second description field in the initial UDC table.
-
Verify that the Numeric (Y/N) field is set to Y.
-
Click OK and then Close.
-
Click Add when the Description 02 column appears in the table on the Work With User Defined Codes form.
- Codes
-
Enter the number of the hot spot that is being defined.
- Description 01
-
Enter the description of the hot spot.
- Description 02
-
Enter whether a given code (hot spot) is to be processed as a numeric or nonnumeric statement.
The default value for hot spots is nonnumeric. If the Description 02 column is blank or the value is N, then the hot spot formula is treated as a string (it displays the formula rather than a calculated value).
(Blank) is the equivalent of a default value from data dictionary item CNUM, usually defined as N (nonnumeric).
If the expected answer is numeric and the hot spot is not hard-coded, then the Description 02 column should contain YX, where Y indicates that the result is numeric and X is the number of decimal places to be rounded to.
Hard-coded hot spots are predefined as numeric; therefore, the first digit is not significant for them. You have to enter only the second digit for rounding purposes.
For example, imagine a user-defined hot spot with a calculated value of 1.2345.
If N, then the formula appears, not the calculated value.
If Y2, then 1.23.
If Y9, then 1.2345 (no rounding because decimals do not exceed 9).
- Special Handling
-
Specify a language preference. It has no impact on hot spot calculations.
- Hard Coded
-
Specify whether a particular hot spot is defined as hard-or soft-coded. System-defined hot spots are hard-coded, and this field is Y. If you set up a code for hot spots, this field should be N.
4.13.11 Setting Processing Options for Assembly Inclusion Rules (P3293)
These processing options control default processing for the Assembly Inclusion Rules program.
4.13.11.1 Defaults
These processing options control default rule types.
- Rule Type
-
Specify whether the resulting value of the assembly inclusion rule is a part number, price, routing operation, or calculated value. Values are:
P: Part List
Q: Work Order Component
C: Calculation
H: Hot Spot
X: Price/Cost Adjustment
R: Route Sheet
- Line Type for X Rules
-
Specify how the system processes lines on a transaction. This code controls the systems with which the transaction interacts, such as JD Edwards EnterpriseOne General Ledger, JD Edwards EnterpriseOne Job Cost, JD Edwards EnterpriseOne Accounts Payable, JD Edwards EnterpriseOne Accounts Receivable, and JD Edwards EnterpriseOne Inventory Management. It also specifies the conditions under which a line prints on reports, and it is included in calculations. Codes include:
S: Stock item
J: Job cost
N: Nonstock item
F: Freight
T: Text information
M: Miscellaneous charges and credits
W: Work order
4.13.11.2 Edits
This processing option controls validation against external programs.
- Function Use
-
Enter the function use for validating external programs. If you leave this processing option blank, the system does not perform any validations against the function use code for the business function and UBE objects that are selected as external programs.
4.13.12 Defining Assembly Inclusion Rule Logic
Access the Assembly Inclusion Edit Group Revisions form.
Figure 4-12 Assembly Inclusion Edit Group Revisions form

Description of ''Figure 4-12 Assembly Inclusion Edit Group Revisions form''
For each assembly inclusion rule, you define unconditional and conditional rules using Boolean logic. Before you define conditional rules, define unconditional rules to include parts, price adjustments, cost adjustments, calculated values, display values, or routing steps—regardless of the segment values.
|
Note: All unconditional rules must be grouped together in the first rule (rule number one). |
To reference a segment from another level in the configured item:
-
Complete the Op field.
-
Complete the Segment Item Left, Segment Branch Left, Configured Item Alias Left, Segment Item Right, Segment Branch Right, and Configured Item Alias Right fields.
-
Continue to enter the remaining rule information.
|
Note: If the rule is not written in this order when referencing a segment from another level in the configured item, you will either get the incorrect segment reference or an error message. |
- Rule Type
-
Enter a value that identifies whether the resulting value of the assembly inclusion rule is a part number, price, routing operation, or calculated value. Values are:
P: Part List
Q: Work Order Component
C: Calculation
H: Hot Spot
X: Price/Cost Adjustment
R: Route Sheet
- Parent Sgmt (parent segment)
-
Enter a number that the system uses to reference the answer to the question. Segment numbers are user-defined.
Cross-segment editing rules reference the segment numbers to ensure that the set of values defines a valid configuration.
Assembly inclusion rules reference segment numbers and their associated values to define prices, component parts, routing, and calculated values for configured items.
If this segment number is used in assembly inclusion rules or cross-segment editing rules, then this is the segment used for the left side of the condition.
- Values
-
Enter an answer that is valid for the segment and rule relationship. You can enter a specific UDC value or one of these values:
*VALUES: Provides multiple values lists for you to use in the logic rule. You can enter up to 45 values.
If you enter *VALUES and press Tab to move out of the field, the system calls the Configured Item Rule Range or Values program (P32921), which enables you to revise values. Values are:
*BLANK: Uses a blank value in the logic rule.
*ZERO: Searches for amounts that are equal to zero as part of the logic rule.
*RANGE: Uses a range of values (for example, 1 to 50) in the logic rule. You enter the range of values. The first value in the range must be less than the second value.
If you enter *RANGE and press Tab to move out of the field, the system calls the Configured Item Rule Range or Values program (P32921), which enables you to revise ranges.
*ALL: Uses all values in the logic rule.
For Dynamic Configurator Only
Note:
The following values do not impact assembly inclusion rules.The following values are valid only in the Cross Segment Editing program (P3292) when the Rules Processing option on the Configured Item Information form is set to Dynamic to enable dynamic configuration (Release 9.1 Update):
*REQ: The system changes the Required To Be attribute (ATRQ) of the defined segment to Required. You may use *REQ standalone to display all valid UDC values in the combo box. Alternatively, you may use *REQ in conjunction with *VALUES to limit the list of valid UDC values that are displayed in the combo box.
*OPT: The system changes the Required To Be attribute (ATRQ) of the defined segment to Optional. You may use *OPT standalone to display all valid UDC values in the combo box. Alternatively, you may use *OPT in conjunction with *VALUES to limit the list of valid UDC values that are displayed in the combo box.
- Child Sgmt (child segment)
-
Enter a number that the system uses to reference the answer to the question. Segment numbers are user-defined.
Cross-segment editing rules reference the segment numbers to ensure that the set of values defines a valid configuration.
Assembly inclusion rules reference segment numbers and their associated values to define prices, component parts, routing, and calculated values for configured items.
If this segment number is used in assembly inclusion rules or cross-segment editing rules, then this is the segment used for the right side of the condition.
- Item Number
-
Enter a number that the system assigns to an item. It can be in short, long, or third-item number format.
- Component Branch
-
Enter a secondary or lower-level business unit. The system uses the value that you enter to indicate that a branch or plant contains several subordinate departments or jobs. For example, assume that the component branch is named MMCU.
The structure of MMCU might be:
Branch/Plant - (MMCU)
Dept A - (MCU)
Dept B - (MCU)
Job 123 - (MCU)
- Cfg Item Alias (configured item alias)
-
Enter a value from UDC 32/CI that specifies a particular instance of a configured item that is referenced in the rule.
The Cfg Item Alias field on the assembly inclusion rule form provides the ability to reference a specific occurrence of an included item. This is not a required field. The Cfg Item Alias field is for use with duplicate components. If you do not use this field with duplicate components then the system processes duplicate components based on the first duplicate item value that is stored in cache.
Important:
You should use the Cfg Item Alias field to ensure that the correct duplicate item is used in a configuration.A configured item alias may be assigned to an item using an assembly inclusion rule. The system verifies that the configured item alias has not been assigned to another item in the assembly inclusion rules. This prevents two components on any rule from being assigned the same configured item alias.
Once the configured item alias is assigned in an assembly inclusion rule, then the Configured Item Alias Left and Configured Item Alias Right fields in the cross-segment editing and assembly inclusion rules can be set to reference a configured item alias. The system verifies that the configured item alias is assigned to the item in the rule.
- Print Part
-
Enter a UDC (32/PF) that indicates whether the system prints the Configurator part on the sales order and work order. The system uses the value that you enter in this field to affect programs such as Print Pick Slips (R42520), Print Invoices (R42565), Bill of Lading (R42530), and parts list on Work Order Print (R31415). Values are:
0: Do not print the Configurator part on the sales order or the work order.
1: Both the sales order and the work order.
2: Sales order only.
3: Work order only.
- Quantity
-
Enter the number of units that the system applies to the transaction.
- U/M (unit of measure)
-
Enter a UDC (00/UM) that identifies the unit of measure for an amount or quantity. For example, it can represent a barrel, box, cubic meter, liter, hour, and so on.
- Operation Seq No. (operation sequence number)
-
Enter a number that is used to indicate an order of succession.
In routing instructions, this is a number that sequences the fabrication or assembly steps in the manufacture of an item. You can track costs and charge time by operation.
In bills of material, this is a number that designates the routing step in the fabrication or assembly process that requires a specified component part. You define the operation sequence after you create the routing instructions for the item. The JD Edwards EnterpriseOne Shop Floor Management system uses this number in the backflush/preflush by operation process.
In engineering change orders, this is a number that sequences the assembly steps for the engineering change.
For repetitive manufacturing, this is a number that identifies the sequence in which an item is scheduled to be produced.
Skip To fields enable you to enter an operation sequence that you want to begin the display of information.
You can use decimals to add steps between existing steps. For example, use 12.5 to add a step between steps 12 and 13.
- Issue Type
-
Enter a code that indicates how the system issues each component in the bill of material from stock. In JD Edwards EnterpriseOne Shop Floor Management, it indicates how the system issues a part to a work order. Values are:
I: Manual issue
F: Floor stock (there is no issue)
B: Backflush (when the part is reported as complete)
P: Preflush (when the parts list is generated)
U: Super backflush (at the pay-point operation)
S: Subcontract item (send to supplier)
Blank: Shippable end item
You can issue a component in more than one way within a specific branch/plant by using different codes on the bill of material and the work order parts list. The bill of material code overrides the branch/plant value.
- Line Type
-
Enter a code that controls how the system processes lines on a transaction. It controls the systems with which the transaction interfaces, such as JD Edwards EnterpriseOne General Ledger, JD Edwards EnterpriseOne Job Cost, JD Edwards EnterpriseOne Accounts Payable, JD Edwards EnterpriseOne Accounts Receivable, and JD Edwards EnterpriseOne Inventory Management. It also specifies the conditions under which a line prints on reports, and it is included in calculations. Codes include:
S: Stock item
J: Job cost
N: Nonstock item
F: Freight
T: Text information
M: Miscellaneous charges and credits
W: Work order
- Write Attached Detail Line
-
Enter a value from UDC 32/WA that specifies whether the component line generates a detail line to indicate that the component is going to be shipped. Values are:
0: Do not create.
1: Create.
This field works only with a P type rule. If it is set appropriately, details are written to the sales order and cost is also rolled up to the sales order. This field does not work with purchase orders as components of a purchase order do not generate detail lines.
Turn the detail lines off whenever possible so that the lines are not processed.
- Trans Type (transaction type)
-
Enter a value from UDC 32/DE that specifies the type of transaction that the component of a configured item should generate. If the conditions for the transaction, processing options, and branch/plant are not correct for the transaction type, then the system does not generate the transaction. You use the Trans Type field in combination with the Write Attached Detail Line field on the Assembly Inclusion Edit Group Revisions form. Values are:
0: Sales Order
1: Direct Ship
2: Transfer
3: Inter Branch/Company
4: Purchase Order
Note:
If you select the direct ship or purchase order transaction type, you must enter a supplier number in the Supplier Number field for the component item.This field works only with a P type rule.
When the value of the Trans Type field is 4 (purchase order), the system validates both the stocking type and line type of the component item. Items with a stocking type of phantom or a line type set to generate a purchase order or work order are not supported.
- Supplier Number
-
Enter a number that identifies an entry in the JD Edwards EnterpriseOne Address Book system for a supplier.
If you select a value of 1 (direct ship) or 4 (purchase order) in the Trans Type field, you must enter a supplier number for the component item.
If no value is entered in the Supplier Number field on the Assembly Inclusion Edit Group Revisions form, the system retrieves the supplier number from the Item/Branch Plant Info form and populates it as the default value.
This field works only with a P type rule. It is display only for Q rules.
- Segment Item Left
-
Enter a number that represents the item number of the parent configured item for the segment referenced in the left side of the condition. Use this field to reference a previously chosen segment from a different configuration level.
- Segment Branch Left
-
Enter the branch/plant associated with the configured item that contains the segment number referenced in the left side of the condition. Use this value to reference a previously selected segment from a different configuration level, and to reference the branch/plant of the item in the Segment Item Left field.
- Configured Item Alias Left
-
Enter a value from UDC 32/CI that specifies a particular instance of a configured item that is referenced in the left side of the condition.
The Configured Item Alias Left field on the cross-segment editing and assembly inclusion rule forms provides the ability to reference a specific occurrence of an included item. This is not a required field. The Configured Item Alias Left field is for use with duplicate components. If you do not use this field with duplicate components then the system processes duplicate components based on the first duplicate item value that is stored in cache.
Important:
It is recommended that you use the Configured Item Alias Left field to ensure that the correct duplicate item is used in a configuration.A configured item alias may be assigned to an item using an assembly inclusion rule. The system verifies that the configured item alias has not been assigned to another item in the assembly inclusion rules. This prevents two components on any rule from being assigned the same configured item alias.
Once the configured item alias is assigned in an assembly inclusion rule, then the Configured Item Alias Left field in the cross-segment editing and assembly inclusion rules can be set to reference a configured item alias. The system verifies that the configured item alias is assigned to the item in the rule.
- Segment Item Right
-
Enter a number that represents the item number of the parent configured item for the segment referenced in the right side of the condition. Use this field to reference a previously chosen segment from a different configuration level.
- Segment Branch Right
-
Enter the branch/plant associated with the configured item that contains the segment number referenced in the right side of the condition. Use this value to reference a previously selected segment from a different configuration level, and to reference the branch/plant of the item in the Segment Item Right field.
- Configured Item Alias Right
-
Enter a value from UDC 32/CI that specifies a particular instance of a configured item that is referenced in the right side of the condition.
The Configured Item Alias Right field on the cross-segment editing and assembly inclusion rule forms provides the ability to reference a specific occurrence of an included item. This is not a required field. The Configured Item Alias Right field is for use with duplicate components. If you do not use this field with duplicate components then the system processes duplicate components based on the first duplicate item value that is stored in cache.
Important:
You should use the Configured Item Alias Right field to ensure that the correct duplicate item is used in a configuration.A configured item alias may be assigned to an item using an assembly inclusion rule. The system verifies that the configured item alias has not been assigned to another item in the assembly inclusion rules. This prevents two components on any rule from being assigned the same configured item alias.
Once the configured item alias is assigned in an assembly inclusion rule, then the Configured Item Alias Right field in the cross-segment editing and assembly inclusion rules can be set to reference a configured item alias. The system verifies that the configured item alias is assigned to the item in the rule.
- Unit Price
-
Enter the price that is charged for the unit of measure in the adjoining field. Use these fields, for example, if the primary unit of measure is EA (each), but you typically use a list price per box.
- Unit Cost
-
Enter a user-defined cost that the system uses based on information that you supply, which includes the name of the costing method and the method of calculation.
- Price Rollup
-
Enter a UDC (32/PP) that indicates whether the price or cost of an add-on is included in the price or cost of the parent configured item. Values are:
0: Separate the price or cost of the add-on.
1: Include the price or cost of the add-on in the price or cost of the parent item. When you select this value, the extended price or cost is zero.
- Rule Number
-
Displays the number that indicates the order in which rules were entered in the system for a particular configured item. It also indicates the order in which rules are processed by the system.
- Seq No. (sequence number)
-
Displays the sequence number for lines in an edit group of cross-segment editing rules or assembly inclusion rules. It is assigned to lines within a rule based on the order in which that line of the rule was entered for a configured item. You can insert a line within a rule to assign a new sequence number.
The sequence number also indicates the order in which each line within a rule will be processed.
4.13.13 Defining Advanced Assembly Inclusion Rules
Access the Advanced Rule Functions form.
Figure 4-13 Advanced Rule Functions form
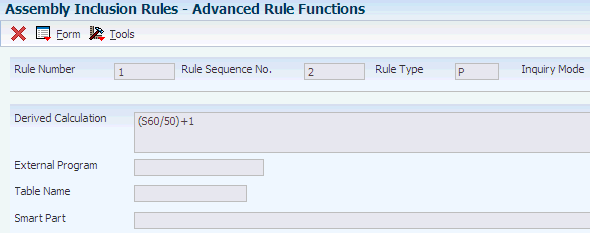
Description of ''Figure 4-13 Advanced Rule Functions form''
4.13.14 Copying Assembly Inclusion Rules
Access the Assembly Inclusion Edit Group Revisions form.
To copy an assembly inclusion rule:
4.13.15 Testing Derived Calculations
Access the Derived Calculations form.
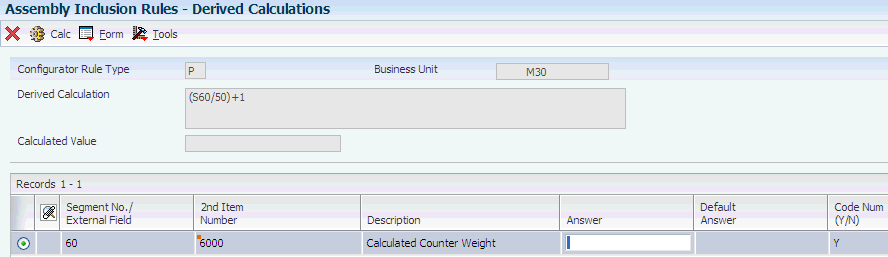
|
Note: The Assembly Inclusion Rule Tester tests the derived calculation for any of the six assembly inclusion rules. The derived calculation to be tested appears at the top of the form. The segments that relate to the derived calculation appear in the middle of the form. |
- Answer
-
Enter a value in the Answer field for each segment that appears, and click the Calc button.
- Calculated Value
-
Review the value that appears in the Calculated Value field for accuracy.
4.14 Setting Up Configured Tables
This section provides an overview of configured table setup and discusses how to:
-
Define table name for a configured table.
-
Set processing options for Configured Table Definition (P3281).
-
Define table definitions with dimensions for configured tables.
-
Set processing options for Table/Item Cross Reference (P3282).
-
Define the configured table/configured item cross reference.
-
Define table return segment values for a C table.
-
Set processing options for Configured Table Values (P3283).
-
Define values for configured tables.
-
Link assembly inclusion rules and configured tables.
-
Copy a configured table.
-
Review a configured table.
-
Print configured rule table values.
4.14.1 Understanding Configured Table Setup
A configured rules table is a collection of data that you define for a configured item. During order processing, assembly inclusion rules can refer to tables to retrieve component parts, calculated segment values, price adjustments, or display information.
You can use tables to reduce the number of assembly inclusion rules that are required when segment answers vary greatly. The table type should be the same as the assembly inclusion rule type that refers to it.
Setting up tables adds time to the setup process. However, tables can dramatically reduce the number of assembly inclusion rules and their complexity, thus improving processing time and simplifying setup.
When you enter an order for a configured item, you select answers for the segments that are defined for the item. For example, for a forklift, you might select a value of 4000 for segment 10 (Lift Rating) and a value of PROPANE for segment 20 (Power type).
Depending on the values that you define for each segment, you can specify the information that returns to the order. You must define the values for each segment as a key to the table.
You can define tables that correspond to the matching assembly inclusion rule types:
|
Note: No table corresponds to the assembly inclusion rule for routing. |
Because only one value can be returned for H and X tables, the system limits setup options when you specify the return dimensions for these table types.
Because a table might contain many segments (keys) and values, you must decide how the table information appears before you can review table information.
|
Note: The tables that are used for rules processing within the JD Edwards EnterpriseOne Configurator system are not UDCs. |
As you work with table information, you can speed data entry by setting a processing option for copying rows of data.
You also can define effectivity dates for the table.
When creating C tables that return multiple values, you must define destination segment numbers during the Table/Item Cross Reference step. The Table Return Segment Values form automatically appears when you are entering a C table.
4.14.1.1 Table Definitions with Dimensions for Configured Tables
To create a configured table, you must define the table type and dimensions. The dimensions refer to the number of segments that are used as keys to the table and the number of values that the table returns to the configured item. The maximum number of keys to the table is 20. The maximum number of return values is 99,999.
Tables can have these dimensions:
-
One segment and one return.
-
One segment and multiple returns.
-
Multiple segments and one return.
-
Multiple segments and multiple returns.
You should have an idea of what you want the table to do prior to defining its dimensions. A one-segment, one-return table is particularly helpful when you want to define price, cost, hot spot values, or other specific information.
You might create a one-segment, multiple return table when one segment can return multiple information consistently. Many component item numbers might be related to a specific segment answer. For example, a paper manufacturer might configure a certain size of letterhead to return a correspondingly sized envelope and response card.
You might create a multiple-segment, multiple return table when using P or Q tables. P and Q tables are based on P and Q assembly inclusion rules, which return parts to the sales or work order.
|
Note: When working with tables with multiple segments and multiple returns, remember that the form displays segment information in columns and values in rows. |
4.14.1.2 Understanding How to Link Assembly Inclusion Rules and Configured Tables
After you define table values, you must provide access to the table so that the part number, calculated value, price adjustment, or display information is retrieved to the order. The table is linked to the corresponding assembly inclusion rule. The table can be accessed through either unconditional or conditional rules. During order processing, the assembly inclusion rule causes the table to be read and the values are brought back to the order.
4.14.2 Forms Used to Set Up Configured Tables
4.14.4 Setting Processing Options for Configured Table Definition (P3281)
These processing options control default processing for the Configured Table Definition program.
4.14.4.1 Data Defaults
These processing options control default values that the system uses when you run this program.
- 1. Rule Table Type (Optional)
-
Specify a value that identifies the type of rule table. Values are:
P: Part list (on sales order and work order)
Q: Work order component (on work order only)
C: Calculated values
H: Hot Spot
X: Price/Cost adjustment
4.14.5 Defining Table Definitions with Dimensions for Configured Tables
Access the Rule Table Definition Revisions form.
Figure 4-15 Rule Table Definition Revisions form

Description of ''Figure 4-15 Rule Table Definition Revisions form''
- Rules Table Name
-
Enter the name of a collection of data that you set up to minimize the number of assembly inclusion rules that you need for a configured item. You must define rule table names in UDC table 32/TN. A rule table can be accessed by 1 to 20 keys and can return up to 99 values. When you reference a rule table in an assembly inclusion rule, the system uses the rule keys to retrieve the values that are associated with the rule table. For example, if you defined segment 10 to be the color of an item, you could set the table to retrieve item Red Component when the customer enters Red for segment 10. In this example, the table would be:
Item Color: Value
Red: Red Component
The table would include the following instruction:
If the color segment value is red, then use item number Red Component on the configured item sales order and work order parts list.
- C Table - Calculated Values, P Table - SO Parts List, Q Table - WO Parts List, X Table - Price Adjustments, and H Table - Hot Spots
-
Enter a value that identifies the type of rule table. Values are:
P: Part list (on sales order and work order)
Q: Work order component (on work order only)
C: Calculated values
H: Hot Spot
X: Price/Cost adjustment
- Number of Segments
-
Enter how many keys (segments) are used to access the table. Key values must be on the current level or a previous level of the configured item.
The maximum is 20 keys.
- Number of Table Values
-
Enter how many values the system returns from the rules table when a match is found on the table keys. If you enter more than one return value for a C (calculated) rule, you must indicate the segment numbers to return the values to.
With H and X tables, the Number of Table Values field is automatically populated with 1.
4.14.6 Setting Processing Options for Table/Item Cross Reference (P3282)
This processing option controls default processing for the Table/Item Cross Reference program.
4.14.6.1 Defaults
This processing option controls default values that the system uses when you run the Table/Item Cross Reference program.
- Default Rule Table Type
-
Specify a value that identifies the type of rule table. Values are:
P: Part list (on sales order and work order)
Q: Work order component (on work order only)
C: Calculated values
H: Hot Spot
X: Price/Cost adjustment
4.14.7 Defining the Configured Table/Configured Item Cross Reference
Access the Configured Item Cross Reference Revision form.
Figure 4-16 Configured Item Cross Reference Revision form
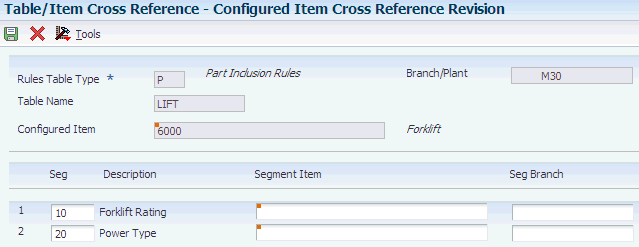
Description of ''Figure 4-16 Configured Item Cross Reference Revision form''
|
Note: Multiple configured items can refer to a single table, and a single configured item can refer to multiple tables.You can enter an item *ALL to define a generic cross-reference for all configured items. If you use *ALL, you must use the same segment numbers for all configured items. |
- Seg (segment number)
-
Enter the segment number to be used as a key to retrieve information from the table. The number of segments is the same as you defined in the Configured Table Definition program (P3281).
- Segment Item
-
Enter the configured item that contains the segment. This field enables you to reference segments from a higher-level configured item.
- Segment Branch
-
Enter the branch/plant that is associated with the segment. If a higher-level configured item is referenced, it can also be in another branch/plant.
4.14.8 Defining Table Return Segment Values for a C Table
Access the Configured Item/Rules Table Return Segment Values form.
- Return Segment
-
Specify the destination segment number for the table return value.
4.14.9 Setting Processing Options for Configured Table Values (P3283)
These processing options control default processing for the Configured Table Values program.
4.14.9.1 Defaults
This processing option controls the default value that the system uses when you run the Configured Table Values program.
- 1. Rule Table Type (Optional)
-
Specify a value that identifies the type of rule table. Values are:
P: Part list (on sales order and work order)
Q: Work order component (on work order only)
C: Calculated values
H: Hot Spot
X: Price/Cost adjustment
4.14.9.2 Processing
This processing option controls whether you can copy from a row.
- Row Copying
-
Enter 1 to enable row copying.
4.14.10 Defining Values for Configured Tables
Access the Configured Table Value Revision form.
Figure 4-17 Configured Table Value Revision form
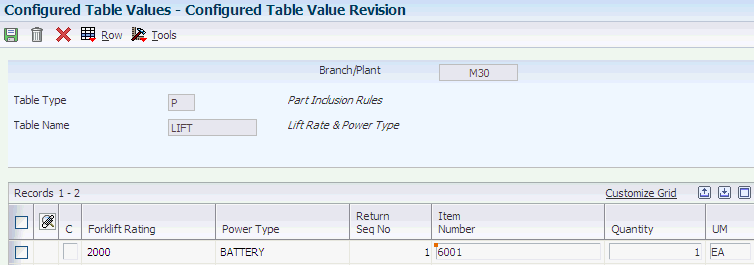
Description of ''Figure 4-17 Configured Table Value Revision form''
- Segment Value 1 and Segment Value 2
-
Complete as many segment value fields as you defined on the Rule Table Definition Revisions form when you defined dimensions for the table. The names of the segment value fields are defined when you create the table/item cross-reference.
Each time that you enter a value for a segment and the associated item number, a new blank row appears.
|
Note: As you work with table information, you can speed data entry by setting a processing option for copying rows of data. You can use one of two methods to copy rows. The first method is to select a row, and then select Copy row from the Row menu. You can then change the row data as necessary for the table. The second method is to enter 1 in the C field of the row that you want to copy. After you complete the fields in a row and press the Enter key, that row is copied into the next row. When you no longer want to automatically copy a row or if you need to make changes, clear the C field. |
4.14.11 Linking Assembly Inclusion Rules and Configured Tables
Access the Advanced Rule Functions form.
- Table Name
-
Enter the name of the table to link to the assembly inclusion rule.
4.14.12 Copying a Configured Table
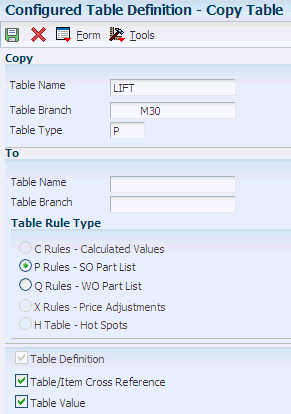
- Table Definition
-
Select to copy the table definition that is the basic data describing a table. The Copy button is selected from the Table Definition form, so the table definition is always copied. The other pieces of table data are selectable, allowing you to copy only the table definition if need be.
4.14.13 Reviewing a Configured Table
Access the Work with Rules Table Detail form.
Figure 4-19 Work with Rules Table Detail form
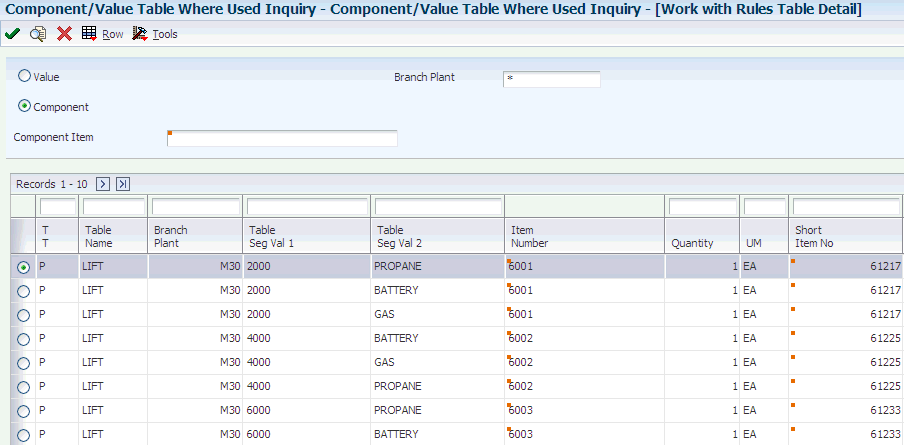
Description of ''Figure 4-19 Work with Rules Table Detail form''
Select a component item by branch/plant to retrieve rules table detail. Select whether you want to view the data by value or by component.
4.14.14 Printing Configured Rule Table Values
Select Configurator Setup (G3241), Configured Rules Table Values.
Print a hard copy of configured table information to verify the accuracy of the configured table keys and return values. Review the table segments and values for the table name and table type that you specify.