2 Setting Up Consoles
This chapter contains the following topics:
This chapter provides overviews of console security and discusses how to:
-
Set up the constants.
-
Set up the consoles.
-
Load data.
2.1 Understanding Console Security
The JD Edwards EnterpriseOne Console system uses JD Edwards EnterpriseOne security to manage access to metric information. Security enables the system to allow only specified users access to the console setup, configuration, batch programs, and metric data. The system administrator should authorize the appropriate personnel to access both the Dashboard program (P80D350) and the basic version of the Dashboard Management program (P80D301, version ZJDE0001).
See JD Edwards EnterpriseOne Tools Security Administration Guide
2.2 Setting Up the Constants
You must complete the setup for the JD Edwards EnterpriseOne Console before you can run data loads, evaluate metrics, and take action.
This section provides overviews of user-defined codes, next numbers, email and distribution lists, charts, and analytics currency, and discusses how to:
-
Define next numbers.
-
Set up default information.
-
Set up analytics currency.
2.2.1 Understanding User-Defined Codes
The system stores user-defined codes (UDCs) in tables by system type and code type. For example, system 00, type MI (00/MI) represents Foundation (system 00) and Metrics Identifier (code MI).
All consoles share the UDC tables. The values in these UDC are hard-coded for the JD Edwards EnterpriseOne Console:
| UDC | Description |
|---|---|
| 00/AR | The Alert Identifier UDC specifies the type of alert being triggered. Values are:
|
| 00/AS | The Alert Source UDC identifies how the alert is being triggered: from an event or from a metric indicator. Values are:
|
| 00/AU | The Alert Status UDC indicates whether the alert is open or closed. Values are:
|
| 00/AY | The Alert Type UDC specifies whether the alert is informational, favorable, or unfavorable so that appropriate action can be taken. Values are:
|
| 00/CI | The Chart Identifier UDC specifies the type of graph that the system uses to display metrics. Values are:
Note: The descriptions are hard-coded in the data service business function and must not be changed. |
| 00/CF | The Dashboard Configuration UDC indicates the type of console. Values are:
|
| 00/CX | The Metric Category Code 1 UDC identifies additional metric information. |
| 00/CY | The Metric Category Code 2 UDC identifies additional metric information. |
| 00/CZ | The Metric Category Code 3 UDC identifies additional metric information. Values are:
|
| 00/DA | The Data Dictionary Lookup Code UDC specifies the table from which the system pulls the data dictionary information. For example, the address book record (AN8) used by the consoles for customers and suppliers should be retrieved from the AN8 field in the Address Book Master table (F0101). Values are:
|
| 00/DD | The Date Dimension UDC indicates the date units that the system uses in the consoles. The system uses these values in the hierarchical structure to drill down to the details of the metrics. Values are:
|
| 00/EA | The EnterpriseOne Analytics UDC identifies the type of console. Values are:
|
| 00/MG | The Metric Group UDC indicates the name of the metric group. Each metric is set up in a predefined group. These groups are based on the key performance areas. Values for the Financial Management and Compliance Console (FMCC) are:
Values for the Plant Manager's Dashboard (PMD) are:
|
| 00/MI | The Metrics Identifier UDC specifies the metrics that can be used to review performance. The system uses these values when configuring the console. Values for FMCC are:
|
| 00/MI continued |
Values for PMD are:
|
| 00/MI continued | Values 8000 through 8999 are reserved for clients.
Description 01 is the label that the system uses for the metric in the Dashboard program (P80D350). |
| 00/PE | The Analytics Presentation Type UDC indicates the type of presentation that is available for metrics. The system can display metrics as charts or grids. Values are:
|
| 00/QT | The Quarter UDC specifies the four quarters in a calendar year. The system uses this value only if you load the date dimension based on calendar year and not fiscal date pattern. Values are:
|
| 00/SB | The Dashboard Search By UDC specifies the hierarchy that the system uses for the drilldown in the console programs. Values are:
|
| 00/SE | The Series Description UDC specifies the labels for the metric charts and grids. For bar charts and combo charts, the system uses the descriptions for the X- and Y-axis labels. For grids, the system uses the descriptions for the column headings. Values are:
|
| 00/SE continued |
|
| 00/SE continued |
|
| 00/VC | The Analytics Variant Code UDC indicates the view by and hierarchy for individual metrics. The drilldown structure can be unique for each metric. Values are:
|
| 00/VC continued |
|
| 00/VC continued |
|
2.2.2 Understanding Next Numbers
JD Edwards EnterpriseOne Consoles use system 80D next numbers for actions and alert subscription definitions.
When you create an action for a related program, the system uses a next number to uniquely identify the action. The system uses the first next number bucket in system 80D for the action identifier.
The system also uses next numbers to identify the alert subscription definition. The system uses the second next number bucket in system 80D for the alert subscription identifier.
|
Note: You must set up next numbers to ensure that actions and alert subscriptions work properly. |
After you assign the next numbers for system 80D, you need to update the data dictionary items:
-
ACTIID should be set to use Index Number1 for System Code80D.
-
SUBSCR should be set to use Index Number2 for System Code80D.
2.2.3 Understanding Email and Distribution Lists
Email and distribution lists enable you to send an interested person information about a metric or metric group. Distribution lists can be set up for each metric group. The email addresses for all recipients are set up in the Dashboard Management program (P80D301) on the Edit Group form. When you send an email for a specific metric, the system sends the message to all persons in the group.
The Email link on the console summary and the View Metric Detail forms enables you to send emails using the standard email system of the organization. The default email client opens with the email addresses that are set up in the P80D301 program populated for the recipients. If you click the link from the console summary form, the system populates the subject line with the name of the metric group. If you click the link from the View Metric Detail form, the system populates the subject line with the name of the metric.
2.2.4 Understanding Charts
The JD Edwards EnterpriseOne Consoles enable you to review metrics using charts. This table lists the chart types that are used by JD Edwards EnterpriseOne Consoles:
| Type of Chart | Description |
|---|---|
| Bar Chart | Graph with vertical bars that represent volume, amount, percentage, or number of units for the metric. |
| Bar Chart with goal marker | Graph with vertical bars that represent volume, amount, percentage, or number of units for the metric and a diamond shaped marker that represents the goal for the metric. |
| Combo Chart (bar chart with line) | Graph with vertical bars that represent volume, amount, percentage, or number of units for the metric and a horizontal line that represents a trend for the metric. |
| Cluster Bar Chart | Graph with vertical bars that represent volume, amount, percentage, or number of units for the metric. The bars are grouped together by date to enable you to easily compare the different classifications such as product, business unit, brand, and so on. |
| Stacked Bar Chart | Graph with vertical bars stacked on top of each other that represent the different percentages for the metric. |
| Pie Chart | Circle split into sections that represent the different percentages for the metric. |
These charts enable the managers to review the metric visually to determine performance.
|
Note: If you do not use the continuous time dimension and no data is available for a metric, the system does not display a chart on the console. |
2.2.5 Understanding Analytics Currency
All transactional data amounts that the system processes and aggregates must be written in a single currency. Defining a single analytics currency tells the system what currency to store all the aggregation currency amounts in and also is the basis for any real-time currency conversion that occurs if the console currency is set up differently than the analytics currency. A single data store currency enables the system to efficiently store and analyze metric information.
The analytics currency is common among all consoles in JD Edwards EnterpriseOne products.
2.2.6 Forms Used to Set Up Constants
| Form Name | FormID | Navigation | Usage |
|---|---|---|---|
| Work with Next Numbers | W0002A | Enter NN in the Fast Path field. | Review next numbers. |
| Set Up Next Numbers by System | W0002C | Enter 80D in the System field and click Find.
Click Select. |
Define next numbers. |
| Work with Dashboard Constants | W80D300B | Configuration (G80D41), Constants | Review console default information. |
| Edit Dashboard Constants | W80D300A | Click Add New on the Work with Dashboard Constants form. | Set up default information. |
| Analytics Data Store Currency | W80D300CA | Configuration (G80D41), Analytics Data Store Currency | Set up analytics currency. |
2.2.7 Defining Next Numbers
Access the Set Up Next Numbers by System form.
- Use
-
Enter a description for the use of the next number.
- Next Number
-
Enter the number that the system will assign next. The system can use next numbers for voucher numbers, invoice numbers, journal entry numbers, employee numbers, address numbers, contract numbers, and sequential W-2s. You must use the next number types already established unless you provide custom programming.
For companies that you do not set up on Next Numbers by Company/Fiscal Year, the results vary, depending on the method selected on Next Numbers Constants:
-
If you are using method 1, the system creates a record for each company that you do not set up and starts numbering with 1 for all companies.
-
If you are using method 2, the system uses the starting number shown on Set Up Next Numbers by System (standard next numbers) for each company that you do not set up.
-
- Check Digit
-
Select an option that specifies whether the system adds a number to the end of each next number assigned. For example, if you are using check digits and the next number is 2, the system will add a check digit such as 7, making the last two numbers 27. The Check Digit option provides a method for increasing numbers randomly to prevent the assignment of transposed numbers. In this example, the system would never assign next number 72 while the Check Digits option is activated.
2.2.8 Setting Up Default Information
Access the Edit Dashboard Constants form.
- Dashboard
-
Enter a value from UDC 00/EA (EnterpriseOne Analytics) that identifies the console. The system uses the code to set up the individual consoles by attaching metrics, configurations, including metric groups and alerts, search by criteria, actions, goals, and lists in the Dashboard Management program (P80D301). The combination of the settings for the Dashboard field determines the appearance in the Dashboard program (P80D350).
- Search By Code
-
Enter a value from UDC 00/SB (Dashboard Search By) that identifies the fields that are available to filter information in the Dashboard program (P80D350).
The only search by fields that the system uses for FMCC are Date, Company, and Business Unit. The only search by fields that the system uses for PMD are Company, Branch/Plant, Product Family, and Customer/Supplier.
You define the search by values in the Dashboard Management program (P80D301). The values in UDC 00/SB are hard-coded and should not be changed.
2.2.9 Setting Up Analytics Currency
Access the Analytics Data Store Currency form.
- Data Store Currency
-
Enter the currency code that the system uses to store console currency amounts in the analytics data load, fact, and aggregate tables. The system uses the data store currency to display the information, unless the processing option for the Dashboard program (P80D350) is set to display a different currency.
The system can display the console information in any currency; however, only one currency at a time can appear on the console. The system stores data in the data store currency and converts the data to the display currency at display time.
Note:
You must define the data store currency code before loading data into the JD Edwards EnterpriseOne Console.You should not change the value in the Data Store Currency field after initial setup. If you change the currency code, the system will have data integrity issues because the data that is stored in the aggregate tables is currency-specific. To ensure data integrity, you should purge all of the data load programs that populate the aggregate tables and rerun the batch programs after you change the currency.
2.3 Setting Up the Consoles
This section provides overviews of console setup and metrics on multiple consoles and discusses how to:
-
Set processing options for the Dashboard Management program (P80D301).
-
Set up the console.
-
Set up metrics.
-
Revise configurations.
-
Create metric groups.
-
Set up search by filters.
-
Enter metric goals.
-
Enter related action definitions.
-
Create lists.
2.3.1 Understanding Console Setup
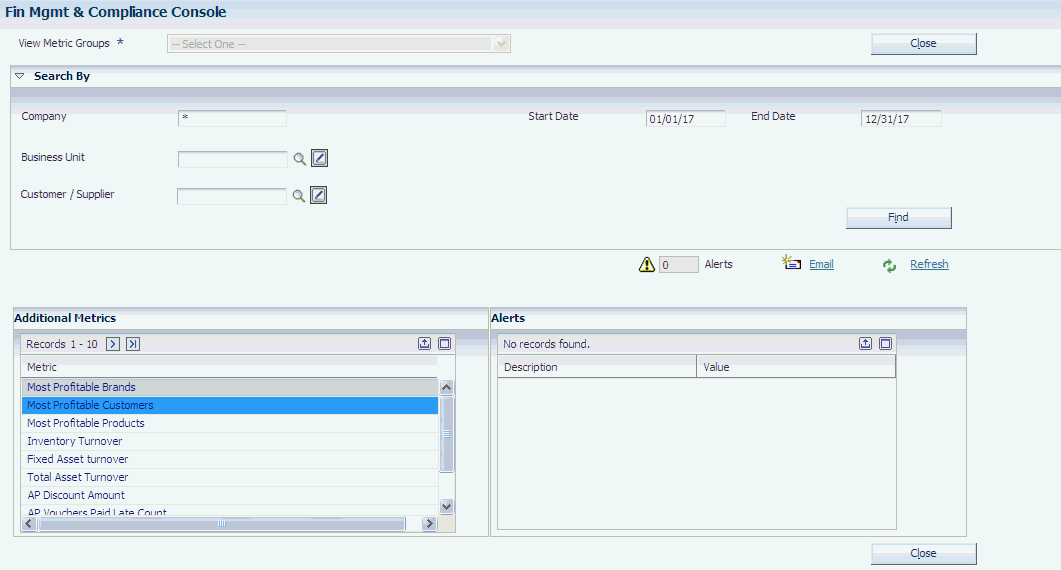
The Dashboard Management program (P80D301) enables you to set up the individual metrics, create groups of metrics, subscribe to alerts, define and attach related actions, and determine the criteria that the console uses for searches, lists, goals, and appearance on the consoles.
Two versions of the P80D301 program are available for setting up the console: basic and advanced. The basic version enables you to create search by filters, set up goals, and define lists. The advanced version is used by system administrators to define metrics, define configurations including metric groups and email lists, specify how the metrics appear and are arranged on the console, subscribe to alerts, define and attach related actions to a metric, and perform the tasks included in the basic version. Only a limited number of users should have access to the advanced version of the P80D301 program.
Metrics are predefined using the Metric tab in the P80D301 program. You determine whether to enable and display goals for the metric and to change the chart type that the system uses to display the metric data. You can also define new metrics using this interface. If you create new metrics, you must create and populate the data store.
The system groups metrics for each configuration of the console. The configuration determines the arrangement of the metrics and the default group that the system populates when console information is viewed. The system contains predefined metric groups for each console.
You can modify a metric group to suit the needs of the user. You can also set up additional groups to view metrics from the various key areas. For example, you can create a group with the inventory turns, cash to cash cycle time, backlog, and shipped revenue metrics. The console displays up to four metrics per group; however, you can access additional metrics within the group from the console.
2.3.1.1 Metric Goals and Thresholds
Goals are target levels for the company for a specified metric. Thresholds are minimum and maximum target levels or goals for the company for a specified metric. Goals and thresholds facilitate a quick assessment of whether that aspect of the financial health of the company is moving in the correct direction and whether a threshold level is breached. The system presents goals on charts for the manager to quickly identify the desired performance of the metric. Not all metrics have identifiable goals. You can set up goals for various levels in the hierarchical structure for a metric. For example, you can have a goal for a company, business unit, and specific customer for the same metric.
UDC 00/MI contains the metrics identifiers and uses the Special Handling field to determine whether a metric supports one or two goal values. The system retrieves and displays goal information based on the type of chart that is used by the metric. The system does not retrieve the goal values hierarchically.
For metrics that use the bar chart with goal markers, the system:
-
Retrieves the goal value only once for any set of key values, such as company, branch, and product family.
The system takes the values from the filter fields, view by fields, and drilldown position, and then determines how to complete the key fields. The system uses the date range in the filter to determine whether a goal is defined within the range for the key fields.
-
Displays the goal as red and green diamonds in each bucket.
The system does not connect the diamond markers with a line. If no goal is found, no marker appears.
The red diamond marker represents the lower goal and the green diamond marker represents the upper goal. If only one goal value is allowed for the metric, the system uses the red diamond to display the goal for each bucket.
For metrics that use the stacked bar charts, the system:
-
Retrieves the goal value based on the values in the filter fields and drill-down path.
The system does not consider individual bucket values when retrieving goal values.
-
Displays the goal as a single red line across the whole chart.
|
Note: If multiple goal values are available for the selected date range, the system averages the goal value for the metric. If you inquire on a metric with a date range of May 1 through June 10 and you have a goal value of 5 for May and 6 for June, the system uses a goal average of 5.5, using (5 + 6) ÷ 2 as the calculation. If the metric is a sum, the system prorates the goal over the selected date range. The system uses the goal value divided by the number of days in the month and then multiplied by the number of days inquired upon as the calculation. In the previous example, the system would use a goal of 7 based on the calculation ((5 ÷ 31) × 31) + (6 ÷ 30) × 10). |
2.3.1.2 Related Actions
Actions are tasks that you can perform directly from the console. General actions such as sending an email are available on both the console summary and View Metric Detail forms of the console. You can access context-sensitive actions, such as interactive or batch applications related to metrics and alerts, on the appropriate detail pages. Default actions are associated with alerts and metrics.
Each metric detail page contains links to access other JD Edwards EnterpriseOne programs, such as the Sales Order Entry program (P4210) and the Sales Update program (R42800). When you click the link, the system opens the program in a new window. You specify the version of the program that the system displays in the P80D301 program.
If you select a related action that is a batch program, the system displays the Batch Versions - Web Version program (P98305W) in a new window. The system populates the Batch Application field with the program number. You can then select and submit the version of the program that you want to run.
2.3.1.3 Lists
You can set up lists that narrow the criteria that is used for displaying metrics. You can create lists for address book records, such as customers and suppliers, and business units. For example, you can create a list for customers that includes only large customers for which you want to monitor only days sales outstanding.
2.3.2 Understanding Metrics on Multiple Consoles
You should not use the same metric UDC value on multiple consoles within JD Edwards EnterpriseOne. The system stores all metric definition information in the Metric Definition table (F80D303), and this table does not allow duplicate values.
The reason for this limitation is that the search by fields are unique for each console. You assign the search by value to each metric on the Metrics Revision form. For example, if you want to include the Profit Margin on Sales metric in groups for the FMCC and PMD consoles, you must ensure that the value you assign in the Search By field in the F80D303 table is supported by both consoles.
You can validate the metrics that are predefined for each console using the Metrics Revisions form.
2.3.3 Forms Used to Set Up Consoles
| Form Name | FormID | Navigation | Usage |
|---|---|---|---|
| Dashboard Configuration | W80D301B | Configuration (G80D41), Basic
Configuration (G80D41), Advanced |
Review and select the available consoles. |
| Advanced - {Console} | W80D301A | Select Fin Mgmt & Compliance Console on the Dashboard Configuration form and click Edit.
Select Plant Manager's Dashboard on the Dashboard Configuration form and click Edit. |
Set up and revise the console.
You can also define new metrics using the Dashboard Management program (P80D301). Defining new metrics is a custom process that also includes creating and populating the data store. |
| Basic - {Console} | W80D301A | Select Fin Mgmt & Compliance Console on the Dashboard Configuration form and click Edit.
Select Plant Manager's Dashboard on the Dashboard Configuration form and click Edit. |
Set up and revise the console.
You can also define new metrics using the Dashboard Management program (P80D301). Defining new metrics is a custom process that also includes creating and populating the data store. |
| Metric Revisions | W80D303A | Select the Metrics tab on the Advanced - {Console} form and click Add New. | Set up metrics. |
| Add Configuration or Edit Configuration | W80D320B | Click Add New on the Configurations tab on the Advanced - {Console} form.
Select the appropriate console on the Configurations tab on the Advanced - {Console} form and click Edit. |
Create or revise configurations. |
| Add Group or Edit Group | W80D320A | Click Add New on the Add Configuration form or Edit Configuration form.
Select an existing search by on the Group tab on the Edit Configuration form and click Edit. |
Create or revise metric groups and subscribe to alerts. |
| Add Search By or Edit Search By | W80D110B or W80D111A | Click Add New on the Search By tab on the Basic - {Console} form or Advanced - {Console} form.
Select an existing search by on the Search By tab on the Basic - {Console} form or Advanced - {Console}} form and click Edit. |
Set up or revise search bys.
The system uses the form associated with the console that you are revising. |
| Add Goal or Edit Goal | W80D107A | Click Add New on the Goals tab on the Basic form or Advanced form.
Select an existing goal on the Goals tab on the Basic - {Console} form or Advanced - {{{Console} form and click Edit. |
Enter or revise metric goals. |
| Add Action or Edit Action | W80D306B | Click Add New on the Actions tab on the Advanced - {Console} form.
Select an existing action on the Actions tab on the Advanced - {Console} form and click Edit. |
Enter or revise related action definitions. |
| Add Customer / Supplier List or Edit Customer / Supplier List | W80D103C | Select the Addresses link on the Lists tab on the Basic - {Console} form or Advanced - {Console} form and click Add New.
Select an existing list from the Addresses link on the Lists tab on the Basic - {Console} form or Advanced - {Console} form and click Edit. |
Create or revise lists. |
| Add Business Unit List or Edit Business Unit List | W80D103D | Select the Business Unit link on the Lists tab on the Basic - {Console} form or Advanced - {Console} form and click Add New.
Select an existing list from the Business Unit link on the Lists tab on the Basic - {Console} form or Advanced - {Console} form and click Edit. |
Create or revise lists. |
| Add Product Family List or Edit Product Family List | W80D103E | Select the Product Family link on the Lists tab on the Basic - {Console} form or Advanced - {Console} form and click Add New.
Select an existing list from the Product Family link on the Lists tab on the Basic - {Console} form or Advanced - {Console} form and click Edit. |
Create or revise lists. |
2.3.4 Setting Processing Options for the Dashboard Management Program (P80D301)
Processing options enable you to specify the display settings for the Dashboard Management program.
2.3.4.1 Display
This processing option controls the user mode.
- Enable Advanced User Mode
-
Specify whether the system enables or disables the advanced user mode. The advanced user mode should be used only by system administrators to set up the console configurations. Values are:
-
Blank: Disable advanced user mode.
-
1: Enable advanced user mode.
-
2.3.5 Setting Up the Console
Access the Advanced - {Console} form.
Select the tabs to access the appropriate forms to configure the console.
|
Note: Access the Basic - {Console} form to set up data in the Search By, Goals, and Lists tabs. |
2.3.6 Setting Up Metrics
Access the Metric Revisions form.
|
Note: The Metric Revisions form is for advanced setup. Only system administrators should be able to access this form. |
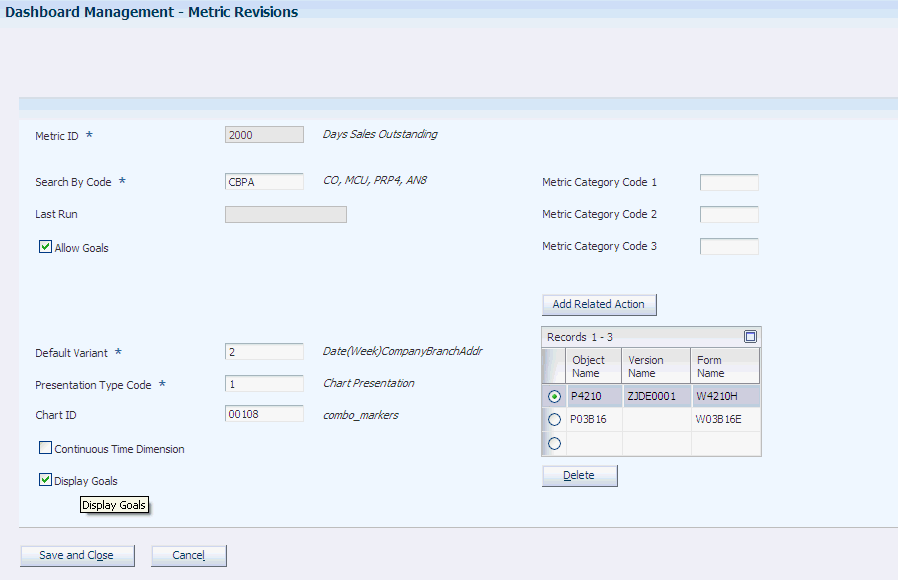
- Metric Identifier
-
Specify the numerical value from UDC 00/MI (Metric Identifier) that the system uses to identify the metric. The values in UDC 00/MI are hard-coded and should not be changed.
The Metric Identifier defines the individual metric for which you are setting up characteristics.
- Search By Code
-
Enter a value from UDC 00/SB (Dashboard Search By) that identifies the fields that are available to filter information in the Dashboard program (P80D350). The only search by fields that the system uses for FMCC are Date, Company, Business Unit, and Customer/Supplier. The only search by fields that the system uses for PMD are Company, Branch/Plant, Product Family, and Customer/Supplier.
You define the search by values on the Search By tab in the Dashboard Management program (P80D301). The values in UDC 00/SB are hard-coded and should not be changed. Not all metrics use all of the search by values that are defined.
- Last Run
-
Identifies the date that the metric was last updated. The system populates the Last Run field when the appropriate metric data load program is run.
- Allow Goals
-
Specify whether the selected metric is allowed to have a goal. Not all metrics have identifiable goals.
The system ignores the Allow Goals setting if a metric is not allowed to have a goal.
If you do not select the Allow Goals option for a metric that can have a goal defined, the system will not display the metric on the Edit Goals form.
- Default Variant
-
Enter a value from UDC 00/VC (Analytics Variant Code) that identifies the default structure for which the metric can be viewed. The variant dictates the structure that the system uses to drill down and up for metric information and determines the data dictionary fields that the system uses to group and review metric data.
A variant consists of one or more data dictionary values from UDC 00/DA (Data Dictionary) and is defined in the Variant Definition table (F80D304). The values in UDC 00/VC are hard-coded and should not be changed.
Note:
A variant is not required for metrics that use a pie chart to display information. - Presentation Type Code
-
Enter a value from UDC 00/PE (Analytics Presentation Type) that the system uses to display the metric data for JD Edwards EnterpriseOne Consoles.
The system contains predefined presentation types, chart or grid, for each metric. You can change the presentation type for a metric if required.
- Chart ID
-
Enter a value from UDC 00/CI (Chart ID) that specifies the type of chart the system uses to display the metric information.
The system uses the chart ID only when Presentation Type Code is set to Chart. The values in UDC 00/CI are hard-coded and should not be changed.
- Continuous Time Dimension
-
Identify whether the metric uses an ongoing time frame to present the information. If a time dimension is missing, the system fills in the missing values with zeros during the presentation.
The system contains predefined time dimension information for each metric in the Metric Definition table (F80D303).
Note:
If you do not select the Continuous Time Dimension option and no data is available for a metric, the system does not display a chart.See Prepopulated Tables.
- Display Goals
-
Specify whether the system displays the goal information in the related chart or grid. If you do not identify a goal for the metric, the system does not use the Display Goals setting.
- Metric Category Code 1
-
Enter a value from UDC 00/CX that identifies additional metric information. The category code is for reference only.
- Metric Category Code 2
-
Enter a value from UDC 00/CY that specifies the number of records the system displays on the console. The system uses the number to determine the number of bars on each chart for the Most Profitable Brands, Most Profitable Products, and Most Profitable Customers metrics.
- Metric Category Code 3
-
Enter a value from UDC 00/CZ that specifies the brand category code, SRP1 through SRP5, that the system displays on the console for the Revenue by Brand and Most Profitable Brands metrics.
- Add Related Action
-
Select the applications or universal batch engines (UBEs) that you want to access from the specified metric. You define the program, version, and form name for applications on the Action tab in the Dashboard Management program (P80D301).
|
Note: The system displays a message if the metric is currently being updated by the corresponding metric data load batch program. |
2.3.7 Revising Configurations
Access the Add Configuration form or Edit Configuration form.
|
Note: The Add Configuration form and Edit Configuration form are for advanced setup. Only system administrators should be able to access these forms. |
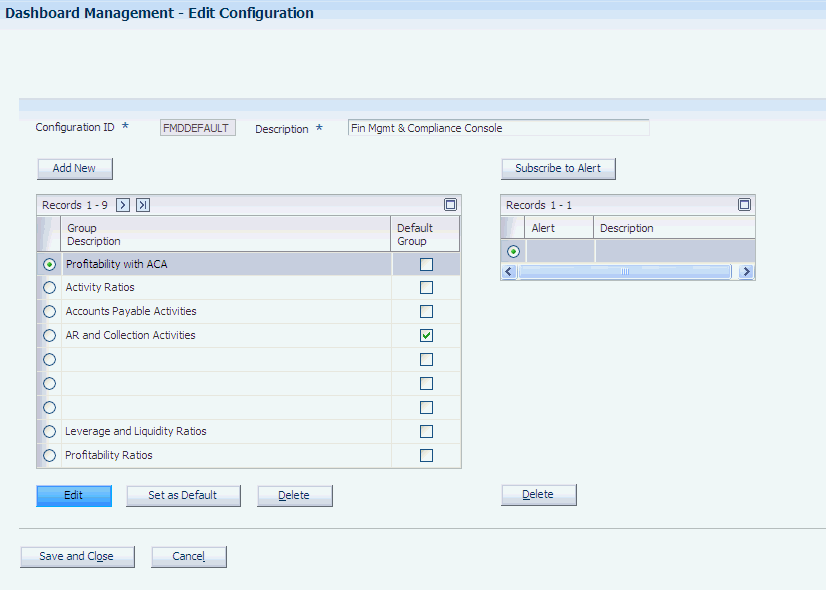
- Configuration ID
-
Identify the console configuration to present when you are viewing metrics information on the console. The system uses the configuration ID in the processing options of the Dashboard program (P80D350).
- Description
-
Enter a brief description of the configuration ID.
- Subscribe to Alert
-
Select to subscribe to one or more alerts per configuration. When you subscribe to alerts, you receive alert notifications on the console summary and detail pages.
- Set as Default
-
Indicate the metric group that the system uses as the default presentation on the Dashboard program (P80D350).
The system sets the group that is selected in the grid as the default group.
2.3.8 Creating Metric Groups
Access the Add Group form or Edit Group form.
|
Note: The Add Group form and Edit Group form are for advanced setup. Only system administrators should be able to access these forms. |

- Metric Group ID
-
Enter the metric group that the system uses to display metric information on the Dashboard program (P80D350).
- Description
-
Enter a brief description of the metric group.
- Email ID (s)
-
Enter the email addresses, separated by a comma, that the system uses as the recipient addresses when sending emails from the console.
The system does not validate email addresses against the JD Edwards EnterpriseOne Foundation - Address Book system.
- Metric
-
Select the metric identifier from UDC 00/MI (Metric Identifier) to include in the metric group.
Note:
You should include only metrics that were set up for the selected console configuration. You can validate the metric setup on the Metric Revisions form. - Metric Description
-
Display the description of the metric that you included in the metric group.
- Variant
-
Select the variant that the system uses from UDC 00/VC (Analytics Variant Code) for the specified metric within the group.
The variant determines how the system allows you to drill down to the details about the metric.
- Variant Description
-
Display the variant description.
- Move Up and Move Down
-
Click to change the display sequence for the metrics within the group.
|
Note: The system does not verify that the metric you add to a group is a valid metric for the configuration. You should be cautious when selecting metrics. |
2.3.9 Setting Up Search By Filters
Access the Add Search By form or Edit Search By form.
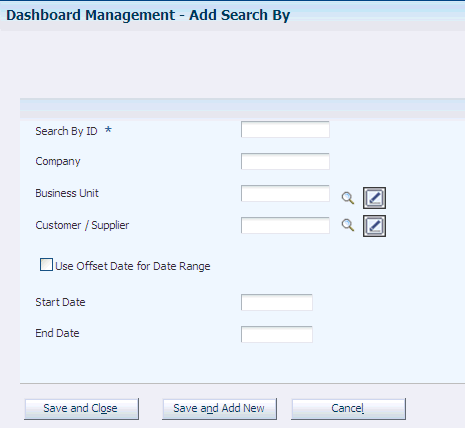
- Search By ID
-
Enter an alphanumeric identifier for the filter information.
- Business Unit
-
Enter a code that represents an individual business unit or the name of a list of business units. You set up lists using the List tab in the Dashboard Management program (P80D301).
- Customer / Supplier
-
Enter a code that represents an individual address book number or the name of a list of address book numbers. The address book number can represent a customer or supplier. Use the List tab in the P80D301 program to set up a list.
- Product Family
-
Enter a code that represents an individual product group or the name of a list of product groups. Use the List tab in the P80D301 program to set up a list.
- Use Offset Date for Date Range
-
Specify whether the date range that the system provides on the Dashboard program (P80D350) is calculated.
If the system calculates dates, you must enter values in the Offset Based on Date and Offset Days fields.
If the system does not calculate dates, you must enter values in the Start of Date Range and End of Date Range fields.
- Offset Based on Date
-
Enter the date from which either the from or through date should be calculated.
If you enter a positive number in the Offset Days field, the system uses the Offset Based on Date field as the from date. If you enter a negative number in the Offset Days field, the system uses the Offset Based on Date field as the through date.
If you leave this field blank, the system uses the current date.
- Offset Days
-
Enter the number of days that the system uses to calculate the metric data. The system uses the Offset Days field in combination with the Offset Based on Date field to determine the from and through dates.
If you enter a positive number in the Offset Days field, the system adds the number to the Offset Based on Date field value to calculate the through date. If you enter a negative number in the Offset Days field, the system subtracts the number from the Offset Based on Date field value to calculate the from date.
- Start of Date Range
-
Enter the beginning date of the search range. If you do not specify a beginning date, the system uses the current date.
- End of Date Range
-
Enter the ending date of the search range. If you do not specify an ending date, the system populates the To field on the console with the wildcard identifier (*) and issues a hard error message. You must enter a value in the To field.
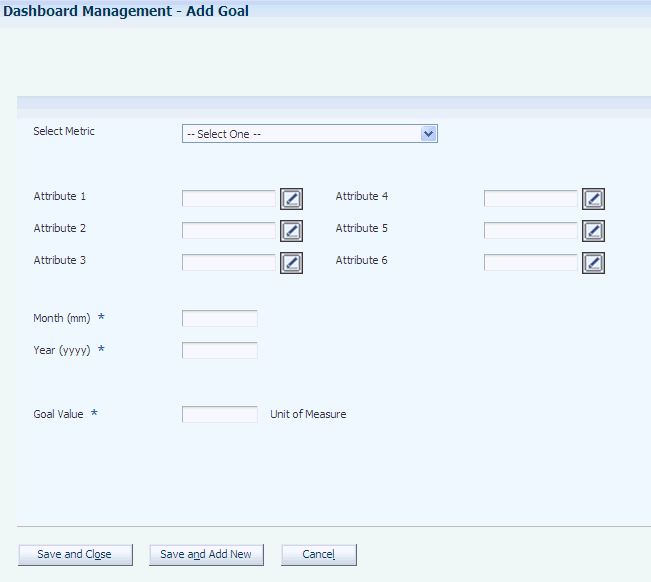
2.3.10 Entering Metric Goals
Access the Add Goal form or Edit Goal form.
|
Note: The system uses information from the Goals Definition Cross Reference table (F80D108) to determine the attributes that are available for goals for the metric. For example, if you select the Days Sales Outstanding metric, the attributes available are Company, Business Unit, and Customer / Supplier. |
See Prepopulated Tables.
- Select Metric
-
Enter a value from UDC 00/MI (Metric Identifier) for which the goal is being defined. Only metrics with the Allow Goals option selected in the metric setup are available to enter goal information.
- Month (mm)
-
Enter the month value for the metric-specific goal.
- Year (yyyy)
-
Enter the year value for the metric-specific goal.
- Goal Value and Lower Goal
-
Enter the numerical value that represents the performance goal for the specified metric. When you add goal information to metrics that enable upper and lower goal levels, this field represents the lower performance goal value.
- Upper Goal
-
Enter the numerical value that represents the upper performance goal for the specified metric. This field is available only for metrics that allow upper and lower goal levels.
The system displays this field only when you enter 2 in the Special Handling field of UDC 00/MI (Metric Identifier). When you add goal information to metrics that enable upper and lower goal levels, this field represents the upper goal value. The system stores the value in the Goals Definition Tag table (F80D107A).
2.3.11 Entering Related Action Definitions
Access the Add Action form or Edit Action form.
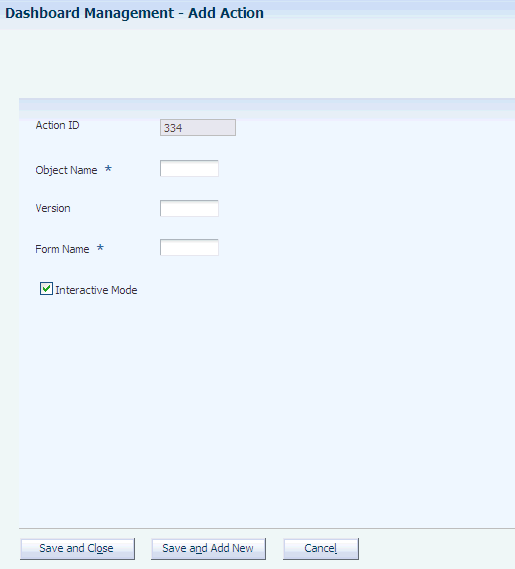
- Action ID
-
Display the unique identifier for the action.
The system generates the value in the Action ID field using next numbers.
- Object Name
-
Enter the identifier for a system object.
JD Edwards EnterpriseOne architecture is object-based. Discrete software objects are the building blocks for all applications, and developers can reuse the objects in multiple applications. The JD Edwards EnterpriseOne Object Librarian tracks each object. Examples of system objects include:
-
Batch Applications (such as reports)
Batch applications must have processing options for the system to access the program as a related action.
-
Interactive Applications
-
- Version
-
Enter the value for the user-defined set of specifications that control how applications and reports run.
You use versions to group and save a set of user-defined processing option values and data selection and sequencing options. The system associates interactive versions with applications, usually as a menu selection. The system associates batch versions with batch jobs or reports. To run a batch process, you must select a version.
- Form Name
-
Enter the unique identifier for the form of the application that is selected.
- Interactive Mode
-
Specify whether the system uses an interactive execution mode for the program. If you select the Interactive Mode option, the Form Name field is enabled.
|
Note: You must enter the application and form names exactly as they appear in the JD Edwards EnterpriseOne Object Manager Workbench (OMW) to ensure that the system calls the correct action. |
2.3.12 Creating Lists
Access one of the Add List forms or Edit List forms.
Figure 2-8 Add Customer / Supplier List form
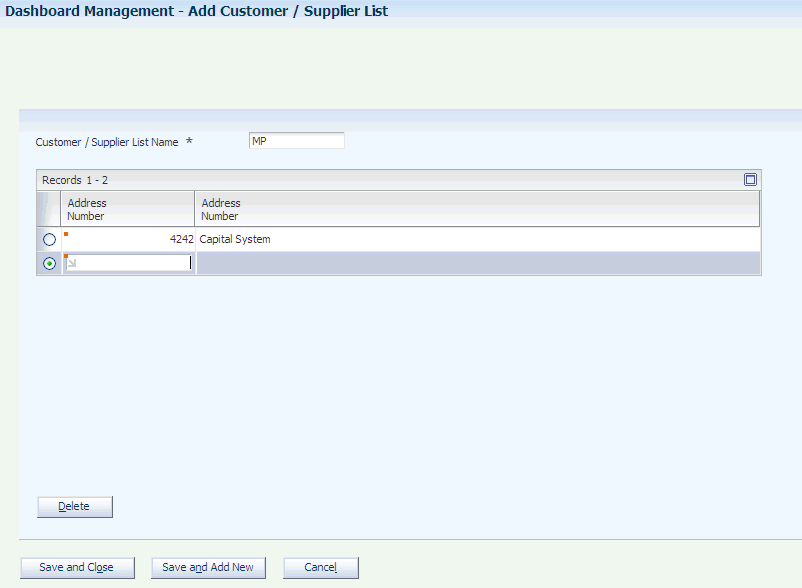
Description of "Figure 2-8 Add Customer / Supplier List form"
- List Name
-
Enter a unique identifier for the list. Depending on the type of list selected, the identifier is for Customer / Supplier, Business Unit, or Product Family lists.
2.4 Loading Data
This section provides overviews of data loading for the JD Edwards EnterpriseOne Consoles and full and incremental data loads and discusses how to:
-
Set processing options for the Date Dimension program (R80D100).
-
Run the Date Dimension program (R80D100).
See Appendix: JD Edwards EnterpriseOne Console Data Movement Reports.
2.4.1 Understanding Data Loading
You load data into the JD Edwards EnterpriseOne Console tables using batch programs. The batch programs pull the data from other system tables and populate the JD Edwards EnterpriseOne Console data tables. You must run the data load programs prior to viewing any metric information because the system aggregates data in a different manner than most transaction tables. The individual metrics depend on the data in the tables to be timely and accurate; therefore, you should set up the programs to run on a regular schedule.
You can use subsystem processing to reduce the runtime that is required when running the data load programs.
Not all batch programs perform the actual metric calculation; the system also performs calculations during runtime of the console. The system stores data at the lowest level of aggregation and performs the calculations at runtime to maximize performance.
You should set up each of the batch programs in the scheduler to run daily to ensure that the metrics include accurate and timely information.
|
Note: Although no program removes data from the JD Edwards EnterpriseOne Console data load tables, you can reload information in the table by running the full load batch program or by setting the Number of Days to Rebuild processing option back to the first day on which you have data to report. Otherwise, you must contact your database administrator to clear the table. |
2.4.1.1 Currency
The system always retrieves the domestic currency amounts from the JD Edwards EnterpriseOne Console transaction tables. If the data store currency differs from the transaction currency, the system retrieves the exchange rate that is in effect on the day the data load batch program is run, and converts the amount that it stores in the data load table. If the console currency differs from the data store currency, the system retrieves the exchange rate that is in effect at runtime of the console, and converts the amounts that it displays on the console to the console currency.
2.4.1.2 Reset Data Load Programs
If one of the data load programs ends abnormally, you must reset the Being Updated option for the metric before you can submit the batch program again. If you fail to reset the option, the system does not update the associated data load table. To reset the Being Updated option, access the Metric tab in the P80D301 program, and click the Reset Data Load button. On the Reset Data Load form, select the metric to reset, and click the Reset button. The system changes the value of the Being Reset field from 1 to 0. After the option is reset, you must rerun the batch program to load the metric data.
2.4.2 Understanding Full and Incremental Data Loads
A full initial load enables the system to load all data from the other applicable system tables into the JD Edwards EnterpriseOne Console tables. Typically, you perform the full initial load only when setting up the system. You then run incremental loads on an ongoing basis to update the JD Edwards EnterpriseOne Console tables with new or revised data.
Some of the data load batch programs do not differentiate between full and incremental loads. The system uses the Number of Days to Rebuild processing option to determine how to build data for full and incremental loads. If you leave this processing option blank, the system retrieves records for which the date is later than or equal to the last processing date in the associated table and before or equal to the current date. If the table contains no processing date, then the system runs an initial full load of data.
For incremental loads that specify to rebuild the table for a specific number of days, the system subtracts the number of days entered in the processing option from the current date. The system retrieves only records with a general ledger date that is on or after the calculated rebuild date.
You use the same batch programs to run the full and incremental data loads. If you run a program twice in the same day, the system replaces the existing records for the day in the table with new records.
2.4.2.1 Example: Number of Days to Rebuild
These vouchers are in the Accounts Payable Ledger table (F0411):
| Number | Voucher Amount | General Ledger Date |
|---|---|---|
| 101 | 100 USD | January 01 |
| 102 | 150 USD | September 09 |
| 103 | 200 USD | February 10 |
If you enter 60 in the Number of Days to Rebuild processing option and run the R80D254 program on February 12, the system uses a start date of December 13 from the previous year (February 12 minus 60 days). In this case, the system selects vouchers 101 and 103 for processing.
If you leave the Number of Days to Rebuild processing option blank and run the R80D254 program on February 12, the system uses the last run date of the R80D254 program as the start date. For instance, if the last run date was February 01, the system selects only voucher 103 for processing.
2.4.3 Setting Processing Options for the Date Dimension Program (R80D100)
Processing options enable you to specify the default processing for the Date Dimension program.
2.4.3.1 Processing
These processing options control how the system creates date dimensions.
- 1. Year (4 digit year)
-
Enter the four-digit year for which the system creates records in the Date Dimension table (F80D100).
If you enter a value in the Fiscal Date Pattern field, and the Year field is blank, the system uses the fiscal year associated with the date that the program is run.
If you do not enter a value in the Fiscal Date Pattern field, and the Year field is blank, the system uses the calendar year for the date that the program is run.
- 2. Additional Number of Years Past
-
Enter the number of previous years for which the system creates records in the Date Dimension table (F80D100).
A value of zero or blank indicates that the system does not create records for any additional years and the system creates records only for the year that is specified in the Year field.
A value of 1 indicates that the system creates records for one past year in addition to the year that is specified in the Year field.
- 3. Fiscal Date Pattern
-
Specify the fiscal date pattern that the system uses when populating the Date Dimension table (F80D100).
A blank value indicates that the system uses the calendar year and not the fiscal date pattern.
Note:
All consoles must use the same fiscal date pattern.If you change fiscal date patterns, you must clear all records from the F80D100 table and rerun all years. Changing fiscal date patterns is an unusual operation and should not be performed often.
- 4. End of Week Day (Calendar year only)
-
Specify the day of the week that the system uses for the end of a week. Values are:
-
Blank: The system uses Saturday as the end of week day.
-
0: Sunday
-
1: Monday
-
2: Tuesday
-
3: Wednesday
-
4: Thursday
-
5: Friday
-
6: Saturday
The system does not use the value in the End of Week Day field when using fiscal date patterns. For the fiscal date patterns, the system uses the week end date from the 52 Period Accounting table (F0008B).
-
2.4.4 Running the Date Dimension Program (R80D100)
Enter BV in the Fast Path field, then enter R80D100 in the Batch Application field.
The Date Dimension program (R80D100) enables you to populate the PMD - Date Dimension table (F80D100) with the days, months, quarters, and weeks in each year that is specified.
The system uses the F80D100 table to determine how to display the date view by information on the console. All metrics use the F80D100 table. The F80D100 table needs to be populated for all years that have metrics data. If a year is not in the F80D100 table and data is available in a metrics table, then the system does not display the data in the metrics chart.
The R80D100 program does not generate output. You must review the records in the F80D100 table for accuracy.
|
Note: You must run the R80D100 program prior to loading any data for the JD Edwards EnterpriseOne Console system. |