6 Managing Compliance
This chapter contains the following topics:
6.1 Understanding Compliance Alerts
Compliance is the ability to assess whether your organization adheres to financial management mandates and standards specified by your company or a governing body. Compliance enables executives to ensure that your organization observes the policies for specific financial system settings. The JD Edwards EnterpriseOne system facilitates the adherence to policies by sending alerts to notify responsible personnel of changes.
Alerts visually notify the person viewing the metric information in the JD Edwards EnterpriseOne Financial Management and Compliance Console (FMCC) when issues arise that must be addressed. For example, if you change a system constant setting, the system sends an alert to the persons on the distribution list to notify them of the change. The system generates alerts through a scheduled batch application or by a table trigger.
The system creates compliance alerts when you change:
-
System constants settings.
-
AP audit match settings.
-
Credit limits.
-
Expense policy settings.
6.2 Changing System Constants Settings
This section provides overviews of the general accounting (GA) settings, AP settings, and accounts receivable (AR) settings that trigger alerts and discusses how to:
-
Change GA settings.
-
Change AP settings.
-
Change AR settings.
6.2.1 Understanding GA Settings that Trigger Alerts
GA system settings control how the system processes and approves batches, whether the system allows you to post before cutoff dates and if it allows invalid accounts, how you identify symbols for accounts, and how the system processes intercompany transactions.
The system creates an alert record in the Alert Instance (F80D311), Alert Instance Tag (F80D311A), Alert Instance Status (F80D315), and Compliance Detail (F80D131) tables when you make changes to these fields in the General Constants table (F0009):
| Field Name | Alias |
|---|---|
| Batch Control Required GL | ICRG |
| Batch Control Required AR | ICRR |
| Manager Approval of Input GL | IARG |
| Manager Approval of Input AR | IARR |
| Allow PBCO Postings | PBCO |
| Allow Invalid Accounts | ALIA |
| Allow Multicurrency Intercompany Trans | DOT1 |
The alert shows changes by individual field.
6.2.2 Understanding AP Settings that Trigger Alerts
AP system settings control how the system processes and approves batches, which offset method is used, how to edit duplicate invoice numbers, which is the current payment status of a voucher, and how the aging period buckets are used.
The system creates an alert record in the F80D311 and F80D311A tables when you make changes to these fields in the F0009 table:
| Field Name | Alias |
|---|---|
| Batch Control Required | ICRP |
| Manager Approval of Input | IARP |
| Duplicate Invoice Number Edit | DUIN |
The alert shows changes by individual field.
6.2.3 Understanding the AR Settings that Trigger Alerts
AR settings enable you to define the dates and periods that the system uses to post AR records.
The system creates an alert record in the F80D311, F80D311A, F80D315, and F80D131 tables when you make changes to these fields in the Company Master table (F0010):
| Field Name | Alias |
|---|---|
| Age As of Date | DAG |
| Aging Method | AGEM |
| Aging Bucket | CRDY |
| Aging Bucket | AGR1 |
| Aging Bucket | AGR2 |
| Aging Bucket | AGR3 |
| Aging Bucket | AGR4 |
| Aging Bucket | AGR5 |
| Aging Bucket | AGR6 |
| Aging Bucket | AGR7 |
The alert shows changes by company number and company name, which the system retrieves from the Company Constants table (F0010).
6.2.4 Forms Used to Change System Constants Settings
| Form Name | FormID | Navigation | Usage |
|---|---|---|---|
| General Accounting Constants | W0000B | General Accounting System Setup (G0941), General Accounting Constants
Click the General Accounting Constants button on the System Setup form. |
Change GA settings. |
| Accounts Payable Constants | W0000E | Click the Accounts Payable Constants button on the System Setup form. | Change AP settings. |
| Work With A/R Constants | W0000I | Click the Accounts Receivable Constants button on the System Setup form. | Review AR settings. |
| Accounts Receivable Constants | W0000D | Select a company on the Work With A/R Constants form. | Change AR settings. |
6.2.5 Changing GA Settings
Access the General Accounting Constants form.
|
Note: The system generates alert messages only for the fields listed. |
Figure 6-1 General Accounting Constants form

Description of "Figure 6-1 General Accounting Constants form"
- Batch Control Required
-
Select to specify whether the system displays an additional form to verify the transaction totals that you enter for each batch. The system displays an additional form when you enter a batch. You enter the total number of documents and the total amount that you expect the batch to contain. When you finish entering each batch and close the program, the system displays the difference, if any, between the totals that you expected to enter and the totals that you actually entered.
If you do not select this option, the system does not display an additional form.
- Manager Approval of Input
-
Select to indicate whether the manager is required to approve general accounting batches before they can be posted. The manager must approve batches. The system assigns a pending status to the batch, and a manager must approve it before it can be posted.
If you do not select this option, the manager is not required to approve batches. The system assigns an approved status to the batch, and it does not require manager approval.
- Allow PBCO Postings (allow Post Before Cutoff postings)
-
Select to specify whether the system allows posting to previous accounting periods. If you allow posting to previous periods, the system generates a warning message to prevent an accidental posting to a previous period.
- Allow Invalid Accounts
-
Select to specify whether the system allows the entry of invalid account numbers for the distribution of vouchers, invoices, and journal entries.
If you select this option, you can enter invalid account numbers if the number is preceded by the invalid account symbol, which is #. If you allow entries with invalid account numbers, you must either change the number to a valid account number or set up a new account number before the batch will post. The system verifies the general ledger account number against the Account Master table (F0901).
- Allow Multi-Currency Intercompany Trans (allow multi-currency intercompany transactions)
-
Select to specify whether the system allows intercompany transactions between companies with different base currencies. If you select this option, you must create intercompany settlements in either the detail or configured hub mode. The post program creates adjusting entries for the intercompany accounts in the foreign currency of the transaction.
If you do not select this option, the system does not allow intercompany transactions between companies with different base currencies.
6.2.6 Changing AP Settings
Access the Accounts Payable Constants form.
|
Note: The system generates alert messages only for the fields listed. |
Figure 6-2 Accounts Payable Constants form
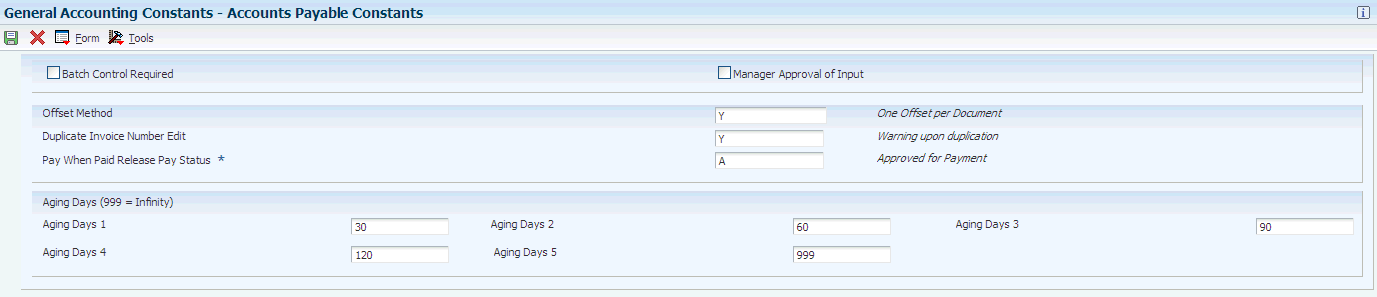
Description of "Figure 6-2 Accounts Payable Constants form"
- Batch Control Required
-
Select to specify whether the system displays an additional form to verify the transaction totals that you enter for each batch. The system displays an additional form when you enter a batch. You enter the total number of documents and the total amount that you expect the batch to contain. When you finish entering each batch and close the program, the system displays the difference, if any, between the totals that you expected to enter and the totals that you actually entered.
If you do not select this option, the system does not display an additional form.
- Manager Approval of Input
-
Select to indicate whether the manager is required to approve general accounting batches before they can be posted. The manager must approve batches. The system assigns a pending status to the batch, and a manager must approve it before it can be posted.
If you do not select this option, the manager is not required to approve batches. The system assigns an approved status to the batch, and it does not require manager approval.
- Duplicate Invoice Number Edit
-
Enter a code that specifies whether the JD Edwards EnterpriseOne Accounts Payable system validates the invoice number to determine whether it is a duplicate. Values are:
-
H: The system validates the invoice number. If the number is a duplicate, the system issues an error message and requires that you enter a unique invoice number.
-
Y: The system validates the invoice number. It the number is a duplicate, the system issues a warning message but does not require that you enter a unique invoice number. The system permits the duplication.
-
N: The system does not validate the invoice number, and it does not issue an error message, regardless of whether the invoice number that you enter is a duplicate.
To locate duplicate invoice numbers, run the Suspected Duplicate Payments report (R04601).
Note:
The system does not validate invoice numbers for vouchers with document type NO. These vouchers are created by the Generate Reimbursements program (R03B610). -
6.2.7 Changing AR Settings
Access the Accounts Receivable Constants form.
|
Note: The system generates alert messages only for the fields listed. |
Figure 6-3 Accounts Receivable Constants form

Description of "Figure 6-3 Accounts Receivable Constants form"
- Age as of Date
-
Enter a date that the system uses to determine the aging category to which to assign an invoice. The system compares the aging date to the invoice date, statement date, due date, or general ledger date, which is defined by the value in the Date Aging Based On field, and then uses the value in the Aging Method field to determine which aging category to update.
If you use method 1, the aging categories are defined in the Aging Days fields (CRDY, AGR1, AGR2, AGR3, AGR4, AGR5, AGR6, and AGR7) in the Accounts Receivable constants.
If you leave this field blank, the system uses the current date.
Note:
The JD Edwards EnterpriseOne Sales Order Management system also uses this date for credit checks. Leave this field blank to ensure that the credit checks are always current. - Aging Method
-
Enter a code that designates which aging categories the system uses to assign invoices. The system uses the date specified in the Age as of Date field and the value specified in the Date Aging Based On field to calculate the aging for each invoice, and then assigns them to the aging category specified by this code. Valid codes are:
-
1: Aging days.
The system assigns invoices to the aging categories specified in the Aging Days fields. The aging categories are user defined.
-
2: Fiscal periods.
The system uses the fiscal periods defined by the date pattern assigned to the company record as the aging categories.
-
3: Calendar.
The system uses each calendar month as an aging category.
-
- Aging Days Current
-
Enter a value that the system uses in conjunction with the value of the Aging Bucket 1 field to define the number of days in the current aging category.
- Aging Buckets
-
Enter a value that the system uses in conjunction with the previous aging bucket to define the intervals for the aging categories.
6.3 Changing AP Audit Match Settings
This section provides an overview of the AP audit match settings that trigger alerts and discusses how to change AP audit match settings.
6.3.1 Understanding the AP Audit Match Settings that Trigger Alerts
Purchasing tolerance rules enable you to define tolerances for quantity, cost, and extended amounts for incoming receipts. The tolerance amounts can be set up for individual items, commodity class codes, and company.
The system creates an alert record in the F80D311, F80D311A, F80D315, and F80D131 tables when you make changes to these fields in the Purchasing Tolerance Rules table (F4322):
| Field Name | Alias |
|---|---|
| Quantity Tolerance Percent | RPQT |
| Quantity Tolerance Units | RUQT |
| Unit Cost Tolerance | RUAT |
The system only generates alerts when you change records in the F4322 table where the Function Type field (FNTY) is equal to 1 (Voucher Match).
The alert shows changes by item number and description, which the system retrieves from the Item Master table (F4101).
6.3.2 Forms Used to Change AP Audit Match Settings
| Form Name | FormID | Navigation | Usage |
|---|---|---|---|
| Work With Purchasing Tolerance Rules | W4322B | Procurement System Setup (G43A41), Tolerance Rules | Review existing tolerance rules for purchasing. |
| Purchasing Tolerance Rules Revisions | W4322A | Select a row with the Func Type (function type) field equal to 1 on the Work With Purchasing Tolerance Rules form and click Select. | Change AP audit match settings. |
6.3.3 Changing AP Audit Match Settings
Access the Purchasing Tolerance Rules Revisions form.
|
Note: The system generates alert messages only for the fields listed. |
Figure 6-4 Purchasing Tolerance Rules Revisions form
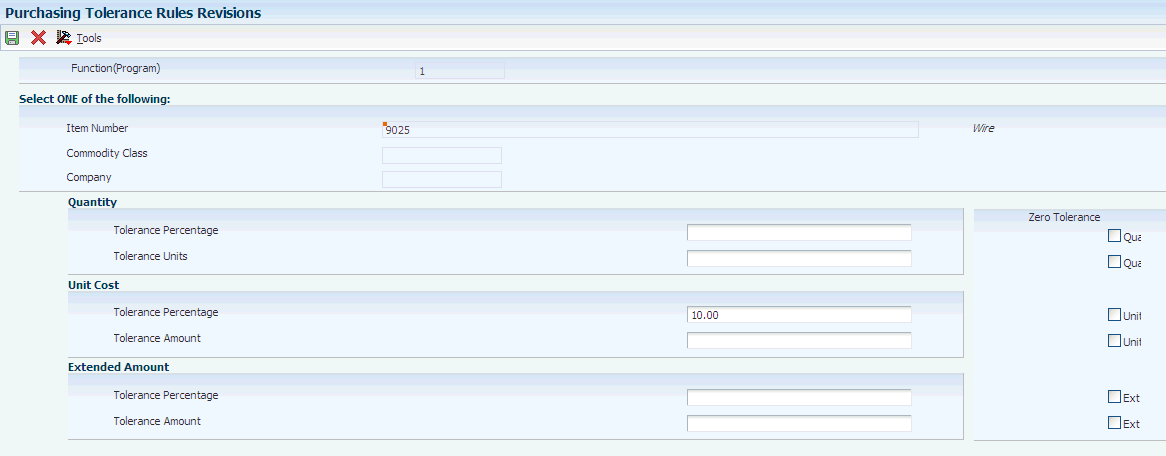
Description of "Figure 6-4 Purchasing Tolerance Rules Revisions form"
- Quantity Tolerance Percentage
-
Enter a percentage above which the system accepts a purchase order line without issuing a warning message. The percentage is based on the line quantity, and the system uses it during the receiving process. Enter the percentage in whole numbers. For example, enter 10 percent as 10.
If you leave this field blank, the system does not perform tolerance checking.
- Quantity Tolerance Units
-
Enter the number of units above which the system accepts a purchase order line without issuing a warning message. The unit is based on the line quantity, and the system uses it during the receiving process.
If you leave this field blank, the system does not perform tolerance checking.
- Unit Cost Tolerance Amount
-
Enter the tolerance amount above which the system accepts a purchase order line without issuing a warning message. The amount is based on the line price, and the system uses it during the receiving process.
If you leave this field blank, the system does not perform tolerance checking.
6.4 Updating Credit Limits
This section provides an overview of the credit limit settings that trigger alerts and discusses how to update credit limits.
6.4.1 Understanding Credit Limit Settings that Trigger Alerts
You set up credit limits in the customer master record. You can enter an address book record directly using the Customer Master Information program (P03013) or you can use the Address Book program (P01012). An address book record for a customer must exist in the system before you can enter a customer master record.
The system creates an alert record in the F80D311, F80D311A, F80D315, and F80D131 tables when you make changes to these fields in the Customer Master by Line of Business table (F03012):
| Field Name | Alias |
|---|---|
| Credit Limit | ACL |
| Recall for Credit Review Date | RVDJ |
The alert shows changes by customer number and customer name, which the system retrieves from the Address Book Master table (F0101).
|
Note: If you activate workflow and add or change the credit limit, the system sends a workflow message to the credit manager. The credit manager must approve the change to the credit limit before the system delivers the compliance alert. |
6.4.2 Forms Used to Update Credit Limits
| Form Name | FormID | Navigation | Usage |
|---|---|---|---|
| Work With Customer Master | W03013A | Customer Invoice Entry (G03B11), Customer Master Information | Select customer master records for review and revision. |
| Customer Master Revision | W03013B | Select a customer on the Work With Customer Master form, and click Select. | Update credit limits and recall for review date. |
6.4.3 Updating Credit Limits
Access the Customer Master Revision form and select the Credit tab.
|
Note: The system generates alert messages only for the fields listed. |
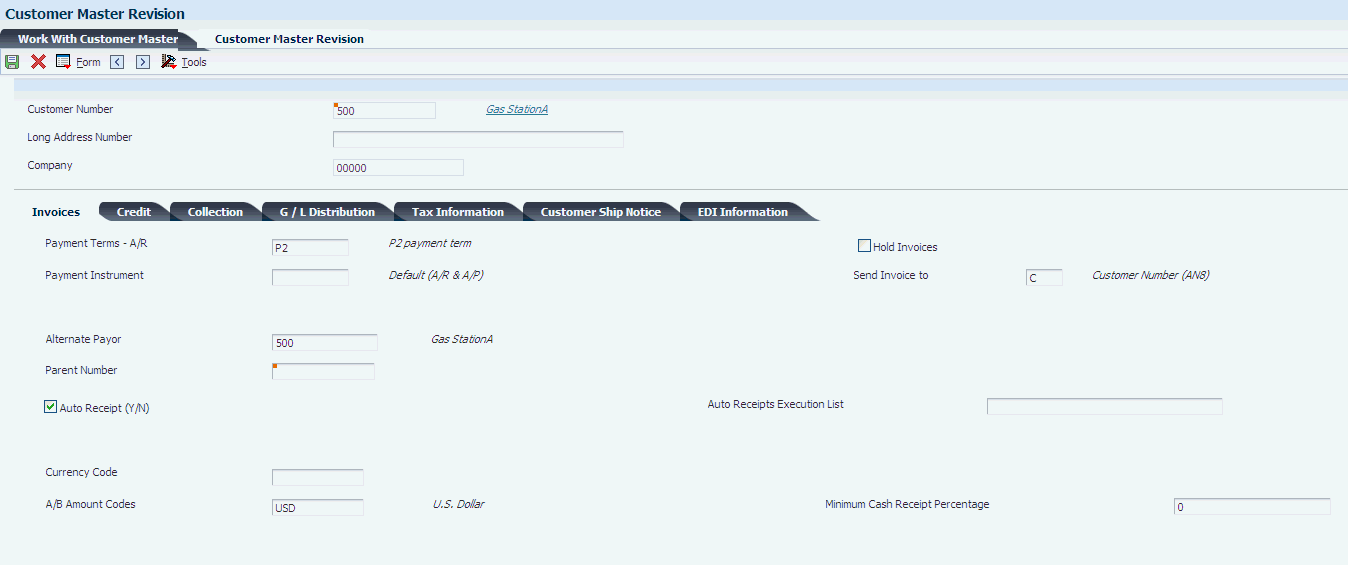
- Credit Limit
-
Enter the total amount that you allow the customer to spend on purchases before the system sends a workflow message. The system uses this value throughout the credit management programs. The system maintains the credit limit at the customer (child) level, not the parent level. The system sends workflow messages for each customer that is over their credit limit.
When you set up or change the credit limit, the system sends a workflow message to the credit manager that the change is pending approval. The change to the credit limit is not reflected in the customer record until it is approved by the credit manager.
- Recall for Review Date
-
Enter the review date for the customer's credit information.
6.5 Updating Expense Policy Settings
This section provides an overview of the JD Edwards EnterpriseOne Expense Management policy settings that trigger alerts and discusses how to update expense policy settings.
6.5.1 Understanding Expense Management Policy Settings that Trigger Alerts
A company's expense reimbursement policy contains rules regarding how employees track, manage, and report expenses incurred while doing business for the company. Depending on the needs of its employees, a company might have numerous expense reimbursement policies. For example, a company might define one policy for senior management and another for its other employees. A company might also define additional policies for employees who work or conduct business in countries that have currencies different from the currency in which they are normally reimbursed.
The system creates an alert record in the F80D311, F80D311A, F80D315, and F80D131 tables when you make changes to these fields in the Policy Edit Rules table (F09E108):
| Field Name | Alias |
|---|---|
| Hard Edit | HEDIT |
| Preferred Supplier | PREFSUP |
| Receipt Required | RCTRQD |
| Daily Allowance | DLYALLOW |
The alert shows changes by expense policy and policy description, which the system retrieves from the F09E108 table.
6.5.2 Forms Used to Update Expense Policy Settings
| Form Name | FormID | Navigation | Usage |
|---|---|---|---|
| Work With Policies | W09E108A | System Setup (G09E41), Policy Entry | Review existing policies. |
| Policy Definition Entry | W09E108B | Select a row on the Work With Policies form, and click Select. | Update expense policy settings. |
6.5.3 Updating Expense Policy Settings
Access the Policy Definition Entry form.
|
Note: The system generates alert messages only for the fields listed. |
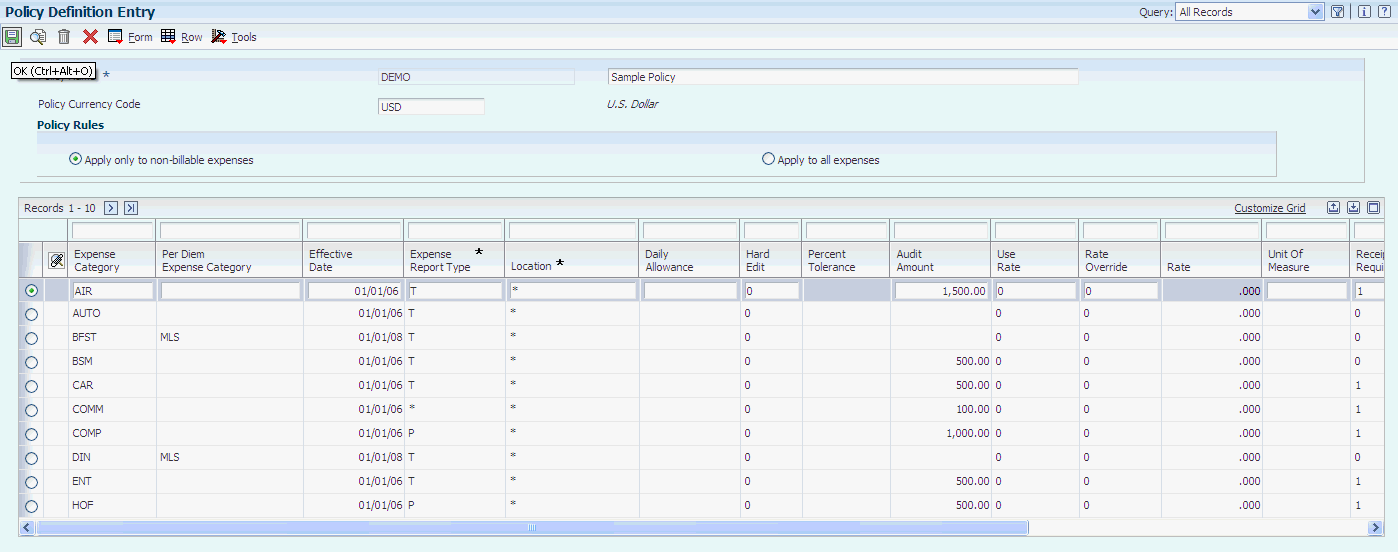
- Daily Allowance
-
Enter the amount that an employee is allowed to spend per day on an expense item.
- Hard Edit
-
Specify whether the system issues a warning or error message to the employee when the expense amount exceeds the daily allowance and percent tolerance. An error prevents the employee from completing the expense report. Values are:
-
0: The system issues a warning message only.
-
1: The system issues an error message. The employee must change the expense amount.
-
- Receipt Required
-
Specifies whether an employee must submit a receipt for the expense. Values are:
-
0: No receipt required.
-
1: Receipt required.
-
- Preferred Supplier
-
Specify whether the employee must use a preferred supplier for the expense category. If an employee does not use a preferred supplier as required, the system automatically identifies the expense report for an audit regardless of the audit rules established. Values are:
-
0: A preferred supplier is not required.
-
1: A preferred supplier is required.
-
Updating values in the key fields for the table such as Policy Name (POLICY), Expense Category (EXPTYPE), Effective Date (EFTJ), Expense Report Type (EXRPTTYP), and Location (LOCATN) generates a series of alerts in all audited columns of the table. The system generates alerts where the previous value is blank and the current value is the entered value.
6.6 Configuring Whistleblower Emails
This section provides an overview of whistleblowing, lists prerequisites, and discusses how to:
-
Define recipients of whistleblower emails.
-
Create whistleblower messages.
6.6.1 Understanding Whistleblowing
Internal whistleblowing encourages the free flow of information and promotes resolving issues at an early stage without involving an external agency. Whistleblower emails are anonymous messages that provide you with the ability to report misconduct or violation of company policies or government regulations.
You can create a whistleblower email by clicking the link on the console summary page in the JD Edwards EnterpriseOne FMCC system. The system sends a notification message to the individuals set up in the Whistle Blower Recipient List Definition program (P80D150) regarding the violation.
6.6.2 Prerequisites
Before you can send whistleblower emails, complete these tasks:
-
Verify the configuration of the [JDEMAIL] settings in the jde.ini file.
See JD Edwards EnterpriseOne Tools System Administration Guide
-
Create an anonymous user ID in the JD Edwards EnterpriseOne system that has access to the Send Whistle Blower Message program (P80D151).
Users must sign on with the anonymous user ID to send anonymous whistleblower email messages.
See JD Edwards EnterpriseOne Tools Security Administration Guide
6.6.3 Forms Used to Configure Whistleblower
| Form Name | FormID | Navigation | Usage |
|---|---|---|---|
| Work with Whistle Blower Recipient Lists | W80D150A | Configuration (G80D41), Setup Whistle Blower Recipients | Review recipients of whistleblower emails. |
| Add Whistle Blower Recipient List | W80D150C | Click Add New on the Work with Whistle Blower Recipient Lists form. | Define recipients of whistleblower emails. |
| Send Whistle Blower Message | W80D151A | Whistle Blower Messages (G80DWB), Send Whistle Blower Message | Create whistleblower messages. |
6.6.4 Defining Recipients of Whistleblower Emails
Access the Add Whistle Blower Recipient List form.
- Recipient List Type
-
Enter a value from UDC 80D/WB that specifies the type of recipient list the system uses to send a whistleblower message. Values are:
-
1: Email Recipient
-
2: Address Book Recipient
-
3: Address Book Distribution List
The system displays the remaining fields on the form based on the value entered in the Recipient List Type field.
-
- Electronic Address
-
Enter the email address or Uniform Resource Locator (URL) for either an individual or an entity.
The system displays this field when you enter 1 in the Recipient List Type field.
- Address Number
-
Enter a number that identifies an entry in the JD Edwards EnterpriseOne Address Book system, such as employee, applicant, participant, customer, supplier, tenant, or location.
The system displays this field when you enter 2 in the Recipient List Type field.
- Mail Box Designator
-
Enter a value from UDC 02/MB that determines the mailbox associated with the queue that the system uses to delivery the whistleblower message.
The system displays this field when you enter 2 or 3 in the Recipient List Type field.
- Parent Number
-
Enter the address book number of the parent company. The system uses this number to associate a particular address with a parent company or location.
Any value that you enter in this field updates the Address Organizational Structure Master table (F0150) for the blank structure type. This address number must exist in the Address Book Master table (F0101) for validation purposes. Examples of address book records that would have a parent number include:
-
Subsidiaries with parent companies.
-
Branches with a home office.
-
Job sites with a general contractor.
The system displays this field when you enter 3 in the Recipient List Type field.
-
- Structure Type
-
Enter a value from UDC 01/TS that identifies a type of organizational structure that has its own hierarchy in the JD Edwards EnterpriseOne Address Book system (for example, email). When you create a parent/child relationship for the JD Edwards EnterpriseOne Accounts Receivable system, the structure type must be blank.
The system displays this field when you enter 3 in the Recipient List Type field.
6.6.5 Creating Whistleblower Messages
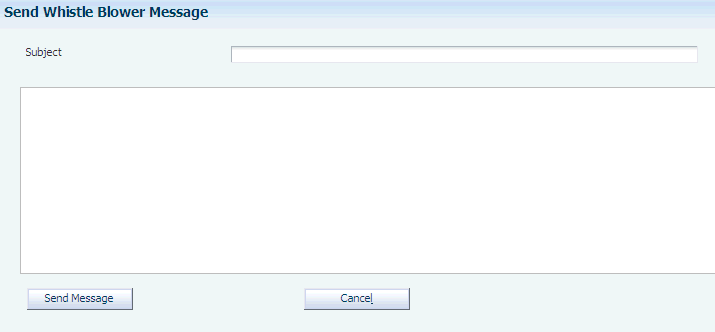
Access the Send Whistle Blower Message form.
Figure 6-7 Send Whistle Blower Message form
Description of "Figure 6-7 Send Whistle Blower Message form"
- Subject
-
Enter a descriptive topic for the whistleblower email message.