2 Setting Up the Inventory Management System
This chapter contains the following topics:
2.1 Understanding System Setup
This table describes the features that you must set up before using the JD Edwards EnterpriseOne Inventory Management system:
2.2 Setting Up Constants
This section provides an overview of constants, lists prerequisites, and discusses how to:
-
Define branch/plant constants.
-
Define batch control constants.
-
Set up ABC Analysis codes.
-
Define item availability.
-
Define system constants.
-
Define the location format.
-
Define segments for locations.
2.2.1 Understanding Constants
Constants provide a basic framework for the JD Edwards EnterpriseOne Inventory Management system. Based on the business needs, you associate specific constants with either the entire system or a specific branch/plant. Branch/plant constants enable you to configure the processing of daily transactions for each branch/plant in the distribution and manufacturing systems.
2.2.1.1 Branch/Plant ALL
The JD Edwards EnterpriseOne Inventory Management system includes branch/plant ALL, which is a generic branch/plant the system uses as a source of default information against which it validates certain types of entries. You can copy branch/plant ALL to create a new branch/plant. Under some circumstances, you might need to change the settings in branch/plant ALL.
2.2.2 Prerequisites
Before you complete the tasks in this section, you must:
-
Set up the branch/plant as a business unit.
-
Create an address book record for the branch/plant.
2.2.3 Forms Used to Set Up Constants
| Form Name | FormID | Navigation | Usage |
|---|---|---|---|
| Work with Branch/Plant Constants | W41001B | Inventory Setup (G4141), Branch/Plant Constants | Review branch/plant constants. |
| Branch/Plant Constants | W41001H | On the Work with Branch/Plant Constants form, click Add. | Define branch/plant constants. |
| Application Constants | W41001E | On the Work with Branch/Plant Constants form, select App. Constants from the Form menu. | Define batch control constants. |
| ABC Codes | W41001I | Select a branch plant on the Work With Branch/Plants form, and then select ABC Codes from the Form menu on the Branch/Plant Constants form. | Set up ABC analysis codes. |
| Item Availability Definition | W41001G | On the Work with Branch/Plant Constants form, select a branch/plant and select Availability from the Row menu. | Define item availability. |
| System Constants | W41001F | On the Work with Branch/Plant Constants form, select Sys. Constants from the Form menu. | Define system constants. |
| Branch Location Definition | W41001A | On the Work with Branch/Plant Constants form, select Location Def from the Row menu. |
|
2.2.4 Defining Branch/Plant Constants
Access the Branch/Plant Constants form.
|
Note: If you use the JD Edwards EnterpriseOne Warehouse Management system, you must define the warehouse information on the Branch Location Definition form of the Branch/Plant Constants program (P41001). Otherwise, you should at least define location length information. |
- Branch Plant
-
Enter an alphanumeric code that identifies a separate entity within a business for which you want to track costs.
Before you enter a value in this field, you must set up the branch/plant as a business unit in the
- Short Item Number Identifier
-
Enter a symbol that identifies the eight-character short item number when you do not want to use it as the primary number.
Leave this field blank to indicate that you want to use this item number as the primary number. That is, you use it most often to enter or review information.
If this is not the primary number, you must enter a special symbol to identify it. Use a symbol that is not significant for any other purposes of entry, such as /,*, or &. Do not use a period or a comma as a symbol. When you enter this item number on any other form, you must include this symbol as the first character.
Note:
Only one of the fields for item number symbols (SYM1, SYM2, SYM3, or SYM6) can be blank to identify it as the primary number. All others must include a unique symbol. - Second Item Number Identifier
-
Enter a symbol that identifies the 25 character second item number when you do not want to use it as the primary number.
Leave this field blank to indicate that you want to use this item number as the primary number. That is, you use it most often to enter or review information.
If this is not the primary number, you must enter a special symbol to identify it. Use a symbol that is not significant for any other purposes of entry such as /,*, or &. Do not use a period or a comma as a symbol. When you enter this item number on any other form, you must include this symbol as the first character.
Note:
Only one of the fields for item number symbols (SYM1, SYM2, SYM3, or SYM6) can be blank to identify it as the primary number. All others must include a unique symbol. - Third Item Number Identifier
-
Enter a symbol that identifies the 25 character third item number when you do not want to use it as the primary number. If you leave this field blank, this item number is used as the primary number.
If you do not want to use this number as the primary number, you must enter a special symbol to identify it. Use a symbol that is not significant for any other purposes of entry, such as /,*, or &. Do not use a period or a comma as a symbol. When you enter this item number on any other form, you must include this symbol as the first character.
Note:
Only one of the fields for item number symbols (SYM1, SYM2, SYM3, or SYM6) can be blank to identify it as the primary number. All others must include a unique symbol. - Symbol Customer/Supplier
-
Enter a character that identifies the customer's or supplier's number. When you enter a number preceded by this character, the system recognizes the number as the customer's or supplier's number. The system then uses the cross-reference table to match the number to the item number. You must complete this field if you want the system to perform cross-referencing.
- Customer/Supplier Cross Ref. Code (customer/supplier cross-reference code)
-
Enter a code from UDC table (41/DT) that identifies the type of cross-reference setup for this customer. Examples of cross-reference types include substitutes, replacements, and customer and supplier item numbers.
- Segment Separator Character
-
Enter the character that you want to use to separate item numbers into segments. When you define segments for items, set up a template for all items throughout the branch/plant. If you use segments across branch/plants, you must define all segments the same for all branch/plants. The character or symbol will be used to separate segments within an item number based on the template that is associated with the item number.
If you leave this field blank, the system displays the segments as one string of characters.
- Commitment Method
-
Enter a code from UDC table H40/CM that specifies how the system commits lot items to inventory. Values are:
1: The normal commitment method for inventory. The system commits inventory from the primary location and then from secondary locations. The system commits inventory from the locations with the most inventory before committing inventory from locations with the least. The system commits backorders to the primary location.
2: The inventory commitment method by lot number. The system commits inventory by lot number, starting with the lowest lot number and committing orders to available lots.
3: The inventory commitment method by lot expiration date. The system commits inventory from the locations with the earliest expiration date first. The system considers only locations with expiration dates greater than or equal to the sales order or parts list requested date.
- Specific Commitment (Days)
-
Enter a number that the system uses to determine when to commit inventory to an order in sales order processing. This value in days is added to current date and compared with the promised ship date for the order line. If the promised date is greater than the calculated date, then the order line will be future committed in the Item Location record (F41021).
Enter 999 to eliminate future commits.
- Number of Days in Year
-
Enter the number of days in a year that your company is open for business. This field is required. You must specify a number from 252 to 365.
- Current Inventory Period
-
Enter a number from 1 through 14 that identifies the current accounting period. The system uses this number to generate error messages, such as PBCO (posted before cutoff) and PACO (posted after cutoff).
- General Ledger Explanation
-
Specify the default description that appears on the second line of a journal entry in the general ledger. Values are:
1: Item master description (default).
2: Primary item number.
- Write Units to Journal Entries
-
Select this check box to indicate that the system moves units to the general ledger after the system records a journal entry.
- Sales/Inventory/Purchasing Costing Method
-
Enter a code from UDC table (40/CM) to indicate the cost method that the system uses to calculate the cost of goods that are sold for the item. Cost methods 01–19 are reserved.
- Purchase Order Issue Cost
-
Enter the amount that you want the JD Edwards EnterpriseOne Procurement system to use to calculate the Economic Order Quantity (EOQ). This cost should be the estimate of the cost of materials, labor, and overhead that you incur when you issue a single purchase order. The default value is 00.
This example shows how the system determines EOQ using the this value:
-
S Purchase Order Issue Cost = 15.0.
-
I Inventory Carrying Cost =.09 (9 percent).
-
Y Annual Sales in Units = 3,000.
-
C Unit cost of Item = 10.0.
-
EOQ = the square root of ((2S/I) × (Y/C)) = the square root of [(2)×(15)/0.09] × 3,000/10.0 = 316.23
-
- Inventory Carrying Cost (%) (percentage)
-
Enter the percentage of inventory investment that you want the JD Edwards EnterpriseOne Procurement system to use to calculate EOQ. Enter the percentage as a decimal value. The default percentage is .00.
This example shows how the system determines EOQ using the this percentage:
-
S Purchase Order Issue Cost = 15.0
-
I Inventory Carrying Cost =.09 (9 percent)
-
Y Annual Sales in Units = 3,000
-
C Unit Cost of Item = 10.0
EOQ = Square root of ((2S/I) × (Y/C)) = the square root of (2(15) divided by .09)) × (3000/10) = 316.23
Note:
Review the field help for the Economic Order Quantity field for more information about the EOQ formula. -
- Commitment Method
-
Enter a code to indicate the method that you want the system to use to commit lot items from inventory. Values are:
1: The normal commitment method for inventory. The system commits inventory from the primary location and then from secondary locations. The system commits inventory from the locations with the most inventory before committing inventory from locations with the least. The system commits backorders to the primary location.
2: The inventory commitment method by lot number. The system commits inventory by lot number, starting with the lowest lot number and committing orders to available lots.
Note:
The lot number is an alphanumeric value, so rules for determining lowest to highest follow alphabetical rules, not numeric rules. For example, for lots 999 and 1000, lot 1000 is committed first because 1 comes before 9.3: The inventory commitment method by lot expiration date. The system commits inventory from the locations with the earliest expiration date first. The system considers only locations with expiration dates that are greater than or equal to the sales order or parts list requested date.
- Specific Commitment (Days)
-
Enter the number that you want the system to use to determine when to commit inventory to an order in sales order processing. This value in days is added to current date and compared with the schedule pick date for the order line. If the schedule pick date is greater than the calculated date, the order line is future committed in the F41021 table. Enter 999 to eliminate future commits.
- Number of Days in Year
-
Enter the number of days in a year that the company is open for business. This field is required. You must enter a number from 252 through 365. The JD Edwards EnterpriseOne Procurement system uses this number to calculate the EOQ.
- Branch Country of Origin Code
-
Enter a code from UDC table (40R/CO) that specifies where a part was made.
Enter a two-digit code indicating parts made outside the U.S, for example, CA equals Canada. Enter a three-digit code indicating parts that are made in the U.S. For example, U equals United States and the second and third digits are the two-digit state postal code. For example, UOH indicates made in Ohio, U.S.
- Approval Route Code
-
Enter a code that determines to whom an order is routed for approval.
- Location Control (Y/N)
-
Select this check box to indicate which type of location control the system requires. You should use location control if you want to use only locations that are in the F4100 table. Values are:
Y: Use only locations that are defined in the F4100 table. When the Warehouse Control option is selected, the Location Control option must be Y.
N: Do not restrict locations to those in the F4100 table. Use all locations that conform to the location format that is defined on the Branch Location Definition form.
- Warehouse Control (Y/N)
-
Select this check box to indicate that the system creates warehouse transactions for the branch/plant.
- Quality Control (Y/N)
-
Select this check box to indicate that the JD Edwards Quality Management system is enabled for the branch/plant.
In addition to activating quality control for each branch/plant that you want to include in quality tests, you need to activate quality management on the Quality Management Setup menu (G3741).
- Use Product Cost Detail (Y/N)
-
Select this check box to indicate that the Distribution programs use the total cost method or the detailed product cost method.
- Foreign Depot
-
Select this check box to indicate that another company owns the branch/plant.
The Bulk and Packed Load Confirmation programs use this code to determine whether the depot from which product is being loaded is a foreign depot. If it is a foreign depot, you must enter a valid borrow agreement during load confirmation.
- Location Segment Control (Y/N)
-
Select this check box to enable the Location Segment Specifications in the Location Definition program (P41001). The segment specifications determine how the system segments locations within a branch using UDC table (41/ER).
You must select this check box if you want to define segments for locations.
2.2.5 Defining Batch Control Constants
Access the Application Constants form.
Define batch control constants to prevents changes made by unauthorized personnel to be posted to the general ledger. Also, you can define a constant that requires you to enter batch control information before the system runs a batch processing job. You might enter batch control information to compare the anticipated size of the job to the end result.
You must define management approval and batch control separately for each distribution and manufacturing system that you use.
- System Code
-
Review the system codes. Values include:
31: JD Edwards EnterpriseOne Shop Floor Control
41: JD Edwards EnterpriseOne Inventory Management
42: JD Edwards EnterpriseOne Sales Management
43: JD Edwards EnterpriseOne Procurement
- Mgmt Apprv(management approval)
-
Enter a code that indicates whether you want to require approval of batches before they can be posted to the general ledger. Values are:
Y: Assign a status of Pending to each batch that you create within the listed systems.
N: Assign a status of Approved to each batch.
- Batch Ctrl (batch control)
-
Enter a value that specifies whether entry of batch control information is required. Values are:
Y: Required.
N: Do not require entry.
For each batch, the system displays a batch control form on which you must enter information about the number of documents and the total amount of the transactions that you expect in the batch. The system uses these totals to edit and display differences from the actual transactions that you entered.
This field applies only to the JD Edwards EnterpriseOne Inventory Management system and the JD Edwards EnterpriseOne Procurement system. In the JD Edwards EnterpriseOne Inventory Management system, the value Y indicates that the system displays a batch control form before you issue, adjust, or transfer inventory. In the JD Edwards EnterpriseOne Procurement system, the value Y indicates that the system displays a batch control form before you enter receipts.
2.2.6 Setting Up ABC Analysis Codes
Access the ABC Codes form.
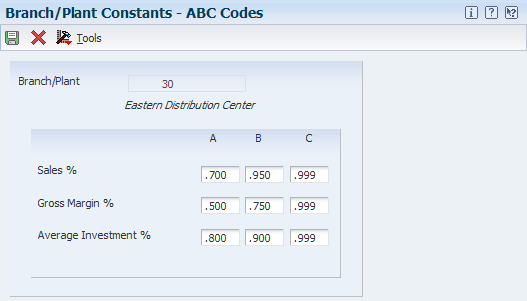
ABC analysis is based on the principle that a small number of items (A) typically accounts for the largest part of a company's business. A slightly larger number of items (B) accounts for a smaller yet significant amount of business. The remaining large number of items (C), taken together, accounts for only a small amount of business.
You can use the ABC Analysis as the basis for inventory cycle counts (in which A items are counted more often than C items). Determine the natural breaks in the inventory item listing to determine where to define the percentage breaks in the branch/plant constants.
- Sales %Gross Margin %and Average Investment % (percentage)
-
Enter a percentage that specifies how to define the A group, the B group, and the C group, during ABC analysis. For the A group, enter a number that is the total of the A percentage added to the percentage that you want the system to use when it assigns items to the A group.
For example, if you want items that make up the top 75 percent of the selling items in the A group and items that make up the next 20 percent in the B group, you enter .95 in this field, which is the total of 75 percent and 20 percent. You enter percentages as decimal amounts. For example, to specify 75 percent, enter .75.
During ABC analysis, the system compares the total sales of a single item to the total sales of all items to calculate the value of each item. An item's value is its percentage of the total sales. The system then arranges the values of all items from those of highest value to those of lowest value and adds the values together beginning with the highest. After it reaches the limit for A items, it continues to add values until it reaches the limit for B items. All items for which value is included in the total between the A limit and the B limit are B items. If an item's value causes the total to go over the B limit, the system assigns that item to the C group.
2.2.7 Defining Item Availability
Access the Item Availability Definition form.
Figure 2-4 Item Availability Definition form
Description of "Figure 2-4 Item Availability Definition form"
You must define how you want the system to calculate item availability for each branch/plant. Item availability affects how the system calculates back orders, cancellations, and customer delivery times.
|
Note: If you are using configuration management, you must enter 1 in the Check Availability field in the Configurator Constants program (P3209) to check availability during sales order entry. If the system finds the exact item and string match, a form displays all locations containing the specific configuration. |
2.2.8 Defining System Constants
Access the System Constants form.
Set up system constants to specify certain system functions. For example, assume that you have several branch/plants and you use different units of measure for the items in each branch/plant. You can set a system constant to automatically convert units of measure by branch/plant.
System constants apply to all branch/plants. You cannot configure system constants for individual branch/plants.
- Unit of Measure Conversion by Branch
-
Select this check box to indicate that the system displays the item-specific conversion table when you add an item to a specific branch/plant. If you do not select this check box, the system displays the item-specific conversion table for all branch/plants from the Item Master table (F4101).
- Update Average Cost On-Line
-
Select this check box to indicate that the system calculates a new average cost immediately after any transaction occurs that affects the average cost of an item. If you do not select this check box, the system calculates a new average cost when you run the Average Cost Update program (R41811). All processes that affect the average cost create transactions in the Average Cost Work File (F41051).
- ECS Control (Energy and Chemical System control)
-
Select this check box to indicate that the system will use the Energy and Chemical System control.
- Internet Enable PPAT Messages
-
Select this check box to indicate that the system sends email messages that are generated by distribution programs over the internet.
Clear the check box to send email messages that are generated by distribution programs to the JD Edwards EnterpriseOne mail box.
- Scientific Rounding
-
Select this check box to indicate that scientific rounding should be performed. Currently, this feature is enabled only for Quality Management Test Results.
- Use Customer Set
-
Select this check box to indicate that the system uses the customer set.
- Ship Ascending Date Rule
-
Select this check box to indicate whether the system applies the ship ascending date rule by customer and by item. When you select this option, the system applies the ship ascending date rule during the sales order entry, and pick slip/commitment and ship confirmation processes. When the system applies the Ship Ascending Date rule, the system sorts shipping customers' lots in ascending order by expiration date, sell by date, or best before date.
- Allow Duplicate Lots
-
Enter a code to determine whether the system can assign the same lot to multiple items. Values are:
1: Do not enable duplicate lots. The lot is restricted to one item and one branch/plant.
2: Enable duplicate lots. You can create a lot that crosses multiple items and branch/plants.
3: Do not enable duplicate lots. The lot is restricted to one item, but it can contain quantities in multiple branch/plants.
- Sales Price Retrieval UOM(sales price retrieval unit of measure)
-
Enter a code from UDC table (40/SU) that specifies the unit of measure that the system uses for retrieving base prices and price adjustments for sales order processing, service and warranty management, and ship and debit processing. You can define base prices in the F4106 table and price adjustments in the F4072 table in various units of measure.
If the base price or price adjustments are not found in the specified unit of measure, the system then uses the primary unit of measure for the item.
- Purchase Price Retrieval UOM(purchase price retrieval unit of measure)
-
Enter a code from UDC table (40/PU) that specifies the unit of measure that the system retrieves for the purchase base price from the F41061 table during purchase order processing.
If you specify the unit of measure for transaction or pricing and the system does not find a record in that unit of measure, the system repeats the process using the primary unit of measure of the item.
- Sales Price Based On Date
-
Enter a code from UDC table (40/D) that specifies how the system updates the price effective date in the F4201 and F4211 tables. The JD Edwards EnterpriseOne Sales Order Management system uses the price effective date to retrieve the base price from the F4106 table and price adjustments from the F4072 table.
- Purchase Rebate Category Code
-
Enter a code from UDC table (43/RU) that specifies which category code the system uses in the criteria for inclusion comparison.
- Preference Schedule
-
Enter a code from UDC table (40/AP) that identifies the advanced preference schedule that the system uses when resolving preferences. The advanced preference schedule determines which preferences the system resolves when using the advanced preference functionality. You cannot maintain preference schedules directly through UDCs, but you can maintain preference schedules by using the Price Adjustment Schedule program (P4070).
- Pref Retrieval UOM(preference retrieval unit of measure)
-
Enter a code from UDC table (40/RU) that specifies the unit of measure that the system uses for retrieving advanced preference adjustments during sales order processing. The system enables you to define the advanced preference adjustments in the F4072 table in various units of measure.
If you specify the unit of measure for transaction or pricing and the system does not locate a record in that unit of measure, the system repeats the process using the primary unit of measure of the item.
- Accelerated Pricing Resolution Engine
-
Specify whether to use the Accelerated Pricing Resolution Engine and whether to use the auto load feature. Values are:
Blank or 0: Do not use the Accelerated Pricing Resolution Engine.
1: Use the Accelerated Pricing Resolution Engine.
2: Use the auto load feature.
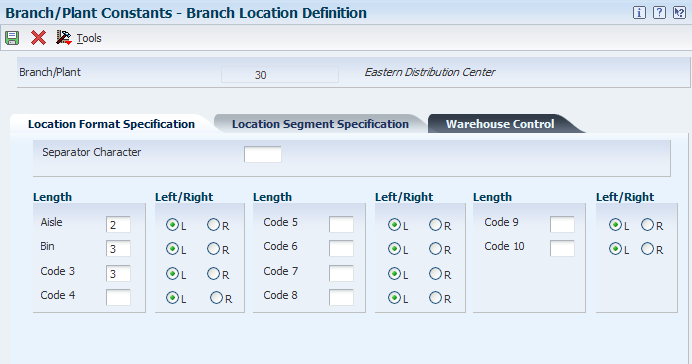
2.2.9 Defining the Location Format
Access the Branch Location Definition form.
Figure 2-6 Branch Location Definition form
Description of "Figure 2-6 Branch Location Definition form "
Define the location format to specify how to set up item locations. You can define elements that contain more specific information about the actual location. An element can represent an aisle, bin, shelf, or any other location that you use in a branch/plant.
You can use up to 10 different elements to define a location's format. For each element, you can define length and justification.
The total length of all elements, including separators, cannot exceed 20 characters. The system does not store separators in the tables, but uses separators to edit a location on a form or report. If you do not want to use separators, leave the separator field blank. When you do so, the system displays the location as one string of characters.
|
Note: If you use the JD Edwards EnterpriseOne Warehouse Management system, you must also define default units of measure for volumes, dimensions, and weights. |
- Separator Character
-
Enter a character that divides the elements of the location when you display them on forms or reports. For example, you might use a /as a separator character to divide elements such as aisle, bin, and shelf in a location code. The location code can contain up to 20 characters, including separators.
Separators are not stored in the tables, but are used to edit a location on a form or report. If you do not want to use separators, leave this field blank. However, you must enter characters and spaces to equal the correct length of each element in the location code. The system then displays the location as one string of characters. The system uses the character that you enter in this field to separate the combination of tank/owner and aisle/bin as it appears on forms or reports.
Companies commonly use a . (period) as the separator character.
- Aisle
-
Enter a number that identifies the number of characters to represent the tank (or aisle for packaged stock). Values are the numbers 1 through 8.
- Bin
-
Enter a number, 1 through 8,that identifies the number of characters to represent the owner for commingled bulk stock (or bin for packaged stock).
- Code 3throughCode 10
-
Enter the number of characters to represent codes 3 through 10 in the location format specification.
2.2.10 Defining Segments for Locations
Access the Branch Location Definition form.
Figure 2-7 Branch/Location Definition form
Description of "Figure 2-7 Branch/Location Definition form"
You can separate locations into segments. When you define segments for locations, you set up a template for all the locations throughout the branch/plant. If you use segments across branch/plants, you must define all segments the same for all branch/plants. Locations with segments are useful if the company handles commingled product in the same locations or works with consigned inventory for a customer or vendor.
You cannot add segment information to an existing location. You must either define the segments when you add a new record or manually add the segment information to every existing location.
A location can have up to 10 segments. Each segment is an attribute that you can use for inquiry purposes. Each segment is assigned a rule number that designates that segment as one of these:
-
Address book number
-
UDC
-
Range of numbers
-
Alphanumeric value
You can assign an address book number to the first two segments only. Each segment is limited to a specific length.
2.2.10.1 Location Segment Specification
Select the Location Segment Specification tab.
- Blank Location Allowed
-
Select check box to enable a blank location for this branch/plant.
- Aisle
-
Enter a code from UDC table (41/ER) that specifies which edit rule the system uses to validate segment 1. Values are:
Blank: The system does not perform any validation.
1: The system uses an address book number for validation.
2: The system uses a UDC for validation.
3: The system uses a numeric range for validation.
4: The system uses an alphanumeric code for validation.
5: The system uses an item number for validation.
Note:
You cannot use this rule with location segment specification.If you want to assign location ownership, you must enter 1 in either the Aisle or Bin field to enable an address book number for that segment.
- Bin
-
Enter a code from UDC table (41/ER) that specifies which edit rule the system uses to validate segment 2.
If you want to assign location ownership, you must enter 1 in either the Aisle or Bin field to enable an address book number for that segment.
2.3 Setting Up Warehouse Locations
This section provides overviews of warehouse locations setup and multiple location entry, lists prerequisites, and discusses how to:
-
Set processing options for Location Master (P4100).
-
Enter individual locations.
-
Enter multiple locations.
2.3.1 Understanding Warehouse Locations Setup
The warehouse consists of locations, such as bins, spaces on a rack, pallet spaces on the floor, and so on. To locate items more easily, you can create a hierarchy of locations within the warehouse and enter information about zones. After you have defined the format for the locations, you must define all of the locations in a warehouse. Use the format that you specified on the Branch/Plant Constants form to enter each warehouse location.
You can define a primary location to store basic information about items in a warehouse. A primary location is not an actual physical location. For example, you could designate a primary location as Location A, and then assign every item in the warehouse to a location that begins with A.
You can also define a blank location as the primary location for inventory items and how the system displays the primary location depending on the location format specifications that you defined for the branch/plant.
You can define locations for:
-
Damaged goods
-
Demo inventory
-
Consigned items
-
Customer inventory
-
Returns
-
Rework
-
Expensed inventory
Additionally, you can define pseudo locations that represent physical locations for products that you sell but do not stock, such as products that are stocked at the supplier's facility and shipped from there.
Location control is a feature that you activate through the branch/plant constants. Location control is required for the JD Edwards EnterpriseOne Warehouse Management system but optional for all other distribution systems.
The system stores location information in the Location Master table (F4100).
2.3.2 Understanding Multiple Location Entry
You can add or revise multiple locations simultaneously instead of one at a time. You specify the range of locations and the incremental value that separates each location.
The Speed Location Setup program (P4100A) enables you to set up the warehouse quickly by copying an existing location to create new locations. However, if you copy an existing location that contains errors, you duplicate the errors for each new location.
You can use an existing location as the model for creating new locations without installing the JD Edwards EnterpriseOne Warehouse Management system. However, the program copies fields such as the putaway, pick, and replenishment sequences, which are specific to the JD Edwards EnterpriseOne Warehouse Management system.
2.3.2.1 Elements
You can use up to 10 elements to define the location. These elements consist of aisle, bin, and location codes 03 through 10. Each element can consist of either alphabetic characters or numbers. You cannot combine numbers and letters in a single element. You can, however, use multiple elements, some consisting of numbers (such as aisles) and some consisting of letters (such as bins).
The system completes the spaces that precede the elements with either blank spaces or zeros, depending on the business requirements. Some bar code readers do not correctly process blank spaces. To precede elements with zeros, you must specify on the Speed Location Maintenance Revisions form that the system completes the leading spaces with zeros. If you activated location segment control in the Branch/Plant Constants program (P41001) and are using the address book numbers to validate the new locations, then the system creates locations that do not contain zeros.
2.3.2.2 Steps
A step is a number that the program uses to create locations from a specified range of locations. After the program creates each new location, it increments the location, either by the step number that you enter for locations that are numeric, or by 1 for locations that are alphabetic. Therefore, by entering a range of locations in combination with a step, you can enter many locations at once.
For example, assume that you want to enter new locations for a flow zone in Warehouse A. The flow zone consists of aisles and bins. Three aisles are marked A, B, and C, and six bins are marked 1 through 6.
-
For aisles, the range is A through C.
The program creates aisles A, B, and C because it always uses a step 1 for alphabetic locations.
-
For bins, the range is 1 – 6 and the step number is 1.
The program creates bins 1 – 6 for each aisle, resulting in aisle and bin locations A1, A2, A3, A4, A5, A6, B1, B2, and so on.
In this example, if you enter a step number of 2, the program creates the bin locations of 1, 3, and 5 for each aisle, resulting in aisle and bin locations A1, A3, A5, B1, B3, B5, C1, C3, and C5.
2.3.3 Prerequisites
Before you complete the tasks in this section, you must:
-
Set up the information on the Location Format Specification tab on the Branch Location Definition form.
-
Verify that Location Control is activated on the Branch/Plant Constants form (optional).
See Setting Up Constants.
2.3.4 Forms Used to Set Up Warehouse Locations
| Form Name | FormID | Navigation | Usage |
|---|---|---|---|
| Work with Location Master | W4100C | Inventory Setup (G4141), Define Warehouse Locations | Review locations. |
| Enter Location Information | W4100B | On the Work with Location Master form, click Add. | Enter individual locations. |
| Speed Location Maintenance Revisions | W4100AA | Inventory Setup (G4141), Speed Location Maintenance | Enter multiple locations. |
2.3.5 Setting Processing Options for Location Master (P4100)
Processing options enable you to specify the default processing for programs and reports.
2.3.5.1 Display
- 1. Location Records
-
Specify whether to include item location records with no available quantity or inbound/outbound quantity when reviewing availability by location.
Blank: Include item location records.
1: Do not include item location records.
2.3.6 Entering Individual Locations
Access the Enter Location Information form.
Figure 2-8 Enter Location Information form
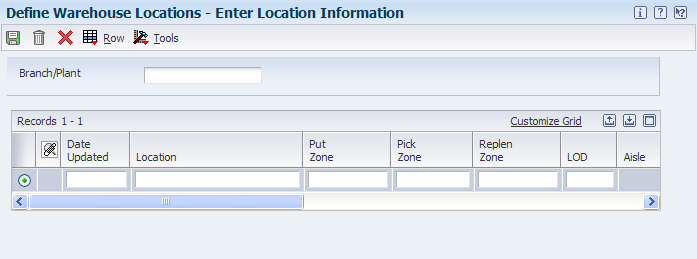
Description of "Figure 2-8 Enter Location Information form"
Enter locations individually if you only want to set up a few locations. You select the naming convention (a combination of numbers, letters, or both, such as A/3/4, 6/B/2/A, and so on), and use the format and separator character that you specified on the Branch/Plant Constants form. A separator character is a character such as / that you use to name locations such as A/3/4 or 3.C.9).
- Location
-
Enter a location but do not use a separator character. If you enter the location identifier without the separator character, you must enter characters and spaces to equal the correct length of each element. The system displays the location with the correct separator and spaces.
- LOD(level of detail-location)
-
Enter a code from UDC table (H40/LL) that summarizes or classifies locations and provides a hierarchy of locations for review purposes. For example, you can assign aisles to level 2, and individual bins within the aisle as level 3.
Use the Detail Level field to specify the beginning level of detail that you want the system to display for the location.
- Mix Item/Lot
-
Enter a code from UDC table (41/ML) that specifies whether to prohibit or enable the system to combine different items into one location or to combine different lot or serial numbers of the same item into one location.
2.3.7 Entering Multiple Locations
Access the Speed Location Maintenance Revisions form.
Figure 2-9 Speed Location Maintenance Revisions form
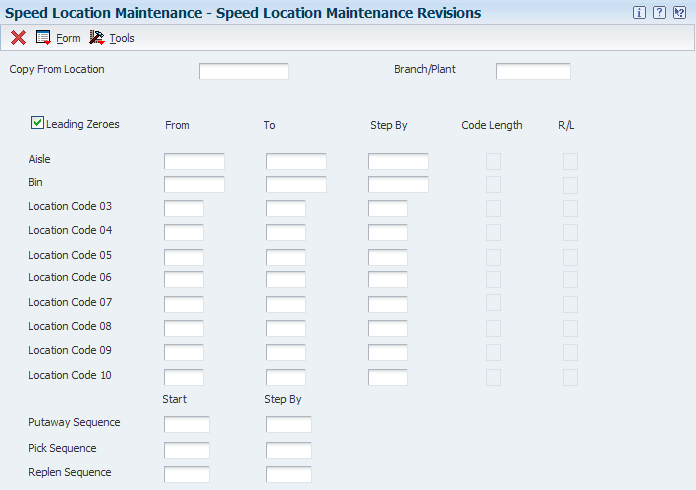
Description of "Figure 2-9 Speed Location Maintenance Revisions form"
You can use the Speed Location Setup program (P4100A) to add or revise location information. The P4100A program updates the F4100 table.
After you select an operation, the system displays a line in the upper left corner of the form that indicates the number of locations that the specification will create. Verify that this number is correct before you update. You can change the specification and select the operation as often as needed to obtain the desired results before you update the table.
If you make an error when setting up the locations, you cannot delete locations in the P4100A. You must access the Work With Location Master form to delete individual locations or an entire range of locations.
- Putaway/Pick/Replen Sequence(putaway/pick/replenishment sequence)
-
Assign a number to a location to determine its place in the putaway sequence. Putaway is the movement of inventory to storage after receipt. A sequence of locations describes the path that warehouse employees follow through the warehouse during movement tasks. You can specify in the Movement Instructions program (P46095) whether the system uses the putaway sequence as a tiebreaker when more than one location is selected for putaway. For example, you can establish sequencing for the most efficient putaway routing.
- Copy From Location
-
Enter the area in the warehouse where you receive inventory. The format of the location is user-defined, and you enter the location format for each branch/plant.
- Leading Zeroes
-
Specify whether the system populates leading spaces with zeroes instead of blank spaces.
2.4 Setting Up Default Location Information
This section provides an overview of default location information setup, lists prerequisites, and discusses how to:
-
Define a default location and approval route code.
-
Assign default print queues.
2.4.1 Understanding Default Location Information Setup
A default location is the branch/plant that is assigned to the user ID or terminal ID. When you set up default location information, you assign a branch/plant and print queue to a terminal that the system uses every time you sign in. If the system uses a default location, it automatically displays the branch/plant. In addition to setting up a default branch/plant for each user who works for the organization, you can also set up a default branch/plant for each supplier and customer who uses the self-service web site to enter and review information about orders, quotes, inventory, and so on. If no branch/plant is assigned to a user ID or terminal ID, then the user must enter a branch/plant manually. When you set up a default branch/plant, you also can define an approval route code if you use approval routing for purchase orders.
A default print queue is the location where the system sends certain types of documents. You can assign a default print queue so that for each time that you print, the system sends the document to the default print queue. If you have not assigned a default print queue, the system first accesses the print queues that were assigned in the version list, and then accesses the print queue that is assigned to the user profile.
Print programs that you have automatically defined access the Default Print Queues table (F40096). To display other print programs, you must set them up as UDCs and modify them to access the F40096 table.
2.4.2 Prerequisites
Before you complete the tasks in this section, you must verify that branch/plants are set up.
2.4.3 Forms Used to Set Up Default Location Information
| Form Name | FormID | Navigation | Usage |
|---|---|---|---|
| Work With Default Location & Printers | W400951A | Inventory Setup (G4141), Default Location & Printers | Review default locations and printers. |
| Default Location & Approval | W400951B | On the Work With Default Location & Printers form, click Add. | Define the default location and approval route code. |
| Default Print Queues | W40096A | On the Work With Default Location & Printers form, select a record, and then select Print Queues from the Row menu. | Assign default print queues. |
2.4.4 Defining the Default Location and Approval Route Code
Access the Default Location & Approval form.
Figure 2-10 Default Location & Approval form
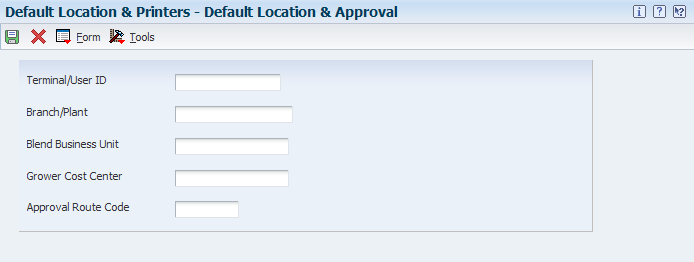
Description of "Figure 2-10 Default Location & Approval form"
- Terminal/User ID
-
Enter the workstation ID number.
- Blend Business Unit
-
Enter the default blend business unit. The system only displays this field when you are using system SY31B.
- Grower Cost Center
-
Enter the default grower cost center. The system only displays this field when you are using system SY40G.
- Approval Route Code
-
Enter a code that determines to whom an order is routed for approval.
2.4.5 Assigning Default Print Queues
Access the Default Print Queues form.
- Output Queue
-
Enter the waiting area that a job goes to after it has processed. Output queues (OUTQ) are sometimes attached to printers. If you do not enter an OUTQ, the system uses the default value from the user's job description.
2.5 Setting Up Standard Units of Measure
This section provides an overview of standard units of measure, lists a prerequisite, and discusses how to define standard units of measure.
2.5.1 Understanding Standard Units of Measure
You must define units of measure for each inventory item. Use the standard unit of measure information as a template for configuring the unit of measure information. You specify the primary unit of measure and unit of measure conversions for:
-
Each item or item/branch combination.
-
All items using standard units of measure.
Specify the primary unit of measure information for individual items or item/branch combinations when you set up item or branch information. The system stores unit of measure information in the Item Units of Measure Conversion Factors table (F41002).
The system stores unit of measure conversions that are not item specific in the Unit of Measure Standard Conversion table (F41003). You can also use unit of measure conversion information that you set up here for non-stock items in other distribution systems.
After you enter a transaction, the system uses this hierarchy to determine the unit of measure for an item:
-
The system first searches the Item Master for records that have item-specific unit of measure conversions.
-
If no records are found in the F41002 table, the system checks for system-wide standard UOM conversions for the item or item/branch in the F41003 table.
-
If no records are found in either the F41002 table or the F41003 table, the system displays an error message.
When you define standard units of measure, you can create any number of conversion factors for any number of units of measure, but they must all be able to convert to primary through either a direct path—for example, 1 box equals 2 each where each is primary—or an indirect path—for example, 1 crate equals 2 boxes equals 4 each. You can also set up conversion factors that associate each unit of measure with the primary unit of measure.
2.5.2 Prerequisite
Before you complete the tasks in this section, you must verify that units of measure are set up in UDC table (00/UM).
2.5.3 Forms Used to Set Up Standard Units of Measure
| Form Name | FormID | Navigation | Usage |
|---|---|---|---|
| Work with Standard Units of Measure | W41003A | Inventory Setup (G4141), Standard Units of Measure | Review standard units of measure. |
| Standard Units of Measure Revisions | W41003B | On the Work with Standard Units of Measure form, click Add. | Define standard units of measure. |
2.5.4 Defining Standard Units of Measure
Access the Standard Units of Measure Revisions form.
Figure 2-12 Standard Units of Measure Revisions form

Description of "Figure 2-12 Standard Units of Measure Revisions form"
- From Unit of Measure
-
Enter a code from UDC table (00/UM) that identifies the unit of measure for an item. For example, units of measure can be eaches, cases, or boxes.
- Conversion Factor
-
Enter the factor that the system uses to convert one unit of measure to another unit of measure.
- To Unit of Measure
-
Enter a code from UDC table (00/UM) that specifies the unit of measure the value in the From Unit of Measure field is converting to.
2.6 Setting Up Item Cross-References
This section provides an overview of item cross-reference setup, lists prerequisites, and discusses how to:
-
Set processing options for Item Cross Reference (P4104).
-
Set up cross-references for promotional items.
-
Set up price cross-references for related items.
2.6.1 Understanding Item Cross-Reference Setup
As you manage the inventory, you might decide to define relationships between the company's item information and the item information of the suppliers and customers. Additionally, you might set up substitute items, replacement items, and bar codes that are associated with an item.
Cross-references associate the internal item numbers with those from other trading partners. For example, customers can order items using their item numbers. If you set up item cross-references for a customer, you can easily convert the customer's item numbers into the company's equivalent.
This table provides examples of cross-referenced items:
| Cross-Referenced Item | Usage |
|---|---|
| Vendor item numbers | Use when vendors require their part numbers for orders or communications. |
| Customer item numbers | Use when customers prefer to order using their part numbers. |
| Item revision level | Use for demand scheduling when customers order new parts for older items. In some industries, such as the automotive industry, a supplier manufactures new parts for current models and replacement parts for older models, while receiving a variety of orders for different parts. In this situation, you can use a combination of the values for customer item number and the customer item revision level. |
| Substitute items | Use when the item that is ordered has no quantity on hand. |
| Replacement items | Use when you or your vendors discontinue an item and replace it with a new item. |
| Bar codes | Use to associate bar code input with a specific item. |
| Associated items | Use to recommend an item as part of the sale. |
When setting up cross-references for electronic data interchange, you should cross-reference each possible number that the trading partners might transmit.
2.6.1.1 Cross-References for Promotional Items
During sales and purchase order entry, the system can automatically replace an item with a promotional item. Examples of promotional items include:
-
A regular item with a coupon.
-
A larger item, such as 10 percent additional quantity for free.
-
An item with an additional item in the same package.
You specify prices for new items according to the price indicators that you assign using cross-reference information. You can establish only one promotional item for an item at a time.
You set up promotional item information at the customer or supplier level. For supplier promotions, you can order a regular item and replace it with the promotional item, or order the promotional item itself.
This table describes how the system handles promotional line items for sales orders and purchase orders:
| Promotional Line Item | Description |
|---|---|
| Sales Order Entry (P4210) | For sales orders, the system cancels the original line item and adds a new promotional line item. If you specify the cross-reference type SP (Sales Promotional Item) in the Promotional Items processing option on the Cross Ref tab, the system searches the F4104 table for sales promotional items. If a promotional item exists, the system cancels the original order line and adds the promotional item to the order. |
| Purchase Orders (P4310) | For purchase orders, the system replaces the original line item with the values for the promotional line item and issues a warning. If you specify the cross-reference type PP (Purchasing Promotional Item) in the Promotional Items processing option on the Cross Ref tab, the system searches the F4104 table for promotional items and replaces the original item with the promotional item. |
The system uses the F4104 table to process promotional items, as well as these activity status codes in UDC table (40/AT):
-
917: Added Promotional Item.
-
990: Canceled by Promotional Item.
2.6.1.2 Cross-References for Related Items
When an item is out of stock and you offer a substitute or related item, you can specify that the system should offer the best or lowest price. For example, a promotion of ten percent is given for a particular item. If the item is out of stock when ordered, and you offer the customer a substitute item, you can offer the promotional price for the substitute. This price is the lowest price after applicable promotions or discounts. It also can be the original item's price or the substitute item's price.
When you specify substitutes for items using the Item Cross Reference program (P4104), you must specify the type of base price and adjustment to use for the substitute item. If you do not specify values for the base price and adjustment indicators, the system uses the value that is specified in the Substitute Items processing option on Cross Ref tab of the Sales Order Entry program (P4210).
2.6.2 Prerequisites
Before you complete the tasks in this section, you must:
-
Set up Purchasing Promotional Items (PP) and Sales Promotional Items (SP) cross-reference types in UDC table (41/DT).
Use special handling codes to prevent multiple promotional items within the same time frame.
-
Verify that you entered Y in the Advanced Procurement Pricing field and the Advanced Sales Pricing field on the Pricing Constants form if you need to apply adjustments.
You can access the Pricing Constants form by selecting Price Constants from the Form menu on the Branch/Plant Constants form.
2.6.3 Forms Used to Set Up Item Cross-References
|
Note: Depending on how you set the processing options, the system displays either the Item Cross Reference Revisions By Address form or the Item Cross Reference Revisions By Item form. |
| Form Name | FormID | Navigation | Usage |
|---|---|---|---|
| Work with Item Cross Reference | W4104A | Inventory Inquiries (G41112), Item Cross-Reference
EDI Advanced & Technical Operations (G4731), Item Cross-Reference |
Review cross-references for related items. |
| Item Cross Reference Revisions By Item | W4104C | On the Work with Item Cross Reference form, click Add. | Set up cross references for promotional items. |
| Item Cross Reference Revisions By Address | W4104B | On the Work with Item Cross Reference form, click Add. | Set up price cross-references for related items. |
2.6.4 Setting Processing Options for Item Cross Reference (P4104)
Processing options enable you to specify the default processing for programs and reports.
2.6.4.1 Processing
- 1. Revise by Item or Address
-
Specify whether to enter cross-references by item number or by address book number. Values are:
Blank: Use the Item Cross Reference Revisions By Address form to revise by address book number.
1: Use the Item Cross Reference Revisions By Item form to revise by item number.
Note:
This processing option does not affect the appearance of the Work with Item Cross Reference form.
2.6.5 Setting Up Cross-References for Promotional Items
Access the Item Cross Reference Revisions By Item form.
Figure 2-13 Item Cross Reference Revisions By Item form
Description of "Figure 2-13 Item Cross Reference Revisions By Item form"
- Cross Reference Type Code (cross-reference type)
-
Enter a code from UDC table (41/DT) that identifies the type of cross-reference setup for this customer. Examples of cross-reference types include substitutes, replacements, and customer and supplier item numbers.
- Item Number
-
Enter the number of the original item.
- Cross Reference Item Number
-
Enter the cross-reference item number that the system assigns to an item number. A cross-reference number enables you to use a supplier's item number if it is different from the item number you use when you are processing an order or printing. You set up this number in the Item Cross-Reference program (P4104).
This item number is not validated against the Item Master table (F4101) because it may or may not be stored in the F4101 table.
- Base Price Indicator
-
Enter a code from UDC table (42/IP) that indicates which base price to use for related items. For example, this code can specify whether the system uses the price for the original item, the substitute item, or the best price, depending on the item's value.
Values are:
Blank: If you leave this field blank, the system uses the code that is specified in the Pricing for Substitute Items processing option on the Cross Ref tab in the Sales Order Entry program (P4210).
1: Use original item price.
2: Use substitute item price.
3: Use best price.
If you leave this field blank, you must also leave the Adjustment Indicator field blank. Likewise, if you enter a value in this field, you must also enter a value in the Adjustment Indicator field.
- Adjustment Indicator
-
Enter a code from UDC table (42/IA) that indicates which price adjustment to use for related items. These adjustments can include the original item's adjustment, a substitute item's adjustment, the best adjustment, or no adjustment, depending on the item's value.
Values are:
Blank: If you leave this field blank, the system uses the code that is specified in the Pricing for Substitute Items processing option on the Cross Ref tab in the Sales Order Entry program (P4210).
1: Use original item price.
2: Use substitute item price.
3: Use best price.
4: No adjustment.
- Card Number
-
Enter an OEM-assigned code from UDC table (40R/CD) that further describes the part number.
2.6.6 Setting Up Price Cross-References for Related Items
Access the Item Cross Reference Revisions By Address form.
Figure 2-14 Item Cross Reference Revisions By Address form
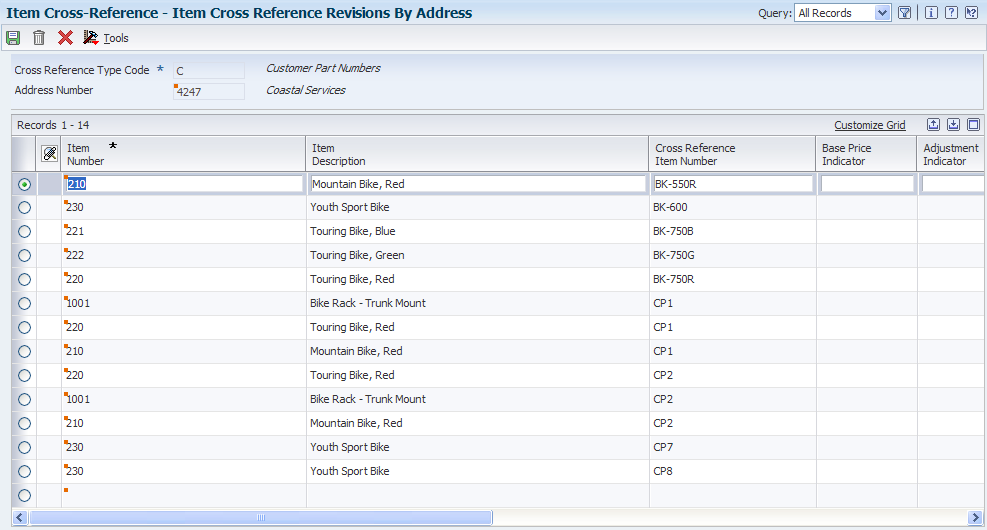
Description of "Figure 2-14 Item Cross Reference Revisions By Address form"
|
Note: You can optionally enter the effective date, expired date, cross-reference description, and customer supplier item revision level. |
- X-Ref Type (cross-reference type)
-
Enter a code from UDC table (41/DT) that identifies the type of cross-reference setup for this customer. Examples of cross-reference types include substitutes, replacements, and customer and supplier item numbers.
- Address Number
-
Enter the address number of the customer or supplier. Leave this field blank to apply to all customers or suppliers.
- Item Number
-
Enter a number that the system assigns to an item. It can be in short, long, or third item number format. The format is determined by branch/plant ALL. The item identifier that is blank is the primary item number. Enter the primary item number.
- Cross Reference Item Number
-
Enter the cross-reference item number that the system assigns to an item number. A cross-reference number enables you to use a supplier's item number if it is different from the item number you use when you are processing an order or printing. You set up this number in the Item Cross-Reference program (P4104).
This item number is not validated against the Item Master because it may or may not be stored in the Item Master.
- Expired Date
-
Enter the date on which a transaction, text message, agreement, obligation, or preference expired or was completed.
- Cross Reference Description
-
Enter a remark about an item.
- Customer Supplier Item Revision Level
-
Enter a reference number that is used to identify the revision level of the customer's item.
When using item cross-reference to translate a customer or supplier external item number to the internal short item number, the customer's number only is not always sufficient. In some instances, the customer part number must be used in conjunction with the item revision level. This combination enables the system to uniquely identify the customer's item.
2.7 Setting Up Messages
This section provides an overview of message setup and discusses how to:
-
Set up messages.
-
Print messages on program reports.
-
Define document type exceptions.
2.7.1 Understanding Message Setup
You can define two types of messages throughout JD Edwards EnterpriseOne systems:
-
Print messages, which are messages that you attach to different document types, customers, or suppliers.
-
Item notes, which are messages that you attach to items.
You can easily and efficiently set up print messages and item notes by selecting an existing message as a base and modifying the description and text. You should also use a base message to define the same message or note in multiple languages.
On the Work with Print Message form, you have the option to display:
-
Print messages or item notes.
-
Current messages.
-
All messages, including those that have expired.
To print a message, you can select an existing version from the versions list or create a new version.
You also can delete a message, although you should consider that:
-
If you delete a message in a specific language, the system deletes only that message.
No other languages are affected.
-
If you delete the base message, the system deletes all messages that are related to the base message.
-
The system removes the message code, detail information, and text lines from the text tables.
2.7.2 Forms Used to Set Up Messages
| Form Name | FormID | Navigation | Usage |
|---|---|---|---|
| Work With Print Message | W40162D | Inventory Setup (G4141), Print Message Revisions | Review print messages. |
| Print Message Revisions | W40162C | On the Work with Print Message form, click Add. | Set up messages. |
| Document Selection | W40162A | Select a record on the Work With Print Message form, and then select Documents from the Row menu. | Printing messages on program reports. |
| Document Type Exceptions | W40162B | On the Document Selection form, select Doc Typ Exception from the Row menu. | Define document type exceptions. |
2.7.3 Setting Up Messages
Access the Print Message Revisions form.
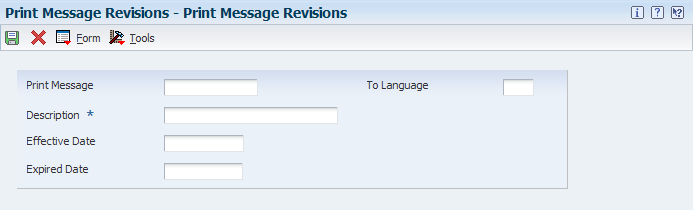
- Print Message
-
Enter a code from UDC table (40/PM) that identifies a predefined message from the Print Message Revisions form. You can print the message on sales orders, purchase orders, and so forth.
2.7.4 Printing Messages on Program Reports
Access the Document Selection form.
You can define the documents on which to print messages. For example, you might print special delivery instructions on every work order. You cannot define individual print programs for item notes. All item notes print on all documents.
Sometimes a print program generates a document that is used for multiple purposes. For example, you can use the Purchase Order Print program (R43500) to print both purchase orders and other documents, such as blanket orders and sales bids.
- Print on Report
-
Enter a value that specifies whether the print message/item note text should print on a specific report. Values are:
Y: Print.
N: Do not print.
2.7.5 Defining Document Type Exceptions
Access the Document Type Exceptions form.
Figure 2-17 Document Type Exceptions form
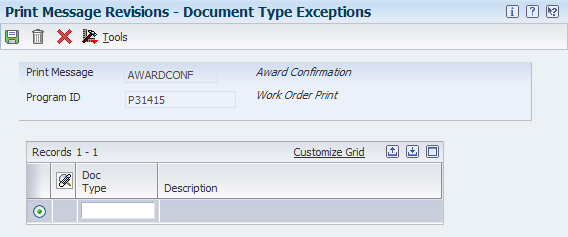
Description of "Figure 2-17 Document Type Exceptions form"
You can prevent messages from printing on specific documents. For example, in the Purchase Order Print program (R43500), you might have a message that you want to print only on blanket orders. For each print program, you can define the document types that exclude messages.
2.8 Setting Up Document Type Information
This section provides an overview of document type information and discusses how to set up document types.
2.8.1 Understanding Document Type Information
You can set up and maintain information about document types in the Document Type Maintenance program (P40040). The P0040 program updates the Document Type Master table (F40039), a single repository for information that is currently stored in various UDCs. The P0040 also updates the User Defined Codes table (F0005).
The P40040 program maintains document type information in these UDC tables:
-
Trace/Track Document Types in UDC table (40/DC).
-
Commitment Document Types in UDC table (40/CT).
-
Blanket Order Types in UDC table (40/BT).
-
Inventory Update Types in UDC table (40/IU).
-
Transaction Type in UDC table (39/TT).
-
Nature of Transaction in UDC table (40/NT).
-
Category of Order in UDC table (40/OC).
-
Other Quantity in UDC table (40/OQ).
-
Interbranch Orders in UDC table (40/IB).
-
Service Contract Type in UDC table (17/CM).
-
Work Order Type in UDC table (48/OT).
-
Carton Status in UDC table (46/RS).
Note:
When you add information directly into any of these UDC tables, the system updates the F0005 table . The system does not updated the F40039 table.
On the Edit Document Type Exclusion form, you can specify which branch/plants to exclude from certain document types. When processing specific document types, the excluded document type does not appear in the Item History table (F4115).
2.8.2 Forms Used to Set Up Document Type Information
| Form Name | FormID | Navigation | Usage |
|---|---|---|---|
| Work With Document Types | W40040A | Inventory Setup (G4141), Document Type Maintenance | Review document types. |
| Document Type Revisions | W40040B | On the Work With Document Type form, click Add. | Set up document types. |
| Edit Document Type Exclusions | W400391A | Select a record, and select History Exclusion from the Row menu on the Work With Document Types form.
Select a record, and select History Exclusion from the Form menu on the Document Type Revisions form. |
Specify which branch/plants to exclude when processing a specific document type. |
2.8.3 Setting Up Document Types
Access the Document Type Revisions form.
2.8.3.1 Inventory
Select the Inventory tab.
- Ignore,Incoming,Outgoing, and Both.
-
Select one of these options:
Ignore:The system selects no transactions.
Incoming: The system selects only incoming transactions.
Outgoing: The system selects only outgoing transactions.
Both: The system selects both incoming and outgoing transactions.
- Include in Integrity Report
-
Select this check box if you want the system to include transactions with the appropriate document type when you run the Item Ledger/Account Integrity report (R41543) and Item Balance/Ledger Integrity report (R41544).
Note:
This feature is not currently activated. - Cross Docking Supply
-
Enter a value that specifies the type of transaction the document type is used for. Values are:
Blank: Other transactions
1: Purchase order receipts
2: Work order completions
- Display Lot Trace/Track
-
Select this check box to display inventory transactions with the document type in lot tracing and tracking. If you do not select this check box, the system processes inventory transactions with this document type, but the transactions do not appear in lot tracing and tracking.
- Consolidate Lot Trace/Track
-
Select this check box to consolidate inventory transactions.
- Nature of Transaction
-
Enter a code from UDC table (40/NT) that specifies how the system processes inventory transactions that have a From side and a To side, as well as Bottom and Top levels.
Examples of From/To transactions are inventory transfers, inventory reclassifications, and work order issues/completions. Examples of Bottom/Top transactions are sales orders and purchase receipts. An inappropriate value causes the inventory transaction to process incorrectly.
2.8.3.2 Sales
Select the Sales tab.
- Order Category
-
Enter a code from UDC table (40/OC) that identifies blanket order types in the JD Edwards EnterpriseOne Sales Order Management system and the JD Edwards EnterpriseOne Procurement system. Values are:
0: Regular order
1: Blanket order
2: Quote - No quantity release
3: Quote - QuantityrRelease
In the JD Edwards EnterpriseOne Sales Order system, when the Order Type option is selected, if the order is set up as type 2 or 3 (Quotes), a value will be hard coded into the Order Type Indicator field to specify that a particular order is a quote.
- Interbranch Orders
-
Enter a value of 1 to identify this order type as an interbranch order type. When you create an interbranch order using the Sales Order Entry program (P4210), the system processes additional order information such as cost markup. You would use an Interbranch order in a situation in which the customer places an order with a sales office, but the sales office ships the inventory to the customer from a warehouse facility. The system creates accounting transactions and intercompany invoices for interbranch sales orders during Sales Update and Invoice Print.
- Other Quantity
-
In the JD Edwards EnterpriseOne Sales Order Management system, this field determines whether the Quantity on Other Sales Order 1 or 2 field in the Item Location file is updated instead of the Soft Commit field or the Hard Commit field.
In the JD Edwards EnterpriseOne Procurement system, this field determines whether the Quantity on Other Purchase Order field is updated in the Item Location file instead of the On Purchase Order field.
- Relieve On Hand Inventory at Ship Confirm
-
Enter a value to indicate whether the quantity that is committed to this sales order is relieved from the on hand quantity during the Shipment Confirmation process. If this option is disabled, the Shipment Confirmation process hard commits only the quantity that is shipped to the appropriate item location.
Note:
This feature is not currently activated. - Ship And Debit Processing
-
Specify whether ship and debit processing is activated.
- Next Number System Code
-
Enter a code from UDC table (98/SY) that identifies a system.
- Document Type Next Number
-
Specify which next number series to use when creating order numbers for this order type. Ten next number series are available. Use this field with purchase requisitions that carry order numbers different from bid requests and purchase orders and blanket sales orders that are numbered in a different number range from standard sales orders.
- Send Status Notification
-
Enter a value that indicates whether to send notification of status change. Values are:
Y: Yes
N: No
2.8.3.3 Procurement
Select the Procurement tab.
- Next Number System Code
-
Enter a code from UDC table (98/SY) that identifies a system.
- Commit Procurement Orders
-
Select this check box to automatically commits the amount on a purchase order for a service or a subcontract.
- Publish Externally
-
Select this check box to allow external publishing of a document type.
2.8.3.4 S/WM
Select the S/WM tab.
- Contract Type
-
Enter a code from UDC table (17/CM) that the system uses to define whether the document type relates to either a service or supplier contract. The service contract can be either a regular or quote contract.
2.8.3.5 Work Order Definition
Select the Work Order Definition tab.
- Order Type
-
Enter a code that the system uses to determine the type of work order, based on the value in the Order Type field. Values are:
01: Unrelated to work order.
02: Manufacturing work order.
03: Manufacturing rework work order.
04: Equipment work order.
05: Service work order.
06: Warranty claim order.
07: Supplier recovery order.
08: Engineering change order.
09: Engineering change request order.
10: Property Management order.
11: Engineer to Order summary order.
12: Rate schedule order.
2.8.3.6 Shipping
Select the Shipping tab.
- Carton Creation Status
-
Enter a code from UDC table (46/RS) that specifies which status the system uses when creating cartons in the F4615 table.
- Carton Change Status
-
Enter a code from UDC table (46/RS) that specifies which status the system uses when changing cartons in the F4615 table.
- Recommended Standard Packs
-
Select this check box to indicate that standard pack carton recommendations are created.
- Enable Shipment Sequencing
-
Select this check box to enable shipment sequencing. Shipment sequencing functionality is available within the JD Edwards EnterpriseOne Transportation Management system.
2.9 Setting Up AAIs in Distribution Systems
This section provides overviews of AAIs in distribution systems and AAIs in the JD Edwards EnterpriseOne Inventory Management system, lists prerequisites, and discusses how to:
-
Set processing options for Distribution AAIs (P40950).
-
Set up AAIs.
2.9.1 Understanding AAIs in Distribution Systems
The system uses AAIs to determine how to distribute GL entries that the system generates. For example, in JD Edwards EnterpriseOne Inventory Management, AAIs indicate how to record the transaction after you issue inventory from a location.
When you use distribution systems, you must create AAIs for each unique combination of company, transaction, document type, and GL class that you anticipate using. Each AAI is associated with a specific GL account that consists of a business unit, an object, and a subsidiary (optional). You also can enter memo text on the generic text form for each AAI table.
After you review and revise the existing AAIs for the business needs, you might need to set up additional AAI items. The system stores AAIs in the Distribution/Manufacturing - AAI Values table (F4095).
2.9.2 Understanding AAIs in the JD Edwards EnterpriseOne Inventory Management System
This table identifies the predefined AAI items that are available in the JD Edwards EnterpriseOne Inventory Management system:
| AAI | Description |
|---|---|
| 3910 | An AAI to identify the inventory account for the inflation adjustment process. |
| 3911 | An AAI to identify the results account, which serves as the offset to the inventory adjustments account. |
| 4122 | An inventory AAI that provides the balance sheet inventory valuation account. |
| 4124 | An inventory AAI that provides the expense or cost of goods sold account. |
| 4126 | A zero balance adjustment AAI that provides the inventory offset account. |
| 4128 | A zero balance adjustment AAI that provides the expense or cost of goods offset account. |
| 4134 | An item balance cost change AAI that determines the inventory offset account. |
| 4136 | An item balance cost change AAI that determines the expense or cost of goods offset account. |
| 4141 | A standard cost variance AAI that determines the cost of goods offset account. |
| 4152 | A physical inventory update AAI that determines the inventory offset account. |
| 4154 | A physical inventory update AAI that determines the cost of goods offset account. |
| 4162 | An AAI that determines the average cost update-inventory |
| 4164 | An AAI that determines the average cost update-cost of goods sold |
| 4172 | A batch cost maintenance AAI that determines the inventory offset account. |
| 4174 | A batch cost maintenance AAI that determines the expense or cost of goods offset account. |
| 4182 | A bulk product gain/loss AAI that determines the bulk inventory offset account. |
| 4184 | A bulk product gain/loss AAI that determines the expense or cost of goods offset account. |
2.9.3 Prerequisites
Before you complete the tasks in this section, you must:
-
Set up companies.
-
Verify transaction types in UDC table (00/DT).
-
Set up document types in UDC table (00/DT).
-
Set up GL class codes in UDC table (41/9).
-
Set up accounts.
2.9.4 Forms Used to Set Up AAIs in Distribution Systems
| Form Name | FormID | Navigation | Usage |
|---|---|---|---|
| Work with AAIs | W40950B | Inventory Setup (G4141), Automatic Accounting Instructions | Review AAIs. |
| Account Revisions | W40950D | Select a record and select Details from the Row menu on the Work with AAIs form. | Set up AAIs. |
2.9.5 Setting Processing Options for Distribution AAIs (P40950)
Processing options enable you to specify the default processing for programs and reports.
2.9.5.1 Defaults
- AAI Table Number
-
Specify the default value that the system displays in the Skip To AAI field.
- Cost Type Field
-
Specify whether the Cost Type field is available to these Distribution AAI tables:
4122
4124
4134
4136
4220
4240
4310
Values are:
Blank: The Cost Type field is not available.
1: The Cost Type field is available.
2.9.6 Set Up AAIs
Access the Account Revisions form.
- Co (company)
-
Enter a code that identifies a specific organization, fund, or other reporting entity. The company code must already exist in the Company Constants table (F0010) and must identify a reporting entity that has a complete balance sheet. At this level, you can have intercompany transactions.
Note:
You can use company 00000 for default values, such as dates and AAIs. You cannot use company 00000 for transaction entries. - Do Ty (document type)
-
Enter a code from UDC table (00/DT) that identifies the origin and purpose of the transaction. The system reserves several prefixes for document types, such as vouchers, invoices, receipts, and time sheets.
- GL Cat(general ledger category)
-
Enter a code from UDC table (41/9) that identifies the GL offset that the system uses to search for a account to post the transaction. If you do not want to specify a class code, you can enter **** (four asterisks) in this field.
You can use AAIs to predefine classes of automatic offset accounts for the JD Edwards EnterpriseOne Inventory Management, the JD Edwards EnterpriseOne Procurement system, and the JD Edwards EnterpriseOne Sales Order Management systems.
The system can generate accounting entries based upon a single transaction. For example, a single sale of a stock item can trigger the generation of accounting entries similar to:
-
Sales Stock (Debit) xxxxx.xx.
-
AR Stock Sales (Credit) xxxxx.xx.
-
Posting Category: IN80.
-
Stock Inventory (Debit) xxxxx.xx.
-
Stock COGS (Credit) xxxxx.xx.
The system uses the class code and the document type to locate the AAI.
-
- Branch Plant
-
Enter an alphanumeric code that identifies a separate entity within a business for which you want to track costs. For example, a business unit might be a warehouse location, job, project, work center, branch, or plant.
You can assign a business unit to a document, entity, or person for purposes of responsibility reporting. For example, the system provides reports of open accounts payable and accounts receivable by business unit to track equipment by responsible department.
Business unit security might prevent you from viewing information about business units for which you have no authority.
If you leave this field blank, the system uses the business unit in the Charge to Cost Center field on the work order.
- Obj Acct (object account)
-
Enter a value that identifies the portion of a general ledger account that refers to the division of the cost code (for example, labor, materials, and equipment) into subcategories. For example, you can divide the cost code for labor into regular time, premium time, and burden.
Note:
If you use a flexible chart of accounts and the object account is set to six digits, you should use all six digits. For example, 000456 is not the same as 456 because, if you enter 456, the system enters three blank spaces to fill a six-digit object. - Sub (subsidiary)
-
Enter a subset of an object account. Subsidiary accounts include detailed records of the accounting activity for an object account.
Note:
If you are using a flexible chart of accounts and the object account is set to six digits, you must use all six digits. For example, entering 000456 is not the same as entering 456. If you enter 456, the system enters three blank spaces to fill a six-digit object.If you leave this field blank, the system uses the value in the Cost Code field on the work order.