| Oracle® Beehive Installation Guide Release 2 (2.0.1.8) for Oracle Solaris on SPARC (64-Bit) Part Number E16643-07 |
|
|
PDF · Mobi · ePub |
| Oracle® Beehive Installation Guide Release 2 (2.0.1.8) for Oracle Solaris on SPARC (64-Bit) Part Number E16643-07 |
|
|
PDF · Mobi · ePub |
Clone patching is an alternative way to upgrade an Oracle Beehive application tier. It involves cloning an already upgraded application tier, then replacing an old application tier with the clone. Clone patching is recommended if you have many application tiers to upgrade.
The following figures illustrate how clone patching works:
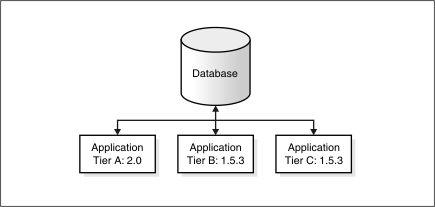
Figure 14-1, "Oracle Beehive Deployment Before Clone Patching" depicts an Oracle Beehive deployment with three application tiers - application tier A has been upgraded to Release 2 (2.0) and application tiers B and C are Release 1 (1.5.3).
Figure 14-1 Oracle Beehive Deployment Before Clone Patching
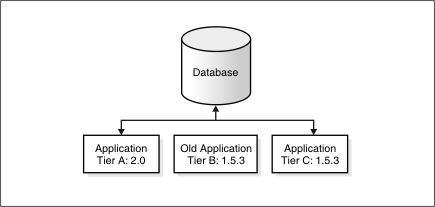
In Figure 14-2, "Backing up Application Tier Before Clone Patching", application tier B has been shut down and backed up.
Figure 14-2 Backing up Application Tier Before Clone Patching
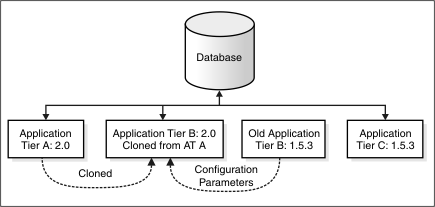
In Figure 14-3, "Oracle Beehive Deployment After Clone Patching", application tier B has been upgraded to Release 2 (2.0) from clone patching application tier A. Some configuration parameters have been copied from the backed up application tier B to the upgraded application tier B.
Figure 14-3 Oracle Beehive Deployment After Clone Patching
You may upgrade Oracle Beehive by clone patching in the following two ways:
Specifying the location of the backed up Oracle Beehive home
This is the recommended method of upgrading Oracle Beehive by clone patching. This method involves creating a backup of the Oracle Beehive instance you want to upgrade by moving it, not copying it, to a new directory. When you run the command beectl clone_patching, you specify the location of the backed up Oracle Beehive home with the --old_oracle_home option.
An advantage of this method is that after clone patching, the application tier remains SSL or AJPS enabled if it was SSL or AJPS enabled prior to clone patching. It does not matter if the cloned, upgraded application tier is SSL or AJPS enabled.
The following table describes the options for the beectl clone_patching command for this method:
Table 14-1 beectl clone_patching Options for Specifying Backed up Oracle home
| Option | Mandatory/ Optional | Description |
|---|---|---|
|
--old_oracle_home |
Mandatory |
Full path name of the location of the old, backed up Oracle Beehive home to be upgraded. |
|
--oui_inv_ptr_loc |
Optional Note: This option is available only for UNIX-based systems. Do not specify if it does not exist on the computer from which you are running this command; in this case, the Oracle inventory will be created in the user' home directory. |
Note: This option is available only for UNIX-based systems. Oracle Universal Installer inventory location. For more information, refer to "Oracle Inventory Location Option of Clone Commands on UNIX-Based Systems". The Oracle Beehive cloning process internally uses the Oracle Universal Installer to update the Oracle inventory. The value of this option specifies the Oracle Universal Installer inventory location. For example: --oui_inv_ptr_loc "/var/opt/oracle/oraInst.loc" Note: This value is platform-dependent. On Solaris, it is |
|
--start_at_end |
Optional |
If true, Oracle Beehive will start components after cloning. Permitted value is a boolean value. By default, components are not started at the end of clone patching. |
Specifying the Oracle Beehive instance system model
In certain cases, you may not be able to specify the location of the old Oracle Beehive home file system. In such cases, when you run the command beectl clone_patching, use the option --local_beehive_instance_id (and related options --site_key and --db_schema_password).
A disadvantage to this method is that the upgraded application tier is not SSL or AJPS enabled even if it was prior to clone patching.
The following table describes the options for the beectl clone_patching command for this method:
Table 14-2 beectl clone_patching Options for Specifying System Model Identifier
| Option | Mandatory/ Optional | Description |
|---|---|---|
|
--local_beehive_instance_id |
Mandatory |
Target Oracle Beehive instance system model identifier. To get the value for Beehive instance ID, run the following beectl command:./beectl list_components --type BeehiveInstance |
|
--site_key |
Mandatory |
Site key of the site you are cloning. This is an alphanumeric string. Notes:
|
|
--db_schema_password |
Mandatory |
Database password for the schema. Note: If you are not in shell mode, you must obfuscate the database password and add the --obfuscated option to the To obfuscate a password, use the beectl obfuscate --expiration_time_in_minutes 0 Enter value for password: Successfully obfuscated the string. |
|
--oui_inv_ptr_loc |
Optional Note: This option is available only for UNIX-based systems. Do not specify if it does not exist on the computer from which you are running this command; in this case, the Oracle inventory will be created in the user's home directory. |
Note: This option is available only for UNIX-based systems. Oracle Universal Installer inventory location. For more information, refer to "Oracle Inventory Location Option of Clone Commands on UNIX-Based Systems". The Oracle Beehive cloning process internally uses the Oracle Universal Installer to update the Oracle inventory. The value of this option specifies the Oracle Universal Installer inventory location. For example: --oui_inv_ptr_loc "/var/opt/oracle/oraInst.loc" Note: This value is platform-dependent. On Solaris, it is |
|
--start_at_end |
Optional |
If true, Oracle Beehive will start components after cloning. Permitted value is a boolean value. By default, components are not started at the end of clone patching. |
Follow the below mentioned steps to upgrade an Oracle Beehive by clone patching:
Ensure that the chipset and the operating system version (including any operating system patches) of all the application tiers you want to upgrade by clone patching is the same.
Refer to "Upgrading Oracle Beehive Overview" and "Upgrading Oracle Beehive" for more information.
Create a source image of the upgraded application tier by following the steps described in the section "Preparing Source Application Tier Instance" in "Cloning Oracle Beehive Application Tiers and Sites".
Run the command beectl stop --all on the application tier you want to upgrade.
Move the contents of the Oracle Beehive home you are upgrading to another directory:
mv $ORACLE_HOME $BACKUP_ORACLE_HOME
$ORACLE_HOME is the Oracle home of the application tier you are moving, and $BACKUP_ORACLE_HOME contains the contents of $ORACLE_HOME.
Unzip the source image of the upgraded application tier (which you created in step 3) in the same location as the Oracle Beehive home you are upgrading. (The Oracle home for this unzipped source image will be $ORACLE_HOME).
To unzip this source image, follow "Step 1: Unzip Compressed Oracle Home" in the section "Application Tier Cloning" in "Oracle Beehive By Clone Patching".
Update ORACLE_HOME in the beectl command to refer to the upgraded target Oracle Beehive application tier as described in "Step 3: Modify Oracle Home Path" in "Cloning Oracle Beehive Application Tiers and Sites".
If you are using the clone method "Specifying the location of the backed up Oracle Beehive home", run the beectl clone_patching command as follows:
beectl clone_patching --old_oracle_home $BACKUP_ORACLE_HOME
If you are using the clone method "Specifying the Oracle Beehive instance system model", run the beectl clone_patching command as follows:
beectl clone_patching -–site_key <secure site key> --db_schema_password <secure database password> --local_beehive_instance_id <Oracle Beehive instance system model ID>
The following is an example of running this command:
beectl clone_patching
  --local_beehive_instance_id beehive_instance_instM2.example.com
  --db_schema_password c2ufOaQ9IYRPpVFnsUOmng8BD3S+O42hZxWlUYHnljZx5EqOH5TkcA==
  --site_key c2ufOaQ9IYRPpVFnsUOmng8BD3S+O42hZxWlUYHnljZx5EqOH5TkcA==
  --obfuscated
Note:
When using obfuscated passwords with thebeectl clone_patching command, ensure the following:
If your Oracle Beehive deployment consists of multiple application tiers, obfuscate passwords on the same application tier you plan to use them; do not use an obfuscated password created on one instance on another instance.
Do not enclose obfuscated passwords in single or double quotes.
|
Copyright © 2008, 2013, Oracle and/or its affiliates. All rights reserved. Legal Notices |
|