| Oracle® Beehive Administrator's Guide Release 2 (2.0.1.8) Part Number E16648-07 |
|
|
PDF · Mobi · ePub |
| Oracle® Beehive Administrator's Guide Release 2 (2.0.1.8) Part Number E16648-07 |
|
|
PDF · Mobi · ePub |
This module presents instructions for performing a variety of configuration tasks involving how Oracle Beehive handles e-mail. The instructions in this module assume that you are already familiar with the use of beectl commands to set properties of the E-mail Service. For detailed instructions on setting service properties, see "Oracle Beehive Parameter Reference" in the Oracle Beehive Administrator's Reference Guide.
For details about exporting and importing individual users' e-mail folders, see "Backing Up and Recovering Individual E-mail Accounts".
This module contains the following topics:
This section contains the following topics:
Broadly, there are two general categories of Oracle Beehive E-mail configuration properties: those which you can freely modify using any administrator tool, and those which should only be adjusted using Oracle Beekeeper.
Configuring Oracle Beehive E-mail Parameters using beectl or Oracle Beekeeper
Configuring Complex Rule-Based E-mail Parameters using Oracle Beekeeper
beectl or Oracle BeekeeperConfiguration of Oracle Beehive E-mail is accomplished by setting parameters of the E-mail Service. The commands, syntax, and a reference of parameters for all components are provided in Chapter 4, "Oracle Beehive Parameter Reference," of the Oracle Beehive Administrator's Reference Guide. You can also configure many of these parameters using Oracle Beekeeper. When you are making simple configuration changes, you can edit parameter values directly using either tool.
Oracle E-mail stores server-side e-mail rules by using XML-formatted code, stored in various E-mail Service parameters. Manual edits to this XML is not supported.
Beginning with Oracle Beehive Release 1, version 1.4, you should configure Oracle E-mail rules using the Oracle Beekeeper administration console. The console will make changes to the XML in the background. This method provides the safest way of modifying the XML-based configuration without introducing errors.
You must first install and configure Oracle Beekeeper, following the instructions in the Oracle Beehive Installation Guide for your platform.
Oracle Beekeeper includes integrated help topics for many of the configuration options for the E-mail Service. You should refer to the online help for details about the various configuration options.
The SMTP Server component is a robust, scalable, and flexible component of Oracle Beehive that provides open protocol access to the Oracle Beehive E-mail Service. The SMTP Server has been designed to be both Internet and internal facing. The SMTP server can be divided into Virtual Mail Servers (VMSes). Oracle Beehive SMTP Servers may have multiple Endpoints, and are configured with dispatch rules. These configuration options provide flexibility to facilitate servicing Internet and internal SMTP clients.
A virtual mail server is a component which engages in SMTP conversations with clients. Two VMSes are differentiated by their behavior, which is controlled by many properties. For example, SMTP defines a time-out for inactivity. A VMS servicing the Internet may be configured with a low value for this time-out, to prevent service loss. A VMS servicing internal clients may permit a longer time-out (because internal clients are assumed not to be hostile). Time-outs are only one of more than a dozen properties of a VMS. Note that the primary driver for having VMSes is to facilitate different behavior for internal clients compared to external clients.
In Oracle Beekeeper, configuration options for VMSes are found by selecting the E-mail Service, the Configuration tab, and then the SMTP Properties subtab.
The following general concepts apply to Virtual Mail Servers in Oracle Beehive:
SMTP Mail (into and out of Oracle Beehive) is processed by a Virtual Mail Server (VMS)
A VMS is capable of various rule-based processing choices
In a default Oracle Beehive installation, there are two default VMSes configured: Inbound VMS and Outbound VMS
Each VMS has two 'matchers,' which can be used to filter which addresses are acceptable:
a Sender Matcher
a Recipient Matcher
By default, both matchers are enabled for both default VMSes.
The Virtual Mail Server components of Oracle Beehive make use of an Evaluator to determine where and how e-mail messages are relayed. The VMS Evaluator picks which VMS will be used to process the message based on the source of the message or the Endpoint the client connects to.
In Oracle Beekeeper, the VMS Evaluator is configured using the VMS Routing section of the SMTP Properties tab.
The rules for the VMS Sender and Recipient matching decide which e-mail messages are allowed to be delivered to an Oracle Beehive recipient, are permitted by Oracle Beehive to be relayed, or will be rejected.
The following are typical types of rules for how Oracle Beehive relays e-mail messages:
Oracle Beehive accepts e-mail to addresses that it is configured to recognize as local. This generally means Oracle Beehive users, but there may be some special cases where a single domain includes some users in Oracle Beehive and some in another system. In this case, the Oracle Beehive VMS evaluators should be configured so that e-mail may be sent to any address in the domain, and the server determines the correct destination to deliver the message
Messages that aren't addressed to recipients in your local domains are routed to their destination. If the Oracle Beehive server is connected directly to the Internet, then the server can perform MX resolution through DNS to find the IP address of the recipient's server. If the Oracle Beehive e-mail server is behind a gateway or proxy, Oracle Beehive should relay all outbound traffic to some other "smart host" to send it out to the public Internet
Messages that aren't to your domains, and are also not from your local domains, are most likely spam or malicious, and e-mail servers should be configured to prevent or block such traffic
In addition to one or more virtual mail servers, the SMTP server presents "endpoints." Endpoints represent a logical listening point. In this terminology, a web server has two endpoints, one for SSL (port 443) and one for regular HTTP (port 80). In Oracle Beehive, the SMTP server can listen for both traditional TCP traffic from clients (on the traditional port 25 default, or on other ports as well or instead), and for internal traffic from other Oracle Beehive services.
A given SMTP Server may listen for SMTP connections on more than one endpoint, and each endpoint is uniquely identified by a logical name. In most cases, an endpoint works the same as a TCP port. By default, the E-mail Service is configured to "assume single endpoint," meaning it assumes all SMTP connections will be made over a single port.
In Oracle Beekeeper, you can configure endpoints by selecting the E-mail Service, selecting the Configuration tab, and selecting the SMTP Properties subtab.
Dispatch rules map incoming connections to a VMS. The mapping is based on one of the following properties of the incoming connection:
The Endpoint at which the connection arrived (if you have multiple endpoints)
The network (IP) address of the client
The sender's e-mail address contained in the e-mail header
The dispatch rules accept as input these data points, and return the appropriate VMS. Note that in the configuration, the Email Service parameter that stores dispatch rules is called VMSEvaluators.
In Oracle Beekeeper, you can configure dispatch rules by selecting the E-mail Service, selecting the Configuration tab, and selecting the SMTP Properties subtab. Expand the VMS Routing sectiManaging Dead Letteron to view the current rules.
See "Setting Up E-mail Relay Routing" for details about configuring VMS routing.
This section contains procedures for accomplishing a variety of tasks using rules configuration with Oracle Beehive. It contains the following topics:
You can use dispatch rules to configure domains (and domain IP ranges) for routing outbound messages to the outbound VMS. Domains not specified will not be routed to the outbound VMS.
Use Oracle Beekeeper to make changes to the SMTP Server's VMS Evaluator, which determines which VMS various messages should be routed to.
To configure outbound Dispatch Rules, perform the following procedure:
Log in to Oracle Beekeeper, select the E-mail Service, select the Configuration tab, and click Edit
Select the SMTP Properties tab
Expand the VMS Routing section
By default, there is one Host Filter Rule, which directs traffic from all hosts to the Outbound VMS. You can edit this default rule
Under Add mapping rule, select Host Filter Rule and click the plus button to add additional host dispatch filters. You can select any VMS to route messages to, based on the originating host(s). You can choose IP addresses or IP address ranges, or specify hosts using their fully-qualified host names. Wildcards are accepted
By default, there is one Endpoint Filter Rule, which directs traffic from all endpoints to the Outbound VMS. You can edit this default rule.
Under Add mapping rule, select Endpoint Filter Rule and click the plus button to add additional endpoint dispatch filters. You only need to do this if you have added additional endpoints. You can select any VMS to route messages to, depending on the originating endpoint
You can promote or demote rules using the up and down buttons, which change the order in which the VMS Evaluator processes the rules. The Catch-All Rule is always last
You can designate any VMS for the Catch-All Rule. Messages which are not matched by any previous rule will be matched by the Catch-All Rule and routed to the designated VMS
When you have finished making your configuration changes, click Apply to apply your changes to the proposed configuration without closing the configuration window, or Save and close to apply your changes to the proposed configuration and close the window.
Activate the configuration by clicking Configuration Control in the System box, and then clicking Activate.
By default, sent e-mails are not auditable, and are not eligible to be filed as records for Records Management. You can configure either or both of these capabilities, but only after you enable this functionality by setting a property of the Email Transport Properties component. By doing so, you cause an event to be raised whenever an e-mail is sent, and that event can be used in audit or records management policies.
To enable audit policies and records management policies to include sent e-mail messages, use the beectl modify_property command:
beectl> modify_property --component _EmailService:TransportProperties --name SentEmailPluginEnabled --value true
If you want to file records of outgoing e-mail messages, you must also designate an Oracle Beehive user account as the special RmAdminEmailId. This user account will be used to store outgoing e-mail messages so that they can be filed as records. You can designate any account, but Oracle recommends creating an account specifically for this purpose.
Once you have created the account, get the identifier of the URM component by using the list_components command:
beectl> list_components --type Urm
Then, use the beectl modify_property command to add the account to the RmAdminEmailId property of the URM component:
beectl> modify_property --component <URM component ID> --name RmAdminEmailId --value user=<userID>
After modifying properties, to apply the proposed configuration change, you must run the beectl activate configuration command:
beectl> activate_configuration
You can also modify these properties using Oracle Beekeeper.
Note:
After setting theSentEmailPluginEnabled property, you still must create or modify audit policies and records management policies to include sent e-mails.See Also:
For more information about auditing sent e-mails, see: Chapter 14, "Managing Oracle Beehive Auditing"
For more information about filing records for sent e-mails, see: "Step 2C: Enabling Record Filing of Sent E-mails" in Chapter 7, "Integrating Oracle Universal Records Management (Oracle URM) with Oracle Beehive," of the Oracle Beehive Integration Guide.
This section describes how to configure the VMS Evaluator to decide which VMS should process a given message, based on the source of the message (by its hostname or IP address) or the Endpoint the client connects to (if you have multiple Endpoints).
Configure VMS routing using Oracle Beekeeper. Log in to Oracle Beekeeper, select the E-mail Service from the list of services, select the Configuration tab, and then select the SMTP Properties subtab. You can view the existing configuration by expanding the VMS Routing section. You can make changes to the current configuration by clicking the Edit button.
Note:
Messages internal to Oracle Beehive (from one Oracle Beehive user to another Oracle Beehive user using native clients such as Oracle Beehive Integration for Outlook) are never routed to a VMS Evaluator. They are delivered directly to recipients without requiring the E-mail Service to evaluate or route them.Messages sent using a client that connects to Oracle Beehive using SMTP are routed through the VMS Evaluator.
You can perform the following routing tasks using Oracle Beekeeper:
Modify an Endpoint Filter Rule to configure which VMS messages from a given Endpoint should be routed to
Modify a Host Filter Rule to configure which VMS messages from one or more hosts or IP address ranges should be routed to
Modify the Catchall Rule to configure which VMS messages that do not match any previous rule should be routed to
Add additional Endpoint Filter Rules or Host Filter Rules, by selecting one or the other from the Type dropdown list under Add Mapping Rule, and then clicking the plus sign
Change the order in which filter rules will be evaluated, by clicking the up or down arrows on any rule to promote or demote it in the order
Remove any Endpoint Filter Rule or Host Filter Rule by clicking the red X
When you have finished making your configuration changes, click Apply to apply the changes to the proposed configuration without closing the configuration window, or Save and close to apply the changes to the proposed configuration and close the window.
Activate the configuration by clicking Configuration Control in the System box, and then clicking Activate.
The Reject All VMS is a special VMS that rejects all e-mail messages sent to it. You can set any Endpoint Filter Rule, Host Filter Rule, or the Catchall Rule to route e-mail to the Reject All VMS by selecting a check box.
If you use the Reject All VMS, you must enable it as well. Unless you have enabled the Reject All VMS, checking the Use Reject All VMS check box has no effect (messages are not rejected).
First, enable the Reject All VMS by performing the following procedure:
Log in to Oracle Beekeeper, select the E-mail Service from the list of services, and click the Manage button.
Click SMTP Properties and expand the VMSDefinition section.
Check the Use Reject All VMS check box.
When you have finished making your configuration changes, click Apply to apply the changes to the proposed configuration without closing the configuration window, or Save and close to apply the changes to the proposed configuration and close the window.
Activate the configuration by clicking Configuration Control in the System box, and then clicking Activate.
Then, follow the steps in "Configuring VMS Routing to Relay Messages" to configure VMS routing rules. Check the Use Reject All VMS check box in any rule.
The Local E-mail Patterns property is a list of domains, subdomains, or other e-mail address patterns. The users who connect to Oracle Beehive using a standards-based e-mail application, such as Eudora or Mozilla Thunderbird, should originate from a domain which you recognize as internal. If you choose not to specify local users using the Local E-mail Patterns, you will need to enter this information each time you configure the Sender Matcher or Recipient Matcher of a VMS to recognize local e-mail addresses.
The local e-mail patterns list can be used by VMSes to serve as an exception to a blocking rule, or as a basis for an accepting rule (whitelist).
By default, there is no preset list of local e-mail patterns. You can add local e-mail patterns using Oracle Beekeeper. To specify one or more local e-mail patterns, perform the following procedure:
Log in to Oracle Beekeeper, select the E-mail Service, select the Configuration tab, and click Edit.
Select the General Properties tab, and expand the General Settings section.
In the List of valid local e-mail address patterns, click the Add Pattern button to add additional patterns.
Click the X button to delete existing patterns.
When you have finished making your configuration changes, click Apply to apply the changes to the proposed configuration without closing the configuration window, or Save and close to apply the changes to the proposed configuration and close the window.
Activate the configuration by clicking Configuration Control in the System box, and then clicking Activate.
When you configure any VMS (such as the Inbound VMS or Outbound VMS), you can check the Match local email patterns check box in the Recipient Matcher or Sender Matcher, to include the list of local e-mail patterns in the rule.
Note:
Oracle recommends using a third-party e-mail gateway between Oracle Beehive SMTP ports and the Internet. Oracle Beehive does not provide spam filtering and other more advanced e-mail security and processing features typically recommended for production e-mail servers.In order to prevent your Oracle Beehive deployment from acting as an open relay, you should use a configuration similar to the following:
The Inbound VMS should reject recipients that are not in recognized local domains.
The Outbound VMS should reject senders that are not allowed (either by mail address or by network location).
Note:
The terms Inbound VMS and Outbound VMS are conventions used as labels for two arbitrary VMSes. In all examples in this module, the Inbound VMS is a VMS being used for inbound e-mail messages, and the Outbound VMS is a VMS being used for anything originating from Oracle Beehive. But in both cases, there is nothing special about either VMS other than its particular configuration, which you can modify. You can set up additional VMSes, and remove VMSes, according to your needs.To prevent Open Relay, any VMS that is accepting e-mails with destinations outside your domain (such as the default sender matcher) should only accept messages from senders that are permitted (local e-mail patterns).
By default, there are no restrictions on the sender pattern matcher, so you should configure it to restrict sender matching as needed.
"Outbound VMS" is for anything originating from Oracle Beehive (either by an Oracle Beehive user through internal Oracle Beehive services, or an Oracle Beehive user through SMTP) and "Inbound VMS" is for anything originating outside of Oracle Beehive (whether sent to an Oracle Beehive user or for relay, if allowed).
There are other ways you could configure Oracle Beehive. For example, you could have multiple end-points and different ports, secured behind port-mappings behind a load balancer or router, and so forth.
One method for preventing Oracle Beehive from acting as an open relay is to set the VMS Routing and Inbound and Outbound VMS rules using the settings shown in Figure 8-1, Figure 8-2, Figure 8-3, and Figure 8-4. This example may or may not be appropriate for your own deployment.
First, in Figure 8-1, "Configuring VMS Routing Rules", the E-mail VMS Routing Rules are configured to insure that e-mail messages sent from trusted, local senders (those in your local domains and IP address ranges) are connected to the Outbound VMS (by the Host Filter Rule). (In this example, this will be the 'trusted' VMS that lets a sender route a message to anyone. See Figure 8-3.)
Messages sent from all other senders (those that do not match your local domains or IP address ranges) are connected to the Inbound VMS (by the Catch-All Rule). In this example, the Inbound VMS is configured so that messages routed through it must be addressed to a local user, so relay of messages is disallowed.
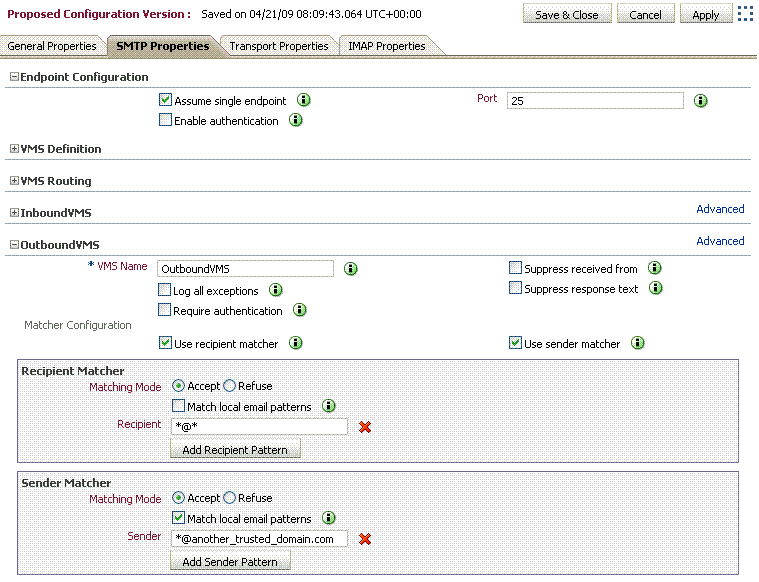
In Figure 8-2, "Configuring the Outbound VMS Sender Matcher", the Outbound VMS is set to accept messages sent to any address (in the Recipient Matcher), and accepts messages originating from the internal addresses that you defined in your local email patterns, as well as a trusted domain another_trusted_domain.com (in the Sender Matcher). This means that connections originating from these sources are considered safe, and allowed to send messages outbound (to addresses outside of Oracle Beehive).
The Match local e-mail patterns check box is checked. This means that local e-mail patterns (set on the General Properties tab) will also be accepted as valid senders by the Outbound VMS.
Note:
In a default Oracle Beehive install,*@* is used as the initial setting, which means any client connecting to the SMTP Server will be allowed to send messages, regardless of IP address or sender domain.Figure 8-2 Configuring the Outbound VMS Sender Matcher
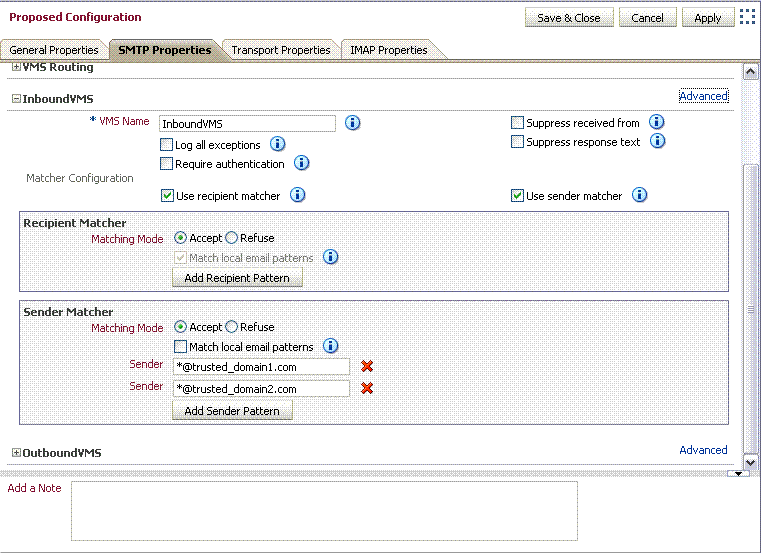
The Inbound VMS Evaluator, as shown in Figure 8-3, "Configuring the Inbound VMS Evaluator", may be left at its default settings. In this configuration example, any external sender (as defined by the Sender Matcher) may send e-mail messages to the Oracle Beehive SMTP Server; however, only e-mail messages with a recipient that matches the local e-mail patterns (see Figure 8-4) will be delivered.
Figure 8-3 Configuring the Inbound VMS Evaluator
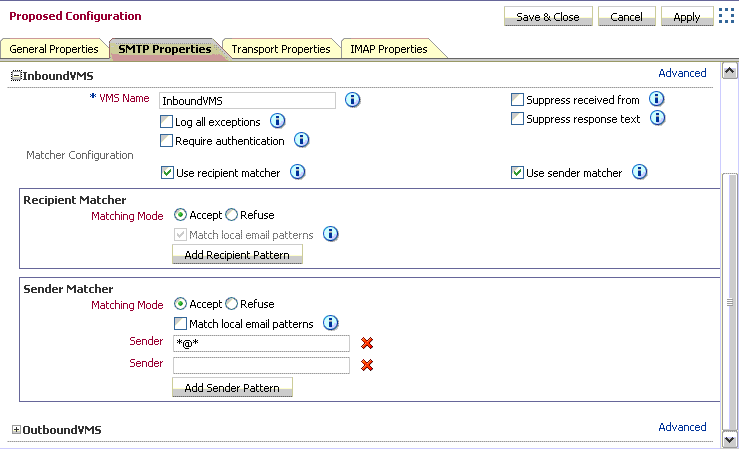
The Inbound VMS Evaluator by default uses the Match local email patterns setting. Local e-mail patterns are set on the General Properties tab. Unless you set a more specific local e-mail pattern, all e-mail addresses are accepted, so the Inbound VMS will accept any e-mail message: even those addressed to external addresses.
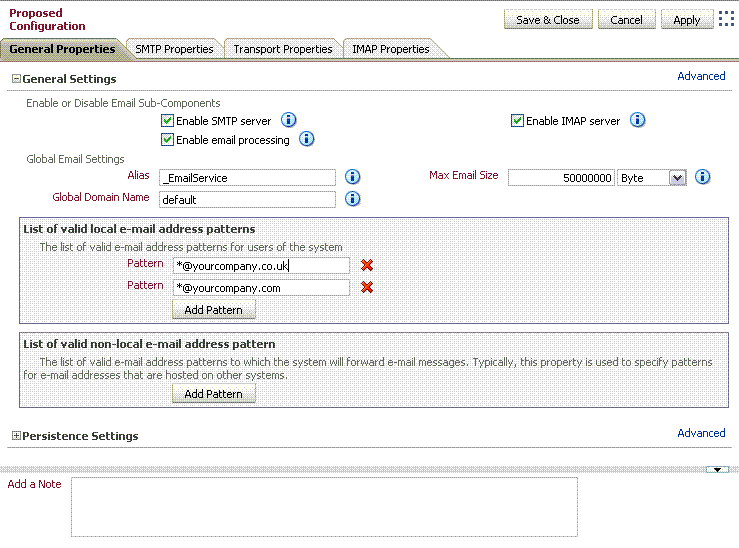
Both the Inbound and Outbound VMSes are now making use of the Match local email patterns setting, to determine which domains or patterns are recognized as valid internal recipients and senders of e-mail messages. Figure 8-4, "Configuring Local E-mail Patterns", shows how to set the local e-mail patterns using Oracle Beekeeper.
On the General Settings tab, under the List of valid local e-mail address patterns, click Add Pattern to add local e-mail pattern(s), according to your internal e-mail domain(s). Under the List of valid non-local e-mail address patterns, click Add Pattern, and add a dummy e-mail address.
Figure 8-4 Configuring Local E-mail Patterns
When you have finished making your configuration changes, click Apply to apply the changes to the proposed configuration without closing the configuration window, or Save and close to apply the changes to the proposed configuration and close the window.
Activate the configuration by clicking Configuration Control in the System box, and then clicking Activate.
Note:
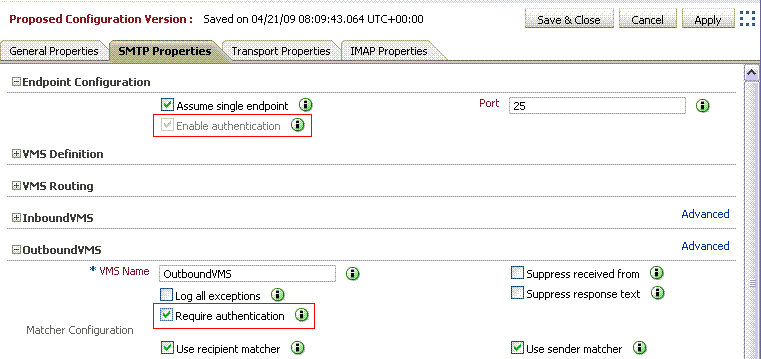
As further protection from unauthorized relay, consider requiring authentication from clients connecting to Oracle Beehive to send outbound messages. To set up required authentication, see "Configuring SMTP to Require Authentication".You may want to configure Oracle Beehive's SMTP endpoint to require authentication from users attempting to use Oracle Beehive for sending messages. This means that users connecting to Oracle Beehive using a standards-based client will have to provide login credentials when sending e-mail messages.
To configure the SMTP endpoint to require authentication, perform the following steps:
Log in to Oracle Beekeeper, select the E-mail Service, select the Configuration tab, and click Edit.
Select the SMTP Properties tab, and expand the section for the Endpoint Configuration.
Check the Enable Authentication box.
Note:
This option allows, but does not require, endpoints to accept authentication.Expand the OutboundVMS Section.
Check the Require Authentication box.
Note:
This option requires authentication for connections to the OutboundVMS. It does not force other endpoints to require authentication.Figure 8-5 Configuring OutboundVMS Authentication
When you have finished making your configuration changes, click Apply to apply the changes to the proposed configuration without closing the configuration window, or Save and close to apply the changes to the proposed configuration and close the window.
Activate the configuration by clicking Configuration Control in the System box, and then clicking Activate.
For any VMS, you can specify a "whitelist". E-mails that match the specified list, which may contain wildcards, are accepted; those that do not match are blocked.
The VMS Evaluator reads the sender's e-mail address, IP, and hostame, and decides which VMS will be used to process the message. Then each VMS has a set of sender and recipient matching algorithms, which act to accept or block e-mail. For example, a typical configuration of the Outbound VMS allows only "internal" users (users with an internal e-mail address) to send e-mail out of the system, which prevents unauthorized users from relaying through the server (a form of spam control).
Each VMS has two properties, Sender Matcher and Recipient Matcher, which are checked during the SMTP transaction between client and server.
By default, the Sender Matcher of the Inbound VMS filters e-mail messages coming in to the Oracle Beehive SMTP server from an external source. In the default configuration, the Sender Matcher accepts e-mails from all senders (it is set to *@* which matches any e-mail address). As long as the sender is in the format of an e-mail address (contains an @ sign), messages from any sender are accepted.
In Oracle Beekeeper, configuration options for VMSes are found by selecting the E-mail Service, the Configuration tab, and then the SMTP Properties subtab. To edit these properties, click the Edit button.
To specify a whitelist, expand the Outbound VMS section and edit the Sender Matcher settings, as shown in Figure 8-6.
Figure 8-6 Configuring an E-mail Whitelist
You can add or remove as many lines as you like.
When you have finished making your configuration changes, click Apply to apply the changes to the proposed configuration without closing the configuration window, or Save and close to apply the changes to the proposed configuration and close the window.
Activate the configuration by clicking Configuration Control in the System box, and then clicking Activate.
You can configure Oracle Beehive so that it acts as a relay server, accepting outbound e-mail messages from internal users, and forwarding them along to another SMTP service (such as Sendmail server, gateway, or an Internet Service Provider) for further processing. In Relay mode, you specify one or more servers to which all outgoing messages should be routed:
If all Beehive outgoing e-mail is routed through a gateway, ISP, or some other MTA, you can use "Simple Relay Mode."
If you need to route directly to the Internet, route to different relay servers based on a recipient's address, or route to non-standard port numbers, you'll need to use more complex delivery routing rules.
If you specify more than one server, the first server will be used and additional servers will serve as fallback servers.
Note:
Messages internal to Oracle Beehive (from one Oracle Beehive user to another Oracle Beehive user using native clients such as Oracle Beehive Integration for Outlook) are never routed to a VMS Evaluator. They are delivered directly to recipients without requiring the E-mail Service to evaluate or route them.Messages sent using a client that connects to Oracle Beehive using SMTP are routed through the VMS Evaluator.
You can set up a rule that selects between different servers depending on a recipient pattern.
To set up relay servers, perform the following procedure:
Log in to Oracle Beekeeper, select the E-mail Service, select the Configuration tab, and click Edit.
Select the Transport Properties tab.
If you have only a single Relay server, you can specify it in the Relay Server field. Leave the Use simple relay mode check box checked, and skip to Step 6.
If you want to specify multiple servers, deselect the Use simple relay mode check box, and then expand the Delivery Routing section.
Click the + button next to the Type dropdown box to add additional Relays. Click the + button next to the Recipient Pattern field to add additional patterns to match for a given Relay. Click the + button next to the Relay Host field to specify additional fail-over hosts for a given Relay. If you have multiple Relays, you can arrange the order in which the rules will be processed by promoting or demoting the Relay order with the blue up and down buttons.
Figure 8-7 Configuring E-mail Relay Routing
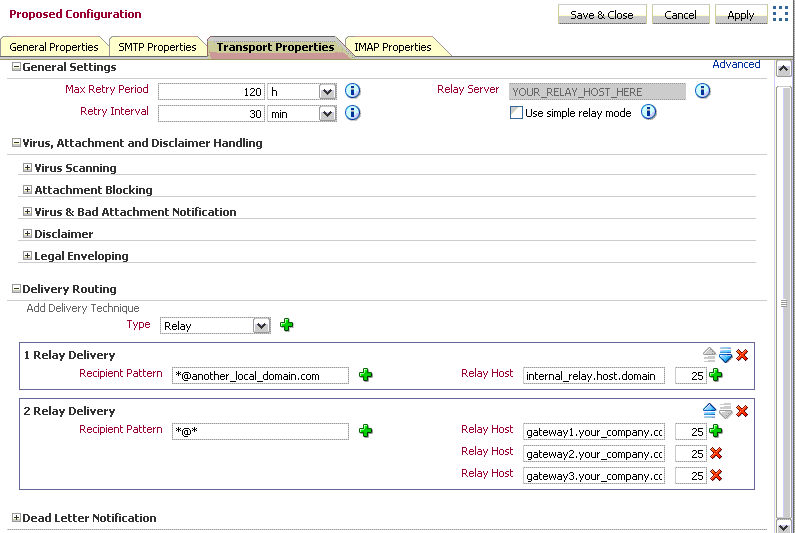
Note:
In addition to the Relay type, you can also specify a Delivery Technique of type DNS-MX. DNS-MX is intended for the use of a DMZ or Internet-based deployment, in which Oracle Beehive will attempt to look up DNS and direct delivery of messages to the corresponding address directly. This configuration is inappropriate for most deployments of Oracle Beehive.When you have finished making your configuration changes, click Apply to apply the changes to the proposed configuration without closing the configuration window, or Save and close to apply the changes to the proposed configuration and close the window.
Activate the configuration by clicking Configuration Control in the System box, and then clicking Activate.
You can set up rules so that e-mail sent from or to specified addresses will be sent to one or more special archiving addresses. With archiving, Oracle Beehive attaches the original message to a new e-mail, includes meta-data about the original message, and sends it to one or more additional destinations for compliance or archiving purposes. For archiving email messages, you can use any third-party archiving server which uses RFC standards and has the capacity to store all your messages.
Archiving rules are a simple way to retain sent and received e-mail. This makes integration with third-party archiving products and services relatively simple. Alternatively, you can use any e-mail client to access and archive forwarded messages all at once.
Configure e-mail archiving rules by performing the following steps:
Log in to Oracle Beekeeper, select the E-mail Service, select the Configuration tab, and click Edit.
Select the Transport Properties tab.
Expand the Legal Enveloping section.
Choose between the two options, Single Destination or Append to Email. To choose Append to Email, de-select the Use single destination box:
With Single Destination, all archive messages are sent to the same address, such as SoxCompliance@archive.example.com.
With Append to e-mail, you define an append string, and the system will send a copy of each message that matches the pattern to the <recipient>_appendstring. For example, if your append string is _archive, and a matched recipient is user.name@example.com, the system will send a copy of the message to user.name_archive@example.com.
Choose the e-mail address pattern or patterns you want to generate an archive message; for example, a specific e-mail address (user@example.com) or a pattern (*@sales.example.com). The system will generate an archive message for any sender or recipient that matches this pattern. Click the plus icon to add additional patterns (an address will generate an archive message if it matches any pattern)
Caution:
Make sure that the Single Destination address, or the modified addresses produced by the Append process, do not result in addresses that match the e-mail address pattern you specify. If any such messages match, a logical loop will be created as the message is repeatedly appended or forwarded.If the destination address or addresses you specify using Single Destination or Append to e-mail is a third-party archive system, make sure that the general routing rules route the messages to the correct destination. For example, you may need to configure DeliveryRules to ensure proper routing.
Caution:
You can configure the DeliveryRules to archive a message after the delivery of a message, or to archive it after a post resolution is done. If the DeliveryRules are set to archive Post Delivery, the Oracle Beehive server will archive the messages when they are delivered to the users Inboxes. If a message does not reach the Inbox, it will not be archived. If the DeliveryRules are set to archive Post Resolution, the message is sent to the archiving system after the Oracle Beehive server has verified that it is a valid and local address.You can set the DeliveryRules in either the Post Resolution rules or the Post Delivery Rules, but NOT in both. Setting DeliveryRules in both can cause duplicates and even errors on the archiver or MTA used to archive the messages.
Note:
The email messages that are archived depend on the filter you use. If you set it to a wildcard (*), all email messages will be archived. DSNs are also archived as they are considered to be messages.When you have finished making your configuration changes, click Apply to apply the changes to the proposed configuration without closing the configuration window, or Save and close to apply the changes to the proposed configuration and close the window.
Activate the configuration by clicking Configuration Control in the System box, and then clicking Activate.
Oracle Beehive allows you to specify one or more virus scan engines for use in scanning e-mail messages.
For instructions on adding a virus engine to Oracle Beehive, see Chapter 11, "Integrating Symantec Scan Engine with Oracle Beehive" in the Oracle Beehive Integration Guide.
After you have added a virus scanning engine, you can enable virus scanning using Oracle Beekeeper.
For instructions on managing attachment blocking and virus scanning, see Chapter 11, "Integrating Symantec Scan Engine with Oracle Beehive" in the Oracle Beehive Integration Guide.
"Dead Letter" is the notification returned for undeliverable messages. Use the following procedure to set up and enable Dead Letter in Oracle Beehive:
Log in to Oracle Beekeeper, select the E-mail Service, select the Configuration tab, and click Edit.
Select the Transport Properties tab.
Expand the Dead Letter Notification section.
You can configure whether to send a notification to local senders, external senders, and administrators, and you can customize the notification message that will be sent. To send notification to an administrator, set the Notifier Email attribute to the e-mail address of an administrator, and check the Notify administrators check box.
Note:
By default, local and remote senders, but not administrators, are notified of undeliverable messages. If you deselect all three boxes, this effectively disables dead letter functionality.When you have finished making your configuration changes, click Apply to apply the changes to the proposed configuration without closing the configuration window, or Save and close to apply the changes to the proposed configuration and close the window.
Activate the configuration by clicking Configuration Control in the System box, and then clicking Activate.
You can define multiple endpoints for an Oracle Beehive SMTP server. An endpoint scheme contains a specification of protocol, a string or wildcard used as a filter, and a port. For example, MX:*:2226.
Caution:
When creating or modifying endpoints, take care that you do not create a port conflict. On UNIX and Linux systems, if you make use of a privileged port, you must perform additional configuration steps: See "Modifying Oracle Beehive Ports using Privileged Port Numbers" in Chapter 4, "Oracle Beehive Property Reference" of the Oracle Beehive Administrator's Reference Guide.Supported protocols are MX (unencrypted) and MXS (MX using SSL):
MX: The server will use the BTI layer to request an MX server listen for TCP connections on the specified port.
MXS: Similar to MX, except that the BTI layer will pre-negotiate an SSL session before any incoming connection requests are presented to the application (SMTP/IMAP) layer.
The filter is not currently used; you must use * for this value.
Once you have added additional endpoints, when you configure VMS Routing rules, you can add additional Endpoint Filter Rules which route specific endpoints to an identified VMS. See "Configuring VMS Routing to Relay Messages" for details.
Perform the following steps to modify the default endpoint, and define additional endpoints:
Log in to Oracle Beekeeper, select the E-mail Service, select the Configuration tab, and click Edit.
Select the SMTP Properties tab.
Expand the Endpoint Configuration section.
If the Assume single endpoint check box is checked, a single port field is listed, which is the configured SMTP server port. All SMTP traffic must be directed to this port. Uncheck the Assume single endpoint check box to configure multiple endpoints.
If you want, you can modify the default endpoint name and scheme.
Create one or more new endpoints using the following steps:
Click the Add Endpoint button.
Enter a name and scheme for the additional endpoint.
When you have finished making your configuration changes, click Apply to apply the changes to the proposed configuration without closing the configuration window, or Save and close to apply the changes to the proposed configuration and close the window.
Activate the configuration by clicking Configuration Control in the System box, and then clicking Activate.
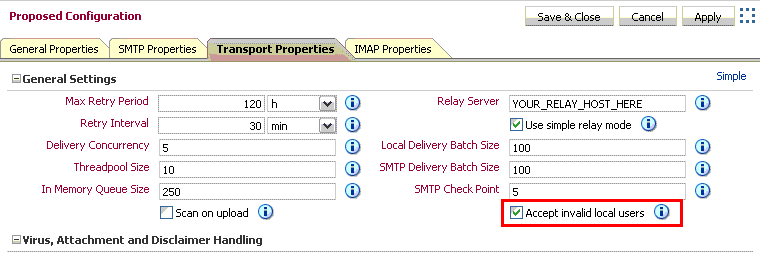
In some cases, you may want to configure Oracle Beehive to accept inbound e-mails sent to addresses within an acceptable domain, but of users whose address is not within Oracle Beehive. For example, if your domain is example.com, you may wish to accept (and subsequently relay) a message for User1@example.com, even though there is no User1 in Oracle Beehive.
By default such "invalid local users" are blocked. To enable acceptance of such addresses:
Log in to Oracle Beekeeper, select the E-mail Service, select the Configuration tab, and click Edit.
Select the Transport Properties tab.
Click the Advanced link to show advanced properties.
Check the Accept invalid local users check box, as shown in Figure 8-8.
Figure 8-8 Selecting Accept Invalid Local Users Check box
When you have finished making your configuration changes, click Apply to apply the changes to the proposed configuration without closing the configuration window, or Save and close to apply the changes to the proposed configuration and close the window.
Activate the configuration by clicking Configuration Control in the System box, and then clicking Activate.
To configure further relaying of such addresses, follow the instructions in "Setting Up E-mail Relay Routing".
To enable logs for e-mail messages, use the beectl modify_property command for ModuleLogLevel. Set the log level to INFO for the mail.service.transport module and activate the configuration as follows:
beectl modify_property --component _CURRENT_SITE:LoggingProperties --name ModuleLogLevel --value oracle.ocs.mail.service.transport:INFO --activate_configuration
Filter the e-mail log messages as the INFO level consists of several other logs. The log is available at:
$ORACLE_HOME/beehive/logs/oc4j/<your BEEAPP container>/log
For more information on modifying the log levels, see Chapter 17, "Oracle Beehive Logging and Diagnosability".
A service instance is physically a OC4J container in the middle tier that deploys an email service application. The following are the different types of email queues:
Active queue – Each service instance has an active queue(s) of messages waiting to be processed.
Overflow queue – When the active queue grows over the tunable system limit, new messages received by that service instance are spilled into another global queue called the overflow queue.
Retry queue – A retry queue is a global queue polled by all service instances.
Email messages in transit are messages that has not been fully delivered. These messages are associated with exactly one of the queues above. To display all email messages in transit and other vital information related to message delivery email queues, use the following beectl commands:
list_email_queues – This command displays the different email queues: active queue(s), retry queue, and overflow queue.
list_email_messages -–queue_id <queue_id> --max_count <max_count> – This command displays all the email messages for a specified queue id.
list_recipients_status -–internet_message_id – This command displays the recipent status for a specified message id.
For more information about the beectl commands, see the Oracle Beehive Administrator's Reference Guide.
You may be installing Oracle Beehive in an environment with some e-mail users using pre-existing e-mail domains. You can maintain a common e-mail domain for all users, allowing new Oracle Beehive users to use the same domain, without creating a conflict between the multiple, coexisting e-mail servers.
If a pre-existing user's e-mail address is user1@example.com, and Oracle Beehive is installed on a server beehive.example.com, then configure the co-existing e-mail system to auto-forward user1's e-mail to user1@beehive.example.com. Then, add an additional e-mail address for user1 in Oracle Beehive as user1@beehive.example.com, and add *@beehive.example.com as a LocalEmailPattern.
Note:
This relies on the co-existing system's e-mail forwards being envelope forwards; e-mails will be forwarded and accepted as user1@beehive.example.com, but the message headers will still be user1@example.com, and visible that way to the Oracle Beehive user.To allow this type of coexistence, perform the following steps:
Log in to Oracle Beekeeper, select the E-mail Service, select the Configuration tab, and click Edit.
Select the Transport Properties tab.
Click the Advanced link to show advanced properties.
Check the Accept invalid local users check box, as shown in Figure 8-8, "Selecting Accept Invalid Local Users Check box". By checking this box, you will allow all e-mails sent to a local address, even if the user or specific e-mail address does not exist in Oracle Beehive.
Select the General Properties tab, and expand the General Settings section.
In the List of valid local e-mail address patterns, click the Add Pattern button to add patterns. Add the e-mail domain you want to use with Oracle Beehive.
When you have finished making your configuration changes, click Apply to apply the changes to the proposed configuration without closing the configuration window, or Save and close to apply the changes to the proposed configuration and close the window.
Activate the configuration by clicking Configuration Control in the System box, and then clicking Activate.
On the non-Oracle Beehive e-mail system, configure user accounts of Oracle Beehive users to automatically forward to the Oracle Beehive SMTP Server. For each Oracle Beehive user, add the additional e-mail address.
|
Copyright © 2008, 2013, Oracle and/or its affiliates. All rights reserved. Legal Notices |
|
